The veranda is a comfortable and cozy place for summer holidays. But when the heat leaves, the owner has thoughts: why not use the veranda all year round? To do this, it must be thermally insulated. How to insulate a veranda? This work is time-consuming and painstaking, but does not require special skills and expensive equipment.
How to insulate the veranda for winter living?
The veranda differs from the main premises of the house in the following features:
- light wall structures;
- large glazing area;
- direct access to the street;
- uninsulated plinth.
Based on this, you should choose technologies and materials for insulation. Particular attention will need to be paid to the constant heating of the room and the organization of its ventilation. Without this, an increase in humidity, condensation and the formation of mold and fungus are inevitable. The light type of walls limits the thickness of the heat-insulating materials used to 50-100 mm.
Materials for insulation and their characteristics
How and how to insulate a cold veranda? There are many for sale different types and models of insulating materials suitable for thermal insulation of the veranda. The most popular of them are:
- Expanded polystyrene, or polystyrene. This lightweight material is available in sheet form. It is conveniently mounted both in the crate and in a continuous layer end-to-end and has good thermal insulation properties. The disadvantages of the material include fire hazard and a tendency to chipping. Styrofoam emits toxic gases when heated. Extruded polystyrene foam, known as polystyrene foam, has greater strength, does not crumble and retains heat better than polystyrene.
- Foamed polyethylene, or penofol. This elastic material is available in sheets or rolls. On the other side, it is covered with a thin layer of heat-reflecting foil. The foil reflects heat back into the room. The material is not hygroscopic and does not require additional waterproofing. It can be used as the main insulation or in addition to other materials. The disadvantages include fire hazard and high price. Used to insulate floors and ceilings
- Mineral wool. Affordable and very popular heat insulator. Basalt wool is made from rocks, glass wool is made from glass waste. Thanks to the fibrous structure, it retains heat well. Supplied in mats or rolls. Mounted in a frame crate. It is subject to getting wet, as a result of which the thermal insulation properties of the material are significantly reduced. Therefore, mineral wool insulation requires careful measures for waterproofing and steam removal. Mineral wool is fireproof; when heated, it does not emit any harmful substances. Basalt wool can withstand high temperatures, it is used for thermal insulation of stoves and chimneys. During installation, it emits dust harmful to health, therefore installation work should be carried out in tight clothing, protective gloves and in a respirator.
- Ecowool. Progressive material is made from paper waste, it is cellulose fibers randomly oriented in space and impregnated with a binder. Impregnation prevents fire and protects against biological threats such as mold, insects, rodents. Ecowool is sprayed onto walls and other surfaces using special equipment that allows you to process any cavities and hard-to-reach places. The disadvantages include the high cost of spraying equipment.
Do-it-yourself veranda insulation technology from the inside
Insulation of the veranda does not require special training of workers and expensive equipment. Operations are well within the reach home master having general construction skills. It is enough to be careful and follow the requirements of the technology and the recommendations of specialists.
Tools and materials for work
How to insulate the veranda from the inside? For work you will need:
- insulation;
- vapor barrier membrane;
- fire and bioprotective impregnation for wooden structures;
- painting tools: brushes, rollers or spray gun;
- double-sided adhesive tape for attaching a vapor barrier;
- stapler;
- wooden slats or metallic profile for crates;
- self-tapping screws;
- mounting knife;
- construction foam;
- screwdriver;
- measuring tool: tape measure, square, level.
When calculating the volume of purchased insulation, a margin of 5-10% must be added to the area of insulated surfaces. It will go to cutting in difficult places and losses during installation. The rest of the material can be returned to the hardware store if you keep the receipt. If you do not provide for a reserve, then half a mineral wool mat or one sheet of expanded polystyrene may not be enough to complete the work.
Preparatory work
Warming the veranda requires high-quality preparation. During preparation, all furniture and furnishings should be removed from the veranda. Next, dismantle the electrical wiring and other communications passing through the room.
You will also have to remove the ceiling and wall trim. If there is no access to the basement under the veranda, then the floor will need to be dismantled. These works will take several days, it is important to take them into account in the schedule.
Wall insulation
Walls are an important part of do-it-yourself veranda insulation. If the crate is made of wooden bars, they will need to be covered with fire-retardant impregnation in two layers. Metal profile guides are more expensive, but provide more accurate installation. Subsequently, it will be convenient to fix drywall sheets on them.
Wall insulation works are carried out in the following order:
- a layer of penofol is attached to the surface of the wall, which performs the function of waterproofing and additional insulation;
- two horizontal guides are attached: on the floor and on the ceiling;
- vertical guides are attached to them and to the wall with self-tapping screws in increments of 60 cm;
- the acquired insulation should enter between the guides without a gap, with some effort, which will allow it to hold on better;
- wooden bars are attached to horizontal rails using steel mounting brackets or are cut with a spike; such reinforcements are not required for the metal profile;
- sheets of insulation are laid between the guides, the laying order is from bottom to top;
- it is necessary to ensure that there are no cracks and gaps left, they should be clogged with scraps or blown with mounting foam;
- after laying the insulation, a vapor barrier membrane is attached to the guides on double-sided tape;
- membrane sheets should have an overlap of 10-15 cm, the joint is also glued with double-sided adhesive tape.

Completes the insulation of the walls fastening finishing: lining, gypsum board or MDF.
Ways to insulate the ceiling
Up to half of the heat can escape through the ceiling. This is due to the property of warm air to rise. Therefore, special attention should be paid to the insulation of the ceiling. In general, the technology is similar to the thermal insulation of walls. For convenience and speed, you will have to attract an assistant. They do everything in this order:
- dismantle lighting and wiring;
- remove the ceiling lining;
- fix a waterproofing membrane on the draft ceiling;
- mount the guide system in increments of 60 cm;
- lay insulation mats between them;
- fix the vapor barrier over the guides;
- joints should have an overlap of at least 10-15 cm and be glued with double-sided tape.
Floor insulation
How to properly insulate the floor on the veranda? Through the floor occurs up to a quarter of all heat loss in the room. To properly insulate it, proceed as follows:
- level the ground under the veranda and cover it with a layer of expanded clay;
- fill expanded clay with a layer of sand 10-15 cm, level and compact it;
- roll out plastic or steel reinforcing mesh;
- fill with cement mortar;
- after drying, lay a layer of waterproofing: roofing material or modern membrane materials;
- place logs from a bar with a step of 60 cm, impregnated with a fire-retardant composition;
- lay foam sheets between the lags:
- if necessary, blow out gaps and joints with mounting foam;
- lay a finishing floor from a tongue-and-groove board or laminate on the logs.
Alternatively, you can lay a layer of plywood or OSB, and lay carpet or linoleum on it.
If the veranda is raised above the ground, then another way of warming the floor on the terrace with your own hands is possible - from below.

Penoplex sheets are mounted on the draft floors with the help of an adhesive composition and dish-shaped dowels. Particular attention should be paid to the places where the floor adjoins the walls so that the so-called “cold bridges” do not form there. These are non-insulated joints through which heat will escape. The method of insulation from below is less effective, but it does not require the dismantling of the finished floor.
We insulate windows
Insulation of the veranda from the inside is impossible without insulation of windows and doors. How to insulate the windows of the veranda? The most reliable method winter insulation- This is the replacement of windows with metal-plastic double-glazed windows. This will reliably insulate the veranda and significantly reduce the cost of its heating.
If for some reason this does not work out, then ordinary windows should be subjected to a step-by-step reconstruction:
- insulate the gap between the window frame and the opening in the wall with foam;
- remove the glass, clean the frame from the old putty;
- putty all existing cracks;
- degrease the frame and apply silicone sealant along the glass abutment contour;
- insert the glass into place, press it with a glazing bead and remove the excess sealant that has come out;
- stick an energy-saving polymer film on the glass using transparent double-sided tape;
- warm the film with a hair dryer for a better fit;
- glue the window frames around the perimeter with a sealing polymer profile of a suitable height.
You can also use traditional methods of insulation: seal the windows for the winter with strips of paper on a soapy solution and lay cotton rolls inside.
Similar methods are insulated and front door. Particular attention should be paid to pairing door frame with wall doorway.
The nuances of roof insulation
High-quality insulation of the roof of the veranda is possible only at the construction stage or by complete disassembly. Due to the small slopes of the roof and the extremely cramped space, laying conventional insulation materials is difficult.
Help can come modern technologies. If the waterproofing of the roof is made at the construction stage, then two or three small holes in the ceiling will be enough to spray ecowool or polyurethane foam onto the roof from below. These materials will penetrate into the farthest corners of the under-roof space and insulate it with high quality.
If it is possible to dismantle the roof, then you can use less expensive methods and traditional materials.
Mineral wool is laid between the rafters, a layer of waterproofing is spread over it. Foamed plastics are also often used. After that, you can return the main crate and roof to its place.
On the underside of the rafters, you will have to arrange a counter-lattice so that the thermal insulation does not fall down.
It is extremely important to carefully fulfill all the requirements for the organization of ventilation of the under-roof space.
Veranda in a wooden house, usually performed whole line functions. This is the vestibule in front of the entrance to the house, and the location of the summer kitchen, and the warehouse of gifts received from the garden or vegetable garden and temporarily stored or processed for the winter. Sometimes the veranda can serve as a greenhouse, where seedlings are grown in the spring. Therefore, many people think about how to insulate the veranda in the simplest and most cheap way so that it serves the needs of the owners of the house for as long as possible both in spring and in autumn, when sub-zero temperatures have already set in on the street.

As a rule, the verandas attached to the house have a rather large area, not comparable to the balcony or loggia of a city apartment. Also a distinctive feature of the verandas is a large area of windows.

These factors make it necessary to approach the work on warming with your own hands with all responsibility and try to achieve the maximum effect in giving the room a veranda with heat-saving properties.
The choice of material for insulation
The choice of insulation to be used during work is one of the main points that will further determine the order of work. Since in most cases the verandas in the house have a frame base sheathed in one or two layers of boards, it would be advisable to use steam and breathable insulation (mineral wool) as a heater.

This choice is due to the fact that insulation based on polyurethane foam (polystyrene, foam plastic) are practically airtight materials.
And, despite the fact that it is easier to work with them than with mineral wool, and foam plastic is also cheap, it is not recommended to use them for warming wooden structures. Between a layer of foam or foam and wooden surface condensation will form, which will cause rapid damage and decay of the wood.
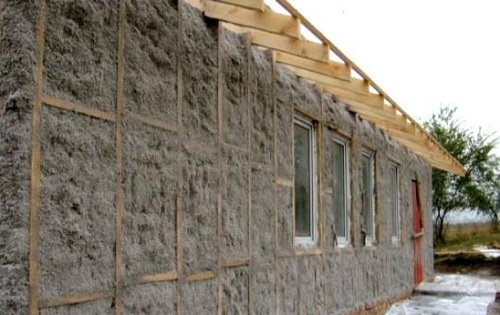
In addition, both materials are quite combustible, and when burned, they emit deadly poisonous dioxin. the only possible option the use of these heaters is the external insulation of the walls of the veranda with the installation of the insulation on the crate, which allows free air to circulate between the insulation plates and wooden wall verandas.

But the effectiveness of such insulation will be significantly lower than the use of mineral wool insulation in combination with foil insulation (penofol or isolon) when insulating the veranda from the inside of the room.
The order of preparatory work
If the insulation of the veranda in the house is carried out during the construction process, then no preparatory work not required. Simply, before sheathing the insulated veranda with finishing materials with inside of the premises, a layer of the selected insulation is laid according to the technology, and it is closed from above with plasterboard, plywood, plastic panels or "lining" - to whom that is more to taste.

But, if the problem of warming the veranda arose already in the built house, when the veranda was in operation, a considerable amount of work will have to be done to prepare it for insulation.
It is advisable to start warming the veranda from the inside from the ceiling of the room. Since the veranda usually has flat roof and it is impossible to lay a layer of insulation between it and the ceiling being in the missing attic, all work will have to be carried out only from inside the room, just like on the balcony. To do this, the ceiling covering is dismantled. It is attached to the exposed crate, with slop construction stapler, vapor barrier film (membrane with one-sided permeability) over the entire roof area with a release around the perimeter of 15-20 cm of freely hanging film. The joints of the film sheets are glued with adhesive tape.

If the insulation is carried out with soft mats mineral wool, then medium-sized nails are first driven into the floor beams in a checkerboard pattern, leaving 10-15 mm not clogged. You will have to work with an assistant. One will hold the mineral wool mat, and the second will “lace up” it to the ceiling using hammered nails and a nylon cord. You can use pre-prepared thin strips of fiberboard to help fix the slabs to the ceiling. After fixing the mats on the ceiling, do not forget to finish off the nails!

The second stage is the laying of foil insulation (penofol, isolon) with foil inside the room. Fix it better in a combined way: on glue and stapled stapler. Penofol is a very light material, so it does not need to be fixed as securely as mineral wool. The joints of the sheets of penofol are glued with foil tape.

After laying the penofol, the main coating is mounted on the ceiling - drywall or any other material.
Wall insulation
Insulation of the walls from the inside is carried out in the same sequence as the insulation of the ceiling. The only difference is the thickness of the insulation. If mineral slabs or polystyrene foam with a thickness of more than 50 mm are rarely used for the ceiling, then material up to 100 mm thick can be used for walls.

Installation of insulation on the walls is much easier and can already be done by one person. Start laying the insulation should be from the bottom, and if the wall area is large - try to lay it in a checkerboard pattern, so that the joints between the insulation plates do not go through the entire wall.

Having finished installing the insulation on the walls, they are also closed with the main decorative material. On verandas, this is usually used wooden "lining" or MDF boards. They "breathe" perfectly, so the veranda is usually fresh and cool.
Floor insulation
As a rule, the final stage of work on the insulation of the veranda from the inside, which requires a large amount of work and time, is the insulation of the floor.
It is possible to insulate both the space under the existing floor by filling it with expanded clay of the middle fraction, and the directly existing subfloor. The first method requires the complete removal of the flooring and laborious work on backfilling claydite gravel over the entire area of the veranda.

In the second case, insulation can be performed on an existing wooden floor by laying a layer of insulation on top of it.
If it is mineral wool, you will need to equip the crate on top of the existing floor, while the thickness of the bar should be equal to the thickness of the insulation. The distance between the lags of the crate is made 2-5 cm less than the width of the insulation, so that the mineral wool mats enter the crate tightly, with some effort.
After that, a layer of penofol is laid and, as the final stage, the floor is laid.

If the insulation is carried out with foam boards, then the arrangement of the crate is not required. It is directly laid on the existing wooden floor. A vapor-permeable film must be laid under it. It is fixed either with dowels - "fungi", or T-shaped brackets.

On top of the foam, you can also lay a layer of foam foam with foil inside the room. On top of such a coating, you can immediately lay any floor material: linoleum, laminate, parquet, plank floor.
Insulation of veranda windows
Usually verandas or terraces are not intended for use in winter time, therefore, the glazing on them is most often single. With no effort to insulate the ceiling, walls and floor of the veranda, it is not able to retain heat, since more than 70% leaves the room through its windows. If you see fit to install on the veranda plastic windows even with double glazing, heat will be better retained.

But even if you don't plan to replace the single-glazed windows on your veranda, you can reduce heat loss somewhat by using heat-saving films. They can only be used in winter period(from October to March), but in the autumn-spring season they can, to some extent, smooth out temperature fluctuations on the street and in the veranda.
The heat-saving film is mounted on a double-sided tape glued around the perimeter of the veranda frame and, after gluing, it is processed with hot air from a household hair dryer.

Due to the ability to reflect up to 30% of infrared radiation tending to leave the room, it is almost equivalent to a second glazing.
Warming the veranda from the inside has one significant drawback. As a result of the work carried out, the “dew point” shifts from outer surface walls, where moisture evaporates freely, on the inner surface of the material with which the veranda is sheathed. If it is wood, then it will quickly begin to rot and be affected by mold.
Therefore, it is better to insulate the veranda from the outside. In this case, the dew point should theoretically move into the insulation and the walls will last longer.
conclusions
Verandas, like terraces or balconies, are rooms intended for use in summer time. Any work on their insulation is quite laborious and ineffective without the organization of constant heating in the cold season. And this requires a large number electricity or fuel for heating private houses. Therefore, before insulating the veranda with your own hands, think! Without extreme necessity, it is hardly worth starting such work. That is why these utility rooms have their own functional features in order to be used for their intended purpose, and not as additional living space in the house.
The veranda is a great place for relaxation, family tea parties and friendly gatherings. In the warm season, the terrace becomes the most popular part of the house and a great opportunity to gather dear people together. However, with the onset of cold weather, the idyll ends - no one wants to sit on a cold veranda. But the situation is easily fixable - for this it is enough to know how to properly insulate the veranda. By the way, competent warming not only retain the usual comfort, but also help protect the corners of the extension from the formation of black spots that occur under the influence of low temperatures.
What is the best way to insulate a veranda?
The range of thermal insulation materials is quite wide, so the selection process remains more relevant than ever. Meanwhile, there are samples that have proven themselves best. It is they who should be given preference when buying.
Leaders in quantity positive feedback- mineral wool and polystyrene. A profitable way to insulate the terrace, and even save a significant amount. To improve the created effect, a foam pad is used. Metallized sheets reflect the cold outdoor air and prevent precious heat from escaping. Penofol is a high-tech heat insulator consisting of polyethylene foam covered with aluminum foil. This material can be used both in tandem with other fellow heat insulators, and alone. Of course, the first option is more efficient, because. allows you to use the advantages of protective raw materials to the maximum.

How to insulate a wooden veranda?
The problem of how to insulate a cold veranda begins to worry the owners of country cottages with the onset of the first frost. Is it really necessary to leave the tradition of relaxing on the terrace until spring? Not at all - keep warm and continue to enjoy life!
Tools and building materials
- insulation (penofol, mineral wool, expanded polystyrene, etc.);
- foam plastic (thickness not less than 10 cm);
- nails, hammer, nail gauge;
- scissors, hacksaw for metal;
- tape measure, pencil;
- Scotch;
- paint, brushes;
- putty knife.
We warm the floor
If you are thinking about how to insulate a wooden veranda, but don’t know where to start, then experts advise you to protect the floor first. Some mistakenly believe that it is not necessary to insulate floors and that you can limit yourself to walls and ceilings, but this opinion does not correspond to reality. If there is no solid foundation tape, then the question of how to insulate the floor on the veranda takes on a different meaning. Defining.

The seams between the boards are puttied, then painted and pierced with penofol from the underside. From the inside, the floor can be insulated with polypropylene-based linoleum or carpet on felt. A more complicated, but also more reliable way is the arrangement of the second floor. It is used as a draft version, followed by the laying of thermal insulation and topcoat. The only thing to keep in mind is that this will significantly reduce the height of the ceiling.
How to insulate walls?
How to insulate the veranda from the inside? If this problem is relevant for you, then get ready for the fact that you will have to completely replace the wall cladding. Boards are removed with a nail gauge. To prevent the tool from leaving marks, place a piece of cardboard under it. The more carefully you remove the old boards, the easier it will be to mount the new ones. One of the most simple solutions- fix the insulation with a foil layer (10-15 mm thick) on wooden brackets, and finish the walls with MDF panels on top.
If the walls are brick, then it is necessary to make a crate of transverse wooden beams with a section of 25x40 mm. Insulation in this case is used thicker - 25-30 mm. It must be cut into strips and laid between the bars. There should be no gaps.

No less popular is next way. After careful measurement of the territory, penofol is cut into pieces of the appropriate size. Leave a couple of centimeters at the top and bottom for the fold. Cover the wall with material, fix the edges with adhesive tape. Next, foam is laid on top of the foam. The panels should fit together as tightly as possible. in the narrow hard-to-reach places you will inevitably need pieces of non-standard shapes and sizes that can be cut with an ordinary hacksaw.
Nail the trim. If the thickness of the insulation is chosen correctly, then the boards will not bend and "sit down" perfectly. The final stage is painting the skin and replacing the ceiling plinth.
How to insulate the ceiling on the veranda?
A hydrobarrier is mounted on the ceiling, then the surface is sheathed with a beam of 27x27 mm. The gaps between the bars depend on the thickness of the insulation, but it is not recommended to leave intervals greater than 0.8 mm. The hydrobarrier is attached horizontally, the seams are glued with metal tape. Sheathing bars are nailed vertically.

Penoplex sheets are inserted between the bars, which are fixed with dowels with a wide cap. A heat reflector is laid on top of the foam, for example, Ecofol (polyethylene foam coated with a lavsan metallized film). Temporarily the heat reflector is fixed with a stapler. Later, he is pinned down by a blockhouse. The installation of the blockhouse is carried out in concentric rows, which is necessary to create a perfectly flat surface.

Blockhouse can be replaced with clapboard or OSB. When carrying out work, use only serviceable tools, remember about protective equipment (mask, gloves). If you spray mounting foam, ventilate the room from time to time.
How to insulate a summer veranda?
If the veranda is not in the house, but is an extension, this does not mean at all that insulation is impossible. In the presence of a canopy or roof, this is quite realistic.
You should start again from the floor. Along the perimeter of the veranda, paved with concrete or stone, a small fence made of building blocks or bricks is laid out. Then the floor is covered with roofing material in two layers, which will simultaneously perform the function of hydro and vapor barrier. The selected insulation is laid on top (layer thickness - 10 cm), then a vapor barrier membrane and a top coat are laid.

The next step is double-glazed windows, brought out under the very roof. The roof is insulated according to the “pie” type: waterproofing film on the rafters, insulation, vapor barrier, decorative coating.
Terrace with wooden floors heats up a bit differently. The floors are opened, insulation is laid between the lags. However, it is necessary to lay waterproofing under it, because. in this case, the foundation summer veranda is usually absent. Along the perimeter, a fence made of timber is installed, which is used as the basis for double-glazed windows.
Features of insulation outside
If you have recently made repairs and do not want to start construction activities again, you can insulate the veranda from the outside. This will provide a wonderful opportunity to ennoble the facade and give the building a modern look.

Lathing is attached to the walls horizontally or vertically. The intervals between the guides are filled with insulation and moisture insulation. The cladding is attached last, for example, metal siding or decorative panels finished with honey powder coating.
Now you know how to insulate the veranda, which means that your home will always be cozy and comfortable. Even on the most dank autumn evenings, spring will reign on the terrace and good mood!
Veranda: photo of insulated options


Video: how to insulate a veranda
The issue of thermal insulation of the veranda using becomes relevant when there is a desire to use this room all year round. The verandas are usually unheated, as a result of which the temperature in them can drop below zero in winter.
If you want to provide comfortable temperature air inside the veranda, even in the coldest season, you need to take care of the quality insulation of the extension.
With complex thermal insulation using proven materials, and installing an elementary heating device: a small solid fuel stove or a good electric radiator, it is possible to ensure a constant temperature in the veranda at +18+19 degrees.
1 Carrying out work from the inside
It’s worth mentioning right away that since the construction of a veranda, as a rule, is a budget project, as a result of which it is built from inexpensive materials - wood, cinder blocks, or gas silicate blocks, it will be necessary to insulate the veranda comprehensively.
You can, of course, insulate only the walls and even make or ceiling, but you will not get the desired effect from such thermal insulation.
To make a full-fledged year-round living space out of the veranda, it is necessary to insulate both the surface of the walls from the outside and the ceiling, walls and floor from the inside of the building.
1.1 What is the best way to insulate?
If savings are at the head of the insulation project, then as thermal insulation material you can use regular foam. This material has good thermal conductivity, and is inexpensive.
It is also easy to work with foam plastic, even one person can handle it without problems, so if you plan to do everything yourself, foam plastic is a good option from inexpensive heaters.
The thermal conductivity of the foam is approximately 0.04 W / mK per , which, of course, is less than that of mineral wool, or extruded polystyrene foam, but also quite good, given the cost of this material.
For insulation of walls, ceiling and floor, you can take foam plastic 5 centimeters thick - in most cases it will be enough.
Expanded polystyrene wins not only in terms of thermal insulation properties. An important fact is that this material has minimal vapor permeability and hydrophobicity, as a result of which condensation will not form on its surface, which is the main enemy of most heaters.
The advantages of expanded polystyrene can also include ease of installation - this insulation is made in the form of plates with dimensions of 100 * 160 cm, for the installation of which in most cases only an adhesive solution is sufficient.
2.1 Do-it-yourself veranda insulation technology (video)
Hard to imagine country cottage or a cottage without a veranda. Basically, such a building is used only in the warm season. But often, in order to increase the usable area and operate the premises in winter, they perform the insulation of the veranda,. About how to implement it correctly and with minimal cost, we will tell in this article.
Warming methods
How to make a veranda suitable for winter living? It is desirable to think over the possibilities of thermal insulation at the beginning of construction, since after completion of work, labor costs and financial investments increase several times.
Insulation of the veranda involves the installation of insulation on the floor, walls, ceiling. However, due to the influence of the atmospheric environment, not all types of materials are suitable for solving this problem.
The best option is rolled and plate heaters based on natural minerals. They are quite air and vapor permeable, which contributes to the free removal of moisture and protects the wood from rotting and damage.
Less preferred for the veranda are artificial polyurethane foam insulation, which have low vapor permeability. These materials are more often used for external insulation, the plates are mounted on a pre-installed timber frame.
Starting from the floor
It is much easier to carry out measures for warming the veranda during the construction phase. As a rule, such structures are made according to frame technology. This facilitates the process of laying insulation in walls, floors and upper floors.
The first stage of preparing the structure for winter living is the insulation of the floor on the veranda. After the foundation has been erected, a lower trim of a bar with a section of 150x150 mm is installed on the supports and the crate is mounted. Before insulating the floor on the veranda, the tree is treated with a protective compound.

Next, the so-called draft floor of the veranda from edged or unedged boards 25 mm thick. In the presence of a subfloor, this problem is solved relatively easily. In the absence of the necessary space under the floor of the veranda, 30x30 bars are attached to the side planes of the ceiling in the lower part, on which the subfloor is mounted.
On top of the fixed boards, an insulating material and a layer of vapor barrier are installed. Since the lion's share of heat loss occurs through the floor, 2-3 layers of insulation are laid on the lower floor, alternating directions at an angle of 90 °.
Instead of slab or roll insulation, solid materials are used, for example, expanded clay is poured between the beams. A layer of vapor barrier is laid on top and the floor is finished.
We insulate the walls
The next step in warming the veranda is wall insulation. Vertical bars are attached along the perimeter of the floor and fixed with the help of jibs and transverse horizontal inserts. Outside, the walls are sheathed with a finishing material of one kind or another, after laying a vapor barrier.
Between the vertical posts, a heater is mounted in at least two layers.

As a rule, the thickness of the material allows you to not fix it additionally. It is enough to cut pieces of mineral wool 3-4 cm wider than the opening into which installation is planned.
After the vertical surfaces are insulated, sew finishing layer vapor barriers and perform interior wall decoration.
We work with the ceiling
It is impossible to qualitatively insulate the veranda from the inside, bypassing the ceiling. The upper frame is assembled similarly to the lower floor, that is, from wooden beams square section. In the case of sequential work, the ceiling is insulated before the installation of the roof. To do this, on the underside of the floor bars, a finishing sheathing of the surface is performed with a preliminary installation of a vapor barrier.
A heater is mounted on the finish in several layers and covered with a draft ceiling. If the veranda does not imply the presence of a separate roof with an attic, a crate is attached over the sheathing and the roof is installed.
Insulation of the finished veranda
It is much more difficult to carry out thermal insulation of a building erected several years ago. In this case, it is desirable to minimize dismantling work that could damage the previously installed finishing material walls, floor and ceiling. Let us consider in more detail the nuances of warming the finished veranda.
Ceiling
If it becomes necessary to rebuild the premises for winter living, the installation of insulation begins with dismantling interior decoration ceiling. The operation is carried out carefully to minimize the amount of waste. As a rule, in wooden houses when decorating verandas, expensive material is used - lining.
After all the panels have been removed from the upper horizontal ceiling, the installation of the insulation begins. To avoid falling out mineral plates, proceed as follows:

Walls
As a rule, the insulation of the finished veranda is performed from the outside. This allows you to save expensive interior decoration. After dismantling the outer wall sheathing, a vapor barrier is installed: the film is fixed in the gaps between the uprights using a construction stapler.

Insulation of the veranda from the outside
Instead of mineral wool, foam plastic is used for external wall insulation, which is resistant to weathering and is not afraid of the influence of microorganisms. The insulation of the veranda with foam plastic is carried out in a pre-mounted crate, which provides free air circulation.

Particular attention is paid to windows. It is better to install two- or three-chamber double-glazed windows.

If the windows for the veranda have single glass, all joints are treated with a special adhesive-based insulation, and the frame landing sites are coated with sealant.
Floor
A large amount of cold air enters the room through the floor. Without high-quality thermal insulation, winter operation of the veranda is impossible, while heating costs increase several times.
We begin work on laying insulation from dismantling floor covering. can be attached in several ways:

If there is a rough sheathing, a vapor barrier membrane is attached and expanded clay or mineral wool is laid. At standard thickness mats or rolls of 50 mm between the timber 150x150, it is recommended to lay 3 layers. On the upper planes of the beams, a vapor barrier is fixed and the floor boards are mounted in their original place.
If there is no draft floor, a false lattice is made of a 30x30 pine beam, attaching it to the side planes of the beams with 70x4 mm self-tapping screws.
Thus, having studied the technology of warming the veranda, even a novice master will be able to independently perform all the work. Of course, it is better to insulate the room at the construction stage. But in extreme cases, you can make the insulation of the finished veranda, spending an additional amount of effort, time and finances.


How to cook ham in the oven at home
Pain in the lower abdomen during pregnancy, reasons for what to do Can the lower abdomen hurt if pregnant
Protein for muscle gain
The best vitamins for men according to customer reviews
How to lose weight on a vegan diet?