On the need for insulation wooden house the owners think about the low temperature in the rooms in winter, the appearance of dampness and mold on the walls, the high cost of heating.
Professional builders recommend insulating the walls of buildings from the outside, but there are situations when this is unacceptable. In such cases, thermal insulation is mounted indoors. Such work will be inexpensive. The article tells how to insulate the walls in a wooden house from the inside and outside.
Features of wall insulation in a wooden house
The wood used in construction has features that must be taken into account.
Wood is a vapor-permeable material; if used improperly, it becomes damp, becomes infected with a fungus, becomes covered with mold, and is destroyed by pests. Over time, the house settles in logs or timber cracks appear.
Old house made of logs, traces of aging of the outer walls are visible
Properly designed and installed system insulation reduces Negative influence to a minimum - otherwise there is no need to talk about the durability of the structure.
Comparison of thermal insulation methods
Insulation of wooden walls is possible from the inside and outside, each of the methods has advantages and disadvantages. To accept the right decision the information collected in the table will help about the method of installing thermal insulation.
| Advantages | Flaws |
| Insulation inside the building | |
| Preserving the appearance of the house | The outer parts of the walls are not protected from adverse weather conditions |
| Can be combined with major or cosmetic repairs | The useful area of rooms is reduced by the thickness of the insulating structure |
| Reconstruction does not depend on the time of year | The dew point moves inside the building, condensation may occur |
| No scaffolding required, one person can handle the job. | Loss of heat storage properties of wood |
| External thermal insulation | |
| Usable area is saved | Insulation protect exterior trim- an increase in the volume of construction work |
| The dew point from the wooden walls is shifted to the insulation layer - the walls do not collapse, there is no condensation in the rooms | Thermal insulation is carried out in the warm season |
| Insulation according to the ventilated facade method prevents the appearance of fungus and mold | Working at height will require strict adherence to safety measures. Can't work without helpers. |
Before deciding on the method of carrying out the work, it is necessary to familiarize yourself with the options for what is customary to insulate wooden house from inside or outside.
Material selection
For warming internal surfaces walls of the house and facades, many specialized heaters have been developed, each of which, however, requires proper use.
Insulation is supplied in the form of piece products or rolls.
When choosing, take into account:
- price;
- service life during which performance characteristics and the geometric shape of the thermal insulation;
- fire and sanitary safety (availability of certificates);
- thermal conductivity characteristics;
- resistance to mechanical damage and climatic conditions.
Polystyrene has long been successfully used for thermal insulation of buildings. The mechanical properties and size of the sheets allow you to insulate the house with your own hands, and if you have the skill, you can do without helpers. In thermal insulation, two types of sheet material made from polystyrene are used. They differ in the way they are made.
Expanded polystyrene is called polystyrene foam. Represents plates white color. On the fault, balls of different sizes are visible.
 Expanded polystyrene (polystyrene)
 Erudite polystyrene is most often light yellow or orange in color, it is denser than polystyrene foam.
Styrofoam
The material is well suited for warming a wooden house.
Advantages:
- light weight - 98% of the volume of the product is occupied by air;
- maintaining dimensional accuracy during long-term operation;
- low thermal conductivity;
- the possibility of mounting in different ways;
- self-extinguishing within 4 seconds - without maintaining combustion with an open fire, the foam goes out.
Foam Disadvantages:
- releases toxic substances when heated above 80 o C;
- easily damaged by mechanical action;
- quickly destroyed by exposure to sunlight;
- low vapor permeability, which must be taken into account, and facade ventilation should be provided.
When buying a heater, it should be borne in mind that a material with a density of 15 kg / m 3 cannot bear a mechanical load, therefore it cannot be plastered. Styrofoam with a density of 25 kg / m 3 can be plastered and used for street insulation. With a mass of insulation of 35 kg / m 3 and above, you can walk on it and most often the material is used for thermal insulation of floors. It is not economically feasible to use foam with such a density for walls.
Extruded polystyrene
Insulation on sale is found under the names Penoplex, Penoplex. Sheets have grooves (selections) along the edges, which allows them to be stacked with an overlap. This eliminates additional sealing of seams. The density of the material is higher than that of polystyrene, any extruded polystyrene can be plastered.
 Jointing seams of extruded polystyrene
 As with the use of foam plastic for insulating wooden houses, ventilated facades are arranged.
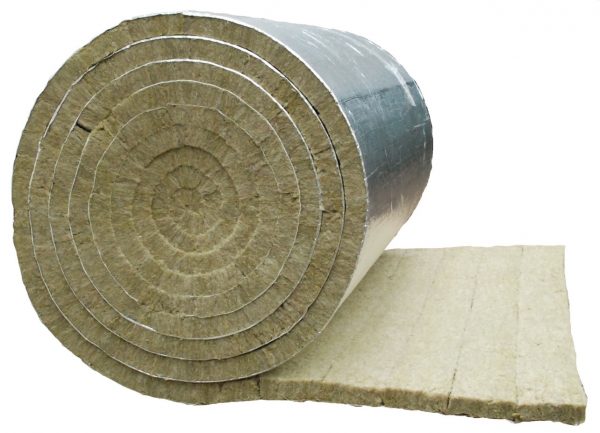
Mineral wool
Mineral wool is obtained by melting rocks. It consists of fibers, between which is a large number of air, which provides thermal insulation properties. It is supplied to trade organizations in rolls or in the form of plates of standard sizes.
Material advantages:
- ease of installation;
- democratic price;
- does not support combustion;
- high rates of heat and sound insulation;
- environmental friendliness;
- high vapor permeability, commensurate with wood;
The main disadvantage is the ability of mineral wool to absorb water, while losing thermal insulation properties. Over time, the material shrinks and shrinks, and performance decreases.
To reduce exposure to water and moisture from the air mineral wool protected with a special waterproofing film.
glass wool
The structure of glass wool is similar to mineral wool, but inferior in performance and manufacturability. When exposed to water and moist air, it quickly loses its thermal insulation properties. Over several years, it becomes caked, which leads to a deterioration in performance. The installation of glass wool requires strict adherence to safety precautions - the smallest particles penetrate the lungs during breathing and enter the eyes, causing irritation of the mucous membranes.
Ecowool
The material is obtained from waste paper and cardboard during the processing of waste paper, as well as waste from the textile industry. Additives prevent rotting, caking, combustibility of ecowool, insects and rodents consider the material unattractive for eating and nesting.
 The process of applying ecowool
 Laying ecowool on your own will not work - the material is sprayed, mixed with water by special installations.
Isoplaat
Wood fiber boards from sawdust coniferous trees produced without the use of chemical components.
 Isoplatate sheets
 The surface of the pressed sheets is treated with paraffin, which reduces the susceptibility to decay. The vapor permeability of the material is approximately equal to the characteristics of wood, which eliminates the accumulation of condensate between the wall and the insulation. Used for outdoor and internal way installation.
Foil insulation
The material is a foam substrate with a glued layer of aluminum foil. It is found on sale under the names Penofol, Isolon, Izodom, etc.
The material performs several functions:
- thermal insulation;
- soundproofing;
- waterproofing;
- wind protection.
 Foil insulation
 Products are resistant to chemical, thermal, biological effects and decay. Installation is reduced to fixing on a wooden surface with a stapler or with the help of nailed rails. When using foil materials, the insulation is nailed with a stapler, then the master has to decide how to sheathe the wall - drywall, distillation, plastic siding.
Warming process
Thermal insulation in log house It will be of high quality if you follow simple rules and a sequence of manipulations. Deviation from the algorithm and incorrect alternation of layers will make the results of labor meaningless.
There are two methods: frame and frameless. They are applicable for outdoor and indoor use.
Frameless way
Without pre-fabrication of the frame, it is possible to insulate with polystyrene foam and extruded polystyrene, basalt mineral wool, Isolat - that is, materials with structural rigidity. The foil material also does not imply a frame structure, although it can be used as one of the layers of the "pie".
Before installing the insulation, the walls are thoroughly cleaned of dust and dirt. Cut off or grind irregularities - the insulation should fit snugly against the base.
The easiest and fastest way to insulate a house is to use Isolate slabs. They are simply nailed with wide-head nails or screwed with self-tapping screws. Of the tools you will need a hacksaw for cutting sheets to size, a hammer or a screwdriver. The surface of the slab is plastered or trimmed with siding. The lack of finishing will lead to the destruction of the sheets under the influence of climatic factors.
Polystyrene sheets are attached to a wooden base with self-tapping screws, using wide plastic washers. Under the influence of ultraviolet, the foam quickly loses its mechanical properties, therefore, with external insulation, plastering work will be required within 20-30 days.
At the first stage, cement-based adhesives are used. Use a special mounting adhesive for polystyrene foam or glue for ceramic tiles.
The surface of the foam is covered with a thin 1-1.5 mm layer of glue, a fiberglass mesh is applied and sunk into the applied solution. The adhesive composition is re-applied and leveled. After drying, the base is treated with a primer and plastered using any composition compatible with cement. For example, plaster bark beetle. The surface can be painted with facade paints.
 Warming the house with basalt slabs
 Similarly, insulation is carried out with basalt slabs.
Frame option
The frame method of installing insulation can be used for any materials, but it is mainly used for installing mineral wool. In the case of using foam, the grate can be used to fasten a finish on it, for example, siding.
 Frame method of insulation
 Installation sequence:
- surface cleaning;
- treatment of wooden walls with a bioprotective primer (antiseptic) and flame retardants (fire retardant impregnation);
- frame installation;
- installation of insulation between the crate;
- installation of a windproof membrane or plate;
- finishing installation.
The opinion is often expressed about the need to install a vapor barrier film between the beams of the walls and the insulation. Such a membrane can fulfill its purpose if the insulation is. For materials that are not vapor-permeable, such a layer is useless - moisture will accumulate at the “wood-insulation” border, accelerating the processes of decay.
For roll materials, the sequence may be different:
- surface preparation, chemical treatment;
- fixing brackets on the wall surface, on which the crate will be attached in the future;
- consolidation roll material using dowel pins.
- Cutting holes in mineral wool through which the brackets protrude outward;
- Installation of a hydro-windproof membrane;
- Fastening the finish coat to the frame.
By choosing the right heat-insulating material and following the above rules, you can qualitatively insulate a wooden house from a bar or boards. Comfort on winter evenings and lower energy bills will be a reward for hard work.
Today, the owners of a wooden house resort to wall insulation from the inside of the room, because they do not want to cover the beauty of the wooden masonry with numerous layers of thermal insulation and plaster. Sometimes wall insulation from the inside is simply necessary due to the uniqueness of the architectural design of the facade of the house. However, internal wall insulation requires competent implementation, since thermal insulation can disrupt gas exchange between the rooms of the house and the external environment, which, in turn, will adversely affect the microclimate of the building and the health of its inhabitants.
Advantages and disadvantages of warming the wooden walls of the house from the inside
In order not to destroy the beauty of a wooden house, its walls are insulated from the inside.
Many experts in the field of construction argue that it is impossible to insulate the walls of a wooden house from the inside for several reasons. Firstly, the insulation, being inside the wall, shifts the dew point into the thickness of the building envelope, which leads to getting wet, and subsequently to freezing of the wall. And since this wooden product, then it will quickly lose its integrity and the house will collapse. Secondly, the insulation will be constantly in contact with the moist air of the room. For this reason, condensation forms on its surface, which adversely affects the level of thermal conductivity of the material.
In this case, he, over time, will cease to fulfill his direct duties. Thirdly, the insulation of a wooden house from the inside leads to a reduction in the usable space of the room.
However, many of the above statements can be argued.

The technology of warming the walls of a wooden house depends on the choice of material.
The internal insulation of a wooden house, especially if it is done by hand, will preserve the beauty and uniqueness of the facade of the building. Condensation never forms from inside the insulation or at the wall-heat-insulating material boundary, if all the work is done correctly and the building components were not saved, but they were chosen solely for their quality and technical parameters.
The main advantage is that it is convenient to carry out internal thermal insulation with your own hands, since no additional help from high-rise installers is needed.
An important fact is that by placing a heater with low steam throughput outside the wall, the owner of a wooden house exposes the building permanent action excess moisture, which leads to rotting of the building envelope, as the balance of air exchange is disturbed.
Important! Any activities related to the insulation of the walls of a wooden house with your own hands can be carried out only after a year has passed after the construction of the building itself. During this time, the house will shrink. Otherwise, the insulation layer will be broken. This will directly affect its technical characteristics.
Some techniques for performing thermal insulation of a wooden structure from the inside
Depending on the materials used and the methods of work, today there are several techniques for thermal insulation of wooden walls from the inside of the room.
Warm seam

The technology of wall insulation "warm seam" is the sealing of joints, seams.
A warm joint is used when the wall masonry is not planned to be finished with various decorative plasters. This method allows you to reduce the thermal conductivity of masonry joints and wall joints. The material is directly placed between the bars of the wall.
For this, synthetic sealants are used (acrylic, silicone, bitumen-rubber, latex), more traditional methods can be used. These are natural sealants - linen, linen rope, tow.
Advantages:
- warming can be done with your own hands, since there is nothing complicated in the execution technique;
- the method is profitable from an economic point of view;
- without disturbing the beauty of the wooden masonry, it is able to increase the thermal insulation characteristics of the wall;
- differs in pore-permeability, which favorably affects the microclimate in the room and the durability of the protective structure.
Warming with mineral wool
As a heater, mats made of mineral (basalt) fiber, glass wool or slag fiber act. This material is characterized by excellent thermal insulation properties, is able to absorb noise, and consists of environmentally friendly components. However, since it has a fibrous structure, it is able to pass steam through itself and accumulate water in itself, therefore the presence of waterproofing and vapor barrier layers is necessary when insulating wooden walls from the inside of the room.
Stages of work:
- all cracks and cracks in the masonry are sealed. To do this, you can use various synthetic sealants. Be sure to treat the wall with an antiseptic;
- crate organization. Consists of two parts. The first transverse crate. It is made of metal profiles, which are placed in increments of 80 cm from each other and across the log masonry. The second part is the counter-lattice. It is made from the same profiles, at the same distance, only along the masonry. The crate will allow you to attach the insulation to the wall surface and provide a ventilated gap. Its main purpose is to remove excess steam with constant circulating air flows and prevent condensation from forming;
- heater installation. Mineral wool is best used in the form of mats, since such a structure is able to withstand significant mechanical loads without compromising its thermal insulation characteristics. The insulation is not glued to the surface of the walls, it is placed at a distance between the profiles of the crate. Joints should not have a width of more than 2 mm. They are sealed with special adhesive tapes;
- vapor barrier. It should overlap and with a slight allowance, so that it will not tear as a result of thermal expansion of the material;
- finishing. It is attached to a metal profile, and if logs acted as fasteners, then to them. It can be fiberboard, chipboard, drywall, lining.
Insulation of the walls of a wooden house with foam
It is very rare to insulate the walls with polystyrene foam of a wooden house from the inside.
This method it is used very rarely due to the formation of condensate, since the foam is a vapor-tight material. However, in the presence of a properly organized waterproofing and vapor barrier layers, this technique is able not only to protect the walls of the building from the cold, but also to provide a pleasant microclimate in it.
In addition, the advantage is the low cost of the material itself. Styrofoam is easy to install, so it will not be difficult to insulate a wooden house on its basis with your own hands. Due to its low thermal conductivity with a small thickness of insulation, you can significantly save usable space at home.
Insulation of the walls of the house from the inside is also carried out with liquid thermal insulation mixtures (ecowool, polyurethane foam, wet plaster). If the latter method has been used for a long time, then the first two have recently appeared in construction and have not yet found wide application. Although the advantages of this method of wall insulation are obvious. This is the formation of a seamless layer, ease of spraying, the insulation does not need steam and hydroprotection.
utepleniedoma.com
Insulation of the walls of a wooden house from the inside
Sometimes it happens that it is not possible to insulate a chopped or cobbled house from the outside. For example, the building is already lined with brick or some unheated structure is attached to it. In this case, the insulation of the walls of a wooden house from the inside is the only way out. This is usually done using mineral wool or polystyrene foam.
Preparatory work for wall insulation
The walls of the house should first be thoroughly cleaned of dust. Next, the wood is treated with an insect and rot repellent. You should also go through the surface with special compounds that increase the fire resistance of the material.

If we are talking about a chopped structure, you must also carefully caulk all the cracks. Usually jute fiber is used for this. For large gaps take tow, twisted into a roller.
Installation of mineral wool boards
Insulation of the walls of a wooden house from the inside can be done using mineral wool. This material has excellent heat-preserving qualities and is easy to install. Under the slabs it will be necessary to arrange a crate. Bars 50 * 50mm are stuffed in a vertical position. The step between them depends on the width of the insulation. Usually it is about half a meter.
Tip: It is best to make the distance between the bars such that it is 2 cm more than the width of the mineral wool layers. At the same time, they will fit into place more densely, and the insulation itself will turn out to be more reliable.

Stuffing can be done with ordinary nails. After the crate is mounted, proceed to the laying of the plates. At the same time, they carefully monitor that there are no gaps between them and the bars. Warming the walls of a wooden house from the inside with your own hands will turn out to be quite effective only in this case. For greater reliability, the plates should be fixed with special dowels "fungi".
Laying a vapor barrier
When performing measures to insulate the walls, it is imperative to arrange a vapor barrier. High humidity will not only reduce the heat-shielding properties of the mineral wool, but will also lead to rotting of the wood. As a vapor barrier, it is allowed to use either ordinary cheap polyethylene film, or some of its modern foil counterpart. The material is mounted directly on top of the cotton wool, fixed to the bars with special staplers.

Important: The vapor barrier should be stretched with foil inside the room. In this case, it is necessary to withstand an overlap between the strips of at least 10 cm. Additionally, the joint should be glued with aluminum or plumbing tape.
At the next stage, they begin to install the counter-lattice under the skin. It can be assembled from bars 30 * 40mm. As a final finish for a wooden house, of course, lining is best suited.
Use of Styrofoam
The insulation of the walls of a wooden house from the inside with polystyrene foam is performed in much the same way as with mineral wool. That is:
- Walls are pre-treated;
- A crate made of timber is mounted on a chopped wall;
- Styrofoam slabs are laid closely between the purlins. Fix them with dowels;
- Next, a vapor barrier is pulled and a counter-lattice is mounted under the finishing sheathing.

On cobbled walls, it is not necessary to arrange a crate for polystyrene foam. It can be glued to the surface with foam glue. In any case, all joints should be sealed with mounting foam or glued with tape.
In the event that the walls of the wooden house were insulated from the inside with polystyrene foam using a crate, the finishing sheathing is mounted on it. If the plates were planted on glue, they should be reinforced with a special mesh. From above, such a surface is subsequently plastered.
We think now you understand how to insulate the walls of a wooden house from the inside on your own. This procedure may take a little time, but technologically it is not particularly complicated.
postroju-dom.ru
Insulation of walls in a wooden house from the inside
Warming a wooden house from the inside today causes twofold feelings. On the one hand, this choice allows you to preserve the external beauty of a wooden building and is a simpler process compared to insulation from the outside. On the other hand, there are concerns about the appearance of the effect of a plastic bag - conditions high humidity inside the building during cold weather. Also, with illiterate wall insulation with your own hands, the service life of a wooden structure is significantly reduced due to an environment that is too aggressive for wood.

Insulation of a wooden house, or what you should know about the technology of heating a log house from the inside
To avoid this, you need to understand some of the subtleties of indoor insulation and follow the right technology. First, the dew point shift should be taken into account: when the walls are insulated from the outside, it is located on the outside of the walls, while when insulated inside, it shifts to the inside of the wall. It is this factor that contributes to the increase in dampness and the accelerated destruction of wood, which was mentioned above. Also, the shift in the dew point entails the soaking of the insulation, which reduces it beneficial features to no. This is especially true of sleklovaty.
In order to prevent this, it is necessary to use a vapor-tight film that will protect the insulation from condensation. However, its use entails a new problem - the greenhouse effect. There is a solution for this problem - the technology for installing insulation provides for ventilation slots in the structure.
This is realized through the installation of crates - wooden battens around the entire perimeter of the insulated surface. Do it if available required set tools is easy and do-it-yourself. Also, the crate serves for reliable fixation of the insulation and subsequent installation of the cladding. It is also worth considering the ventilation system in advance, since all natural cracks in the walls will be sealed during the insulation process.
In general, the process of warming a wooden house from the inside can be divided into several stages:
- surface treatment. After the installation of thermal protection is completed, access to the walls and floor with inside will no longer be. That is why it is important to immediately carry out all necessary operations with wood: clean it, sand it and impregnate it with protective solutions: moisture resistant, antiseptic and fireproof. At the same time, you can do the same with the boards for the crate, because the same fate awaits them.
- Sealing gaps between logs. Suitable materials include tow, linen, jute. You can also use special silicone sealants.
- Installation of hydro and wind protection. To do this, you can use a vapor barrier membrane film - it will also perform these functions.
- Lathing installation. First, vertical support rails are installed, located at the corners and next to windows and doors. Then, at a certain distance, additional vertical yards are installed. The distance between them depends on the selected insulation, or rather, on the width of the plates or rolls in which it is produced. It should be inserted closely between the boards, a maximum of 1-2 mm of clearance is allowed.
- Insulation lining.
- Installation of vapor barrier (in the case when it comes to do-it-yourself wall insulation). It is best to choose special membranes for this purpose that retain moisture, but allow air to pass through. It must be overlapped so that when the materials expand as a result of heating, it does not tear and retains its performance.
- Mounting on the walls of the counter-lattice - horizontally arranged wooden boards. They fix the membrane mesh and insulation. Also, it is the counter-lattice that creates ventilation gaps, due to which excess moisture evaporates from the vapor barrier.
- Cladding installation. The most popular options are lining made of wood, PVC and MDF, drywall and tiles.
 The scheme of warming the house from the inside
 Warming starts from the floor, then work is carried out with the ceiling. The walls are insulated last. Do not ignore any of these three objects. Otherwise, most of the heat will go through uncovered areas.
It should be noted that wall insulation work should be carried out in the warm and dry season, preferably in summer.
What materials are used to insulate walls with your own hands?
The most popular heaters that you can install with your own hands today are:
- mineral wool. It is made from various rocks, molten glass, blast-furnace slag. It has a high service life with good vapor and waterproofing, low sound and heat conductivity, lightness. Also pleased with the price of mineral wool. Is issued in rolls and in plates;
- glass wool - a subspecies of mineral wool, made from glass fibers. The characteristics are similar to other types of mineral wool, but cheaper;
- expanded polystyrene is cheap and is a good external insulation, however, it is not recommended for internal use. This is due to the fact that it does not allow air to pass through and, when heated, releases toxic substances;
- isoplats - comparatively new material for wall insulation, consisting of pressed linen and wood fibers. Differs in the increased mechanical durability therefore at its use it is possible to exclude installation of a crate. However, it is more expensive than other heaters and has a greater thermal conductivity, which means it retains heat worse.
 Mineral wool
  glass wool
  Styrofoam
  Isoplat
However, not every heater can be easily and quickly installed with your own hands. In addition to the options listed above, there are also substances sprayed onto the walls: ecowool and polyurethane foam. They compare favorably with traditional methods. When using them, a crate is not needed, which means that the insulation “eats up” less living space, and often they already include water-repellent impregnations. However, when covering a wall with such materials, special equipment is needed, so it can cost a pretty penny.
Thus, when insulating a wooden house with your own hands, you should remember the following:
- It is very important to isolate the walls and filler from moisture and steam. Otherwise, the tree will begin to become covered with fungus and mold, rot and collapse, and the insulation will simply lose its useful properties.
- All walls and wooden materials used in the installation must be covered protective equipment: antiseptics, hydro- and refractory mixtures.
- Before proceeding with the installation of the crate, make sure that you have done everything you need, and the wall will not be useful to you for the next thirty years. Are the gaps closed? Is the wood impregnated with protective mixtures? Is the wiring done? If yes, then you can move on.
- It is extremely important to think over the ventilation holes in the roof, because the natural cracks between the logs will be sealed. And without an accessible path to fresh air moisture from insulating materials will remain in the room, turning it into a greenhouse. For tomatoes, this is good, but for people, not so much.
- Do not chase cheap materials - they will negatively affect the quality of the microclimate in the house. So it is better to prefer mineral wool to polystyrene, and membrane film to polyethylene. And no, if you make holes in polyethylene, it will not look like membranes from this, but will simply turn into a pile of garbage.
- Only wood is used for cladding: it has a lower thermal conductivity than metal structures.
A few tips for the trail:
- You should not take on the insulation inside the house in the first few years after construction. At this time, the wood is actively drying and shrinking. As a result, the walls are displaced, new cracks appear, the crate and cladding are deformed. For the first time, it is better to limit yourself to a rough finish: sealing cracks, the so-called “warm seam”, and plaster. These measures will be enough for several years.
- Seven times measure cut once. In the process of warming the house with your own hands, you should not rush: one gap missed in a hurry can nullify all the work of warming the house.
(1 rating, average: 5.00 out of 5) Loading...
In contact with
classmates
derevanniedoma.ru
How to insulate walls in a wooden house from the inside
 A wooden house is a kind of work of art. Surely every owner during construction wanted to get a beautiful appearance rooms, as well as a unique interior space. If you sensibly assess the situation, it is impossible to insulate the walls from the outside so as not to hide the wooden beauty. Therefore, all issues of insulation are solved inside the house.
The selection of materials is carried out depending on the requirements that the internal structure promises. Naturally, this type of indoor work significantly reduces living space, and if the person who will deal with the insulation does not have experience in such work, you can easily break the home microclimate.
However, there are times when you simply cannot do without warming, and in this article we will consider the fundamental principles of such an event. In fact, technological process no different from outside work.
Why can a house lose heat quickly?
First of all, this can be the result of poor-quality installation of thermal insulation. Otherwise, poor-quality laying and shrinkage of wooden beams is possible, in which cracks appear over time.
How insulation works are carried out:
- walls are prepared first;
- further caulking of cracks is carried out;
- installation of vapor barrier;
- arrangement of the crate (this is done on load-bearing walls);
- installation of insulation material with subsequent sealing;
- system arrangement forced ventilation;
- final finishing work.
An important stage in the construction modern houses is their thermal insulation. The main goals of insulation are to create a comfortable temperature in the premises and more economical use of energy resources used for heating.
Buildings made of wood and buildings made of stone also need thermal insulation.
According to building codes, thermal insulation should be carried out from the outside. The reason is that the dew point is located on the outside of the room in the insulating material or in the front layer of the supporting structures. With this method of thermal insulation in rooms, condensation will not form on the walls.
But this option is not the only one. Thermal insulation is carried out not only from the outside, but also from the inside. In some situations, internal insulation is the only right option. For example, if the owner of the home ownership wants to preserve the external presentability that distinguishes wooden buildings, or the architectural appearance of the house has historical value.
We offer you to learn how to do the insulation of the walls of a wooden house from the inside with your own hands. different types thermal insulation materials.
Causes of heat loss in a wooden house
As a rule, wooden houses are very comfortable. In such buildings it is cool in the warm season and warm in the winter.
The decrease in temperature inside a wooden house is caused by two main factors:
- improper vapor barrier;
- cracks that appeared in the old building due to the drying out of the tree over time.
Is it possible to insulate a wooden house from the inside? Of course, and if the house is old - even necessary! In order to perform thermal insulation from the inside, it is necessary to choose the right materials and follow the technology provided for such a task.
Insulation works for both new and old wooden houses are carried out in stages.
How and how to properly insulate a wooden house from the inside with your own hands? Consider the stages of internal wall insulation and select an environmentally friendly insulation for internal thermal insulation.

Training
All actions related to the construction and improvement of residential buildings must be preceded by calculations - this rule also applies to the insulation of a wooden building.
Calculations make it possible to find out the degree of effectiveness of thermal insulation and find out whether, in principle, it is possible to produce insulation from the inside.
Insulating material always fulfills its purpose, but the location of the dew point plays a decisive role. Under no circumstances should it be placed on the inside of load-bearing structures, especially in insulation material, and the task of calculations is to demonstrate this.
 When placing the dew point from the inside, the room will be quite comfortable temperature regime, but in winter it is always damp, leading to wetting of heat-insulating materials, wood rotting, and mold formation.
Provided that the dew point does not appear in the interior of the room, even in winter, thermal insulation can be performed from the inside.
But at the same time, the interior space of the living quarters will inevitably have to be sacrificed.
Choosing materials
A number of requirements are imposed on the materials used for internal thermal insulation of wooden houses:
- low heat conductivity;
- resistance to fire;
- strength;
- environmental Safety.
Thermal insulation methods are selected based on the materials used for this purpose.
How to insulate the house from the inside? Currently, several types of insulation for the walls of the house are produced:

Modern heaters have a large number of advantages: lightness, flexibility, excellent thermal insulation parameters.
We close up the joints
Having decided to take up the insulation of a wooden house with your own hands, you need to take into account one important point. The structure of wood shrinks, this process takes several months. In addition to shrinkage, when the heating system is brought into operation in the premises, the tree begins to dry at a high speed. This is reflected in the configuration of logs and timber.
Initially densely spaced wooden elements at the docking points they can form large gaps that release heat into the street.
 For this reason, the first step in insulating a wooden home should be grouting.
For this, sealants and other materials are used. It is convenient to seal the cracks with a wide chisel.
If the gaps are large, rolled tape tow is used.
At this stage, the main thing is to stop the exit of warm air through the cracks.
Important! Do not forget about the safety of electrical wiring when sealing gaps, especially if it is located on the surface: in this case, be sure to separate it and isolate it from the wall.Protection of wood from fire and biological factors
Part of the load-bearing structures located from the inside, on long time will be covered with an insulating layer. Given this, wood should be treated with agents that protect it from fire and mold. You can’t save on processing with such compounds, and you need to choose high-quality products in order to provide good protection.
When processing load-bearing structures with agents that have a fire and bioprotective effect, it must be taken into account that wooden fences also need to be processed, since they will also be located in the insulation.
Ventilation
For what reason did the owners of private houses not think much about the ventilation of buildings before? The thing is that earlier ventilation was carried out in a natural way - through loosely spaced windows and cavities in the walls. This is typical for old log houses even now.
The materials used for the construction of modern buildings make it possible to avoid gaps and crevices through which air flows can circulate. But this does not mean at all that there should be no air movement in the rooms at all. Ventilation systems are being designed in modern buildings. Such systems remove recycled air from rooms and provide an influx of fresh air.
Properly executed internal insulation necessarily provides for ventilation. Only in this case the microclimate in the house will be optimal.
The insulation itself, which has a porous type structure, for example, the same mineral wool, also needs ventilation. For this reason, a small distance must necessarily remain between the supporting structure and the heat-insulating material for unhindered air circulation and the removal of excess moisture. In this case, the level of humidity in the entire room will be uniform.
It is not difficult to make such a gap. A wooden rail about 25 mm in size is attached to the supporting structures at an equal distance, and a vapor barrier film is attached on top of it. Thus, a small distance is formed between the wall and the heat-insulating material for air movement, which protects against moisture. internal structures and insulating material.
On a note! If the walls of the building are made of a log having a cylindrical configuration, then the ventilation gaps are formed naturally. In the event that glued laminated timber was used to build a house, it is recommended to take care of the design of the ventilation gap.Vapor barrier layer
The use for insulation of such heat-insulating materials as glass wool, mineral wool, polystyrene foam (non-pressed variety) necessarily provides for a vapor barrier device.

It is mounted as follows: a vapor barrier membrane is attached to the crate for ventilation. A stapler is used for fastening.
Important point! When installing the vapor barrier membrane, be sure to stretch the film tightly so that a ventilation gap is formed between the supporting structure and it.The connection of two sheets of vapor barrier film is overlapped by at least 10 cm and fastened with adhesive tape.
If as thermal insulation material an extruded variety of polystyrene foam is used, then there is no need for a vapor barrier layer. Extruded polystyrene foam has waterproofing properties that prevent the penetration of moisture.
Fencing installation
In all options for thermal insulation of the internal load-bearing structures of a log or timber house, with the exception of the use of isoplat, a fence must be installed. Usually, a bar with a square section (50 mm) is used for its design. The distance of the wooden block depends on the width of the insulation material.
When using mineral wool, the step between the location of the bars should be 10 mm less than the width of the heat insulator in order to achieve maximum fit.
When using extruded polystyrene foam, the step is made in accordance with the width of the sheets of material.
Important! Before installation, be sure to treat all wooden blocks with a composition that has fire and bioprotective properties.The bars are fastened with screws directly to the wooden supporting structures. If there is a crate to form a ventilation gap, the bars are attached to the installed rails. Fasteners are recommended to be inserted into pre-made small holes (a thin drill is used for this) so that the tree does not crack.
In some cases, the fence is made of plasterboard profiles attached to the supporting structures on direct suspensions. This is done only if the lining is made of drywall.
Wooden bars are preferable, as they have a lower heat conductivity compared to metal products.
In the process of thermal insulation of the ceiling, the fence is designed according to a similar principle. When insulating the floor, wooden logs, to which the finish coating is attached, serve as a fence.
Installing a heat insulator
Insulating material is laid in the cavity between the enclosing elements. If the heat insulator is in the form of sheets, then wall mounting should start from the bottom, and when using roll material - from the top, moving down.
Sheets of mineral wool are located at a distance, due to which their secure fastening. But this material, just like polystyrene, needs additional fasteners with nails (one for each sheet).
The heat insulator in rolls is fixed at the top of the wall with one screw, then the material is unfolded and attached with nails at a distance of one meter.
First, solid sheets are mounted, and the remaining areas where trimming is necessary are filled with insulating material at the very end.

If the roof is sloping, the ceiling heat insulator unfolds from the bottom in the direction from the bottom up and is fixed with nails or with a cord. Small nails are nailed onto adjacent bars at a distance of 15 cm, and after the heat-insulating material is laid, a cord is pulled between the beams in a zigzag pattern, which will ensure reliable fastening of the insulation.
When insulating with extruded polystyrene foam, all existing gaps at the seams are sealed with construction foam. The application of foam requires pre-moistening of the surfaces. Dried excess foam is cut off with a knife.
Video about wall insulation from the inside
The video tutorial below shows how to properly insulate a wooden house from the inside:
Does your wooden house require insulation? But you don't know how to do it right? Then the following information will definitely come in handy. It will be about. Although I would like to note that this method is not used as often as the external installation of insulation. Why is this method considered less popular?
Modern thermal insulation materials have high technical specifications: light weight, flexibility, excellent ability to maintain indoor microclimate.
There are several good reasons: firstly, the internal version of the insulation slightly reduces the living space; secondly, by performing the installation of a heater on your own, due to inexperience, you can get a violation of the microclimate due to high humidity. That is why it is best if the insulation of a wooden house from the inside occurs after consultation with specialists or professional builders. They will tell you how to insulate a wooden house inside competently, quickly and correctly.
Please note that the method of internal insulation is fundamentally different from the installation of insulation outside the house.
Causes of a cold snap in the house and the procedure for thermal insulation work
Usually houses built of wood are particularly comfortable: they are cool in summer and warm in winter. Most often, a cold snap in a wooden house can be caused by 2 main reasons. This:
- poor-quality or improperly mounted outer heat-insulating layer;
- the appearance of cracks in the walls of the house as a result of improper installation, or drying out.
After the reasons for the cold in a wooden house have become clear, you can proceed to familiarize yourself with the list of upcoming work aimed at its internal insulation.

This process will take place in several stages:
- First you need to prepare the surfaces.
- Then caulk all existing gaps.
- Arrange a layer of vapor barrier.
- Mount the crate.
- Lay a layer of thermal insulation.
- Arrange ventilation system.
- Next comes the finishing work.
And now about all these stages in more detail.
Back to index
Work on preparing the surface for insulation
The first stage of work on insulation involves the preliminary preparation of surfaces.

When working on laying heat-insulating material, it is necessary to protect the respiratory and vision organs from the ingress of fine dust and other substances.
To begin with, clean all surfaces of the walls from dirt and dust. And then you can proceed to the careful processing of wooden walls with the help of special composition protecting the tree from insect breeding. It is very good if the composition you have chosen will additionally perform a function that prevents the process of decay. wooden surfaces, and protect it not only from moisture, but also from the risk of fire.
And yet, at the same stage, you need to take care of security electrical wiring. If there is an option for its surface location, then it must be separated from the wall. Close up the gaps
Having done all the above procedures, you can proceed to the second stage of warming. It provides for the implementation of work to eliminate existing gaps. They need to be carefully sealed. Many people know that after a house is built from a bar, it is necessary to carry out an additional procedure to eliminate gaps, after about 1 year.
Naturally, this is done if the house remained uninhabited. During the operation of the premises, re-caulking of cracks can be carried out later, after about 3 years. What is the best way to fill gaps? Usually, a material such as jute fiber is used for these purposes.
From the tools you will need a chisel, preferably wide and rather thin. For especially large slots, a tape tow is used, which, before being placed in the gap, is twisted in the form of a roller. It is necessary to fill the slots until the material used can no longer be placed in them.
Back to index
Vapor barrier layer: nuances

Cork insulation retains heat very well and lends itself well to processing.
The presence of a vapor barrier in a wooden house is very important, since as a result of insulation, the wall is blocked between 2 heat-insulating layers. In this case, the degree of humidity in the room increases, since the walls arranged in this way are not capable of breathing. What to do in this case? Saves quality ventilation system, only with its help is it possible effective fight with humidity. If you do not allow dampness on the walls, then you will avoid the process of wood decay.
Simply put, you need to equip a high-quality vapor barrier. It is performed using a special film, which is placed on the surface of the wall with its rough side towards the wooden surface.
Back to index
Sheathing and thermal insulation layer
You can mount the crate layer on the walls using a wooden beam. It is also allowed to use metal profile, but only in the case of subsequent sheathing with moisture-resistant plasterboard sheets.

Scheme of wall insulation: 1 - outer skin (lining); 2 - polyethylene; 3- OSB board; 4, 6 - vapor barrier layer; 5 - thermal insulation layer (mineral wool); 7 - ventilation gap; 8 - inner lining.
In order for the corners of the crate to be even and correct, it is necessary to take care of the preparation of the corner posts in advance. To do this, make measurements of the height of the room and, in accordance with this value, cut the timber. The cross section of the beam used for these purposes should be 50 × 100 mm.
As a result of these manipulations, you should get a stand that resembles the letter “G” in its outline. Each of the corners of the room should be equipped with such a rack. When mounting, do not forget to check the verticality of their location.
Now you can proceed with the installation of vertical bars in increments of about 0.5 m. The bar should have a cross section of 50 × 50 mm. Do not forget that all wooden parts of the crate must be pre-treated protective composition against decay and fire.
After the crate is completed, you can proceed with the installation of the heat-insulating layer. For these purposes, a material such as mineral wool is well suited. After you have unrolled the roll of material, you need to cut it according to the desired height value. And the width of the heat-insulating layer should be 2 cm greater than the distance between the two vertical bars.
Having placed a strip of a heat-insulating layer between the bars, you need to fix it on the wall with anchors. Please note that anchors with large round caps are used. A second layer of insulation is fixed to the surface of the bars. Vapor barrier, or rather the film used for its device, will help to avoid dampness, and will also prevent small particles of mineral wool from getting into the air. The vapor barrier layer is fastened to the bars using a construction stapler.
Wood has been used in construction since ancient times. This material is valued for its affordability and thermal conductivity. A house made of timber requires proper care, then it will always be comfortable in it. Many have noticed that two or three years after construction, the house becomes noticeably colder. This is due to the fact that all the walls of the building are in constant motion.
The position of the bars changes slightly and cracks appear along the seams, even correctly installed windows over time, drafts begin to pass. Construction flaws can also manifest themselves. In fact, fixing all these reasons is not difficult even with your own hands. If you do not want to spoil the appearance of the house, we will tell you how to insulate log house from within.
Why is it cold inside a wooden house:
- Walls. Small gaps in the seams of a wooden house are the most common reason for the lack of heat in the premises.
- Windows and doors. Eternal sources of drafts and heat losses in any home.
- Ceiling. From the course of physics it is known that warm air rises. If the upper part of the house from the timber is not sufficiently insulated, the heat simply escapes.
- Floor of the first floor. In any house, it has a large area. Cold from the ground can greatly cool the air in the house.
Consider in order what you can do with your own hands with each of these reasons.
First, the walls of the house need to be caulked. For this, a special tool is used - a caulk. If it is not available, a hard spatula or a wide screwdriver is used. As a heater, tow, hemp, felt or jute rope. It is not difficult to do it with your own hands, the main thing is to correctly follow the sequence of actions.
You need to start caulking from the bottom seam around the entire perimeter of the house, only then move on to the next one.
The insulation must be driven into the cracks of the timber as densely and deeply as possible. You need to understand that after finishing work, the ceiling height will increase by several centimeters. Therefore, if you caulk each part of the house separately, one of the walls may collapse - the timber will simply pop out of the groove. Another way is to apply acrylic or silicone sealant to the joint of the timber.

If you are not satisfied with the result achieved, experts advise to additionally insulate the walls with thermal insulation. To do this, a guide beam is vertically attached to the wall, its height must be equal to the thickness of the insulating material. The entire surface is covered with a layer of waterproofing. Insulation is laid tightly between the guides, without gaps. For this purpose, any sheet material is suitable. After that, it remains only to make decorative wall cladding.
Windows and doors - how to get rid of the cold
The two main causes of cold entrance doors and windows - drafts and insufficient thermal insulation. Very often, cold from openings is confused with drafts. To determine the cause of a heat leak, you just need to make sure that the doors and windows are actually blowing or not. To do this, you need to hold a burning lighter at a short distance along the perimeter of the frame and sashes.
If the draft comes from the sashes, you need to seal all joints. To do this, it will be enough to stick a silicone seal with your own hands. You can also use foam rubber, but it has a short service life. You can also glue the windows with construction tape for the winter.

If it seeps through the perimeter of the frame, it is necessary to remove the trim and window sill to get to the opening between the wall and the frame. Then the opening is glued with waterproofing and insulated. As thermal insulation, you can use any rolled insulation or mounting foam. From above, the insulation must be pasted over with aluminum or reinforced tape, after which the platbands are put in place.
If it feels cold from the door, but there is no draft, you need to check the thermal insulation of the door. To do this, experts advise simply knocking on the canvas. The hollow structure from the inside will have to be changed. A window with single glazing can freeze in the cold season. In this case, you will have to install new windows.
Insulation of the roof and ceiling of a wooden house
Many do not consider heat loss through the roof and ceiling significant. In fact, there are often gaps through which the log house simply heats the street. Also, the surface of the roof can heat up from poor thermal insulation of the ceiling. By getting rid of these losses, you can save up to 60% of heating costs.
Before you begin to insulate the upper part of the wooden house, you should seal the entire seam of the upper beam of the wall and the roof structure.
If the attic in the house is non-residential, it is very simple to insulate the ceiling with your own hands. To do this, a layer of thermal insulation of about forty centimeters is laid there. You need to understand that the insulation for the ceiling should be light. Typically, sawdust, polystyrene, mineral wool and other lightweight materials are used for this purpose.

If the ceiling is a roof vault, insulation is a little more difficult. To begin with, the entire surface of the roof from the inside must be covered with a layer of waterproofing so that moisture does not get on the insulation. Roof insulation is done in two ways:
- Sheet insulation is laid tightly to each other. In this case, special attention should be paid to the absence of gaps between the sheets, because between them the heat will still go out.
- Sheet insulation is laid from top to bottom with an overlap. This is done for additional protection against moisture, it will simply drain over the sheets of thermal insulation.
After that, it remains to ennoble the surface with decorative trim. For this purpose, lining is perfect.
Solving the cold floor problem
Home heating will not work efficiently if the house has cold floors. They cool the room and do not allow the air to warm up.
The wooden floor is insulated very simply, for this it is necessary to remove the floor upholstery. In order not to confuse the order in which the boards lay, it is better to mark them in advance. This will save a lot of time during assembly. Then the entire surface between the lags is covered with waterproofing so that the insulation does not pick up moisture from the soil.

The heat-insulating material is laid on it in such a way that there are no slightest cracks over the entire surface of the floor. Insulation is used by anyone who is not afraid of moisture. On top, you need to lay another layer of waterproofing, because when cleaning the premises, water can get there and accumulate inside. After that, the floor boards will need to be laid in the reverse order.
The cement floor is insulated in two ways. If the height of the premises allows, logs made of wooden beams are laid on the floor. Between them, a heater is laid, which is closed with waterproofing from above. Then the floor is upholstered with a board.
If the ceiling height does not allow you to raise the floor level, you need to remove cement screed and remove the backfill of the floor by about half a meter. After that, the pit is waterproofed and the insulation is filled up. Usually expanded clay is used for this. A layer of foam or other dense material is laid on top of it. A new screed is made on top.


Chicken in kefir - recipes for marinated, stewed and baked poultry for every taste!
Simple Chicken Recipe in English (Fried) Recipes in English with translation
Chicken hearts with potatoes: cooking recipes How to cook delicious chicken hearts with potatoes
Recipes for dough and fillings for jellied pies with mushrooms
Stuffed eggplant with chicken and mushrooms baked in the oven with cheese crust Cooking eggplant stuffed with chicken