To connect plumbing fixtures to the water supply network, a flexible water supply is used. It is in demand when connecting faucets, showers, toilets and other points of water intake, and greatly simplifies the installation process. Flexible piping is also used during installation gas equipment. It differs from similar devices for water in manufacturing technology and special safety requirements.
Characteristics and types
Flexible hose for plumbing is a hose of different lengths, made of non-toxic synthetic rubber. Due to the elasticity and softness of the material, it easily takes the desired position and allows installation in hard-to-reach places. To protect the flexible hose, the upper reinforcing layer is designed in the form of a braid, which is made of the following materials:
- aluminum. Such models withstand no more than +80 ° C and retain functionality for 3 years. At high humidity aluminum braid is prone to rust.
- Of stainless steel. Thanks to this reinforcing layer, the service life of a flexible water supply is at least 10 years, and Maximum temperature transported medium - +95 °C.
- Nylon. Such a braid is used for the manufacture of reinforced models that can withstand temperatures up to +110 ° C and are designed for intensive use for 15 years.
Nut-nut and nut-nipple pairs are used as fasteners, which are made of brass or stainless steel. Devices with different indicators of permissible temperature differ in the color of the braid. Blue are used to connect to a pipeline with cold water, and red - with hot.
When choosing a water supply, you need to pay attention to its elasticity, reliability of fasteners and purpose. It is also mandatory to have a certificate that excludes the release of toxic components by rubber during operation.
Features of gas connections
When connected gas stoves, speakers and other types of equipment also use flexible piping. Unlike models for water, they have yellow and are not tested for environmental safety. For fixing, end steel or aluminum fittings are used. There are the following types of devices for connecting gas appliances:
- PVC hoses reinforced with polyester thread;
- synthetic rubber with stainless steel braid;
- bellows, made in the form of a corrugated stainless steel tube.

Holding "Santekhkomplekt" offers engineering equipment, fittings, plumbing and accessories for its connection to communications. The assortment is represented by products and materials of well-known foreign and domestic manufacturers. Discounts apply for bulk purchases, and product quality is confirmed by standard certificates. For information support and assistance, a personal manager is assigned to each client. The ability to arrange delivery within Moscow and to other regions of the Russian Federation allows you to quickly receive the purchased goods without any hassle.
Drainage is a hydro-reclamation measure to remove excess ground water.
If water does not leave the territory of the site for a long time, soil gleying occurs, if shrubs and trees quickly disappear (wet), it is urgent to take measures and drain the site.

Reasons for waterlogging the soil
There are several reasons for waterlogged soils:
- clay heavy soil structure with poor water permeability;
- an aquiclude in the form of gray-green and red-brown clays is located close to the surface;
- high occurrence of groundwater;
- technogenic factors (construction of roads, pipelines, various facilities) that impede natural drainage;
- violation of the water balance by the construction of irrigation systems;
- the landscape area is located in a lowland, a beam, a hollow. In this case, precipitation and water inflow from higher places play an important role.
What causes excess moisture in the soil
You can see the results of this phenomenon yourself - trees and shrubs are dying. Why is this happening?
- the oxygen content in the soil decreases and the content of carbon dioxide increases, which leads to a violation of the processes of air exchange, water regime and nutrition in the soil;
- oxygen starvation of the root-forming layer occurs, which leads to the death of plant roots;
- the intake of macro and microelements by plants (nitrogen, phosphorus, potassium, etc.) is disrupted, because excess water washes out mobile forms of elements from the soil, and they become inaccessible for assimilation;
- there is an intensive breakdown of proteins and, accordingly, the processes of decay are activated.
Plants can tell at what level groundwater occurs
Take a close look at the flora in your area. The species inhabiting it will tell you at what depth the groundwater layers are located:
- top water - in this place it is best to dig a reservoir;
- at a depth of up to 0.5 m - grow marigold, horsetail, varieties of sedge - blister, holly, fox, Langsdorf reed grass;
- at a depth of 0.5 m to 1 m - meadowsweet, canary grass,;
- from 1 m to 1.5 m - favorable conditions for meadow fescue, bluegrass, mouse pea, rank;
- from 1.5 m - wheatgrass, clover, wormwood, plantain.
What is important to know when planning site drainage
Each group of plants has its own moisture needs:
- with a groundwater depth of 0.5 to 1 m, vegetables and annual flowers can grow on high beds;
- the depth of the water reservoir up to 1.5 m is well tolerated by vegetable crops, cereals, annuals and perennials (flowers), ornamental and fruit and berry shrubs, trees on a dwarf rootstock;
- if groundwater at a depth of more than 2 m, you can grow fruit trees;
- optimal groundwater depth for Agriculture- from 3.5 m.
Do you need site drainage?
Record your observations at least for a while. You yourself will be able to understand how much drainage is needed.
Maybe it makes sense to simply redirect melt and sediment water along a bypass channel, and not let it flow through your site?
Perhaps it is necessary to design and equip a storm drain and improve the composition of the soil, and will this be enough?
Or is it worth it drainage system only for fruit and ornamental trees?
The exact answer will be given to you by a specialist, whom we strongly recommend calling. But after reading this article, you will gain some awareness in this matter.
At the end of the technological and production tasks associated with the arrangement of the sewer system in apartment building, production building, as well as in private households, it is required to test the system involved using the forced spill method. This task was applied to identify possible defects or improper installation of the entire sewer part involved and the act of testing systems internal sewerage and drains will be material evidence of work on the acceptance of the facility.

A visual check should be accompanied by entering into the test report of internal sewerage and drain systems according to SNIP, which is currently represented by the current regulations of the appendix of the D series, which corresponds to SP 73.13330.2012 "Internal sanitary systems of the building", recently a new one has been applied updated working version according to SNiP 3.05.01-85.
Work on the installation of new plumbing for many novice craftsmen causes concern. Diversity constructive solutions plumbing fixtures and how to connect them requires the contractor to know the intricacies of the process.
We will try to uncover and analyze the main ones of them, how to properly install the toilet bowl with your own hands without the help of plumbers.
The range of sanitary ware on the market is diverse. Any owner has the opportunity to choose presentable and functional equipment to his own taste and budget.
In addition to traditional floor models, manufacturers offer a wide selection of suspended and built-in devices. The drain tank in them can be attached to the wall or connected to the base of the plumbing.
The version of the bowl of floor and hanging models can be any, for example, dish-shaped, funnel-shaped or even a visor modification
The latest models of toilet bowls also differ in the design of key components.
The output drain happens:
- horizontal;
- vertical;
- oblique.
The type of outlet drain should be considered when choosing a model. If your plans do not include alteration of the sewer pipe supply, then in the installed model the drain should be arranged according to the same principle as in the dismantled one.
Drains and plumbing supplies that do not match each other, provided that this is not a toilet bowl with a release, it is almost impossible to combine it as tightly and efficiently as possible.
Fixing plumbing to the floor is carried out by means of specially made two or four attachment points. But you can also find models in which the corners that come with the product are used for fastening to the floor.
A new plumbing fixture can be put in place of the old one, or you can choose another “corner” for it by making a small redevelopment in the bathroom.
Preparation of tools and materials
To connect the tank to the water supply you will need a flexible hose. It usually comes with a kit. For connection to the sewerage - a rigid or bending corrugated cuff.

It is impossible to qualitatively install a toilet bowl with your own hands without a minimum set of necessary tools that any owner has in the house
To assemble the structure and connect to communications, you will need:
- perforator or impact drill;
- a set of screwdrivers with a flat and cross-shaped "sting";
- set of wrenches;
- building level;
- a simple pencil or marker;
- stationery knife;
- roulette;
- chisel;
- hammer.
If the installation of plumbing will be carried out on tile, then it is also necessary to prepare a "ballerina" or a spear-shaped drill for tiling. To make holes for the installation of fasteners, you will also need an 8 or 10 mm drill.

From the auxiliary materials you will also need:
- metallized tape;
- silicone sealant;
- FUM tape;
- polyethylene film;
- moisture-absorbing piece of fabric;
- container for collecting liquid.
Depending on the type of model connected and the method of installation, grout may also be required.
Removing an old toilet
Removing an old toilet is one of the most time-consuming operations.
The work is carried out in several stages:
- Shut off the faucet.
- Disconnect the hose going to the tank from the water supply, drain the water from it.
- The empty tank is removed from the mounts.
- Unscrew the nuts located on the back of the toilet and disconnect it from the sewer. To loosen the drain, the toilet must be shaken from side to side.
- Drain the remaining water from the toilet by tilting the bowl forward.
- The sewer hole closer to paradise is cleaned of dirt and temporarily clogged with a rag gag or a wooden plug of a suitable diameter.
The easiest way to break the bolts is to hold the head with an open-end wrench and unscrew the nut with an adjustable wrench. If threaded connections heavily slagged with salt deposits or rusted.
To facilitate the task will help the use of universal grease "WD-40", which in a matter of minutes is able to loosen deposits. In the absence of such, you can use vinegar or kerosene.

The sewer hole must be closed without fail so that toxic hot gases do not spread outside the pipeline
If rotten taffeta or any other support is found under the dismantled toilet, it must be removed. This can be done with a puncher, a nail puller or a chisel.
In houses old building drains on sewer pipes are often fixed with cement coating. It is easiest to knock down the dried solution with a chisel, puncturing it in several places. Detailed instructions read on dismantling the old toilet.
Image gallery
Option #2 - with horizontal outlet
Plumbing fixtures with horizontal outlet have become one of the most popular in our country. The relevance of the installation of such equipment is explained by the specifics of the wiring in Russian apartments of the sewerage system.

The main feature of toilet bowls with a straight horizontal outlet is for correct installation a strictly fixed point of connection to communications is required
The horizontal outlet is located at the back of the bowl or base and points back. Models with this design installed end-to-end with the wall, connecting to any type of location of the sewer riser.
The connection is made using fittings of the appropriate size. The joint is sealed by placing a sealing gum inside the pipe.
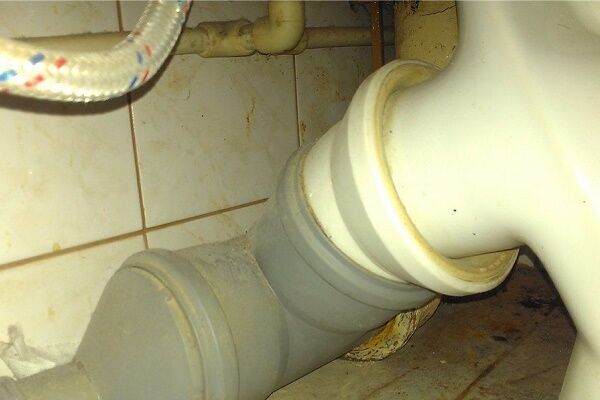
Direct connection is performed only if the sewer system is made of plastic. To connect to cast iron pipes, whose circumference rarely has an ideal shape, use cuffs and eccentrics.
Option # 3 - with an oblique outlet
The flare in models with an oblique outlet is located at an angle of 45 ° relative to the floor surface. Models with an inclined outlet win against their counterparts in that they are less likely to become clogged, since this design allows you to create less resistance when moving solid impurities.

Vulnerable points of devices with oblique outlet are the articulation points of the product with the sewer pipe, which, if not properly installed, can be covered with cracks
Connecting a device with an oblique outlet to the sewer system can be done in one of three ways:
- By direct connection through the socket of the sewer branch. They choose when there is no need to move the plumbing fixture, and the direction of all elements clearly coincides. The outlet of the toilet bowl is treated with soapy water and deepened into a socket equipped with a cuff.
- Accession by means of an eccentric. A socket with a 5 cm offset center, equipped with a sealing gasket, is mounted in the sewer outlet and, by rotation, the toilet bowl is shifted to the right or left side.
- By installing a corrugated outlet. The use of corrugations makes it possible to deploy the device for a relative oblique sewer outlet even at an angle of 90 °.
Flexible outlet - although convenient, but far from the best remedy for connecting toilet bowls with an oblique outlet. It should be used only in extreme cases, when it is not possible to use other methods.
To find out in more detail how to install a toilet with an oblique outlet, go to.
Image gallery
by the most simple option connecting a toilet with an oblique outlet is the use of corrugations, which ensures perfect tightness
If with the help of corrugations not a temporary, but a long-term connection is made, then you need to use a reinforced version of the corrugated pipe
Using the corrugation, the slanted outlet toilet can be connected to a floor or wall drain
If it is possible to reduce the distance between the toilet bowl and the sewer system, instead of corrugations, it is recommended to use a sealed cuff and a plastic outlet
The use of corrugations in connecting to the sewer
Reinforced corrugation for reliable performance
Side outlet toilet connection
Cuff in the sewer connection
Features of mounting compact models
The technology for the correct installation of floor-standing toilet bowls of compact models includes seven main steps:
- The toilet is pushed as tightly as possible to the drain hole and check whether the outlet coincides with the sewer socket.
- In the presence of small displacements, the device is connected to the sewerage outlet using a corrugated pipe.
- A plumbing fixture with a connected corrugated pipe is moved to the wall, making sure that strong creases and bends do not form on the pipe.
- The ends of the connecting element are covered with a thin layer of silicone sealant.
- After adjusting the position of the device, with a pencil outline the boundaries of the sole of the device and the points where it is planned to drill holes for deepening the dowels.
- The toilet is pushed aside. At the marked points, holes are made with a diamond drill with a diameter equal to the size of the dowels used.
- Plastic plugs are inserted into the holes. The toilet is "hoisted" to its original place. Bolts are screwed into the prepared holes.
Tip: to facilitate putting on the corrugated pipe to the outlet, its end must be smeared on the inner walls with liquid soap.
If holes have to be made in tiles, to minimize surface damage, first slowly drill the top layer by hand, and only then turn on the hammer drill with an impact drill
In order to ensure the closest possible fit of the toilet sole to the floor covering, silicone is applied according to the intended counter of the installation of the device. The toilet itself is then put in its original place, guided by the intended contour.
To fix the plumbing fixture, the washers and screws threaded through the holes in the heel are twisted extremely carefully. Under no circumstances should they be killed!
Photo guide for assembly and installation of the compact
Consider the process of installing a toilet bowl using the example of assembling and fixing Chinese PORTA plumbing. An excellent product with a 25-year manufacturer's warranty and a very attractive price.
Image gallery
Before installing a new toilet bowl, we dismantle the old plumbing, clean the floor under it, repair it and fill it with a semi-dry cement mortar
We install a new plastic adapter in the sewer outlet, to which we will connect either a corrugation or a rigid plastic elbow
If necessary, we change the cold water supply pipes in the area behind the toilet. Most often this has to be done so as not to change the pipeline a year or two after the installation of new plumbing
According to the completed connection from the toilet to the sewer, we expose the plumbing for fitting in order to mark the attachment points and outline the leg
Step 1: Preparing the floor for the new toilet
Step 2: Replacing pipes and fittings connecting to the sewer
Having understood the toilet installation technology, you can save on plumbing services and do the job as efficiently as possible. The toilet can be mounted in the traditional way or more modern method- with installation. In the second case cistern will be hidden in the wall, which will favorably affect the interior of the room.
You are provided with instructions on how to complete each of the listed installation options.


| H | h | h1 | L | l | l1 | B | b | |
|---|---|---|---|---|---|---|---|---|
| With one-piece molded shelf, mm | 370 and 400 | 320 and 350 | 150 | Not less than 605 | 330 | 435 | 340 and 360 | 260 |
| Without one-piece molded shelf, mm | 370 and 400 | 320 and 350 | 150 | 460 | 330 | 435 | 340 and 360 | 260 |
| Baby | 335 | 285 | 130 | 405 | 280 | 380 | 290 | 210 |

Work set
- Perforator.
- Roulette.
- Wrench.
- Fan pipe.
- Flexible hose.
- FUM tape.
- Fasteners.
- Sealant.
In the case of installing a toilet bowl on the installation, the listed list will expand with the corresponding set. Everything you need is bought at any plumbing store.
Dismantling the old toilet

First step . Shut off the water supply and drain all the liquid.

Second step. We unscrew the hose through which the tank is connected to the water supply.

Third step. We unscrew the fasteners of the tank. If they are rusty, we arm ourselves with a screwdriver or open-end wrench. We press the bolt head with the selected tool and unscrew the nut with an adjustable wrench. If it doesn’t work, pre-soak the nut with kerosene. We remove the tank.
Fourth step. Dismantling the toilet bowl.
Fifth step. Disconnect the toilet drain from the sewer.

In old buildings, plums are usually fixed with cement plaster. To destroy it, use a hammer and a chisel. We need to prick the cement and gently shake the toilet to the sides. The drain should turn and loosen. We tilt the product, allowing the remaining water to drain into the sewer.


 If the toilet had an outlet to the floor, you need to clean off the wax ring
 Sixth step. Close sewer hole with a wooden or other suitable plug.

Important! Sewer gases do not have the most pleasant smell. However, they are poisonous and highly flammable. Be sure to keep this in mind as you work.

Getting ready to install
The base for the installation of the toilet must be level. There are several options for the development of events, namely:
- if the floor is tiled and does not have level differences, we do not carry out any preliminary measures to level the base;
- if the floor is tiled and not even, install the toilet with chopsticks. To do this, holes are drilled in the floor, chopsticks are hammered into them according to the level, and after that the toilet bowl is attached to the chopsticks with screws;
- if a tile replacement is planned, we dismantle the old cladding and fill in a new screed, if the old one has level differences;
- if the toilet is installed in a new house or apartment without any finishing, we fill in the screed and lay the tiles.
We pay attention to pipes. Sewer from debris and various deposits, we install a tap on the water supply (if it was absent before) to shut off the water supply to the tank.
How to install a conventional toilet


As a rule, when selling, the toilet bowl and the tank are disconnected. The internal fittings of the barrel are most often already assembled, which greatly simplifies the installation process.
First step. We put the toilet bowl in its place and make marks at the attachment points.

 Marks on the floor for fasteners
 Second step. We remove the toilet bowl and drill mounting holes in the marked places.

Third step. We drive the dowels into the mounting holes.
Fourth step. Installing the bowl. We insert fasteners through special sealing gaskets. Tighten fasteners. You should not pull too hard - you can damage either the fasteners or even the toilet itself. We pull until the sanitary ware is firmly attached to the surface. From above we close the fasteners with plugs.


Fifth step. We mount the cover and seat. The manual for their assembly usually comes with the toilet, so we will not dwell on this event separately.
Sixth step. We connect the toilet to the sewer. The procedure depends on how the toilet outlet is connected.

Video - Installing a Compact toilet with wall outlet
Prices for accessories for toilets and urinals
Accessories for toilet bowls and urinals
If the release is done into the wall, we work like this:

If the release to the floor is being arranged, we do the following:

Useful advice! If the toilet connection with drain pipe is carried out with the help of corrugations, sealing in most cases can be abandoned, because. the design of such an adapter hose is itself able to provide a sufficiently tight fit.
Seventh step. We carry out the installation of the tank. Drain mechanisms, as a rule, are sold already assembled. If the mechanism is disassembled, reassemble it according to the manufacturer's instructions (assembly order for different models may vary slightly).


We take the gasket from the kit and install it in the water hole in our toilet. Install the tank on the gasket and tighten the bolts.
Fasteners are most conveniently installed like this:

Eighth step. We connect the tank to the water supply using a flexible hose. We turn on the water supply and check the quality of the system. If it digs somewhere, tighten the nuts a little. The level of filling the tank with water is adjustable by moving the float lower or higher.

We let the tank fill several times and drain the water. If everything is fine, we take the toilet into permanent operation.

Modern version installation. A special wall installation is used, in which the mechanism of the tank is hidden. As a result, only the toilet bowl and the drain button remain visible.
We mount a wall-mounted toilet for installation
Video - How to install a wall-mounted toilet on a Geberit Doufix installation
The first stage is the installation of the frame

We carry out the installation of a metal frame with fasteners. We attach the tank to the frame. The position of the frame is adjustable with brackets at the top and screws at the bottom. Frames are sold separately, have the same structure and are suitable for use in combination with any toilet.
The assembled structure will have a height of about 1.3-1.4 m. The width should exceed the width of the tank.
The second stage - we hang the tank
We perform the installation in compliance with the following recommendations:
- we place the drain button at about a meter distance from the floor;
- between the attachment points we maintain a step equal to the distance between the eyes of our toilet bowl;
- the drain pipe should be located at a height of about 220-230 mm;
- wall-mounted toilet hang at a distance of 400-430 mm from the floor. These are average values. In general, focus on the growth of future users;
- between the drain tank and the wall we maintain no more than 15 mm distance.
The third stage - we mount the finished installation

We first check the evenness of the wall with a plumb line. When deviations are found, do the following:

The fourth stage - install the tank
First we connect the tank. The drain may have top and side outlets. Almost all modern models receptacles allow you to choose between these two options.
Important! When installing the toilet on the installation, it is better to refrain from connecting the tank with a flexible hose. will last much longer than a hose. Would you like to destroy the frame skin in the near future for the sake of a five-minute replacement of such a hose? That's it!
The best way to connect is to use plastic pipes. All necessary fasteners usually come with the tank. Separately, you have to buy only a panel for the drain buttons, and even then not always.

We connect the release of our toilet bowl with the sewer. The most convenient way to do this is with a corrugation. We check the tightness of the structure. If everything is fine, turn off the water, temporarily turn off the toilet from the drain and remove the bowl to the side.
Important! The procedure for connecting the cistern to the toilet and plumbing may vary depending on the model of the product. We clarify these points in a separate order and follow the manufacturer's instructions.

Fifth stage - we sheathe the installation
To do this, we use moisture-resistant drywall with a thickness of 10 mm. It is recommended to fix it with a double layer. First we do the following:
- we screw the pins for hanging the toilet into the frame (they are included in the kit);
- close the drain holes with plugs (also from the kit) so that they are not clogged with dust and debris;
- we make holes in drywall for pins, pipes and a drain button.
We fasten the sheathing sheets to the frame with the help of special self-tapping screws. Keep the fastening step at the level of 30-40 cm. The design will have small size and weight, so there are no strict recommendations regarding the distance between fasteners.
We tile drywall with tiles or finish it in another way at our discretion.
Useful advice! Before starting to tile the box with tiles, we install a plug and a cuff in the place of the future location of the drain button. They are usually included in the kit.
Video - Installing a hanging toilet
Stage six - install the toilet

To do this, we connect the outlet of the bowl to the sewer hole and hang the product on the pins (we installed them in the previous stages of work). You can follow these steps in reverse order, whichever is more convenient for you. Tighten the fixing nuts.

Important! Previously, the tile that will be in contact with must be covered with a layer of silicone sealant (a gasket can be installed instead).
You can turn on the water supply and use the toilet for its intended purpose.

The assembly instructions for the installation remain the same. Only the order of installation of the toilet bowl changes. Work in the following order.


First step. Lock your knee firmly. Metal fasteners will help you with this.
Second step. Treat the toilet outlet with technical ointment.
Third step. Install the toilet in the place intended for it. Circle the outline of the sanitary ware and mark the holes for the fasteners.
Fourth step. Remove the toilet and install the mounting brackets from the kit according to the marking.
Fifth step. Install the bowl, press its outlet into fan pipe and fix the sanitary ware with bolts or other fasteners included in the kit.
Sixth step. Connect the tank to the drain. Installation and connection of this element is carried out in the same way as in the case of mounting a wall-mounted toilet model.


Seventh step. We bring the drain button into a pre-prepared hole in the casing, turn on the water supply and check the operation of the toilet bowl. If everything is fine, we accept the product for permanent operation.

Read our new article- and also find out what varieties there are, how to choose and install.
Video - Installing an attached toilet with a hidden cistern
Successful work!
Video - Do-it-yourself toilet installation
Installation of plumbing equipment is carried out in strict accordance with building regulations and norms. Home craftsmen often experience fear of such work. This is used by service companies that request very decent money for performing fairly simple operations. Meanwhile, fixing the toilet to the floor is quite affordable for self-fulfillment event. It is only important to carefully familiarize yourself with the existing work technologies, choose the most suitable one, and follow all the instructions exactly.
Regardless of the chosen method of attaching the toilet bowl, installation work begins with the assembly of the cistern. The device is assembled in accordance with the instructions and fixed in place intended for it. Also, before installing the toilet, the units for supplying and discharging water must be prepared. There are several methods for attaching devices. The main selection criterion is the floor material on which the equipment will be installed. Let's take a closer look at the most common methods.
Method number 1: installation on dowels
The most practical method that allows you to install the device with the least effort and time. It is optimal for use on a flat, smooth surface, since the slightest height difference adversely affects the quality of the flush. It is preferable to use this method of fastening for lightweight compact structures, since the fixation may not be entirely reliable. Plumbers advise installing equipment on a special gasket, which you can easily make yourself from old linoleum or a sheet of thin rubber. The toilet bowl is installed on the workpiece, circled around the contour with a marker. After that, with a sharp knife or just scissors, the gasket of the desired shape is cut out.
The device is fixed to the floor with dowels or special plumbing fasteners. Fasteners usually come with new equipment. It can also be purchased from specialized stores.
Now we need to markup. We “try on” the toilet bowl on the place prepared for the equipment and draw it around the contour. We remove the device. We apply a thin layer of sealant and glue the gasket on it. This design will be the most reliable, although some masters prefer to do without a substrate at all. You can start drilling holes for fasteners. As practice shows, if you stick the gasket with high quality and choose the diameter of the drill so that the holes for the fasteners are slightly larger than it, then further installation will be much easier. This is due to the fact that the rubber backing acts as a kind of "contact spot" for the floor and the device.
It happens that it is required not only to fix the toilet bowl to the floor, but also to raise it a little. This is true if there are several devices in the apartment. Then the last one in the system needs to be raised by about 3-4 cm. In this case, a piece of a two-inch board is used, which is used as a stand. It is cut exactly along the contour of the toilet and placed on the floor, a rubber substrate is placed on top of it. All this is sealed with a sealant and forms a reliable and durable structure. Holes for fasteners are drilled directly on the gasket.

Tighten the mount on the base of the toilet very carefully. Excessive force can damage the ceramics from which the device is made.
As fasteners, you can use long metal dowels or special plumbing fixtures. The latter usually come with new equipment. The quality of fixing they have is about the same, so you can use both options. We drive dowels into the holes prepared in the floor. We install the toilet and carefully screw it. It must be remembered that excessively strong tightening of the ceramic from which the device is made can be damaged.
Now you need to connect the device to the sewer. At this stage, we pay special attention to the corrugation. We generously lubricate both its edges with silicone. We insert one of them into the sewer socket, and put the second on the toilet outlet. All parts of the connection should be carefully pressed with your fingers so that the sealing is of high quality. As an additional measure, you can use metallized tape, which can be used to seal the joints. We connect the water supply and the device is ready for operation. There is a similar mounting method, which is presented in detail in the video.
Method number 2: mounting on glue
Of all the methods for fixing a toilet to the floor, this one is the easiest, but also the most time consuming. For the curing of the epoxy mixture, which is used as an adhesive, it takes about 12-15 hours. This method can only be used for smooth surface. Most often it is used to fix equipment on floor tiles. The method is very easy to perform. First, both surfaces to be bonded must be well cleaned of dust and debris. floor tiles can be sanded to make it rougher. This will improve the adhesion of the material. Surfaces are degreased with any solvent or acetone.
Preparing glue. You can buy ready-made epoxy or make your own. To do this, you need to take 100 parts of epoxy resin ED-6, 200 parts of cement, 20 parts of solvent or plasticizer and 35 parts of hardener. The order in which the components are added to the solution is important. First, the resin is heated to 50C, a solvent is added to it, then a hardener, and at the very end - cement. The composition must be constantly stirred to form a plastic, homogeneous mass.

To keep the toilet securely in place, flooring prepared: cleaned for better adhesion and lubricated with a small layer of glue. Excess composition, speaking under the weight of the equipment, is immediately removed with a damp cloth.
Properly prepared adhesive mixture can be used within one and a half hours. We apply it to the base of the toilet bowl so that the solution covers an area of at least 20 square meters. cm, and the layer thickness was at least 4 mm. We install the prepared equipment in the right place, combining the sewer socket with the outlet, and press it to the floor with force. After that, the device is left for at least 12 hours. This period is necessary for the curing of the adhesive composition. During this time, it is not recommended to even touch the toilet. Then we connect the equipment to the water supply and sewerage.
Method number 3: taffeta mount
Most often, this method is used to install toilets on a wooden floor. Taffeta is a pad of durable wood to which equipment is attached. The thickness of the board from which the element is cut, corresponding to the shape of the toilet support rack, should be 28-32 mm. To protect the part from dampness, it must be carefully treated with drying oil. For reliable fixing to the floor from the bottom of the taffeta, an anchor is mounted. The simplest option is nails driven in a checkerboard pattern, which should protrude from the part by 2-3 cm. The recess prepared for installing the toilet is poured cement mortar. Taffeta is sunk down into it with anchors. As a result, it should be flush with the floor.
After approximately 12 hours, during which the mortar is completely dry, you can proceed to fixing the equipment. The device is fixed with screws. Rubber washers must be placed under their heads, which will prevent possible damage to the toilet frame when tightened. Experts advise lubricating the screws with grease or graphite before work, so that later, if necessary, they can be easily unscrewed. Wood taffeta can be replaced with a rubber backing. It is cut from sheet material 5 to 15 mm thick, possibly even from an old rubber mat. Such a substrate should be 1-2 cm smaller than the toilet support column.

Mounting the toilet on taffeta involves the use of a special wooden insert. The diagram shows all the elements of such a mount.
There are various ways to attach a standard toilet bowl to the floor. They differ significantly in complexity and time spent on installation work. It is important to choose the right fastening method. It depends on the material from which the floor is made in the room. Installation work can be carried out independently, but if there is no experience or desire, it is better to turn to professionals. They will quickly and competently carry out all the work, guaranteeing a long and flawless service of the new equipment.
Replacing and installing a toilet in a bathroom does not happen so often. This usually happens along with the repair of the entire room and the apartment as a whole. Therefore, caring owners rarely undertake such a task that is so difficult at first glance. In fact, there is nothing complicated in installing a toilet bowl with your own hands, especially since you yourself will do it for free, while saving family budget. It is enough to carefully consider the action plan for preparing the installation, choose the right reliable tool and arm yourself with the necessary knowledge base for installing the installation and connecting the toilet.
Preparatory work
Installing a toilet properly begins with careful surface preparation. If the bathroom is done new renovation and the floor is tiled, consider yourself lucky and you can install the toilet with your own hands directly on it. If the replacement of the toilet is not related to the repair, then you should first dismantle old toilet and properly prepare the floor for the next installation.
Dismantling step by step looks something like this:
- Turn off the cold water so that the toilet bowl does not fill up when draining.
- Drain any remaining water from the tank by pressing the drain
- We unscrew the hose connecting the tank and the cold water pipeline.
- We unscrew the fasteners of the toilet bowl correctly to remove it. If the toilet is old, you may need a wrench or solid oil to make it easier to unscrew the old rusty fasteners.
- After dismantling the tank on our own, we proceed to the toilet bowl mounts. V Soviet times toilet bowls were often screwed to wooden board screws, which was then concreted. Also, the toilet was installed on a sand-cement hill. In any case, you may need a chisel, spanners and a hammer. Carefully remove all traces of cement, screws and dowels.
- Slightly turning and shaking the drain, we grind off all the water remaining in it and carefully remove the sanitary ware.
- Carefully close the sewer hole remaining after dismantling to prevent toxic fumes from escaping to the surface. This can be done with a wooden or rubber plug wrapped in cloth.
After the old toilet is properly removed, you need to decide how to level the surface under it. If he stood on a wooden board in a recess, the board can be removed, and the recess can be concreted and reinforced with a sheet of metal, and then the toilet can be mounted with your own hands.
If the faience piece of furniture was on a hill of sand-cement mixture, it must be disassembled with a chisel and a hammer until the surface becomes even. A milling cutter with a metal brush can be useful.
Varieties of toilet bowls
Toilet bowls differ not only in shape and color, but also in the method of installation, the shape of the bowl and other parameters. Let's take a closer look at some of the design features of toilet bowls.
There are models with a funnel-shaped bowl, a bowl with a shelf or a visor type and with an inclination of the back wall. Installation of toilet bowls of different configurations may differ slightly in terms of design, but step-by-step instruction do-it-yourself installation of toilet bowls is the same.
According to the installation method, toilet bowls can be divided into floor and hanging toilet bowls. There is also a hybrid version, which is also called the floor attachment. A feature of such a toilet is that its bowl is on the floor, like a floor one, but the cistern and all sewer communications are in a false wall.
The advantages of a wall-hung toilet are a hidden cistern, compactness and easy access to the floor underneath. On the other hand, a hidden cistern requires the installation of false panels and vice versa reduces the area of the bathroom.
One of the most convenient types is the oblique outlet toilet. The wide mouth prevents clogging, and the stability of the design does not require fastening of the bowl. Installing a toilet with an oblique outlet is possible with your own hands, you can of course pay for the services of a master and wait for the final result, but many people decide to take matters into their own hands and do everything for free.
Necessary tools and materials
Before installing the toilet, stock up on the necessary tools so that they are at hand at the right time. The list of tools can include:
- A powerful electric drill or hammer drill with a set of drills for concrete or tiles.
- Hammer.
- A set of open-end wrenches or an adjustable wrench.
- Roulette.
- Pencil or marker.
- Screwdriver.
- Pliers.
- FUM tape.
In addition, you will need certain consumables and accessories:
- Corrugation.
- Flexible hose.
- Sealing silicone with gun.
- Toilet pad.
Step by step instructions for installing a new toilet
When all preparatory work for the installation of the toilet bowl are made correctly and the materials are prepared, make up detailed plan step by step how to install a toilet with your own hands.
The installation of a toilet bowl of a traditional floor design can be done independently in the following ways:
- On a wooden stand
- On epoxy
- on dowels
Mounting on a wooden base step by step. If the replacement of the toilet bowl is included in the general plan for repairing the premises, then it is best to install it on a wooden pillow using fasteners, and subsequently concrete it correctly. When pouring the screed, the wooden base treated with drying oil is placed on the site of the proposed installation of the toilet bowl. In this case, the dimensions of the plumbing should be taken into account. The board is filled with mortar to the top and subjected to prolonged drying.
Installation of the toilet step by step with epoxy glue. Fixing the toilet bowl with epoxy glue will be a great option if the bathroom has a perfectly flat floor:
- The surface must first be degreased with a solvent or any other substances.
- You need to process the base of the toilet.
- Notches or marks are made on the floor with a pencil.
- Next, the glue must be carefully applied to the sanitary ware or floor at several points, as a rule, there are four of them. After that, the toilet is pressed against the surface for 12 hours.
Installing the installation of the toilet step by step on the screws. If the base of the structure has holes for fasteners, it is advisable to install the toilet on screws or dowels:
- We place the toilet as close to the wall as possible or in the way it will stand in the room.
- You can pre-connect the corrugation to the sewer system with your own hands, so that you can see how far from the wall the plumbing item should be.
- Through the holes at the foot of the bowl, we correctly mark with a pencil or felt-tip pen the place for drilling holes for dowels.
- Set the toilet aside and drill holes.
- We mount fasteners.
- We install the toilet with our own hands so that the fasteners pass through the holes in the toilet.
- We thread a rubber or plastic washer-gasket so that the pressure of the bolts does not destroy the plumbing.
- We tighten the bolts.
It is worth mentioning that some types of toilets are quite stable. Installing the installation of a toilet with an oblique outlet step by step does not require drilling and doweling.
A completely different principle of installation and installation of a hanging toilet bowl. All sewer communications are hidden in the wall. For reliable fastening of the hanging toilet, a metal frame is used, embedded in the wall. On it, the installation and installation of the hanging toilet is carried out step by step, and the hidden cistern and sewer and water hoses neatly placed inside the structure, which is then closed with drywall or lining on its own.
The wall hung toilet has a stylish appearance and a higher cost. If you figure it out, connecting a toilet to a wall-type sewer is not much more complicated than a conventional floor installation. You can easily learn how to install wall hung toilet on one's own.
Do-it-yourself toilet installation installation: video
To learn in detail and clearly see how to install a toilet bowl with your own hands, we offer you a video. After watching the video tutorial, you can compare the characteristics of your toilet bowl and independently connect the toilet bowl with your own hands step by step.
Do-it-yourself installation of a toilet bowl on a tile
The most difficult is the correct installation of the toilet on the tile for several reasons. First, no one wants to ruin a new tile. Secondly, this material can be quite brittle, so it requires especially careful drilling. Thirdly, the faience toilet bowl must be securely fixed on the tile, since its surface is smooth and the design can move.
The presented video shows the correct installation of the toilet bowl with our own hands, it is done exactly on the tile step by step, so after carefully watching the video tutorial, we will easily learn how to install the toilet bowl correctly.
- The video begins with a story on how to install the corrugation on the toilet. We can start the same way or change the order a bit.
- The video indicates that you need to measure the dimensions of the room in order to install the toilet exactly in the middle. It concerns separate bathroom. If you have a shared bathroom, before installing the toilet on the tiles, we need to first place it in the way it will stand in the room.
- We install the toilet on the tile, put it against the wall, circle the base with a pencil, as you can see from the video tutorial on how to install the toilet on the tile. We outline the holes for the fasteners in the same way.
- Turn over and inspect the toilet.
- In places where holes will be drilled, notches must be made so that the drill does not play on the tile and does not damage it.
- We fix the drill desired diameter into the puncher and start drilling first in the mode without impact. Only after the tile has been fully drilled can the concrete floor impact mode be used.
- We insert dowels and drive in screws.
- We install the toilet with our own hands, thread the plastic gaskets and tighten the bolts.
Connecting the toilet to the sewer with your own hands
After a secure fastening is made, you can proceed to connecting the toilet bowl to the sewer system step by step:
- First you need to install a corrugation or a plastic adapter pipe with a slope of 45 degrees. The edges of the corrugations can be pre-lubricated with silicone grease for trouble-free installation. If the corrugation is located slightly to the side relative to the socket of the sewer pipe, it is necessary to connect the toilet bowl to the sewer with an eccentric. Any gaps or irregularities between the corrugation and the riser can be corrected with the help of a FUM tape with your own hands.
- Drain tank connection. We place the drain tank on the toilet bowl, having previously placed sealing gaskets at the points of connection of the water hoses.
- We connect the flexible hose with one end to the inlet to the drain tank, and the other end to the water outlet, as shown in the video.
- Checking the connection of the toilet to the sewer riser for leaks.
- You can seal the base of the toilet with silicone sealant.
When connecting a toilet bowl, special attention should be paid metal parts such as fasteners, screws and bolts. Over time, from moisture, they can become covered with a layer of rust, which is not aesthetically pleasing and impractical. If necessary, it will be difficult for you to unwind them. Therefore, pre-treat them with grease or other lubricant.
One of the controversial issues is the installation and connection of the toilet to the sewer in wooden house. In fact, innovative waterproofing methods make it easy to equip rooms with high humidity in a wooden house. Can be used on bathroom walls and other rooms wooden house special water-repellent agents and are not afraid of wood swelling.
Another feature of a wooden house is shrinkage several years after construction. To prevent it, the floor under the toilet in the bathroom of a wooden house should be further strengthened with reliable structures.
Installation cost
If it is necessary to replace or properly install a toilet bowl, the first thing that interests us is how much it costs to install a toilet bowl. The cost of installing a toilet bowl by an experienced master in the capital is at least 1,500 rubles. This does not include the cost Supplies- screws, corrugations, lubricants and the cost of dismantling if necessary.
You will have to buy them anyway, but if we have everything necessary tools for installation and connection of the toilet to the sewer, the cost of all work is reduced exactly by the cost of ordering a qualified craftsman. You can perform many operations for installing a toilet bowl for free, unless of course you do this business yourself.
Video tutorial on installing a toilet
To consolidate everything you read and clearly see how the toilet is installed with your own hands, you can watch the video tutorial.


Chicken in kefir - recipes for marinated, stewed and baked poultry for every taste!
Simple Chicken Recipe in English (Fried) Recipes in English with translation
Chicken hearts with potatoes: cooking recipes How to cook delicious chicken hearts with potatoes
Recipes for dough and fillings for jellied pies with mushrooms
Stuffed eggplant with chicken and mushrooms baked in the oven with cheese crust Cooking eggplant stuffed with chicken