Capital finishing of the balcony is often associated with the need to raise the floor. Most often, during construction, the balcony base is below the level of the rooms in the apartment, and the resulting threshold prevents movement between the rooms. Of course, it is much more convenient to go out onto a balcony or loggia flat surface than jumping over ledges or rapids and tripping over them. But not everyone knows how to raise the floor on the balcony. Let's see how this can be done.

The balcony and loggia are undoubtedly part of the apartment, and therefore require good and quality repair. Not only the fences of this place are being finished, but also the draft bases, which are often represented by cold concrete slabs. By the way, this kind of base, if the balcony is open, is constantly tested by atmospheric phenomena. Usually, to protect the floors, the balcony is glazed, but the base still remains cold. And in the process of raising the floor, it can be thoroughly insulated. Yes, and by removing the difference in floor levels between living quarters and those located on the street, you can protect residents from falls, as a result of which you can get injured.

Also, raising the level of the balcony floor is necessary to level the draft base. Indeed, in the case of finishing sometimes materials are used that are quite demanding on the evenness of the sheathed surfaces.

In general, raising the level of the floor on the balcony is not so difficult, and therefore you can cope with the task yourself, without the involvement of craftsmen. In this case, it will also turn out to save a lot of money, which can be useful for the purchase various materials for finishing.
On a note! The average height of the floor on the balcony is about 10-12 cm. Thus, under the final floor, a niche will be sufficient for laying the insulation.

4 ways to raise the floor on the balcony
You can raise the floors on the loggia or balcony in different ways. All of them differ in the ways of creation, the materials used, as well as the speed and specifics of the work. Among them are those that have a significant load on concrete slabs and cannot be used in case of unreliable structures, and there are those that are suitable for use in any case. Consider 4 main ways to change the level of floors.

On a note! If the loggia or balcony will be separate room, then a small - up to 5 cm - difference in height between the floor in them and the rooms is allowed. If the balcony is a continuation of the room, then there should be no drops.
Cement screed
The screed based on sand and cement is highly durable, reliable, and if it is poured in accordance with all the rules, it turns out to be very even and ready for laying any type of topcoat.
On a note! When arranging cement screed you can think about organizing an additional floor heating system on the balcony. It's about using warm floors. They will not harm this type of screed, but they will allow you to stand on the balcony with comfort - your feet will not freeze even in winter.

The main disadvantage is its considerable weight. All components of the mixture used are quite heavy and the screed will have a strong effect on the base of the floor. Thus, it cannot be used in all cases, especially when it comes to a significant thickness in case of a large difference between the level of the floor and its desired height. Cement screed can only be used when there is confidence that the floor will accurately withstand the mass cement mixture or if the screed layer is small. In general, the thickness of the screed should not be more than 10 cm, if you need to raise the floors by great height, it is recommended to choose another method.
Attention! Pouring cement screed can only be done in the warm season. In winter, it cannot be equipped due to low temperatures - remember that the mixture contains water.

Also, a feature of the screed is the fact that its drying time is large - to walk on such a floor and produce further work possible only 28 days after the arrangement of the screed.
Screed with expanded clay
This is a dry version of the screed that does not need to dry for a long time. Floors can be leveled and raised fairly quickly using this method. The basis in this case is expanded clay, which is poured onto the waterproofing layer. Sheets of any leveling material are laid on top of it. It can be drywall, gypsum fiber, plywood, chipboard and other materials. The sheets are fixed to each other at the required floor level, relying on a layer of expanded clay.

The advantage of such a screed is ease of installation, lightness (can be used for floors of any strength), speed of work - wait until the screed sets and dries in order to continue others Finishing work, do not have to. This option is also suitable if you need to raise the floors to a considerable height - up to 20 cm.
For filling the base, it is recommended to use fine or medium expanded clay, large is undesirable. Sometimes this material can be replaced by fine-grained slag. Before laying the upper leveling layer, it is recommended that the bulk material be well compacted so that it does not shrink.

On a note! If expanded clay is used as the bulk material, then it is not necessary to lay an additional layer of insulation, since this material itself is able to retain heat in the room.
If you need to repair the floor on the balcony, and you do not know or cannot decide how to level and finish the surface of the balcony or loggia, then do not rush to call the master, because even a beginner can do this amount of work, while opportunity to save.
Follow the step-by-step instructions in this article, and you will see that this type of work is very simple and does not require extra skills.
Which material to choose depends on whether the balcony is glazed, insulated or completely open. For each option, the material is selected individually.
For a glazed non-insulated balcony
If your balcony is glazed, but does not have heating systems and is not planned in the future, then it is necessary to select moisture-resistant materials. Despite the fact that the balcony is closed from precipitation, condensation will form evenly during temperature changes.
In this case, the following types of materials are suitable for alignment:
- moisture resistant plywood;
- drywall;
- gypsum fiber sheet (GVL);
- cement-bonded particle board (DSP);
- oriented strand board (OSB).
- moisture resistant laminate;
- tile;
- linoleum;
- carpet.
For an open balcony
by the most difficult case when choosing materials is due to constant exposure to precipitation and low temperatures in winter.
In this case, the following materials are suitable:
- oriented strand board (OSB);
- cement-bonded particle board (DSP).
Finishing materials:
- terrace board;
- porcelain stoneware;
- ceramic tile.
Note!
The balcony slab must not be heavily overloaded. If you plan to raise the floor by more than 5 cm, it is better to use lightweight materials and structures such as wooden beams(lag) or dry screed instead of cement.
For a glazed and insulated balcony
If your balcony or loggia is glazed, has or will have in the future a radiator, underfloor heating system or one of existing systems constant heating, then you can use the materials that are used in leveling and decorating the premises in the apartment.
Subfloor and leveling methods
The most popular and common methods for leveling and creating a subfloor on a balcony or loggia are described below.
Cement strainer

A cement screed can be made provided that the layer is from 3 to 5 cm. If the height of the floor screed on the balcony is less than 3 cm, there is a possibility of cracks, and if more than 5 cm, then there is a large load on the balcony slab.
How to level the floor with a cement screed with your own hands:
The balcony area in this example is 3.7 square meters. To obtain a screed with a height of 3-4 cm, it took 6 bags of 40 kg of sand-concrete.
The solution is kneaded with a perforator with a mixer attachment.
- We clean the surface of dust and debris.
- The first step is to make beacons from the solution using a trowel or other convenient tool.
It is necessary to put a hard surface on the beacons (pieces of drywall, ceramic tiles or other similar material at hand).
Next, using building level we make beacons of the same level among themselves and leave to dry for a day. This is necessary in order to align one beacon relative to the other horizontally. Thanks to this action, the floor on the loggia or balcony will eventually be even.
In this example, the beacons are at a distance of about 90 cm from each other, since a meter long level was used.

- After the beacons have dried up, we connect them with a solution to each other using a trowel and align this solution horizontally using the rule. Thus, lighthouse lines were obtained. Let it dry again overnight.


- Next, we distribute the solution between the myakovy lines and, as a rule, level the entire surface. Where the solution had time to harden, but it turned out not evenly, then you can moisten the surface with water in this place for better alignment. Where the solution was not enough, it must be added and leveled with a rule. The main thing is that in the end the floor of the balcony is even.


- On the third day, using a spatula, carefully remove the pieces of material from the lighthouses, and seal the remaining recesses after them with mortar and level them with a trowel and a rule. It remains to wait for complete drying and you can start finishing the floor on the balcony. Approximate drying time of the screed is 25 days (7 days for every 10 mm layer).

Draft floor on logs
First you need to determine how high the floor will rise. It is worth considering that sheets of insulation are usually installed under the logs.
For safety, the distance from the future finishing floor to the window sill should not be 1-1.1 meters.
In this example, a bar with a section of 50 by 70 mm is used.
Instruction:
- We cut the timber along the width of the balcony or loggia. Over precision is not required, you can safely cut the timber in this way: the width of the balcony is -2 cm.

- Lay the cut bars on the floor. The distance between the crossbars is not less than 40 cm and not more than 60 cm.

- On each beam we make half of two holes for attachment points. The distance between the holes must be at least 80 cm.

- After all the diameters are drilled, it is necessary to drill concrete through the timber.

- Further, through the beam, anchors are inserted into the holes and tightened. The depth of the hole should exceed the length of the fastener by 2-3 cm, otherwise it will not be possible to insert it entirely.

Note!
Anchors are selected according to the width of the balcony slab. Be very careful about this issue so that when drilling holes for anchors, you do not surprise your neighbors from below in the form of a hole in their ceiling.
- At the next stage, longitudinal logs must be laid on the fixed cross-sections. The distance between the longitudinal logs should not exceed 45 cm. For most loggias and balconies, it is enough to put 2-3 logs. From the wall of the room, the log can be moved up to 10 cm, and from the wall of the parapet up to 20 cm.

- After the longitudinal logs are laid with the help of a level, it is necessary to find the highest point and from there begin attaching the log to the cross section, while the central beam can be put on its side for now, and high point is located on the extreme lags.
After fixing the beam on the highest section, we fix the same log to the cross-sections in the remaining places.
In places where it is necessary to raise the log in level, we put mounting wedges on both sides and fix it with a self-tapping screw. If the width of the longitudinal log is 7 cm, then the self-tapping screw must be taken 1-2 cm more or the 7 cm self-tapping screw should be slightly drowned in the log during installation.

- After one of the beams is leveled and fixed from it, the opposite lag is leveled and fixed with the help of a level. It is important to align the extreme lags with each other, and not from the central to the extreme. If the width of the balcony or loggia is small, there may be no central log.

- When the extreme bars are set to the level, now it is necessary to adjust the central bar to their level also with the help of wedges and secure with self-tapping screws.

- Further, if desired, the gap between the wooden crate and the floor of the balcony is insulated with a mineral veil.

- After the cotton wool is laid, our entire structure must be covered with sheets of plywood or chipboard. The plywood will be screwed to the timber with self-tapping screws, and in order not to miss later, it is necessary to project the center of the timber onto the wall by marking it with a pencil.

- Next, we fasten chipboard or plywood to the timber with self-tapping screws 41 mm long, focusing on the visible center and the mark on the wall.

Note!
The correct subfloor should sag between the lags by 2-3 mm with a load of 80 kg.

In addition to the text version of the instructions, we recommend that you familiarize yourself with the instructions in video format, where the installation is shown in a more detailed form with an explanation of the nuances.
Dry screed
Floor preparation. It is necessary to clean the floor of debris and seal the cracks, if any. mounting foam.

Soundproofing. Sounds are mainly transmitted over solid parts and details. To prevent sound from the walls from being transmitted to the floor, it is necessary to leave a gap between the dry screed and the walls. Along the entire perimeter of a balcony or loggia, we lay a soundproof tape made of polyethylene foam. In addition to protecting against sound, such a gap will not allow a clean floor to warp when it expands from heat. 
Waterproofing. A vapor-moisture insulating layer of polyethylene film with a thickness of 80 microns is laid on the base of the floor. Along the edge of the walls, the film should rise above the level of the future floor by about 6-10 cm. The edges of the film are fastened with masking tape or tape. 

The first layer of expanded clay is laid. Fraction from 1 to 5 mm. In this case, the floor rises by 17 cm. Since the expanded clay layer should be at least 3 cm and not more than 7 cm, we will make 2 layers of expanded clay and one intermediate layer of gypsum chipboard. 
Installation of guides along long walls by level. Aluminum rules 2 cm thick serve as guides. 
 Leveling the surface between guides using a rule. You can make it yourself right size from scrap materials, such as plywood or chipboard. In order to move around the expanded clay and not spoil the finished surface, we put small pieces of plywood, chipboard or GSP.

We remove the guides, and smooth out the remaining irregularities. The first layer of expanded clay is ready. 
The thickness of the first layer of expanded clay was 7 cm. If it was necessary to raise the floor by 9 cm, then you can close the GSP screed and on this the draft floor on the balcony or loggia is ready. In this case, it is necessary to raise the floor by 17 cm, and this requires another layer of expanded clay, so the GSP will serve as an intermediate layer. 

We proceed to laying the intermediate layer of GSP. 

We proceed to laying the second layer of expanded clay. We pour expanded clay into the places where the guides are installed. The guides are leveled in the same way as when leveling the first layer. 

We fill the space between the guides with expanded clay and level the surface in the same way as the first layer. 

The tie must be closed. Cut out the elements from the GSP. We put the first element and firmly press it against the wall. So that there is no gap between the plates, we glue the joints and report the remaining elements. We fasten the joints with self-tapping screws every 5-10 cm. 


After installing the floor elements from the GSP, it is necessary to cut off the excess edging tape and film. 

Paul is ready. On such a floor, you can lay any coating - linoleum, carpet, laminate or tile. 
In addition to the text version of the instructions, we recommend that you familiarize yourself with the instructions in video format, where the installation is shown in a more detailed form with an explanation of the nuances.
Bulk method
Step-by-step instruction:

The drying time of the self-leveling floor on the balcony is 1-3 days, depending on the temperature conditions and the thickness of the layer.
Finishing Instructions
Below are step-by-step instructions for finishing the floor on a balcony or loggia with your own hands with the most popular materials.
Laminate

- The first step is to measure the distance between the walls of the balcony and mark the required distance on the sheets of laminate.
It is necessary to make a small gap between the wall and the floor covering. This is done in the event of a change in the size of the laminate due to moisture and temperature changes. The laminate should be cut at a right angle, otherwise it will not be possible to lay the lamellas evenly along the walls. In this case, for cutting the laminate is used electric jigsaw.
You need to cut at a low speed to avoid the appearance of notches, and when approaching the edge, the jigsaw must be driven even more slowly to avoid chipping.


- The next step is to lay a substrate on the surface of chipboard or plywood. The substrate spreads on the floor cleared of construction debris.

- We fix the substrate to the wooden base with staples and construction stapler. This is necessary so that during the laying of the laminate, the substrate does not fidget and does not move. Alternatively, you can use double-sided tape.

- After fixing the substrate, install the first piece of the laminate. In this example, one piece of laminate covers the entire surface of the balcony, as a result, the seams are perpendicular long walls balcony.

There are other ways to lay laminate: diagonally, longitudinally, herringbone or squares. In these cases, more finishing material will be required and there will be more undercuts. - Next, we move on to installing the following elements. The connection technology depends on the method of processing the ends of the products. In this example, there was a lock that snaps into place with a slight pressure on the lamella.

- Difficulties may arise in the area. In this place it is necessary to cut the lamella under the recess. We measure the length and width of the notch, transfer it to the lamella and cut it out.


- The last element of the laminate is laid after preliminary cutting. On the last lamella, the cut must be made along. It's okay if it turned out a little uneven, since this area will be closed with a plinth, and small defects will not be noticeable.
- Paul is ready.


You can make a linoleum floor on a balcony or loggia with your own hands as follows:

We proceed to the installation of skirting boards. They hold the linoleum in place and prevent the canvas from moving during operation.
- We remove the protective strip from the plinth that closes the cable channel.
- We attach the plinth to the wall and, using a perforator, make holes for fixing through the plinth.
- We insert the dowels into the holes and fix the plinth with a screw or a self-resolving screw.
- We put in place the strip that closes the cable channel.

Tile

In this example, the standard way of laying tiles is considered. Laying begins along the parapet from the far corner of the balcony slab.
First you need to make a markup, for this, attach the first row of tiles to the balcony slab and make a markup with a pencil.
Sequencing:
- The surface is cleaned of dust and debris.
- We mix the adhesive composition according to the instructions on the package. The solution is kneaded using a perforator with a mixer nozzle.

- The adhesive composition is applied to the selected area up to 3 mm thick. At one time, no more than 1 sq. m. area on the floor so that the glue does not dry out. The surface is leveled and excess glue is removed with a notched trowel.

- We proceed to the installation of tiles. Glue is applied to the back of the tile and leveled with a notched trowel. Thickness up to 5 mm.

- We lay the tiles to the prepared area and press down evenly. We control everything by level.
- By analogy, the following tiles are laid. Plastic crosses are inserted between the tiles for evenness of the seams.
Porcelain stoneware tiles are laid seamlessly to flooring had a holistic view.
- Leave to dry for a day, after which, if desired, you can seal the seams with grout.
Terrace board for an open balcony

Preliminary work:
- Lathing installation. Before installation, it is necessary to treat all wooden products with drying oil or an antiseptic.
- The next step is cutting the bars to size.
- Next, we lay out the bars on the surface of the balcony slab and align them in a horizontal position so that they all converge in the same plane. If necessary, the bars are lifted on plastic or wooden linings.
- The lag is fastened with anchors or dowels with self-tapping screws.
- For closed balcony you can lay the insulation between the lags and cover with a film, and then carry out the installation of the terrace board.
- To get used to the terrace board laid out on the balcony and left for 2-3 days. During this time, the coating will acclimatize and will be completely ready for installation.
Installation of a terrace board on the floor of an open balcony:

- We lay the first element along the wall and fix it with self-tapping screws in the pre-counterbored holes;
- Installation of a hidden fastener for a terrace board. It is installed on a beam in the groove of the board and is fixed with a self-tapping screw. Fasteners are mounted on each log;
- The following panels are attached in a similar way.
- When joining the end sides, the joints must be on the logs and fixed with mounting clips;
- The extreme board is fixed to the lags with self-tapping screws, just like the first one;

When installing, it is necessary to leave a gap between the wall and the floor covering. The tree has the property to expand and close laid plates begin to interfere with each other, warp and swell, tearing out the fasteners.
Most apartment owners refuse an open balcony and strive to glaze and insulate it, using the best technologies that exist today. It is not at all difficult to make a floor on a loggia on your own. You should approach this professionally, observe all stages of work, and then the floors will be warm, beautiful and will last a very long time. Consider how to make the floor on the loggia with your own hands.
Material selection
It is difficult to imagine a cozy loggia that does not have glazing and insulation. In this way, the indoor climate is improved, suitable for indoor flowers or for exercising outdoors. Simple glazing can increase the temperature on the loggia by about 5-7 ° C, and if the apartment is located on the south side - by about 10-12 ° C. The insulated loggia is another full-fledged room of the apartment.

If you decide to combine the loggia and the next room, then the walls and floor should be well insulated. When choosing a material for the floor on the balcony, you should analyze all the options available and stop at the most suitable one.
You can insulate the floor different ways. For example, laying the "warm floor" system.
But before that, you need to perform other types of work:
- floor leveling;
- thermal insulation;
- fire protection.
Then you can start doing floor heating and finishing.
Depending on the capabilities of the owners and the characteristics of the premises, the materials necessary for all stages of floor installation are selected.
Should be considered:
- features of the balcony device;
- degree of insulation;
- type of glazing;
- financial opportunities;
- the planned temperature after insulation.
Even if insulation and glazing are not performed, the floor installation on the balcony involves the following steps:
- surface leveling. Knowing how to fill the floor on the balcony, this will not cause any particular difficulties;
- clean finish.
Profitability, reliability and beauty are the components of finishing the balcony floor.
The building materials from which it is made must withstand:
- the influence of the external environment;
- sudden changes in temperature;
- rainfall and weather surprises.
Leveling the floor on the balcony
Typical houses have poor finishes and curved surfaces. Since almost all Decoration Materials must be laid on a flat surface, then the floor on the balcony should be leveled. It will also prevent the accumulation and ingress of water into the room.

An additional load should not be created on the base plate, so the installation of the floor on the balcony should be made of lightweight materials. Regardless of what finishing materials will be used, do-it-yourself installation of the floor on the balcony is carried out according to the following technology:
- removal of old finishes;
- getting rid of rot and dampness;
- sealing all existing seams and cracks;
- treatment with an antifungal compound;
- alignment and sealing;
- priming the surface or preparing the base for final finishing.
You can level the floor on the loggia in different ways:
- Standard cement screed without insulation and any fillers.
- Dry screed with insulation with expanded polystyrene or expanded clay;
- Dry and semi-dry screed with insulation.
- Alignment under the "warm floors" system.
- Wooden floor on logs with or without insulation (details: "").
- Under linoleum or laminate, alignment can be done in any way.
- Screed under the tile.
Expanded clay layer for good insulation must be at least 3 cm. Together with expanded clay, it is allowed to use dry sawdust, but this is done only if the floor is sealed on the glazed loggia.
The screed is made from a mixture of sand and cement, the ratio of which depends on the proportions of water and sand. It is also necessary to take into account the brand of cement. There is little water in a semi-dry screed, and cement and sand should be mixed well. The liquid solution will crack when dried, especially if the temperature is high or low. Thick mortar is not easy to lay.
The consistency of the floor leveling mortar should be like thick sour cream. Such a solution will completely cover the expanded clay, and if the mixture is very liquid, it may float.
A dry screed is a laid gypsum-fiber or fiber-cement sheets on a surface well-leveled with expanded clay. The joints of the plates are glued and fixed with self-tapping screws with an interval of about 20 cm. Then foil polyethylene foam is laid, and a laminate or linoleum is laid on it.
Installation of a wooden floor on logs
If it is difficult to choose materials for the floor of the loggia, it is better to use wood. It is a natural and durable material. For finishing the floor in houses, wood is used longer than other finishing materials.
From wood, you can make not only the floor, but also the facing of the walls of the balcony. You also need to choose how to paint the floor on the balcony.

The usual do-it-yourself floor installation on the balcony is performed using the following technology:
- The surface is cleaned and prepared for leveling.
- A simple screed is performed.
- When the screed dries, waterproofing the floor on the balcony is performed. For this
the waterproofing film is spread. - Lags are laid and fixed to the base.
- Expanded clay or other insulation is poured.
- The main layer or base is laid for the final finish.
When performing the floor on the logs, it is necessary to take into account the height of the threshold balcony door and a layer of insulation. The size of the beam is selected individually, since the height of the floor on the balcony can be different. For example, if you plan to lay insulation in several layers, then you need to raise the height of the floor. The crate of the timber is made directly on the concrete slab. It is recommended to lay a waterproofing film.

You need to set the logs on the balcony with an equal distance from each other and better across the plate. This will make it easier to adjust the horizontal level of the bars. Expanded clay is poured into the space between the lags.
Finishing boards are nailed to the logs. You can use a ready-made wooden shield and fix it with a plinth.
Do not forget about the existence of a threshold, which should also be beautifully designed (more details: ""). He will hide the gap and smooth out the height difference between the floor of the balcony and the living space.
Balcony laminate flooring

If it is planned to mount the "warm floor" system, it is necessary to choose a laminate with the appropriate marking. However, such material will cost more.
Linoleum floors
The floor on the loggia is also being finished with the help of insulated linoleum. This flooring is practical. Unlike simple thin linoleum, it has a greater thickness and a fibrous base. The price of insulated linoleum is higher, however, the difference is obvious. The floor will be much warmer than when using ordinary linoleum, it will be possible to walk on it barefoot.
The basis for linoleum should also be flat and insulated. Thin linoleum can also be made warm by insulating the base or using the "warm floor" system.

It would be ideal to put a whole piece. If the floor on the balcony is of a complex shape, then the widest place and length are measured, 2-5 cm are added to these dimensions for allowances. Having purchased linoleum of the right size, it should be spread at home so that it evens out. After a few days, the shape of the sheet is adjusted to the floor of the loggia with a sharp knife. The edges should be pressed down with something heavy.
If suddenly an extra 2-3 cm was removed, do not worry, these flaws will be hidden by the plinth. The quality of linoleum laying will depend on how good the plinth fixings are. It is recommended to use collapsible skirting boards with a flexible edge. It perfectly bends around surfaces at the joints.
Under the plinth you can hide:
- communications and wires;
- landline telephone wire;
- electrical cable;
- internet cable;
- antenna cable for TV.
It is necessary to measure the length of the plinth taking into account the connection with a fixing decorative corner. After laying the plinth on all sides, the corners are assembled. All corners must be pressed well and fixed to the wall. The plinth along the entire length is also fixed to the wall with self-tapping screws with an equal pitch.
And how to make a floor on a loggia from pieces of linoleum? This is not an easy task. To join pieces with perfectly even edges, the method " cold welding". To heat the adhesive that is applied to reverse side linoleum, cardboard or other dense material is placed under the joint. Then the joint must be heated either with a building hair dryer or with a warm iron so that the glue “grabs”. The glue is very difficult to remove, so it should not show through the seam. When the glue has done its job, the tape and cardboard are removed. The result is a smooth seam.
Floor insulation on the balcony
Consider how to make a warm floor on the balcony. To get a high-quality insulated floor, all seams and cracks should be sealed very well. Before you insulate the floor on the balcony with your own hands, it must be done good waterproofing floors on the loggia. For these purposes, it is easier to use mounting foam, silicone or sealant. You need to work carefully so that everything looks beautiful. It is necessary to remove the remaining foam, clean up the smudges of silicone.
There are two layers in the construction of a warm floor:
- Draft with laid heating system;
- Clean with finishing.

As top coat can choose:
- marble slabs;
- porcelain stoneware;
- tile;
- carpet;
- parquet board;
- laminate;
- linoleum.
The height of the main layer for insulation by any kind of "warm floor" system should be 10-15 cm. The threshold will hide the difference in levels.
It is better to entrust the installation of underfloor heating to specialists. To save money, you can do the screed yourself.
Tiles for finishing the floor of the loggia
On an open loggia, finishing from any type of tile would be ideal, especially if it is based on a cement screed. The choice of color, pattern, texture is huge. Most often in the decoration you can find tiles, ceramic tiles and porcelain stoneware. A floor made of such materials will be reliable and durable, of course, if you do not drop heavy objects on it. The tile floor has disadvantages: it is slippery and cold. As a rule, a warm rug is laid on such a floor.

The floor is laid on the balcony as follows:
- Deleted old finish and prepare the surface for leveling.
- The waterproofing film is spreading.
- The heater is installed.
- A screed or leveling is done with a mixture.
- In the usual way using "crosses", which are necessary so that the seams are of equal thickness, the tiles are laid on the appropriate adhesive.
- Processing seams with grout or sealant.
The floor on the balcony is best made of durable porcelain stoneware. However, there are difficulties when laying: it is difficult to cut due to its strength. There is also a special tile that fits seamlessly. It forms a flat solid surface, for example, marbled.
It was considered how to properly make the floor on the balcony from various materials so that it turns out beautiful and lasts a very long time.
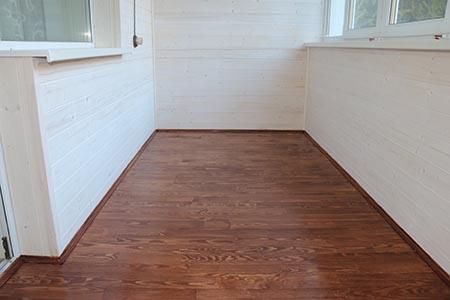
The wooden floor on the balcony is being built by apartment owners who are accustomed to truly rational use of every free meter of their home. Such a coating, created from high-quality dried and polished products, is suitable for both open and glazed, well-insulated loggias. In the second case, the extra squares of the area go to the arrangement winter garden, office or play area for children.
Laying wooden floors - all the pros and cons
Wood is the best material for flooring installation. When touched with bare feet, a person does not feel the discomfort that accompanies every step taken on a concrete base or ceramic tiles.It also has other advantages:
- Ease of processing, fastening to various basic surfaces.
- Aesthetics and versatility. The wooden floor on the balcony goes well with any style of interior.
- Environmental friendliness due to the natural origin of the material.
- High strength. Coatings made of larch, oak, beech serve for decades without changing their initial operational and external characteristics.
- The possibility of high-quality alignment and insulation of the flooring.
The disadvantages of wood floors include the tendency to rot and flammability. These problems are solved by treating the used products with antiseptics and flame retardants.
Third minus wood flooring- the ability to absorb moisture from environment. To increase their water-repellent capabilities allows painting or processing the flooring with a protective varnish.
Plank floors are usually installed on warm loggias with glazing. Then the latter are used as full-fledged living quarters.
It is allowed to build the described structures on open balconies in old high-rise buildings (for example, in Khrushchev). But in this case, it is necessary to take care of the wood as carefully as possible.
Procurement of materials and tools - what to look for?
Insufficiently dried boards must be kept for 3-10 days at room temperature, and then each of them is scrupulously examined. All products with a deformed surface or other problems are rejected, the rest are impregnated with flame retardant and antiseptic composition.
Advice. Treating wood with protective solutions at home takes time. It is wiser to immediately purchase elements with impregnation.
Insulation of coatings is carried out with foam plastic, foam plastic, mineral wool, and other materials with a low thermal conductivity. You also need to purchase a waterproof film, polyurethane foam.
Cutting wood, laying floor elements is carried out using simple tools. Home master will need:
- hammer;
- hacksaw or jigsaw;
- building level;
- stapler;
- drill;
- screwdriver;
- hardware.
A sharp knife is used to cut the insulation. If the base surface requires repair, materials for pouring the screed are purchased.
Foundation preparation - cosmetic and capital
The old floor covering is dismantled. The floor is cleared of debris, carefully inspected. If the surface is sufficiently even and does not have serious defects, the following actions are performed:
- all horizontal and vertical seams are sealed with mounting foam;
- small holes and gaps are filled with a sand-cement mixture (proportions - 3 to 1 plus water);
- the base is primed (preferably with a penetrating solution).
In cases where the screed is in an unsatisfactory condition (large recesses, destroyed concrete layer), it is removed and a new one is poured. The order of work is as follows:
- The joint between the wall and the slab is treated with waterproof mastic (with a 10-15 cm approach to the vertical surface).
- A formwork is constructed along the perimeter of the ceiling, which will not allow the poured composition to drain. Its height is taken as 10 cm.
- Two slats are placed along the length of the base (parallel to each other). They play the role of beacons. The operation is carried out using the building level.

After that, the space between the installed slats is filled with concrete mortar and well leveled. After a day, the mixture will seize. Beacons are removed from it. The resulting recesses are filled with cement.

Tubercles and sagging are carefully cleaned from the screed (using a wide spatula). The structure is left for 10-14 days for complete hardening.
Log system - how to do it yourself?
A waterproof film or penofol is laid on a leveled balcony base. The latter not only protects the structure from moisture, but also additionally performs the function of an effective insulation.

Other materials are also used as waterproofing. Let's highlight the most popular of them:
- Ruberoid is inexpensive and quite effective. It is laid on bituminous mastic.
- Penetrating compositions - applied in 2-3 layers, completely fill the pores of concrete.
- Painting latex-acrylic and special plaster moisture-resistant compositions. To work with them, you need a brush and a spatula.
If the floor and exit to the balcony are located at different heights, the coating is laid on the logs. Step-by-step instructions for creating a crate are given below:
- The bar is selected. Its cross section should be equal to the height to which it is planned to raise the base, minus the thickness of the board used as a coating.
- Two long blanks are pre-mounted in parallel at the edge of the loggia and along the wall.
- The bars are cut into segments. The length of the latter corresponds to the distance between the previously laid elements. And the total number is calculated so that the distance between them is 0.8–0.9 m.
- All blanks are treated with an antiseptic, dried, impregnated with drying oil.
The frame is being installed. Long pieces are laid first, then (from two ends of the room) - side elements.

The resulting frame is fastened with screws and metal corners. Its horizontalness is checked. If necessary, the structure is leveled with steel plates or wooden wedges placed under the bars.

The process ends with the installation of transverse segments. They are fixed to the crate in the same way. The finished frame is attached with dowels to the balcony base.
Insulation of the crate - it's simple
The floor on the balcony should be protected from freezing from the side of the concrete base. For these purposes, use:
- rigid materials - perlite-cement and expanded polystyrene extruded plates (Penoplex);
- roll products - slag, glass or mineral wool;
- sawdust and special fillings - ecowool, vermiculite, expanded clay.
The process of thermal insulation with your own hands is simple. The selected insulation is cut into rectangles with a length and width of 20-30 mm more than the required size. They are laid between the lags.
The material should be mounted as tightly as possible. Then through it cold air guaranteed not to penetrate the coating.

An important nuance! On open balconies, it makes no sense to carry out thermal protection of the floor. It will not be possible to qualitatively insulate the coating, since raindrops falling on it will begin to seep through the boards. This will lead to the formation of rot, the active reproduction of microorganisms and the destruction of wood.
Loose heat insulator is poured between the lags in an even layer. Lightly compacted. When subsidence, the required amount of material is added and it is compacted again.
Installation and finishing of the coating without difficulties and delays
Now batten produced with special locks on the edges (thorn groove). Due to this, its do-it-yourself styling does not cause difficulties for home craftsmen.
Installation of wooden products is carried out in the direction from the wall. A spike is cut off from the first board. They place it strictly perpendicular to the vertical surface with an indent of 10–15 mm and attach it to the logs with self-tapping screws or nails, which are screwed (nailed) at a 45-degree angle.

The second element of the coating is inserted with a spike into the groove of the previous one. The rest of the parts are assembled in the same way. The very last piece is cut to the required dimensions and mounted in place. The gaps along the walls are covered with plinth.
The design is painted or varnished (tinted, colorless). These compounds reduce the tendency of natural wood to absorb excessive moisture. They are applied in 2-3 layers with the obligatory drying of each of them.

Any floor finish can be done. If you plan to use laminate or linoleum as a cladding, it is recommended to level the plank base with plywood sheets. They are attached to the logs with self-tapping screws in increments of 0.2 m.
Laying boards on a screed - features of the operation
When the threshold and the balcony slab are on the same level, wooden blanks allowed to lay directly on concrete base. In this case, the lag system does not need to be created.
There are two ways to arrange such coatings. The first option requires making grooves in the screed and installing bars in them, on which wooden products are then fixed. The installation of the latter is carried out according to the algorithm described in the previous section.

The second method is more labor intensive. But the result of the work is much better. Step by step everything looks like this:
- Liquid waterproofing is applied to the screed.
- Plywood is mounted on the moisture-proof layer. It is attached to the surface with dowels.
- A massive board is installed on top. A gap of 0.8–1 cm is left between the first product and the wall.
- Wooden planks are fixed every 0.2–0.3 m with self-tapping screws. Holes for them are recommended to be made with an electric drill in advance.
- The hardware goes deep into the flooring by 7–8 mm. The remaining recesses are covered with a dowel of wood.
Some craftsmen fix the boards on plywood with two-component adhesive compositions. And then they are additionally fixed with pneumatic studs.
The design is sanded and covered with tinted varnish. If the surface is not very smooth, paint is used instead. It masks the flaws of the coating.
Hardwood flooring - a budget option
The wooden covering on the balcony has a lot of advantages. But the cost of quality lumber is quite high. Economical home craftsmen replace the natural board with cheaper products:
- wood fiber (chipboard);
- oriented strand (OSB).
Such plates are laid on logs according to the standard scheme with minor differences. They are listed below:
- The joints of the mounted workpieces are placed strictly on the bars. If they hang down, the floor will begin to sag under the weight of a person.
- The installation step of the transverse logs is 0.4 m, and not 0.8–0.9.
- The surface of wood boards is treated with drying oil.

Floorings constructed from chipboard or OSB are not finished with laminate. Their decor is carried out only with carpet or linoleum.
If you have already glazed your balcony, it's time to think about laying the flooring to make the room look beautiful and feel comfortable in it. Listen to the opinion of experts, they advise to equip a wooden floor.
It is easy to lay an environmentally friendly coating on the balcony with your own hands, it is only important to protect the base from moisture and properly mount the balcony flooring.
Wood has long been used in the construction of residential and non-residential buildings due to its high heat-saving properties. Compliance with the technology of laying plank flooring on the balcony will delight you with a flat surface, and a wide selection of coating materials gives you the opportunity to implement your own design.
What are the advantages of wooden floorboards:

- the reality of obtaining a flat surface even with dilapidated concrete slabs of the balcony base;
- ease of processing and fastening wooden boards for high-quality insulation of a balcony room;
- strength without special load for concrete slab and long service life of the aesthetically pleasing coating.
Advice. Of particular relevance is the choice in favor of boardwalk, if there is a significant difference in height between and apartments. By laying a wooden base along the logs, it is possible to raise the balcony floor to the level of an apartment floor. Even with the existing irregularities of the concrete slab, the flooring surface will turn out to be even.
Despite the many advantages of using wooden structures, one should not forget about some of the disadvantages that can upset after glazing the balcony:
- wood is highly flammable;
- natural material is subject to decay processes, it can be damaged by insects;
- the tree is defenseless against moisture, which will lead to deformations of the coating.
A few shortcomings of a wooden floor can be easily minimized if, before laying floor structures, the material is treated with a high-quality antiseptic against decay, impregnated with flame retardants that prevent the fact of ignition. Protection against moisture absorption will be provided by varnishing or painting the floor, which will also extend the life of the boardwalk.
How to prepare the concrete base of the balcony
If you had to do construction work, a set necessary tools you have. In order to equip the wooden floor on the balcony with your own hands, you will also need building materials (logs from timber, boards), which should be treated with a special impregnation or buy wood already treated with a protective solution.
Before starting work, it is necessary to clean the space of the balcony slab from debris, remove the worn-out cement screed, and thoroughly clean the old solution.
The general plan for further action is as follows:
- Arrangement of waterproofing the surface of the subfloor.

- Laying wooden lags followed by their consolidation.

- Work on the insulation of the floor, covered with logs.

- Installation of a wooden structure on the balcony.

- Finishing floorboards.
If it is necessary to pour a new cement screed, the joint between the wall of the house and the balcony slab is filled with waterproofing mastic. Then, a temporary formwork frame is installed along the perimeter, not forgetting about the beacons along the wall and leveling them horizontally. After pouring cement mortar(the next day) the beacons are removed, the voids are filled with cement and the screed is left to dry for two weeks.
Wood floor waterproofing work
To protect the wood on the balcony from moisture, it is necessary to ensure the insulation of the base so that, due to dampness, it is not necessary to fight fungus or mold. How to implement an event:
- seal all cracks to protect against moisture penetration from the outside;
- apply the first layer of a thick waterproofing film to the floor of the balcony;
- the second layer of waterproofing is covered with a slab after the installation of insulation.

Comment. The easiest way to isolate the surface plastic wrap, you can use penofol (polyethylene reinforced with aluminum foil). The fabrics of the hydrobarrier are overlapped (15 cm), and the edges are sealed with adhesive tape. Some craftsmen isolate the base liquid glass or liquid rubber.
The technology of the device of a wooden floor on the logs
In some cases, it is allowed to lay wood flooring on top of a cement screed, but practice shows that it is more reliable to arrange a balcony floor on logs. This will get rid of the height difference on the balcony and in the apartment, make the balcony warmer.

Floor lag installation plan
This stage construction works can be called the most responsible, its implementation will ensure the horizontality of the balcony base. For mounting wooden frame you will need three well-dried timber of a certain section. We proceed to laying the boards on the base of the balcony slab.
- We lay two beams along the length of the balcony - along the edge of the base near the wall and parallel along the edge of the balcony.
- Having measured the distance between the lags, you need to cut the bars according to the measured length for laying the cross members between the longitudinal beams.
- We fasten the transverse and longitudinal bars of the crate with the help of metal corners and self-tapping screws.
- To align the structure horizontally, we use a level; we use plywood or plastic as linings.
- The resulting wooden frame is fixed with dowels to the surface of the concrete base.
Video instructions for installing wooden logs:
In the course of fastening the horizontal and longitudinal logs, the gasket located under the bars should be flashed through with a self-tapping screw. The distance between the transverse sections laid under the heavy longitudinal beams should be at least 50-80 cm. It must be ensured that approximately 5 cm is maintained from the transverse beam to the wall.
Important. When calculating the height of the crate structure, the height of the floor should be taken into account along with the laying of the finish coating. Otherwise, a do-it-yourself surface may turn out to be higher than the balcony threshold.
Measures for warming the floor with lags

To protect the floor equipped on the balcony from the threat of freezing from below, you need to know how to properly insulate a wooden structure. This stage is especially important if the balcony below is not glazed or the space is completely open. If you do not plan to install a "warm floor" system, insulation can be done with the following materials:
- rigid products in the form of slabs of perlite-cement mixture, blocks of extruded polystyrene foam;
- roll insulation, made on the basis of various kinds mineral wool;
- sawdust or specially made fillings.
It is very easy to do it yourself, taking into account important rule- the thickness of the bars and insulation should be the same. The material selected for insulation is cut into flaps rectangular shape according to the size of the space between the laid lags with an allowance of 2-3 cm for a snug fit.
Before laying the insulating material, the balcony slab can be covered with a layer of insulation, the fabric of which is mounted overlapping on the walls (20-25 cm). In the case of choosing a bulk insulator, they fill up the space between the lags, by tamping the material they achieve a flat surface, adding backfill if necessary. Choosing a heater from mineral wool, it must be covered with a vapor barrier material to protect against the accumulation of condensate.
Comment. You should not spend efforts on warming a balcony without glazing. On the floor of an open space exposed to the environment, moisture will accumulate in the heat-insulating gasket, which can lead to its decay, destruction of the wooden structure.
self-supporting plank flooring

Today, it will not be difficult for home craftsmen to lay wooden flooring due to the presence of special tongue-and-groove locks on the edges of the floorboard. This innovation makes it easy to adjust the floorboards during the installation process. Laying boards on logs is carried out in the direction from the wall. Starting to mount the first plank canvas, a lock spike is cut off from it, and the board itself is laid strictly perpendicular to the vertical wall.
An important point. Before fixing the floorboard with screws to the joists, make sure there is an indent of no more than 1.5 cm. The first board with its three edges should not touch the walls, you need to leave a gap of up to 15 mm, and the screws must be screwed in at an angle of 45 degrees.
Elements of the boardwalk, by analogy with the bars already fixed on the floor of the balcony, must be pre-treated with an antiseptic. Particular attention should be paid to the wrong side and the ends, after laying the wooden floor it will be impossible to get to them. The plan for further action is as follows:
- At a distance equal to the width of the board (maybe a little more), install the auxiliary rail, securing it with self-tapping screws.
- Starting to fasten the second element of the coating, insert its spike into the groove of the previous panel.
- To ensure that the boards fit snugly together, drive a couple of wedges between the batten and the second board.
- In a similar way, mount the rest of the floor, additionally fixing each board with screws at an angle (into the groove).
- Fix the first and last element of the boardwalk longitudinally, fixing it to the logs with self-tapping screws.
Video instruction:
When the wooden floor is completely mounted, the gaps formed along the walls are covered with a plinth. Masters advise before finishing the floor structure to open it with varnish or paint to protect the wood from moisture absorption. It is advisable to apply 2-3 layers of the composition with the obligatory drying of the surface after each treatment.
Floor finishing options
The assembled and varnished wooden structure is ready for use. To ensure a long service life of the flooring on the balcony, it is worth considering the finish coat before mounting the skirting boards. What material is suitable for the floor on the balcony:
- facing tiles - the ability to choose a pattern and ease of cleaning;

- laminate or parquet board create the illusion of continuing the room;
- terrace board - is resistant to moisture and temperature changes;

- linoleum or carpeting will make the floor pleasant for walking barefoot.

If wooden base you do not want to cover with anything, process a well-sanded wooden board deeply penetrating varnish, choosing the tone you like. In the case of different-sized floorboards with a not particularly attractive appearance, paint the floor on the balcony with paint intended for outdoor use. This will help mask imperfections in the coating.


Promotional codes e-delivery for September E-delivery promotion
Codes for the game dungeon hunter 5
Indian castes: what is it?
The lost memoirs of Faina Ranevskaya Faina became friends with Ekaterina Geltser immediately
Life schedule by date of birth Who will I be in my future life