If you want to build a porch to the house with your own hands, then we have great news for you - it is quite possible to do it yourself! What's more, you can even choose from several options available - concrete, wood, or metal porches! At the same time, in last version the structure will be equipped with a beautiful polycarbonate canopy.
Let's take a closer look at each of the available options. First, let's get acquainted with the instructions for making a concrete porch to the house.
Option one. concrete porch
The strongest and most durable design, which also looks quite solid. First, decide on the size of the porch.

Stage number 1. How to calculate the dimensions of the porch

In most cases, the porch of the house is just a few steps. You are obliged to choose the optimal dimensions of this design. Ideally, the width of the stairs should be between 0.8 and 1 meter. If possible, you can make it even wider - so the whole porch will look more attractive and comfortable. Making the width smaller is highly discouraged.
As for the angle of inclination of the stairs, it should be in the range of 28-45 degrees. The table below shows the optimal dimensions of this design.

The width of all steps of the porch should be the same and be approximately 25 centimeters, while the optimal height is from 12 to 20 centimeters (it all depends on who exactly the porch is intended for).
Note! When arranging the upper platform, try to keep it below the front door by about 5 centimeters.

Stage number 2. How to make a porch foundation
First, dig a pit according to the dimensions of the future structure (at least half a meter deep). Build formwork around the perimeter.

Then take the crushed stone and fill it with the bottom of the resulting pit (the thickness of the layer should be about 20 centimeters). Thoroughly tamp the gravel, then pour sand on top of it in a 10-centimeter layer. Sand is desirable to pour cold water to make it easier to tamp it down.
Cover the resulting area with roofing material. Lay a reinforcing mesh on top with cells of 100x100 millimeters, then fill everything concrete mix. You can easily cook the latter with your own hands, for this, adhere to the following proportions:
- one part of cement;
- five pieces of rubble;
- three parts of sand.
After pouring, level the surface of the concrete, pierce it in some places with a reinforcing bar to remove air. Now it remains only a few days to wait for the initial curing of concrete to occur.

Stage number 3. How to build a formwork for steps

To build the formwork for the steps, you will need thick plywood. At the same time, it is important that the height of such formwork is 20 centimeters greater than the height of the porch itself. The construction process itself is nothing complicated: cut out all the details of the formwork from plywood (according to the height of each of the steps), and then install them in the right places. To tighten the shields together, use metal plates, wooden bars, or any other suitable fasteners.

Note! The shields located on the sides must be reinforced without fail with additional stiffeners.
In addition, reinforce all the steps, and lay the reinforcement in such a way that it is located in all 3 planes at once. Alternatively, you can weld an iron frame, the shape of which matches the planned staircase, and build the formwork around it. This will be even more convenient. In other words, do what feels right for you.


Stage number 4. How to pour steps for the porch with your own hands
To begin with, lubricate, using oil, all the internal surfaces of the formwork. This is necessary so that later you special efforts removed the structure. As for the pouring solution, prepare it in the same way as before.

Start pouring in stages, starting with the first step. After pouring each new step, take a short break so that it dries a little, and then proceed to pouring the next one. So your porch for the house with your own hands will turn out to be as strong and durable as possible. In the course of pouring, fasten additional formwork parts in front of each step. In this case, the height should be the same as that of the first step.
Note! The formwork surface that will be in contact with the mortar should be as smooth as possible.
After pouring, carefully level the concrete, then pierce it with reinforcing bars.

It is possible to dismantle the formwork not earlier than in a week, and even better days after 10. At the end, swipe finishing designs. For cladding, you can use tiles or natural stone, boards or, alternatively, any other finishing material(decide for yourself).

Installing railings is not necessary at all, do it at your discretion. If you still decide to install, then please note that the height of the handrails should be at least 0.9 meters. As an example, we give an option that is equally suitable for metal / wood structures. Install support posts made of metal pipes. In this case, the length should be such that the angle of inclination of the railing is similar to the inclination of the stairs. Connect the ends of the racks together with iron pipes, but of a smaller diameter. Use a welding machine to connect.
The top tube will serve as a handrail. To fill the space between the pipes, you can use absolutely any rental. When mounting the element, the gap can also be any - here everything will depend solely on your personal preferences.

After installation is complete, thoroughly clean all metal parts, cover them with two layers of primer mixture. Thanks to this treatment, the service life of the railing will increase markedly.
Video - Construction of a concrete porch to the house with your own hands
Option two. Do-it-yourself metal porch (with a polycarbonate roof)
Immediately make a reservation that the option described below is successfully combined with almost all types of private houses. The process consists of several stages, let's get acquainted with the features of each of them.


In this case, there are no fundamental differences from the foundation that we previously created for the concrete porch, the only exception is the fact that the support posts for the future canopy must be installed at this stage. We recommend installing supports in each of the corners of the structure - thanks to this, the structure will turn out to be more stable. If the dimensions of the porch are large enough, make several supports along its length in increments of 2 meters.
First, dig holes about 1.5 meters deep for supports (by the way, they can be used as the latter steel pipes). Place each pipe in the appropriate hole, then fill it with concrete.
Note! Wooden bars can also serve as supports. The sequence of actions here is the same, only the lower parts of the bars should be pre-tarred or wrapped with roofing material, and also treated with an antiseptic.
Also install supports under the stairs. Also dig holes, place metal racks in them, and then fill them with concrete. It is unlikely that the length of the stairs will be too large, therefore, the supports above and below the structure will be enough. Although, for greater reliability, you can additionally put supports in the middle of the flight of stairs.
When pouring concrete, make sure that the ladder is somewhat recessed into it. Pour concrete not to the very top of the site - leave a small gap (within 10-30 centimeters, the specific figure depends on the current dimensions of the structure). Later when the assembly metal structure is completed, you can fill the pit to the top.


Stage number 2. How to weld a ladder

To get started, take a couple of metal channels. Weld them to the supports that were installed and poured with concrete in the previous stage of work. Later steps will be welded to these channels. Take an iron corner (without fail equal-shelf), cut it according to the length of the steps, adding the width of the weld. After that, weld this corner along the contour.

Take the second segment of the corner, weld it in the same way, only to the attached corner. At the next stage, it is necessary to weld the second corner to the channel. As a result, you should get something like the following.


It turns out a kind of L-shaped product, you have to connect them together. For the upper connection, use an equal-shelf corner - weld it along the contour to both elements so that the shelves are placed inward. Make the bottom connection using the same corner, but the shelves should already “look” outward.


To fill the steps of the stairs, which will decorate the future porch to the house with your own hands, you can use any materials - for example, plywood or wood. For fixing, use self-tapping screws, twisting them from below. And to further reinforce wooden elements, use an adhesive or, alternatively, a silicone-based sealant.


In principle, further finishing can be done at your discretion. If you want, you can not close the horizontal openings at all - in this case, the casing will be mounted directly on the steps.
Stage number 3. How to make a canopy over the porch with your own hands

So, we installed the racks at the stage of pouring the base, so the further algorithm of actions should look something like this.

Take the cross supports and install them in accordance with the dimensions of the frame. If you like, your future canopy can be curved. To achieve this, cut the profile every 4 centimeters and bend it as needed. The advantage of canopies with a curved shape is that precipitation and different kind debris will slide freely from them.


Take polycarbonate, install it on the frame and fix it with self-tapping screws (we recommend using special thermal washers). The fastening step in this case should be 30 centimeters. Seal the edges with glue. Everything, the canopy can be considered ready!

Video - Do-it-yourself porch to the house from a profile pipe under polycarbonate
Option three. wooden porch
You can find a diagram of a porch made of wood below.


The work consists of several stages, we will get acquainted with the features of each of them.

Stage number 1. How to build a foundation
The best option in this case is a pile foundation. The fact is that such a base is extremely simple and quick to install, but its reliability is at a fairly high level.
First, dig holes where the piles will be located - not only in the corners of the future structure, but also along the length of its sides (the step should be from 0.8 to 1 meter). It will be great if you do this below the freezing level of the soil. After that, take the support bars and treat them with an antiseptic, and wrap the lower parts with roofing felt for waterproofing. After that, insert the bars into the holes. Align them vertically, and then fill with concrete mortar.
After the concrete has hardened well, you can proceed to the next step.
Stage number 2. How to mount lags
If necessary, trim the tops of the beams so that all supports are at the same level. It is worth noting that when calculating the height of the piles, it is necessary to act in such a way that, upon completion of the installation of the platform, a 5-centimeter height difference remains between the front door and it.
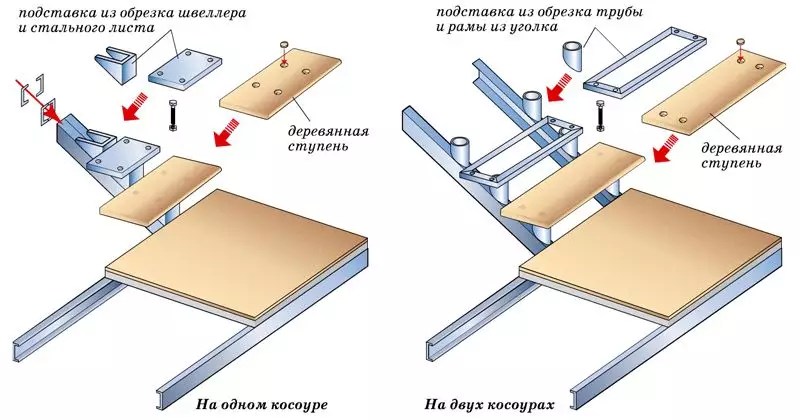
Stage number 3. How to make a bowstring (kosour)


Now start making the supporting part of the ladder structure. It is to this part that the steps will subsequently be attached. In other words, the kosour is, as it were, the side face of the steps.
To make a bowstring, you will need boards that are 50 millimeters thick. Take one of them, draw steps on it and cut them out with a saw or jigsaw. At the end, connect the stringer to the joists using a tenon-groove connection.
Stage number 4. How to arrange steps and platform

This is the last stage, after which the porch to the house with your own hands can be considered completely finished. First, attach the sheathing boards to the joists (you can either nail them or screw them). If you want, you can also lay some kind of finish on the boards (here, again, everything depends only on your personal preferences).
Attach treads and risers to the stringer, and you need to start working only from the bottom step. The sequence of actions is as follows: fix the riser, install a tread on top of it, and so on. Fasten using a thorn-groove connection or self-tapping screws.


As for the arrangement of the visor and railings, there are no special restrictions here. Step by step instructions on the installation of these elements, we cited above. The algorithm of actions itself is the same, only instead of cladding elements and supports, it is necessary to use similar wooden details(you can use any other material you like).

Video - Original do-it-yourself wooden porch
Common mistakes in the process of building a porch to the house
There are several mistakes that are made in the work most often. Let's get acquainted with them.
- Mistake #1. The construction of the porch is carried out after the completion of the construction of the house itself. In such cases, the depth of the foundation is not significant, moreover, it is not associated with the foundation of the house. Consequently, the foundation is affected by groundwater, heaving of the soil, as well as a number of other factors leading to the fact that cracks appear between the porch and the house.
- Mistake #2. Wooden support poles, which are used in the case of arranging a wooden porch, are not treated with antiseptic preparations. The result of such an error is obvious - after some time, the structure has to be rebuilt.
- Mistake #3. The height of the platform is the same as the height of the entrance to the house. AT winter time when the soil rises, the height of the porch increases, which can cause the front door to jam.
- Mistake #4. There is no vapor barrier or it is of poor quality. As a result, moisture will seep through the structure and reach the cladding, which does not allow steam to pass through. Further, this steam will turn into water and simply remain under this material. With the onset of cold weather, moisture will begin to expand, which will lead to a breakdown of the finish.
Do-it-yourself porch made of stone or brick
We left this option to the very end, since it is perhaps the most difficult and time-consuming, so not everyone is able to do everything with their own hands. And it is not surprising, because building a foundation out of bricks, where there is no particular need for accuracy, is one thing, but laying it out perfectly evenly is quite another.

It's no secret that professional masons are engaged in laying bricks only if there are several helpers whose job is to prepare cement mortar and timely submission. As for the stone, things are somewhat more difficult for them, because uneven edges are extremely reluctant to fit together. In a word, if you do not have experience and a couple of assistants, then it is better to immediately forget about the porch made of stone or brick, otherwise you will simply waste your time and money.

Much easier to build concrete stairs, then choose a facing stone or tile for steps, the size of which is as close to natural as possible. After that, you can easily overlay the entire structure. Among other things, this way attractive in that even if you make some mistake, then without any problems you will be able to chip off the desired piece of cladding and repeat the finish.
How about a canopy over the porch?
If we talk about the visor, then it will serve not only to protect the porch and the staircase itself from rain or snow, but also as decorative element design design. On the net you can find a lot various options visor, in addition, there are photographs in print media specializing in suburban construction.

Note! In most cases, visors are made from a frame - metal or softwood - and polycarbonate / plexiglass as a sheathing material.
Tellingly, visors made of wood must be tinted every few years or, alternatively, covered special formulations Otherwise, the wood will dry out and begin to crack along the grain. The thickness of the polycarbonate used here should be 7 millimeters, and it is recommended that the material be laid in spans of a maximum of 0.7 square meters. You should not use glass for this, because in winter it may not withstand the mass of snow cover and simply crack (another reason for this may be the deformation of the wood).

Note! The visor should have a larger area than the entire porch to the house with your own hands, by about 50 centimeters. Otherwise, the performance of the main function - protective - can be forgotten.

In the instructions for pouring the base, we already mentioned that it is preferable to install support pillars under the visor even during the formation of the foundation. It is better to install your visor on such supports. In addition, this option will allow in the future (if such a need arises) to equip a closed glazed veranda in just two to three hours.
As for the coating, they can serve as sheet metal, on top of which a beautiful tile is laid, but it is still better to use polycarbonate or plexiglass, which we just mentioned.

Note! To protect the metal that covers the visor from corrosion, paint it with two or three coats of a suitable paint.
It is also important that the visor turned out to be pitched, and on it there was a metal chute installed at a slight slope. We also recommend attaching a chain almost to the ground to the end of this gutter so that water does not splash around when it rains. And in this case, it will smoothly flow down the chain. To avoid the appearance of puddles near the porch, you can equip drainage at the drain point.

Glazed porch - is it possible?
Such a solution as a closed porch takes on last years increasing popularity. Transparent glass structures look extremely attractive, which is why many are eager to build something similar near their home.

What is a glazed porch? In fact, this is a simple foundation made of stone or concrete with a ladder and a canopy (the latter must be on piles). By means of corners, the length of which corresponds to the height of the piles, a frame is created.

Note! Sheets can be of any height, while the width must be a maximum of 1.2 meters. If the sheet is wider, then its windage will be so strong that the wind, which has a speed of 30 meters per second, will easily break 5 mm glass.
If the distance between the piles is more than 1 meter, then it is better to break them with pseudo-piles. Similarly, you can divide the height using a pair of double corners for this. Thanks to this, you will reduce the load on the sheets of glass, and the porch to the house with your own hands will still be light and transparent.
As you can see, some specific skills or knowledge for self construction a porch is not required, since even the most complex options can be handled with your own hands. Each of the described operations is basic for the construction industry, and a person with skillful hands perform them without problems.
That's all, good luck with your work and warm winters! And for a more detailed acquaintance with the issue, we recommend that you watch the thematic video below.
Video - We make a porch with our own hands
An integral part of any home, like the roof and floor, is the porch. It is from him that acquaintance with the exterior and style of the whole house begins. Very often, when buying a house, you can find that it does not have a porch or it is too old and needs to be replaced, in which case you need to know how to properly attach a porch with your own hands.
Where to start building a porch
The main thing in any work is to plan your activities correctly and clearly at all stages of construction. Determine the interior design of the porch, calculate the dimensions and choose the material for construction, the configuration and number of steps, the type of handrails and their style.
Also, when building a porch with your own hands, it is imperative to take into account some of the nuances and design tricks. For example, the number of steps should be odd and this is not a whim of the builders, but a proven psychological factor, and their width should not exceed 20 cm.
Also during construction, it is worth paying attention to the railing, which will help emphasize the style of the porch, highlight its features, or act as an absolutely conservative assistant. But do not forget that when building a small porch with your own hands, an excessive pile of interior details is unacceptable, so it is better to refuse the railing altogether.
Another important feature that should not be missed during construction is the size of the site. It can be made absolutely any size, since there are no strict rules and recommendations for its construction.
Materials for building a porch
Attaching a porch with your own hands will help a properly sustained combination of tone and style with the whole house, and not everyone succeeds in this. Surely everyone has seen the ridiculous stone porch attached to wooden house or vice versa.
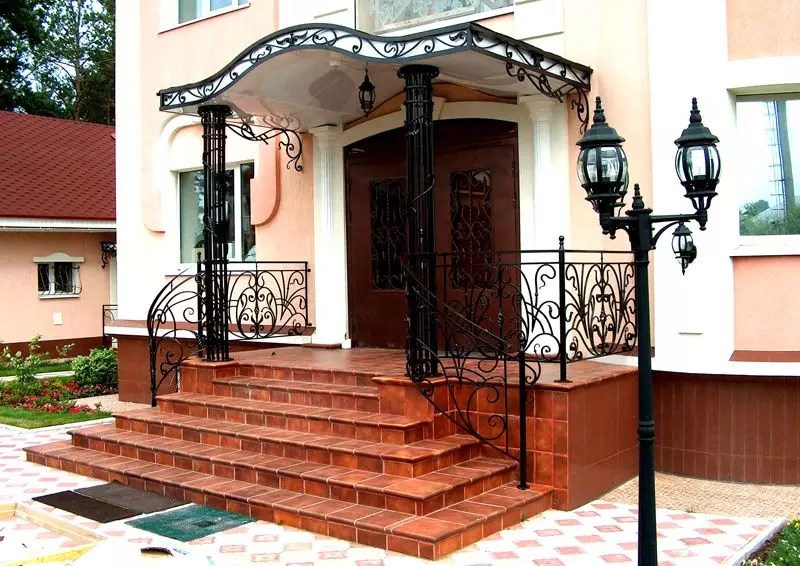
You can avoid such mistakes during construction by combining stone and wood, but you need to approach this process carefully and carefully. The porch, made in the same style as the attributes of the external design, will harmoniously merge into the structure of the building. So, if red brick or decorative forging is used in the construction of the fence, then these elements must be added to the design of the porch. Its lighting should partially coincide with the lamps that illuminate the house from the outside. Let them emphasize the unity of thought and style of their master.
The amount of investment in the construction of a porch to the house will depend on the amount of work and materials used in the construction of your own hands.

How to build a wooden porch
The tree has always been a noble decoration of any home and emphasized the sophistication of style. A wooden porch is no exception. Such a porch is best attached to a wooden house. Construction can be done in several ways.
Frame method. This construction method is the simplest. After pouring and fixing the foundation, a stepped wooden box is installed on it. The porch is fixed and leveled with the help of transverse support beams, and the wood in contact with concrete must be treated with resin or bitumen to extend the life of the structure.
Beam method. This construction method is similar to the previous one, but after the porch is placed on the foundation, the staircase itself is installed on beams that are sunk into concrete using the punching method. The beams themselves are fastened with a support beam or rigidly fixed to the foundation. As in the first method, special attention should be paid to the processing of wood in contact with concrete.

Concrete porch extension
When building a concrete porch with your own hands, the first thing to do is preparatory work. It is necessary to calculate the size and dig a hole for the foundation of the future structure. The pit should be at least 100 centimeters deep with a sand and gravel cushion pre-filled to the bottom. After preparing the pit, a wooden formwork is formed and reinforcement is performed with knitted reinforcement. The hole is then filled with mortar.
The second stage of construction is even more painstaking than the first. It consists of the direct erection of stairs. The process begins with the erection of formwork and reinforcement, and the staircase is gradually erected one step per pour. After the formwork and the reinforcing frame, the steps begin to be poured and the corners are additionally reinforced with metal profile corners.
Attention ! After pouring, the level of the base of the porch should be below the level of the door, for further facing of bare concrete and aesthetics.
Do not forget about handrails and railings. If the house is lined with brick, you should not invent something new, it is best to choose a brick base for the railing. You can also choose decorative wrought iron railings with wooden handrails. It is important to remember that only wooden railings are ideal for use in any weather and season.

Making a brick building
The stages of building a brick porch are the same as for a concrete structure, but as always there are a number of nuances. When creating masonry, the same method is used as when building a house, that is, row by row. A brick structure will undoubtedly cost more than a concrete one, but it will serve its owner much longer and better.

Installing a canopy over the porch
To protect the porch from the weather, you will need to build a roof, and in the common people a visor. It will help protect the site from rain and snow, protect it from premature wear, and also help to stylize the building under the overall design of the house. Most often, the roof is made of metal profiles or metal tiles, but it is possible to use a wooden beam or polypropylene plates.
The most beautiful and natural, namely wooden roofs, require additional attention and care. So, about once every 3-4 years, repainting or special processing of wood is required to extend its service life. If you neglect these requirements, then the visor will dry out and crack, and soon it will completely collapse. When using polypropylene plates, it is worth remembering their low strength and fragility. It should also be borne in mind that the total area of the roof should exceed the area of \u200b\u200bthe porch by at least 0.5 meters.
Advice ! When building a concrete or brick porch to the house, you can lay the foundations for fixing the roof in advance.
Thus, you will save energy for further mounting of roof fasteners and time for marking and strengthening it.
The roof must be single or gable, but always with gutters for water drainage. To prevent water from splashing in the rain, an ordinary chain should be attached to the end of the gutter to the ground, and drainage should be made on the ground under the drain point, which will eliminate possible puddles in front of the porch.
Stylistic features of construction
There are a huge number of styles and variations in the construction of the porch, but based on the latest trends in fashion and interior preferences, the following commonly used styles are distinguished.
Classic style. Absolutely conservative style with a minimum of interior and design introductions, and even with their complete exclusion. Classic gable roof with pillars, railings and cladding with tiles or porcelain stoneware. Paint colors and facing material neutral or taupe. The style emphasizes practicality and simplicity combined with independence.
Style country house . The predominance of a mixture of several styles, but no frills, where moderate classics prevail and country notes are intertwined. Used natural porch decoration vine or ivy, which creates a unique atmosphere and a warm environment.
European style. Moderation of views and a certain severity create an incomparable style of old Europe. The style is dominated by the presence of many decorative interior details, ranging from rocking chairs to garden figures and fountains.

Terrace. A separate style inherent in a separate and outdoor terrace or a veranda with its own interior and furnishings, which consists of wicker furniture or wooden chairs and tables. Most often, the roof has to be abandoned on the veranda, and this causes a number of inconveniences.
Lock . The interior of this structure is dominated by the style of medieval castles, ranging from a pointed spire on a gable roof to a complete porch finish. natural stone. A mandatory attribute of this style is the presence of massive forged interior details and lamps stylized as torches and candlesticks.
Arbor. The style intertwines a classic porch and a romantic gazebo for dates. Style requires the presence of benches and coffee tables, which are conducive to long conversations, romantic dates or just gatherings on fresh air. Also in the interior, the correct multi-level lighting and the presence of a large number colors.
Conclusion
Building a porch with your own hands will never become commonplace. After all, every day many types of design and interior novelties are created that can emphasize a particular style, and this gives impetus to action and the conquest of new heights in repair. It is clear that you do not need special skills for building a porch with your own hands, but you will have to take into account all the nuances. But the main desire and then everything will be within the power of even a novice builder.
We will learn more about how to make a staircase for the porch with our own hands in the next video.
A porch is not an easy visor over. This is practically the calling card of the house. buildings can be luxuriously decorated, but if in front of the door lies instead of a step wooden box from under the vegetables, and as a roof over the door a piece of unevenly cut iron - the whole impression was gone. How to properly and beautifully for a private house? A photo best projects, design secrets and much more on the topic - in this material.
The porch is an indispensable part of the facade of anyone and few people think that in fact this structural detail has a very important function. It is the transition from ground level to the height of the first floor of the building. If houses have, then this height can be quite decent - up to one and a half meters.
At least one, but it will be needed. Before the front door, there must certainly be a platform on which it will be convenient to turn around and open the door leaf so that it does not interfere with the passage.

In addition to the specified main function, the tasks of the porch include:
- preventing entry into the house and dirt;
- in some cases, the placement of seats for relaxation and garden tools;
- in a closed structure performs the task of a heat insulator;
- is an element of decoration of the facade.

In list minimum requirements to the design - the presence of at least two or three steps, the minimum size of the site is one square meter.
All about Feng Shui
The shape of the entrance extension depends on the taste and preferences of the owner and can be:
- rectangular;
- angular;
- radial;
- trapezoidal.
Chinese folk omens they say that the well-being of the family depends on the form of this part:
| Semicircle and circle | 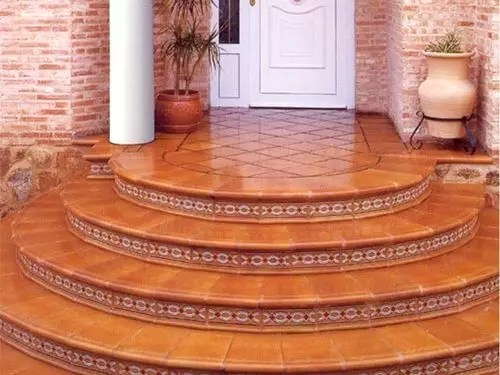 | Promote harmony and well-being in family relationships |
| Square |  | For success and stability in life |
| Rectangle |  | Helps personal growth and solitude |
| Trapeze |  | Financial stability |
| corner option |  | Unity of children and parents |
According to these canons or not, but the shape of the porch for country house should look. If this design has rounded shapes, they should be repeated in the lines of the building or adjacent and.
Open and closed mold
The entrance part of the house can be closed or open. In the first case, the construction will be less expensive and not difficult. In the second, the structure will become an integral part of the facade and can be used not only as a porch, but also as.
Note! The porch material does not have to be the same as the façade material. It is only necessary to maintain the general style of design.
Projects closed porch for a private house can be very different, consider a photo of the most successful options.
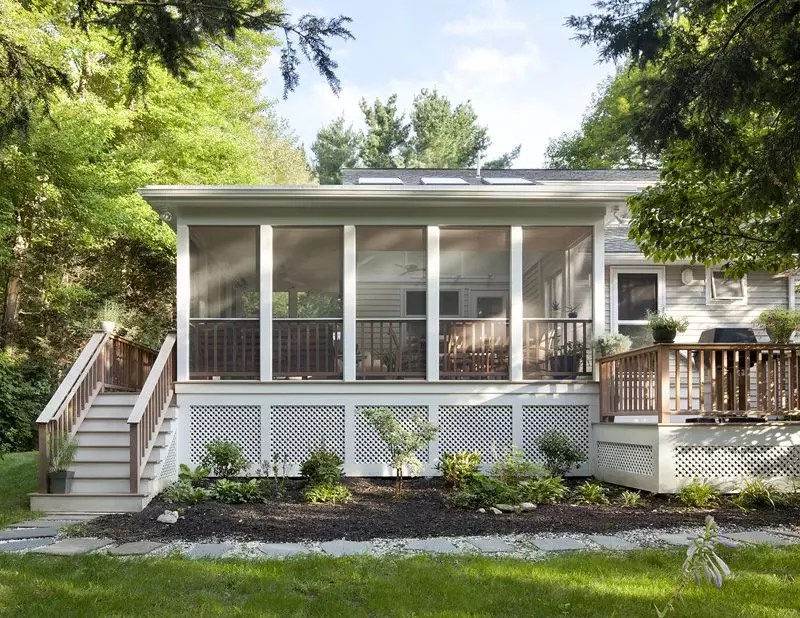
Veranda– glazed on three sides, in which there is no heating system. It can not only be in front of the facade of the cottage, but also recede from its side.
Advice! In order for the attached veranda to look like an organic part of the house, it should be no more than a third of the area of the first floor.

The terrace has no walls. This is an open form, which can be not just in front of the house, but even located around the entire perimeter of the building. In this case, the steps can be located in any convenient place or at several points at once. Most often, the terrace is decorated with railings, they give the structure a finished look.

Metal porch in private houses: photo
Metal structures are strong and durable. Forged options are distinguished by an openwork design. Such extensions can look like real works of art. The basis is metal racks and profiles or pipes. If the house has already shrunk, you can firmly tie it to the metal porch by welding parts of the reinforcement. Forged extensions have only one, but a significant drawback - they will not protect the entrance to the house from cold and wind. Photo of a porch in a private house made of metal:

 The combination of stone and metal is the most durable and monumental option
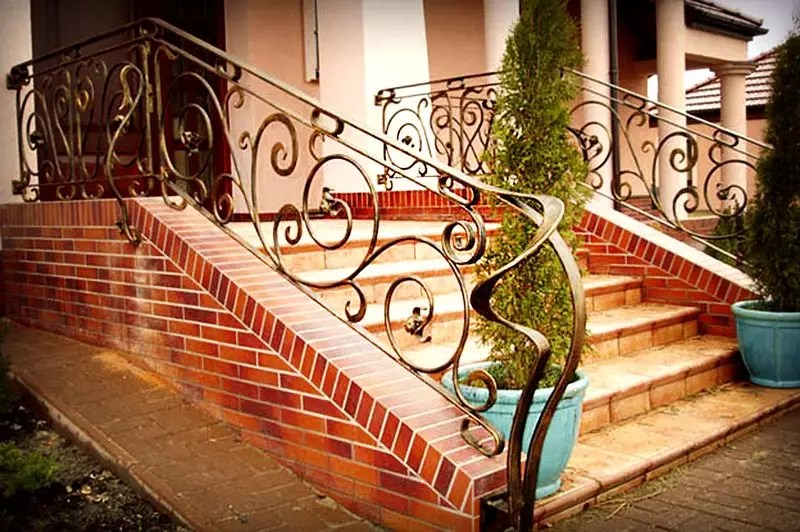

Reinforced concrete structure
This extension option is the most common. Experts advise laying the foundation of a concrete porch along with.
In this case, the steps for lifting are also made of concrete. To form the feet, figured formwork and special spacers are used. So that over time the concrete base does not collapse under the influence of rain and snow, it is covered.


Design features
The appearance of the entrance extension should correspond to the style of the facade of the building. Various materials are used for decoration:
- a rock;
- ceramic tiles;
- wood;
- plastic;
- moisture resistant laminate.
Note! If for facing steps is used ceramic tile, you should take care of the anti-slip coating. In its role can be a rubber or polyurethane mat. It is especially important to provide such coverage in winter.
For decoration use original and other accessories.
Common styles:
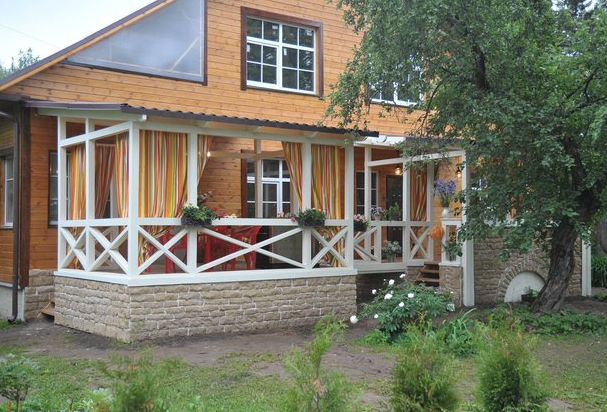
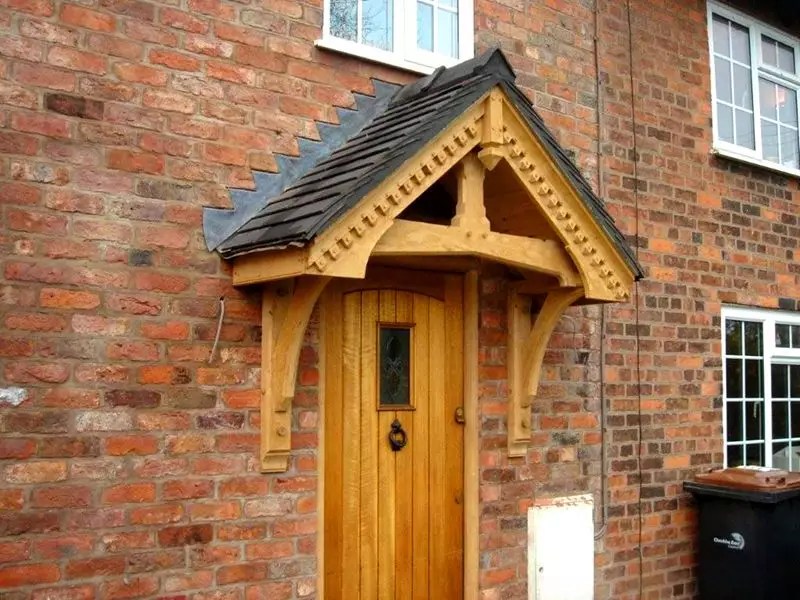
- Country. Characteristic features this - figured balusters and a parapet lined with stone. The visor is made of wood, and the space between the railings is filled with crossed wooden slats.

- implies the use of . The pattern should be in harmony with the patterns on the platbands and cornices. If you add bright coloring, you get a truly royal porch.

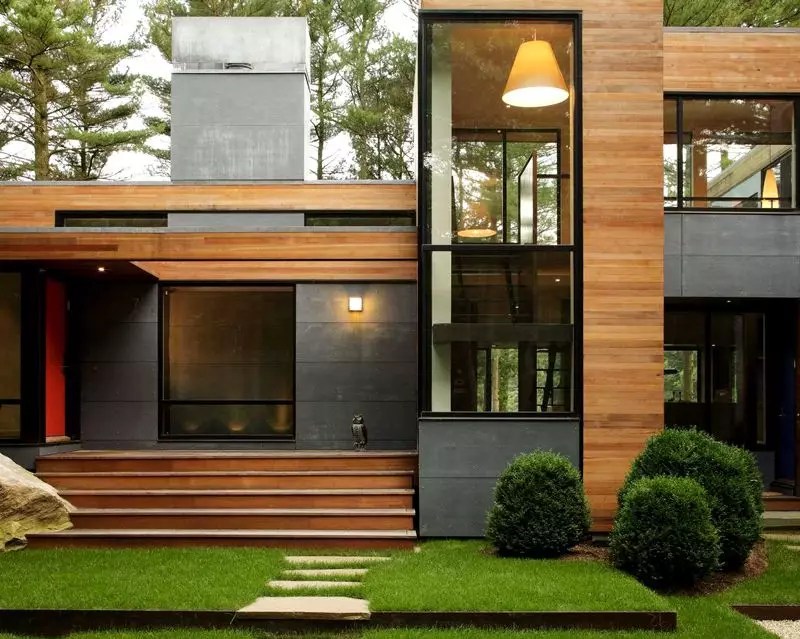
- High tech. In use harmonious combination metal and plastic. Details are made of galvanized pipes, it is possible to use tempered glass. A good idea would be to use polycarbonate. He has different colors, easy to mount and bend if necessary.
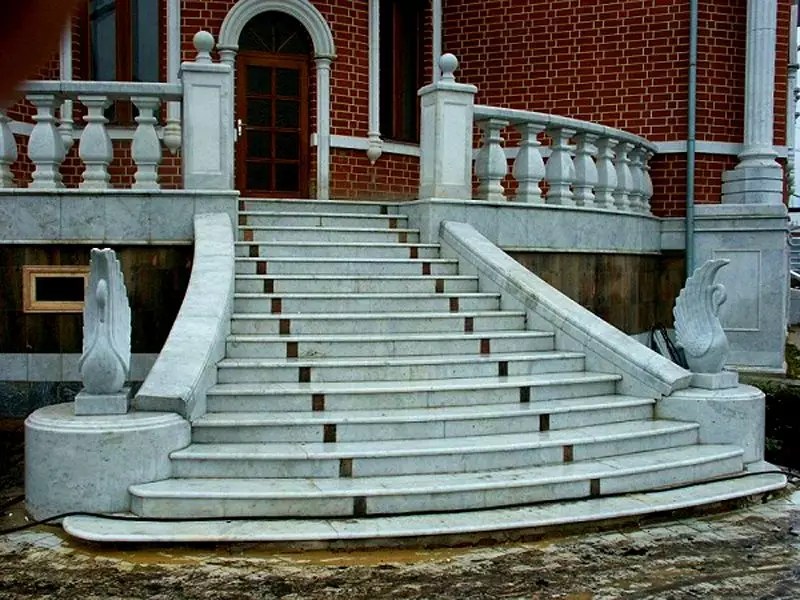
- Classic. Such extensions are decorated with stone. Marble and granite are best suited for this purpose. Columns are appropriate in the facade. Wrought iron railings can be installed.
Do-it-yourself porch to the house: projects, photos and advice from builders
For the construction of the porch does not require any special skills. First of all, you will need to work. It is necessary to measure the height of future degrees, the doorway.
Here are some examples of projects:


All these options can be reworked to suit your own requirements and facade features.
Do-it-yourself wooden porch construction with a canopy
Stage 1 - design
In each case, the size and shape of the porch may be different, but there are some mandatory parameters:
- the width of the flight of stairs is not less than ninety centimeters;
- slope of the stairs within thirty - forty-five degrees;
- height of steps from 15 to 19 centimeters;
- the width of the steps is thirty centimeters.
These are dictated anatomical features human and adapted to its average parameters. For people with large growth, all the above parameters should be increased by 3-4 centimeters.
Important! So that rainwater does not stagnate on the steps, when they are arranged, they make a slight tilt forward.
If there are only a couple of steps on the wooden porch, you can do without. But if there are elderly people in the house, it is better to provide for them.

The minimum site size is one square meter. If possible, it is better to provide a larger area. Subsequently, you can put on it for the summer. The flooring level should be provided five centimeters below the threshold of the front door. So even when the boards swell in wet weather, there will be no problems with opening and closing the door leaf.
Stage 2 - arrangement of the foundation
The wooden structure at the entrance is installed on a columnar or pile foundation. You can install such a foundation in just one day. For this purpose, recesses are drilled in the ground, into which asbestos-cement pipes are installed, which are reinforced with reinforcement and filled with concrete mortar. You can also install wooden poles, but they will not stand for a relatively long time, even if the wood is impregnated protective compounds. The easiest way to work with screw piles.
Supports of any type are buried to a level below the freezing level of the soil. After installation, a horizontal strapping is attached to the supports.
Stage 3 - installation of stairs
The thickness should not be less than 3 centimeters. Otherwise, when moving furniture or a refrigerator, the load will be such that the steps will simply break. To fix the steps on the stringer, use self-tapping screws. Unlike nails, they won't loosen over time and split wood.
Stage 4 - canopy device
From what to make the roof of the porch - everyone decides, but the issue of a harmonious combination of materials should be taken into account. Combination of concrete and wood the best way. The tree goes well with tiles and. Examples in the photo of the visor above the porch:


The shape of the roof can be shed, hipped or arched. The main thing is the presence of a slope for water flow and. The distance between the rafters is not more than thirty centimeters.
Important! All wooden parts of the porch should be carefully treated from wood-eating insects and rot.
Results
To make you feel like in a children's rhyme, a prince on the porch, you have to work hard. A project should be developed that guarantees the stability of the structure and its harmonious combination with the facade of the building.

The entrance to the house, equipped with a veranda or terrace, will become a comfortable place for the whole family to relax. You can use for inspiration best photos porch for a private house and recommendations on the video:
YOU MAY ALSO BE INTERESTED IN:
The main purpose of the porch is to protect the entrance of the house from rain. Before you build a porch with your own hands, you should properly plan all the work: think over the design, appearance, proportions and dimensions of the porch, the number of steps, etc. The optimal number of steps is 3, 5, 7 (odd number). The height of each step is 15-20 cm, and the depth is no more than 30 cm. If you make the depth more than 30 cm, then it will be uncomfortable to walk.
Scheme of a porch with a staircase built on a concrete base.
Fencing the porch with a railing justifies itself only for a tall building, if the steps are from 1.5 m. If there are few steps, then the railing is rather an excess, but if you are not constrained by funds, then you can assign them the role of a decorative decoration.
The most preferred railing height is 80-100 cm.
It is important to note that it is better to build a porch of a house with your own hands together with the house, then they will have one base and waterproofing. But it is not recommended to connect it “tightly” with the building, because. these structures have different weights and shrinkage, as a result, cracks can form at the junction. If the porch is simply attached to the house, then it is important to consider that it should be 5 cm below the door of the house. Using this instruction, you can easily build a porch with your own hands.

Scheme of several options for the device of the porch.
It is very important that the concrete porch be maintained in general style with the house. The porch device consists of the following steps:
- site preparation for construction;
- size calculation;
- production and installation of formwork;
- laying concrete blocks.
Materials for building a porch with your own hands:
- crushed stone;
- sand;
- water;
- plywood;
- boards;
- nails with a double cap;
- concrete.
Construction tools:
- roulette;
- shovel;
- putty knife.
In order to determine the height of the porch of the house, you need to level the entire soil at a distance of 2 m from the threshold. Then measure the distance from the threshold to the end of the flat area with a tape measure. Thus, we find out the height of the blocks of steps. Next, the height of the steps is calculated. To do this, you need to divide the resulting height by the number of planned steps. The tread value is calculated by subtracting from 45 cm.
Site preparation and foundation technology
As for the platform for the porch, there are no strict GOSTs and SNiPs. Any platform can be made: small, large, even encircling the whole house. Some designers even make the porch of the house as part of the veranda. There are a huge number of options for a concrete porch.
Next, we build the foundation with our own hands under the porch. To do this, we dig a pit along the perimeter of the entire porch with a depth of 50-60 cm (depending on the depth groundwater). We fall asleep 20 cm of rubble, on top of another 10 cm of sand. We ram everything and fill it with water. We lay waterproofing on top of the sand, pour concrete with reinforcement. The foundation is completely ready. Now you need to wait a few days until he gains strength.
Formwork manufacturing technology

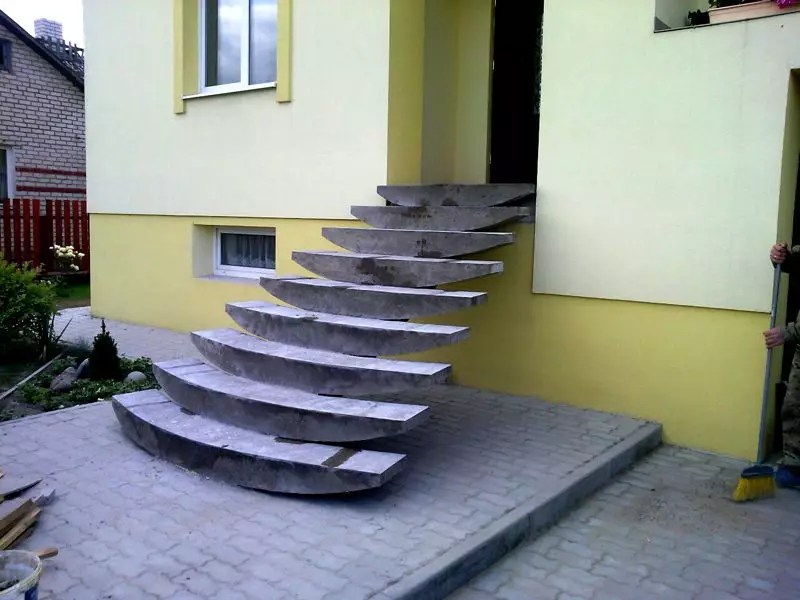
Scheme of a porch on a movable step made of concrete: 2 - Entrance door; 3 - floor beam; 4 - anchor (broadening) against heaving; 5 - soil during heaving; 6 - fixed foundation; 7 - the level of the estimated depth of freezing; 8 - foundation (pipe, pillar); 9 - external staircase made of monolithic reinforced concrete; 10 - air cavity 10 - 15 cm, base; 11 - a movable step made of concrete.
The formwork height should be more height porch by 30 cm, because some will go into the ground. If the soil is strong, then the formwork can be made only 20 cm higher. Next, on the plywood, it is necessary to draw the side brushes of the formwork. Treads and steps are drawn at right angles, and then treads and a platform with a slope of 5 mm per 30 cm of depth.
Next, draw steps with a slope of 15 degrees. The stiffening ribs are attached to the side parts of the formwork. Shields are mounted with their own hands 1 cm from the building. Stakes at a distance of 45 cm from the excavation are hammered to a depth of 20 cm. Spacers are made between the formwork and the stakes. Next, a 10 cm base layer is poured and well compacted. Pieces of boards are cut according to the size of the steps. Their lower edges are made inclined so that irregularities can be eliminated after pouring concrete. Next, with the help of double-head nails, boards are nailed to the formwork.
After the formwork is prepared with your own hands, before pouring concrete, you need to put a layer of vapor barrier on the ground to prevent moisture from entering. Next, we impose roofing material on the foundation of the house and apply a layer of sealant. Next you need to brush inner surface formwork with a special lubricant so that the solution does not stick.
Concrete laying for house steps
Now you can confidently move on to pouring the concrete prepared in advance. It must be laid immediately after being removed from the concrete mixer. We start from the bottom tier and gradually reach the top one. The concrete solution must be well compacted so that voids do not form. We build each next step only after the previous one has completely dried. To strengthen concrete blocks, you can use metal corner. It is immersed in not yet hardened concrete.
If the boards begin to bend under the pressure of concrete, then they will need to be secured with additional props. During pouring, the steps are filled with concrete completely, filling every corner and leaving no voids. With a shovel, you can compact concrete in every corner so that there are no empty spaces. At the end, large aggregate grains must be removed with a shovel inside the concrete.
After about 7 days, all the steps of the house will completely harden and only then it will be possible to remove the formwork. After the pouring is over, you can proceed to the finishing of the concrete porch. Tiles and porcelain stoneware are well suited for this. Use only outdoor tiles.
If the house is brick, then the railing is best made of metal or brick, and the handrails are best made of wood. Good, high-quality wooden railings are optimal for any stairs and for any season. If you make a canopy for the porch, then it should cover the entire porch with a margin.
The most correct version of the porch is when its foundation is cast along with the house. In this case, there are practically no problems. Sometimes when planning a building, they forget about it. Then the porch is attached to the house. They make an extension mainly from three materials: wood, metal and concrete. If the house is brick, they can build it out of brick. Another option is to make from building blocks with subsequent finishing. In any case, when planning to make a porch with your own hands, you must immediately decide what kind of foundation to make and whether or not to connect it with the foundation of the building.
How to calculate parameters
First you need to decide which side the steps will go to. They can be on one, two or three sides. Determine this based on personal preferences and finances that you can / want to allocate for construction. The height of the porch depends on the height of the plinth and should be 50-70 mm below the edge of the door leaf. This small step prevents precipitation from entering the house. Perhaps more importantly, it prevents the doors from being blocked if the porch rises from frost heaving (if the doors open outward).
Determine the dimensions of the top platform
The layout of the porch begins with determining the size of the upper platform. If the doors open outward, you should be able to open the doors while standing on the platform. That is, its depth should be 30-40 cm more than the width of the door leaf. According to the recommendations of GOST, the dimensions of the site should be 1.5 times the width of the doorway. More is possible - less is undesirable - inconvenient.
If your doors are 80 cm wide, then the depth of the upper platform at the very minimum is 120 cm. You determine its width based on the tastes and proportions of the house, but it must definitely be greater than the width of the doorway.
We count the number and size of steps
You know the height of the porch: 50-60 mm below the door leaf. The recommended step (riser) height is 15-20 cm. Divide the height of the porch by the height of the steps, you get the approximate number of steps. The number is rarely whole. The remaining centimeters can be divided between all the steps or make one of them higher. Another option is to make a small step at the bottom, although this can be inconvenient.

The optimal step width (tread) is 25-30 cm. Knowing the number of steps, the depth of the upper platform, the depth of the steps, you can calculate the dimensions of the porch completely. According to them, it is already possible to develop the foundation for the porch.
When choosing the parameters of the steps, one must adhere to the recommendations of SNiP: the sum of the prosup and the double riser should be in the range of 600-640 mm. For example, you calculated that the height of the step (risers) is 17 cm, the tread (depth of the degree) is 280 mm. After completing the calculations, we get: 170 mm * 2 + 280 mm = 620 mm. We fit into the recommended parameters, so nothing needs to be changed.
What foundation is needed
If the porch is planned to be light - wooden or metal - the foundation is most often made of pile or column. Specifically, they are chosen based on geological conditions. On well-draining soils with low level ground water enough , with a tendency to heave needed already , perhaps .
For a heavy porch - made of brick or monolithic concrete - they make strip foundation or . The type of foundation is most often similar to that on which the house is built.

Then you need to decide whether you will tie the porch foundation to the house foundation or not. Decisions are made based on the planned mass of the extension and the type of soil. Both options have disadvantages. If there is no connection, cracks often form at the junction of the porch and the house, and the porch can warp due to frosty heaving. Owners often face this problem. summer cottages- basically the porch to the cottages is made of wood and incoherent. After the earth thaws, it may itself “sit down” in place, or it may require some additional measures.
When arranging connections, the formation of cracks is also possible, but not only at the junction, but also in the “body” of the extension. This happens if the arranged reinforced connections cannot compensate for the uneven load, created by the house and an outbuilding. Therefore, a connected foundation for the porch is made if it is attached to a heavy house and itself is heavy and massive, made of reinforced concrete. The second difficulty with this decision is to make the connection of high quality. To do this, use ribbed reinforcement with a diameter of 12-16 mm, under which holes are drilled in the foundation with a given diameter. Reinforcement is hammered into them and on its basis a frame for the porch is knitted.
There are two main designs of stairs: on bowstrings and on stringers. They can be made from wood or metal. There are also combined options- metal + wooden steps or metal + concrete steps.

Stair structures - on bowstrings and stringers
On bowstrings
Ladders on bowstrings are the simplest. For a porch - a good option, especially if the house is wooden or a small country house. To inside bowstrings are attached to supporting bars. If you work with metal, the bars are welded horizontally (you can use minimal slope 1-2° in order for water to flow from the steps). In the case of wood, support bars can either be nailed, to which the step will then be attached, or notches are cut in the bowstring (no more than 1/2 of the thickness of the board), into which the step boards are inserted.
On kosoura
The ladder on the stringers can also be of a simple design - with open supports. In this case, triangles are cut at the required angle in the upper part of the board. Their lower part serves as a support for the steps.

When cutting the stringer, the height of the step and the width of the tread are set aside. They are connected at right angles. According to the marked markup, a template is made, with the help of which all the steps are marked.

The number of stringers in a staircase depends on its width and on the thickness of the boards used for the steps. The thinner the board for the steps, the more often you need to put stringers. If you use 25 mm boards, then there should be a distance of no more than 50-60 cm between the two supports. If you need a large width of the stairs, but do not want to put three stringers, use thicker boards. It is important that they do not bend under your feet.

If you decide to weld a ladder on stringers from metal, you will need to be patient: you will have to weld many small segments, but the principle of formation is the same.

Ways of fastening parts
The lower edge of the porch stairs can sometimes rest directly on the ground. This option is simple but unreliable. Firstly, the soil may settle, the staircase will begin to collapse. Secondly, when in contact with the ground, both wood and metal are destroyed faster. There are special impregnations for wood (Senezh and Senezh Ultra, for example), and metal is well formed with a primer and painted in several layers. Nevertheless, it is better to make a base - to fill in a shallow-depth tape, on which the bowstrings or stringers will rest.

K iron concrete base There are two ways to fasten the stairs for the porch - to the bed - a beam with a section of at least 75 * 75 mm or to a mortgage beam of a smaller section (in the photo on the left).
Difficulties may arise with the installation of porch pillars. There are several ways. There is one very simple and effective one that works great even on heaving soils (clays and loams). Holes are dug under the pillars with a depth of 50-60 cm. A bucket and a half of sand is poured into them at the bottom, and it is well tamped. On top of the sand, rubble is poured from half a bucket and also rammed. They put a pole, level it to the level, put spacers that will hold it in a given position. The space between the wall of the hole and the pillar is gradually covered with rubble, carefully ramming it. The hole is filled flush with the ground, the top can be concreted (so that the precipitation does not drain), but not spilled to the very bottom. The poles installed in this way do not lead even with strong heaving. A significant part of the water goes into the sand, and the rubble takes over the remaining forces of frost heaving, neutralizing them.

If piles, strip foundation or monolithic slab, the columnar base is folded, then studs or special glasses are walled up in concrete to fasten wooden racks. After the concrete has matured, the bars of the racks are attached to them with capercaillie or bolts.
If the racks are metal, a corner with a wall thickness of at least 3-4 mm is laid in the concrete so that it can be easily welded to it later.
When building a wooden porch with your own hands, questions may arise about attaching railings and balusters. They can be assembled on ordinary nails, but if desired, you can use bolts or capercaillie. In this case, holes are pre-drilled, then fasteners are installed in them and tightened with an angle wrench. Such a connection is certainly more reliable than just on nails.

If the porch is attached to a freshly cut wooden house, in which shrinkage has not yet been completed, and the design of the porch provides for a canopy, it is necessary to mount the racks on special adjustable plates.


We draw your attention to the fact that both the metal and wood that you will use to build the porch require careful processing. The porch is exposed to all climatic influences and the materials require good protection.
Monolithic concrete stairs
The most durable stairs are made of monolithic concrete. They take longer to make than metal or wood, but their service life is calculated in decades. The types of stairs made of concrete are described in detail in the video. The basis of the calculation is also given.
How to make a concrete staircase on stringers with your own hands, see the next video.
wooden porch
A wooden porch is one of the most common options in our country. Wood is plastic, easy to work with, costs relatively little (in our country), forgives many mistakes. That is why it is a favorite building material.
It also has disadvantages: it requires good protection before starting construction (antibacterial impregnations and fire retardants), as well as regular care - updating the protective paintwork. Then long time looks attractive, otherwise it quickly loses its decorative effect.
One of the options for building a wooden porch with a staircase on bowstrings can be seen in the video. Please note that the porch is being built on sandy soil, so the method of installing the pillars used is not suitable for everyone. Everything else is clear.
brick porch
Since brick is a dense and heavy material, a serious foundation is required for a brick porch. Usually it is a monolithic slab, and with double reinforcement, and it is better if it is larger in size than the planned porch.
When calculating the parameters of the steps, it is necessary to take into account the dimensions of the brick and the thickness of the seam between them. Then it will be easier to lay the work - no need to cut the brick. If you are not going to clad the porch, for the outer rows use quality material. The inner rows - backfilling - can be made from battle or building blocks and their remnants.

Brick porch with wooden steps
If the house is on a high plinth, making a monolithic brick porch is too expensive. Then the columns or walls are folded, leaving empty space inside. It can then be used for household purposes or covered with decorative shields. If needed top platform, from above, these columns / walls are overlapped with a concrete slab - homemade or finished - this is optional. Then a ladder is attached to the resulting base. It doesn't have to be brick. It can be metal, concrete or a combination.
Photo report: wooden porch on a metal frame
Theory is only a theory, and in construction too. You always understand the essence of the matter better if you observe the process yourself, because you can see how others are doing and learn something for yourself.
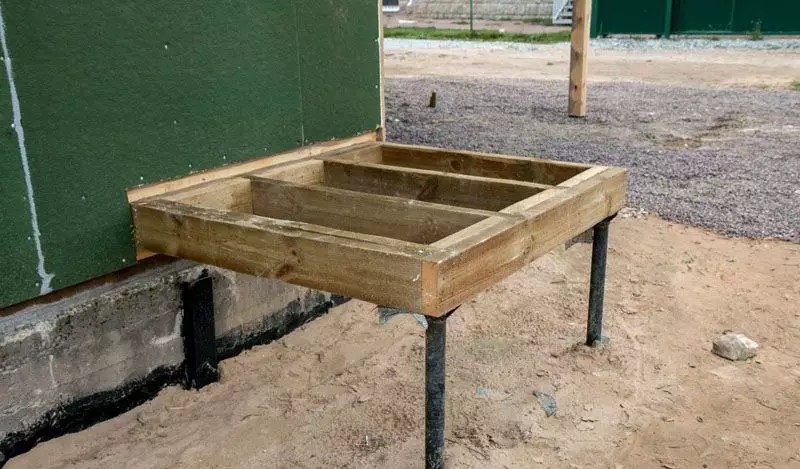
At the request of the parents, an exact copy of the old porch was made. The only difference is that a metal frame is welded for the new one.

In place of the demolished porch, a pit was dug 25 cm deep. Sand was filled in layers and rammed into the bottom, crushed stone - 10 cm each. A metal mesh with a cell of 10 cm was laid on top and all this was filled with concrete.

Welded according to the previous dimensions of the porch metal carcass(from the corner 70 * 5 mm). Sidewalls are exposed vertically and fixed on hairpins. Further, a base for benches is welded to them. All metal treated with a rust converter, primed and painted twice.

The wood used for construction is dry. Planed boards were cut to size (the width of the porch) and treated with an impregnation for direct contact with the ground.

We lay the dried boards on the frame. You have to drill a hole for each fastener - you just can’t take a corner just like that.

At this stage, two mistakes were made at once. The first is that the sheathing was not started from the sidewalls. Immediately began to lay the stairs. As a result, water constantly flows into the joints of the side sheathing and steps and the wood is distorted. It is necessary to start the sheathing from the sides, and make the steps a little longer so that they protrude beyond the side sheathing by at least a couple of centimeters. The second mistake is that the boards on the porch are stacked close to each other. At high humidity they swell and the surface becomes uneven. When laying the porch sheathing, make gaps of at least 5-8 mm.

After all the boards are fixed, they are polished. First with a belt sander with a coarse grain, then with a disc sander with a fine one. The process is lengthy. At the same time, the task is to remove green color impregnation. It does not overlap even with three layers of tinting.

After sanding, we start painting. Apply three times. Each layer after complete drying of the previous one. The resulting color is dark mahogany.


While the paint dries completely, we proceed to the manufacture of benches. We cut boards under them, grind off an oblique chamfer (for beauty), cover with impregnation.

We make the backs with a small decor - rounding at the edges.

We saw along the marked lines with a jigsaw, then grind to a smooth edge.

The sides are covered with plywood, which was painted in the same color. The porch is ready.

Finished wooden porch do it yourself - side view
Do-it-yourself brick-concrete porch: photo
The walls of the landing are preliminarily made of bricks, on top of which a monolithic concrete slab. Along the edge, a frame of corners is monolithic into it - so that the stairs and railings can be welded.

Porch plan: how everything should look

From a corner of 70 * 70 * 5 mm we cut blanks of the desired length. Then we treat them with a rust converter. We start cooking after the reaction has stopped and the metal has dried up.


We welded the first bowstring from metal.

The finished sidewall was attached to the concrete base with two pins.

Fastening to a concrete support support
In the same way, we cook the second bowstring and fix it. When working, make sure that the two bowstrings are in the same plane.

We begin to weld the support bars. It is important to constantly monitor the horizontal position so that the steps are not oblique.


We weld the transverse pieces of the corner to the supporting bars so that we get a shelf.

The corners are welded so that they form a frame. We put a piece of sheet slate in it. We lay out a reinforcing metal mesh on the slate. The edges of the mesh are welded to the frame.

Pour concrete into the prepared steps. We make it high-quality - so that the steps do not wear out longer.

While the concrete is gaining strength, we take on the racks that will support the canopy over the porch. For them, we take a profiled pipe 70 * 40 * 3 mm. From it we cut four columns. Two are slightly longer - they will be near the wall of the house, two are 15 cm shorter - they stand along the outer edge of the porch, creating the desired slope - so that the water and snow go off normally. For railings and crossbars, we use a profiled pipe 40 * 40 mm.

All metal is also treated with a rust converter.

First, we set up the racks, grab them, set temporary stops
In order to avoid lateral stresses, it is important to set the racks strictly vertically. We expose them, grab them, in several places with short seams, again we check whether they are standing correctly. We weld temporary stops and only after the next check we weld according to all the rules.

After all the racks are exposed and welded, you can assemble the railing. At the desired height, they are fixed strictly horizontally.


Then we proceed to the installation of the roof. We also cook it from profile pipe 40*40 mm. First, the strapping around the perimeter - at the level of shorter racks, then - the rest of the structure. It is not difficult, but it takes a lot of time - a lot of intersections.

Then it was the turn of the railings and decorations. And again, there are no difficulties, it can be done easily if desired.

Everything, the porch is ready for finishing work. Rough tiles for outdoor use were purchased for the steps and landing. She also trimmed the sidewall of a monolithic slab.

The metal was painted with matching paint, the roof was covered with corrugated board left after the installation of the roof. The do-it-yourself porch turned out to be quite good.

Porch design photo ideas


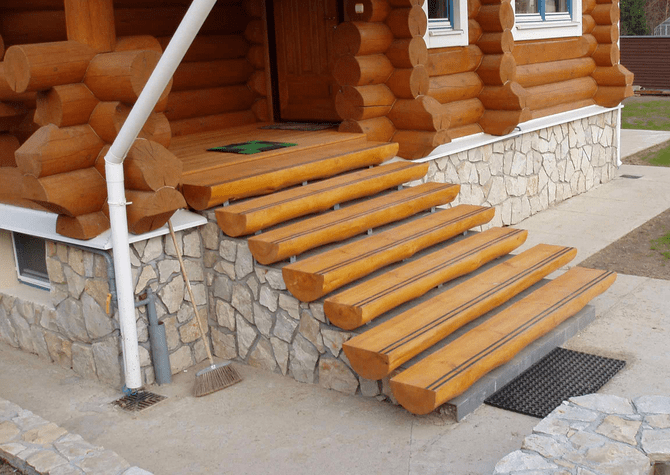
Porch to wooden bath or dacha - a ladder made of logs

Porch sheathed with WPC - wood-polymer composite


Chocolate biscuit: the secrets of cooking in a slow cooker and oven
Chemical composition and nutritional value
Apple chips at home
Braised cabbage with white beans, recipe
How to reduce the ass, hips and stomach at home?