This article is about how to wooden box for tools. If you have a lot of tools and want to keep them organized, the best thing you can do is to create a simple wooden box. From our experience, we find them very useful as they are lightweight, durable and provide plenty of storage space for tools. Don't forget that you can adjust the size and design to suit your needs.
The main components of the tool box are made from 20mm boards, as they have a beautiful appearance, and very durable. In addition, we recommend that you glue the joints and fasten everything with self-cuts. Try to screw in the screws as symmetrically as possible.
Upon completion of the assembly, it will be necessary to sand the entire surface of the box. Make sure all edges are smooth. Otherwise, you may injure your hands on sharp edges. Also, be sure to check that the heads of all screws are flush with wooden surface. Get rid of dust and chips before painting.
What you need to make a wooden tool box
In order to make a wooden tool box, you will need the following:
materials
Tools
- protective gloves, goggles;
- ruler, ;
- crayon, tape measure, level, carpenter's pencil;
- and drills.
Advice
- Pre-drill holes in wooden components before tightening screws.
- Make a handle out of a cylindrical stick.
Time
- 1 hour
Drawer decoration
Making a simple wooden toolbox is one of those projects that can be done in less than an hour. But it can make your life easier, especially if you work with tools a lot.
Smart Tip: Before joining the parts, add some glue to the joints. Immediately remove excess adhesive with a dry cloth, otherwise it will be difficult to remove after drying.
The first step of the project is markup. As you will see in the next step of the project, we will be using 1x8 boards to make the tool box. Therefore, you should use a carpenter's pencil and square ruler to mark lines on wooden boards.

In order to get accurate cuts, we recommend using a jigsaw or a good circular saw. Make sure the saw has smooth teeth or it may tear off the edges.
Smart Tip: Also, check that the blade will pass exactly along the cut line before sawing.
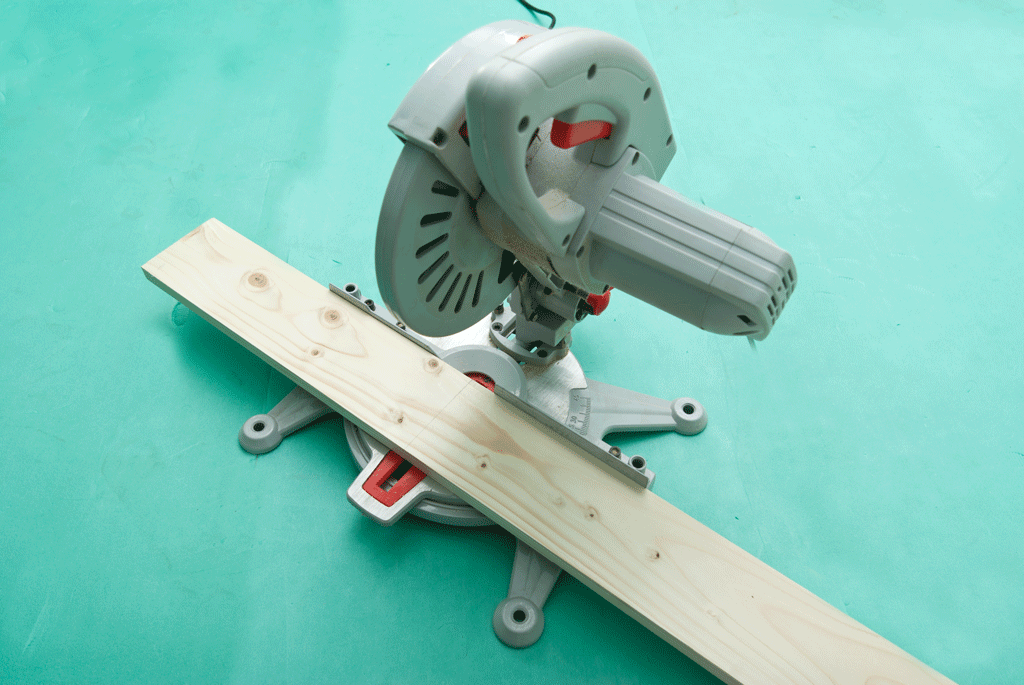
In the picture, all the components needed for the box. circular machine can make the job easier as many of the cuts need to be made at an angle.

You must use this blueprint when crafting crate components. Make sure you double check all measurements otherwise the components may not match.

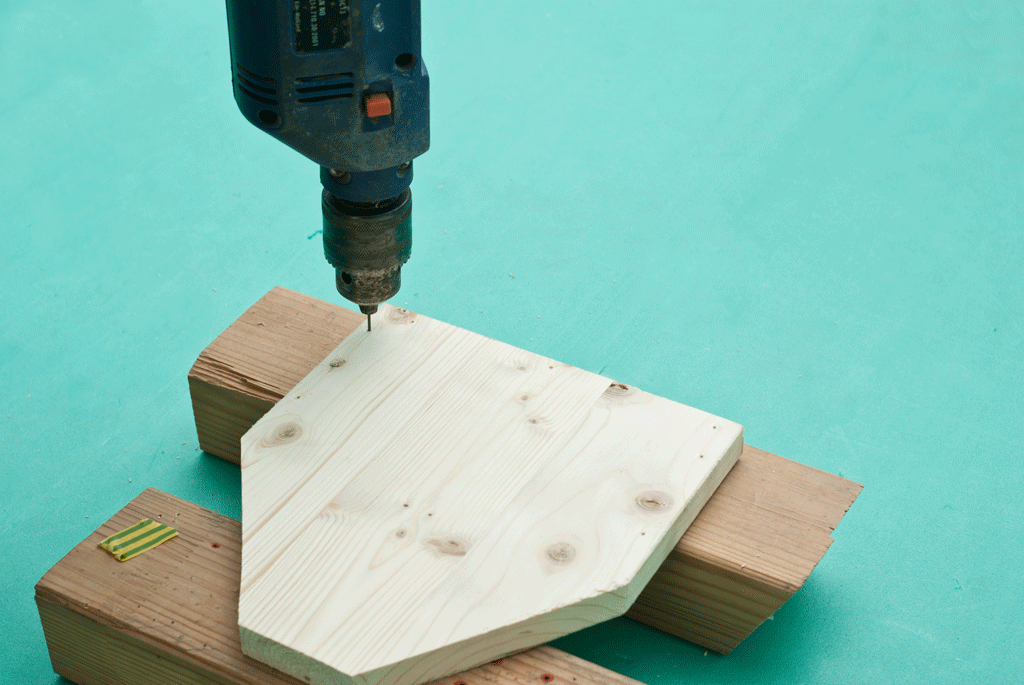
After creation wooden parts you need to drill holes around the edges. As you can see in the picture, you need planks on the wood block to prevent damage to the surface. Drill three holes on the bottom and two holes on the sides.
Smart Tip: If you are not experienced in woodworking, you should draw guidelines for pilot lines. Indent from the edges to prevent splitting of the wood.
If the bottom edges are not smooth, you should carefully sand them with 120 grit sandpaper before assembling.
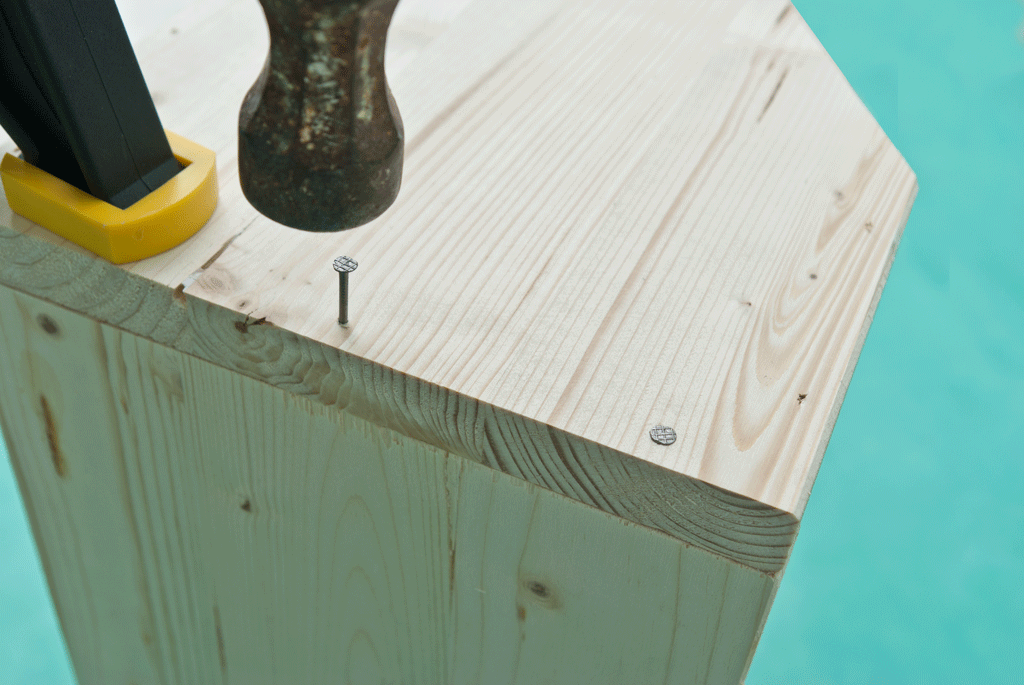
Coat the bottom ends with wood glue to strengthen the connection. Remove excess glue with a dry cloth, otherwise you will waste time cleaning it.

Press the components firmly and leave for half an hour. If you are using good glue, it will well fasten the joints.
Still, screw the self-tapping screws into the drilled holes anyway.

In order to obtain a solid construction, we recommend using self-tapping screws. Work carefully to prevent damage to wooden components.
Smart Tip: Align all parts before twisting. As you can see in the picture, the edges should be even.
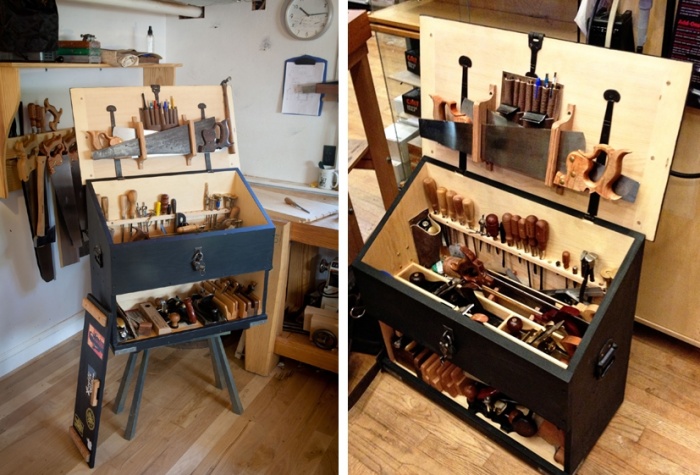
After installing all the components together, the tool box should look like the one in the photo below.

Make a handle out of a cylindrical wooden rod. Handle diameter is approximately 20-25 mm.
Smart Tip: Use a ruler to cut the rod to the desired length.

Add some wood glue to both ends of the rod before pushing it back into place. Then drill a hole and screw in the screw. Hold the handle while twisting, otherwise it may move out of place.
Smart Tip: Leave about 15 mm from the top edge to the wooden handle.

Don't forget to smooth the edges of the wooden components with sandpaper.
Smart Tip: Clean the box of dust and chips before painting.

After completely sanding the entire surface of the box with sandpaper.
Smart Tip: Apply multiple coats of paint, varnish, or stain to enhance the look of the wood and protect the materials from rotting.

If you want your box to have the same dimensions as in our article, we clarify that 1 inch equals 2.54 cm.
The various designs of tool boxes discussed in the article are united by the ease of doing it yourself. Choose the right project and, guided by our drawings and photographs, make yourself a convenient portable storage for the tools and equipment used in your work.
simple open box
This box is good because the tools in it are located in their places and are in sight. You can’t put many devices in it, but there is a place for the main ones. An open box is useful in household use when you need to repair something outside the workshop: they reported to the box what was missing and went to work.

A wooden tool carrier comes out heavier than factory counterparts, so you should not plan it too bulky. The box will not beat the knees if you make it narrow. The high handle also adds convenience - you don't have to bend down low to pick it up.
Pick the right pieces of plywood and trim pine boards. Mark and cut out the details of the box. Select the grooves in the workpieces with a manual router or make circular saw two cuts and clean out the indentation with a narrow chisel.
 Details of the box body: 1 - wall (2 pcs.); 2 - sidewall (2 pcs.); 3 - bottom; 4 - groove along the thickness of the partition and a depth of 1/2-1/3 of the thickness of the material
Sand the surfaces and assemble a rectangular box from blanks. Lubricate the ends with carpentry glue and fasten the parts with small carnations.
Saw out a central partition from 5 mm plywood, the width of which should be 1 mm less than the distance between the grooves in the walls of the box. Mark the location of the cutout for the hand, drill the entry hole for the file, and cut the plywood with a jigsaw.
 Partition drawing
Spread the grooves with glue and install the partition in place.

Make two pads for the handle from a block with a section of 20x45 mm, rounding the corners of the blanks with a planer. Prepare rail holders for hand tool: in one, cut out recesses for pliers and pliers with a jigsaw, and drill holes for screwdrivers in the other with a drill. Using glue and screws, fix the parts to the partition by placing them at different heights.

So that the surfaces do not get dirty for a long time, cover the box with varnish.

Toolbox in stool
In this upside down stool, you can move the tool to any place in the house or yard, and put it on its legs, reach for a shelf or hammer a nail where your height is almost not enough.

Using plywood or OSB with a thickness of 10-15 mm, cut out the cover (item 1), longitudinal sides (item 2) and sidewalls (item 3) according to the dimensions indicated on the drawings.

Make a handle and four legs with bevels at the ends at an angle of 15 ° from bars with a section of 40x50 mm.

Assemble the stool by fastening the parts with screws.
 Box assembly scheme: 1 - cover; 2 - tsarga; 3 - handle; 4 - leg; 5 - sidewall
Round the edges of the cover and the oblong cut in it, apply a finishing coat.
Box for the young master
If your child enjoys crafting or repairing, make a small box with him for his favorite tools.

Take planed 16mm boards and cut out the pieces according to the drawings. Prepare a round birch stick for the handle.
 Drawings of the details of the box: 1 - sidewall; 2 - bottom; 3 - handle; 4 - handle stand; 5 - holder
Draw lines parallel to the edges on the sides corresponding to the positions of the handle posts, drill between them through holes under screws.

Remove the burrs with sandpaper and proceed to assemble the box. Connect the bottom and sides with glue and screws, then install the handle stand along the marking lines.

Now replace the second post while inserting the handle into the blind holes. Screw on the screwdriver holders.

Color the box in the color your child chooses.
Wooden box with lid
The necessary set of tools varies depending on the hobby or profession, respectively, and the internal structure of the box may be different. The next tool carrying option is suitable for any equipment, it is distinguished by its solidity and reliability.


Use light wood for the box: pine, linden or poplar. The optimal thickness of planed boards is 12 mm, thinner ones are more difficult to fasten, and thicker ones will increase the weight of the structure.

Required accessories:
- Pen.
- Corners - 8 pcs.
- Latch — 2 pcs.
- Loop - 2 pcs.

Mark the lumber according to the drawings and cut the blanks.
 Cutting blanks for the box
Table. Parts list
Make sure the cutting is correct by folding the box out of the blanks. Sand one by one all the parts with sandpaper No. 220 and mark them. Assemble the bottom and lid of the drawer using clamps, corner clamps, or mounting brackets to secure the blanks. Lubricate both joining surfaces with wood glue.

Drill guide holes for the screws and countersink for the hats, and after fastening the parts, wipe off excess glue with a rag.

Fasten the blanks of the body of the portable part. Replace the dividing partitions by screwing them on the sides and bottom with screws.

Screw the carrying handle in the middle.

Install support rails inside the drawer at a distance of 30 mm from the top.

Clean out pencil marks and burrs near the screws with a fine sandpaper, blow dust off the surface.

Cover the box with a layer of polyurethane varnish, after drying, remove the raised pile with a “zero” and repeat the finish.

Align the hinges with the gap between the body and the lid of the box. Mark and make pilot holes for screws 10 mm deep, fasten the hinges.

Screw on the corner pieces using small screws.

Install the handle and latches on the lid.

Fill the finished box with the tool.

If desired, place containers with dividers or cassettes for storing small items in the large compartment of the drawer.

If you decide to add partitions inside the box, make them removable so that you can change the free space for a new tool.
A good owner will always have a whole arsenal of tools at hand: from nails and screws to pliers, a level and a set of screwdrivers, not to mention a drill, puncher and screwdriver. Very often, simple household repairs do not start in any way due to the fact that the master cannot find all the tools he needs in the apartment or garage. To prevent this from happening, all working tools must be stored in a specially designated place - a tool box.
What are the tool boxes, what requirements do they have to meet, and how to make a tool box with your own hands - this is an article about this.
Varieties of tool boxes
In fact, a tool box is a box with or without a lid, divided into several compartments of various sizes and shapes. Small drawers are designed to store fasteners, they can contain drills, tips, or other small parts. As a rule, such boxes are divided into several compartments, each of which has a separate lid. Such boxes are easy to carry, because they weigh a little.

Larger cases are needed to store and transport large tools such as hammers, saws, drills or jigsaws. Quite huge boxes will be needed to contain perforators, levels or mallets. These tool boxes are often made on wheels so that they can be moved and transported.
Professional toolboxes can differ depending on the skill of the craftsman: so a plumber needs one set of equipment, and an auto mechanic needs a completely different one. You can find such boxes in building supermarkets or in specialized stores, they are often sold complete with the tools themselves.

The cases are divided into several categories. This takes into account not only their size, but also the design, as well as the material of manufacture. Structurally, it can be:
- Open boxes with handles for large tools and easy transfer from one place to another.
- Multi-tiered boxes with many small and large compartments for complex storage of working parts and their facilitated transportation. Such a box can be thrown into the trunk of a car or carried by hand.
- Compact cases with ergonomic handle containing all the tools needed for minor repairs or country trips.
- Chests of drawers, consisting of several drawers, as a rule, are used permanently at the place of work.
- Tool belts are needed for those who work at heights or in hard-to-reach places.
- Trolleys are a kind of tool boxes on wheels, which are large in size. On such devices, very large equipment is moved, such as welding machines, drills.

Important! When choosing a box for your tools, it is better to give preference to multifunctional boxes, where each part has its own place, and small compartments are closed with lids. Otherwise, all the tools run the risk of being mixed into one heap during transportation.
What are tool boxes made of?
Cases and boxes can be made from various materials, but the main requirement for them is the same - the boxes should be light, since the tools themselves weigh quite a lot. There are a few more nuances that you need to know about those who buy a case for their arsenal of tools:
- The bottom of the box should be as thick as possible, since it is on it that the entire mass of the contents presses.
- A full box should not deform when lifted - the walls remain perpendicular to the lid and bottom. If the walls sag, this indicates that the strength of the case is insufficient for such a set of components.
- Well, if the material of the box is fire-resistant, then expensive tools will survive even during a fire.
- If there are gaps in the box, dust and construction debris will enter the box and contaminate the tools. And in this case, the contents are threatened with oxidation and rust due to high humidity.
- Durability is an important factor, because a professional box costs quite a lot, and the load on it from metal components will be significant.

Today, the most popular materials for such boxes are:

Attention! All materials must comply with special standards, because if the box breaks at the most inopportune moment, all heavy tools will fall on the feet (or on the head) of the unfortunate owner.
If you can still make a metal or wooden tool box with your own hands, then you can really only buy plastic boxes.
How to make a DIY tool box
If the owner has decided to make a box for his inventory on his own, first of all, he needs to determine the size and choose the design of the box.

To do this, you need to inspect all your tools, measuring the most dimensional elements and taking into account small things (bolts, nuts, washers, etc.). According to these parameters, the dimensions of the container itself and the internal compartments are calculated.
Tool box design
Speaking about the design of the boxes, they do not mean their shape, but the way they open and the presence additional sections. The following designs are considered standard:
- Case - portable box rectangular shape with a handle. As a rule, cases are divided into many departments, have removable partitions that allow you to independently divide the space inside the box. The weight and dimensions of such cases are usually small.
- Container - a larger box for a variety of tools. As a rule, it has the shape of a trapezoid with a rectangular bottom. Inside this box there are also partitions, and there may be separate smaller boxes (folded like a nesting doll). Sections of such a container can be pulled up and to the sides, forming a whole "trellis" with tools and fasteners. Large tool boxes of this type can be equipped with wheels, which is very convenient and practical.
- Multiboxes are arranged vertically and the drawers in them are pulled out along the guides, as in a regular chest of drawers.
With your own hands, it will be easiest to make a case for tools, because in this design there are no complex mechanisms and hinges with which additional sections come out.

Important! Although it is quite possible to build a container with boxes that fold over several floors with your own hands. To do this, each pair of "floors" should be fastened with metal brackets, providing mobility to the elements (as in the figure below).

Bringing an idea to life
Speaking of material for self-manufacturing box, then, of course, the easiest way to work with a tree. For the first experience, it is better to choose inexpensive wood - a planed coniferous board is quite suitable for boxing.

The whole process of making a tool box consists of several stages:
- Make a drawing of the future boxing. To do this, use a regular drawing paper and a ruler or professional program AutoCAD type.
- The resulting drawing is transferred to the wood with a simple pencil or marker.
- Cut out the details along the contour using a jigsaw or saw.
- Treat the tree antiseptics or stains to prevent it from rotting and making it "inedible" for insects and rodents.
- The box is being assembled. Now all the details need to be connected into a single structure, according to the drawing. To do this, it is best to use wood glue, which is applied to the ends of the parts and pressed against each other for a few seconds.
- It is better to additionally fix the elements of the box with self-tapping screws, making sure that the wood does not crack when screwing in the fasteners.
- Install the lid using conventional hinges or another device appropriate for the type of drawer opening.
- The lid is equipped with a handle for carrying and transporting the box with tools.
- Inside the box is marked into sectors, given the diagram and drawing. Additional partitions are cut out of the board and fixed in place with glue and self-tapping screws.
- The walls, bottom and lid of the box are polished in several ways. sanding paper, then painted or covered with several layers of varnish.
The box is ready to use, it remains only to fill all its compartments with the appropriate tools and fasteners.
The simplest tool box
Beginners in carpentry are offered more than simple design box for tools - an ordinary box with a handle, but without a lid. The advantage of such a box is that it is suitable for tools of various sizes, if desired, even a water level or a puncher can be placed here, or you can make a miniature box for an “apartment” master.
Such a box consists of only six parts:
- two long side elements;
- two short sides, the height of which should exceed the height of the long sidewalls, since the handle will be attached here;
- the bottom, which should be made from a single piece of wood, since it is the bottom that takes the load from the weight of the tools;
- a handle, the role of which can be played by a bar, plank or round segment - the choice depends on the size of the box and the estimated mass of its contents.
If desired, the design can be supplemented internal partitions or complicate it with compartments with lids or doors.

All elements are assembled into one structure, fixed with carpentry glue, then additionally fastened with self-tapping screws. Particular attention should be paid to the fasteners of the handle - it must be strong and reliable.
You can independently assemble a tool box not only from boards, depending on the arsenal of tools, plywood, chipboard, OSB, galvanized metal or aluminum sheet can be used.
There is nothing complicated in the manufacture of such a box, and the advantages of the product are obvious: tools and fasteners will be in a certain place, at any time it is enough to get the box from the pantry or garage and make the necessary repairs.
Practical storage systems for the garage or workshop.
For many, the garage is not only a place to store a car, but also a real car, locksmith and carpentry workshop. Therefore, it is important that everything is always at hand and in the right place. But sometimes it is so difficult to understand the variety of screwdrivers, pliers, scissors, drills and other utensils that are stored in the "male Eden". In this review, simple yet effective ideas will help you create almost perfect storage systems in your garage.
1. Magnetic tape

Magnetic tape for storing small metal parts.
Magnetic tape pasted on the wall in the garage can be used to drill storage, scissors, bolts, nuts and other small metal parts. Such a magnetic holder is very convenient to use and will help prevent the loss of small but important spare parts.
2. Plastic containers

Rack made of plastic containers.
From large plastic containers and blocks of wood, you can build a large rack for storing tools, wires, spare parts and any other things. The organization of such a rack will allow you to put things in order and significantly save space in the workshop or garage.
3. Roof rails

Rails for trash bags and paper towels.
On one of the free walls of the garage, you can place several small roof rails, on which it will be convenient to place rolls of garbage bags, paper towels, sandpaper, adhesive tape, coils of rope and much more.
4. Furniture brackets

Brackets for furniture storage.
Many summer residents use the garage to store folding outdoor furniture. So that it does not stand in the corners and does not take up much space, make a vertical rack for it with wooden or metal brackets and screw it to one of the free walls.
5. Jars

Storage of nails, bolts, screws and other small things.
Bolts, nuts, nails, screws, screws and other little things do not take up much space, but it is extremely inconvenient to store them mixed. Putting things in order will help jars with lids screwed to the bottom of a wall cabinet or under the desktop top.
6. Grid under the ceiling

Lattice for storage of pipes and plinths.
A plastic grate screwed into the corner of the garage under the ceiling is ideal for storing leftovers. water pipes, skirting boards, profiles and other long things. Such a storage system will help to significantly save space in the garage and prevent possible breakdowns fragile building materials.
7. Organizer for screwdrivers

Wooden organizer for screwdrivers.
A small, practical screwdriver organizer that any man can make by simply drilling the right number of small holes in a block of wood. Such a product can be hung on one of the walls of the garage or workshop to keep all the screwdrivers in one place.
8. Vertical storage systems

Vertical panels for storage.
Several perforated panels of metal or plywood under a table or in a cabinet provide an ergonomic and comfortable place to vertically store small hand tools.
9. Plastic pipes

PVC pipe storage systems.
The remains of PVC pipes of different diameters can be used to create the most different systems storage. For example, pieces of wide pipes screwed to the bottom of the cabinet are suitable for storing a screwdriver, drill and other tools of this type. From pieces of PVC pipes of medium diameter, you can make cells for storing various sprays, polyurethane foam, tubes of paint and other containers.
10. Tassels

Hanging brush storage.
It is very convenient to store paint brushes and spatulas suspended on a thin wire or on a thin steel rod.
11. Rack for garden tools

Wooden rack for garden tools.
So that garden tools do not take up a good third of the garage space, store them on a special rack screwed to one of the walls. Such a rack can be made with your own hands from wood bars, a wooden pallet or pieces of plastic pipes.
12. Multifunctional rack

Pallet rack with shelves.
Wooden pallet complemented with shelves made of pieces wooden slats, will become a functional component of the garage and will help to place a huge amount of hand tools and small ones in one place.
13. Rod holder

Rod storage.
A regular wire rack can be used to create a handy rod holder. Such a storage system can be fixed under the ceiling so that it does not take up space below and does not get underfoot in the autumn-winter season.
14. Pegboard

A box for storing various small things and products is considered an indispensable attribute in a modern economy. Thanks to this design, all things are in their place, while not forming a mess. For example, vegetables and fruits should be stored in a ventilated building where fresh air can freely enter.
For tools, monolithic products without any holes are suitable. For various little things, designs with additional doors and a folding mechanism are suitable.

We offer original options for storage boxes made by hand. Here you will find out what materials and tools will be needed for the manufacture of these products.

What materials are used to build structures?
Most often, boxes are made of wood and other materials. For tools, it is better to choose solid pine or maple. Alder or aspen is suitable for products. These tree species are distinguished by their durability and strength. They do not emit resinous secretions and do not dry out over time.

Plywood is suitable for the manufacture of decorative products. Here you can place every little thing. To fix the parts, a special adhesive composition is used.

Master class on creating a box with your own hands
We offer step by step instructions how to make a box at home. To do this, you will need the following tools and materials:
- tape measure;
- simple pencil;
- board 25 mm thick;
- wooden trimmings 15 mm thick;
- thin plywood;
- metal corners;
- nails and screws;
- hacksaw;
- screwdriver;
- metal hinges for opening the lid structure;
- hammer.

The first step is to familiarize yourself with the diagrams and drawings of how to make a box. This will allow you to correctly compare the dimensions of the finished product. Do not make structures that are too large, as they will take up a lot of free space.

When all the components are ready, you can proceed to the manufacture of a storage system for vegetables and fruits. The process includes several steps:


On the surface of the boards, we mark the size of the side parts of the product. Next, move on to the bottom of the box. We mark the size on the wooden trimmings. After that, using a hacksaw, we begin to cut the blanks.

We fix the boards together with small nails. We fasten the bottom details using the same method.

The cover of the product consists of a plywood sheet. It is installed on special hinges that allow you to control the closing process.


The do-it-yourself box photo shows the entire workflow.

Tool storage box
This type of design is considered best idea do-it-yourself box. This product will allow you to keep all the working tools in one place. Here you can make additional departments for storing screws, nails and nuts.

For this you need to prepare:
- thin board;
- thick plywood;
- hacksaw;
- electric jigsaw;
- hammer;
- screwdriver;
- tape measure;
- drawing of the finished product;
- metal corners.


On sheets of thick plywood, we make markings for the details of the box. After that, we drill holes for fastening metal loops. Next, we connect the side parts to each other.

Let's start making the bottom for the storage system. To do this, we attach a thin board to the side of the box. So that it does not fall under the weight of the tools, it must be strengthened with thin boards. To do this, several wooden elements are stuffed on the bottom surface.


In the side parts of the plywood we draw the markings for the handles. They will be cut inside the main body of the product. Here you need an electric jigsaw. The cutting base is installed at the beginning of the markup.


In the process of cutting parts, do not make sudden movements. They can cause cracks on the surface of the product.

Now let's start installing partitions. To do this, cut out a small square from thin plywood. It is fixed with metal corners in the middle of the structure.

The diagram shows a detailed image of the tool box. The drawing shows the exact number of parts:
- side parts - 4 pcs.;
- bottom - 1 pc.;
- partition wall;
- handles - 2 pcs.

DIY drawer photo


History of sky lanterns
Job description: concept, purpose, structure, procedure for compiling and formalizing Purpose and content of job descriptions for managers
Interview questions What job are you going to work on?
What to do if the boss criticizes all the time If the boss does nothing
How to understand: will the kitten be fluffy?