All gardeners and gardeners are in constant search methods for increasing productivity. The use of organic fertilizers is an expensive method, and not so accessible. Mineral complexes are much cheaper and give good results, but over time the soil becomes worse in quality. The plants on it grow worse every year.
Compost can be a good solution to the problem. He's good will fertilize the soil and at the same time save money on garbage removal and watering, as well as the purchase of special fertilizers. All kitchen waste just needs to be sent to compost pit. You can also send garden waste there. You just need to know how to make compost correctly.
Harvesting methods
 Composting can only be done in two ways:
- in a heap;
- in a box (composter).
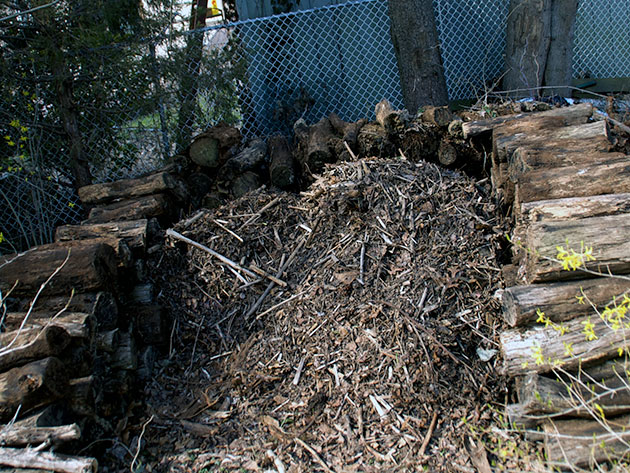
The first method is the simplest and cheapest. Air and moisture pass through the wire frame of the pile perfectly. It takes no more than 9 months for compost to mature using this method.
A closed compost bin can be purchased at any specialty store. It looks more attractive and protects the contents well from all kinds of pests. There is a drum inside the box that turns the compost in the box. Also, such containers have a special hose for water supply.
 The most effective process of humus occurs in a compost pit and container, since they maintain a constant temperature and humidity. How larger pit, the sooner the compost fertilizer will ripen. Optimal sizes the pits are considered to be:
- diameter - 2 meters;
- depth - 1 meter.
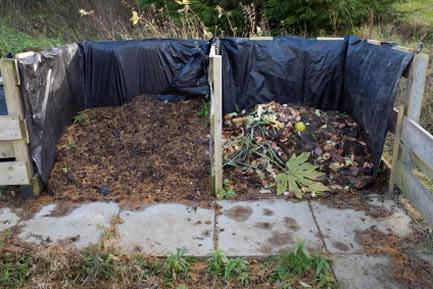
The pit can also be made into an elongated rectangular shape, dividing it with a partition. In this case, it will be convenient to fold mature compost.
The compost heap can even be located directly on the surface of the earth. Organic matter that is composted decomposes with the participation of bacteria that require good ventilation air, water and nitrogen. That is why the compost heap should be well ventilated, be in constant humidity and not become waterlogged. Moreover, it should not be too huge. It is better to make its base about a meter, and its height no more than one and a half meters.
First of all, you need to dig a hole as deep as a shovel. A drainage layer of branches of berry bushes or small trees is laid at the bottom. This is necessary so that the liquid formed during decay can easily flow down. A layer of soil and various organic waste are placed on top, and each layer is watered and compacted well.
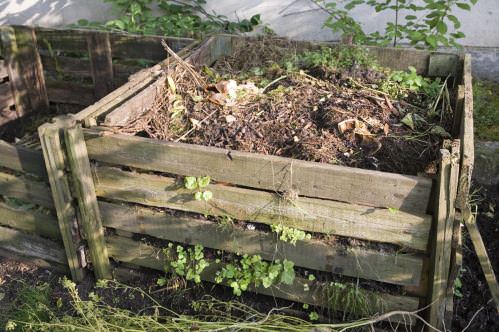
If there is already mature compost on the site, then it is better to lay it as the first layer. It will be ideal option- it will be a source of necessary bacteria for new compost. In order for the pile to have the correct shape, you need to enclose it with a pre-made wooden frame or large metal mesh. This will protect the substrate from birds.
The top layer of the heap should be sprinkled with earth, and a layer of soil should be laid on top of it. good layer straw. It is not recommended to use film, as it interferes with air ventilation, and because of this, plant waste will simply rot.
Place for a pit
 It is recommended to place the compost bin in the far corner of the garden or vegetable garden. There should be partial shade, as exposure to direct sunlight will slow down decomposition process. It is also not recommended to place the pile near trees. Their roots will very quickly stretch towards the source of nutrients and pump out useful substances from it.
Compost composition
Compost is obtained from organic residues, manure, vegetation, and kitchen waste, which decompose under the influence of microorganisms. In addition to organic matter, good compost requires constant moisture, air and bacteria.
Humidity should be approximately the same as wrung out washcloth. Proper moisture levels are incredibly important and should be maintained between 45-70%. In this case, the temperature should be about 27−35 degrees Celsius.
Dry material will not be able to decompose, but too wet material will cake and its components will not be able to interact. In hot and dry summers, the pile needs to be watered, and in rainy weather, the compost needs to be stirred regularly. Under no circumstances should the compost be allowed to overheat. If the temperature reaches 60 degrees, then all beneficial microorganisms will simply die.
For effective decomposition there must be a sufficient amount of oxygen in the mass. To ensure good air flow, you need to stir the entire contents of the compost heap once every two weeks. The more often this is done, the faster the substrate will mature.
The essential participants in the decomposition of organic matter in a composting bed are:
- worms;
- insects;
- bacteria.
They generate heat and activate decomposition processes.
Compost material must be shredded. This will allow you to wait for the result faster. Large pieces will take longer to decompose.
All compost components can be divided into groups:
- Green mass. This includes: grass, garden stems, weeds, food waste, manure and bird droppings. These are all nitrogenous substances that help mixtures maintain carbon-nitrogen balance and mature effectively.
- Brown mass. This includes: straw, tree leaves, cardboard, wood shavings, branches and tree bark. These carbonaceous components contain a huge amount of fiber. It is food for bacteria, and they, in turn, loosen the mixture and contribute to its rapid decomposition. In addition, these components saturate the compost with useful macro- and microelements.
Layer scheme
 When forming compost with your own hands, you need to alternate green layers with brown ones. This will improve air flow and speed up the decomposition process, which will help achieve the desired fertilizer texture.
The decomposition of nitrogen and carbon occurs differently. The nitrogen components generate heat, and decomposition occurs very quickly, while bacteria multiply rapidly and absorb oxygen. Materials containing carbon are friable, have a lot of oxygen, and when rotting they consume nitrogen. The necessary balance can be achieved by taking equal parts of nitrogenous and carbonaceous material.
The layers should be laid out one at a time or mixed in such a way that they interact with each other but do not form lumps. Layers can be spilled chicken droppings, fermentation stimulator or manure.
The optimal composition of compost is equal parts of the brown and green groups.
 In order to obtain high-quality humus, in no case Unsuitable waste and materials must not be used.
- Leaves or branches of diseased plants should not be sent to the compost bin. Even with decomposition, the infection will not die.
- There is no need to use large pieces of wood, as well as cuttings of evergreen trees and shrubs, since they will rot for a very long time and will delay the maturation of the substrate.
- It is also not recommended to use fallen leaves from the current year, as they take a long time to rot.
- Perennial weeds with seeds are also not sent to compost.
- The use of waste treated with poisons and pesticides is prohibited, as they can destroy beneficial bacteria and microorganisms.
- You should not put glass, plastic and synthetic fabric, as well as fat, bones and other hard-to-decompose waste into the pit.
- Under no circumstances should human or animal feces be used, as they may contain worms.
- Among the plants, it is not recommended to add potato and tomato tops, lily of the valley, and castor beans to the compost. This waste contains poisons that kill microorganisms. Decomposition will be very slow and ineffective.
 Plant waste must be placed not too thick layers (about 20 cm). A thick layer will slow down rotting. The layers should alternate.
- Green manure plants are rich in protein and decompose very quickly. They are placed between coarser waste.
- Straw and hay are invaluable for the composition, as they facilitate the flow of air and provide porosity to the structure. But before laying, the material must be thoroughly crushed and mixed with nitrogenous materials, kitchen waste or other organic matter. This layer should be quite thin.
- Wood shavings contain very little nitrogen and decompose slowly, so they must be mixed with green matter.
- Food waste is a very valuable mass that quickly decomposes. To prevent waste from rotting, it must be mixed with coarse materials, such as wood shavings.
- Manure and bird droppings contain a huge amount of nitrogen and have a beneficial effect on compost. It is recommended to sprinkle soil on top of the manure layer.
- Paper decomposes well thanks to cellulose. Before laying it, you need to wet it and tear it into small pieces. It should be combined with rough material.
Acceleration of maturation
You can use special preparations called biodestructors. They do not contain chemicals, but they contain a huge number of bacteria, which significantly accelerate the decomposition processes.
You can use a homemade herbal solution. To do this, you need to take five parts of well-chopped grass, 2 parts of manure and 20 parts of water. The composition should be infused for two to three days.
Yeast is very effective remedy accelerating the decomposition process. For 1 tablespoon of dry yeast you need to take 200 grams of sugar and 1 liter of water. A hole is made in the compost and the solution is poured into it.
Determining compost readiness
The ripening of compost can be determined by the following signs:
- it is impossible to see individual components - leaves, stems, branches, etc.;
- the consistency of the composition is free-flowing and loose;
- color black or dark brown;
- There is a smell of wet earth.
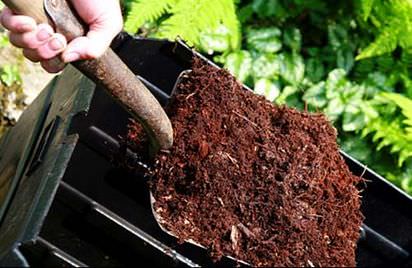
Ready and fully mature compost looks like fertile soil(humus), but in the mass you can see some inclusions of unrotten materials, which make the composition loose.
Possible problems
There may well be some problems with compost:
- The appearance of ants. This situation indicates that the compost is too dry and the material decomposes very slowly. The situation can be saved by watering and shoveling.
- Foul odor and mucus. This suggests that the compost contains a lot soft materials. This can be corrected by adding straw when mixing the compost. Dry branches, cardboard or leaves will also work.
- No visible changes. This indicates that the pile is too dry. Watering and adding freshly cut grass will help correct the situation.
- Unpleasant smell. This can happen when the heap has an unbalanced composition.
Rules for using compost
Mature fertilizer can be applied to any crop. The dose is 20 kilograms per 1 square meter. The composition is applied for spring or autumn plowing, into holes during planting, and also as mulch. In summer and spring, compost is spread over the soil and dug up.
Mature compost consists of a large amount of nitrogen, so first-year fertilizer is not recommended for those crops that are able to absorb and accumulate nitrates. But two-year compost is perfect for most garden plants.
Making compost is not a complicated process; the main thing is to do everything according to the rules and recommendations given.
Attention, TODAY only!
The basic principle of gardening is that the land on which seedlings are planted must be fertile or sufficiently fertilized. Compost plays one of the first roles in gardening. Through the application of various organic fertilizers, gardeners achieve results in harvesting great harvest vegetable, fruit, berry crops.
But a number of questions still remain pressing:
- where to get fertilizer of such quality that you don’t have to worry about the health of both the soil and the plantings;
- how to make compost - your own fertilizer - without spending a lot of money.
There are many fakes on the market that are presented as natural fertilizers - humus, compost, and so on. But there is no guarantee that this is not an ordinary “dilution” stuffed with various chemical additives, which will then harm the soil and crops.
The solution to these questions rests on a new one: how to make compost yourself? This procedure can be done by anyone. And a high-quality organic fertilizer, due to the various nutrients it contains, is practically no different from high-quality humus. And this allows him to guarantee excellent productivity.
What is compost
 Compost is a natural organic fertilizer, which you can get yourself. Thanks to waste products and various microorganisms contained in it, it is saturated with various necessary elements and processes.
Such fertilizer is quite easy to make with your own hands in your garden or garden plot. The resulting substance can subsequently be used for growing and further cultivating biologically and environmentally friendly agricultural crops and products.
Having set the goal of how to make compost with your own hands high level, You must familiarize yourself with and continue to adhere to certain rules, be aware of some of the subtleties and nuances.
How to make compost yourself
Start
To make compost with your own hands, you need to maintain the following conditions and take into account the following information.
Choose the time required for this event, traditionally these are the months from September to November.
Do not be afraid to start creating humus with your own hands, since this activity is quite simple and will not require any serious time or financial stress.
Useful information that compost heap will be a kind of bioreactor. That is, you need to be prepared in advance for the fact that only clean waste will go there, without any chemical or synthetic impurities.
To start making compost yourself, you need to make sure that there are (or can be provided) sufficient conditions for creating humus: a warm and humid place.
First stage
 Before preparing compost, it is necessary to prepare a place for a compost heap.
A compost heap is created with your own hands as follows: first, a remote place is selected on the site and fenced off with some organic materials, usually simple boards. The size of the enclosed space will be of fundamental importance here. The following dimensions must be maintained: width - 1.5 meters, length - 1.5 meters, height - 1 meter. If it turns out to be smaller in area, the produced compost will quickly dry out and at the same time not warm up enough inside. All this will lead to the disruption of the technology for creating high-quality humus, since fermentation inside the heap will be too slow. But if you maintain the dimensions, such problems will not arise.
The process of transition of organic mass consisting of waste into high-quality humus will take place due to the vital activity of the organisms contained in it. They will multiply rapidly, due to which the required amount of energy will be released. The waste products of these organisms will launch all important biochemical processes and ensure their progress as quickly as possible.
Second phase
When the site for creating humus is ready, you can proceed to the next stage, how to make humus with your own hands.
What can you put in compost?
 For composting, you will need to collect as wide a variety of waste as possible. It is important to understand here that the more extensive its composition, the more complete the humus will be. Let us note once again that the composition must be made from natural materials. Any synthetic chemical waste should not be allowed into it.
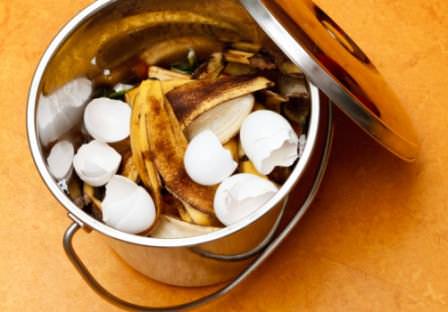
You can safely put the following in a compost heap: various household and household waste, peeled potato skins, stems, seeds and peels from fruits and vegetables, egg shells, leftover bread, tea leaves.
You can put leftovers after construction work: shavings, sawdust, thin cardboard, paper.
Agricultural waste (weeds after weeding, chopped branches, unnecessary hay or straw), waste products of poultry and animals. Even natural fabrics, paper, newspapers, etc. will do.
To prepare compost correctly, it is important to remember that all waste that is placed in it must be pre-shredded. If you don’t do this and add waste that is too large and not pre-shredded into the compost, you may end up with just a big dump instead of compost. The necessary processes, microorganisms and other necessary things will no longer be in it. Accordingly, it will not be humus either. That is, each such mistake in the question “how to make compost” can lead to damage to the collected material.
A proper compost heap also requires proper care for her. In this case, care means properly covering it. It is necessary in order to regulate the amount of moisture, heat and exposure to sunlight.
The correct solution would be to cover the humus with organic materials as well. It would be appropriate to use thick paper, cardboard, boxes, unnecessary chipboards, etc. Under no circumstances should it be allowed various kinds polyethylene films and other synthetic materials. They reduce contact with oxygen and, accordingly, disrupt important metabolic processes within the humus. Characteristic smells will help convince you of this.
Third stage
 At this stage we will determine compost is ready to use. On average, compost becomes usable after 8 months from the start of its creation. Determining that humus is ready for use is very simple. To do this, you need to make sure that the compost material has a homogeneous granular mass, the color of which should be dark brown and have a characteristic earthy odor. If these characteristics appear in a composted heap, you can safely use it for fertilizer.
Ways to use compost
The material obtained by the above method is organically important fertilizer, which can be used for any garden crops. In this case, there are no contraindications, exceptions or reservations. This compost can be used for all crops grown, adhering to the same doses as traditionally applies to manure. That is, it will be about 100 or 200 kilograms per one hundred square meters. This valuable humus can be added in autumn or spring during plowing or while digging up the soil. It's also very easy to use. It is enough to simply scatter it over freshly plowed soil or put it in holes like mulching material.
Answers to frequently asked questions
What if the compost was made incorrectly?
Often, beginners, when starting to prepare humus for the first time, make various mistakes. If for some reason the compost was not done correctly and mistakes were made, this does not mean that you should throw everything away. You can try to correct the situation and loosen the humus. In this way, air exchange will be restored and the necessary processes can be restarted.
What to do if the compote is too dry?
In this situation, which arose due to the fact that, most likely, not enough heat is supplied to the material for humus, you can add a little moisture yourself. The average moisture content in the composted material should not exceed 60-70 percent.
More often, another situation arises: sometimes the compost material turns out to be too moist due to the fact that work with it is carried out in the autumn, and it is most often rainy. If the compost heap is overfilled with water, in this situation it is necessary to control the moisture level and close the heap in time.
How to speed up compost readiness time
For any farmer or just a gardener, 8 months of compost maturation is more than a serious time. However, there is great news for gardeners. At the moment, there are several simple measures that allow you to shift the ripening time of compost to just a few days. To do this, you need to add specially selected microorganisms to the compost material.. The necessary microorganisms and bacteria are contained in special preparations that were developed specifically for quickly obtaining high-quality humus. They are completely harmless and bring only benefits and excellent results. They take root perfectly inside the compost and more than significantly speed up the metabolic processes inside it.
To obtain excellent humus in a few days you need to turn to a biostimulating drug such as Embrico Compost. We owe its development to Crimean scientists. This drug helps the compost heap mature in literally 5-7.5 weeks.
Biostimulator for humus "Embrico Compost"
 In addition to the fact that this stimulator effectively accelerates metabolic processes within the humus, it has a number of pleasant additions:
- completely removes any characteristic odors characteristic of organic waste;
- eliminates pathogenic microbes contained in waste;
- promotes the death of weed seeds;
- destroys eggs and larvae of various unwanted insects and helminths.
How to use Embrico Compost correctly:
- First, shake the packaging until the color is uniform;
- After each use, squeeze the packaging as much as possible to remove excess air from it and close tightly. After this, the drug can be used more than once;
- For 1 m3 of compost, use 100 ml of stimulator. It must be diluted in a ratio of 1:50;
- water for dilution must be free of chlorine. If this condition is not met, the beneficial microorganisms contained in it may either weaken or die completely.
Compost possibilities
If the compost is correct, you can safely expect a lush harvest. And what’s especially nice is that it’s not just for one season. Good and proper humus can improve the structure of the soil. This allows him to ensure productivity for several years in advance.
Good and correct humus contains all the most necessary micro- and macroelements for the best growth of plantings.
Compost can improve the immunity of garden plants to various kinds of unfavorable conditions, diseases, even pests.
Your own personal compost allows you to save a lot on expensive products and rationally use commonly disposed household waste.
It has become much easier to obtain your own compost thanks to the development of a biostimulator. Now you don’t have to wait almost a whole year for the humus to be ready.
» Medicines
The annual use of the site for growing various crops greatly depletes the soil. To restore its fertility, it is necessary to periodically apply fertilizers. One of the most available types food, which has a rich composition of nutrients, is compost. This fertilizer can be made at the dacha with your own hands.
Compost is one of the types of organic fertilizers that can be prepared independently using various household and vegetable waste. A high-quality composition containing minerals and valuable trace elements is equivalent to humus. The nutrient mixture reaches readiness as a result of the decomposition of organic matter under the influence of heat and moisture. A compost heap is identified with a living biological reactor. The process of converting waste into a valuable nutritious product occurs thanks to intensively developing microorganisms.
Preparing compost is not a labor-intensive process, but the technology still has some features. Only the right composition can restore vitality soil, increase its fertility and improve its structure. There are a great many recipes and methods for preparing organic fertilizer. Each experienced gardener has his own exclusive secrets, which consist in the use of various additives, the combination of certain components, etc.
For those who did not take care of setting up a compost pit in advance, bagged humus is offered. But before purchasing, you should collect information about the manufacturer, otherwise you may get a neutral or negative result after fertilizing the land.
 Natural compost is rotten organic waste
 What is it made from?
No matter how tempting the offers to purchase ready-made compost may be, you can only fully trust a product you prepare yourself. To obtain organic fertilizer you can use:
- waste and peeling of vegetables/fruits;
- eggshells (only from eggs that have not undergone heat treatment);
- tea leaves, coffee grounds;
- mown grass;
- dry leaves;
- peat;
- manure domestic animals, bird droppings;
- thin branches, stems;
- paper, natural fabrics, feathers (raw materials in crushed form);
- straw, shavings, seed husks.
All or part of the ingredients are filled into a box or pit in a certain order. To start the fermentation process, it is necessary to create a favorable temperature regime and high humidity.
 Compost is prepared from the remains of fruits, vegetables, eggs, straw and other things.
 The following ingredients should not be placed in a composter or pit:
- vegetable waste and fruits that have passed heat treatment (there are practically no useful microelements in them, the composition will turn out to be non-nutritious);
- weeds(all types of weeds contain poisonous or toxic substances that pose a danger to the soil and cultivated crops);
- plants affected by any diseases or pests(compost with such a component will provoke the spread of the disease on the soil and plants);
- synthetic material(it is not subject to the process of decomposition and rotting);
- citrus waste (essential oils inhibit decomposition processes, a large number of crusts can increase soil acidity).
According to popular rumor, you can add dog and cat feces to compost, as well as used toilet filler. Experts do not recommend using this type of waste, since animal waste products may contain worms that are dangerous to human health. Being in a warm and humid environment, they survive well, and then successfully colonize raspberries, strawberries and other fruits.
Advantages and disadvantages
To appreciate the full benefits of using compost, you need to consider its effect on the soil environment and plants.
- Compost contains a large amount of valuable minerals and trace elements in the correct proportion. When it enters the soil, a rapid metabolic process occurs, as a result of which the deficiency of missing substances is instantly compensated.
- Organic matter, when combined with soil, forms a single structure. After heavy watering or rain, micronutrients remain on the surface, unlike mineral fertilizers, which settle into deeper layers of the soil.
- Compost allows moisture and air to pass through well, which allows it to improve the soil structure in upper layers. This is important for normal development root system.
- The fertilizer contains a large amount of humus, which increases the fertility of the land.
- It is almost impossible to overfeed plants with organic matter. All components are of natural origin. They are exposed natural processes decay without polluting the soil with various toxins.
- Compost from organic fertilizers is the most accessible a way to enrich the soil with useful substances.
 Real compost has virtually no downsides and mixes completely with the soil.
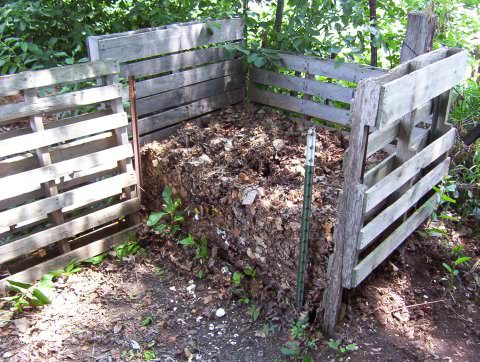
 Compost has virtually no disadvantages. However, it is worth noting that when arranging a compost heap or pit, you need to choose a place away from the recreation area and home, since the process of rotting is accompanied by the release unpleasant odor. In addition, this object attracts flies, ants and other insects. Arranging a special box equipped with doors will help to avoid problems with such a neighborhood. Insulating a compost heap in this way also has aesthetic value; the corner of the site will not look dull.
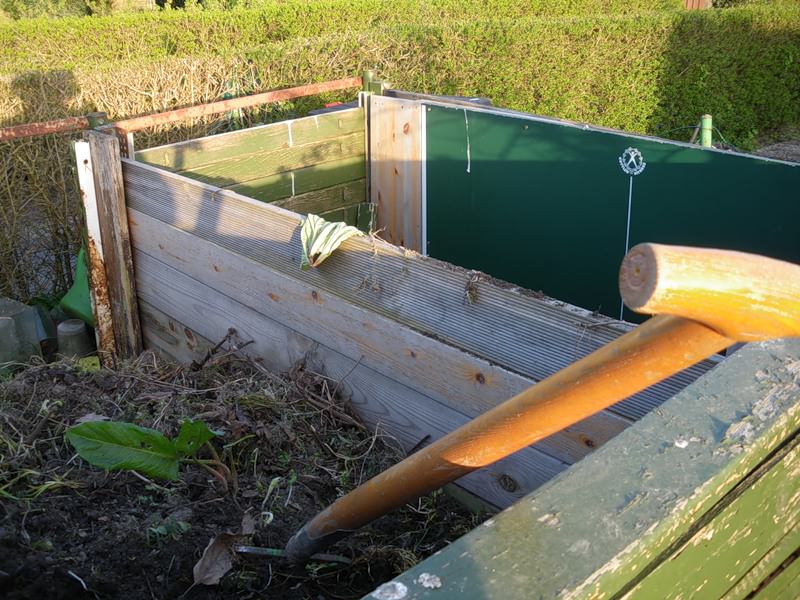
How to make a compost bin with your own hands
To organize a place for collecting organic waste in order to obtain fertilizer, it is recommended to use a compost box. Making a storage unit is not difficult at all, following simple rules.
Requirements for construction on site
In order for the manufactured container to meet all requirements, it is worth considering important points when assembling it:
- the side walls must have holes to ensure air circulation (2 cm gaps can be left between the boards);
- there is no such element as the bottom in the box;
- the presence of a lid will limit the flow of water during heavy rains (excess moisture will provoke the development of fungus);
- the lower part of the box should be opening to ensure the intake of fertilizer (the composition ripens faster from below).
Materials for making organic fertilizer
To make a compost bin, bars and boards are selected. You can also use wooden shields. Instead of a wooden lid, an upholstered frame is often used. plastic film or polycarbonate. Fixation of individual elements of the container is carried out with hardware and hinges (unlocking fragments).
Optimal box dimensions: height – 1 m, width – 1.2 m.
Manufacturing instructions
- Clear the area under the compost bin from plant debris and remove the turf layer. Mark according to the drawing.
- Dig holes 35-50 cm deep in the corners to install supports.
- Install the supports in the holes, level them vertically and fill them with gravel to half the depth. The part remaining to the soil surface is filled with cement.
- 1-2 days after the cement has hardened, fill the cement fill with earth.
- Connect the supports at the top and bottom with bars (on 4 sides).
- Cover the frame with boards around the perimeter, leaving 2 cm gaps for air access. The board needs to be attached to hinges on one or both sides at the bottom so that it can open to collect fertilizer.
- The top should be equipped with an unlockable lid made from several boards without gaps.

How to make a compost heap
As an option, prepare a compost heap in one of the secluded corners of the site. A heap does not mean a random dump of garbage, but a systematic collection of organic waste. It is better to choose a place in the shade; in the sun the components will dry out. A shady shelter provides the necessary humidity, which has a beneficial effect on the decay process. Worms, wood lice and other microorganisms also contribute to decomposition.
The right materials
These products are made from natural ingredients and will not cause any harm to the soil or plants. For example, the drug Embiko Compost (Gringo) ensures the ripening of fertilizer in just 6-8 weeks.
How to determine when compost is ready
Ready compost can be identified by its characteristic dark color composition. It should be crumbly, moist, and not smelly. The ripened fertilizer has the smell of forest soil.
By following the rules for making compost, you can regularly replenish the supply of nutrient mixture for your garden with your own hands, without spending additional money on ready-made fertilizers.
Fertilizing the soil is an important requirement of the agricultural technology of any plant, and compost is considered one of the main components for adding to the soil. Today we will learn how to make it at the dacha yourself.
Many summer residents have been preparing compost with their own hands for a long time, because this not only saves time and money, but also eliminates many unnecessary worries, which are already enough at their summer cottage.
What are the benefits of making compost at your dacha?
- Compost is considered one of the best fertilizers, which, when applied to the soil, fills it with a huge amount of microelements.
- Compost is the cheapest and most practical means for properly structuring the soil, as it increases moisture conservation and creates the loosening necessary for all plants.
- By scattering compost over the surface of the soil, you can create the best organic mulch that will conserve moisture and suppress the growth of many weeds in the area.
- Preparing compost for dacha area– this is a very useful process, as well as a significant contribution to the development and protection of environment. No mineral fertilizer can compare with high-quality compost, and a properly formed pit in which organic components rot can become a real incubator for beneficial bacteria and microorganisms.
- Preparing compost significantly reduces your physical effort, since now you do not need to remove it from the territory summer cottage a good portion of the garbage, everything can simply be placed in a special pit.
What is garden compost
Compost is a specific product obtained from organic waste under the influence of the environment and a huge variety of insects and microorganisms. It is used for structuring the soil, mulching, and fertilizing.

The bark and branches of trees, stems and leaves of plants - all this can be placed in a certain order in a special hole or simply on a pile, provide conditions for rotting and processing, and get a high-quality, truly environmentally friendly product without any harmful or toxic compounds. Naturally, the process of decomposition of all organic residues will force you to wait seriously, maybe even several years, but you will get real quality, and not a mixture prepared on the basis of unknown components from the store.

How to make compost
Professionals are familiar with making compost using the fast and slow methods. They are also called cold and hot.
Before we get into the “recipes,” we’d like to talk about building a proper compost bin or pit.
How to make a compost bin?
So, initially we need to prepare the material for the production of a compost bin in size. Almost any boards or planks that are not rotten and have not previously been in contact with toxic materials are suitable for this. In the first case, during the biological process, rotted planks can deteriorate; in the second, planks covered in paint or oil can simply poison the compost, ruining its quality irreversibly.
We would advise you to take unedged pine in boards or beams so that the finished box will last for many years, and work with this material. This way you will make a high-quality container, but won’t spend a lot of money.
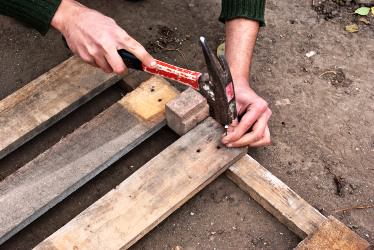

Now we choose a place and begin construction. On a hill or on a flat area, it doesn’t really matter if your terrain is not rainy and the groundwater level is low. In general, it is advisable to place the place for compost slightly above the standard soil level so that it does not get washed away. So, we create four sides of a box, like a standard vegetable box, but much larger in size.
It is imperative to maintain gaps between the collecting slats to ensure ventilation of the compost for the correct internal biological processes.
At the place where the box is assembled, we install supports; we attach three ready-made walls from pine boards or timber. We leave the last side removable so that it is convenient for us to get the finished product for fertilizing or mulching the soil in the country.

It is advisable to place some material, for example, old linoleum, at the bottom of the box or, as they say, compost pit.
How to make proper compost quickly?
How to prepare compost correctly in a fast way? This question interests many newcomers to the dacha business, and therefore we move on to it without delay.
First of all, we create a special container - a frame that will contain all organic residues entering the compost on a single heap. It could just be a fenced pit wooden structures, a special wooden or plastic box in which there will be ventilation and access to the contents from above or from the side.
Create drainage at the bottom of the container. It can be made from a layer of hay, straw, spruce branches. The layer should be about 10 cm.

Materials and various products for composting are stacked in layers. For example, you can immediately put branches and other fruit waste, then a layer of paper, the next layer of leaves, then a layer of mown annuals or grass, and so on. It is important that the layers alternate approximately as follows, dry waste with wet waste, soft with hard. This method of laying will provide access to air, ventilation, and speed up the composting process. In this case, it is necessary to remember that compaction is of no use here, and may even cause harm.
It is necessary to lay each layer with special process accelerators, for example, nitrogen supplements, which are offered in garden stores, manure from herbivores, plants such as legumes, nettles, dandelions, and yarrow. You can also use rotted manure or ordinary garden soil.

To maintain the temperature and the correct internal environment, it is necessary to cover the compost storage special materials- oilcloth, old rags, a piece of linoleum or carpet. The main thing is to maintain warmth inside.

IN summer time When there is a drought outside, the compost can be shed a little in order to maintain the required humidity inside the storage facility. But remember, only spill, and not fill to the top.
If you smell specific aromas from the compost bin, this may indicate that the cooking process has failed and is not proceeding correctly. If it smells like ammonia, there are too many nitrogen components in the pit (the situation can be improved by adding some torn paper). If you smell rotten eggs, it means there is not enough oxygen in the hole or box, and the contents need to be well stirred by sprinkling the layers with straw or shavings.
If you managed to make the container correctly and fill it in even layers, the compost will be ready in a few months. It is better to select it from the lower layers, so that the upper ones fall evenly, pressing on top with new organic residues.

How to compost slowly?
How to make compost from grass or branches? How to get the most correct and high-quality product? Naturally, this method a little more difficult, or rather, longer, but as a result you will get very high quality compost.
By by and large, you don’t have to do anything special, just prepare everything for rotting once and wait for several years. By the way, you can install a new compost pit in the corner of your plot every year so that in 2-3 years you can reach constant annual volumes.
So, how do you make your own compost?
If you can make compost in a barrel in a quick way, then for a slow, cold method, you will need an ordinary pit at some elevation in the area. The hole you dig is small, about the size of a shovel, but wide enough to accommodate enough branches and logs for composting. Next, broken tree branches and arrows, trimmings and rotten logs in a crushed state are poured inside the pit. Our entire pile is covered with soil on top and forgotten for a long time. In the second year, if you are very lucky, or in the third, which is stable if prepared correctly, you will receive excellent fertilizer for the garden.
When choosing from methods of preparing fertilizer, many choose the fast one, and it’s not even worth explaining the reason to anyone. But now I want to talk not about the method, but about what should go into the compost pit and what should not.
What can you make compost from?
If you want to prepare high-quality compost and also save time, Throw only the following into the rotting area:
- Kitchen waste (fruits, vegetables, cereals, tea leaves, coffee grounds);
- Straw, hay, shavings, sawdust, mown grass;
- Thin branches and stems of garden bushes and trees;
- Recycled wood from a garden shredder;
- Rotted animal manure;
- Rotted leaves and other garden waste;
- Various algae;
- Others natural materials– fabric and paper;
- Chopped weeds (avoiding rhizomatous weeds from entering the compost).
What you shouldn't compost from
When preparing fertilizer, you must also remember what should not be placed in the compost storage:
- Bones, large and hard, waste of poultry, meat, fish, droppings of domestic animals;
- Fresh leaves, rhizomatous and perennial weeds;
- Plants or debris infested with diseases or insect pests;
- Fresh manure, which can only be added to slow-cooking compost;
- Garden waste that contains toxins, poisons, herbicides and so on;
- Unnecessary waste - metal, glass, rubber, plastic, polyethylene, etc.
How to make compost (video)
By following the simplest rules and advice from experienced summer residents who have been preparing a healthy “potion” for their garden for many years, you can make compost at your dacha with your own hands very simply and immediately begin fertilizing the soil to improve the quality of your harvests.
Composting - useful activity, because it allows you to use food and organic waste that would otherwise be thrown away to create a fertilizer with more nutrients. To make compost, you'll need a composting area and a variety of decomposable waste, preferably from both your kitchen and the outdoors. With the help of the recommendations given in this article, you will be able to produce high-quality compost for your garden. If compost is made correctly, you can give your plants all the nutrients they need and make the soil more fertile while using waste material.
Steps
How to make a compost pile in the garden
- It is best to place the pile on the ground a few meters away from the plants, rather than on tiles or wooden floor. This will make turning the compost easier.
- Plastic containers protect your compost from pests and other animals that might get into your garden. If the container does not have a lid or has short edges, the compost will attract animals.
-
Use only selected animal products. If your city has food waste bins, you can throw all animal products there, but you cannot do this at home. It is best to add eggshells to your compost as they contain calcium, which is essential for plant growth.
Know what foods you can't pick. There are a number of biodegradable products that should not be composted at home for reasons related to health, hygiene and slow decomposition. These include:
- Meat and meat trimmings
- Bones
- Fish and fish bones
- Oil and fat
- Human or animal excrement (not including excrement of herbaceous animals - such as rabbits and horses)
Choose a location for your compost pile. The pile should not be located too close to the house so that odors do not bother you and so that pests that come to the smell do not get into your house. The pile can be located either in the shade or in the sun, but it should be understood that in the sun the waste will decompose faster, but it will need more water. Arrange the pile so that you have enough room to turn over the waste.
Katherine Kellogg is the founder of goingzerowaste.com, a site dedicated to sustainable living and how to make it simple with a positive approach and love. step by step process. He is the author of the book 101 Ways to Go Zero Waste and advocates for plastic-free living with National Geographic.
Decide where you will put the compost if you don't need large quantities. Katherine Kellogg, author 101 ways to produce 0 waste, advises: “Composting is much easier than it seems. There are companies that provide their composting containers and take away all the compost when it is ready. The client receives free compost in the quantities he needs. This is especially convenient if you live in an apartment."
Buy a ready-made composting container. If you don't want to spend time preparing the site, buy a ready-made container at a garden supply store. As a rule, containers are cylindrical in shape and made of plastic. They have a lid on top, but no bottom at the bottom. These are cheap devices that do not require preparation.
How to fill the container
-
Line the bottom with light brown material if possible. First, place leaves and other dry plant debris on the ground or bottom. In order for the heap to have a reliable foundation, the thickness of the first layer must be at least 5-10 centimeters.
- If you don't have brown material, you can do without it. You can use a small amount of garden soil or fresh compost - this will create the necessary bacteria in the compost heap.
-
Collect green waste. Green organic waste is high in nitrogen, which will start the heating process in the compost pile. Young weeds (it is important to pick them before they have seeds), comfrey leaves, yarrow, and cut grass are suitable to start the process. You can also add green fruits and vegetables, fruit and vegetable peelings, coffee grounds, tea leaves (including the contents of tea bags), and chicken, turkey, cow, or horse manure.
- Do not compact large quantities of green waste together as it may become anaerobic. This means that they will not provide enough oxygen in the pile for beneficial microbes to multiply and help break down the waste.
-
Use plenty of brown waste. Brown waste contains large amounts of carbon, which forms fibres. Brown waste includes leaves (autumn), dead plants and weeds, sawdust, straw, dried plants (including compositions of dried flowers without packaging), hay.
Add other waste to the pile. You can also compost the following waste: paper towels, paper bags, cotton clothing (cut into pieces), eggshells, hair and animal dander. However, these wastes can only be added in small quantities.
Place all waste in several layers. The ideal proportion is three parts brown waste and one part green waste, or equal parts brown and green waste. These wastes must be in contact with each other and must be stacked in layers of several centimeters.
Cover the container with a lid or hide food waste under a layer of vegetable waste. If you want to use food scraps, be aware that this garbage can attract animals and insects, as well as bad smell. To prevent this from happening, cover the entire container with a lid or hide food waste under a layer of vegetable debris.
- If you don't have any leaves or branches, simply tuck food scraps under the top layer.
How to look after your compost
-
Keep the compost moist. To organic matter decompose faster, they need to be in contact with moisture. It is easiest to sprinkle each layer of waste with a small amount of water as you build the pile. Add water or wet green scraps if the pile seems dry. If the pile is too wet, add dry brown waste.
- In dry weather, fill the waste bucket with water before adding waste to the pile. This will keep the pile moist.
- The pile should be as wet as a sponge from which the water has been squeezed out.
-
To speed up the decomposition process, grind waste. Shred leaves and other plant debris, as well as eggshells. Since larger pieces take longer to decompose, shredding will speed up the compost production process.
Speed up the heating process. The compost heap must be warm so that microbes can multiply there and begin the process of decomposition of organic waste. Covering your compost heap with black garden wrap or any other dark material during cold weather will raise the temperature inside.
- The temperature of the compost pile is extremely important as it is an indicator of microbial activity and the decomposition process. The easiest way to estimate temperature is by touch. If the pile is warm or hot, the process is proceeding as planned. If the temperature of the pile is the same as the ambient air temperature, it means that microbial activity has slowed down and that you need to add more nitrogen-rich (green) waste.
- Covering the container will make the compost pile look neater.
-
Stir the compost. Move the inner layers out and the bottom ones up. Break up any lumps or sticky parts. If you add more scraps to the pile, do so while turning to ensure everything is well mixed.
- You can turn the pile with a pitchfork in another place. Mix the compost separately and return it to the container. This turning will introduce air into the pile, which speeds up decomposition.
- You can also buy special device for turning over. There is a special mixer: it is a long pole with a handle at one end and blades at the other. Lower the pole into the pile and turn the handle to mix everything up.
-
Turn the pile once every 1-2 weeks. It is important to stir the compost regularly, especially if you are adding new food waste, which can start to smell if not mixed with other waste. By turning the heap, the necessary bacteria begin to grow, a sweet smell appears, and the decomposition process is accelerated.
-
Learn to tell when your compost is ready. At some point, you will have to stop adding fresh trash to the compost so that the composting process can complete. You'll know the compost is ready when it stops heating and turns uniformly brown.
- Usually the process takes 2-3 months. It all depends on weather conditions and the contents of the heap.
- Plants can grow in very fresh compost, but if the decomposition process continues, the compost can begin to suck nitrogen from the soil. If you think the compost is ready, either leave it in the container for a little while longer, or spread it over the soil in the garden, leave it for a few weeks and only then plant the plants.
-
Use compost . If all goes well, you will eventually find a layer of good compost at the bottom of the container. Take it out and spread it on the ground or bury it in flower beds or beds.
- Try running the compost through a mesh or using your hands to pick out large clumps that have not yet decomposed.
- The composting process is simple and quick. If collected cubic meter waste, maintain the desired level of moisture in it and turn it weekly, you can provide yourself with several batches of good compost per year.


Dua for Sadness Anxiety and Depression
Buddhism: the basics of religion, how many Buddhists are there in the world
Obligatory prayers: features and order of performance by men
Druid horoscope by date of birth: interpretation and features
What is oregano: all about the amazingly healthy seasoning!