What was done
Project: the Innsbruck project was adapted to the site and the wishes of the Customer's family, a decision was made to relocate the terrace.
foundation: based on geology and the architect's calculations, the house was built on a pile-grillage foundation.
ceilings: basement - reinforced concrete monolithic; interfloor - reinforced concrete floor slabs.
box: walls made of aerated concrete blocks, laying with masonry glue. Windows are made to order, with one-sided lamination, installation on site.
roof: metal tile.
exterior finish: walls are insulated with basalt facade insulation and plastered, finishing elements made of wood, made on site, based on TK-visualization, painted. Plinth laid out decorative stone.
interior decoration: finishing was carried out according to the design project, where the combination was taken as the basis decorative plaster with stone and wood. False beams were mounted on the ceilings.
additionally: a fireplace is installed and finished.

What was done
The very case when our Customer and we speak the same language and are inspired by the ECO high-tech style! Designer Ilya came to us with a ready Project of his future home! Our team liked the project - after all, such unusual and stylish solutions it's always a professional challenge!
We prepared estimates for Ilya and developed unique design solutions - all this allowed us to implement this project! The frame house is made in our proven Canadian technology with 200 mm insulation along the entire contour! Outside, the house is sheathed with imitation timber. All windows are custom-made and laminated in colors according to the project. Additional accents are placed thanks to the professional coloring of imitation timber and the selection of colors.

What was done
What does it cost us to build a house? Indeed, having a team of professionals and knowledge - building a house from scratch is a matter of time! But sometimes the task is more difficult! We have introductory - an existing foundation, or buildings on the site, extensions to existing buildings and much more! For the Matsuev family, it was precisely such a difficult task. They had a foundation from an old burnt house, and a landscaped area around it! The new house had to be erected in a short time on the existing foundation. Dmitry and his family had a desire to build new house in hi-tech style. After careful measurements, a project was made that took into account the old layout, but had a new modern form with interesting innovations! The house has an entrance group where you can sit at a table on cozy evenings and a complex but possible exploitable roof in our lane. To implement such a roof, we called on our knowledge and modern Construction Materials LVL beams, welded roofing and more. Now in the summer on such a roof you can arrange an unusual dinner or watch the stars at night! In the decoration, our architect also emphasized the minimalistic and graphic high-tech style. Smooth stucco walls with painted planken details add personality to the wooden beams at the entrance. Inside, the house is finished with imitation timber, which is painted in different colors depending on the purpose of the room! Large windows in the living room kitchen overlooking the plot - created the desired effect of illumination and airiness of the space! The house of the Matsuev family has graced our photo gallery in the country architecture section in high-tech style, in the style chosen by bold Customers with excellent taste.

What was done
Olga and her family have long dreamed of a country house! A reliable, solid home to live in, which will fit perfectly into their difficult narrow lot! With the advent of children, it was decided to realize the dream, children grow up quickly and in their own house in nature there are many opportunities and Fresh air. We, in turn, were happy to work on an individual project at home in classical style from red brick with a bay window! After the first acquaintance with our company in a cozy office, we invited Olga to take a look at our existing construction site: evaluate the order and construction processes, store materials on the site, get acquainted with the construction team, make sure the quality of work. After visiting the facility, Olga decided to work with us! And we were happy to do our favorite work again to make another country dream come true!

What was done
Project: changes were made to the San Rafael project and redevelopment was made according to the wishes of the Customer.
ceilings: basement - reinforced concrete floor slabs; interfloor - reinforced concrete floor slabs
box: walls made of expanded clay concrete blocks, mortar masonry??? Windows inserted.
roofing: metal tile
terrace: rough enclosing elements are made, flooring is done.

What was done
Dmitry approached our company with an interesting draft design to calculate the cost. Our experience allows us to perform such calculations according to draft designs with minimal errors, no more than 2%. Having visited our construction sites and received the cost of construction, Dmitry chose us from among many of our colleagues in the shop to complete the project. Our team has begun to implement a difficult and expressive country project with spacious rooms and a garage, large windows and complex architecture. After the delivery of the project, Dmitry chose us as a contractor company, and we, in turn, wanted to make further work on the same high level! Since the object is large, Dmitry proposed a phased cooperation, namely, upon successful completion of the foundation work, we proceeded to the second part of the project - walls + ceilings + roofing. Also, the exact timing of construction was important for Dmitry, in order to speed up the construction processes, the team was reinforced by 2 experienced masons.
The box on a pile-grillage foundation was handed over right on time! The result pleased us and the Customer. All stages of work were coordinated and worked out for Dmitry and his individual project, from which all participants in the process benefited!

What was done
Project: The project of our company Inkerman was changed taking into account the wishes of the Customer's family, the house was planted on the site, taking into account the existing situation on the site and the relief
foundation: based on geology and the architect's calculations, the house was built on a reinforced pile-grillage foundation.
ceilings: wooden wooden beams, in places of large spans installation of LVL beams. The basement is insulated basalt insulation in 200mm; interfloor overlap with sound insulation 150mm.
box: box: walls made of expanded clay concrete blocks, mortar masonry. Windows inserted.
roofing: installation of metal tiles.
exterior finish: the facade is insulated with 100 mm basalt facade slabs, the facades are covered with facing bricks; color scheme proposed by the architect and agreed with the customer.

What was done
The Krutov family decided to build a spacious house for the whole family!
From the idea to its implementation, Olga and other family members went through several stages! The choice of technology, the long work on the project, the construction of the foundation, the construction of the house with the exterior and then the work on the interior! The frame technology was chosen as energy-saving, prefabricated and high-tech! Why did the Krutovs choose our company? They liked the quality of work at our construction site and the workers who gave a detailed tour! We also worked on the estimate for a long time, combining different variants finishes, comparing their cost. This made it possible to choose the best option from a wide variety finishing materials and kits.
The project was created by an architect friend, but we had to work out the constructive part of it. After that, the most reliable and effective foundation was erected - UWB. Then work began on the box. A frame house with 200 mm insulation along the entire contour and a unique 300 mm roof insulation technology. For exterior finish siding was chosen in a spectacular combination of colors - coffee and cream. The accents are placed thanks to the powerful roof overhangs, interfloor belt and large windows!

What was done
When you decide to become a happy owner of your own home and move to a new home for permanent residence, first of all you think about what the house will be like; what to build it from; how much will it cost and most importantly, WHO will do all this?
Alexander, came to our company with the desire to move to his own Vacation home. He liked the Avignon project and there was already a strip foundation. After the initial visit to the site, measurements and examination of the foundation, we gave our conclusions and recommendations. Strengthen the foundation, change the project and adapt it to the dimensions of the existing foundation! After agreeing on the cost, it was decided to build in the winter. Alexander received as a gift reinforced concrete floors, one of the leading construction teams and a house according to the project he liked, which stood on the site with exterior decoration by spring! Alexander watched every stage of construction, regularly visiting the construction site and was pleased with the result, and we were satisfied with our work. This is an individually designed Avignon project, realized in stone technology with external insulation and siding trim!

What was done
Each house is a separate story of creation and implementation! Once we built a house good people and they recommended us to another nice person! Rumyantsev Andrey came to our company with a desire to replace the old country house to build a one-story spacious country house with a fireplace for warm family evenings... It was decided to build the house from aerated concrete blocks so that the future country handsome man would please the owner for decades! The customer voiced his wishes for finishing - and we, in turn, brought everything to life. Thanks to the detailed visualization of the project, each element of the exterior decoration is a member of a friendly ensemble! Bavarian masonry, as the final stage of exterior decoration, looks noble and thorough. Without a doubt, such a tandem - aerated concrete and brick can be safely called best solution in the field of stone housing construction - warm, affordable, beautiful, reliable. Modern technologies we have stepped forward so much that such unique configurations become available in a short time, because we built this project during the winter months. The main thing is to have the necessary knowledge and constantly replenish their stock!

What was done
Project: the project of a European company was taken as a basis and was adapted to the site and the wishes of the Customer's family, a terrace and a patio were proposed, taking into account the cardinal directions on the Customer's site.
foundation: based on geology and the architect's calculations, the house was built on a pile-grid foundation.
ceilings: basement - reinforced concrete monolithic; interfloor - wooden on beams with a sound insulation device of 150 mm.
box: walls made of aerated concrete blocks, laying with masonry glue. Windows are made to order with one-sided lamination, installation on site.
roof: metal tile.
exterior finish: the walls are insulated with basalt facade insulation and plastered. Based on the visualization, facade panels were added under the Tolento stone. The enclosing elements of the terrace, balcony made of wood, made on site, based on the TK-visualization, painted. Roof overhangs are hemmed with spotlights in the color of the roof.

| Vladimir Murashkin, The owner of the house "brought to life according to his idea and sketch!" House options: |
What was done
When Customers come to us with bright, modern ideas future home, we light up doubly! After all, to work on a new stylish project it is always interesting and a challenge, how to implement all the bold ideas from a constructive point of view, what materials to use? Vladimir bought a plot with picturesque views of the Oka River! Such a view could not be ignored, so a dizzying terrace (51.1m2) and a large balcony, focused on beauty, became an indispensable attribute of the future home! Vladimir wanted to relax in nature in wooden house, and it was necessary to build a house in a short time and the ideal solution for such tasks was frame technology construction! If we are different, then in everything! The house was made even more spectacular by the vertical finish with an imitation of durable larch timber, painted in natural shades with an accentuated wood texture. complement modern look at home - windows with lamination! It turned out to be an excellent country house, with zest and at the same time incredibly functional.
It all started with an individual project found by the Customer's family on a European website. It was with him that she came to our office for the first time. We made preliminary calculations for the project, conducted a tour of the existing construction site, shook hands and the work began to boil! The architect improved and adapted the project to the site and the Customer's family; the foreman "planted" the house on the site. Based on the fact of geological surveys, it was decided to put the house on bored piles. The frame has grown in a few weeks, then the roof, insulation, exterior finish! Behind winter period a house grew on the lot. The customer invited a third-party technical supervisor who monitored the process regardless of our multi-stage control. The color scheme for painting the imitation timber was chosen by our manager and here we have a bright and cozy dream country house of the Pushkov family!
The realization of a long-standing dream - to escape from a stuffy, dusty city was the construction of a 6 x 8 frame house. independent implementation of your project.
Layout plan of a frame house 6 x 8
As usual, before you start doing anything, you must at least in general terms imagine what needs to be done, from what and in what volume. All these questions can be answered. If you decide to completely manage on your own, then you will have to complete all the steps yourself:
- layout;
- Constructive decisions;
- choice of heating method;
- do not overlook the wiring of electricians and plumbing;
- the choice of materials for the implementation of all elements of the house.
A separate point should be mentioned the coordination of the project and obtaining a building permit. But here, as they say, everyone decides for himself to go the official way or act at his own peril and risk.
After much deliberation on the topic of how much space is needed for living, it was decided to stop at the variant of a 6 x 8 frame house with an attic. The first floor is full-fledged residential, the second - attic. Small architectural excesses - a balcony and a "cuckoo" in a simple gable roof.
Using the simplest graphic editors, you can draw layouts:
To visualize the idea, it is already necessary to use specialized software. It, as a rule, also contains a library with projects frame houses 6 x 8, where you can get some ideas.
General view of a small frame house 6x8.

I took as a basis, on which frame houses are built in North America and Scandinavia. By construct:
- wall thickness - 15 cm;
- rafter thickness - 20 cm;
- overlap - 15 cm;
- mineral wool and penoplex are adopted as a heater.
Start of construction of a frame house 6x8. Foundation works
The best time to start building is spring. Then the whole warm season is ahead - you can do a lot before the onset of cold weather. But due to a number of circumstances, work began only in September.
Since the load from the turnkey frame two-story house 6 x 8 with an attic is small and the soil is non-porous (sandy loam), then the choice was stopped on a strip monolithic foundation:
- laying depth - 50 cm;
- plinth height - 50 cm;
- tape width - 40 cm.

Reinforcement with a diameter of 12 mm was used to reinforce the concrete. Two armored belts are made in three bars. The rods were connected by tying a binding wire.
The formwork for pouring the tape is made of centimeter plywood and 50 x 50 bars. In total, 18m3 of concrete was required for pouring.
To ensure the possibility of access of construction equipment to the place of pouring the foundation, the entrance to the site was previously backfilled and installed drainage pipe in the embankment. I also had to hire a tractor to level the construction site and dig a trench for the foundation.
The top layer of soil inside the foundation is taken out. Geotextiles were laid and a layer of expanded clay was poured. Approximately took about 5 m3. The purpose of this operation was to remove rotting organic matter from the underground and warm the soil.
After complete solidification, the tape is treated with Bitumast waterproofing mastic weighing 21.5 kg. Coating was done by hand with a brush.
An important nuance - in reality, the consumption of mastic is two times more than stated.
According to the instructions, one bucket is enough for 100m / 2. The waterproofing of the basement took almost everything without a trace, although the area there is clearly smaller.

Since the rains were approaching, in order to create more or less tolerable conditions for the continuation of work, it was necessary to buy a second-hand banner and erect some kind of awning over the construction site.

In parallel, a larch board was purchased to make lining under. The foundation had to be slightly topped up with cement to bring it to “0”. When pouring the foundation, small differences of up to 2 centimeters in height were obtained.
Lay 2 layers of Technoelast EPP insulation along the upper edge of the tape. On top of it is a lining board. At the final stage, we fasten all this with anchors to the surface of the foundation.

Everything. The foundation for the construction of a two-story frame house 6 x 8 is ready. Now you can proceed to the implementation of the floor frame and walls directly.
The erection of the walls of a karkan house 6x8
On the lining board, the lower strapping and floor logs are carried out. The cross section of the boards is 150 x 50. The material is the same larch. All connections of parts are laid with polyethylene foam gaskets.

The boards are connected to each other using galvanized self-tapping screws 100 x 5 and, if necessary, fixing perforated corners.

The lower trim is made of two parallel boards installed at a distance of 10 cm. The boards are connected to each other at the corners of the foundation tape and along its entire length every 1 - 1.5 meters. The space between them is densely filled with insulation. In terms of strength, such a design is practically not inferior to a solid beam of similar dimensions or several boards spliced in thickness.
In order to be able to work comfortably and safely, the logs were laid OSB boards 18 mm thick. With the role of the subfloor, as subsequent events showed, they did an excellent job.
Now it's time to assemble the first wall. The frame is assembled from pine board 150 x 50. The installation step of the vertical racks is 60 cm. In some places it turned out less - then you have to cut the insulation along. To ensure the spatial rigidity of the structure, it is imperative to install jibs. Otherwise, the whole structure can develop like a house of cards.
We lay Isoplat between the lower trim and the wall of the first floor. This insert will improve the soundproofing properties of the frame.

The installation of the wall ended already after dark, but very successfully.

Construction is progressing slowly. The awning does its job - protects from rain. Another wall has been erected. There is progress.

At the end of October, all walls were installed and internal partitions ground floor

Ladder to the next second floor completed.

Procured, brought and stored materials and components for flexible roofing. The construction of the frame of the pediment begins - a ridge beam is installed.

The role of the roof is still performed by the banner. Even though it's cold, it's dry. As materials are purchased and brought in, they are stored inside the house and under the awning overhangs.

Interfloor overlap is made of the same boards 150 x 50, connected by jumpers. As a result, neat cells were obtained, where mineral wool will then be installed during insulation.

Slowly, the frame of the gables, internal partitions of the second floor and the truss system are being built.

The cross section of the rafters is 150 x 50. The installation step is 60 cm. We install jumpers between them every 80 cm. This will subsequently save time and material when insulating the roof. In the resulting cells, it will simply remain to tightly install the insulation mats.

Roof structure:
- wind protection is laid over the rafters (Corotop film, density 140 g/m2);
- bar 50 x 50;
- inch crate;
- plywood 12 mm thick;
- soft roof (bituminous tiles).
We are finishing the roof. The 6 x 8 frame house is gradually taking on recognizable shapes.

The windows that got in the way under their feet finally waited in the wings. To finish off all the work with the roof, skylights were first installed. Then came the turn of the windows on the ground floor:
- hall - four windows 1500 x 1500, single-chamber, one hinged, two - tilt-and-turn;
- bedroom - one window 1500 x 800, single-chamber, tilt-and-turn;
- bathroom - two windows 1500 x 600 and 500 x 600;
- porch - 1500 x 600.
The last to be brought and installed were the central window and balcony door for the second floor.
The windows were brought in in several passes. As they arrived, they were installed.

It's already cold outside - winter. To heat the premises, a 5 kW Artox heat gun was purchased. In order not to heat the street, empty door and window openings temporarily have to be blocked with improvised materials.

At the time of construction of the door - makeshift plywood. After the completion of the interior and most of the exterior decoration, there are already decent

The project of a frame house 6 x 8 with an attic provides for insulation with mineral wool Rockwool LightButts. Looking ahead, I would like to say that in total it took about 40 m3 of insulation. This is not so little, and it is necessary to think over the logistics of the delivery, placement and use of the material in advance.
Before installing the insulation inside the frame, care must be taken that it does not fall out. To do this, from the outside, we sheathe the entire structure with Isoplat. This material simultaneously performs the functions of wind protection, sound insulation and additional thermal insulation.

The size of the mats is 600 x 800 x 50. Thanks to the pre-set pitch of the racks in the frame, the whole process looks quite simple:
- print out the package;
- we install a heater between the support bars in the spacer;
- if the sizes do not match (unfortunately, it turned out, and so) we cut it with a construction knife to the desired size.

Thickness is achieved by installing mats close to each other. On the walls - three mats (total thickness 15 cm), roof - four (20 cm).
Separate story. An integrated insulation scheme was used (the joint use of foam and mineral wool).
Floor Pie:
- penoplex 50 mm;
- mineral wool - 100 mm;
- vapor barrier Corotop;
- OSB - 18mm.
More on initial stage inch boards were nailed to the underside of the log, acting as cranial bars. Penoplex will rely on the formed protrusions.
Since the material is not afraid of moisture, no insulation is required from the underground. Penoplex plates are cut to size with a hacksaw and installed between the lags.

Along the perimeter of the sheets and joints, where we had to gain space from scraps of material, we carry out sealing mounting foam. We cut off the frozen excess with a knife. It turns out a continuous heat-insulating layer.

Lay a layer of mineral wool on top. The principles are the same - dense installation and laying with an offset so that the seams do not intersect.


We cover the surface of the insulation with a vapor barrier. This will help protect it in the future from moisture from the room. At the very end, we spread the Vibrostek strips along the lags and install the OSB back and fix it with self-tapping screws.
The floor of the attic floor is insulated a little differently:
- we hem the ceiling of the attic floor with Tyvek vapor barrier;
- the Isoplat plate is fixed;
- from the side of the attic, 15 cm of Rockwool are laid inside the ceiling;
- from above, we close the entire layer again with thermal insulation;
- we lay strips of Vibrostek 4 mm thick along the lags.
We lay a draft floor from OSB 18 mm (the ceiling above the bathroom and bath in a two-story frame house 6 x 8 is made of two layers of waterproof plywood 12 mm thick).
Heating and ventilation of a frame house
Projects of frame country houses 6 x 8 necessarily provide for a source of heating. And this building is no exception.
The main source of heat is a wood burning stove. Gas is not planned yet, you can cook on electricity, and a burning fireplace is just beautiful.
Under the furnace, even at the stage of foundation work, a small patch was poured, not connected with the main foundation. The dimensions of the base are 1.2 x 1.4 m. The height of the base is comparable to the tape. Half a meter buried in the ground and the same outside.
Start - the base of the furnace

The work of the master is arguing, and the turn of the installation of the combustion chamber and the screen quickly enough came. Fireplace door Pisla 510 got relatively cheap for 15 thousand. I managed to find it on sale.

Gradually, the laying of the fireplace is moving forward. Watching the work of specialists is a pleasure.

The future furnace has almost grown to the ceiling. There are no severe frosts yet, which is very pleasing. And inspires some optimism.

It so fortunately coincided that the last windows and the first fire coincided. Let's do the first run. Since the stoves still need to be settled, we heat them without fanaticism - carefully so as not to spoil all the work.

For three hours of the firebox, the temperature in the room rose by sensations of 10 - 15 ° C. Given that the thermal insulation of the house is not yet fully completed, there is no vestibule and instead front door there is plywood on hinges covered with a blanket, the result is quite decent.
Now is the time to talk about, in fact, it is a sealed thermos. If there is no ventilation, then at best the air will be musty and stale. In the worst case, the heater and wooden elements will start to fade.
For the ventilation system, I purchased a Domen Regio heat exchanger with a capacity of 250m3/hour and a set of air ducts. The installation allows, in my opinion, to perform the most important function - to regulate the performance and, if necessary, to heat the supplied air. Heating is carried out using a built-in heating element of 1 kW. Maximum temperature supply air can reach + 30°C.
In practice, it looks like this:
- we leave for a long time - we set the power of the installation to 5 - 10%;
- We return - we translate into a full-fledged working mode.
Installation of the heat exchanger on vibration suspensions, ducting and commissioning ventilation system was carried out by specialists of the company where the equipment was ordered. It should be noted that the system has started working, there is a slight heating and the impressions so far are the most positive.


Installation of ventilation ducts in a frame house.

Another thing to talk about is electricity. The input to the house was carried out with a 5 x 6 cable. Accordingly, the following were purchased and installed:
- bipolar input machine;
- switchboard ABB;
- distribution boxes and slats;
- automatic machines 16-40A (10 pcs).
Wiring inside the house is carried out in a metal hose inside the walls. The passage through the power elements of the frame is made through pre-drilled holes.

The interior decoration was made of my favorite material - wood. Although sometimes a worm of doubt crept in, who wanted drywall and wallpaper. They say it's simpler and more elegant. But the tree still unconditionally won.

I started the cladding from the second floor. Larch lining 110 mm was used, in half grade extra and grade A. The better the material, the easier, simpler and faster it is to work with.

Moreover, more quality lining no waste due to the absence of knot cracks, resin pockets and deformation, which are so rich in grades AB and B.

Interior decoration of the attic walls of a frame house.

It was decided to make the living room a little more pretentious, so that there would be no associations with a beautiful shed:
The bottom of the walls, up to a level of approximately 80 - 100 cm, is still sheathed with larch clapboard. Above, from this level and to the very top, I fastened the lining of the abash. The whole artistic refinement lies in the orientation (vertical) and the alternation of wide and narrow boards. Of course, I had to tinker a bit, but overall it looks very good.

In other rooms, the walls are also sheathed with alternating boards, but in the usual horizontal orientation.
To prevent the insulation from getting wet, it is closed from the side of the room with a Tyvek vapor barrier. The joints were glued with metallic tape.
Slowly, as the finish is completed, you can begin to settle down. Sofa in the attic.

Wardrobe in a niche on the second floor. The closet is very spacious. Somewhere around three cubes. There is where to turn around, or rather meet.

The work is not carried out sequentially one after another, but as the weather permits, the availability of materials, the presence of other urgent matters. Exterior finish frame country house 6 x 8 was made according to this principle.

On top of the installed Isoplata, he pulled windproofing produced by TechnoNIKOL onto the walls. Classic technology:
- rolls overlapped by 15 - 20 cm;
- stapler fastening.

Everything else was sewn up already in the spring, when it was warm and pleasant to work outside.

The material for the work is still the same - larch lining grade A. Advantages - resistant to water, convenient to work (high-quality good material). Disadvantages - expensive, fragile (it is necessary to drill holes for fasteners).
Roof overhangs and wind boards on the gables were sewn up with plastic. Durable (does not rot), aesthetically pleasing and easy to install. No matter how you look at it, there are positives everywhere.
Landscaping
The house is almost ready. You can already live. Although there are still many shortcomings. It's time to improve the site and ensure a comfortable life.
So let's start with the fence. Poles for the gate. base casting, profile pipe, lining with facing bricks. Everything seems to be clear, there is nothing archaic and cunning.

By the same principle, we make the entire fence of 40 meters. We attach painted corrugated board to the posts. As they say cheap and cheerful.

The most important part of the fence is the automatic sliding gate. Very convenient, although not so cheap anymore.

Well, as for the amenities - a sewer was made. A well-septic tank was dug and sewerage was laid. Now, in a two-story frame house 6 x 8, a bath, a toilet, a shower room and other signs of civilization take place and can function in full.


My mistakes and conclusions after the construction of a frame house 6x8
The experience gained shows that 6 x 8 on a turnkey basis is quite realistic on its own. Hired workers were involved in the foundation, stove, and ventilation. Digging a well does not count, since this is more of an improvement and has an indirect relationship to construction.
Looking back, I want to draw several important conclusions:

Summing up The overall result, we can say - to make a dream a reality is quite within our power. And the independent realization of a dream reduces the price of a 6 x 8 frame house by one and a half to two times, which means it makes the dream even more attractive and achievable.
Anyone who decides to build their own house often does not know where to start. But the layout of the rooms is far from the very first step in the process of building a home. Before developing a project or drawing up a detailed work plan, it is necessary to answer the following questions: what is the general living space future home; will it be heated; if so, how? The subsequent stages of construction depend on the answers to them.
layout one-story house with oven 6×8
Building 6x6 - most likely, country house in which accommodation is possible all year round but only during the warm season. Therefore, its layout is simple due to the small footprint. Its drawing is also simple due to the lack of a heating system. And for year-round operation, buildings are being built more spacious, for example, and more. But then stove heating is simply necessary.
However, the construction company can offer with a heating system. It will include general and detailed plan construction. The customer, who wishes to have a house with a stove, can make his own amendments, which will be immediately taken into account by the contractor. This option is called custom building.
The client can order from the company not only finished project, but also the construction typical house already resolved planning issues.

Option interior layout and the location of the stove in the house
If the customer fully accepts the proposed plan, then the construction will cost him much less.
Advantages
When the layout is well thought out, taking into account a specific heating system, the installation of the stove is practically independent of the building material from which the dwelling is built. It is suitable for both wood and brick house. Its advantage is that there is always a wide choice of fuel for space heating: coal, peat, firewood, even cardboard and dry tree branches. The user himself decides what to heat, which is more affordable and cheaper.
Heating with electricity is more expensive, and not all residential areas are equipped with gas pipelines.
The next advantage is that home heating does not depend on heating season heating plants, from emergency repairs and prolonged interruptions in the supply of fuel. The furnace is autonomous, its mode of operation is determined by the user himself, who does not need a plan for seasonal shutdowns of the system.

The layout of the house with a stove 6 × 9 meters
The ability of the stove to create a cozy and comfortable atmosphere is well known. Thanks to this quality, no other can compare with it. heating system. It is pleasant, sitting with a book by the stove, to inhale the smell of resinous firewood and listen to their quiet crackle. This is reminiscent of the distant times, fanned by romance. In addition to these advantages, the stove can be equipped so that it becomes an original addition to the interior.
Read also
Layout of a spacious house 10x10 for a large family
The Russian stove gives a special charm to the room. In terms of heat capacity, nothing can compare with it. She is able to accumulate heat, and then gradually give it away, maintaining constant coziness and comfort in the hut. In the past, it performed a cooking and heating function. Today it is quite rare.
Only those who like the rustic design style of the house will decide to decorate their apartments with it. True, master stove-makers have disappeared, who do not need a drawing for its construction. 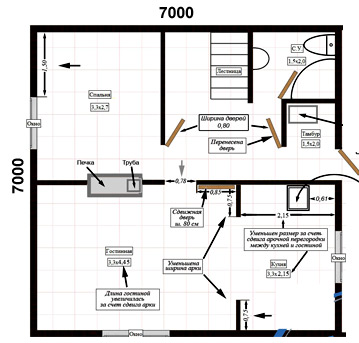 But recently, the project of a house with a fireplace is a common offer of construction companies. This fashionable heating device heats, but does not accumulate heat at all. Used more as a decorative element.
The age of technological progress has made its own adjustments. Today, a house with a stove that runs not only on solid fuels, but also on electricity, gas, and fuel oil is common. But the most affordable heating material is still firewood.
Installation and operation rules
form, appearance oven fixes its drawing. Many try to install it somewhere in the corner so that it does not interfere with anyone, does not take up much space. But this is not the main criterion for installation. Its most rational location reflects, as a rule, each project of a house with heating developed by the company.
In, as well as in or in, it is preferable to put the furnace structure in the very center.

Detailed plan of the house with a fireplace stove 8 × 8
Then the effect of it will be the greatest, because it will successfully warm up all the rooms. As practice has shown, it is impossible to install it at outer wall so as not to heat the street.
If the plan of a dwelling with a stove system is developed professionally, then after its implementation, even all year round it will be warm and cozy. It is recommended to plan the stove in suburban or no higher than two-story. If it is still cool on the second floor, then some residents close it for the winter, living only on the well-heated first floor.
Read also
Holiday houses or guest places on your site
Very important rule: a house with a stove must have effective thermal protection. Otherwise, all efforts to warm it up will be in vain. BUT cash for the purchase of fuel will literally fly into the pipe. You should not save on the insulation of your home. True, no company will offer a house project without thermal insulation. But if its layout is with a centralized heating system, then such a construction plan is not suitable for installing a furnace.
Layout of a Finnish house with a 6x6 oven
It is a mistake to think that if a powerful stove is installed in a small building, for example, 6x6, then a small amount of firewood will be sufficient for heating. This is not true at all. All of them will leave only for its weak warming up. And the rooms will be cold. Each house with a stove is equipped with a heating facility that corresponds to the space that it is intended to heat. So, if the hearth is 6x9, then heating structure should be more warm.
Another important rule that should not be neglected is the installation of the furnace on a separate foundation. It cannot be the same for her and for the whole house. This should be clearly demonstrated both by the general design of the dwelling and by a separate drawing of the structure for the firebox.
Detailed drawing of a log house with a 5×6 stove
The fact is that the soil under different weights sags in different ways. Why the stove can warp, cracks will appear. As a result, not only heat will enter the rooms, but also smoke with carbon monoxide.
Knowing the installation rules, you should not forget about the rules of use. A house with a stove requires strict compliance with fire safety regulations. And it doesn’t matter what area it is, 6x6 or much larger. It should be remembered that the chimney damper is closed on time. If the coals are not burnt out enough, the room will fill carbon monoxide. And the consequences of this are very sad. If you close it too late, then the precious heat will escape into the pipe. Repair of the furnace is usually carried out by the one who installed it.


 in women Total viral")


Chantilly Castle - the second in France after Versailles Chantilly Castle how to get from Paris
Amusement park "The Land of Legends Theme Park" in Turkey
Holy places in Greece. Greece Orthodox. Pilgrimage to the feast of St. Nicholas
Picodi: All discounts in one place!
How to get to Dolmabahce Palace