Liven up the walls of your kitchen, bedroom, living room, nursery or hallway with drawings by following one of our master classes and inspired by a selection of 100 photo ideas.
- Water-based acrylic paints are most suitable for wall painting, as they are bright enough, do not smell, dry quickly and can be adjusted during the painting process.
- So that the drawings on the wall are not afraid of wet cleaning, they should be covered with a matte varnish.
- It is best to take one or a maximum of two walls for painting, otherwise the interior will be overloaded, and the space will visually decrease.

- When choosing a pattern for the wall, consider the orientation of the room to the cardinal points. If the windows of the room face south, then cold shades (blue, blue, turquoise) can be safely used for wall painting. If there is not enough light in the room, then we advise you to bet on warm shades (yellow, orange, brown, red, and others).

- The drawing on the wall should fit into the interior of the room in style, colors and themes. So, for example, in classic interior patterns in the style of damask, heraldry, cage, floral and floral motifs will be good.

Flowers on the wall of the kitchen in a classic style
Idea 1. Wall painting with a stencil (+ master class)
Stencils help out when you need to outline the contours of a complex image, draw letters, numbers or any repeating patterns.


For wall painting, you can use a ready-made template or custom-made in a printing house. Such stencils can be flexible or rigid, one- or two-layer (to create a multi-color pattern), self-adhesive or glueless. As a rule, they are durable, fit snugly against the wall and are designed for reusable use.
- Do you want to buy a super-fashionable and unusual stencil? We advise you to look for it in the international online store Etsy on the request "stencil" (price from $10 to $100).
However, a simple single-layer stencil for wall painting can be made with your own hands, following our step-by-step instructions.
What you need to make a stencil: office paper, plastic film or thick paper(for example, whatman paper or wallpaper), pencil, scissors, office knife or special knife for cutting stencils, masking and transparent tape, as well as a printer and some kind of graphics editor (vector or raster).
What you will need for stencil wall painting: paints (water-based acrylics are best), a synthetic round brush (7 cm in diameter for painting large drawings and a smaller one for finer work), a sponge (can be used instead of brushes) and paper towels to remove excess paint.
Instruction:
Step 1. Find a suitable vector (!) stencil on the Internet, for example, on the site http://www.getpattern.ru/. Please note that it is advisable to choose a contour image (or make it such, following this instruction), because the colored areas will only waste ink when printed.
- It is also important that the stencil does not have too thin bridges, otherwise the paint under them can leak and ruin the design. Or they might just break.
Step 2. The selected image must be scaled to right size and print. It is very easy to do this if the size of the stencil does not exceed the A4 format. However, if you need to print a large template, then you need to break it into several parts, following this instruction. Next, you just have to assemble the picture as a mosaic.
- If you are using a transparent vinyl film, then you just need to overlay it on the original drawing, circle its contours with a felt-tip pen or pen, then cut out unnecessary segments (see photo).


Step 3. At this stage, the A4 paper stencil must be pasted over with transparent tape on both sides and overlapped (!) To protect the paper from soaking. And finally, cut out all the segments intended for painting with a clerical knife.
If you printed several A4 sheets for a large stencil, then at this stage you can immediately start cutting, but keep in mind that you will have to paint the stencil with an almost dry brush so that the paper does not get wet. But in order not to take risks, it is advisable to laminate the drawing or copy it onto a denser base (for example, vinyl wallpapers). For this you can:
- Use carbon paper (lay it between the base and printouts, and then circle all the lines with a pencil).
- Cut out all the holes for painting from the printed drawing, and then transfer its contours to the base. Next, you need to take the knife again and cut out the segments for painting, now on the basis.
When cutting out the stencil, be sure to protect the table from scratches by placing some kind of substrate, such as glass, on it.
Step 4 Now it's time to glue the stencil to the wall. To do this, try on your template to the selected place, align it with building level and stick with tape. If necessary, for example, if you need to draw repeating elements with equal intervals, you first need to mark up using the building level.
- If the stencil has thin and movable bridges, fix them on small pieces of double-sided masking tape (you can twist a piece of ordinary masking tape into a ring).
- A more convenient way to fix the stencil is with a spray adhesive with low level adhesion, which allows you to remove the template easily and without a trace (sold in art stores).
Step 5. Hurray, the most time-consuming work is left behind, it's time to start painting.
- If you are using a sponge: dip the sponge into the paint, remove the excess on a napkin, then start painting the stencil with tamping movements.
- If you are using brushes: dip the brush into the paint, then run it a little on a paper towel to remove the excess (the bristles should be almost dry), then start painting in a circular motion. Be careful when painting areas near the very edges of the stencil so that the paint does not seep under the holes and ruin the outline of the pattern.
- If you are using spray paint: spray the paint carefully, in thin layers and in several passes, to avoid smudges.
- If you are using a roller: lowering the roller into a trough with paint, wipe it on a napkin, then proceed to painting. On the edges of the stencil, move the roller from side to side, not up and down.

Step 6. When the drawing on the wall is completely dry, cover it with a matte varnish to protect it from moisture.
Idea 2. Wall painting in a cage (+ master class)
As you know, the cage is the most versatile print that never goes out of style. It fits perfectly in both classic and modern interior, both in the interior of the kitchen and the children's bedroom. You can decorate one or more walls with a cage using wallpaper or painting.
- Do-it-yourself painting checkered walls is somewhat more difficult than sticking checkered wallpaper, but painting gives the best result: the painted surface can be washed, repainted, and most importantly, it does not have seams that risk peeling off.
The easiest way is to paint the walls in a large Vichy cage, as in this selection of photos.


Wall painting in a tartan plaid requires a little more effort, but still, it is accessible even to beginners - after all, accuracy of marking is more important here than painting skills.


Now let's take a look at step by step instructions painting the walls with your own hands in a tartan cage as in the photo below.

What you will need: 4 paints of the same color, but different tones (in this project used a light olive for the background, a slightly more saturated swamp shade for the vertical and horizontal stripes, an even darker one for the intersections of the stripes, and two paints in contrasting colors), brushes, roller, masking tape and a laser level, a stepladder and other basic painting supplies .
- It is best to use blue masking tape for wall painting, which can be removed without leaving marks, without damaging the wall covering and marked “for clear lines”.
Instruction:
Step 1. Prepare the wall for painting, then paint it with the background color using a roller. V this master class the background is a light olive tone of paint. Allow the background layer to dry before moving on to the next step.
Step 2. Mark vertical stripes of the same width on the wall using a laser level and masking tape. Then paint them darker than the background paint and let dry.

Step 3. Now mark the horizontal stripes in the same way, paint over them and leave to dry.

Step 4. Paint the intersections of the stripes in an even more saturated shade to create the effect of layering threads of the same color in a checkered fabric (as if the cells turned out to be darker than the stripes).
- By the way, if you want to paint the walls in a Vichy check, then at this stage the work can be considered finished.

Step 5 Now it's time to draw the contrasting thin stripes required for the plaid.
To do this, use the laser level and masking tape again, mark a line along and in the center vertical stripes. Then paint over them and let dry. Then, with the same paint, draw lines along the horizontal thick stripes.

Step 6. Finally, draw cells of another contrasting color (in this master class it is blue). The technology is still the same, but the cell becomes larger, as the stripes are already drawn along the lines of the first background layer.

Step 7. It remains only to cover the painted wall(s) with matte varnish to enhance its moisture resistance and strength.

Idea 3. Hand-painted walls
Hand-painted walls allow you to create unique and personalized interiors, embody the most daring fantasies and design ideas.


Flowers on the wall


Flowers on the wall

Flowers on the wall


Painted walls are especially good in children's rooms.
With the help of hand painting, you can correct, disguise or beat some of the flaws in the room. For example, draw a missing window, pieces of furniture or accessories, paint over a spot on the wall, and so on.


Painted headboard and vase
Hand-painted walls are best left to professionals, but simple drawings are quite within the power of beginners if they have at least a little drawing skill. Here are some examples of simple images.


The steps for painting walls with your own hands are as follows:
- We are looking for an idea, a motif of a drawing suitable for the interior;
- We plan the composition, develop sketches and choose the final version of the future painting, print the image in color. It is also advisable to “try on” the drawing on the selected wall using a photo editor (that is, take a picture of the wall, put a sketch on it and scale the composition to the desired size);
- We cover the walls with artistic acrylic primer (preferably);
- We transfer the sketch to the wall with a pencil using:
- Projector (the picture is displayed on the wall, then its contours are simply drawn).
The process of painting the wall from drawing contours to painting with Molotow acrylic markers:

- Grids (the section of the wall for painting is divided into 100 equal squares, then each square is manually drawn according to the sketch on a scale with the same grid).
- “Stencil” (in Photoshop, contours are selected from the desired drawing, then the sketch is scaled, divided into parts and printed on A4 sheets, then the sheets are glued together like a mosaic, the resulting canvas is glued to the wall and all the lines of the drawing are drawn according to the stencil principle).
- We paint the image with paints, paint over large spots of the composition, work out the details. The painting should be carried out according to the principle “from the general to the particular”.
- We cover the finished painting with matte varnish. This stage is optional, but desirable to give additional strength to the pattern.
Idea 4. Stamping (+ master class)
To paint the walls with your own hands quickly and easily will allow the stamping technique, when drawings or patterns are applied with a stamp. As a stamp, you can use both ready-made paint stamps and roller stamps, as well as improvised means - sponges cut in the shape of a circle or other shape, brushes and even your own fingers.


- Ready-made stamps are sold in construction markets, they can also be ordered in specialized online stores. For example, excellent stamps are made by a Russian company "Ecowallpaper"(photo above). By the way, roller stamps can also be purchased on the company's website (pictured below).

You can also make a stamp for painting a wall with your own hands from microporous rubber (foam, foamed polymer or simply “foam”) and a piece of cardboard.

What you will need: foamy microporous rubber (often sold in departments for children's creativity in the form of colored sheets), cardboard, pencil, sharp stationery knife, scissors and glue, as well as acrylic paints.

Instruction:
Step 1. Cut out any shape or figure from a sheet of porous rubber. For example, it can be a circle as in our master class, a letter, an asterisk, autumn leaf, butterfly, flower, etc.
- You can make several different stamps to create some kind of composition, let's say a fruit with a stem (pictured). In addition, a separate stamp must be made for each color.

Step 2. Glue the resulting blank onto a piece of cardboard. Voila, the stamp is ready!
- If you want the stamp to be reusable, then you should use a plastic base instead of cardboard.
Step 3. To start painting the wall, dip the stamp in the paint quite liberally, but so that the paint does not drip from it, then attach it to the wall. If you want the print to be as clear as possible, you need to evenly press on the stamp.


Next, in the same way, arrange the prints along the entire wall, adhering to the same interval. In order to avoid mistakes, it is advisable to pre-apply markings on the wall. In addition, before starting work, it is worth practicing putting stamps on any draft.
- Unsuccessful print can be carefully erased (assuming you are using water-based ink).
- Additionally, prints can be added. For example, draw outlines, add colors and interesting details.
Step 4. When the stamped drawings are dry, cover the decorated wall with a matte varnish.


Idea 5. Painting with crayons on a slate wall
Having decorated one or two walls with chalk wallpaper or slate paint, you will have the opportunity to change the drawings on the wall at least every day, write down foreign words, to-do lists and products, household tasks, motivating or just funny phrases. The chalk wall looks especially cool in the interior of the children's room and kitchen.


- If you want to leave a picture drawn with chalk forever, you just need to cover it with a matte varnish.
- You can (and should!) draw on the slate surface not only with crayons, but also with chalk pencils, markers and paints.
- Lettering (the so-called painted words) looks especially impressive on a dark wall. True, if you don't professional designer fonts and not an artist, then it’s unlikely that you will be able to write words beautifully, but you can do it with a homemade stencil. The main thing is to find a suitable blank on the Internet.
Idea 6. Striped wall
Striped walls not only look cool, but also visually correct the imperfections of the room. So, for example, vertical stripes “raise” low ceilings, while horizontal stripes increase space and push walls apart.


Painting striped walls with your own hands is very simple, the main thing here is to carefully stick the masking tape and correctly calculate the optimal width and number of stripes.
- To find out the required number of strips of the same width, but alternating in color, you need to divide the height or width of the wall by the desired width of the strips. But there is one caveat - if the number of stripes is even, then along the edges of the wall the strips will be different color. To make the number of stripes odd and the wall design turn out symmetrical, you can “play” a little with the width of the strips or simply divide the height or width of the wall by an odd number. So, for example, a wall 270 cm high can be decorated with 17 strips 16 cm wide.

In order for the stripes to be the same color under the ceiling and above the floor, there must be an odd number of them.
- It is desirable that the strips have a width of 10-30 cm. A width of less than 10 cm will be too narrow, and more than 30 cm will be too wide and heavy.
- It is best to use blue masking tape for streaking, which is removable without leaving a mark, without damaging the wall covering, and marked "for clear lines".
- To make the lines even and crisp, and the paint does not flow under the masking tape, use a small brush to paint along the tape and a larger brush to paint the main body of the strip. It is important to ensure that there is no excess paint on the brush. The movement of the brush should not be up and down along the tape, but to the right and left (across the tape).
Idea 7. Decorate the wall with vinyl stickers
Vinyl stickers are good because they are easy to stick, peel off without leaving marks, are sold in a great variety of pictures and are very inexpensive. With their help, the design of the wall can be changed as often as you want.

Text wall sticker in the interior

Vinyl stickers in the form of words in the bedroom

Vinyl stickers in the nursery

Vinyl sticker on the kitchen wall

- Most a large number of decorative wall stickers can be found on Aliexpress, and you can also look for good pictures in building hypermarkets and art stores. If you wish, you can order the desired picture in the size you need in the printing house.
- It is best to stick stickers on painted walls or plain wallpaper.
- Before you glue the picture, you need to make a markup.
According to many designers, wall painting requires interesting solutions. One such solution is decorative paints.
With their help, you can create an atmospheric and unique style, the walls in which will look perfect.
In this article, we will tell you not only about the uniqueness of this option, but also about how to paint yourself.

Features and types of decorative paints
If in doubt whether it is worth painting walls in this style, then study the characteristics of such painting and you will immediately imagine the final version, filled with effective details and causing genuine delight.

Just choose the right type of paint. There are several of them:
- Pearlescent colors. Create the effect of silk. "Silk" walls are a real luxury.
- Velvet colors. They will create depth and emphasize the space.
- Mosaic colors. Create the effect of granite or any other texture.
Advantages of decorative painting
Decorative painting is certainly superior to other painting options in many ways. Such painting will be durable and safe for the health of both adults and children.

Walls are easy to maintain. Walls do not fade and do not collect dust. Therefore, you do not have to constantly wipe them from dust. It will be enough sometimes to pass over them with a brush.

Disadvantages of decorative painting
Regardless of the advantages, there are also disadvantages. The first thing to say is to refer to the price.

It is quite high, and if you call the masters, then buying paint, painting itself and materials will cost you a round sum.

You should also be aware that the painting process itself cannot be called a simple matter. To do quality work with your own hands, you need to seriously try.

How to paint?
If you decide to do decorative painting yourself, then you should carefully consider each stage of the work. Initially prepare all materials, tools and paint.
The painting process should go evenly over time, so it's better to prepare right away. The paint must be well mixed. If you want to get contrast, then use light and dark tones.

But before you start, choose a technique. There are several of them.

Stencil. It is possible to apply patterns on the walls using a stencil. This will greatly facilitate the process, as it is available to everyone. It just takes patience and precision.

The stencils themselves can be made by yourself or purchased in specialized stores. Decorative painting must be done responsibly. Use a small roller and you'll be fine.

Roller with texture. In the hardware store you can buy a special texture roller. It can be depicted completely different patterns for every taste. Any amateur can also handle such painting. With light movements, draw small strips in different directions and you yourself will be surprised at the result.

Sponge. It can be used as a roller. Thanks to its structure, the sponge helps to create an interesting wall texture. It is used as a stamp. It is convenient, but it is worth practicing in advance.


Decorative painting with a brush. This option is suitable for more confident craftsmen. Working with a brush is more difficult than other methods. Need to use brushes different sizes to create unique patterns.

When you do the decorative painting yourself, it will look much more expensive. If you carefully assimilate the material with the technique of decorative painting, then you will completely do without the masters and arrange real beauty in your home.

Photo of decorative wall painting


Decorative wall painting is one of the most popular types of decoration. It is very diverse, individual, with its help you can create a unique beautiful room, which will not have an analogue. At the present time, this type of wall decoration, like decorative painting, has become a strong competitor to conventional wallpaper.
Dyes for wall decor, as a kind finishing material, has many advantages:
- The service life of painted coatings is a couple of times higher than that of wallpaper or plaster.
- There are no joints on the painted surface, which results in a perfect continuous picture.
- Huge range of different colors and effects.
- Moisture-resistant properties help to make walls unique even in the kitchen and bathroom.
- In the case of repainting, it does not need to clean the existing paint layer.
- The use of water-based paint when decorating guarantees an environmentally friendly surface that does not emit toxic substances and does not cause allergies, which is the ideal solution for decorating a children's bedroom.
- Regardless of the basis of the surface (be it concrete, drywall, plaster), it fits equally well on the wall.
Decorative wall painting has only one requirement for the coating - it must be even.

Coloring tools
Painting the walls in the apartment, in addition to the paint itself, is carried out using the following tools:
- roller;
- spatulas (metal, plastic, notched, rubber);
- sponges;
- hard brush;
- sandpaper;
- stencil (for the effect of a pattern on a painted wall).

Before you start wall decor, you need to decide which decorative effect I want to get it so as not to buy an extra tool. Although the price of rollers and brushes is low, it will be possible to use them more than once.
Wall preparation
If decorating on the wall with paint is done for the first time, you need to prepare the surface for such a design decision. Preparation of walls for primary painting is carried out in stages:
- Cleaning the coating from the old finish.
- Surface priming.
- Inspection for flaws, which are repaired if necessary.
- Uneven surfaces are puttied and sanded.
- Re-priming.
After all the work done, the wall is ready for decorative painting.
In order for the paint to lay flat on the walls, and there were no any defects on the coating, it is necessary to wait for the complete drying of the putty mixture and the primer on the wall.

Types of wall decoration with paint
Due to the fact that decorative paint is too expensive, an alternative is in demand by building professionals - artistic painting of the walls with ordinary cheap paint. There are several varieties to create a unique room using ordinary paints. Let's consider them in more detail.
This is the name of painting the walls with decorative paint, which creates the effect of an old shabby surface. To create such a masterpiece you need:
- Cover the surface with the selected color.
- Apply acrylic painting to create a hue contrast.
- Apply colored glaze to the surface in combination with a shade of the painted wall, evenly smooth it over the plane with a wide brush, and when all surfaces are covered with glaze, touch the uncured paint with the same brush.
- With a round paint brush, you need to poke in a chaotic manner over the surface, thus making the walls look old.

In this method of application, there is only one drawback: all the bumps and bulges become more noticeable.
This decorative painting is a great idea for decorating an office, it gives the impression that the walls are covered with leather. After preparing the surface, you need to start finishing:
- We cover the walls with latex paint of your favorite color.
- We make a suede brush.
- Mix the glaze with latex paint, a little darker than the tone of the surface.
- We cover a piece of the surface with the mixture, moisten the suede brush in water and wring it out, lightly touch it over the not dried coating, making stains, and partially removing it.
- We will blot the existing noticeable lines with a piece of wet suede to give the naturalness of the leather coating.

Venetian plaster effect
One of the most beautiful and decorative ways wall painting. To recreate the effect of the Venetian, you must perform the following steps:
- Place latex paint in a wide container. On one side, sprinkle a little pigment for paint, gently stir half with a stick so that the dark and light sides come out in the container.
- We take a lighter paint on a spatula and apply it to the coating like ordinary plaster.
- Dip the spatula in dark color and cover a piece of the wall.
- When light and dark spots appear on the wall, we begin to drive along the wall with a spatula in different directions to evenly smear the colors for a harmonious look.
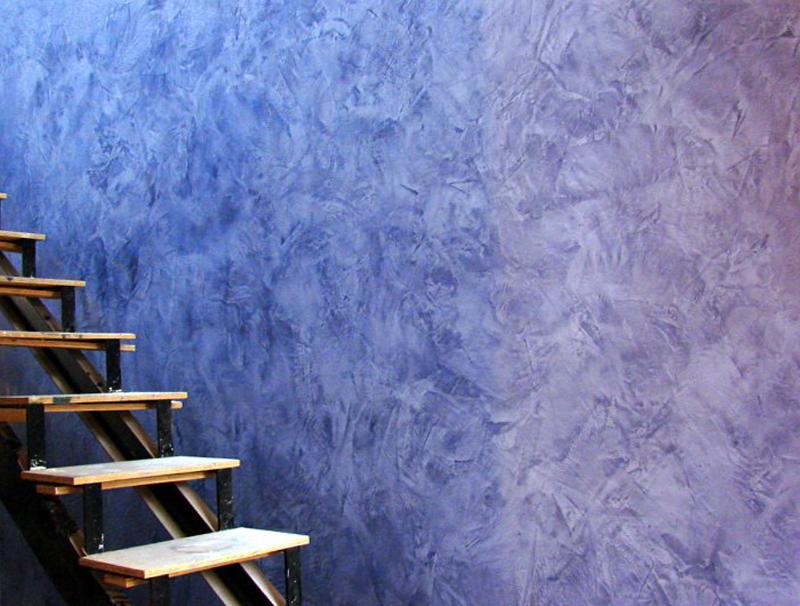
At the final stage, Venetian plaster is sanded with fine sandpaper and rubbed with a special wax composition.
To create the effect Venetian plaster» it is necessary to use only a plastic spatula during the work.

Wrinkled skin effect
This effect is created simply, but requires patience, because everything is done slowly, gradually.
- We take a piece of paper, paint a piece of wall according to its size.
- We crumple the sheet, apply it to the surface, begin to smooth it, while creating the outlines of a crumpled coating.
The entire wall is gradually processed in small pieces.

In the video: the effect of wrinkled (worn) leather on the wall.
For decorative painting of walls, you can use not only purchased tools, but also improvised means. A regular rag roller creates an interesting effect indoors, which is suitable for children's rooms. In case of application this method surface preparation may not be perfect because this kind of finish hides all the imperfections on the wall.

Roller painting steps:
- Apply the first layer of paint, wait for drying.
- We breed another shade of the base color (slightly darker than the previous one).
- We moisten the rag in the paint, twist it to make a tourniquet, wrap it around the roller.
- We paint from the very top of the wall to the bottom in different directions to get a texture pattern.
Types of paints
Wall decoration with special dyes for wall decoration is a diverse material. They come in many colors and look beautiful. Types of decorative paint differ in properties based on the composition.

According to the components of the composition of the paint are divided:
- acrylic;
- latex;
- water-based;
- alkyd and oil.
Acrylic paints
Most often used for painting walls in the apartment. They are popular due to the value for money. They have the following properties:
- fireproof;
- make the walls strong and durable;
- resistant to temperature changes;
- dry quickly, create protective film on the walls;
- adhere well to the coating;
- environmentally friendly;
- have an assortment of more than a thousand.

latex paints
- no pungent odor;
- high degree of fire safety;
- paint does not respond to a sharp change in air temperature;
- dilution with plain water is possible;
- dries quickly after application;
- abrasion resistance;
- environmental Safety.

In addition to positive qualities, there are also negative ones. The color scheme of this type of paint does not have bright colors, and under the resulting film are created good conditions for living biological organisms. Before using latex dye, the surface must be well primed.
Water-based paints
They are in demand for painting rooms without creating an interior, their price is low, and they cope with the direct purpose of painting surfaces. The advantages of water emulsion can be called:
- low cost of material in the construction market;
- low consumption during application;
- harm to health;
- have good moisture permeability.
Among the shortcomings of the water-based coating, experts single out the speed of washing off from the coating, as well as the need certain temperature in the room while painting.

Alkyd and oil paints
Dyes based on alkyd and oil are characterized by a rich color finish, a durable layer. positive qualities These types of finishes are:
- saturated beautiful colors;
- very durable layer when dried;
- long service life.
Negative qualities are also present: it is a very pungent smell during painting, high material consumption, high cost, a small range of colors.

In order to save money, many people want to paint the walls with their own hands, without the help of professionals. But how to apply decorative paint on one's own? There are some recommendations of experts regarding the application of decorative paints to the walls:
- Before painting the surface, it must be primed to avoid the appearance of mold.
- Prepare the room by covering the floor with a protective film.
- Mix the paint well after opening it.
- When using a brush, apply horizontal stripes and then smudge them vertically.
- If you use a roller, you need to roll it along the tray with the material, then from top to bottom, then cover the walls with paint, pressing the tool well (for uniform color).
To make the coating evenly colored, you must first apply a layer with a brush, and then walk over the painted surface with a roller. If desired, you can apply a variety of methods of decorative staining.

Decorative wall painting with your own hands is a very real task. The main thing is to follow the instructions for use of the material along with the recommendations for application.
Learning to paint surfaces decoratively (2 videos)
Various decorative painting effects (28 photos)


Wall decoration is an obligatory stage in the design of the room. Today we will consider in detail the option of decorating the wall - painting. This is a popular and sought-after way to update and diversify the interior.
Painting the walls in the interior gives scope for creativity and imagination. A variety of colors on the shelves of stores allows you to implement design ideas and bring your dream interior to life. Right choice material is important, as the final result will depend on it. To start the painting process, materials offered in stores are studied and suitable ones are selected.
Characteristics of paints that are important to know:
- To paint indoors, you need only interior paints, on the packages of which there is a mark “for interior work”.
- The way paint interacts with water affects its application in different rooms: rooms with high humidity(bathroom, kitchen) need moisture resistant paint. For other rooms, where there is no dampness and moisture, non-moisture resistant paints can be used.
- All coloring materials are also divided into two groups: breathable and not. Vapor-proof (non-breathable) paints should be chosen only for rooms where you plan to spend little time. The walls in the bedroom, for example, are painted only with vapor-permeable paint. This is the key to healthy circulation and air renewal.
- Wear resistance. This is an important indicator of the paint, which shows the degree of its resistance to abrasion. For example, if frequent wet cleaning of walls is planned, then the paint must be wear-resistant.
- Hiding power, that is, the ability of the paint to cover the surface. This directly affects its consumption. The hiding power on the can indicates how much of this paint is needed to cover 1 square meter surfaces.
Kinds
All these parameters must be considered when choosing in order to obtain the desired result. However, that's not all. The paints themselves are divided into types, all the advantages and disadvantages of which we will now analyze.
Acrylic water-based paint
This dye is one of the most popular and sought after. It is based on polyacrylate resins.
Advantages: excellent hiding power, easy to apply, unlimited possibility of tinting. The invariable advantage of the paint will be the low cost. Does not fade, moisture resistant, wear-resistant. Doesn't have bad smell, non-toxic. Also, the advantages of paint include the fact that it is easy to use and suitable even for those who did not take a brush in their hands.
Disadvantages: high consumption. When using this type of paint, it is often necessary to apply more than one or even two coats of paint to achieve the desired result. Minus paint and what is affected by sunlight. Also, this paint does not resist the effects of fungus and mold.
silicone paint
These paints got their name because of the silicone resins they contain. These coatings belong to a new generation of paints that have the advantages of water-dispersed and silicate coloring materials, and the disadvantages have been eliminated. Most often used in facade work.
The advantages of silicone paint are that it is vapor permeable and waterproof. It is resistant to sunlight, does not fade, is not afraid of high temperatures. Resistant to alkaline attack and pollution. The scope of silicone paint is almost unlimited due to its excellent operational properties, durability and variety of options in decorative design.
The disadvantages of silicone dyes include high cost. When applied over a large area, this paint is quite expensive. But here it is also taken into account that the durability of this paint, its strength and resistance to damage, will very quickly pay off all investments.
latex paint
This water-based dye contains latex. The paint is known for its high wear resistance.
The advantages of latex paint are moisture resistance and durability. The surface can be subjected wet cleaning without compromising coverage. This paint is universal: it is applicable to concrete, wood and paper. Latex paint coating looks spectacular and can decorate the interior. The paint is non-toxic, vapor-permeable, endowed with excellent thermal insulation properties, very economical in consumption and dries quickly.
Of the shortcomings, it is indicated that the walls for painting need perfectly even. Latex paint absolutely repeats the entire surface of the wall. Also, the paint is not resistant to temperatures below zero. In the room where staining with such paint will be carried out, there should not be strong temperature changes, otherwise it makes no sense to use it. The high cost can also be a deterrent, but as with silicone paint, it's a good investment in the longevity and durability of the finish.
Vinyl paint
Created on the basis of vinyl compounds and practically ousted from the market acrylic paints.
The advantages of vinyl paint are low cost. This coating does not turn yellow, its decorating ability is sufficient high level. Resistant to solvents and chemicals. Eco-friendly: allowed for painting walls and ceilings in children's rooms.
There are a lot of disadvantages: strong shrinkage during drying, which often requires a second layer of staining. The paint has proven itself to be not very durable. The disadvantages include low vapor permeability.
Dye, which is made on the basis of PVA. Suitable for interior decoration. A budget option. A definite plus in the affordable price.
The downside is that for painting indoors, there must be favorable conditions, without temperature fluctuations and with perfectly aligned surfaces. The paint is not wear-resistant, so do not expect miracles from it.
Acrylic latex paint
Contains the qualities of latex dyes. Wear resistance, long-term operation without loss in protective properties and decorative qualities.
Structural paint
The viscosity of this material allows the paint to keep the relief specified during application.
There are many advantages of the coating: from non-toxicity and lack of smell to the ability to make a unique relief pattern with different degrees of roughness on a given surface. The paint is waterproof, washes well, and is able to mask surface imperfections. Very durable.
Of the shortcomings, it is worth mentioning only a fairly high cost.
The quality of the paint and the operating conditions - that's what you should worry about when choosing a dye. Don't overpay for a brand name or for minor improvements that manufacturers often use to drive up the price. You can always find a quality product within your budget. Please contact a sales consultant.
Wall preparation
Preparing the walls is perhaps one of the most important steps. To begin with, it is worth removing all previous coatings. All roughness, cracks and irregularities are carefully rubbed. Smooth surface- this is a guarantee of an excellent result after painting. After leveling, the surface must be cleaned of dust. A brush, a soft cloth and a vacuum cleaner - any of these items will do the job.
The next step is primer. This is necessary in order to fill in small surface defects and enhance the adhesion of the wall and paint. Acrylic primer is very popular. It is great for any surface. For priming walls and interior partition you can use several equipment options: roller, spray or wide brush. After the primer is applied, it must be left to dry completely. It will take about 5-6 hours.
After the soil has dried, puttying is performed. To apply the first layer, it is worth using a starting putty. It exists both in the finished version and in the form of a dry mix. The first layer is applied on top of the masking mesh, which consists of fiberglass. After the plaster has dried, it is rubbed with special device. Then you need to apply a layer finishing putty, which also rubs off after drying.
Acrylic primer not only enhances adhesion, but also has antibacterial properties that prevent fungus and mold from multiplying on the wall.
What range to choose
The choice of color has a strong influence on the interior as a whole. Two different shades of the same color can both spoil and decorate the room. When choosing a color scheme, you need to take into account the lighting, the desired color of furniture and textiles, the mood that you want to create in the room.
V home interior neutral colors always look win-win: yellow, coffee, apricot. It is quite easy to choose an interior for them, and these colors have a beneficial and calming effect on the psyche. The bright colors of the walls will require more attention and effort in order to find the right environment for them. Designers advise not to use more than five colors in one room.
Trendy colors in the interior
Fashion comes and goes, dictating its own rules, including in the interior. The most important thing is that the environment is ideal for you. Consider what colors are relevant today:
- White color immediately evokes the idea of purity. White is a lifesaver if you want to enlarge and expand the space. Recommended for small and dark spaces.
- Black, on the contrary, reduces space. With poor lighting, this color can turn a room into a very dark and gloomy one. Designers advise diluting black with glossy or mirror surfaces.
- Grey. This color is often associated with the backdrop for very expensive items in an interior setting. It should not be made the main color of the room, because it is rather boring in itself. Light gray color with the addition of various color spots in the setting will perfectly decorate the interior, give comfort and renewal to the room.
- Red is known to stimulate appetite and increase blood pressure. It is used with caution in residential areas, especially in children's rooms. If you use it as the main color in the room, it will make an oppressive impression. It is used as an additional accent, especially in the interior of cold colors. This will make the room cozy.
- Yellow influences intellectual development so it's perfect for a kid's bedroom. This color is also used in rooms that are located on the north side.
- Orange color has the ability to harmonize the atmosphere in the room. This color is conducive to communication, so it is perfect, for example, for the living room. With orange, you need to act as carefully as with red. You should not make it the main color in the room, as it can quickly get bored.
- Brown, especially its light tones, is considered a classic example of color in the interior. Perfect match with it beige shades, peach, and also coffee. Noble, creating comfort, color.
- Blue color gives a feeling of peace and relaxation. This color reduces appetite, tunes in to a wave of relaxation. Ideal for the bedroom. A light shade of blue can expand the space.
- Purple, especially its dark shades, can cause a feeling of fatigue. Its use in the interior should be approached with caution.
- Green color considered good for both eyes and peace of mind. Green is available in both warm and cold tones. It is believed that this color helps to concentrate, so it is often used for offices. Designers often use pistachio and olive colors in their decisions: they are considered successful for the interior. It is not always easy to match furniture to green walls, so think ahead if you are going to use this color.
Combination of colors and methods of applying paint
Combining colors is not as easy as it seems. For bright spots in the interior, you should use a neutral and calm tone. Also, a combination of related colors is always considered successful. Combine different shades of the same color and get a harmonious interior.
Consider the main methods of applying paint when combining colors:
Horizontal Division
This is a visual division of the wall into two horizontal stripes: it becomes two-color. The most commonly used proportions are one to one or two to one. The top stripe is dyed dark tone, the bottom one becomes lighter. For a clear separation of the bands, the use of molding is acceptable.
Color inserts
A design with colored inserts can be suitable, for example, for a children's room. The basis is a neutral shade: beige, white. Against this background, a drawing is made: geometric shapes, which are then painted over with bright colors.
accents
It’s worth mentioning right away that furniture in the interior can also be an accent. If you want to pay attention and focus on the bright solution of the walls, then it is better to choose one or two walls and paint in a rich shade. Leave the rest in neutral colors so as not to overdo it with accents.
gradient and ombre
The idea of making a gradient on the walls is considered one of the most popular in interior design. This method of painting is obtained when different shades of the same color are applied to each surface of the wall or a separate part of it.
The method of painting ombre is that the shade on one wall of the room changes in the horizontal or vertical direction. To get the whole range of shades of the same color on the wall, you must first paint the surface in the lightest of the available shades. Then the wall is divided into quarters and the lowest quarter must be painted in the darkest shade.
The next step is to mix the darker shade with some of the lighter one and paint over the part of the surface above the dark piece. In this case, you need to step a little on a dark surface. In the very center, the most saturated and bright color is usually used, smoothly smoothing it to the light part, which is at the top.
Horizontal and vertical stripes
This design move can be performed in the most various options. If the house has low ceilings, then you can fix this with the help of narrow vertical stripes. This visually stretches the walls and increases the height. To expand the space, you can paint a horizontal wide strip on the wall. It is usually decorated with various interior items: lamps and paintings.
Ornament
This method involves covering the surface of the wall with various images of figures. To greatly simplify the work, a stencil is used, which is made independently or buy a ready-made version in a hardware store.
geometric shapes
To create the desired style in the apartment, it is required to apply geometric shapes to the walls. Rhombuses, peas, squares are a few examples for decorating. This method of painting the walls requires a considerable amount of patience, because applying a drawing by hand will take a lot of time and effort.
The textured method of painting is to obtain a surface with a unique structure as a result. This can be achieved with the most different ways. The stores now have all the materials that are needed to implement this idea. This method perfectly masks surface irregularities.
This finishing method is suitable even for beginners. The wall should be painted with thick paint, which will not dry immediately, but will give time to create a unique pattern on it. To do this, immediately after staining, take a crumpled piece of paper or a bag of polyethylene and blot the entire painted wall, each time stepping on the previous print.
To implement this idea, we need a regular sponge or brush with soft bristles. Ordinary water-based paint will do just fine. To apply the pattern, a sponge is taken, dipped in paint, and then slightly pressed against the surface of the wall. So the whole area is processed. This way of decor visually increases the area of the room.
old lock
This finishing method can often be found in hallways. country houses. This decor creates an imitation of laying out natural stone. It is considered expensive due to the fact that it is difficult to do it on your own and requires the involvement of craftsmen who know how to do it professionally.
modern wall painting ideas
It is often mistakenly believed that wallpaper looks much more profitable than painted walls. This is not true! And examples of decorating houses with paint, which are in no way inferior to wallpapering, are examples of this. The future design is only limited by the imagination. Modern materials can help make your dream come true. Consider the recommendations of designers for decorating walls:
Living room
The living room in every home has a different function. This is the most representative place in the house, but it is used everywhere in different ways. In one house, this room is a hall and a meeting place for the whole family and guests, in another it is a quiet and secluded place for reading. It is important to determine the functional load of this room, because its color scheme depends on it!
If you like bright and saturated colors, but are afraid to use them, then there is a solution. Choose the same colors, but more muted shades. Brown, pink, orange, light green, blue, grey, black and purple blends well with white. This is a color that is used both in decoration and in furniture solutions. White neutralizes dark and saturated tones. The living room is the place where you can bring any idea to life!
Bedroom
The walls in the bedroom are most often painted with water-based paint. It is breathable and safe. With equal success, she can be trusted with the coloring of wood, brick and concrete wall. The bedroom is designed for rest and relaxation, so the colors should be chosen accordingly. Consider the most popular interior styles that are found in the bedrooms:
| romantic provence | Delicate and transparent shades most often prevail here: light pink, lavender, pale blue, white and light lilac. |
| Baroque layered | Here, at least three aristocratic shades of these colors are mixed: noble emerald, pale green, gold, beige, walnut, black and burgundy. |
| High tech | In such interiors, only basic colors in cold colors are used: gray, light beige, white, cream. |
| Minimalism | A minimum of colors, the advantage is for black, white and gray colors. |
| Elegant classic | Classic neutral shades are used for wall decor: beige, brown, light cream and milky colors. Painted walls go well with furniture and flooring in dark shades. In the bedroom, all colors are used, only in their calm version. |
Kitchen
People spend a lot of time in the kitchen. Here they cook, eat, communicate. Color solution cuisine is very important, as it can directly affect the mood in the morning. The paint for this room should be moisture resistant and washable.
Bright yellow shades will always cheer you up. Green color is suitable for those who are constantly on a diet: it has a positive effect and calms the appetite. Light and beige shades are ideal if you need an elegant look. classic kitchen. Red color is a bold and bright decision, but requires careful handling, as it greatly affects the appetite.
Children's
Paint for a children's room needs eco-friendly, vapor-permeable and washable. Children often draw on the walls and need a special coating from which to quickly wipe off pranks.
A suitable option for a nursery: paint in one base color, and then add bright accents yourself. These are bright stickers, cartoon characters drawn with felt-tip pens and paints, fictional characters - what is enough imagination for!
Preferred colors for a children's room: yellow, orange, blue, green, light blue, pale pink.
Hallway
The corridor is the first thing a person sees when entering a house. It affects the impression of family members living here. When choosing a decor for a hallway, it is important to consider its dimensions: for small and narrow spaces undesirable construction frame structures and the use of dark colors. The paint should be easy to clean and wet clean.
Wear resistance is another condition when choosing a coloring matter in the corridor. It should be borne in mind that light colors will be too easily soiled in this place.
Bathroom and toilet
Thanks to water-based paints, which are not afraid of water, the painting of the walls in the bathrooms began to replace the decoration with tiles. Here you can not be shy and express your design idea in full! Bright, muted, dark and light - a variety of colors and textures are used in bathrooms.
The main thing to consider: the paint should not be afraid of water, be resistant to dirt and durable. Often they combine walls decorated with tiles and painted.
- After the paint package is opened, the dye is stirred to obtain a uniform color.
- Painting takes place in a room where the temperature is not lower than 5 and not higher than 20 degrees Celsius. Humidity is also important to obtain the desired result. If the air is dry, it is better to turn on a humidifier or use a sprayer.
- Drafts are excluded!
- If mold or fungus is present on the walls, then before painting, the surface is treated with an antiseptic solution.
- Working brushes, as well as rollers, must be thoroughly washed from paint and dried.
Summarizing, I would like to note that if you carefully follow the technology and use suitable materials and dyes, the result of staining will delight for years!
If you think that painting takes a maximum of half an hour and the walls become like new, we have to disappoint you. Surface painting is a work that is not without nuances: the process can be delayed due to the wrong paint, roller or wrongly applied layer. Also important is the time of day at which you pick up the instrument. Training, of course The best way achieve success, but we recommend avoiding other people's mistakes - we tell you how.
Mistake #1: Painting Unprepared Walls
Minor defects, dust, grains of sand, bristles from the brush during the previous staining may be under the paint and adversely affect the result. Under a layer of paint, all the shortcomings will be visible - it remains either to put up with it, or to clean the wall and repaint it. And possible greasy spots will show through, no matter how many layers you cover the surface. Defects will be especially noticeable if you use glossy paint.
What to do: to avoid double work and unpleasant surprises, prepare the wall in advance. Take sandpaper or a special plaster tool for grinding and go over bumps and defects. After - brush off the dust with a brush or broom. Stains can be removed by wiping the wall with a damp cloth and soap.
Mistake #2: Ignoring the Primer
Do not use a primer before painting the walls? Don't be surprised if you end up with an unevenly painted wall or paint overrun. The fact is that the primer provides a lower hygroscopicity of the surface, which saves the means for painting. And also the base gives the "cohesion" of the surface with the paint, which improves the painting of the walls.
What to do: choose the appropriate primer for the walls. Apply it with a brush vertically in small stripes, and then horizontally - perpendicular to the first layer. After the base has dried, you can cover the surface with the first layer of paint.
Mistake #3: Wrongly thinned paint
The paint is too thick consistency or becomes so in the process of work. Then it must be diluted - this is an intuitive action. But with what to dilute - this is already a question that can ruin both the material and the whole work. For example, if water-dispersion paint is diluted with white spirit, it will cause the polymers to stick together. If you paint a wall with such a composition, the result will be of poor quality - disappointment is inevitable: the paint will lie unevenly, maybe even in lumps. If, on the contrary, oil paint diluted with water - it simply does not mix with the bulk.
What to do: read the composition on the paint can and select the product according to it with which you will dilute the product. Do not pour in too much water or thinner - it is better to add little by little, mixing the paint thoroughly.
Mistake number 4: painting without a sample
Choosing a color is a rather complicated process, especially if the shade has to be combined with another tone or pattern. The unfortunate masterpiece will have to be repainted, and so the process can be repeated indefinitely. The same applies to the shade, which you have to "extract" with your own hands with the help of color.
What to do: add the coloring concentrate to the paint little by little, mixing the contents thoroughly. First, pour a small amount of paint into a small container and add a couple of drops of color - see what color you get. Get the tone you want, and then do the same in a larger bank if you like the result. To make sure the color is compatible with the overall decor of the room, try to paint - apply paint in an inconspicuous corner and wait for it to dry. If the result suits you - for the case.
Mistake #5: Choosing the wrong tool
Using the right brush or roller is just as important as choosing the right paint. And it's not a matter of taste. In order to evenly paint over the wall, you need to purchase a couple of rollers and a brush. First you will “roll up” the surface, and with a brush you will paint corners and hard-to-reach places.
What to do: for the first coat of paint, it is better to choose a roller with a long pile - 1-1.5 cm. It will pick up more paint, which will make it faster and easier to get a uniform color. For re-painting, a roller with a short pile - 6–7 mm is more suitable: it will help you use the paint more economically and definitely will not leave “streaks”. Bet on a brush with natural bristles - it will not leave lint on the surface.
Mistake number 6: applying paint "in different directions"
If you apply paint vertically, then horizontally, and then at random, in the hope that the wall will look decent when it dries, you are making a serious mistake. All strokes can show up, especially if you use a brush.
What to do: choose one painting option - vertical or horizontal - the paint will lie evenly, and the coloring will not look ridiculous due to chaotic strokes. When painting in several layers, you can alternate methods, for example, paint the first layer vertically, the second horizontally.
Mistake number 7: applying paint in one layer
When applying paint in one layer, the coloring may turn out to be uneven, and if you want to change the color of the surface in a drastic way, you definitely won’t be able to finish the job quickly. Even if you change from a light shade to a darker one, the first color will show through.
What to do: For an intense shade, apply two, and preferably three layers. The first will allow you to distribute the paint over the surface; the second and third - it is better to shade it, even out the color and fill in small irregularities.
Mistake number 8: staining on wet paint
Of course, I want to finish painting faster and enjoy the result. Therefore, we often do not think about the consequences of painting on a “raw” wall. As a result, the wet layer begins to come off, stick to the brush or roller. Oil paint, in turn, can go bubbles - all work will have to be started again. True, after waiting for the paint to dry, and sanding the places with defects.
What to do: be patient. While the paint dries, do something else. Pay attention to the instructions on the can, which indicate how long the paint takes to dry completely. If it's a single base emulsion, it won't be long before you can get back to work.
Mistake #9: Not enough paint
This can become a serious problem. Firstly, because during a trip to the store, the already applied layer may dry out (after drying, the joint between fresh and already applied paint will be noticeable). Secondly, it is difficult to choose the right shade if you added color to the paint yourself.
What to do: the easiest option is to take more. In extreme cases, an unopened jar can be returned to the store or left “just in case” - touch up places where the paint will peel off over time. On paint cans they always write what area the volume is designed for - pay attention to the numbers. Keep in mind that if you paint the surface in two layers, the area will double.
Mistake #10: Wrong Timing for Painting
Applying paint in bright sunlight can cause the compound to dry too quickly - before you even distribute it evenly. Also, the paint may start to foam or peel off. And if you paint by the light of an electric light bulb, all the errors will be barely distinguishable.
What to do: the best option for painting the surface is during the daytime, without direct sunlight falling through the window. It is better to paint the south side in the morning or in the evening, when the sun does not shine so brightly.


Chicken in kefir - recipes for marinated, stewed and baked poultry for every taste!
Simple Chicken Recipe in English (Fried) Recipes in English with translation
Chicken hearts with potatoes: cooking recipes How to cook delicious chicken hearts with potatoes
Recipes for dough and fillings for jellied pies with mushrooms
Stuffed eggplant with chicken and mushrooms baked in the oven with cheese crust Cooking eggplant stuffed with chicken