Modern house is the embodiment of imagination, creativity and creativity of its owners. Textiles still play a huge role in creating a certain homely atmosphere. With it, you can set the atmosphere of the room, bring bright ideas or quickly update it in a matter of minutes. A big role, of course, is played by cute and funny pillows, which can serve not only for a comfortable night's sleep, but also for decorating the whole house. To realize, you need only a little creativity, creativity and imagination.
Soft pillows, which can be located in all rooms, can have a completely unexpected appearance. In addition to boring and monotonous square and round products, you can quite unexpectedly sew a new and intricate thing. She will play the role of not only textiles, but also soft toys for the smallest in the house. Such products provide an element of the game, while you can easily take them not only with you to bed, but also play them on the floor.

Types of pillows for the game
Specialty stores and children's supermarkets have long offered a wide range of pillows in a playful format. Most often, they are presented in the form of large soft toys with 4 legs, which can be fixed with Velcro, thus creating a perfect square shape.

With such creative pillows, it is much easier and easier for a child to put them to bed in a playful way, or simply decorate their bed or sofa in the living room with them. A large number of such pillows in the same style help to create a certain comfort, helping to comfortably sit and enjoy your vacation.

However, toy pillows can also be made independently with your own hands, just armed with necessary materials, patterns and patience. Most often they are made in the form of soft animal toys, which have a wide body-base with soft and pleasant stuffing.

The main advantage of such products is that you can spend the remnants of fabric and flaps on them, harmoniously and correctly stitching them into a single composition. With the help of these pillows, the child can learn colors, as well as develop the sensitivity and motor skills of their hands, playing with bows, ribbons, buttons or other decorative elements on it.

DIY pillows for children may also be in the form of letters. This is quite a fashionable and widespread trend among young parents lately. The letters of the name at first simply decorate the bed of the crumbs, and in the future they serve as toys and pillows for him while playing on the floor. They can have different heights and thicknesses of the stuffing. The main thing is to arrange them correctly and harmoniously, combining them with a common fabric element or other accessory.

Another type of modern and fun toy pillows is draft rollers. Most often they are performed in the form of funny animals on a twine or animals with a long body. Such colorful rollers will not only decorate the room, but also protect from blowing on the windowsill, near the door or balcony block.

Important! If the pillow is used purely for sleeping, then it is worth avoiding the use of hard materials - buttons, dense fabric, plastic bets. They can injure the skin while resting.

A separate place is occupied by pillows for travel in transport. They often resemble standard products for adults, only they are made in the form of the letter “C”, where the shape is repeated by the animal twisted into a ball or its long and fluffy tail. Such pillows will help little travelers with pleasure to gain strength at any time of the day, in an unusual position of the body.

How to choose the right fabric for sewing?
When embodying interesting ideas for do-it-yourself pillow toys, it is important to understand what materials you should work with. The durability and strength of the finished product depends on the tooling and quality of the fabric used.

As for the color scheme, any solution and variety can reign here. The main thing is to initially decide for yourself what functions the pillow will perform. If she decorates the room or upholstered furniture, - it must be combined with the general tones of the interior. If this is just a funny and bright children's toy, then it can have the most unexpected incarnation.

Quite often, the funniest and cutest DIY pillow toy ideas come from plain old scraps of fabric. They can remain from old sewing crafts, cuttings, worn out, but bright things. They can be cheaply and angrily turned into a new funny thing.

As for the filler, here it is necessary to foresee the functionality and direct purpose of the finished product. If you want to fill it with down or feathers, then it will not hold the desired shape that you want to give. To diy pillow toy ideas were brought to life strictly according to the plan, then they should be stuffed with silicone, thick cotton cloth, or foam rubber.

If the design of the finished pillow toy can allow a cover or removable elements, then it is better to think about it in advance and calculate it when sewing. This will help to clean this thing more often from dirt and dust, keeping its original appearance as long as possible. Most often, pillowcases or covers are made from dense and high-quality fabric - fleece, jeans, drape or linen, which, with frequent washing, will not lose their shape and original appearance.

If you want to create a "cool" pillow for hot summer nights, then take silk fabrics as a basis. They will keep you feeling cool for a very long time. Brocade products for children should not be made. They are better suited for the usual decoration of furniture in certain classic interiors.

We use fillers
In addition to using standard fillers (feathers, down, foam rubber, etc.), you also need to know certain rules and secrets of filling hand-made pillows.
The main requirements and criteria for the work performed look something like this:
- First of all, the material used for stuffing the product must have hypoallergenic properties. This will avoid unnecessary problems and will not expose the health of the household;
- The filling should have a medium degree of rigidity. Too hard base will not be comfortable and orthopedic. Soft stuffing - over time, it will completely lose the shape of the sewn thing;
- The ideal filler should not lose its original shape and volume even after washing or dry cleaning;
- The interior should be easy to clean a large number of once.
These criteria can be met by polyester materials of various processing - synthetic winterizer, foam rubber or synthetic winterizer.

Very often, many needlewomen, making a pillow for the house with their own hands, make one serious mistake - they use cotton wool for stuffing. However, products with such a "stuffing" will last a very short time, in particular, if they play the role of a child's toy. Over time, cotton wool begins to roll and stray into one specific corner. The product with it will lose its shape, and become dense and unpleasant to the touch.

A little less often, instead of stuffing, old fabric patches or fur are used, but they also do not tend to keep the shape of the pad for a very long time with frequent use. An alternative would be silicone balls, which have different size and diameter. They contribute to the development of motor skills in children and quite easily give the product the desired shape.

Decor Ideas
It is difficult to imagine a pillow-toy for children that is monophonic and inexpressive. Needlewomen often try to give them brightness and similarity with different cartoon characters or animals. For this, quite different materials and tools, the main thing is to determine the direct purpose of the product.

The basis for the decor can be bows, colorful ribbons, laces, buttons, zippers, lace, beads or beads. It is better to deprive products for very young children of small accessories in order to protect the baby from swallowing small particles. Yes, and for older kids, it is best to fix all the additional elements well - sew or glue to prolong the life of a funny animal. From these auxiliary things, you can make facial features, clothes, bows, flowers and other cute applications.

What do you need for tailoring?
Do not worry if you do not have the necessary experience in sewing or a wide range of tools. You can sew a funny toy pillow quite quickly and easily with your own hands, even if there is no special sewing equipment at hand. This is especially easy to do if you sew a toy from different pieces of fabric. The main thing at the same time is to iron all the seams with an iron and carefully sew everything with dense threads. Separately, the seams can be decorated and reinforced with tape. It remains only to fill the product with filler and do the design of the appearance.

If the pillow in finished form should have a completely simple form- a long roller, square or rectangle with the paws of the animal sewn separately, then it is quite appropriate to use a zipper or buttons for fixing. These things of regular geometric shapes provide only the correct stuffing, which should have its own clear radius and length. More complex pillow toys should be sewn according to certain sketches or tips.

Ideas for creativity can be taken from specialized literature, magazines for needlewomen, or simply on the Internet. To do this, there are a huge number of sites and forums where you will be offered schemes and patterns for every taste.

Decorating your home or giving your child a real soft friend made by hand is very easy and simple. Create and embody your imagination in creativity and needlework. It will give you a lot positive emotions and great mood!


If you want to add bright details to the interior of the nursery, decorate the crib or just please the baby with a new friend, sew decorative pillow toys. The process of creating them is not at all complicated, but with detailed master classes From this article, even a novice mother-needlewoman can handle sewing a soft miracle.
Today, many craftswomen have already become interested in sewing pillows in the form of funny animals or other items. They are not difficult to perform, you can get a lot of joy from the manufacturing process. Products are bright, aesthetic, functional.
- so that the interior does not look monotonous, combine pillows different shapes, colors, take fabrics of different textures. Pillows can be in harmony with the color of curtains, wallpaper, textiles. Or, on the contrary, they can become bright accents in a too “calm” room;
- choose pillows according to the style of the children's room. V modern interior bright colors, pillows in the form of cartoon characters or books will look good. For classical style it is better to stay on pastel-colored pillows in the form of classic bears, stars, hearts, etc.;
- use mostly natural fabrics for sewing toy pillows. Cotton or linen look great, wash well and do not harm babies;
- before sewing the pillow, it is better to wash the fabric (or simply moisten it with water) and iron it. In this case, the finished pillow will no longer shrink when washed.
- use sintepukh or holofiber as a filler. These materials are practical, keep their shape well, and are hypoallergenic. They can be washed in the machine on a delicate cycle.
The main qualities of a pillow toy
In order for a toy to bring not only joy, but also benefit, it must be:
- comfortable;
- beautiful;
- environmentally friendly;
- easy care.
What kind of pillow toys will your baby like?
Sewing a pillow is a very exciting activity. There are several areas of the "pillow world":
- cat pillows. Perhaps the most common today. On the Internet, you can easily find patterns for pillow toys in the form of cats. Cats can be of all colors of the rainbow, with different characters, various shapes. But it is worth looking at any of them, and a smile immediately appears on the face.

- owl pillows. Another mega-popular look. Toy owls are very bright, compared to real birds. Owl pillows have won the love of both kids and adult serious lovers of creativity;
- letter pillows. Not so long ago they became popular, but they have already managed to win a lot of attention. Most often, either the first letter of the child's name is chosen, or the entire name is sewn. Pillow letters can be decorated with various decorative elements or make applications;

- elephant pillows. Under the guidance of craftswomen, gray elephants turn into bright, colorful, positive animals. They can become both small pillows and full-fledged pillows, on which it will be convenient to take a nap even for an adult;
- pillows-pillows in the form of funny animals. These pillows are, without a doubt, not only decorative, but also functional. You can sew them almost in one pattern, adding and modifying only details and colors. By the way, more recently, the idea of putting cushions under the door has become popular, thereby protecting the baby from drafts. Great idea to replace an old folded bedspread, isn't it?
- travel pillow toys . Everyone knows the rollers that can be put under your head in an airplane or car. Try to sew one yourself in the form of a funny animal, and your journey will become even more exciting, and the children will no longer be bored on the road. After all, in between rest with such soft animals, you can also play.
Now that you know the basic principles, you can try to apply the knowledge in practice and try to sew baby pillows yourself.
Pillow-toy cat
We will need:
- four types of cotton fabric (one larger piece for the torso and legs, and three small pieces for the tummy, paws and ears);
- fleece (can also be replaced with thick cotton) for the back of our pillow;
- interlining as a sealant for the front cotton side;
- sewing needle and thread;
- scissors (better zig-zag, but you can get by with regular ones);
- filler for toys;
- buttons for fastening paws;
- floss threads for muzzle embroidery;
- a disappearing marker or other pencil on the fabric to make markings for embroidering the muzzle.
Work description:
- Prepare all the materials and print the pattern.
- Using a disappearing marker, transfer the pattern to the fabric. Cut out the details. Do not forget to leave 1-1.5 cm of fabric for allowances. Should get 2 big details(from different cuts of fabric), 4 parts for handles, legs and ears, 2 parts for the tail.
- Sew a heart appliqué to the front of the body.
- Place the part for the front side of the torso with the wrong side on the interlining (on the adhesive base), fix with pins and cut carefully along the contour. Do the same with reverse side pillows.
- Now take cotton and interlining for the body, connect so that the wrong side of the fabric lies on the adhesive base of the interlining, and iron it well. Iron until the pieces stick together well.
- Next, we work in turn with each pair of details. Fold them right side inward, secure with pins. Stitch on a typewriter or make a smooth seam by hand.
- To prevent the fabric from shrinking, cut each piece along the contour with zigzag scissors or make cuts with regular scissors.
- After all the parts of our future cat are stitched, we turn them inside out. front side and fill with filler. We stuff tightly, but not too tight so that the fabric does not bulge and does not gather.
- Now we connect the two parts of the body together. We fold them with their right sides to each other, make an even line, leave a small hole at the bottom for the filler.
- We fill the body of the cat with holofiber, distributing it evenly throughout the volume.
- Sew up the hole with a hidden seam.
- Then we take the buttons and front paws and sew them to the body.
- We embroider a muzzle ( step by step process see photo).
We hug a new friend and put him on the sofa!
You always want to combine several functions in one thing. So, for example, toys can be pillows. Nowadays, there is nothing surprising that cannot be done with your own hands. Depending on which animals you like, which pillows you prefer. You can create these products with your own hands, so patterns for creating soft pillow toys, also with your own hands, will come in handy for you!

Here are photos with these characters that may interest you. In fact, toys - pillows are far from being an innovation in our time, but most likely an ordinary, but cozy interior detail.
In order to make a toy in the form of a pillow, or vice versa, it is not necessary to draw complex patterns of toys - pillows with your own hands and use abstruse literature. Most often, it is enough to show imagination and your product is ready.
We study the creation of patterns for do-it-yourself pillow toys
For this you will need:- the cloth
- scissors
- filler
- accessories
- sewing machine.
- Make up the outline of the future pillow.
- Cut out the fabric according to the details obtained from the outlines.
- Sew the pieces together with the front sides inward.
- Turn the fabric inside out.
- You iron the pillowcase that has received so far.
- In the hole through which you turned the fabric on the front side, stuff the filler.
- Sew up the rest.
- Complete with accessories.
Your product is ready. Use for joy!
You can make the pillow you like in the form of a lion, giraffe, sheep, cow, scales, toucan, tiger, horse, owl, cat, star, dolphin, even a whale.
Therefore, it is up to you to decide in what way your today's handmade pillow will perform.
For her, it is not even necessary to make and draw patterns, but if you want to have a pillow with absolutely clear details, then it is better not to neglect them. 
- paper
- pencil
- scissors
- threads
- main fabric
- fabric for decoration
- filler
- accessories for the manufacture and completion of the product.

Create a pattern, in the form of a toy that you like. Transfer the pattern of the part to the main fabric. Transfer patterns of parts and details to additional fabric for decoration. Sew the right sides of the part of the product together. Turn them inside out from the wrong side.
Decorate the pillow with additional fabric. Fill with filler. Sew the pillow so that there are no holes. Complete with necessary accessories.

If there are few of them and they are comfortable for your face, then this will only be a plus for your fabric pillow.
Toys in the form of pillows are multifunctional and doubly original. Their indisputable advantage, first of all, is convenience and beauty.
Any person will be happy to have such a nice accessory at home, even just as an element of decor. Everyone decides for himself what his pillow - a toy will be intended for. The good news is that this product can be made without problems and labor in absolutely any form, only the imagination of a person and the availability of materials for making a pillow play a role here.
Delight others, yourself and your kids with your crafts. Your pillow toy will be to the liking of anyone who notices it in your interior.
Create for happiness and for your pleasure!
Video on the topic of the article
6 166 353
Beautiful decorative pillows can revive even the most restrained interior. They bring an atmosphere of comfort, home warmth and allow you to relax. To decorate your home with them, it is not necessary to spend a lot of money, because you can create these cute decor elements yourself.
We have selected themed workshops for you, from which you will learn how to sew the pillow of your dreams. With step by step photos and detailed description even a beginner can handle it.
Volumetric heart of roses
A handmade pillow can be a wonderful gift. Armed with fantasy and a thread with a needle, it can even be turned into a unique Valentine. We are offering to you step by step master class making an unusual pillow with a voluminous heart.
For work you will need:
- finished pillow of the desired size;
- fabric for roses, which does not require overcasting;
- scissors;
- needle with thread.
Take a circle of fabric by the middle, gather it up, forming folds as in the photo. Fix the workpiece in the desired position with a couple of stitches.
Sew another circle of fabric on the bottom, forming a voluminous bud.

Continue sewing circles on the rosette until you get a flower right size.

Prepare the rest of the roses in the same way. Their number depends on the size of the flower heart.

Sew the flowers to the pillow starting from the outline of the heart.

Arrange the blanks close to each other so that there are no gaps between them. A magnificent heart is ready to conquer and win hearts.

Such a designer pillow will decorate the room of a capricious fashionista or will become a highlight of your living room. And she will cheer you up just by looking at her.

fluffy pillow
The original pillow with a fringe will successfully fit into any interior. Pleasant to the touch fleece will make it a favorite thing not only in the children's room.
For work you will need:
- fleece for the base of the pillow and fringe;
- filler;
- scissors;
- threads;
- pins;
- sewing machine.

For fringe, it is better to choose a fabric several colors of the same range- get a stylish transition between them. In our case, 10 strips of 37 * 10 cm in three shades of brown are used.

Fold each strip in half and cut the fringe.
Sew the first strip to the base of the pillow, stepping back 1 cm from the edges. This is the result you should get.

Next, fold the fringe to one side.

Sew next to the second strip at a distance of about 1.5 cm from the first.

Continue sewing on the fringe in the same way. Alternate dark stripes with light stripes in several rows, achieving a beautiful and smooth transition of colors.

Put a second square on top of the fringed blank and pin it around the edges with pins. Sew the pillow around the perimeter, leaving a small opening for stuffing.

Turn pillow inside out and stuff with filling. It is better to use a synthetic winterizer or holofiber. natural materials, such as cotton wool and fluff, can clump over time and the product will lose its neat appearance.
Sew up the opening with a blind stitch.

It turns out a very beautiful sofa cushion, which will create an atmosphere of warmth and comfort in your home.

Pillow "Butterfly Wings"
We present to you detailed photo lesson on decorating an interior pillow. Even if sewing is not your forte, you can easily master it: you will need a ready-made pillow for work. Guided step by step instructions, you will turn an ordinary pillowcase into a masterpiece of art design.Pillow-toy "Owl"
A funny and bright owl is a win-win gift option for both an adult and a child. When such a cute bird settles in your baby's bedroom, he will not only sleep with her, but also play with her.
For work you will need:
- cotton in two colors;
- felt for eyes and beak;
- black buttons or beads for pupils;
- bow ribbon;
- crayon;
- threads;
- needle and pins for sewing;
- scissors;
- lace;
- filler.

Attach the template to the fabric and cut out the necessary details, make an allowance of 1 centimeter for the body and wings.

To decorate the toy, lace, bows and a wooden flower button are used. If you are using a full-size pattern, then cut out an 8 * 16 cm rectangle and a 4.5 cm square for the bow, or change the size of these parts in proportion to the owl.
Sew on the beak and lace with a zigzag stitch. Lace is placed in the center of the body, between the wings.

Sew wings and eyes with the same seam. Attach the black pupil buttons by hand.

Fold the body parts of the owl right side inward, secure with pins and sew. Leave a hole at the bottom between the wings for further manipulations.

Turn the toy inside out, iron it and stuff it with stuffing. If you used ordinary scissors to cut out the details, before turning out, make neat notches near the ears and in all convex places so that the fabric does not shrink.

Sew up the opening with a blind stitch.
You can do decor. Fold the square for the bow into a strip and iron it.
Fold the rectangle in half right side inward and sew, leaving a 1 cm allowance.

Turn it inside out, gather in the middle and sew on the prepared strip, forming a bow. Sew it on the owl's ear.

Tie a bow from a small piece of ribbon, sew it and a wooden button to the body of the toy.
Such a cute owl will reliably guard your sleep.
Another idea for implementation is to sew a solid owl according to this pattern. It is enough just to show imagination and choose the appropriate toy color scheme and decoration.
Pillow with application "Cat in love"
An elegant pillow with a cool application is a wonderful gift for any occasion. With its help, you can confess your feelings or just cheer up your loved one.
For work you will need:
- thick white pillowcase 35*35cm;
- shreds of cotton 4 colors;
- white interlining;
- iron;
- 3 green beads for the eyes;
- threads to match the fabric;
- decorative braid.

Cut out two rectangles 17*13 cm- clouds around the cat and the fish. In our case, they are white with orange polka dots. You can choose the color of your choice.
The cat's body is a rectangle 16*12 cm, orange with small white polka dots.
Cut a rectangle out of white fabric 20*11 cm. It will make the eyes and thoughts of a cat.
Cut out the rectangle 10*5 cm from green fabric for the body of the fish.
Fold the interlining adhesive side with the wrong side of the rectangles and iron them so that they stick together. So it will be easier to cut small parts and they will not crumble.

Cut out blanks for the appliqué. You can use cardboard templates or immediately cut out the details from the fabric.

Arrange the elements on the pillowcase and achieve the desired picture. Mark the ground line with decorative tape. Choose the expression of the cat's loving eyes.

When you decide on the location of all the elements of the application, you can proceed to the last step. It remains to sew them to the pillowcase.
Sew with a small white zigzag the outline of a white cloud to a polka dot cloud.

Sew the contour of the fish to the prepared two-layer cloud with a green zigzag. Embroider the fish's fins and outline of the head. Attach an eye bead.

Sew the details of the cat with a small zigzag thread to match the fabric. Lastly, attach the eyes and embroider his mustache.

Embroidered paws will give the animal even more charm. You can add small flowers to the application to make the composition more expressive.

The finished pillow will definitely take the crown place on the sofa in the living room and will become the star of your interior.
Pillow-spyushka "Sleeping Kitten"
Want even more cats? We are offering to you interesting idea for creativity: sew a charming kitten, which, with its very appearance, evokes drowsiness and peace.
For work you will need:
- cotton fabric 3 colors;
- fleece;
- interlining;
- scissors;
- iron;
- filler;
- chalk or a special marker for fabric;
- floss threads;
- 2 buttons;
- pins;
- pattern.

Attach the patterns of the torso to the fabric, circle and cut it with an allowance of 1 cm. Place the part with the wrong side on the adhesive side of the interlining, secure with pins and cut it out. Prepare the second part of the fleece body in the same way.

Cut out the paws, ears and tail of the kitten.

Remove the pins and iron the two-layer parts of the body with an iron so that the cotton sticks to the interlining.

Fold the parts of the ears, paws and tail in pairs right side in and sew them on the machine, leaving holes for eversion. Cut the stitched blanks with curly scissors or make the notches normal.

Turn the parts inside out and iron them, stuff with filler. Sew the holes in a zigzag pattern. Attach the resulting parts with pins to the front side of the front of the cat. Sew them to the body of the kitten in a zigzag.

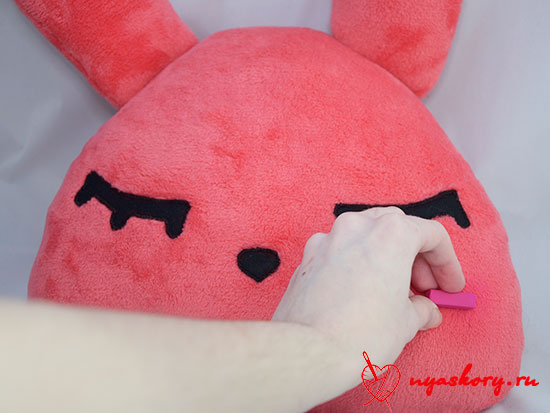
Draw the cat's face with chalk.

Put the fleece part (back) on top and fix it with pins. Sew the blanks, leaving a small opening at the bottom for eversion. Trim the seam allowances with curly scissors or cut the notches normally.

Turn the piece right side out and iron it. Stuff the toy with filler and sew up the opening left earlier with a blind seam.
Sew upper legs and buttons to the body for decoration.

Embroider the nose and closed eyes with floss threads.

The soft splyushka cat is looking for its loving owner. Everyone will be happy with such a pet. He will be happy to settle both in the baby's crib and in the cozy living room.

Do you feel the strength and desire to create, but still consider yourself a beginner? We bring to your attention an informative video from which you will learn how to sew a funny cat pillow from a regular pillowcase. An original pattern, a minimum of action, a little decor and imagination - and you will get an elegant cat or a mischievous cat.
By the same principle, a cheerful hare will turn out, it is enough just to make the ears longer.

Download even more funny cat patterns to make your wildest ones come true. creative ideas. Such cute little animals will be a wonderful decor for your home or cottage, as well as an original present for your dear people.


Cushion-dog
Do you think that animals do not belong in the house? And here you are wrong. You can always get yourself an adorable pillow dog. A cheerful dachshund will gladly take his place on the sofa and will not cause you any trouble.A detailed description is presented in our step-by-step master class.
According to this scheme, you will get both a small toy puppy and a solid adult dog. It all depends on the amount of materials at hand and your desire.
And if you have a lot of unclaimed pieces and shreds of fabric left, then you can sew a bright dog pillow out of them. This patchwork toy with a cute face, made in the technique of patchwork, will become a favorite character in the children's room.

This toy can be made together with children and have a fun and useful time. And your child will receive the first lessons of cutting and sewing.
Piggy bank of master classes on pillows + interesting ideas
Heart valentine pillow:Original circles:


Checkered dog:
Romantic option:
In the form of a star:
A few more original pillows for inspiration:


Pillows for children: cats, bunnies, owls, dogs, bears:


Decorate pillowcases with plant prints
An original way to decorate a pillowcase with a floral ornament is to transfer prints of live fresh grass and leaves onto it. A product with such a design will be unique and one of a kind. It will also warm you on winter evenings with thoughts of a warm summer.
For work you will need:
- natural light fabric;
- freshly picked plants;
- hammer;
- scissors;
- parchment, preferably siliconized for baking.

Fern, plantain, clover are perfect for prints. Tear off the plant you need, spread it on the fabric and cover with parchment. Beat it very hard with a hammer so that the juice stands out from the leaves, which is absorbed into the fabric and forms an imprint. Remember: you need to beat off the plants on a hard, flat surface.

Experiment with different leaves, stems and their arrangement to get the desired result.
It is sewn mostly simply, rarely requires exotic materials. That is why you are waiting amazing journey into the world of pillow dreams
Step-by-step master classes and patterns or how to sew a pillow with your own hands
A lot of master classes are waiting for you now. Let's start with baby pillows.
Pillows - toys for adults and kids
Soft plush friends are always in the price of children. But what if we make them a little more practical, but no less original? In this section you will see a lot of children's pillows in the form of toys and just unusual and bright designs for a great rest for your baby.
Children's pillow - toy "Rosalina"
With this shy beauty, children's sleep will always be a joy. To sew a soft zaya for a child, you will need:

- velsoft (for the base of Rosalina, you can take faux fur and fleece);
- thin felt (for muzzle decoration);
- threads in the color of the fabric + black;
- lace 2 colors (for decoration);
- small rose (for the central part of the bow);
- synthetic winterizer (for stuffing);
- dry pastel (to give a gentle blush);
- cotton pad (optional)
- chalk or pencil (for transferring patterns to fabric);
- needle;
- pins (for chipping parts);
- scissors.
Here are the patterns for Rosalina (click to enlarge):


Cut them out carefully, velsoft is a capricious fabric. We start with the ears. Sew them as below. Turn the ears inside out and stuff with padding polyester.


Put the ears inside the head. Pin along the edge, baste and sew, leaving a hole at the bottom.


Turn the head inside out along with the ears. I got it like this:

Stuff Rosalina with padding polyester, sew the bottom hole with a blind seam.

Now we have to make Rosalina's face. To do this, take all the details of the face, pin them to the head with pins (so that they do not move out), and then sew them with a small hidden seam.
To apply blush, simply take a pastel chalk and rub the bunny's cheeks, rub with your finger. If the pile on the fabric is not very long, you can do this with a cotton pad, after applying a pastel on it.


Rosalina definitely needs to make a pretty headband! To do this, cut the lace so long that it is slightly longer than the distance between the ears.
Sew the ends of this piece to the ears, as if pulling it.

Now let's make a bow! To do this, take another piece of lace, fold it in half and sew the ends.

Now simply sew a line of running stitches down the center of the bow. And pull off.


Quad cat
Necessary materials
What is useful to us for a pillow - a Quadrocat toy?

Here is the list:
- fleece of 2 colors (for muzzle and head);
- felt (for eyes and nose);
- threads in the color of the fabric;
- synthetic winterizer or synthetic winterizer (for stuffing);
- white acrylic paint for the pupil (or rhinestones)
- a glass of water (if you use paint);
- second glue (if you chose rhinestones);
- pencil or chalk for transferring patterns to fabric;
- sewing needle;
- paper for transferring patterns to fabric;
- scissors.
Before you start sewing, you will need the patterns that I have prepared for you (click):

First of all, I want to say: this is only a quarter of the pattern (for the head and muzzle), for the nose it is half. For felt parts, allowances are not needed. For everyone else, half a centimeter should be enough.
First of all, cut out and sew the ears together. Trim off excess seam allowances. Turn out the ears.


Ears while you can put aside, take the muzzle and head. Sew the muzzle into the head as shown below.
In order not to get lost, you can make small notes in the same places on the muzzle and border.

This is what the cat's face looks like:


Now put the ears inside the Quad Cat where you like and sew them on. Also sew the cat along the edge, leaving a small hole at the bottom.

Turn out the pillow. While the Quadcat looks like this:
And now you need to fill the pillow with padding polyester as tightly as possible, since fleece is very sensitive to stretching and it can just turn out to be “orange peel” if the stuffing is not dense enough

And sew the bottom hole with a hidden seam. At the bottom you can see the already completely sewn hole.

Our cat is still without a face! Let's fix this. Take the eyes and nose and attach them where you would like to see the muzzle.

We will sew on the eyes and nose. To do this, bring the thread out, as below, and sew with a buttonhole, but VERY small. That is, there should be no distance at all between the stitches.

This process is quite painstaking, but it's worth it! Final photo:

Do-it-yourself letter pillows
A very common type of sofa cushions. They are sewn quite simply, the main thing is to have the alphabet with the right language. And increase the letters to the right size, of course.
The most important thing is not to forget to cut off the right amount of strip for the side jumper.

I found two such alphabets, but there are still a very large number of different fonts on the web, each of which is applicable for letter art. 

Photo of children's pillows


There will also be many inspirational photos at the end of the article, so don't miss it.
DIY decorative pillows: photos and creation schemes
There will be rollers, and flower pillows, and just unusual, practical and easy-to-do ideas.
Soft heart dear
Now we will talk about how to make a gift to your loved one with your own hands. And then Valentine's Day is about to come, and somehow I rarely prepare you for this)
What gift am I talking about? We will sew a beautiful pink pillow in the shape of a heart with frills from a veil.
Necessary materials

- faux fur for the heart itself (the pillow is large enough, so the dimensions of the material are decent: 110 x 40 cm);
- veil, chiffon or organza for ruffles and flowers (dimensions: 300 x 30 cm);
- sintepuh or synthetic winterizer for stuffing;
- threads in the color of the fabric;
- satin ribbon for a bow;
- rhinestones;
- pattern paper;
- pencil for translating patterns;
- scissors;
- needle;
- pins for pinning patterns and frills.
You will need patterns (click to enlarge):


As you can see, this is only half of our heart. Therefore, when you cut it out, first translate one half, then the other. And so for both parts.
Cut out two pieces so that the direction of the pile on them is the same. Cut off a strip of the following sizes from the veil: 300 x 18 cm. Such a large length is needed so that, with further shirring of this strip, you can insert it into the edges of the pillow.

Now fold the strip in half lengthwise. Sew on sewing machine two lines at a distance from the edge and from each other by about 5 - 7 mm. But do not fasten the ends of the thread! And leave a larger supply of thread on all sides.

We haven't secured our stitches, so now we can tighten them. Just pull on both threads and slowly gather our frill to the desired state (the length of the finished frill should be equal to the length of the edge of the pillow itself).

After the threads are tightened, tie all the threads into knots at the ends and cut off the excess threads.


Now you need to put the frill inside the pillow, as shown below, and stick it in.
 And then sweep and sew, without sewing to the end. Leave a small hole. After everything is sewn, turn the future pillow inside out and stuff it with sintepuh.
Now sew together the ends of the frill, as in the bottom photo.

If you have a small spare of frill left, then you can hide the seam slightly by laying a small fold. It remains to sew up the left hole.

Our pillow, of course, is good, but there are not enough decorative elements on it, so we will make roses with you To make roses, you will need 3 strips of veil with the following dimensions: 9 x 50 cm, 5 x 30 cm and 4 x 17 cm. Process them as well as a frill for a pillow.

It's time to wrap our rose! To do this, start folding the rosette, as below. But when wrapping the flower, bend the edges of the rose to make it look more natural. Make all 3 roses in this manner.


The roses came out great, didn't they? I hope everything worked out for you too. By the way, I wrote about creating similar roses in one of my previous posts.
It remains only to sew or glue the rose to the pillow. It comes out very nice:

Other sofa cushions
It seems that a few more detailed master classes will not hurt you)
butterflies

Lamb

Bear and dog


Frill

Roses 
Roller “Princess Hotdog”(do not bother with the name, this is a character from one stoned cartoon)
I don’t have a detailed photo description, but I can say one thing: for the body you will need six elongated wedges and two parts (almost semicircles) for the muzzle.

Other fabric fantasies


It's nice to know that blog readers are inspired by my posts. The beautiful needlewoman Marina Grudzinskaya sewed pillows based on the works presented in this article. Come visit her (profile in In contact with and Instagram) and evaluate the products themselves:


I want to show you where to buy great materials to create super-soft and delicate pillows that are indistinguishable from store-bought ones. I bought this myself wonderful fleece— I'm overjoyed, he's so glorious. The most important thing is that the color palette is on top.
On this, dear friends, I ask you. This time it turned out to be a very plump article on ideas (I personally counted about 50 ideas). I hope that you found exactly the option that you wanted. See you soon!
Sincerely, Anastasia Skoreva


Mixed Personality Disorder: Causes, Symptoms, Types and Treatments
GTA 4 control settings
FAQ on Smuggling in GTA Online
LSPDFR - welcome to the police
The huge map of Grand Theft Auto San Andreas and its secrets