Today we will talk about how to make a sawmill with your own hands from improvised materials. We will also consider drawings and manufacturing schemes. various designs homemade sawmills with visual illustrations and photos
Those devices that are on sale are certainly convenient and functional, but such sawmills cost a lot, therefore, if you have some experience working with metal and various devices, then you can try to make a sawmill yourself.
To create a sawmill from a chainsaw, you need two channels, from 140 to 180 millimeters high and about 8 meters long. We also need corners 50 by 100 millimeters and two rails, they need to be turned upside down. Creating the basis for the sawmill, we drill holes with a diameter of 14-16 millimeters along its length, the holes should be located at a distance of 1-1.5 meters from each other. The work will require ties, their number should be equal to the number of holes, segments can be used as ties water pipe.
The length of the screed should be 25 centimeters, they are connected with bolts. Racks are made of metal squares, on which the base for the sawmill is placed. When making the base, you need to carefully ensure that the base consists of strictly straight elements. The distance from the extreme racks to the end of the base should be from 80 to 100 centimeters. To give additional structural rigidity, special braces can be welded between the uprights.

The first half of the work is done, then we make a movable cart, it will be based on a steel plate 600 millimeters long and 4 to 6 centimeters thick. A corner of 40 by 40 millimeters is welded to the plate from below, and then the trolley is placed on bearings or rollers. At the top, it is necessary to weld two corners, to which we attach a chainsaw, with which the saw will be cut. The last step is to make a structure for fixing the log. This requires pipes 35-40 millimeters in diameter and movable hoses, which we have with subsequent fixing at any required height, limited by the length of the pipe.
Instructions on how to make a sawmill with your own hands
2 The sawmill is based on rails from a corner, the length of which is 50 millimeters. Install it side up. Much attention is paid to the installation of wheels. They should not rub off on the corner. Most often, the installation is performed with the edge of the corner up. In this case, the wheels are not erased. As "sleepers" use profile pipe size 2
5x25 millimeters. A half-inch pipe is welded between the profile tube, on which there should be fasteners in the form of nails. Fasteners must move and tilt freely. The wood clamp must act after the hammer hits the fastener. The clamp is self-locking.

4 Original pulleys have a diameter of 30-32 centimeters. They are stitched on lathe. The worn belt after this operation should protrude a couple of centimeters. The pulley housings are welded to the tubes. The structure should move freely along a horizontal guide made of a half-inch pipe.

It can be fixed with screws. The right pulley should automatically tighten. To do this, you need to install a spring from the shock absorber. The left pulley must be fixed. However, it can move when resized band saw. Pulleys are installed in parallel. However, in order to prevent the tape from flying off, they are performed with an inclination of 3 degrees.
The mechanism of vertical movement of the saw unit homemade sawmill
This mechanism should be only propeller with two rotors connected to a low-speed lift motor. Screw nuts should be made of bronze, not cast iron, which is brittle and not suitable for this purpose. The screws must be covered with protective rubber corrugations.
Recently, some manufacturers of band saws use automobile chains as a mechanism for vertical movement of the saw unit (instead of screws), referring to the simplicity and reliability of the design. This is not true, since during operation the chains are pulled out, which leads to skew and jamming of the saw unit. Cables that get tangled in the lifting mechanism are also not suitable for this purpose.
The gear motor that drives the chains or cables wears out over time, under the weight of its spontaneous rotation and gradual lowering of the saw unit, especially from vibration during the sawing process, the result is a board at the exit thicker than at the entrance.
Supporters of a chain or cable lift of the saw unit convince that the weak point of the screw lift is the bronze nut, which can also wear out over time.
But in the process of choosing between replacing an obsolete gear motor or replacing a bronze nut, it is more economically feasible to replace the nut than an expensive, mostly imported gear motor, which is 10 times more expensive.
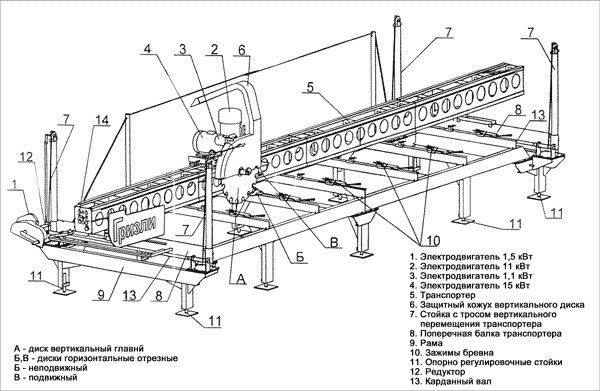
This sawmill consists of four units: a drive with a saw, a device for adjusting the thickness of the bar, a device for moving the saw unit, and a log fastening mechanism.
Saw drive. Using a blade from a mechanical hacksaw, you can make a saw with a length of 450 mm and a width of 40 mm. The teeth can be cut with a grinder disc and parted by heating them with a torch. The desired shape of the saw is attached to the grinder.
The saw moves horizontally in 4 hardened rollers mounted on racks. The length of the racks depends on the thickness of the beam (80 mm in the diagram). To give rigidity, a plate is installed between the rods.
From the engine with a power of 3 kW and a rotation speed of 1500 rpm. rotation is transmitted to the flywheel shaft pulley. Flywheel which weight is 7 kg and diameter is 200 mm. To obtain a saw stroke of 100 mm, with a deviation from the center of 50 mm, a finger is fixed in the flywheel, and a connecting rod is attached to it. And the 2nd end of the connecting rod is fixed on the saw. Offset of the flywheel axis relative to the axis of the saw 25 mm.
The device for adjusting the thickness of the bar. To obtain the desired thickness of the bar, the base is raised or lowered, fixed with four M 14x2 bolts. It is restrained by nuts welded to the plates with bent edges.
The two-millimeter pitch of the screws allows for more precise adjustment of the thickness of the timber. All screws are equipped with sprockets, which are connected by a chain. You can use the chain from the gas distribution mechanism VAZ 2101. When adjusting, the chain is moved by hand in the right direction, thereby turning the screws. Counting the revolutions on the mark, on one of the stars.
This is interesting: read our other articles from the construction industry: "Manufacturing technology paving slabs"and" We make a cinder block with our own hands.
Saw unit moving device. The saw part of the sawmill moves along the guide corners along the frame. The distance between the corners is 550 mm. Each rack has 2 rollers. The upper roller rests on the guide corner, the lower one keeps the saw part from rising. The rollers are bearings with a diameter of 20 mm.
A chain is placed along the front guide. A bushing is welded on it and the axis of the sprocket passes through it, which engages with the chain. The steering wheel is fixed on the other side of the axle. By rotating, which we move the saw part along the frame.

Log fastening mechanism. In the sawmill, the log is clamped with two combs. The first - movable is moved by a screw, the second - is not movable. After installing and fixing the log with combs, the movable comb is clamped with 2 screws.
When processing a log, first four slabs are cut, and then the tetrahedral beam is sawn into bars required size.
Those devices that are on sale, of course, are convenient and functional, but such sawmills cost a lot, so if you have some experience with metal and various devices, you can try to make a sawmill yourself. This article provides an example of a homemade sawmill using parts from a Niva combine, for example, pulleys. Turning work in the manufacturing process is used little.
Another instruction on how to make a sawmill with your own hands
1 A special frame is attached to the saw bar, which is made of metal. The thickness of the board is determined by the gap between the frame and the tire. A homemade sawmill lasts no more than three months, since cheap materials are used. They start to fail.
2 The sawmill is based on rails from a corner, the length of which is 50 millimeters. Install it side up. Much attention is paid to the installation of wheels. They should not rub off on the corner. Most often, the installation is performed with the edge of the corner up. In this case, the wheels are not erased. As "sleepers" use a profile pipe measuring 25x25 millimeters. A half-inch pipe is welded between the profile tube, on which there should be log fasteners in the form of nails. Fasteners must move and tilt freely. The wood clamp must act after the hammer hits the fastener. The clamp is self-locking.
3 Profile tubes are used as rails. Adjusting bolts are placed on the protrusions, which have a size of M14x100 millimeters. "Bridges" are installed on profile tubes. It is on them that the logs will be laid. The last two "bridges" are located at a distance of 50 centimeters. This is necessary in order to conveniently place short workpieces.
4 Original pulleys have a diameter of 30-32 centimeters. They are turned on a lathe. The worn belt after this operation should protrude a couple of centimeters. The pulley housings are welded to the tubes. The structure should move freely along a horizontal guide made of a half-inch pipe. It can be fixed with screws. The right pulley should automatically tighten. To do this, you need to install a spring from the shock absorber. The left pulley must be fixed. However, it can move when changing the size of the band saw. Pulleys are installed in parallel. However, in order to prevent the tape from flying off, they are performed with an inclination of 3 degrees.
Mechanism of movement of a sawmill. The saw part of the sawmill moves along the frame along the guide corners 13 (plan-scheme 2), the distance between which is 550 mm. Each rack 14 has two rollers 12 (plan 2). The upper roller rests on the guide corner, and the lower one keeps the saw part of the sawmill from rising. Bearings with a diameter of 20 mm are used as rollers.
A chain 5 is fixed along the front guide (plan-scheme 1). A sleeve 16 is welded on the front pillar, through which the axis of the sprocket 17 is passed (plan 2), this sprocket engages with the chain. At the other end of the axis, a steering wheel 15 is fixed. By rotating this steering wheel, the saw part moves along the frame. You can do without the steering wheel - more on that below.
Timber attachment device. The logs in the sawmill are fixed with two combs 7 and 9 (plan-scheme 1). The first of them is movable and moves with the help of screw 8, and the second is fixed. After the log is installed and clamped with combs, the movable comb is fixed with two screws.
When sawing a log, four slabs are first cut, and then the resulting four-edged timber is dissolved into boards or bars of the desired size.
For the convenience of loading large logs, the sawmill can be made without legs, while you can move the saw part by pushing it in front of you, which will simplify the design. no need to make a steering wheel. To make it more convenient to push, it is better to additionally make handles.
The mechanism for adjusting the thickness of the resulting board. To obtain the desired thickness of the board when sawing, the base 6 (plan-scheme 2) is lowered or raised, which is fixed on four M14x2 threaded screws. The base is held by nuts 18 welded to plates 4 (figure below), the edges of which are bent. On top of the base there are lock nuts, which are tightened after setting the sawmill to the desired thickness of the sawn boards.
The screw pitch of 2 mm simplifies the calculation of revolutions when obtaining the desired board thickness. An asterisk 20 is installed on each screw (plan-scheme 2), these asterisks are connected by a chain. Sprockets and chains from the gas distribution mechanism of a VAZ 2101 car were used. When adjusting, the chain is taken with both hands and moves in the right direction, thereby rotating the base screws. In this case, revolutions are counted according to the mark made on one of the asterisks.
Undoubtedly, the sawmill is necessary equipment for every person who works with wood, as well as for everyone who plans to build their own in the near future wooden house. But a factory-made sawmill is not a cheap pleasure, and it is advisable to buy it for those who are engaged in the preparation of timber at a professional level, for whom this is a means of making money. If you do not belong to this category of businessmen, but you nevertheless need a sawmill, then a home-made sawmill is an excellent way out for you. At the same time, a do-it-yourself sawmill will not require you to invest a lot of money - at least it will cost less than the one you can buy in a store.

You can learn about how else to make a sawmill with your own hands from the following description.
In order to make a sawmill with your own hands, you will need 2 channels, the height of which is 140-180 mm, and the length is 8 meters. 50x100 mm corners and two rails turned upside down are perfect for making the base for a homemade sawmill. At the same time, it is important to ensure that only strictly straight elements are in the basis. Then along the length of the base it is necessary to drill holes at a distance of 1 -1.5 meters from each other. The diameter of the holes should be 14-16 mm, and the distance between two adjacent holes should be even along the entire length of the base. Next, prepare the ties.
Their number should be equal to the number the resulting holes, sections of the water pipe ¾ are suitable as a workpiece. The length of each tie should be 25 centimeters. Tie connections are made using studs or bolts. The base assembled in this way is placed on racks that can be welded from metal squares or I-beams. The number of racks depends on the length of the resulting base. So, for example, a sawmill, the drawing and manufacturing procedure of which is described here, has 4 racks. The distance from the ends of the base to the extreme racks should be approximately 80-100 cm. Special braces must be welded or attached with screws between the racks - this will give the base of the homemade sawmill the necessary rigidity, preventing it from bending under the weight of the log.
And one more piece of advice for those who decide to build a sawmill with their own hands: it is best to assemble it right at the place where it will then work. The fact is that its weight is large enough, and it will be very problematic to transport it to another place without having to disassemble the entire structure. And when assembling it at the place of direct work, you can dig the racks into the ground for stability.
After assembling the base and installing it on the racks, it is necessary to proceed to the next stage - the manufacture of a movable trolley.
This trolley can be based on a steel plate, the dimensions of which are 4-6 cmx600 mm (thickness, length). As for the width of this slab, it all depends on the distance between the channels of the base - in width, the slab should extend approximately 10 mm beyond the channel on each side. From below, a stop is welded to the plate or attached in another way - a corner of 40x40 mm, after which the cart is placed on bearings or rollers, which will ensure its free movement along the base.

On top of the cart, it is also necessary to weld 2 corners - this is required in order to attach an electric motor to it, with which the sawmill will perform its functions. The movement of the trolley with a circular saw and an electric motor is carried out using a steering wheel and a chain from a conventional combine. To clamp the log being processed, it is necessary to make a structure that will consist of pipes with a diameter of 35-40 mm and movable rods that can be fixed at any required height within the length of the pipe.
When choosing a saw and an electric motor for a sawmill of this design, it is best to give preference to a circular saw with a diameter of 1 meter and an electric motor with a power of 10 kW. Working on a sawmill of this design is easy - you just need to put a log, fix it with a rod and move it by turning the steering wheel. In this design of the sawmill, the movable cart can move in both directions.
In order for a log cut made with a saw to be even, it is only necessary to ensure that the saw is sharp enough. Naturally, compliance with safety rules when working with a sawmill is one of the conditions of paramount importance that must be observed, regardless of whether you made a sawmill with your own hands or purchased it in a store. Making a sawmill with your own hands, as you can see, is not at all difficult, for this it is not at all necessary to be an ace in mechanical engineering, it is enough just to have skillful hands. And you can use the saved money to decorate your own wooden house.
Over the past few decades, wood has been the most popular building material, which is applicable both in the construction of structures and in the decoration. A few years ago, primitive tools were used for woodworking, which did not have high productivity. AT modern world there are machines that allow you to automate the process to simplify the processing process and increase productivity. An example is a sawmill used for sawing workpieces. The cost of the industrial version is very high, the sawmill is purchased only if production is set up in large volume. In everyday life, home-made versions are most often used, which have a lower cost and are best suited for solving household tasks. A homemade sawmill from a chainsaw can be made using various drawings.
Varieties of homemade models
There are quite a few different sawmills that are made from chainsaws. As a rule, the movable structural element is fixed in a special trolley, which moves along the previously located rail tracks. At the same time, you can install a powerful Ural chain saw or a tape version of the Druzhba version in the trolley. In doing so, we note the following points:
- chain version is used for sawing roundwood. In the design, the saw chain becomes the cutting tool, after which quite a lot of sawdust remains. Note that a large number of waste can be called the main design flaw. Otherwise, the chain assembly is superior to other versions: greater reliability and service life, high performance, and so on;
- band saws are used for sawing wood large diameter. It should be borne in mind that when sawing, a huge amount of sawdust scatters around. Therefore, certain safety precautions must be followed.
For domestic use, a sawmill of small size and productivity is often suitable. At the same time, an ordinary chainsaw becomes the main structural element, and the rest is only the devices necessary to ensure a smooth cut.
What is needed to carry out work on the home-made creation of a sawmill?
In order for the sawmill from the chainsaw to be made correctly with your own hands, you should download or create drawings yourself that reflect the main linear dimensions and correct location of all elements. Before doing this work, you should decide where the equipment will be installed. A sawmill from a chainsaw can have various dimensions which allows installation in almost any room. It is also necessary to provide for the possibility of attaching the structure to the base. During cutting, quite a lot of dust can be generated. Therefore, when working indoors, you should take care of the presence of a special hood.
When considering how to make a sawmill from a chainsaw yourself, you should pay attention to the list of necessary parts below:
- Channels with a length of 8 meters and a height of 150 millimeters in the amount of 2 pieces. It is worth paying attention to the fact that the channels will take the entire load, which can be very significant.
- Two rails. They will become the upper part of the sawmill, as well as a kind of guide for the movable element. The rails must be exceptionally straight and free from defects.
- Corners, calm, the dimensions of which are 50 by 100 and 40 by 40 millimeters.
- As screeds, segments of a water pipe are used, the length of which is 25 centimeters.
- A slab of steel about 60 centimeters long and at least 4 centimeters thick.
- The mechanism of movable hoses that act as protection for electrical wiring.
- Pipes with a diameter of 35-40 millimeters.
- Manual chainsaw. The choice of saw should be taken seriously. It should be borne in mind that the features of the tree saw being carried out will depend on its performance.
When considering such a list, we can say that finding everything you need is quite simple, a do-it-yourself sawmill from a chainsaw will be quite cheap. However, it is recommended to take into account that most of the elements are exposed to high humidity, that is, on the surface, if you install the sawmill under open sky rust will inevitably appear.
Features of ongoing work
We immediately note the moment that doing the work yourself is quite simple. Manufacturing must begin with the assembly of the base from the inverted rails and corners. To connect them, you can use welding. It is important enough that the sawmill from the chainsaw is installed exclusively parallel to the base, for which you should check the location of the rails and corners using a level. You can also check your floor beforehand to facilitate work.
After that, work is carried out in the following order:
- At the base, in increments of 1 meter, holes are created, the diameter of which is 14 millimeters. In order to drill a hole in steel, drills are used from a smaller diameter to a large one, that is, perform pre-drilling, or use drills with a complex cutting edge and carbide material.
- Then screeds are taken, which are connected with bolts.
- Metal squares are used to create racks. The base is placed on the racks. The distance between the base and the uprights should be about 100 centimeters. Fastening is carried out by welding.
- To increase the rigidity of the structure, braces are welded between the posts.
The above work allows you to get the basis for the considered design. However, in order for it to be called a sawmill, it is necessary to create a movable cart on which a chainsaw will be installed. To do this, from the bottom steel plate corners 40 by 40 millimeters are welded, and then rollers and bearings are installed. Two more corners are welded from the top of the plate, which are necessary for fixing the chainsaw.
It is important to note that the design of the fixation of the saw depends on its type. The stronger the fastening, the less effort will need to be applied when processing wood.
As you can see from the information provided in this paragraph, you will need a welding machine and good drills to complete the job.
Another important element can be called a mechanism for attaching logs. During sawing, a large load occurs, which can move the workpiece. For fastening, movable hoses and pipes are used, which should be positioned at the required height.
In conclusion, we note that in order not to feel thirsty while working at the sawmill, you need to install hoods that will remove dust and other impurities from the air. You can make an effective retraction yourself, it will significantly increase comfort during work and increase productivity.
If you find an error, please highlight a piece of text and click Ctrl+Enter.
Not everyone can afford the purchase of a finished sawmill, especially since it only pays off with constant use (read commercial). Is it possible to make a sawmill with your own hands? What difficulties should a do-it-yourselfer who decides to independently saw up unprocessed logs into industrial wood face?
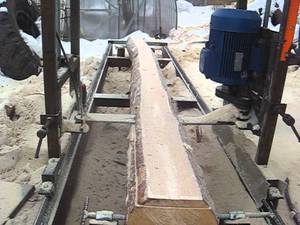
Homemade band sawmill
Let's make a reservation right away - it is very difficult to make a band sawmill yourself. It's not so much about components, extensive turning and welding work, the need for sharpening and wiring the saw in a special way, and in the well-functioning performance of the entire complex.
It is necessary to ensure the loading and stability of movement up to 300 kg of one log, the adjustment of the cutting thickness, and most importantly, safety precautions. But if the availability of free wood won, we make a band sawmill with our own hands.
We will explain the principle of tape cutting with an example: take two spools of thread, stretch a thin tape between them. Forcibly rotating the tape - we cut the log, the distance between the tapes is the maximum size of the timber. It is convenient to cut boards with band saws.
We start with the choice of a production area or premises - at least 3x6 m, verified. The second most important is the metal wheels of the cart and band saw, this must be found or bought. Ramu belt mechanism order with wheels, but it is better to buy ready-made. Do-it-yourself manufacturing requires skills and a lot of high-precision tooling.
View 1: 1 - rack; 2 - roller; 3 - plate; 4 - screw; 5 - chain; 6 - guide bracket; 7 - movable comb; 8 - screw; 9 - fixed comb; 10 - remote control.
View 2: 1 - pulley for starting the engine (if a three-phase motor is connected to a single-phase network); 2 - engine; 3 - pulley; 4 - shaft; 5 - housing with bearing; 6 - base; 7 - flywheel; 8 - finger; 9 - connecting rod; 10 - saw; 11 - screw M14x2; 12 - roller; 13 - guide corner; 14 - rack; 15 - steering wheel; 16 - sleeve; 17 - asterisk; 18 - nut М14х2; 19 - locknut; 20 is an asterisk.
We install guides - any strong, even metal: I-beam, channel, corner, under them after 0.5 m of a support or anchor for stability. The distance between the guides is the diameter of the largest log with a margin of about 0.7 m. Maintaining the geometry, we weld everything together. We attach the wheels, the frame of the belt mechanism, the electric motor through the pulley to the trolley.

Consider a mechanism for changing the horizontal movement of the saw relative to the log. By moving the trolley relative to the fixed log, we cut off the horizontal layer of wood - we make boards.
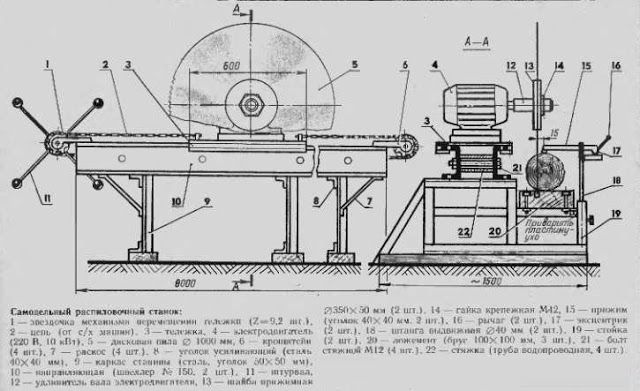
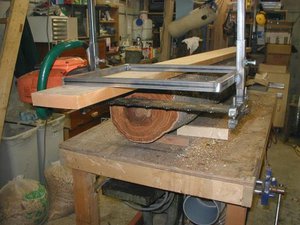
Circular sawmills have received the greatest handicraft use due to their versatility and ease of manufacture. We will make a circular sawmill with our own hands. Most importantly, we will need a circular saw - a disc of more than 500 mm (the more, the better). The propeller is usually an electric motor, through a pulley that increases the speed.
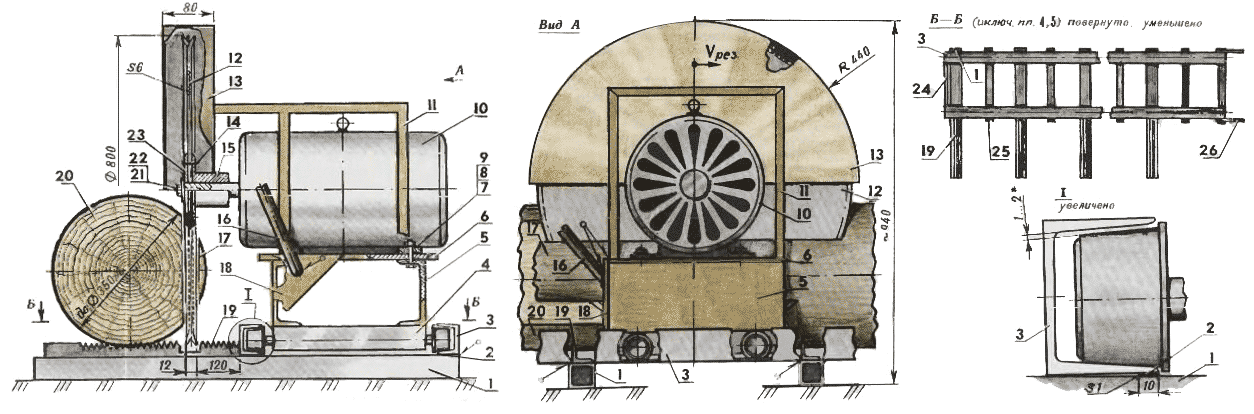
1 - main sleeper ( steel pipe 80x80x3, 5 pieces); 2 - lining ( steel sheet, 40x10x1.22 pieces); 3 - canvas guide (steel channel No. 8, L1750, 4 pcs.); 4 - trolley (hoist carriage); 5 - lower bracket (steel channel No. 18, 2 pcs); 6 - plate - base (stylish sheet s5); 7 - bolt M20) (4 pcs.); 8 - Grover's washer (4 pcs.); 9 - nut M20 (4 pcs.); 10 - asynchronous three-phase electric motor (220 V, 5 kW, 930 rpm); 11 — upper bracket (steel angle 45×45); 12 - canvas circular saw; 13 - protective casing (steel sheet s2); 14 - steel pin (8 pcs.); 15 - hub of the circular saw (St5); 16 - persistent handle ( water pipe 3/4″); 17 - cutting slab; 18 — kerchief resistant (steel sheet s5); 19 — comb (steel angle 45×45, L400); 20 - log; 21 - M30 bolt; 22 - split washer; 23 - washer-lock (steel sheet sЗ); 24 - thrust crossbar (steel corner 45 × 45); 25 - shortened sleeper (steel pipe 80x40x3, 6 pcs.); 26 - pad for extending the web (steel sheet 250x180x10, 2 pcs.).
A welded frame is being prepared, a metal (rarely wooden) plate with a slot for the disk is placed on the frame. The gaps between the disc and the plate are minimal. The saw shaft is attached to the plate from below on bearings and a pulley. The pulley of the electric motor and the saw are connected by belts (reinsurance when the saw is jammed) - a homemade sawmill can work!

one of the options for a homemade sawmill
To tension the belt, use the weight of the engine with the addition of weights. Make the base of the electric motor movable coaxially with the saw shaft, with a deviation under weight in the opposite direction. As a mover, the wheel of a working tractor is often used, driven by a saw pulley without belts.
The principles of cutting are the same as in the band cut - we feed the log to the cutting disc. After a disk cut, the surface of the lumber is of higher quality due to the processing speed. Circular sawmills are vertical and horizontal - they are easier to use in mobile installations.
Tire sawmill
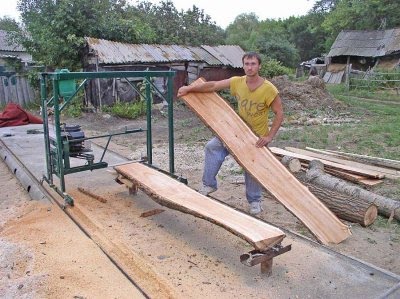
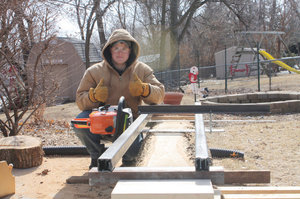
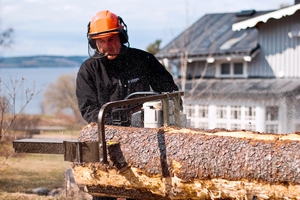
It is necessary to start with an understanding of what and how much we will cut. If you need to cut 100 - 200 rafters for a house under construction from free logs, then 400 boards - it is better to use a manual professional chainsaw. Let's make a homemade sawmill from a chainsaw, the method is inexpensive, simple and effective.

drawing the simplest sawmill from a chainsaw (download full drawing)
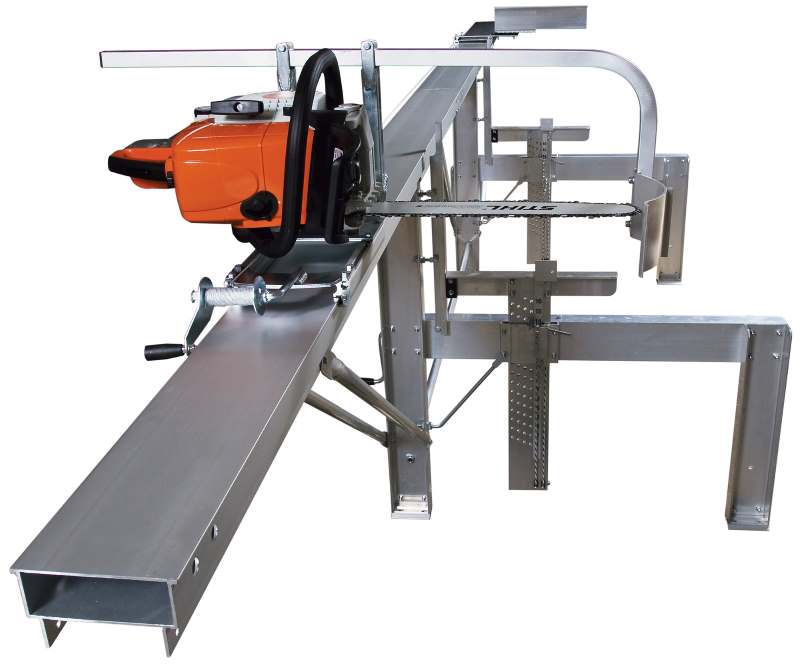
You will need any flat metal profile, welding and a grinder. We start with the maximum length of the log - practical about 4 m. For such a length you need to find a channel or an I-beam, you can weld it from pieces with reinforcement - the main thing is that the resulting profile is even. We begin to make our autonomous tire sawmill based on a chainsaw.
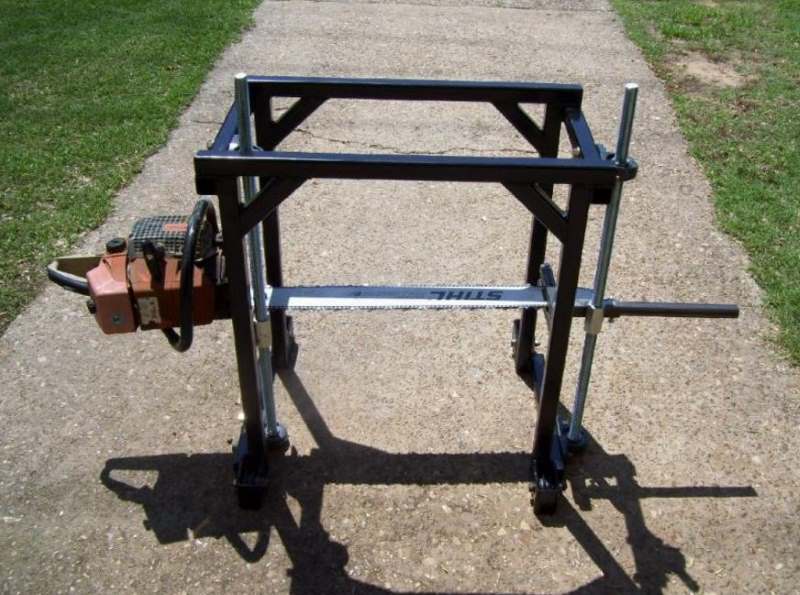
The design is a powerful profile at a working height - above the belt, along which a fixed chainsaw moves in a trolley.
The height is due to ergonomics, a long knee-elbow posture is not useful. Parallel to the main profile, a log is placed on the support frame, a working chainsaw moves along the log and makes the necessary trimming.
A few more details about the features. The main element is the main profile, which provides geometrically correct dimensions lumber, must be strong and rigid enough if the channel is at least 200. The profile is supported by 3 or more supports connected to the support frame on which the log rests.
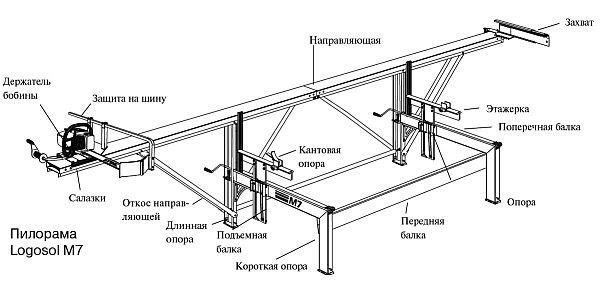
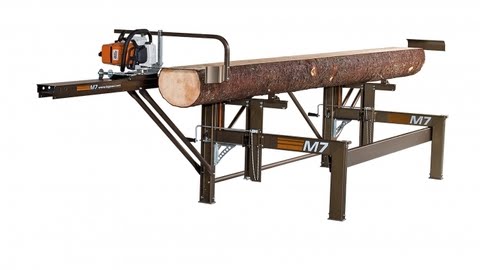
If you decide to do chain sawmill with your own hands - be sure to look at the LOGOSOL sawmills. Drawings and documentation can be downloaded on the website and taken as the basis of your homemade product.

The main sawing errors are formed during the vibrations of the cart with the chainsaw, so the movement of the cart along the profile is at least four rigidly pressed metal wheels, it is necessary to provide for a manual drive. The simplest is a well crank with a drive wheel along the main profile.
To install a heavy log, slopes are usually set along which it is convenient to push the log sequentially from side to side onto the support frame, wedging it on the frame.
The most difficult thing is the adjustment mechanism for the thickness of the product. The simplest way- installation of screw or any rigid fixation jacks along the edges of the vertically movable support frame. We adjust the jacks - we adjust the thickness of the product. An example of the construction of a mobile tire sawmill based on a chainsaw can be seen in the photo.

Wood cutting can be done by one person: holding the chainsaw handle and adjusting the gas, we feed with the other hand.
Conclusion
A few thoughts on the feasibility of manufacturing a sawmill. Tested by time and practice - self-production makes sense with free materials. If you calculate the labor costs and materials, and the possible benefits, you will understand for yourself. The worst thing, when self-manufacturing- Few people pay attention to safety. This moment must be considered! Trouble-free operation and quality wood.
Since ancient times, wood has been the most popular building material. And if earlier rather primitive tools were used to process it, today the latest technology is used. modern technology. So, for example, in order to cut wood and process it to the desired size, builders resort to the help of a sawmill. Unfortunately, such a tool is not cheap and therefore it is not available to everyone. Home craftsmen found a way out of this situation by making a sawmill from a chainsaw with their own hands. Tips for its design, drawings and video instructions can be found on numerous Internet sites, as well as in our article.
Construction markets offer a large selection of sawmills, which are based on a chainsaw. Mounted in a trolley with rollers, the unit can be manually moved along a pre-laid rail track. For harvesting wood, a powerful chain or band saw chainsaw can be used.

For domestic conditions, large sawmills are most often not required, so the best solution would be to manufacture a functional home-made mini-machine. This unit will have small size which makes it easy to move if needed.
Often a chainsaw acts as the main element of such a device, which can be purchased at a specialized store or use a Ural brand unit.
Do-it-yourself sawmill from a chainsaw: video instructions and drawings
 Having available drawings and having studied the video instruction, it is quite simple to make a structure for processing logs, boards and slats on your own. Before starting work, you need to choose a suitable place. You can install a sawmill from a chainsaw in an old barn, garage, hangar, or even just under a canopy. If the room for the unit is closed, then you should take care of the hood.
Chainsaw sawmill - option number 1
For the manufacture of the structure, in addition to the chainsaw, you will need:
- two channels 8 meters long and 140-180 millimeters high;
- two rails;
- corners 50x100 mm and 40x40 mm;
- pieces of a water pipe of 25 cm as screeds;
- steel plate 4-6 cm thick and 60 cm long;
- movable hoses;
- pipes with a diameter of 35-40 mm.
Do-it-yourself sawmill should start with the assembly of the base from rails and corners turned upside down 50x100 mm. They must be installed strictly parallel to the floor, so you need to use the building level.
- According to the drawing, holes are drilled along the length of the base in increments of 1-1.5 meters and a diameter of 14-16 mm.
- Then, according to the number of holes, screeds are taken, which are connected with bolts.
- Racks are made of metal squares and a base is placed on them. The distance between the end posts and the base should be about 100 cm.
- To make the structure more rigid, the braces between the uprights can be welded.
 After the base is completed and installed, you need to make a movable cart with your own hands. For this a corner is welded on the bottom of the steel plate 40x40 mm and the product is placed on rollers or bearings. Two corners are welded on top of the plate, to which a chainsaw is attached.
At the last stage of work on the manufacture of a home-made sawmill, it is necessary to make a structure for fixing the logs. To do this, movable hoses and pipes should be positioned at the required height and secured.
The first version of a homemade sawmill from a chainsaw is ready. There is another way to make a do-it-yourself woodworking unit. The tools and drawing for it will need the same, however, the design itself is more refined.
Do-it-yourself sawmill from a chainsaw - option number 2
 The design consists of four main nodes:
- Driven saws.
- Mechanism for regulating the thickness of the manufactured board.
- Mechanism for moving the saw part of the structure.
- Devices for fixing logs.
Since a chainsaw with a running engine and cutting teeth already in stock, it will be necessary to do with your own hands only both mechanisms and a device for fixing logs.
Mechanism for adjusting the thickness of the boards.
Logs are sawn by raising or lowering the base, which must be welded to the plate with four nuts with bent edges. Top of this device locknuts need to be installed, which must be tightened after the unit has been adjusted to the desired thickness of the material being processed.
Mechanism for moving the saw.
The saw in the structure moves along the frame along the guide corners, the distance between which should be 50 cm. weld two rollers or bearings by 20 mm. The lower roller should keep the sawmill from lifting, and the upper roller should be supported on the guide angle.
Device for fixing logs.
On such a unit logs are fastened with two combs- fixed and moving by means of a screw. After the material to be processed is installed, the moving comb is fixed with screws in a stationary state. Now you can begin to safely operate a homemade sawmill made from a chainsaw.
 The sawmill is an impressive rather dangerous unit, therefore, before starting its assembly, you should carefully consider the place of its operation. It should be well lit, ventilated and have free space. The nearby warehouse for finished boards will greatly facilitate the material processing process.
For a sawmill with an electric motor, you should carefully install the necessary switches and machines, as well as do the wiring.
Since the most dangerous elements of the unit are all its cutting and moving parts, they should be given special attention when assembling the structure.
Before starting the operation of the assembled equipment, it is necessary to check all fastenings and components, as well as the stability of the structure.
Operating instructions for a homemade sawmill from a chainsaw
After the design is assembled and tested, it must be tested in working with wood. For this you need:
Jerking movements when cutting should not be done, as this can lead to a tire stopper.
It should be borne in mind that it is necessary to work within the means personal protection , which include mittens, a dressing gown, sleeves and glasses. In addition, it is worth worrying about protection for the movable frame in advance. It can be made from acrylic or clear plastic. These shields can protect against saw chain and shavings.
A sawmill assembled with your own hands from a chainsaw will make it possible to produce high-quality lumber with a cut of the correct shape. Therefore, if you often have to work with lumber, then such home-made equipment, made on the basis of the attached drawings and videos, will become an indispensable thing on the farm.


Chocolate biscuit: the secrets of cooking in a slow cooker and oven
Chemical composition and nutritional value
Apple chips at home
Braised cabbage with white beans, recipe
How to reduce the ass, hips and stomach at home?