If you calculate what components make up the final cost of lumber - the price of wood + processing + transportation to the destination - it becomes clear what you can save on. Wood blanks (board, timber, slats) are one of the most used samples in the field of construction and repair.
Given the simplicity of working with a tree, it makes sense to deal with its "dissolution" directly on the site. It is enough just to make a sawmill. This article will acquaint you with typical drawings, the procedure for making its tape modification with your own hands, and some design features.
The expediency of such a decision will become even more obvious if you look at the prices for factory sawmills on the websites. They are available for sale, but the cost of the installations is such that most of us are unlikely to want to purchase any model for household use. Depending on the series (in rubles): "Kedr" - from 138,000 to 194,000, "Taiga" - from 116,890 to 172,400. And these are still relatively inexpensive samples. Only mini-machines are cheaper (about 94,000), but they are unlikely to satisfy all the needs of the owner of a private house in woodworking.
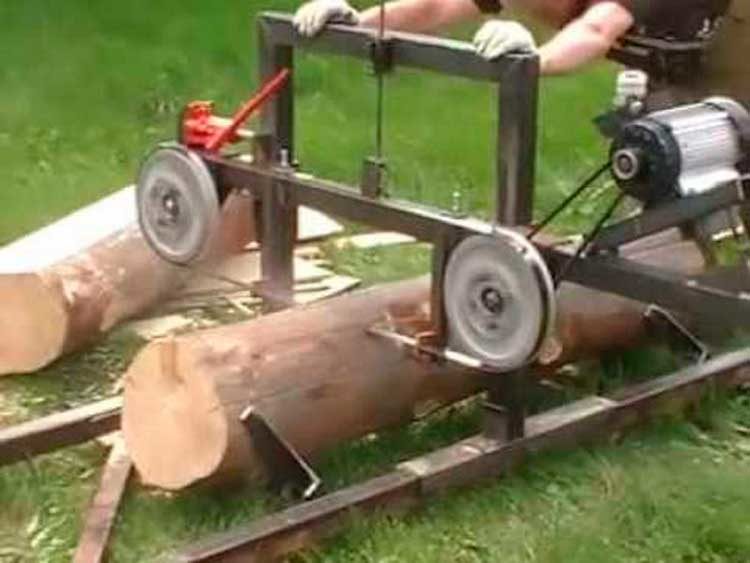
There are several modifications of this type of equipment. But if we are talking about assembling a sawmill with our own hands, then the choice is small - an option with a fixed position of the saw and a movable frame (trolley) on which the workpiece is located. It is she who moves in the process of woodworking along special guides (rails). Everything else is improvements, "services" that facilitate the work of staff and ensure product quality. For example, a mobile saw.
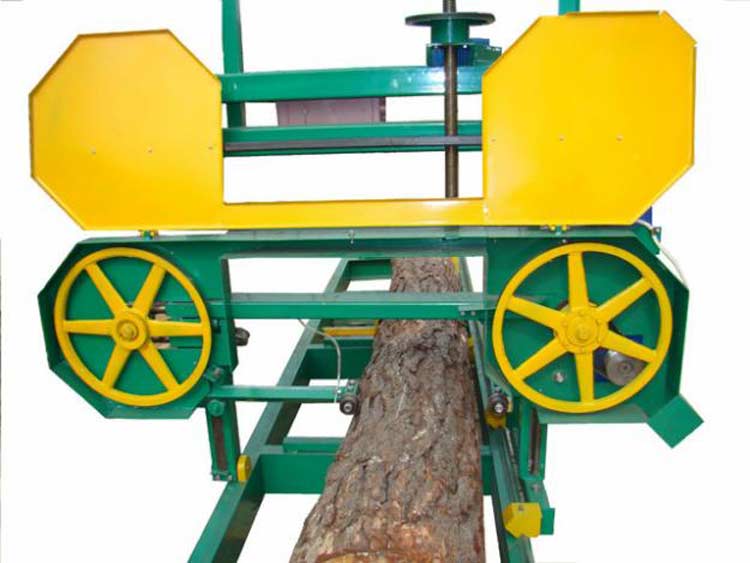
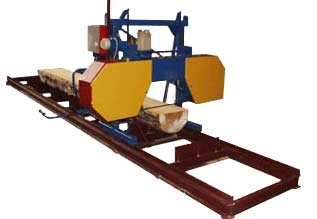
Here are some easy-to-make models of homemade band sawmills.
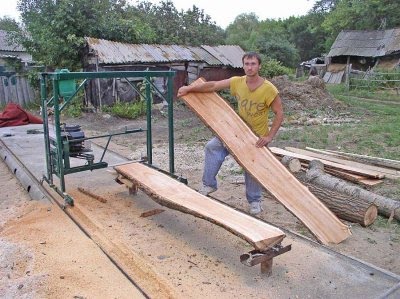
![]()

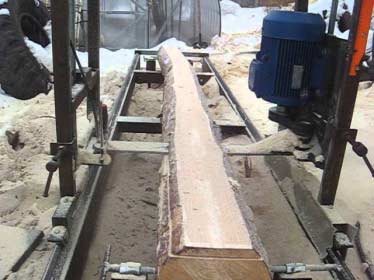
Design features
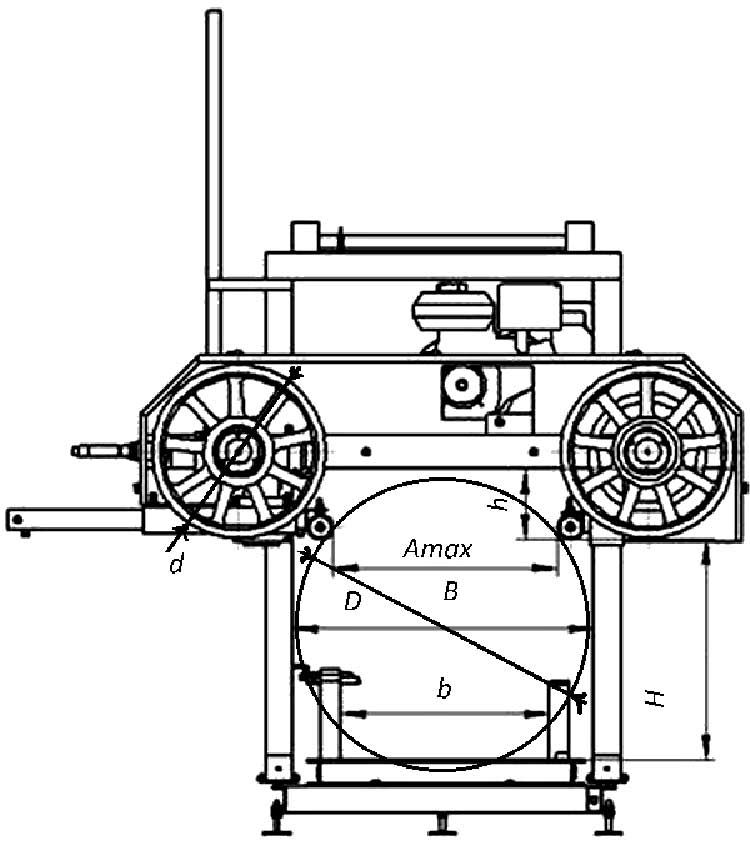
The dimensions of the sawmill are determined depending on its location. Plots (adjoining, country or other) differ in layout, so choose optimal dimensions The owner will have to install it himself. All drawings that are available (special literature, the Internet) can only serve as "guidelines" - according to the ratio separate parts, their linear parameters, and so on. With your own hands, the sawmill is made in a way that is more convenient to work in a particular place and with a certain type of raw material. Basically, such equipment is used for dissolving logs and trimming boards.
What to consider when designing a sawmill
The design of this type of installation is good in that it can be constantly refined and improved, more precisely “customizing” its characteristics and capabilities to the growing needs of the owner. For example, if it was originally planned for the dissolution of logs into boards, then it is quite possible that after a while the question of organizing own production timber.
It is assembled according to a block-modular scheme, and in the absence of practical experience in the manufacture of complex mechanisms, it is advisable to start with the simplest options. Subsequently, it will not be difficult to equip a manual band sawmill with automation elements (cutting thickness control, saw feed, programmer, etc.). That is why further - general instructions for drawing up band sawmill drawings and assembling. The author strongly recommends that you follow the sequence and install the first installation in your life according to a simplified scheme.
There are many modifications of band sawmills. The first question is in what plane is it supposed to cut? This determines the location of the working tool. Second - will the products of the same type be manufactured or will it be necessary to use the sawmill as a universal device? For example, not only for dissolving timber into boards, but also for cutting logs into separate segments. All this is taken into account in advance. It is desirable that the frame on which the working saw is attached can be reinstalled.
Logs that bloom on a band sawmill are characterized by significant weight. During operation, its frame is also subjected to dynamic loads. The main attention is the stability of the band saw equipment. This is both the quality of the cut and the safety of the attendants.
Making a band sawmill is half the battle. Its competent operation requires certain skills in setting up. The main "pitfall" is the wiring and sharpening of the saw. This issue should be studied in detail!

Preparatory activities
Location selection
If there is suitable premises, then it should be noted that its usable area should not be less than 18 "squares". This is enough to dissolve even large logs on a band sawmill.
In the private sector, rarely anyone can allocate an empty building or at least a compartment for installation. As a rule, woodworking has to be done on the street. It is unlikely that the neighbors in adjacent areas will applaud the sawdust and small chips flying in the wind. Yes, and your own territory will quickly become littered. Conclusion - after assembling the band sawmill, you will immediately have to deal with the construction of a solid type fence. For example, from polycarbonate sheets or plywood.
In addition, you will have to decide in advance where the storage of finished lumber will be organized. Therefore, next to the sawmill there should be at least a small, but free piece of land.
This is what should be taken into account when choosing a workplace for equipment.
Choice of materials and components
Engine. As a rule, one of two types is used - gasoline or electric. The main thing is to match the power. From a practical point of view (if anyone has any doubts) the asynchronous el/motor is much better. Firstly, the problem with connecting to the house electric / network from the category of solvable. Secondly, such a mechanism is neither in TO nor in frequent repairs does not need (unlike benzo / unit). Thirdly, the constancy of speed will ensure the high quality of cutting logs at the sawmill. Materials. Given the weight of the processed wood, only metal products are everywhere. Which? For the movable part (trolley) on which the workpiece is placed, a profiled (thick-walled) pipe of square or rectangular section is also suitable. But the support frame of the tape installation, taking into account the total load, should be mounted from the channel. Accordingly, the rails for the movement of the trolley are from the clearance corner (at least 45). Although you can use the same channel, only with smaller linear parameters.
Tools and equipment
Here it is short - you can not do without a welding machine. With regard to the sawmill, bolted connections should not be practiced. Over time, one way or another, but they will loosen up, and doing daily monitoring of the condition and tightening is not the best prospect.
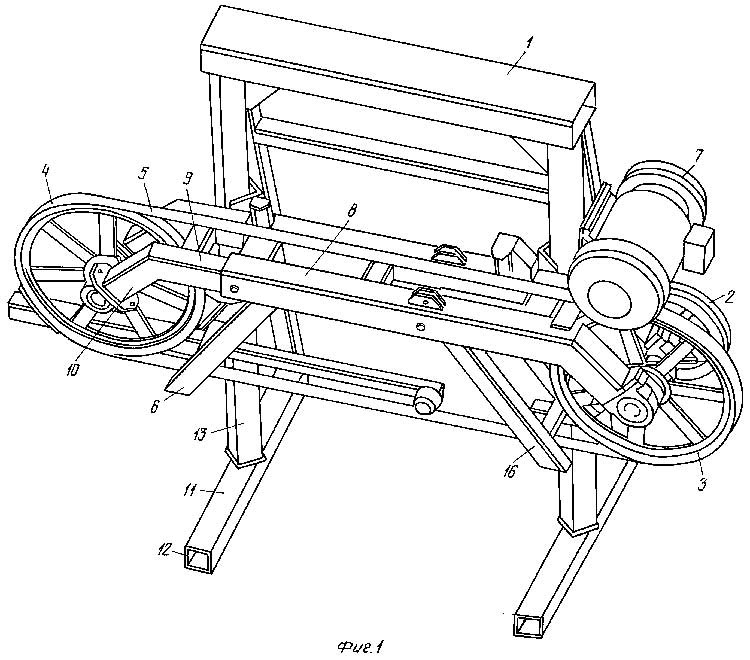
Sawmill drawings
Below are drawings of a simple band sawmill, which you can easily adapt to your conditions and needs, observing the proportions and principles of operation:

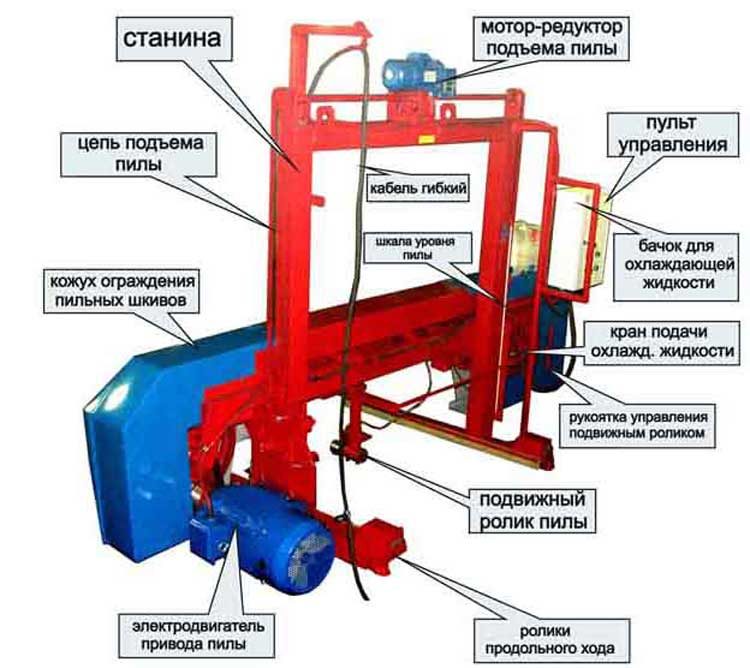
Features of the assembly of the band sawmill
The algorithm of actions is quite simple. Difficulty - in the manufacture (with adjustment in size) of the components.
support platform
A trolley with lumber will move along it. Plus, a frame is attached to the rails, on which the working tool is located. The main requirements are the reliability of such a support and alignment in a horizontal plane. On what to fix it - a specially equipped foundation (for example, columnar) or on racks dug into the ground - is decided on the spot.
Cart
Its purpose has already been mentioned. In order for the log to be in a fixed position during sawing, the mobile frame should be equipped with a “clamp”, which will firmly press the workpiece to the frame and prevent it from moving. Accordingly, the trolley must have wheels to ensure its mobility.
saw frame
The difficulty is in providing the possibility of changing the position of the cutting tool. If there is no regulation mechanism, then all products will turn out to be calibrated (of the same standard size, although the same). There are several engineering solutions, so this issue will have to be dealt with separately. It is pointless to give something specific, without knowing what modification of the sawmill is in question.
The general manufacturing procedure and features of work are noted in the article. The author recommends that you first decide for what purposes it is supposed to assemble a band sawmill. And only then look for the best option. You can simply copy the available drawings and assemble the installation of other sizes with your own hands, observing scaling. Or take a specific scheme as a basis, modifying (modifying) it for your own needs. I recommend watching a video about assembling a band sawmill:
Good luck in designing a band sawmill!
 One of the most used natural materials is wood, the processing of which is an important part of modern technological process. If half a century ago one could only dream of motorized sawing equipment, today its range pleases the eye, wallet and at the same time human hands, strained from everyday work.
One of these devices, which is difficult to do without, was and remains a sawmill, which makes this process the most automated. But this purchase is quite expensive, why not everyone can do it. But even such a barrier can be skillfully bypassed by making a sawmill at home.
The benefits of homemade
Despite numerous warnings, the popularity of equipment that can be made by hand does not fade away every year, but is only reinforced by new variational solutions.
The main advantages of this category of instrument are:
- low cost;
- the same effect as for factory copies;
- the ability to adapt it from improvised materials, which are not a problem to find in the household.
Varieties of homemade chainsaw sawmills
The existing arsenal of homemade cutting units can be divided into 2 broad groups:
- stationary sawmills;
- mobile.
Stationary
In the first group, it is also possible to distinguish between 2 main subspecies (fixed and movable) depending on whether the cutting component itself moves or stands still.
In a stationary fixed sawmill, only wooden beam, which is directed forward towards the cutting block. With this technical approach, a high quality of cutting and geometric accuracy of the resulting sawing materials are ensured.
In this case, there is no strict limit to the overall parameters of the workpiece, but already in the design process, the problem with its direct supply to the saw blade is inevitable.
Mobile
 In a mobile sawmill, which has stationary supports, the saw itself will move along guides with a rail mechanism, and the workpiece will have a static position in space all this time. At the same time, the work is simplified at times, but with the dimension of the blanks, you will have to rack your brains for more than one evening.
Mobile or portable designs for sawmills quite often replenish the collections of wood harvesting workshops. They are easy to move from place to place, however, much more effort will also have to be made for the required cutting quality. The cutting blade moves towards a fixed log or beam, which acts as a direct guide. The operator in such a situation, in addition to taking care of his safety, is forced to constantly monitor the correctness of the move, which even under the most best conditions still will not provide the highest quality of both sawing surfaces.
But in both cases, the design originates from the main working mechanism of the saw and not necessarily high power. For domestic purposes, a medium-power motor and a conventional cutting headset will suffice.
Do-it-yourself sawmill from a chainsaw - a step-by-step guide to action
Any such event must be started with a clear understanding of why it is being started. The type of construction that will be most appropriate will depend on this. For homework, it is better to undertake the implementation of a stationary sawmill, having thought in advance of the site or place (in the garage, shed, in the backyard) where it will be located.
We will consider further work in a logical sequence:
 In principle, if you figure it out, it’s quite simple and not so much expensive compared to acquiring a factory sawmill.
What else can be added to the presented design scheme? There are many options, however, most often it is the mechanism that is responsible for controlling the specified sawing thickness that is built on. To do this, locknuts are adapted to the welded base, by tightening which it selects the thickness of the boards that are needed in this case.
What is the best sawmill design?
Only its creator can know the answer to this question. Quite popular today is a mini sawmill from a chainsaw, which is quite simple to maintain and which requires a minimum of consumables to assemble.
But no matter which of the proposed designs becomes your technical masterpiece, you should not forget about safety precautions and the consequences of its non-compliance.
When performing construction work, it is quite difficult to do without a process such as sawing.
Of course, there are many different tools and equipment for this.
But the most relevant, according to many experts, is the use of a sawmill.
Do-it-yourself sawmill from a chainsaw is a real opportunity to carry out the sawing process much faster, better and more efficiently.
If we talk only about a gasoline saw, it is a versatile type of tool with which you can perform not only sawing, but also many other processes.
But when doing woodwork, one of the most important points is dimensional accuracy, and this cannot be achieved with just one gasoline saw.
The ideal option in this case would be to use a sawmill.
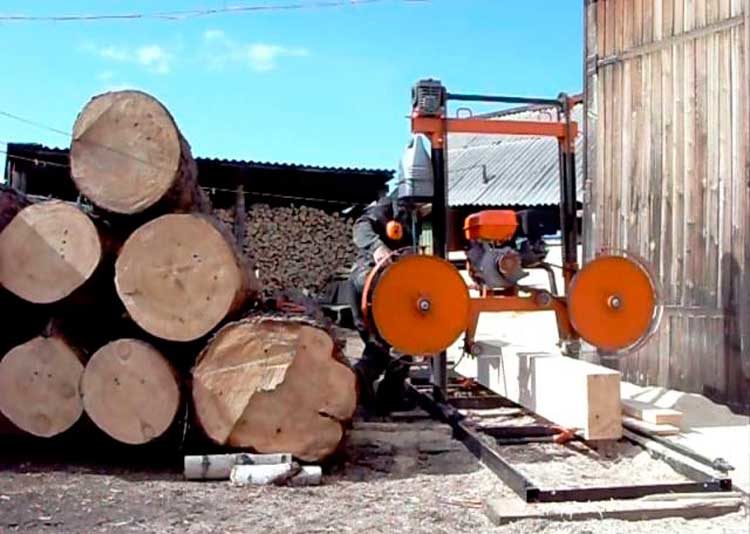
Of course, you can buy a band or tire type sawmill. But this purchase will cost a lot. Experts suggest exploring the possibility of a sawmill from a chainsaw.
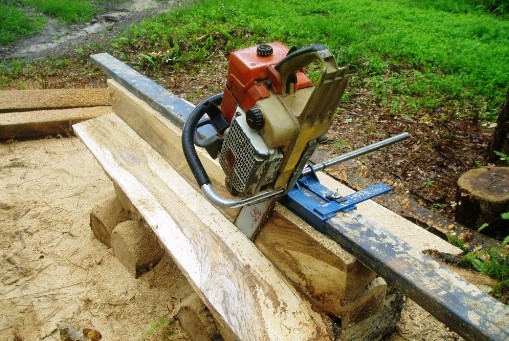
What kind of tool is this to turn out? The result will be a tool whose design resembles a tire sawmill. The sawing process is carried out using a chain fixed on the surface of the bar.
The heart of such a tool is the engine, the power and size of which can be quite different. In addition, the type of engine can also be different, depending on the type of fuel:
- Electric
- Petrol
- Diesel
With the use of channels
In this case, you need to purchase 2 channels (160 mm and 8 m high). In addition, for work you need to buy 2 rails. When creating the basis of future equipment, 15 mm holes are drilled along its length. The distance between them is approximately 1 - 1.5 m.
In the process of work, one cannot do without special ties, 25 cm long. The number of ties should be the same as the number of holes. There is no need to buy special ties for this.
The sawmill can only be installed on flat surface in the form of a concrete floor, a leveled earth floor or a foundation specially created for this purpose.
In addition, the reliability of the installation of the sawmill can also be ensured as a result of the additional use of special studs, anchor-type bolts, foundation reinforcement, etc.
After fulfilling all the above conditions, you can proceed with the installation of the rail track. For its installation, the rails are mounted on specially welded side frames.
To create the base of the sawmill, metal blanks, plumbing, corners or metal rails can be used.
In the manufacture of equipment such as a do-it-yourself sawmill from a chainsaw, the video shows in detail how to properly install fasteners for finished raw materials. Installation is carried out on rails in a place and markings strictly established on the drawings.
For this, a special frame equipped with two clamps is used. The accuracy of sawing the log, as well as the safety of the work process, depends on how accurately the fasteners will be carried out.
At the same time, only two types of fasteners must be used: end or partial. Only in this case, the cutting element of the sawmill will be able to rotate.
It is not excluded the possibility of creating one fastener from several parts, for example, 1 m each. Using this option, it must be remembered that a small gap (2 - 3 cm) must be left between two frequent ones. This will enable further processing.
The moving part of the sawmill is presented in the form of a frame moving along a rail track. The frame is mounted on special rollers or bearings welded to the base.
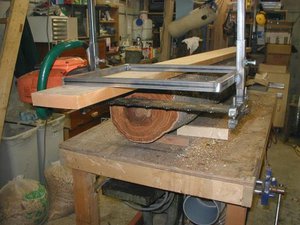
In addition, the frame is also used as a platform on which a gasoline saw is mounted. For this, a special mount is used. IN ideal the mount should provide two positions for the chainsaw: vertical and horizontal.
Thanks to this, it will be possible to ensure maximum stability and strength of the chainsaw. A variety of options can be used as fasteners:
- clamp
- metal box
- Retainer
- Metal plates and more
When installing the mount, it is advisable to install not very thick between the body of the gasoline saw and its mount. rubber gaskets. The use of such gaskets will help to minimize the vibration level and reduce the noise level of the sawmill.
In conclusion, I would like to say that thanks to the manufacture of a sawmill from a conventional gasoline saw, it is possible not only to save a significant amount, but also to become the owner of just this type of equipment, power, dimensions, the functionality of which will fully meet the fact that it will fulfill the functional tasks assigned to it. on the highest level.
You can make such a universal device according to the finished drawing with your own hands, and its simplest variety is video:
Noticed an error? Select it and click Ctrl+Enter to let us know.
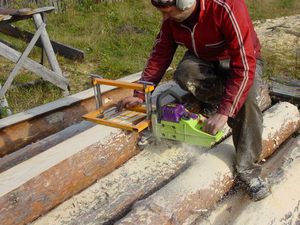
Hello dear readers and subscribers of the blog, Andrey Noak is in touch! Today I will tell you how to make a sawmill from a chainsaw with your own hands with drawings and photos.
The crisis makes us look at old processes with new eyes. Somewhere sawmills are closed, and somewhere, on the contrary, they decide to open a sawmill. As a rule, private traders have recently opened a sawmill, they have lower costs and higher efficiency. Here, a business plan for a sawmill is not needed, but if it comes in handy, then you!
Sometimes the word "open" is too strong a word. They just put up a sawmill to use it at home, for example, to build a house, well, in extreme cases, saw a log to a neighbor. This is the case we are considering
When opening your sawmill, there are several options for how best to do this:
- Buy inexpensive equipment;
- Do it yourself.
Again, to build a house and get 3 - 5 cubes of boards, buy a sawmill for 50 - 150 thousand, well, just some kind of squandering. After all, our boards will cost several times cheaper than 18 - 30 thousand rubles.
There is a way out, to make a sawmill out of. It won't take you long if you have hands that grow from the right place. In addition, it will serve you faithfully for a long time, because today it has its own sawmill.
Estimated price
At a cost, you can meet 5 - 15 thousand rubles for the manufacture of your sawmill:
- Chainsaw - 9 thousand rubles;
- Electric saw - 5 thousand rubles;
- Mechanical jacks 2 pcs. - 1500 rubles;
- Additional expenses - 4500 rubles.
What do we need?
- Welding machine, electrodes;
- Lumber, posts, screws, nails;
- Chainsaw, electric saw or just an electric motor;
- Elongated tires with chains, if you cut a forest of large diameters, about this below;
- Material for the manufacture of the case, preferably a corner, as it is quite resistant to vibrations;
- Rollers and guides;
- Cord, clothesline or cable to advance the saw during sawing;
- Roller bearings.
What material to choose for the manufacture of the case? Metal is certainly considered generally accepted. It withstands the weight of logs well, is resistant to changes in humidity.
Another cheaper and more economical option for using wood can be considered as a material. With high-quality fastening to screws and self-tapping screws, the wood will easily withstand the load from.
What needs to be foreseen?
Before manufacturing, you need to pay attention to the following things:
- Diameter, if there are large diameters, then a more powerful saw is needed, a longer tire with a chain;
- Loading heavy logs for sawing, for this it is necessary to provide some kind of mechanism, or it can roll them up or additional jacks or, ideally, a loader;
- The log must be fixed so that it does not play during sawing and the boards are even;
- The chainsaw guide and sled should not play, so they need to be reinforced;
- The more powerful the saw, the easier the production will be. Therefore, when purchasing a saw, you need to take the most powerful;
- Using electricity as a source of energy allows you to save a lot;
- Do not forget that the chain must be for ripping, this will significantly increase the speed of the process. Experts recommend using a 3 * 8 chain.
- it is advisable to buy carbide. This is currently being done by the Shtil company. Ordinary circuits fail fairly quickly;
- The length of the sawn logs, you need to take into account the maximum and minimum. So that the longest ones enter, and the shortest ones do not fall between the guides;
- Calculate in such a way that the saw does not vibrate and does not play on the guides during operation;
- The power of the saw, in some cases, you want both more powerful and more economical. In this case, craftsmen do the following. Instead of a chainsaw, they put an electric motor, and leave the tire for sawing, see the photo below;
- Sawmill height. It is necessary to provide in such a way that the back does not hurt to bend over and the logs do not need to be raised high. If the forest is not heavy, it is better to make it higher. If the forest is heavy, you can go lower.
- Sawing up the forest can be carried out both by the upper part of the tire and the lower one. When sawing with the lower part, they fly towards the chainsaw and clog it. The upper part throws out sawdust from the chainsaw, this allows you to increase both the life of the saw itself and the downtime during sawing;
- In the process of sawing, the chain very often stretches on the saw and needs to be tightened. Therefore, when installing the saw, it is imperative to provide access to the chain tension and secure the saw with access to the mechanism;
- When sawing, it is better to fix the position of the chainsaw handle, this simplifies the process;
- The cable, clothesline or string must not be pulled, as the sawing process must be uniform in time.
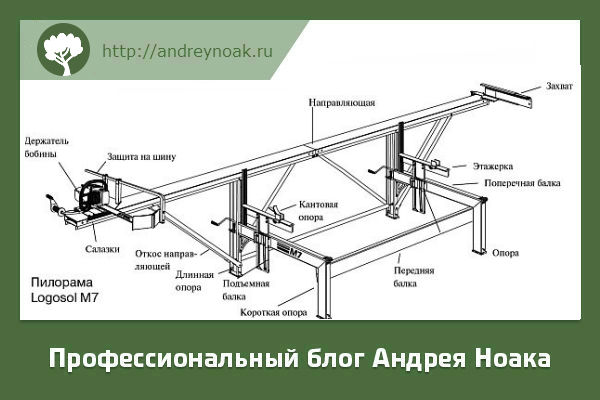
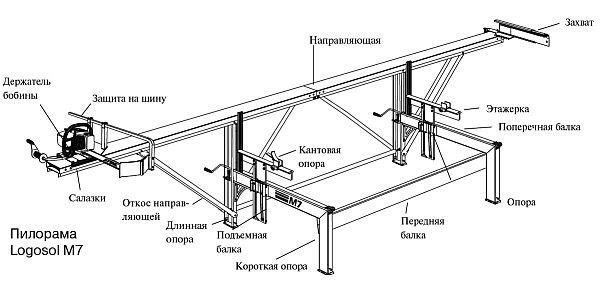
Drawings of the sawmill Logosol
A bit of background, the Swiss guy Bengt-Olofa Byström developed a very simple and mobile Logosol sawmill. Its development quickly spread around the world, winning the hearts of millions of private owners. As you already understood, its main advantage is low cost and mobility. Video of sawing wood at the Logosol sawmill:
Drawings analogues Logosol
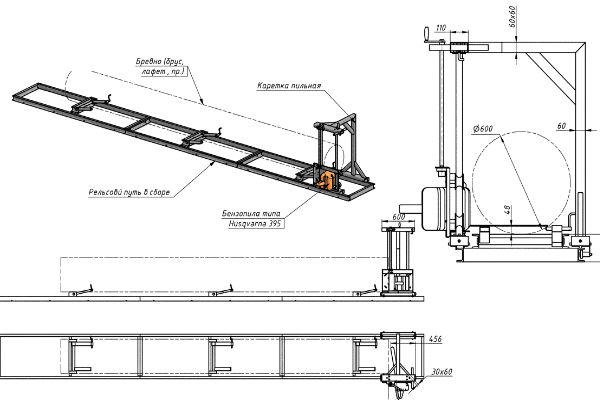
Do-it-yourself sawmill drawings
According to the drawings, I will immediately say that individual drawings are made for each case. After all, I don’t know what kind of chainsaw you will use. Secondly, I don’t know what material you have, I’ll write a corner, for example, and you have a pipe that will fit perfectly. Therefore, we draw the entire scheme, taking the drawings shown above as a basis.
Step by step manufacturing process
So, the process will go like this:
- We draw drawings based on the materials that you have;
- Frame manufacturing. To do this, we weld a corner or pipe into a frame;
- Sledge manufacturing. Can from wooden board with a covering of a section of the movement of a sled by a corrosion-proof sheet or galvanization. The second option is from the corner where the rollers will drive. The third option is from rails. Options are presented as the load on the sawmill increases;
The sled is made from 50mm board. The board is galvanized for less abrasion. A profile (square) pipe without a fourth wall rides on the sled.
- The next step is the board thickness adjustment mechanism. There are two options here. The first one, as in the Logosol sawmill, the log is lifted, and the cutting part is motionless. This option is more suitable for sawing small logs, so as not to bend over and your back does not hurt, to cut faster. To use this method, conventional mechanical jacks are well suited, you need to make sure that their lifting height is as high as possible. The second option is when the log is motionless, and the saw goes down and up along the ruler. Which option you will implement, you need to consider at the stage of creating drawings;
- Chainsaw mount. Structural strength testing. Elimination of backlash;
- Making a mechanism for uniformly advancing the saw from a cable, clothesline or cord:
- Start-up and adjustment.
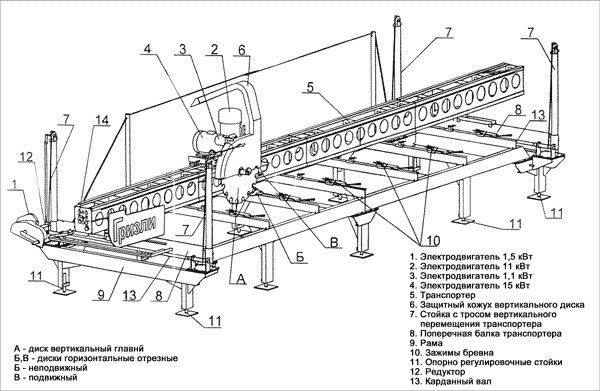
Today we will talk about how to make a sawmill with your own hands from improvised materials. We will also consider drawings and manufacturing schemes. various designs homemade sawmills with visual illustrations and photos
Those devices that are commercially available are certainly convenient and functional, but such sawmills cost a lot, so if you have some experience working with metal and various devices, then you can try to make a sawmill yourself.
To create a sawmill from a chainsaw, you need two channels, from 140 to 180 millimeters high and about 8 meters long. We also need corners 50 by 100 millimeters and two rails, they need to be turned upside down. Creating the basis for the sawmill, we drill holes with a diameter of 14-16 millimeters along its length, the holes should be located at a distance of 1-1.5 meters from each other. The work will require ties, their number should be equal to the number of holes, segments can be used as ties water pipe.
The length of the screed should be 25 centimeters, they are connected with bolts. Racks are made of metal squares, on which the base for the sawmill is placed. When making the base, you need to carefully ensure that the base consists of strictly straight elements. The distance from the extreme racks to the end of the base should be from 80 to 100 centimeters. To give additional structural rigidity, special braces can be welded between the uprights.
The first half of the work is done, then we make a movable cart, it will be based on steel plate 600 millimeters long and 4 to 6 centimeters thick. A corner of 40 by 40 millimeters is welded to the plate from below, and then the trolley is placed on bearings or rollers. At the top, it is necessary to weld two corners, to which we attach a chainsaw, with which the saw will be cut. The last step is to make a structure for fixing the log. This requires pipes 35-40 millimeters in diameter and movable hoses, which we have with subsequent fixing at any required height, limited by the length of the pipe.
Instructions on how to make a sawmill with your own hands
2 The sawmill is based on rails from a corner, the length of which is 50 millimeters. Install it side up. Much attention is paid to the installation of wheels. They should not rub off on the corner. Most often, the installation is performed with the edge of the corner up. In this case, the wheels are not erased. As "sleepers" use profile pipe size 2
5x25 millimeters. A half-inch pipe is welded between the profile tube, on which there should be fasteners in the form of nails. Fasteners must move and tilt freely. The wood clamp must act after the hammer hits the fastener. The clamp is self-locking.
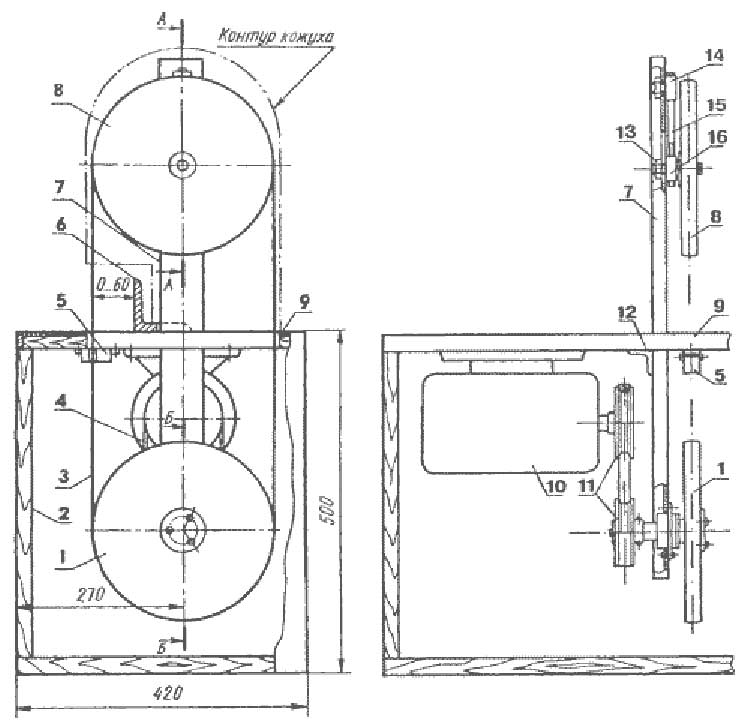
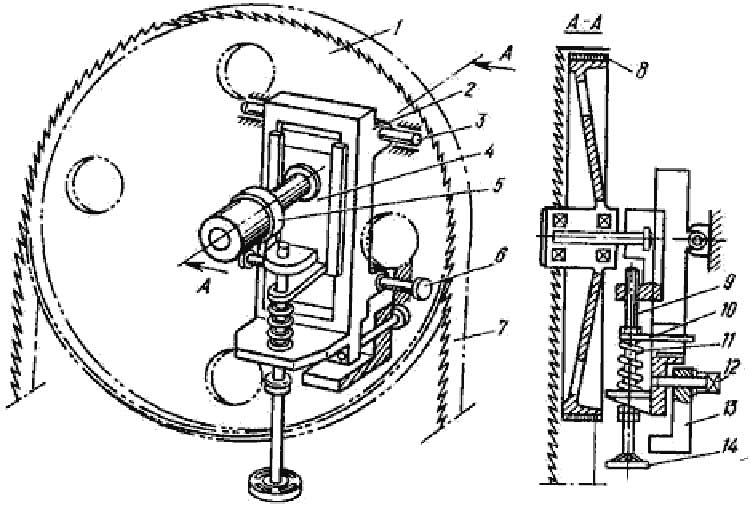
4 Original pulleys have a diameter of 30-32 centimeters. They are stitched on lathe. The worn belt after this operation should protrude a couple of centimeters. The pulley housings are welded to the tubes. The structure should move freely along a horizontal guide made of a half-inch pipe.
It can be fixed with screws. The right pulley should automatically tighten. To do this, you need to install a spring from the shock absorber. The left pulley must be fixed. However, it can move when resized band saw. Pulleys are installed in parallel. However, in order to prevent the tape from flying off, they are performed with an inclination of 3 degrees.
The mechanism of vertical movement of the saw unit homemade sawmill
This mechanism should be only propeller with two rotors connected to a low-speed lift motor. Screw nuts should be made of bronze, not cast iron, which is brittle and not suitable for this purpose. The screws must be covered with protective rubber corrugations.
Recently, some manufacturers of band saws use automobile chains as a mechanism for vertical movement of the saw unit (instead of screws), referring to the simplicity and reliability of the design. This is not true, since during operation the chains are pulled out, which leads to skew and jamming of the saw unit. Cables that get tangled in the lifting mechanism are also not suitable for this purpose.
The gear motor that drives the chains or cables wears out over time, under the weight of its spontaneous rotation and gradual lowering of the saw unit, especially from vibration during the sawing process, the result is a board at the exit thicker than at the entrance.
Supporters of a chain or cable lift of the saw unit convince that the weak point of the screw lift is the bronze nut, which can also wear out over time.
But in the process of choosing between replacing an obsolete gear motor or replacing a bronze nut, it is more economically feasible to replace the nut than an expensive, mostly imported gear motor, which is 10 times more expensive.
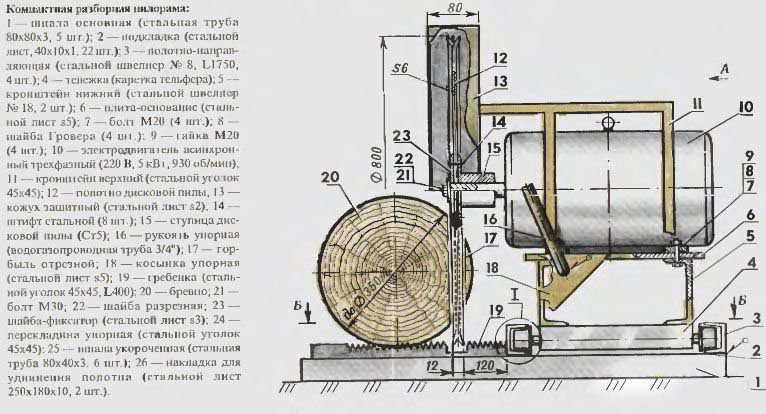
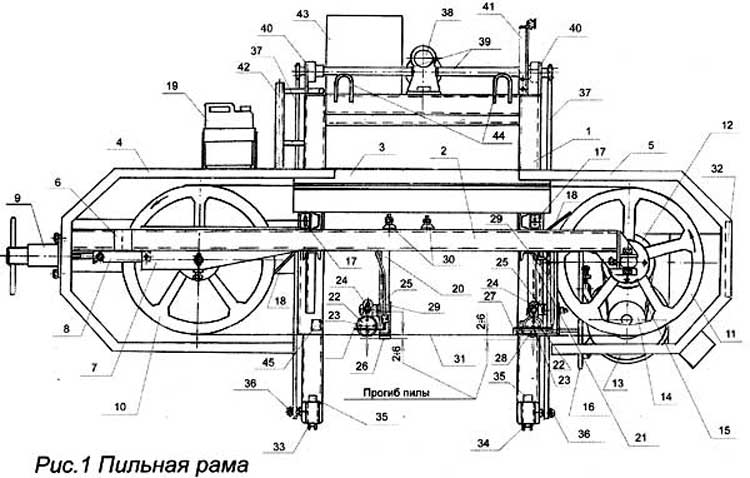
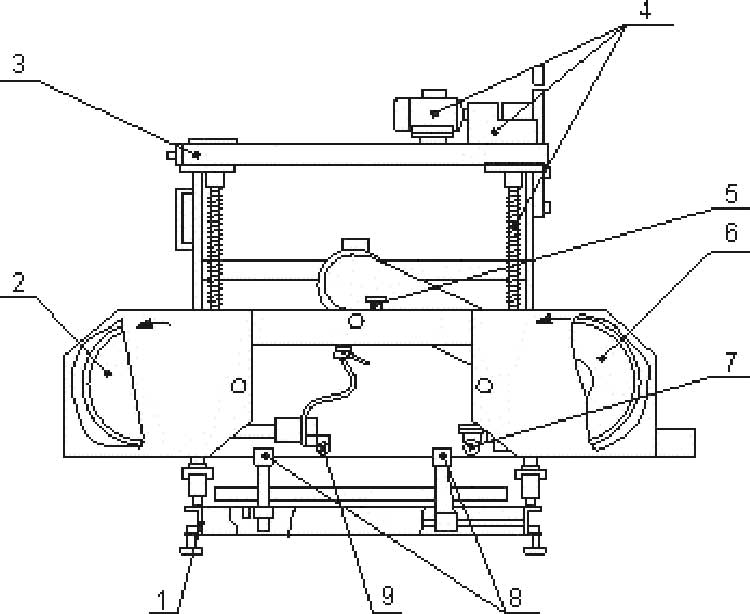
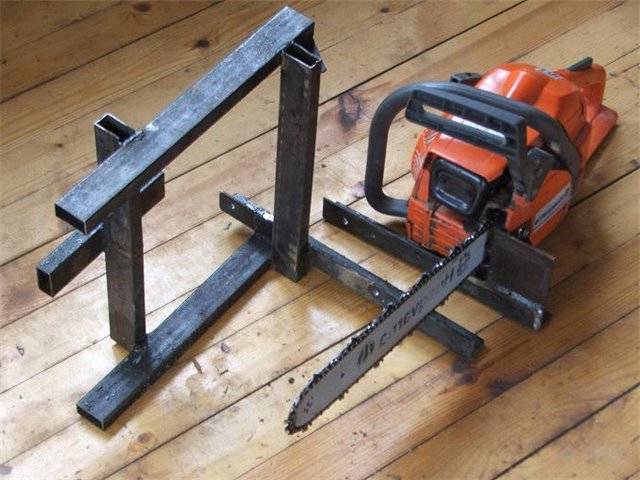
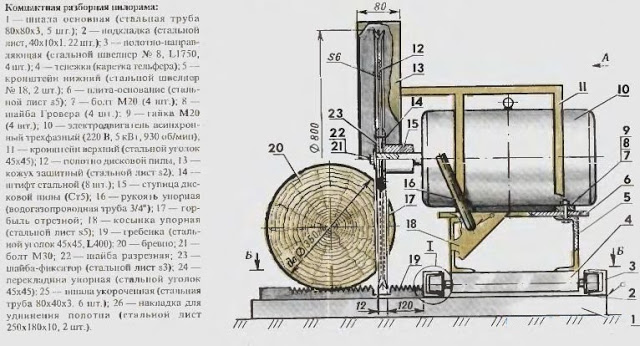
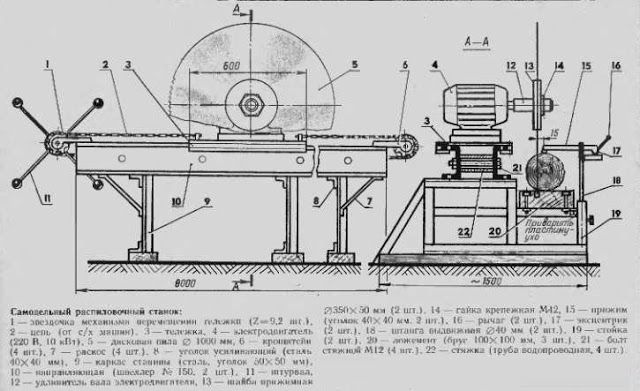
This sawmill consists of four units: a drive with a saw, a device for adjusting the thickness of the bar, a device for moving the saw unit, and a log fastening mechanism.
Saw drive. Using a blade from a mechanical hacksaw, you can make a saw with a length of 450 mm and a width of 40 mm. The teeth can be cut with a grinder disc and parted by heating them with a torch. The desired shape of the saw is attached to the grinder.
The saw moves horizontally in 4 hardened rollers mounted on racks. The length of the racks depends on the thickness of the beam (80 mm in the diagram). To give rigidity, a plate is installed between the rods.
From the engine with a power of 3 kW and a rotation speed of 1500 rpm. rotation is transmitted to the flywheel shaft pulley. Flywheel which weight is 7 kg and diameter is 200 mm. To obtain a saw stroke of 100 mm, with a deviation from the center of 50 mm, a finger is fixed in the flywheel, and a connecting rod is attached to it. And the 2nd end of the connecting rod is fixed on the saw. Offset of the flywheel axis relative to the axis of the saw 25 mm.
The device for adjusting the thickness of the bar. To obtain the desired thickness of the bar, the base is raised or lowered, fixed with four M 14x2 bolts. It is restrained by nuts welded to the plates with bent edges.
The two-millimeter pitch of the screws allows for more precise adjustment of the thickness of the timber. All screws are equipped with sprockets, which are connected by a chain. You can use the chain from the gas distribution mechanism VAZ 2101. When adjusting, the chain is moved by hand in the right direction, thereby turning the screws. Counting the revolutions on the mark, on one of the stars.
This is interesting: read our other articles from the construction industry: "Manufacturing technology paving slabs"and" We make a cinder block with our own hands.
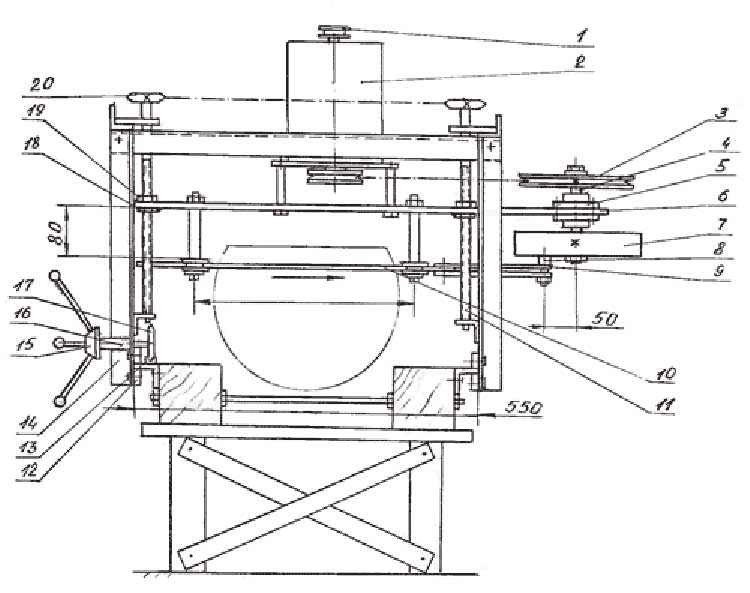
Saw unit moving device. The saw part of the sawmill moves along the guide corners along the frame. The distance between the corners is 550 mm. Each rack has 2 rollers. The upper roller rests on the guide corner, the lower one keeps the saw part from rising. The rollers are bearings with a diameter of 20 mm.
A chain is placed along the front guide. A bushing is welded on it and the axis of the sprocket passes through it, which engages with the chain. The steering wheel is fixed on the other side of the axle. By rotating, which we move the saw part along the frame.
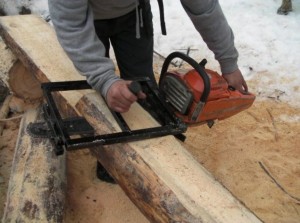
Log fastening mechanism. In the sawmill, the log is clamped with two combs. The first - movable is moved by a screw, the second - is not movable. After installing and fixing the log with combs, the movable comb is clamped with 2 screws.
When processing a log, first four slabs are cut, and then the tetrahedral beam is sawn into bars required size.
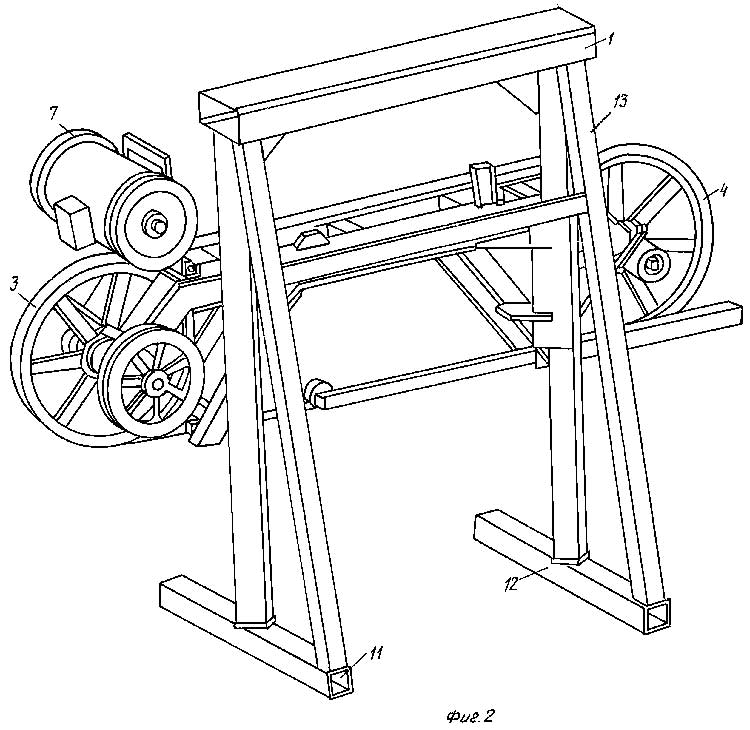
Those devices that are on sale, of course, are convenient and functional, but such sawmills cost a lot, so if you have some experience with metal and various devices, you can try to make a sawmill yourself. This article provides an example of a homemade sawmill using parts from a Niva combine, for example, pulleys. Turning work in the manufacturing process is used little.Another instruction on how to make a sawmill with your own hands
1 A special frame is attached to the saw bar, which is made of metal. The thickness of the board is determined by the gap between the frame and the tire. A homemade sawmill lasts no more than three months, since cheap materials are used. They start to fail.
2 The sawmill is based on rails from a corner, the length of which is 50 millimeters. Install it side up. Much attention is paid to the installation of wheels. They should not rub off on the corner. Most often, the installation is performed with the edge of the corner up. In this case, the wheels are not erased. As "sleepers" use a profile pipe measuring 25x25 millimeters. A half-inch pipe is welded between the profile tube, on which there should be log fasteners in the form of nails. Fasteners must move and tilt freely. The wood clamp must act after the hammer hits the fastener. The clamp is self-locking.
3 Profile tubes are used as rails. Adjusting bolts are placed on the protrusions, which have a size of M14x100 millimeters. "Bridges" are installed on profile tubes. It is on them that the logs will be laid. The last two "bridges" are located at a distance of 50 centimeters. This is necessary in order to conveniently place short workpieces.
4 Original pulleys have a diameter of 30-32 centimeters. They are turned on a lathe. The worn belt after this operation should protrude a couple of centimeters. The pulley housings are welded to the tubes. The structure should move freely along a horizontal guide made of a half-inch pipe. It can be fixed with screws. The right pulley should automatically tighten. To do this, you need to install a spring from the shock absorber. The left pulley must be fixed. However, it can move when changing the size of the band saw. Pulleys are installed in parallel. However, in order to prevent the tape from flying off, they are performed with an inclination of 3 degrees.
Mechanism of movement of a sawmill. The saw part of the sawmill moves along the frame along the guide corners 13 (plan-scheme 2), the distance between which is 550 mm. Each rack 14 has two rollers 12 (plan 2). The upper roller rests on the guide corner, and the lower one keeps the saw part of the sawmill from rising. Bearings with a diameter of 20 mm are used as rollers.
A chain 5 is fixed along the front guide (plan-scheme 1). A sleeve 16 is welded on the front pillar, through which the axis of the sprocket 17 is passed (plan 2), this sprocket engages with the chain. At the other end of the axis, a steering wheel 15 is fixed. By rotating this steering wheel, the saw part moves along the frame. You can do without the steering wheel - more on that below.
Timber attachment device. The logs in the sawmill are fixed with two combs 7 and 9 (plan-scheme 1). The first of them is movable and moves with the help of screw 8, and the second is fixed. After the log is installed and clamped with combs, the movable comb is fixed with two screws.
When sawing a log, four slabs are first cut, and then the resulting four-edged timber is dissolved into boards or bars of the desired size.
For the convenience of loading large logs, the sawmill can be made without legs, while you can move the saw part by pushing it in front of you, which will simplify the design. no need to make a steering wheel. To make it more convenient to push, it is better to additionally make handles.
The mechanism for adjusting the thickness of the resulting board. To obtain the desired thickness of the board when sawing, the base 6 (plan-scheme 2) is lowered or raised, which is fixed on four M14x2 threaded screws. The base is held by nuts 18 welded to plates 4 (figure below), the edges of which are bent. On top of the base there are lock nuts, which are tightened after setting the sawmill to the desired thickness of the sawn boards.
The screw pitch of 2 mm simplifies the calculation of revolutions when obtaining the desired board thickness. An asterisk 20 is installed on each screw (plan-scheme 2), these asterisks are connected by a chain. Sprockets and chains from the gas distribution mechanism of a VAZ 2101 car were used. When adjusting, the chain is taken with both hands and moves in the right direction, thereby rotating the base screws. In this case, revolutions are counted according to the mark made on one of the asterisks.Undoubtedly, the sawmill is necessary equipment for every person who works with wood, as well as for everyone who plans to build their own in the near future wooden house. But a factory-made sawmill is not a cheap pleasure, and it is advisable to buy it for those who are engaged in the preparation of timber at a professional level, for whom this is a means of making money. If you do not belong to this category of businessmen, but you nevertheless need a sawmill, then a home-made sawmill is an excellent way out for you. At the same time, a do-it-yourself sawmill will not require you to invest a lot of money - at least it will cost less than the one you can buy in a store.
You can learn about how else to make a sawmill with your own hands from the following description.
In order to make a sawmill with your own hands, you will need 2 channels, the height of which is 140-180 mm, and the length is 8 meters. 50x100 mm corners and two rails turned upside down are perfect for making the base for a homemade sawmill. At the same time, it is important to ensure that only strictly straight elements are in the basis. Then along the length of the base it is necessary to drill holes at a distance of 1 -1.5 meters from each other. The diameter of the holes should be 14-16 mm, and the distance between two adjacent holes should be even along the entire length of the base. Next, prepare the ties.
Their number should be equal to the number the resulting holes, sections of the water pipe ¾ are suitable as a workpiece. The length of each tie should be 25 centimeters. Tie connections are made using studs or bolts. The base assembled in this way is placed on racks that can be welded from metal squares or I-beams. The number of racks depends on the length of the resulting base. So, for example, a sawmill, the drawing and manufacturing procedure of which is described here, has 4 racks. The distance from the ends of the base to the extreme racks should be approximately 80-100 cm. Special braces must be welded or attached with screws between the racks - this will give the base of the homemade sawmill the necessary rigidity, preventing it from bending under the weight of the log.
And one more piece of advice for those who decide to build a sawmill with their own hands: it is best to assemble it right at the place where it will then work. The fact is that its weight is large enough, and it will be very problematic to transport it to another place without having to disassemble the entire structure. And when assembling it at the place of direct work, you can dig the racks into the ground for stability.
After assembling the base and installing it on the racks, it is necessary to proceed to the next stage - the manufacture of a movable trolley.
This trolley can be based on a steel plate, the dimensions of which are 4-6 cmx600 mm (thickness, length). As for the width of this slab, it all depends on the distance between the channels of the base - in width, the slab should extend approximately 10 mm beyond the channel on each side. From below, a stop is welded to the plate or attached in another way - a corner of 40x40 mm, after which the cart is placed on bearings or rollers, which will ensure its free movement along the base.
On top of the cart, it is also necessary to weld 2 corners - this is required in order to attach an electric motor to it, with which the sawmill will perform its functions. The movement of the trolley with a circular saw and an electric motor is carried out using a steering wheel and a chain from a conventional combine. To clamp the log being processed, it is necessary to make a structure that will consist of pipes with a diameter of 35-40 mm and movable rods that can be fixed at any required height within the length of the pipe.
When choosing a saw and an electric motor for a sawmill of this design, it is best to give preference to circular saw with a diameter of 1 meter and an electric motor with a power of 10 kW. Working on a sawmill of this design is easy - you just need to put a log, fix it with a rod and move it by turning the steering wheel. In this design of the sawmill, the movable cart can move in both directions.
In order for a log cut made with a saw to be even, it is only necessary to ensure that the saw is sharp enough. Naturally, compliance with safety rules when working with a sawmill is one of the conditions of paramount importance that must be observed, regardless of whether you made a sawmill with your own hands or purchased it in a store. Making a sawmill with your own hands, as you can see, is not at all difficult, for this it is not at all necessary to be an ace in mechanical engineering, it is enough just to have skillful hands. And you can use the saved money to decorate your own wooden house.


Can't understand the meaning of life
Mate Brewing Methods
Trollface quest games Black humor games
Dark spots in photos?
Rules of the game Bald in VK. Scrabble nerd. The purpose of the game Balda