For turning works, wood of any species can be used, but it is necessary to take into account the properties of each species and the purpose of the product. The wood of birch, maple, walnut, pear, beech, hornbeam, linden is well processed on the machine; worse - pine, spruce, oak, ash. Birch wood is used for decorative items, dishes, toys. Products made from Karelian birch are especially beautiful. From linden, you can make dishes of various shapes, souvenirs (matryoshkas, etc.), toys. Furniture parts, screws, nuts, tool handles are machined from elm. From pear wood, walnut, you can make decorative items - caskets, accessories, souvenirs. Ebonite, fiber, rubber are also well processed.
Photo 3 Hard way to cut the magazine down. These mills can cut logs into planks with ease. For the most part, you will see dust. For faster and easier cutting, lay down the log and cut parallel to the length of the log. Photo 4 easy way cut the log down.
Long chips are produced and faster cutting is achieved. Be sure to support the magazine so it doesn't roll, and make sure as you approach the cut, stop and flip the magazine. Photo 6 Now you can even stand on the edge and cut.
Down, since there's so little left to cut. Also make sure you clear long shavings from the chain chip port or they will build up and tie up the chain. In any case, it is important that you do not hit mud or rocks or concrete when you break through. Sharpening a dull chain isn't difficult, but it's not as fun as cutting loose turning blanks. It is extremely important to keep the chains sharp and well lubricated. Most fast way burn the chainsaw - try to cut wood with a blunt chain without oil.
For processing wood, prepare blanks without knots, cracks, rot, wormholes, fiber inclination, well dried. A blank in the form of square bars is prepared as follows. At the ends, two diagonals are drawn with an awl (pencil) and the center of its rotation is found. At the intersection of the diagonals of the ends of the workpiece, recesses of 3-4 mm are made; for the central tooth of the trident and the center of the tailstock, in addition, it is advisable for the trident to make a cut with a depth of 2-3 mm. Then, along the ribs, the bars are planed with a planer so as to give them the shape of an octahedron or close to a cylinder. The edges of the workpiece can be hewn with an ax.
Remember also that the chain and bar can get hot. Do not touch them immediately after cutting through the log. Even wet wood creates enough friction to heat up the chain and its shaft. Once you cut the logs into more manageable pieces, the rest can be cut with a bandsaw to suit your needs. This does not mean that you cannot cut your workpieces with a chainsaw. It takes a little more diligence and time, but it can be done this way. However, having said that after lifting them, the final cut on the bandsaw can save you a lot of time by cutting off unwanted wood more precisely.
When processed in cups and jaw chucks for fixing in blanks, an allowance of at least 50 mm is left along the length, when processing in the centers - at least 20 mm, in thickness (diameter) an allowance of 2-3 mm.
On lathes, as a rule, products are made and grooves of circular section are made in the form of a roller, axis, cylinder, cone, ball and other surfaces, which in combination give a different profile of the part.
Mark the contour on the workpiece with a compass or disk, an old saw blade works. Photo 7 Using the old saw blade- fast way. This gives you some guidance as you cut the gap. I have 36? band saw that will cut up to 20? log diameter. Have you ever tried to raise 20? Hole diameter to belt table? Most of what you turn will fit into this size range. This is most important when cutting wet or green wood. band saw so that the blade is a 3 or 4 serrated tooth blade per inch.
For this purpose, the workpiece is clamped in the centers (headstocks) of the machine or mounted in a chuck or on a faceplate, after which it is given a rotational movement, during which the cutting tool processes its surfaces. The cutter is given movement along or across the workpiece, depending on its shape.
To master the skills of turning, it is necessary to perform a series of exercises on working methods.
A hooked tooth blade does not shed wet sawdust as well as a missing tooth, so slipping on the blade becomes a problem, downright dangerous in fact. Remember to always allow the blade to cut. Never insert wood into the blade; let him feed himself.
Forcing a cut can severely distort the blade, especially on large pieces, causing a strong buildup of heat that crystallizes the blade's weld and eventually causes the blade to break. If you have to climb wood into the blade to get it cut, it's time to change the blade or sharpen it. Here's a word about choosing the empty spaces in the bowl in the magazine.
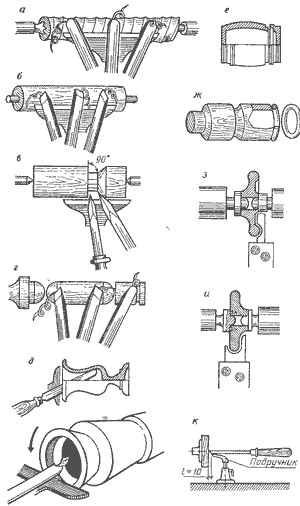
Turning includes the following work methods: selection and preparation of a workpiece, installation of a workpiece in centers or a chuck, installation of a handpiece with a holder in the required position, primary (rough) turning, marking turning, secondary (finishing) turning, marking, profile turning, cutting and rounding the ends, cleaning and grinding, finishing, cutting off the product from the allowance, decorating products by burning, carving, and then finishing.
Photo 8 shows a bowl cutout for an apartment. At least it doesn't matter to me. The wobble foot is quickly and effectively cured with grinding machine. The oval shape with which the bowl is dried gives good story about how you could turn the bowl this way. There is a lot of room for distortions of truth here, and it can be really interesting; some of these tricks mentioned earlier.
Layout for 4 natural bowls. Photo 10 lines showing a natural bowl. This is where the most vibrant colors are located, and the subsequent movement during the drying process really adds mystery to the piece. Now that you've shortened your pivot spaces, it's probably worth finding a place where they can be saved until you have time to rotate them. The best place located on the side of the building, which is constantly in the shade. If you do not have such a place, an open shed or tarp will suffice.
Cylinder turning
The workpiece is fixed with a trident and rear center. To do this, install one end on the trident with a hammer, and bring the center to the other end and fix tailstock nut. Then, rotating the handwheel kicked, they clamp the workpiece with the center and lock it with the handle.
The handpiece is brought with a minimum gap parallel to the workpiece being processed, fastened to the center line (or 1-2mm higher) and installed as close as possible to the workpiece (about 2-3mm between the most protruding part of the blank and the handpiece). Without turning on the machine, manually turn the workpiece and make sure that it does not touch the handpiece.
You want to minimize contact with direct sunlight as much as possible. It also helps keep the area moist. There are several products that can be used to seal the ends of turntables as well as all surfaces. A product called green wood sealant, which is an emulsion of wax and oil, works very well. If you don't have access to this, old oil paints or canning wax work well enough. No matter what you do, don't wrap your blanks in plastic bags.
After checking the fastening of the workpiece, the handpiece, the tailstock and its quills, they begin processing. Rough turning is performed with a reyer (chisel) 20-25 mm wide with a semicircular blade. The handle of the chisel is taken with the right hand, and the cutter is firmly pressed against the surface of the handpiece with the left. The first chip with a thickness of 1 - 2 mm is removed by the middle part of the cutting edge of the cutter, and the next - alternately by the right and left sides of the blade, gradually moving the chisel along the entire length of the workpiece and the handpiece. The chips are removed to the specified dimensions or until the cutter passes along the entire circumference of the object being turned. In cases where the length of the product exceeds the length of the edge of the handpiece, it is moved under the unturned part and work continues.
This absorbs moisture, preventing the wood from breathing, and creates the perfect brewery for bacteria and fungi. The smell pervades the forest and it never goes away. It remains a constant reminder of why we don't use plastic bags. There is one exception to this rule. If you live in the desert, using plastic bags for short periods of time may be one of the the only ways prevent validation.
Now if you want the wood to sleep i.e. the bacteria had wonderful color changes in the wood, set one end of the log to the soil. Different kinds react to different shapes, and the resulting colors are different. It usually takes a couple of months, but the wait is usually worth it. If you forget you did it and leave the log too long, the end result will be dry rot and a useless piece of wood.
As soon as the allowance for the diameter of the workpiece is 2-3 mm, they proceed to turning with a jamb (meisel). The meisel is held in the same way as the reyer, but more obliquely, so that the direction of the blade makes an angle of 45-50 ° with the direction of the cylindrical surface of the workpiece. The obtuse corner of the jamb is turned towards the movement of the chisel, and the sharp one is raised up. The chips should not be cut off by the entire length of the cutting edge, but by its middle and lower parts. When turning long parts for the second time, as well as during the primary one, grooves should be made for orientation. from the handpiece Check the diameter of the workpiece with a caliper at several points along the length.
If your turn time frame is extended, don't hesitate to cut wood into turn pieces until you need them. Leave the logs intact and work one end. Keep the ends of the log sealed as described above. Cutting as needed will extend the life of the magazine until you're ready to start spinning, within reason. Don't expect the magazine to be free for months. Weather conditions play a decisive role here.
Hot dry conditions will cause logs to be scanned more quickly than damp or wet ones. When cutting logs to length, to make them more manageable, make sure you cut them at least 6 inches longer than the diameter. This is to ensure that there is enough wood left when checking to use the full diameter of the log.
The straightness of the surface of the workpiece is checked with a ruler. If during the turning of the workpiece there is a scuffing of the wood fibers, it is necessary to change the direction of movement of the chisel or the cutting angle. It must be remembered that cutting thick chips and working with a blunt chisel can lead to tearing of the fibers and tearing out pieces of wood.
Now that we have the bowl cleaned and ready to turn, it's time to install it on the lathe. There are many ways to do this. Three and four jaw chucks, screw chucks, expansion chucks and faceplates are some of the most commonly used devices.
You can use three and four jaw self-centering cartridges, but there are a couple of "sweeps"? when using them. First, in order to capture the jaws, a spike must be installed. The size of this spike is proportional to the size of the bowl you want to turn. To do this, you must first turn the workpiece between centers. Now, depending on the size of the workpiece and the speed of your lathe, this can be done, however it is an extra step and can be a little intimidating because most spindle lathes are fast and have short strokes.
After the product has received the desired shape, it is necessary to trim its ends. When trimming, the chisel is placed on the handpiece on the edge with a sharp downward angle.
When cutting with an acute angle, the chisels make a deep cut perpendicular to the axis of the workpiece. Then the chisel is removed and an oblique cut is made from the side of the end to be cut in the direction of the original cut, preventing the cutting edge from cutting into the end of the product. The cut wood is separated, forming a groove (recess). This operation is repeated several times until the rod remains minimum diameter(10-12mm), sufficient to hold the product in the centers of the machine. Before removing the product from the machine, the end face is cleaned by removing thin chips perpendicular to the axis of rotation without oblique cuts.
Another problem is that most greenwood is quite soft and the thorn is likely to be heavily crushed when the jaws are tightened. This is a safety limitation because the crushed spike cannot securely hold the swivel cap. The same restrictions apply to expansion cartridges. The mounting notch must be turned or drilled into the bottom of the workpiece before it can be mounted on the chuck. The softness of the green wood makes it susceptible to crushing when the jaws expand.
This crushing severely limits the retention efficiency of the expander cartridge. Also, since most chucks have the same jaw set, the bowl bottoms are the same, disproportionate sizes for larger and smaller bowls. Attachment points should be proportional to the size of the bowl.
Types of turning works: a - rough turning, b - fine turning, c - trimming of ends, d - rounding of ends, d - turning of internal cavities, e - turning of composite products, g - turning of rings, h, and - turning of parts with shaped cutters, k - frontal turning on the faceplate
Screw chucks are a viable alternative to using the above devices. Jerry Glazer manufactures a screw chuck with a sharp tapped screw that bites into wood while holding it securely. It also allows you to take wood from a chuck and put it back down while chasing the same streams. One of the requirements of this chuck is that the workpiece must have a flat surface so that the workpiece can fit against the chuck flanges. Remember also that green wood is much weaker than dried wood and the workpiece can pull out of the threads if it turns aggressively.
Depending on the purpose of the product, trimming can be straight, convex or concave. With convex trimming, first make a rough rounding of the end of the workpiece with a semicircular chisel. For finishing, a flat chisel is used, cutting wood with the middle of the cutting edge or an obtuse angle. When rounding, the chisel must be held firmly in your hands, leaning on the handpiece and not allowing it to oscillate in order to avoid getting furrows and potholes.
The use of cyanoacrylate adhesive in the screw hole greatly enhances the screw cartridge's ability to maintain its grip. The best and safest mounting device, at least in my opinion, is the bezel. Photo 11. There should be at least 6 screw holes large enough to accommodate #10 screws. It's also a good idea to smooth the mounting surface of the blank. This allows the screws to apply even pressure to the wood and prevents the workpiece from wobbling on the faceplate.
This article does not discuss the deep turning technique. We will discuss the parameters required for the successful transformation of a green tree. Place the bowl blank on the lathe. It is imperative that all checks are completely disabled. If they are not, they will cause a wound. Small cracks or checks just keep growing, so they need to be unwrapped. Once appearance formed, remove the tailstock and start the excavation process.
Cone turning techniques. Having prepared a cone-shaped blank with the necessary allowance, they outline the dimensions of the cone - the diameter of the base, the diameter of the cut of the top, and fix it on the machine. The blank on the machine is installed in such a way that the top (smaller end of the cone) faces the headstock. This creates convenience for working with the right hand, in addition, turning will occur along the fibers, and against.
The methods mentioned at the beginning of the paragraph of this article apply here. Photo 13 The first cuts start in the center and work on the outer edge. Continue moving towards the rim, making the same depth of cut. This descending process leaves strength and rigidity on the side of the bowl and allows for a thin wall to be carved.
Do not hollow out the bowl, and then try to cut the walls thin, there is not enough rigidity to the wall to cut. Once you've set the wall thickness, don't go back to the rim and try to make another cut. This will end in disaster because there is not enough wood to support the cutting. This is especially true for finished grain bowls and vases. It could be scotch more or less. Speed is important here because as soon as the blowing starts, the bowl will start to change. At this stage there will be no time for a coffee break.
The handpiece is set somewhat obliquely, parallel to the plane of the cone, and lowered as the chisel approaches the top of the cone. First, the surface is treated with a semicircular chisel, then with a jamb (meisel).
Straight cutting. Rectilinear cuts for speed and accuracy are made according to templates, but their use does not exempt from the use of measuring tools and markings. Templates are made from hard cardboard, plywood, but the best ones are made from zinc. When marking on the side surface of the cylinder with a pencil or chisel, the first risk aa1 is applied along the circle forming the extreme end; then, through the distance ab, the second risk is applied or the first inner end of bb1 at a distance ab, the risks aa1 carry out the third risk bb1 and at a distance hell - the risk dd1 and so on, until the entire length of the cylinder is marked according to the figure. Marking rails are used to mark a large number of parts. For turning, they take a narrow meisel and perform a groove bb1 and vv1. First, triangular cutouts k and l are made, the excess between them is removed with a narrow chisel, a template is inserted into the resulting recess and the edges of the groove and dimensions are checked.

Rectilinear cutting: A - cutting; B - marking of the workpiece; V - cutting grooves k, l; G - inserting the template into the recess; D - templates 1, 2, 3; E- marking rail
The second groove (recess) is first selected in the form of a small triangle and bored, gradually deepening towards the axis of the cylinder. During the groove, the recesses are constantly checked with a template. As soon as the template enters completely under the edge and the sides of the recess will not have a gap, the groove can be considered complete. All other recesses are sharpened in the same way as the second groove, checking them with templates. To get the last notch of the OMN, it is necessary to machine the OM cylinder, and then carefully bevel the edge. After turning all the recesses, the sides of the cylinder are trimmed.
Curvilinear profile turning. Mark the cylinder and make a template. Turning starts with cylindrical shapes aa1b16; vv1g1g; dd1e1e. Turning is performed with a small allowance for final processing, after which they begin to grind curvilinear forms zhazh1a1, zbb1z1, etc. It is more convenient to sharpen concave surfaces with a reyer, gradually deepening the sides of the recess and checking the correctness with a template.
Turning curvilinear and spherical shapes. A cylinder of the required dimensions is machined from the blank and the surface of the product is marked, as shown in the figure. Then the templates are cut out and the turning of the figures zaa1z1 begins.
They sharpen with a semicircular or flat chisel, checking the work with template 1, as well as with calipers or calipers. After fine turning, the template must exactly adjoin the profile being machined, fit snugly with MN ribs to the surface to be turned. Next, the cylindrical parts bvv1b1 are sharpened; gdd1g1; ezhzh1e1, leaving an allowance of wood for finishing. The remaining curvilinear and spherical surface is machined, controlling with templates 2 and 3. Finishing of the surface is carried out with a meisel.
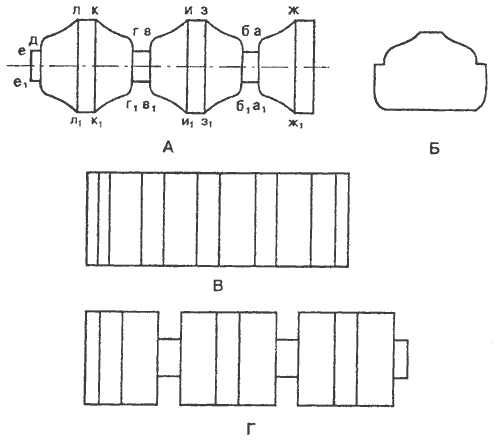
Curvilinear profile A - product profile, B - template. B, D - cylinder marking
Chips begin to be removed from that part of the part that has the largest radius of curvature. Moving the meisel away high points rounding to low, you should smoothly, without jerking, raise the handle of the tool up. The curvilinear and spherical surface to be turned should be controlled as often as possible with a template and a caliper until it completely coincides with the template figure. After that, the product can be trimmed.

Turning curvilinear and spherical shapes: A - turning figures (1,2, 3 - templates), zaa131, 6vv161, gdd1g1, ezhzh1e1 - turned surfaces, B - product marking. B - the position of the template when turning the product (MN - the edges of the template)
Turning a complex profile of a cone-shaped product. When performing this type of work, a truncated cone is first machined according to the dimensions required according to the drawing, the product profile is marked, and then turning is started. In order to prevent the sharp edges of the undercuts from crumbling during turning, turning should begin with cutting notches a, b, c. For greater accuracy of the profile, use hooks. Choosing the right hook size, the groove is carried out from high rounding points, checking the notch with a caliper and other tools. The outer surfaces of the product are turned with maizel. After turning the profile, the product is trimmed.
Turning inner walls (cavities)
Turning products with internal voids are performed by frontal turning, as a rule, from cylindrical blanks mounted in a chuck on the headstock. First, turn the inner, and then the outer part. Grooving and boring of holes and hollow forms are performed with hooks that have sizes and shapes depending on the profile of the product. When turning internal cavities in large parts with a diameter of 100 mm or more, workpieces should be installed on the machine spindle in a cam chuck. When making internal undercuts in products with a diameter of up to 100 mm, workpieces can be installed in a cup chuck. The workpiece is firmly held if its end is inserted into the socket of the cartridge to a depth of at least 1/5 of the length of the product and fits snugly against its inner walls. The end of the workpiece inserted into the chuck should preferably be ground in centers according to the size of the chuck. Hammer the workpiece into the chuck removed from the spindle. Having fixed the workpiece, it, together with the chuck, is screwed onto the spindle of the headstock of the machine and proceed to turning.
First, external turning is carried out, giving the workpiece a rough contour of the product. The end of the workpiece is cut with a flat chisel, then a handpiece is brought to it and set across the guides of the frame at a distance of 2-3 mm from the surface of the end.
Before starting the internal undercut in the workpiece, it is advisable to drill a hole 10-15 mm less than the depth of the undercut. Holes can be drilled with a drill set in a brace for drilling diameters up to 10-12 mm, or with a drill set in the tailstock quill for holes with a diameter greater than 12 mm. Starting the internal recess, lay a semicircular chisel on the handpiece and start boring the drilled hole.

The complex profile of a cone-shaped product: a, b, c - notches
bore inner surface should be gradually, periodically removing the chisel from the nest to cool it and remove the chips. As the nest deepens, it must be expanded with the side of the cutting edge of the chisel, laying it on the surface of the handpiece at an angle to the axis of rotation.
The cutting edge of the chisel in the depth of the undercut should be adjacent to the side facing the turner. Right hand, holding the handle of the chisel, while stretched forward, behind the axis of rotation of the spindle, and the left one tightly presses the chisel to the handpiece. Thus, pressing the cutting edge of the chisel against the inner wall of the nest, a groove is made from the depth to the outer edge.
Internal surfaces of complex shape are processed with special tools - hooks, the shape of the cutting edges of which corresponds to the boring profile. In the manufacture of particularly complex profiles, a set of hooks is used, sequentially turning the profile details. After the inner recess is completed, proceed to the outer turning and cut off the product.
An example of turning internal surfaces. To make a glass for pencils, you need to pick up a blank of hardwood with a size of 75x75x150mm. On a turned product, you can make a drawing using burning, firing, painting with paints or simply cover it with oil varnish. Work sequence.
1. Give one end of the workpiece a cone shape with an axe. Fix it in the chuck and screw it onto the machine spindle.
2. Press the workpiece with the center of the tailstock and carry out rough turning with a reyer to the dimensions largest diameter products. Mark the length of the cone and process it.
3. Remove the center from the tailstock quill, install a 10 mm drill on it and mark the drilling depth on it. Drill a hole of the required depth in the workpiece, expand it by increasing the drill diameter to 16mm.
4. Install the hand rest perpendicular to the center line.
5. To bore the inner surface of the product with a special cutter-hook; it should move in the direction from the center to the edge of the workpiece. Boring accuracy is checked with a control template.
6. Cut the base of the glass with a Maisel. Clean the product with sandpaper and varnish its surface with a brush.
Faceplate turning
This type of frontal turning is used in the manufacture of large-diameter products (plates, cups, trays).
Cups, plates are made, as a rule, from one piece of soft hardwood - aspen, linden or alder. To do this, the selected board is planed on the machine, marked with a thickness gauge and cut into squares, the corners of which are cut off, giving the blanks a shape close to a circle. The diameter of the workpiece should exceed the diameter of the cup or plate being made by 15-20mm. The workpiece is fixed with screws on the faceplate so that when processing the front surface, the cutting tool is not touched by the screws.
First, the workpiece is turned along the perimeter with the handpiece placed parallel to the guides. Then, moving the handpiece parallel to the plane of the faceplate and in the direction from the center to the edge, the inner surface of the product is turned.
After finishing, the screws are unscrewed and the product is removed from the faceplate. You can make plates from combined wood.
All equipment at enterprises undergoes a mandatory classification according to engine power, the time of its permissible operation, and we ask for technical characteristics. The classification of lathes for metal is carried out according to several more criteria:
- accuracy class;
- weight;
- degree of automation;
- flexibility of the production system;
- special purpose in metal processing;
- versatility or narrow focus of the unit in performing metal operations.

A variety of lathes are used for metal processing. According to the ENIMS classification, all types of lathes for metal belong to group 1. The equipment is divided into groups, there are 9 in total. Groups combine equipment designed for metal processing, according to design and purpose.
The tasks that are performed on a particular machine and the severity of the parts determine the mode in which it operates, which affects the number of automatic functions of the machine and its configuration. The breakdown of equipment into groups also depends on this.
There is no such metalworking task that cannot be performed on a lathe in manual or automatic mode. But there are also groups of auxiliary machines with limited capabilities, designed to perform a narrow range of tasks, and there are almost universal ones, such as screw cutters. Their capabilities are limited by the weight and size of the workpieces.
Group 1 includes lathes for metal:
- single spindle automatic and semi-automatic.
- multi-spindle automatic and semi-automatic.
- revolving multi-spindle automatic lathes.
- drilling and cutting;
- carousel;
- screw-cutting;
- multi-cutting;
- specialized;
- different.
Subgroups in group 1 of turning equipment also turned out to be 9, as well as groups for classifying machine tools for metal. The types of turning work are very diverse, but it is almost impossible to do without other machines when working on metal. These include:
- drilling and boring, belonging to the 2nd group.
- grinding, polishing, finishing - 3 gr.
- combined - 4 gr.
- for processing threads and gear surfaces - 5 gr.
- milling - 6 gr.
- planing, slotting, broaching - 7 gr.
- cut - 8 gr.
- the widest group No. 9 - different. this group includes equipment for the processing of pipes and couplings, peeling units, testing, dividing, balancing.

Deciphering the designations according to the ENIMS classification of lathes for metal
Lathes have a place at the top of the table because the rest of the metal machines produce blanks for them or perform subsequent work after turning operations.
How a lathe works
The working principle of the lathe is as follows:
- the rotation of the workpiece on the machine is carried out by a spindle or faceplate, which receive rotation through a gearbox, a belt drive from an electric motor;
- the amplitude of the feed determines the speed of the caliper with fixed cutters in the cutter holder;
- regardless of the type of automation of the machine - automatic or semi-automatic, it can be with a horizontal or vertical layout. Lathes received such a classification from the position of the spindle, on which the position of the workpiece during processing depends.
- on the vertical machines work is underway on metal on heavy wide, but not long parts.
- long workpieces with small and medium diameters are machined in a horizontal position.
The more opportunities for installing additional equipment on the machine, the wider its technological capabilities.
Schemes of popular machines
As can be seen from the diagram, screw-cutting lathes are in position 6 of group 1. But they are found more often than others due to their constant need in enterprises and experimental workshops specializing in the processing of metal parts.
Screw-cutting 16K20 is used to perform basic turning work of varying complexity. The basic model is produced in 4 variants. The difference between the machines in the distance between the centers. In various modifications, this gap can be 71, 100, 140 and 200 cm. Such a variation in the working length led to other design changes to simplify the processing of parts of the same type in weight, length or diameter. Other models were developed on the basis of 16K20. Their letter designation indicates the modernization of the base model:
- 16K20G - with a recess in the frame.
- 16K25 - a lightweight model designed for the manufacture of parts from blanks with a diameter of up to 50 cm. The location of the blank above the bed is horizontal.
- 16K20P - has an increased accuracy class, thanks to special bearings.
- 16K20F3 - with numerical control.
Video 16K20F3
On this basis, other screw-cutting models for metal processing are also created. The scheme of machines is general, but if necessary, it is supplemented with the functions necessary for the customer. On machines made on the basis of 16K20, it is possible to process metals of varying degrees of susceptibility to processing, including hardened metal. The drive power is adjustable; when working with hard alloys, the energy costs of the equipment increase.
Most metalworking operations are performed on screw-cutting lathes, in which the layout scheme has a rather complex design.
The main components of the lathe:
- bed;
- apron;
- spindle (front) headstock;
- caliper;
- back grandma.

At first glance, there are few main parts, but to control them, the design of turning equipment has:
- the friction clutch is responsible for the rotation of the spindle;
- variators are designed to change the spindle speed;
- automatic switches;
- handles, flywheels, clamps for manual movement, fixing and turning on mechanisms.
Types of lathes differ from each other in purpose, technical characteristics, layout, etc.
Accuracy notation
The accuracy of the machines according to ENIMS is indicated in the name at the end of the abbreviation in Cyrillic letters:
- H - indicator of normal accuracy;
- P - indicates the increased accuracy of the machine;
- B - indicates high accuracy;
- A - designation of especially high accuracy;
- C - machine with super precision.
Weight classification:
- Lathes weighing up to 1 ton are considered light - (< 1 т);
- Medium units include units from 1 to 10 tons, in this category there are screw-cutting units - (1-10 tons);
- Heavy - these are the machines whose mass exceeds 10 tons - (> 10 tons);
- With a weight of over 100 tons - these are unique machines - (> 100 tons).
In brackets is given the designation that occurs in the marking of the machine.
Description of some groups of lathes
Frontal machines
Lathes are designed for the manufacture of parts up to 4 meters in diameter. The purpose of machines with such technical characteristics for turning cylindrical and conical parts on them. But also on wide blanks placed on the faceplate, other metal work can be carried out, such as cutting grooves, chamfering and much more. On the frontal machines, heavy and varied work is carried out, which leaves an imprint on its technical characteristics. Screw-cutting lathes compared to the frontal have a more complex design.
The working part of the windshield machine consists of:
- plates;
- caliper and its base;
- front and rear headstock;
- faceplates.
Vertical lathes
The scheme of carousel machines is a little more complicated. He has:
- bed;
- faceplate;
- Remote Control;
- a turret with several positions (for example, 5);
- vertical turret support;
- two gearboxes;
- traverses;
- side support;
- 1 or 2 racks (depending on the design and purpose):
- handwheel and side handwheel;
- cutter holder for 4 items.
On turning-and-boring machines, parts with a diameter of 2 meters or more are processed. Each of the models of vertical lathes can process workpieces of various diameters. An increase in the diameter of the workpiece by 1.26 times requires an increase in the working area of the machine. 6 types of rotary machines were mass-produced, with similar technical characteristics, which could process workpieces of the following sizes:
- 2 meters;
- 2 m 52 cm;
- 3 m 18 cm;
- 5 m 4 cm;
- 6 m 35 cm.
If it is necessary to produce parts exceeding 6.35 meters, specialized machines with unique technical specifications. Calculate required size the working area of the next model in a row is not difficult, it is enough to multiply the previous value by 1.26.
Turret lathes
On turret-turning equipment, parts are made from bar blanks. On the machines, it is possible to manufacture complex-shaped parts according to an individual drawing. The classification of turret machines is carried out depending on the method of fastening the workpieces on the spindle:
- bar;
- cartridge.
Almost all the operations that screw-cutting lathes perform can also be performed on a turret, with the only difference being that several tools can be fixed at once in the turret of the transverse calipers, in the sequence necessary for work. Screw-cutting lathes do not have such an opportunity; all subsequent types of processing are carried out on them after changing the cutter at the end of the previous operation. You can do the work with tools one by one, and some operations can be carried out in parallel to each other.
The turrets of some machines of this type are designed so that one socket can hold several cutters at once. The stroke of each tool is limited by a stop. In addition to limiting travel, they act as a caliper gear switch. Having worked out the programmed cycle, the head rotates and in the working position sets the tool necessary for the next stage.
Part processing video
Using the example of the 1G340P scheme, it can be seen that, in terms of their layout, turret machines are the same as screw-cutting lathes. The purpose of these types of machines is similar.
Turret machines can be equipped with heads rotating in a horizontal or vertical plane. Automatic and semi-automatic machines have similar turret settings before work. In this category of turning equipment, there is also a classification according to the number of spindles in the machine design.
If you find an error, please highlight a piece of text and click Ctrl+Enter.


How to understand: will the kitten be fluffy?
What kind of light alcohol can be drunk for pregnant women: the consequences of drinking
Why do the legs swell in the ankles and ankles of the feet in pregnant women: causes and methods of treatment
The wedding of Prince Harry and Meghan Markle: scandalous and secret details of the marriage (photo) The future marriage of Prince Harry year NTV
How to close white plums for the winter