Forged gates made of high quality materials are a solid construction that can serve its owner for many years. They become the hallmark of the owner of the house and create a positive impression, adding great value to the site.


Peculiarities
Forged products have remained popular for many years, thanks to which manufacturers can present a rich assortment of iron products, which differ not only in the design of the structure, but also in the material for manufacture, as well as the type of movement of the sashes. Such products become an excellent addition to any land plot and guarantee its reliability. But in addition to the guarantee of protection, it should not be overlooked that forged gates are also responsible for a solid appearance, which the structure acquires thanks to a variety of patterns that can give an ordinary metal lattice an original look.


The most unique feature of wrought iron gates is their original design., which becomes unique, as the drawings are developed directly by the customer. And already on the basis of samples of patterns and additional details, the main scheme of the gate structure is created, which becomes a direct embodiment of the originality and individuality of the future owner.
Forged products are perfectly combined with wood, and with bricks, and even with a stone fence. Does not affect the beauty of the product and the landscape - it fits harmoniously into any landscape.

Features of forged gates are not only in their appearance, but also in production technology. Computer techologies allow you to easily develop a product design in the form of a three-dimensional image, which allows the customer to evaluate the design and, if necessary, make corrections to the sketch together with the designer. The gate structure can be created entirely by hand or using stamped blanks.

Stainless steel is used for forging, but the rest of the parts can be made of metal. Every detail of the structure is necessarily processed with three types of compounds: the primer increases the service life of the product, the nitro paint ensures the invisibility of the joints of forged elements, the anti-corrosion coating makes the material more resistant to environmental influences.


In total performance characteristics and the aesthetics of the structure give the forged gates considerable value, which is practically reflected in a number of advantages of these products.


Advantages and disadvantages
Forged gate designs can have various characteristics but in general outline all of these products have similar advantages and disadvantages.
Advantages of forged products:
- Versatility. They can be easily combined with any materials and exteriors of buildings.
- Such gates are easy to maintain and do not require much attention and care.
- A wide range of products represents a large number of finished products of various styles and designs. Ready-made gates can be easily matched to the landscape of the site, its style and features, the required type of entrance or entrance to the territory, the degree of protection and reliability are also taken into account.


- You can also always order a design according to individual requirements. Hence, the third advantage of forged gates is their exclusivity.
- The long service life is, perhaps, one of the main advantages of these structures. Due to the strength and reliability of the metal, the quality of forging, the doors are able to serve for quite a long time without losing their operational and aesthetic characteristics.
- Independence from weather conditions often becomes a priority feature when choosing a gate, especially in areas with harsh climatic conditions. Even during manufacturing, the structure is treated with special anti-corrosion compounds that protect the material from the adverse effects of the environment. Also, with self-processing of the product with anti-corrosion agents, you can increase the service life by several decades.
- Equipping the doors with additional security systems increases the level of their reliability. They can be video cameras, motion sensors, automatic doors and locks of an electrical or mechanical device.


- Forged products are made entirely of environmentally friendly materials. They can be not only outdoor, but also used in homes, being reflected not only in doorways, but also on pieces of furniture, decor and architectural elements.
Disadvantages of wrought iron gates:
- High price. But one cannot ignore the fact that their service life significantly exceeds the service life of other types of doors.
- Forged products are difficult to manufacture and install.
The design characteristics will depend on the owners themselves. We must not forget that regular processing of the hinges and their lubrication, as well as the application of protective agents against the influence of environmental factors, will only help to extend the service life and preserve their original appearance. As for cleaning from dirt and dust, even with a large number of openwork forging elements, you can easily wash the gate with water from a hose.

What types are there?
There are numerous items for the classification of wrought iron gates.
They differ in their purpose:
- for closing arches;
- to close the road;
- for use as a passage through a fence;
- to protect the entry and exit path.

By the type of movement of the shutters, the gates are:
- swing;
- sliding, consisting of one sliding sash;
- sliding or double-leaf sliding gates, consisting of several leaves that move in opposite directions;
- lifting.
Swing gates are the most popular and frequently chosen options. They are easy to use and do not require additional costs for the leaf movement mechanism and its subsequent maintenance. All that may be required is to periodically lubricate the hinges to prolong their life. As the name implies, the doors of these gates, according to the classical scheme, simply diverge to the sides when opened.
Sliding structures have a different type of leaf movement, which consists in the movement of the gate along the fence, which saves space by freeing a certain area from open leaves. Sliding gates work in a similar way.


The lifting gates are equipped with a special mechanism for the movement of the rolls, when using which the door leaf rises and enters the room, clearing the way for passage. Such a mechanism is quite rare to be found at a wrought-iron gate, but it still comes across.
Each type of sash can be equipped with an automatic movement system, which greatly simplifies the operation of the structure. Automatic system the movement of the doors allows you to remotely open or close the gate, which is convenient for motorists who no longer need to leave the car in order to leave the yard or enter the site. The automatic system is controlled by a remote control or an app on the device.


According to the shape of the shutters, the structures are of the following types:
- Deaf. This type of gate is a combination of openwork forging and inserts from other materials, which together gives reliable protection territory from prying eyes.
- Transparent. The most common type of wrought iron gate, which consists of openwork forging and metal rods for the base.
- Solid. The solid wrought iron gates are based on a canvas, which, in turn, is decorated with a forged ornament or a bas-relief. This type is analogous to a blind gate, but has a greater degree of protection.
- Wrought iron gates with a wicket.


As a basis for a solid gate, not only a sheet of metal, but also wood can be used. It has also become popular to use polycarbonate and profiled sheet. Wooden gate they look elite and are a solid addition to the site, and the iron forging made against their background in the form of various patterns and bas-reliefs becomes an excellent addition. Metal sheets They are also not inferior in characteristics to wooden ones, and in many respects even surpass them.
Materials (edit)
Mainly for forged gates, stainless steel, metal sheets and shaped pipes are used.
The gate structure itself consists of several elements:
- product frame;
- sash webs (if provided by design);
- decorative elements of forging.

In fact, the components of a forged gate are extremely simple and available for purchase in any hardware store, but the whole difficulty lies in the technology of manufacturing the forged pattern itself, its design, creation and welding of all elements.
Additional materials that can also become a direct part of a forged gate can be:
- wood;
- brick;
- concrete;
- a rock;
- corrugated board;
- polycarbonate;
- imitation of all of the above materials.


Materials can be processed both by cold and hot forging, if they are not stamped during production, but welded.
Style and design
Initially, forged gates were used solely for protection and only in wealthy estates, since earlier products of this type were quite expensive. But so that the massive gates do not look alien and do not spoil general impression from the appearance of the possessions, blacksmiths began to supplement forging with various patterns formed under the influence of the era and its style.
Today, the technology of manufacturing forged gates differs little from the traditions of their ancestors: craftsmen also use blacksmith tools and, according to the customer's sketch, create exclusive masterpieces. The style of the gate is always developed with an emphasis on classical design directions, or it is created entirely individually for the customer.


Various images and drawings of representatives of flora and fauna, the initials of the owner of the site, the family motto and all the artistic elements that the customer may want can be interwoven into the main patterned ornament. In the same style as the gate leaves, wickets, fences and various exterior elements are being developed.


In fact, there are several styles that are reflected in the manufacture of wrought iron gates:
- Gothic;
- classicism;
- Roman style;
- baroque;
- modern;
- rococo;
- minimalism.


Regardless of the style of the gates themselves and whether they look simple, elegant or exclusive, it is important that they are combined with the fence, all the architectural elements of the site and its design. Landscape designers they recommend that owners, when choosing a wrought-iron gate, be careful with the design, especially if the main style of the house is more inclined towards modern technospheric directions in design, since there is a risk of creating a fence that is tasteless against the background of a certain structure.
Colors
The choice of the basic color of the gate and their color design is a very important step in the design of the entrance lobby. Here you need to combine color range architectural structures, fences, exteriors and correspond to the design of the site. The most common color for wrought iron gates is black with gold leaf. Antique fences in dark colors also look spectacular. White also looks beneficial, especially if the main style of the landscape is close to or corresponds to modernist trends.


By professionals landscape design several basic canons have been developed for choosing the colors of fences and their components.
Following them, you can easily decide on the colors:
- the color of the gates and fences is matched to the tone of the roof of the main architectural structures;
- if the support pillars have a stone finish, then the forging color is limited to brown or beige tones;
- gray color and other light shades, including white, can visually increase the area of the site;
- dark shades repulsive - these colors can create the effect of inaccessibility, which is suitable for the owner who loves privacy and wants to hide from prying eyes;
- you should choose a color that contrasts with the facade of the building, if it is in light colors;
- black is in harmony with any landscape;
- if desired, create the effect of merging the fence with environment you should not choose green tones, it is better to give preference to blue sky shades;
- you need to experiment and follow your own taste.


Installation
The installation of forged gates is a rather painstaking task that requires certain knowledge and professional skills, therefore it is better to entrust the installation of such an expensive product to professionals, because only they can guarantee high-quality work performance and subsequent operation without marriage.
One of the very first steps when installing a gate is preparing the opening. If it is designed without mistakes and shortcomings, then the gate will stand exactly, without defects, and the locks will work properly and not jam. The basis of the forged structure is bearing pillars, which also need to be lined with brickwork to increase their strength.

We must not forget that forged products have a decent mass. At the base of the supporting pillars is a metal tube, which must be inserted into the recess and fixed, if possible, with brick or crushed stone.

It is also important to install the supporting poles at the required distance with millimeter precision. The depth of the hole for the pipe should be from 1 meter or more, depending on the mass of the structure: the heavier it is, the deeper hole... The pipe itself must be thick-walled, otherwise it simply will not support the weight of the structure and will begin to deform under pressure. After fixing the pipes, they can be concreted with a mortar in a ratio of sand, cement and water of one to three.
After drying, it is required to prepare a thicker mortar and already start laying the brick with a trowel. It is also important to stretch the metal rail at the gate attachment points, between the brickwork. Then you should install the fasteners and the door structure itself.
It is difficult to install the structure with your own hands and it is quite dangerous for the future technical characteristics gate. But if, nevertheless, a decision is made to engage in the installation independently, then a certain set of tools, skills in their use and a willingness to conduct accurate work with a miscalculation of each movement, will be required, because all actions must be performed step by step so as not to be mistaken with the dimensions.

Of the tools you will need:
- "Bulgarian";
- drill;
- welding machine;
- fasteners;
- measuring instruments.
After finishing work with the support beams, you can assemble the main structure and frame of the product. The structure is hung on supports, then the sash is adjusted and attached to the structure. In this work, it is necessary to observe maximum accuracy, because the slightest defect can lead to deformation of the structure and a decrease in its operational life.

Although the development of a sketch of the future gate structure is one of the most important steps, but before proceeding with it, it is necessary to decide which of the various types of construction will be most suitable for the site.
To do this, you will need to make calculations and take into account some parameters:
- Construction level. Depending on the purpose, the height of the structure can vary from 1.5 to 3 m: a small one is suitable for decorative items, and a gate of three meters height provides highest level security.
- Width. Depends on the width of the access road, as well as on the total width of the site: the larger it is, the wider the gate.
- Parameters and design of the fence.
- Functional design. This is the most important point for calculations, determining the distance between sections, the presence of a wicket inside the gate, the mechanism of movement of the leaves and their type.
And only after taking into account all these parameters, you can start developing a sketch or choosing a ready-made gate from the manufacturer.

Another important aspect is the combination of wrought iron gates with a hedge.
A pleasant bonus is that forged structures look great with different types fences:
- A hedge in combination with a wrought-iron gate gives mystery and originality to the entrance group of the site, especially if this hedge is molded. But the simple weaving of loaches can also give the site a unique look of a fairytale estate.
- The combination of wrought iron gates with a wrought iron fence is not uncommon, but this type of entrance group cannot provide the proper level of privacy, and if you spend money on a solid type of fence, it will be quite an expensive purchase.


- The way out of this situation in terms of financial savings is the use of corrugated board. But a significant disadvantage is that often this material, along with forged patterns, looks inappropriate and alien.
- A brickwork fence in combination with wrought iron elements is one of the best solutions in terms of a combination of forging and fence.
- A stone fence, along with brickwork, complements a wrought-iron gate extremely elegantly, but this type of fence is quite expensive. The way out of this situation is to purchase an imitation stone.
- Also, a very elegant way to decorate a gate and a fence in the same style is to combine the elements of forging on the gate and the fence itself with another type of material, be it stone or its imitation, wood, brick or profile.

Not everyone who plans to purchase forged gates has the ability or desire to order a design for individual designs, sometimes it is easier to buy a finished product, observing the required parameters. But even the purchase of these designs is not an easy process: here it is also important to take into account a large number of factors for purchasing a product.
Here are some tips that everyone can find useful when buying a wrought iron gate:
- The functionality of the product is one of the most important factors which must be considered when paying attention to the individual operating needs of the owner.
- Products with a low price are very attractive, but it is better to give up the temptation to purchase them, since forged structures with the proper level of quality cannot have such a low cost.


- If the purpose of purchasing a forged gate is not only reliability, but also the desire to pay attention to entrance group and what lies behind it, then the best solution there will be an acquisition of bright products with an unusual design.
- For those who live in harsh climatic zones, where the air temperature can be below -30 degrees or above +30, it is recommended to purchase galvanized structures.
- For those who want to save money on wrought iron gates, you can look for aluminum products. But you should not rely on the reliability and strength of this structure - it will rather become decorative element than an obstacle to private property.


Forged structures are unpretentious in maintenance, but taking care of them technical condition will only have a positive effect on operational properties products.
Here are some tips for the care and maintenance of wrought iron gates:
- When rust spots, cobwebs of paint and other defects appear, which especially often happens with negative impact climatic conditions on metal, additional painting may be required. Rust stains, chips and defects are treated sandpaper until completely cleansed, and then covered with paint.
- It is necessary to check the condition of the gate once a year and get rid of any shortcomings so that you do not have to carry out their complete painting or replacement in the future.
- To prevent the metal from rusting, it is necessary to treat it with specialized compounds.


- The movement mechanism also requires maintenance, especially if it is equipped with automation.
- It is periodically required to clean the gate from dust and dirt.
It is these few simple steps to maintain the structure that can increase their service life by a significant amount of time, and therefore save the owner's money and time.
A neat fence with a beautiful gate and a wicket is a memorable business card of the owner.
Their appearance characterizes the owner, shows his viability and economy, because the fence and gates are the first things that guests and passers-by see.
A good gate, and if it is also with decorative elements, it is not cheap. The price depends on the selected material and on the price for the work, usually the work comes out as material.
To save on work, you need to know how to make metal.
Material selection
If the fence is brick, then the material from which the gate will be made is not important, if the fence, then it is better to make the gate from it.
The gate should stand out against the background of the fence, but at the same time be in harmony in color and material. In order to immediately know how much material is needed, you can first sketch out the drawings of the future gate.
Wicket material:
- Billets are metal, the metal must be high-carbon, this will prevent rapid corrosion.
- For pillars, pipes or a profile with a diameter of at least 100 mm are suitable.
- Profile pipe or angle for the wicket frame.
- Metal sheet with a thickness of 1.5 mm or a sheet of metal profile for cladding.
- Metal curtains, preferably with a bearing mechanism.
- Lock.
- Primer.
- Dye.
- Anti-corrosion treatment fluid.
Tools for the job:
- For marking, you will need a thread, a plumb line and a tape measure.
- Semi-automatic welding machine with a power of 220 W.
- Manual drill, if any, or a shovel.
- A sledgehammer for driving in posts.
- Screwdriver and drill for fastening the sheathing to the frame.
- Grinder for cutting metal and cleaning seams from welding.

Installation of poles
The pillars are the supporting part that supports the entire structure of the gate or wicket. The length of the posts must exceed the height of the overall structure by 1 meter so that they can be buried in the ground for reliable stability.
With a drill in the ground, it is necessary to make two wells at a distance of about 1 m, with a depth of about 50-70 cm.Pillars are inserted into these wells and an additional 30 cm is driven in with a sledgehammer.
After that, the pillars are set vertically in level and at the base are poured with concrete. To give additional rigidity to the posts, in the upper part they are welded with a transverse profile.

Assembling the frame
The size of the frame of the future wicket must be made less than the width of the opening of the posts by 5-8 cm for a comfortable swing of the sash. The distance from the ground to the sash of the wicket should be from 15 to 20 cm, this is necessary in case of snow.
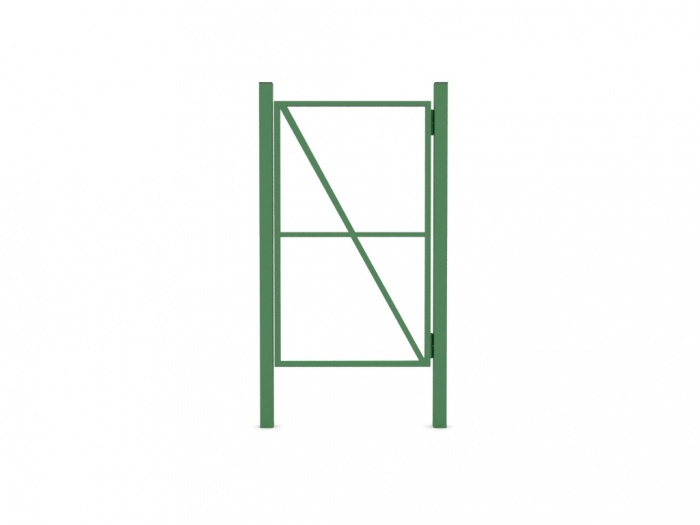
The metal frame is welded from a profile or corner with a metal thickness of 3 mm or more. The profiles are welded together at the corners of the frame. To make the frame rigid, an additional transverse bar is welded in the middle.
In the resulting frame halves, they are additionally welded on one profile obliquely in such a way that they resemble the Latin letter "Z" to each other. After that, to all the racks of the finished frame and additional stiffeners, sheathing made of metal profiles or iron will be attached.

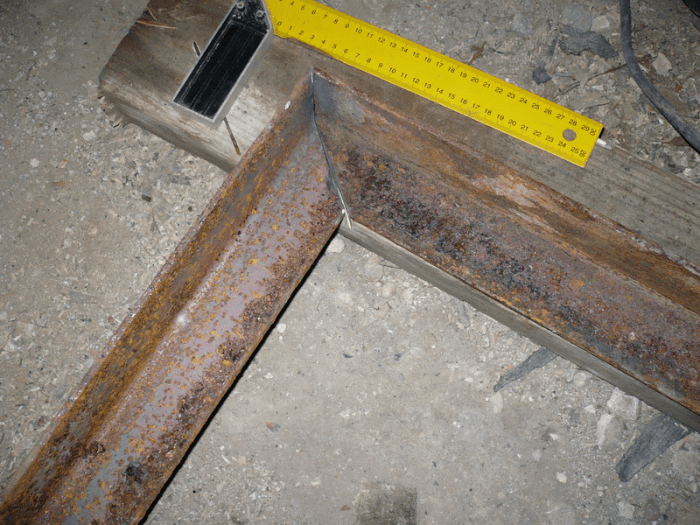
The preparatory work is a very important part. Before starting to cook the frame, it is necessary to cut the workpiece with a grinder to size, remove burrs at the cut points, degrease the cuts with gasoline or a special solution. And then start cooking on a flat, prepared surface.
The surface on which you are going to assemble the frame with your own hands must be even, if this is not the case, it may bend at one of the corners, and the frame will take the form of a propeller.
After the frame is ready, the curtains are welded to it. They consist of two parts, one part is welded to the door frame, the other to the posts. It is desirable that the curtains have a bearing mechanism.
Frame sheathing
For cladding, it is best to take a sheet of galvanized metal or a painted sheet of metal profile, it does not corrode and will last a long period.
From a sheet of metal that has been prepared in advance, a whole piece is cut to the size of the welded frame of the gate. If there is no such large piece of metal and you cannot cut a whole piece, then try to cut it so that the seam of the joint between the pieces of metal falls on the middle cross bar of the frame.
Further, with your own hands, pressing the sheet of metal tightly to the frame, grab it around the perimeter. If you chose a sheet of metal profile or galvanized metal, then attach it with rivets or self-tapping screws using a drill and screwdriver.

Insert lock and handle
After you have finished with the cladding, you need to embed the lock. For gates, it is best suited for three bolts that slide out into the locking part of the frame. The handle can be selected complete with a lock or separately, all at the discretion of the owner.
Decorating
To decorate the resulting gate, various forged products can be welded to the outside. Such products in various hardware stores and supermarkets are available in large assortment... You can choose what you like and make any pattern or composition with your own hands.

The final stage
When the new wicket door is in place, all the parts are screwed on, the decorative forging pattern is welded, it is necessary to clean all metal surfaces and welds from traces of rust, and open it all with a rust converter. After the transducer is taken with a white film, it must be wiped off with a rag, and all metal parts must be primed. When the primer is dry, apply over the paint in two layers.
That's all, our gate is ready!
The above method for assembling a wicket door with your own hands is also suitable for a gate. The assembly principle is the same for almost all materials.
Look very attractive, wood and metal. If you decide to make a gate or a gate made of wood, then you need to provide tools for processing wood in advance and at the end take the necessary measures to protect it from pests and the influence of natural factors.
Not one can do without a convenient entrance. suburban area or yard. But making a gate with your own hands from corrugated board, wood or metal is not difficult at all.
Do-it-yourself wicket from corrugated board
To install a gate from corrugated board with your own hands, you must:
Determine the location future wicket. Immediately when installing the fence, leave an opening between the two support pillars, to which the frame will be welded. So easily the problem of discrepancy between the size of the gate and the opening is solved.


Weld transverse crossbar, which will give the structure strength. For this, a piece of pipe is placed in the middle of the frame. Use a level to make sure it is level.


Cutting down excess parts of the frame. You should get an even frame, without the incoming pipe elements. After joining, they are welded and then cleaned using a grinding wheel.


Weld the tops loops... First, the attachment points are carefully cleaned with the help of a "grinder", the upper loop is attached, after which the frame is hung. It remains to weld the lower loop. At this stage, it is important to check if the installation is correct. If, when opening, the frame touches other parts of the structure, it means that a mistake has been made in the wicket scheme.


Fully weld the hinges... The frame is removed again and the hinges weld well. The resulting seams must be cleaned. If you do not want the material to be damaged during welding, cover the corrugated board from sparks and scale.

Do lock hole using the "grinder". The main thing is to correctly make all measurements and mark the desired place on the frame pipe in advance.


Install strike plate do-it-yourself gate lock from corrugated board. It is attached to the fence post with a screwdriver. The frame is pre-installed in place. When everything is ready, check if the lock closes well.


Protect the structure from rust... To do this, it is covered with special compounds and painted.
Mount sheets corrugated board... The material is first adjusted to the dimensions of the resulting frame, then installed using a drill and a rivet or self-tapping gun. Last but not least, pads and handles are mounted on the lock.

Install limiter... This is a piece of metal placed inside the opening and designed to prevent the gate from opening too much.

In this way, a do-it-yourself wicket made of corrugated board is installed directly on the fence posts, which allows you to get a reliable and durable structure without unnecessary effort.


Do-it-yourself wooden gate
The wooden gate also looks good. This design is no less durable and decorative. The stages are as follows:
Prepare tools and materials for work. You will need boards and bars, metal corners and hinges, self-tapping screws, bolts, a drill, a level, a square, a tape measure, a socket head and a ratchet, a construction pencil. Wooden blanks before starting work, it is advisable to soak with an antiseptic that will protect against insects, mold and drying out.


Make the right ones measurements... It is necessary to decide on what width the passage will be, and then calculate the required number of boards. Bars are required for the frame. It is hung on supports that are pre-installed using metal wedges. So as not to cut off the dos later ki, carefully determine the distance between the supports before installation.


Prepare the material for the frame. The bars should be about 5-10 cm shorter than the wicket boards.

Assemble the frame via metal corners and fasteners. At this stage, bolts will come in handy, the size of which should be much smaller than the width of the workpiece, which will allow you to perform the assembly efficiently without damaging the bars. You will get a rectangle, in the center of which the crossbar is installed.


Hang frame on ready-made supports. Try on if all the structural elements converge well, then install the frame using the props.


Fasten on supports loops... Pre-level all the elements, and do not tighten the bolts to the end. It is enough to adjust them and squeeze them all the way.


Mount boards wickets. They are screwed to the frame with self-tapping screws.

Color received wicket.
Install the top the bar. Such a frame looks very decorative, and it is easy to make it: you need to place the bar slightly above the top of the boards, placing a piece of timber between it and the support. Nail it down.

Install the heck. Small metal locks are well suited to wooden gates with their own hands, which are placed on the outer board from the opening side.

Thus, you can easily make a wooden gate with your own hands in just a few hours.
Wooden gate for giving step-by-step instructions with a photo
A wooden gate for a summer residence looks great - step-by-step instruction with a photo will help you make it quickly and easily. The construction will require larch boards. It is this type of wood that is preferable, since it is less susceptible to decay and has a decorative cut. If desired, you can replace it with pine.

Thus, you need to prepare:
- larch blanks 2000 x 140 x 20 (10 pcs.);
- pine boards 2000 x 150 x 50 (2 pcs.);
- loops (2 pcs.);
- metal-toothed plates (6 pcs.);
- brass plates (4 pcs.);
- brass screws (40 pcs.);
- corner;
- the heck;
- door handle;
- priming;
- protective agent;
- yacht varnish;
- chisel and hammer;
- hacksaw;
- drill;
- screwdriver;
- jigsaw;
- plane;
- bubble level;
- pencil and brush;
- skin;
- rope.
It is advisable to sketch in advance schema wickets to have an idea of the installation steps.
The gate is made as follows:
Make pine blanks sidewalls... Hinges are attached to them.

Align items vertically using a level.

Support boards and attach to concrete pillars.

Treat wood with several layers antiseptic and protective composition, cover with yacht varnish.

Install support bar using self-tapping screws.

Collect frame, fastening the corners with brass strips and self-tapping screws.

Strengthen the structure with metal-toothed plates which are pressed into the wood and nailed.

Such a plate will make the gate reliable and durable.

Adjust the hinges for the wicket door.

Mount loops onto the support bar.

Insert the frame into the opening to check that the size is correct.

Make from the board brace, which will add rigidity to the structure.

Attach the brace to the frame with plates.

The result is a sturdy wicket door frame.

Fix the frame to the hinges, sheathe her boards. The first workpiece is set to the support, which is leveled.

There are 2 self-tapping screws for each planking board, 3 for the corner ones.

Sew all the boards.

Drill holes for self-tapping screws in advance and countersunk so that the caps sink a little into the material.

Mount pen. For the convenience of work, we advise you not to fix the second board from the edge yet - it is easy to reach through the opening to both sides of the wicket.

With a pencil and rope, forming a compass, draw circles at the top of the structure.

Make cuts along the lines obtained jigsaw, process the cuts in the same way as the workpieces, only finish with not one, but two layers of varnish.

Set brass corner to keep the hinges from aligning.

Fasten the rubber retainer with a self-tapping screw.

Such a step-by-step instruction with a photo of a wooden gate for a summer residence will help to make without much difficulty.

Diy wicket schemes
Wicket diagrams will help to cope with the work. You can see them in the pictures.


Wicket from corrugated board photo
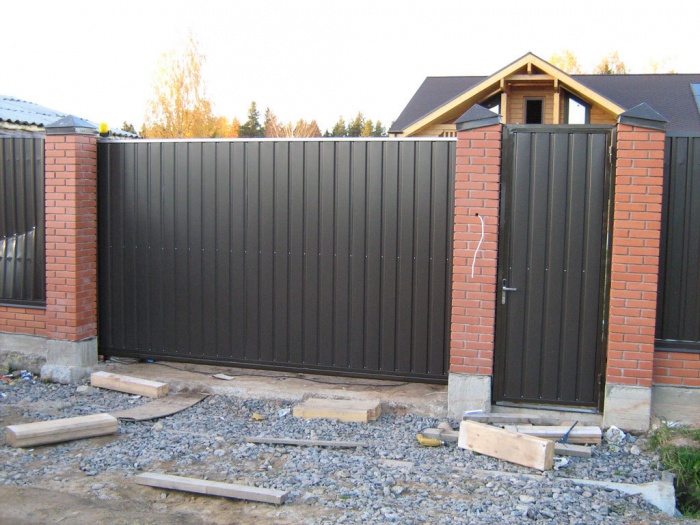
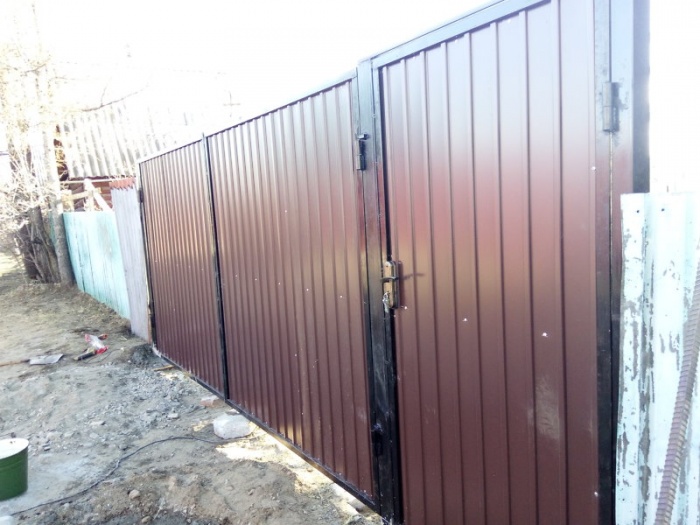
A gate made of corrugated board with your own hands can be made in several versions. For example, designs are made in the same style as the fence or, conversely, contrast with it. The gate looks great in combination with brickwork or wide pillars of light stone. You can decorate it with a visor over the opening, forged edging and other elements, even hang mailbox... By connecting your imagination, it is easy to create a gate that has a strict, solid or, on the contrary, a bright and fresh look.
Wooden gate photo
To make a wooden gate with your own hands, boards or a picket fence of various widths are used, there are no gaps between them, or, conversely, large distances are left. The gate itself is painted in the same color as the fence, or made in contrast. Black hinges and locks work well for wood with natural wood grain. As for the frame, it does not have to be wooden - a metal profile will do. An interesting option- a wicket made of panels installed horizontally
Wrought iron gates photo
Forged gates look decorative. They have a light, airy, romantic look, which is achieved through the use of openwork weaving, mesh, metallic flowers and curls. Usually, such products are painted black, which goes well with light shades of the supports. The upper edge is made semicircular, curly, or the profile is decorated with decorative peaks. Above the opening, you can install a forged openwork visor, which perfectly complements the design.
Chain-link gate
For those who do not want to spend a lot of time on the fence, it is recommended to make a gate with their own hands from a chain-link. The simplest and most uncomplicated option: two supporting metal pillars are mounted in the ground, to which an ordinary rectangular frame with a mesh is fixed. Everything metal parts covered with paint, except for the chain-link itself. To conveniently mount the handle, it is recommended to install a small piece of metal profile obliquely between the outer side of the frame and the cross member
A gate made of a metal picket fence photo
It is easy to make a gate with your own hands from a metal picket fence. The workpieces are painted in the desired shade, mounted with gaps at the same level or in a checkerboard pattern: some below, others above. To make the gate look more interesting, it is worth using unusual fittings, decorative strips, self-tapping screws with large hats that stand out against the background of the material, hang a mailbox.
Each summer resident tries to make his site well-groomed and comfortable for relaxation. The easiest way to "revive" and make your summer cottage stand out from the rest of the gardens is to equip a beautiful gate... It is the entrance composition that attracts attention in the first place and creates the impression of the site as a whole. You will hardly surprise anyone with the same type of factory structures, and experienced summer residents prefer to design and equip the entrance complex with their own hands.
Consider the features of various wickets, and also give detailed instructions planning and assembling wood and metal fences.
What should be a country gate
There are no clear requirements and norms for the placement and dimensions of the wicket. When designing, it is important to take into account the purpose of the door, the presence of a fence on the site, the size and design of the site itself.

The nuances of arranging a gate for entering a garden and summer cottage:
The width of the canvas is about 1 m. As a rule, this is enough to carry bulky things and pieces of furniture onto the estate. A large fence requires reinforcement of the support beams and the use of more durable hardware.
The height of the structure is limited to 2-2.2 m. This value depends on the height of the existing fence and the purpose of the sash.
Experienced summer residents agree that the optimal placement of the front entrance is close to a residential building, so that the gate is visible from the window.
The main criteria for choosing a wicket
Consider the types of gates for summer cottages based on their main design characteristics: purpose, device and material of manufacture.
Purpose of the enclosing door
Conventionally, all country wickets can be divided into three groups:

Design features of the wicket
Based on the design of the frame and the interface with the fence, they distinguish the following types country gates:
- freestanding fences;
- wickets that are part of the gate;
- fences adjacent to the entrance gate.
According to the degree of openness of the door leaf, they are distinguished: curtains, free and combined.
Blind gates protect the dacha estate from prying eyes and drafts. This option is very popular. To make the fence attractive, the canvas is framed with decorative elements made of wood or metal.
Free wickets partially block the view of the territory of the site. To create an openwork canvas, apply artistic forging- the elements are made in the same style. Simpler products are made from wooden picket fence or a metal mesh netting. Translucent models of wickets are made of polycarbonate.

Combined entrance gate are created from several different canvases. The gate is made deaf at the bottom, and the upper part is decorated with forged inserts.
Fabric material
The most demanded materials for the arrangement of gates: metal, wood and polycomosite. Let's consider the features of the application of each of them.
Metal gate for giving is considered self-lasting, wear-resistant and mechanically strong. The disadvantage of the model is the complexity of making it with your own hands. To implement the project, you will need specialized equipment and skills of a welder.
Varieties of metal fences: wickets made of corrugated board, forged products or the use of sheet metal cloth.
Features of corrugated board fences:
- the profiled sheet is made of steel, covered with a protective layer of zinc and polymer - this ensures the material is resistant to corrosion;
- rigidity of the canvas due to the presence of square waves;
- ease of fixing sheets to metal frame- fastening is carried out using special rivets;
- affordability and ease of use.

Certain disadvantages are inherent in professional flooring:
- there is a high probability of the appearance of dents with mechanical damage;
- the formation of corrosion due to a violation of the integrity of the upper layer;
- "Rustic" appearance.
Forged Products on the contrary, they are distinguished by sophistication and exclusivity. But for the presentable design, you will have to pay a relatively high cost. Forged elements make the wicket heavier. Some summer residents are alarmed by the transparency of such a fence, but this drawback can be easily eliminated by installing a "curtain" made of polycarbonate.
Sheet metal wickets are practical to operate, but the material is difficult to process independently.
Wooden gate for a summer residence is appropriate if the fence on the site is also made of wood. The fence is organically combined with gabions, natural stone and brick. Advantages of wooden models:
- ease of wood processing;
- opportunity self-made wickets;
- availability and environmental friendliness of the material;
- beautiful appearance.

Disadvantages of wood products:
- susceptibility to moisture, decay and combustion processes;
- the need for regular processing protective equipment and paintwork;
- service life - about 5-8 years.
Polycomposite and plastic models appeared on the market recently, but have already gained popularity among summer residents. Wickets of various sizes, textures and colors are on sale. The assembly and installation of the fence does not cause any difficulties.
Manufacturing technology of a wooden gate
For work, you will need a hacksaw, a screwdriver with bits and drills, a level and a tape measure. From the materials you need to prepare:
- corners;
- loops;
- self-tapping screws;
- door trim boards;
- thick wooden beams for the frame;
- support beams.
Advice. It is better to buy lumber ready-made - dry, planed boards of the same thickness on a thicknessing machine
When choosing wood, it is advisable to give preference to:
- larch and cedar - a dense material that is resistant to weather conditions;
- spruce or pine - affordable wood, easy to process;
- oak is a durable, solid raw material with a beautiful texture;
- laminated veneer lumber, assembled from hardwood.
Step-by-step instructions for making a wicket for a summer residence:

Step-by-step installation of a corrugated gate
The requirements for a summer cottage gate are fully met by a fence made of a professional sheet. You will be able to prepare a drawing and assemble a gate with your own hands.
Drawing development and procurement of materials
Having considered the ready-made drawings of the wicket for a summer residence, you can easily draw up your own plan, based on the parameters of the site and personal preferences.
The diagram should indicate:
- the total length of the support pillars;
- the depth of the foundation for the racks;
- distance from the ground to the door leaf;
- the width of the wicket;
- frame design, number of jumpers;
- the location of the hinges and bolt.
Important! Support pillars must be buried below the level of soil freezing. On heavy soils, a depth of 0.7 m is permissible, and on light, heaving soils, at least 1 m.

Based on the developed drawing, materials are selected:
- metal profile for pillars - two cuts of 3.3 m each;
- cover plates for supports - two squares 80 * 80 mm;
- wall profiled sheet - 1 * 2 m;
- metal profile for the frame 40 * 40 mm - 5.5 m;
- two hinges, lock and latch.
Additional Consumables: waterproofing film, sand-cement mortar, primer for metal and paint, rivets for fixing the profiled sheet.
To assemble and install the gate with your own hands, you will need the following tools:
- grinder and drill;
- welding machine;
- hacksaw for metal;
- drill for digging a hole.
Installation of support legs
Pre-clean and level the area, mark the place for the support beams - the distance between them should be 4-5 cm more than the width of the wicket.
Procedure:
- Drill holes with a diameter of 40-50 cm.
- Cover the bottom of the boulders with a waterproofing film.
- Equip a crushed stone "pillow".
- The edges of the metal posts, which will be immersed in the ground, must be cleaned of rust and treated with a primer.
- Place the beams in the pits, level the supports and secure the position with stones.
- Fill the pit with a cement-sand mortar.

After a day, check the parallelism of the beams by measuring the dimensions of the opening from above and below.
Create frame and canvas
Sequence of work:
- Prepare the components of the frame - cut the pipe with a section of 40 * 40 mm according to the drawing.
- On the flat surface lay out the segments and fix the structural elements with clamps.
- Check the evenness of the assembly.
- Tack the elements with a weld seam and once again check the evenness of the diagonals and the perpendicularity of the corners.
- Install the cross bar and reinforce the frame with metal corners.
- If the assembly is correct, carry out the final welding.

"Try on" the frame by exposing the frame to the support legs. Mark the places for the hinges - the distance to the edges of the canvas should be about 25-30 cm. After welding the hinges to the frame, grind the welding seams, cover the frame with a primer and paint.
Frame trim:
- Cut the profiled sheet.
- Fix the metal sheet with rivets. A weak fastening will lead to loosening of the canvas during the wind, and a strong fastening will lead to its deformation. Therefore, the screw must be screwed in carefully.
Final assembly of the structure
Hanging the finished canvas on the support posts is carried out after the foundation has completely solidified.
Wicket assembly procedure:
- Place the fence in the opening, placing it under the canvas wooden bar 10 cm thick.
- On the beam, it will mark the places for the mating loops.
- Weld the hinges and hang the wicket.
- Check door movement. Spontaneous opening or closing of the gate is unacceptable.
- Place a stopper on the back of the hinges so that the door only works in one direction.
Gates for summer cottages: photo ideas for decorating the entrance ensemble
The gutter and the fence act as a single decorative element thanks to the pattern applied across the entire fence fabric.

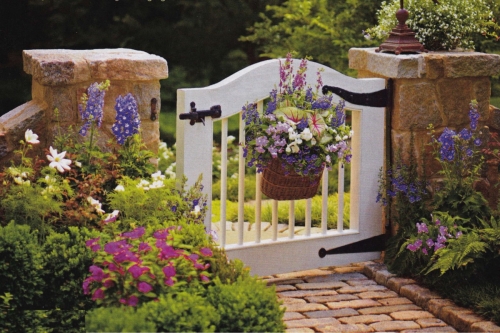
Low Provence style fence suitable for separating the garden from the backyard suburban area... The white gate looks great against the backdrop of lush greenery and natural stone.
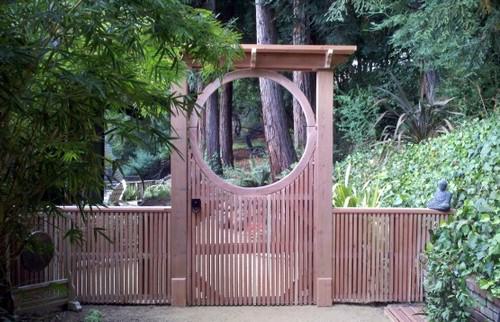
Original and at the same time simple form the entrance door emphasizes the laconicism and sophistication of the Japanese-style garden.
An unusual solution is a combination of forged elements and natural materials. Skillfully crafted bunches of grapes are complemented by a natural branch of the vineyard.

Eco-decor made of untreated wood is appropriate for a small country estate. The doors of the gate, like the fence, are designed in a rustic style.
It is important to think about making the enclosing structure, as well as installing a gate with a wicket. There are several options for implementing the latter. For example, you can make a wicket separately from the gate or built into the "body" of the gate frame. Regardless of which option you choose, the wicket must be strong and reliable enough. If we talk about quality and reliability, then the metal wicket has no equal. Making a gate from metal allows you to show your imagination, since there are many interesting methods of how to design it. It is even possible to include forging elements in the design of a wicket made of metal, which will give it a special charm.
Getting ready for work
So, if you want to make a high-quality, beautiful and reliable gate, then it is important to do good preparation. If you want to include forging elements for a fence and a gate made of metal, then it is best to order them from a specialized company.
In general, it is quite possible to make an iron gate yourself. For this, you can successfully use a profile pipe or metal profile. However, in your case it will be possible if you have skills in working with welding equipment. If there are no such skills and even more suitable equipment, then you can invite a friend and help him. So, you can save a lot if you had to contact a specialized company.

So, to carry out the work, you need to have the following equipment:
- Welding machine.
- Special protective suit for welding.
- Welder's protective mask.
- Grinder with cutting and grinding wheels.
- Hammer.
This is perhaps the main set of tools and materials.
Reminder! Do not neglect the means of protection. Working with welding equipment is associated with high temperatures. Therefore, there is always a risk of injury.
We make a project
A do-it-yourself metal wicket must first of all be competently designed. The basis of any metal wicket is a frame. Therefore, it is important to prepare everything you need for him. Moreover, you should decide in advance on the dimensions of the future metal door. It is worth noting that it should not be higher than the entire fence; from the outside it does not look very beautiful. Although in this matter there are no strict requirements for everyone, their own vision.
So, making a reliable wicket made of metal requires the following preparation:
- Material for posts. Metal is predominantly used shaped tube or a sturdy metal corner.
- You will also need to purchase material for its sheathing. Often metal wickets sheathed with a metal profile. Alternatively, it can be sheathed with wooden planks.
- Anti-corrosive liquid. It should be treated with all structural elements in order to significantly extend its operational life.
- Good quality metal primer.
- Also prepare sturdy metal hinges for the door installation.
- The necessary material for the manufacture of a wicket, it can be a rectangular or square profile pipe.
- You will also need additional hardware, such as a lock, handle and other elements.
Installation of support pillars
The main bearing part of the gates and doors is the support pillars. With this in mind, they must be reliable and durable. They must be able to cope with the weight of the gate. The installation of the support pillars is very simple. Carry out the markup, according to a previously prepared project. Holes in the ground can be made with a garden drill, up to 1 m deep.
The bottom of the trench must be covered with rubble, which is carefully rammed. Before installing the metal pillars of the support, they should be treated with an anti-corrosion compound. After that, lower the pillars into the dug hole and set them strictly according to the level. You can also use a plumb line.
Advice! For greater efficiency, temporary spacers can be installed to secure the post in a perfectly level position. This will allow you not to deviate from the vertical during the concreting process.
With the support pillars in place, it was time for concreting. Prepare concrete mix and fill the pillars of the support with it. After that, the pillars should be left for a few days so that the concrete can set.
We make a frame from metal
Then you can start making the frame. It can be made from a corner with a thickness of 3 mm or more. Lay out the workpieces on a flat horizontal surface and weld in the corners to each other. You should have a rectangular frame.
Advice! Take your time to weld everything thoroughly. First, apply the potholders, check the diagonals, and then you can finally weld everything. This will avoid skewing.
Additionally, it is recommended to weld diagonals or cross members to strengthen the entire frame. The metal wicket is adjusted to the size that you have designed. After the end of welding, all welded seams are processed with a grinding wheel on a grinder. This will make the corners look nice and smooth. Also, in addition to the "body" of the frame, check that there are no burrs and so on.
In the next step, awnings are welded. They are in two parts. One of them is welded directly to the support post, and the second to the metal gate. For convenience, it is recommended to weld the awnings to the gate first. Then put the wicket to the pillars of the support and put marks on them. Next, the awnings are welded onto the pole. The metal sash can be hung.
While the wicket does not weigh yet, it will be convenient to paint it. Apply a primer first, and then, if necessary, one or two coats of paint. Only after the paint has completely dried, one of the final stages can be carried out - frame sheathing.
Metal frame sheathing
Today there are many ideas of how and with what you can sheathe a gate. For example, in this article, you can view ready-made options metal gates made of metal in the photo. The metal profile is predominantly used. This material is resistant to corrosion, as it has a special anti-corrosion coating.
The metal profile is attached to the metal frame using special rivets or self-tapping screws. For this, the profile sheet is cut to size, and then applied to the frame. Holes are drilled in the marked places, and then a self-tapping screw is screwed. The screw cap can be matched to the color of the metal profile.
Conclusion
So, as you can see, it is quite possible to make metal wickets made of metal with your own hands. The most important condition is to know the sequence of all works. Additionally, we suggest that you familiarize yourself with the video material, which will clearly show how to do all the work yourself. Plus, you can use metal wickets in this article in the photo. Perhaps you can take one of the ideas for your case. We hope that this material will help you in making a beautiful and reliable metal gate.


 Future marriage of Prince Harry year NTV")


Energy drinks: give vigor, but take away health What will happen if you drink 4 energy drinks
Mustard for weight loss: how to use the seasoning with maximum benefit Is it possible for children to have mustard
The benefits and harms of mustard for the human body Table mustard benefits and harms
How to treat the ear after piercing: types of antiseptics, their composition, rules and features of the treatment of a pierced ear
Sistine Chapel in the Vatican: description, history, architectural features