It is important to think about the manufacture of the enclosing structure, as well as the installation of a gate with a wicket. There are several options for implementing the latter. For example, you can make a gate separately from the gate or built into the "body" of the gate frame. Regardless of the option you choose, the gate must be strong enough and reliable. If we talk about quality and reliability, then the gate made of metal has no equal. Making a metal gate allows you to show your imagination, as there are many interesting methods for how to design it. You can even include forging elements in the design of the metal gate, which will give it a special charm.
Getting ready for work
So, if you want to make a high-quality, beautiful and reliable gate, then it is important to do good preparation. If you want to include forging elements for a fence and metal gates, then it is best to order them from a specialized company.
In general, it is quite possible to make an iron gate on your own. To do this, you can successfully use a profile pipe or metal profile. However, in your case it will be possible if you have skills in working with welding equipment. If there are no such skills, and even more so suitable equipment, then you can invite a friend and help him. So, you can save a lot if you had to contact a specialized company.

So, to perform the work, you need to have the following equipment:
- Welding machine.
- Special protective suit for welding.
- Protective mask of the welder.
- Bulgarian with cutting and grinding wheels.
- Hammer.
This is perhaps the main set of tools and materials.
Reminder! Do not neglect protective equipment. Working with welding equipment is associated with high temperatures. Therefore, there is always a risk of injury.
We make a project
Do-it-yourself metal gate, first of all, must be correctly designed. The basis of any gate made of metal is the frame. Therefore, it is important to prepare everything necessary for him. Moreover, you should decide in advance on the dimensions of the future metal door. It is worth noting that it should not be higher than the entire fence, from the outside it does not look very nice. Although there are no strict requirements in this matter, everyone has their own vision.
So, the manufacture of a reliable metal gate requires the preparation of the following:
- Column material. Mostly used metal profile pipe or a strong metal corner.
- You will also need to purchase material for its sheathing. Often metal gates are sheathed with a metal profile. Alternatively, you can sheathe wooden boards.
- anti-corrosion liquid. It should be treated with all structural elements in order to significantly extend its operational life.
- Good quality metal primer.
- Also prepare reliable metal hinges for installing the door.
- The necessary material for the manufacture of the gate, it can be a profile pipe of rectangular or square section.
- You will also need additional fittings, such as a lock, handle and other elements.
Installation of support pillars
The main bearing part of gates and doors are pillars. Given this, they must be reliable and durable. They must be able to withstand the weight of the gate. Mounting the poles is very easy. Carry out the markup, according to a pre-prepared project. Holes in the ground can be made with a garden drill, up to 1 m deep.
The bottom of the trench must be covered with rubble, which is carefully rammed. Before installing metal support poles, they should be treated with an anti-corrosion compound. After that, lower the pillars into the dug hole and set them strictly according to the level. You can also use a plumb line.
Advice! For greater efficiency, you can install temporary spacers that will fix the post in a perfectly level position. This will allow not to deviate from the vertical during the concreting process.
When the pillars of the support are exposed, it's time for concreting. Prepare the concrete mixture and pour it into the pillars of the support. After that, the posts should be left for a few days so that the concrete can set.
Making a metal frame
Next, you can proceed to the manufacture of the frame. You can make it from a corner with a thickness of 3 mm or a profile. Lay the workpieces on a flat horizontal surface and weld them together in the corners. You should end up with a rectangular frame.
Advice! Do not rush to weld everything thoroughly. First, apply potholders, check the diagonals, and then you can finally scald everything. This will avoid distortion.
Additionally, it is recommended to weld diagonals or crossbars to strengthen the entire frame. The metal gate is customized to the size that you have designed. After welding is completed, all welds are processed with a grinding wheel on a grinder. So, you will make the corners nice and smooth. Also, in addition to the “body” of the frame, check that there are no burrs and so on.
At the next stage, canopies are welded. They consist of two parts. One of them is welded directly to the support pole, and the second to the metal gate. For convenience, it is first recommended to weld canopies to the gate. After attaching the gate to the pillars of the support and put marks on them. Next, the canopies are welded onto the pole. The metal sash can be hung.
While the gate still does not weigh it, it will be convenient to paint it. Apply a primer first, followed by one or two coats of paint as needed. Only after the paint has completely dried, one of the final stages can be carried out - sheathing the frame.
Metal frame sheathing
Today there are many ideas of how and with what it is possible to sheathe a gate. For example, in this article, you can view ready-made options metal gates made of metal in the photo. The metal profile is mainly used. This material is resistant to corrosion, as it has a special anti-corrosion coating.
The metal profile is attached to the metal frame using special rivets or self-tapping screws. To do this, the profile sheet is cut to size, and then applied to the frame. Holes are drilled in the marked places, and then the self-tapping screw is twisted. The head of the self-tapping screw can be selected according to the color of the metal profile.

Conclusion
So, as you can see, it is quite possible to make metal gates made of metal with your own hands. The most important condition is to know the sequence of all works. In addition, we suggest that you familiarize yourself with the video material, which will clearly show how to do all the work yourself. Plus, you can use metal gates in this article in the photo. Perhaps you can take one of the ideas for your case. We hope that this material will help you to make a beautiful and reliable metal gate.
Despite the diversity building material for fences and fences, when choosing a gate for a summer residence, it is rather two types - a gate made of metal and wood. A gate in a country house or in a private courtyard is not only an entrance to the territory. This is protection against unwanted intrusion and theft of property. But besides all these functions, the gate also serves as a decoration of the site.
This is what classic metal gates of a simple design look like
Metal gates have a number of advantages and positive qualities:
- Metal is stronger and more durable than wood;
- The metal gate serves as more reliable protection;
- Variety of cost options appearance, purpose and material.
Such gates are made of a single sheet of steel or aluminum. They are solid in appearance, and can carefully hide the courtyard from prying eyes and vandalism. The thickness of the metal can vary from 1 to 5 mm. Such gates are not highly decorative and need regular staining.

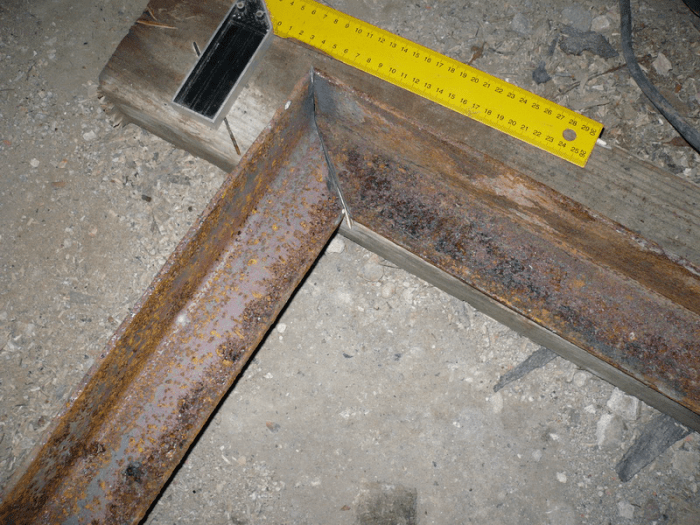
Welded metal garden gate
Each of these metals has its pros and cons. Aluminum gates are light in construction, but more prone to accidental damage. In addition, this metal is more expensive in price.
Gate made from steel sheet, is heavier and needs strong foundations. But compared to aluminum, it will cost much less for family budget and has a long service life. Such a gate will not be damaged by a pebble accidentally flying out from under the wheels of the car. It is quite possible to make metal gates with your own hands. This requires a welding machine, grinder and experience with such tools.
How to make a metal gate yourself

Forged gates
And the gates are made by hand from metal by forging. They are aesthetically pleasing and rich in appearance. The price of such gates is high, so for a large number of consumers they remain an inaccessible luxury. 
These gates are most often made to order. Elements self made make each piece exquisite and unique. Forged gates- this is an element of the decor of the cottage, which indicates the status and strong financial position of its owner.
In order for the gate not to look too transparent, they are supplemented with a sheet of metal, corrugated board or polycarbonate. To make such an exhibit with your own hands, you need to have good skills and craftsmanship in forging, so most often they just buy forged fences.
Welded gates
These gates are widely used. They are often installed separately or paired with gates to fence the cottage. They can be solid or openwork, with handmade decoration. As a sheathing, a metal or aluminum sheet or corrugated board can serve. Gates made in this way are distinguished by reliability, strength and durability. They are easy to make with your own hands, if you have the skills to work with metal or follow the instructions.
At the same time, you need to know that if the frame of a welded gate is sheathed with corrugated board, it cannot be attached to the base like ordinary metal. For this, special screws are used.
These gates include metal gates made of welded mesh. But if they are used in dacha fences, then only to separate zones within the site or, for example, to separate the recreation area from the garden or vegetable garden.
Sturdy bases - a guarantee of strength and durability of the gate
Whatever metal gate or wicket is chosen for fencing the cottage, they all need a solid and reliable foundation. After all, the durability and beauty of the fence depends on it. A skewed gate is unlikely to please the owner's eyes.
The metal has enough weight to create a large load on the poles. It will even have significant weight due to the metal frame. Therefore, metal gates and gates must be installed on strong poles that can withstand the load.
Stone or must be installed on. Depending on the type of fence, it can be tape, continuous along the perimeter of the entire fence, or made in the form of glasses, providing strength to the pillars.

Drawing and diagram for mounting the foundation for a brick pillar
If you plan to install the pillars with your own hands from metal pipe or concrete, you need to know how to do it right. First you need to plan a place for future gates and gates. After that, in the intended place with the help of a drill, a hole is made to the depth of freezing of the soil.
A garden drill is best suited for this job, as the holes should not be much larger than the diameter of the supports, which, in turn, should enter there easily and freely. The bottom of the pit is covered with a pillow of rubble and sand. After that, the pole is installed. With the help of a plumb line, its verticality is checked, after which the free space of the pit is covered with rubble or broken bricks.

An example of an installed brick frame fence on the foundation
Crushed stone should be well compacted and poured with cement-sand mortar, which is made in a ratio of 1: 3. The cement hardens for several days, after which you can safely attach a gate or gate to the pillars.
Metal gates and gates are very popular. They are often installed when fencing a summer house or a private courtyard. Some types of such gates can be made with your own hands, and some are better to buy. But they are all durable, reliable and durable.
Probably, there is not a single person who would remain completely indifferent when looking at an openwork metal pattern. Even more admirable is the massive pattern with which they are decorated, which are part of the entrance group.
The presence of massive metal gates, decorated with elegant patterns, is not a sign of a desire to isolate themselves from others, but they serve as an indicator that the owner has a taste and thinks about his own image. At the same time, forged gates are very well able to perform their main function - to protect the site from penetration. uninvited guests, which is facilitated by height, the presence of sharp tips and strength. Also, almost any modern gate can be equipped with video surveillance systems, which will only improve their protective properties.
Assortment of gates and wickets - from classic to exclusive
Exists a large number of firms offering high-quality forging services, which will make it possible to manufacture gates according to existing sketches. Also, almost any manufacturer of forged gates accepts for execution sketches and customer drawings, which contributes to the realization of any fantasy when designing your own personal plot and enclosing it with a fence.
Timeless classic

The most popular are gates and fences made in the classical style. The presented sketch gives a complete picture of how the entrance group will look like. A smooth fence with rare rods, which does not create the impression of being fenced off from the world, will be the choice of a person who is used to combining conciseness with practicality, but at the same time having taste. The arched vaults of the gates and the similar design of the wicket give a certain sophistication to the presented version.

Another reading of the classics, which practically does not differ from the previous version. The main difference of this model will be a larger number of decorative elements, which gives the whole ensemble a massiveness, which is hidden by rare rods. Missing line at the top and bottom openwork patterns visually limits the height of the wicket and gate, making them complete. 
A sketch of a gate that combines the sophistication and beauty of a forged product and provides elevated level security, achieved due to the sharp tips that end the bars of the gate and fence. The arched vault visually enlarges the entire structure; a large number of patterned inserts is also a weighting element. The rolled execution of rods can give the whole ensemble beauty and unusualness.

For those who are not used to experimenting and are more inclined towards classic, smooth lines, manufacturers are ready to offer the options shown in the photo above. Such fences are in constant demand, because they are easy to perform, and look very presentable.
Another advantage of such options is the ability to mount the gate directly on the gate, unlike arched varieties, where the gate door does not fit. These types of gates can be decorated with patterns of varying degrees of complexity, have pointed peaks at the top or be completely smooth, which, of course, will deprive them of the brutality that the type of forged gate causes. 

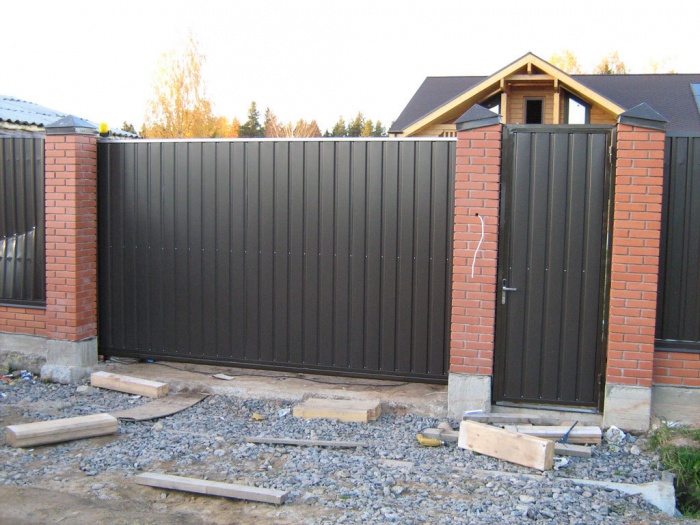
For those homeowners who value privacy and personal space, gates closed with sheet metal are recommended. In this case, there is the option of completely covering the door leaf and the fence, or closing only the lower part in the form of a forged fine mesh. Both options are distinguished by massiveness, monumentality, which speaks of the seriousness of the owner of this site and his concern for his own intimacy. The manufacture of such gates will require more metal, which will affect the cost, lead to a rise in price. But it's worth it, because these gates look beautiful and solid at the same time, but the openwork top and bottom do not create the impression of a "concrete wall".
Exclusive Models
For people with sufficient financial resources or building solid country houses, it can be recommended to pay attention to more expensive models gates and fences, which most manufacturers are classified as elite.

The main feature of these varieties of the question, which can be seen in the picture above, is their massiveness and closeness. In all models, sheet iron is used, which completely closes the front of the gate, a fence is similarly designed to create an integral ensemble. Also, an obligatory element that gives the gate status and exclusivity is the presence of forged or cast three-dimensional design elements that act as decorations placed on the gate. One more important detail becomes a complete set of ready-made gates with bolts and flashings.

Another option for the exclusive design of arched gates with the possibility of placing a gate due to the even foot of the vault. This model is characterized by rich decoration, many smooth lines of the pattern, creating airiness, which gives the gate a regal look without creating a feeling of massiveness. It should be remembered that such options, when most of the gates and fences are covered with a sheet of metal, are distinguished by their large weight, which requires preliminary calculation for the manufacture of the corresponding support pillars.
Wood and metal - a good combination


A separate place among the forged gates is occupied by models in which they successfully rallied l wood and metal. The gates themselves in this case are made of wood, a material that has been used for decoration since ancient times. country house, and all fasteners, edging, platbands and just decoration elements are made by forging. Tips are also made in the same way, in case of a decision to create them.
A similar solution in the manufacture of gates allows you to get not only reliable protection, but gives the entire input group a touch of eclecticism and following the roots.
Making forged gates with your own hands - the impossible is possible
If you want to get the original gate, which will be exclusive and will not be repeated by anyone in the area, there is an opportunity make them by hand. Despite the apparent complexity, this process is quite simple and straightforward.
The first step is to come up with a sketch of the future gate. It is best to draw pictures, which will help visualize the future result.

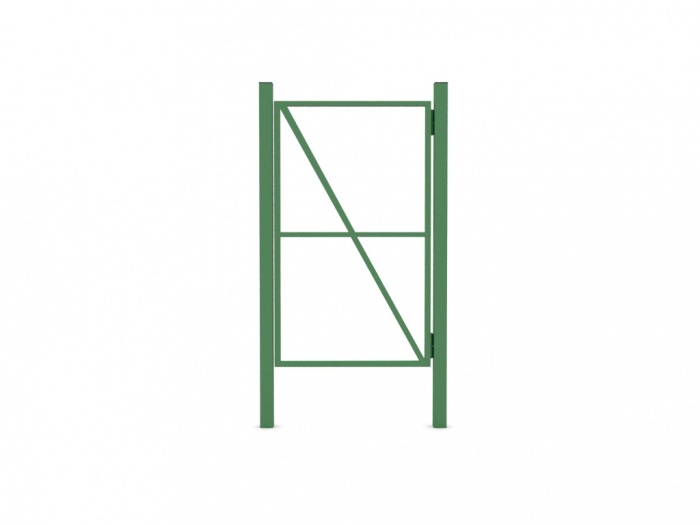
A pre-prepared sketch of the future gate will facilitate the work in the future
When developing a sketch, one should be guided by two postulates - strength and reliability. But we should not forget about beauty. It is important to first think over the geometry of the leaves of future gates and fully calculate dimensions future design.

Drawing - the first assistant in the manufacture of gates with their own hands
The tool needed to make the gate
When choosing a tool, you should choose what the gate will be. Either the entire manufacturing process will be independent, including metal forging, or forged elements will be purchased ready-made.
In the first case, additional forge, hammer, anvil. This path should be chosen only if you have practical skills in blacksmithing. Otherwise, it is better to prefer the second option.
To make a gate you will need:
- welding machine and a set of electrodes;
- powerful yews;
- angle grinder;
- brick;
- I-beam and profile pipe;
- sheets of metal, not less than 1 mm thick;
- cement mortar.
The first stage - supporting pillars
The first step will be the installation of support pillars, which must be strong enough to support the entire structure, which is distinguished by its considerable weight. The central part of the column will be a pipe with a diameter of at least 25 mm, and a facing brick will also be required.

Properly installed poles will guarantee the reliability of the entire structure.
It is important to remember that you must first calculate the thickness of the material, since the pipe will be lined with bricks. It is also necessary when digging a hole to leave a gap between the edge and the pipe of no more than 10 cm, so as not to cause the base to skew under the weight of the valves.

The final step in installing the pillar will be laying it with bricks.
The installation of the pillar consists in digging in the pipe, ramming the base using crushed stone and laying the pipe with bricks. Also at this stage, it will be necessary to weld the shank, special fasteners for the back curtains of the gate leaves. Sometimes only two tires are enough, but if the gate is supposed to be heavy, you can weld three to be sure.
Shutters are an important stage
For welding the sashes, a flat area should be chosen to prevent twisting of the frame parts. The prepared profile must be cut in accordance with the drawing, after which the frame is laid out on a flat area and all parts of the alignment are caught by spot welding.

When welding the frame, all parts must be placed on flat surface to prevent twisting and deformation
After that, it is necessary to carry out control measurements, only then proceed to finishing welding with a continuous seam. Also, in the manufacture of sashes, it is necessary, in accordance with the drawing, to weld all decorative elements, while trying to weld in such a way as to make the seam as less noticeable as possible.
Painting
After welding the wings until the final installation, it is necessary to paint the resulting structure. Pre-treat the metal with an anti-corrosion compound, clean all visible welds, cover the gate with a primer layer after degreasing and apply a layer of paint. It is best to use a spray gun, which will ensure the evenness of the paint overlay.
Gate installation - the finish line
The final step is the installation of the gate. To do this, hinges should be welded to the ends of the wings, which should be located at the same distance as the reciprocal hinges on the poles. There is a small nuance of welding loops. The lower ones should be fastened in one direction, and the upper loops in the opposite direction. This is necessary to protect against the removal of the gate in the future.

At the final stage of production, decorative elements are welded and painting is carried out.
On the back of the leaves, it is necessary to weld brackets to accommodate the lock or provide for the option of placing modern locking elements.
The last step is to hang the gate on the hinges, for which you will need the help of a partner, which will help speed up and facilitate the process.
Making a forging machine
The video below provides instructions for making the machine cold forging with your own hands. Simple, fast and cost-effective. The video is very popular.
Still at the design stage of the fence for suburban area or a private house, one difficult issue remains to be resolved - to arrange a gate together with a gate, or leave the gate separately, and the gate - separately. There are a number of cases when there is no way out and then you have to combine the gate with a gate. For example, if there is simply no space. Yes, and the cost of such a design will be cheaper. However, there are many reasons to leave the gate as an independent entrance.
Gate or gate with metal gate
From the point of view of aesthetics, of course, a separate gate looks more attractive than in a company with gates, however, the price of materials, installation and work will differ. Nevertheless, the photos of metal gates on our page indicate that many find this an unconditional benefit. We will not go into debate, and we will simply consider the main stages of work on installing the entrance group.
The metal gate provides an opportunity both to show the imagination of the graphic designer and designer, and to reliably protect the territory from penetration, and, if necessary, from prying eyes. If you have free time and very little free money, then forged elements or a combined gate solution will favorably highlight entrance group against the backdrop of neighbors.
Design work
Before you start working directly, it is better to spend an hour or two sitting with a pencil and paper and evaluate your requests. Perhaps it is easier and cheaper to realize your desires by the hands of masters. If there is a technical possibility to build a gate with your own hands, even better. Naturally, the place for installing the gate has already been chosen and the approximate dimensions are put on paper. If this is not so, then first of all, it is necessary to remove the numbers that can be operated on. Only then can one speak of constructive solution gates.
Regardless of what the gate will be sheathed with and whether it will be sheathed at all, without welded metal frame it won’t work out in any way, but before starting work, you should make sure that you have at hand at the right time:

To install and assemble the gate, you will need an elementary tool and electric welding, and if you are unable to handle it, you will also need a welder.
Making a gate from metal
According to predetermined dimensions, frame elements are cut off in accordance with the drawings and diagrams, after which the frame is tacked by welding in a draft. The dimensions are checked again in place and only then can the frame be scalded with a reliable seam. At the same time, one must not forget that the design may include a lock or an electric drive, in the end, which should also be taken into account when constructing the frame.
The sheathing of the gate is made either with self-tapping screws or rivets, depending on what it will be sheathed with. It makes sense to pay attention to combined options gate solutions: metal and wood can be perfectly combined, if required by the general design decision. If there is no financial opportunity to use forging in the design, they will be perfectly replaced by metal patterns. When choosing a material for the posts, it must be borne in mind that their height will be about a meter more than the gate. In order for the pillars to be installed securely, the minimum depth of the well for their installation must be at least 0.8-1 m, depending on the type of soil.
Installation of a metal gate
The diameter of the well for the post should exceed the diameter of the post itself by 25-20 cm. This is necessary to fill the support concrete mix. Before you make supports for the gate, you need to take care of the anti-corrosion treatment of the material, especially its underground part. Anticorrosive treatment, priming or coating with waterproofing materials will extend the life of the pole by several years.
When holes are drilled in the soil of the required depth, a pillow of crushed stone, broken brick, and small stone is laid on the bottom of each of them. The thickness of the pillow should be at least 15 cm. Then the pillow is compacted and using a level or building level a pillar is installed, which is then poured with concrete mixture. It is prepared from cement grade 300, and the consistency should be such that the solution freely penetrates into the space between the post and the soil.
Further work on installing the gate is carried out after the solution has completely solidified. Then hinges are welded to the posts, a finished gate is hung and, if necessary, the entire finished structure is painted with water-repellent enamel. Thus, without special financial costs, you can install a metal gate with your own hands. Successful work to all!
Many people make the gate separate from the gate. You can make a metal gate with your own hands so that it will decorate any building. When performing this process with your own hands, you can bring to life all your most daring ideas and unexpected decisions. Forged elements will help to give solidity to the product and decorate it. And thanks electric drive no longer need to go outside.
Before you start working on the production of this metal product with your own hands, you need to choose the place where the gate will be installed. You should also take measurements and arrange all this on paper in the form of a diagram.
Materials for the production of gates
- metal blanks are selected with a high carbon content, since it is he who is the least susceptible to corrosion and, accordingly, will last much longer;
- sheet of metal (thickness not less than 1.5 mm);
- pipe or profile for posts (diameter not less than 100 mm);
- profile pipe or corner (section not less than 25 mm);
- special liquid or gasoline, which will be necessary for anti-corrosion treatment;
- dye;
- mixture for priming the surface of the metal profile;
- electric drive or lock.
Wickets production tools

In order to, be sure to prepare all the tools that will be needed when working:
- kapron thread - will be needed for marking;
- welding (power 220 W);
- hand drill or sledgehammer for driving posts;
- a screwdriver with which metal is attached;
- grinder - needed for stripping and cutting metal;
- scissors for metal;
- shovel.
How is the installation of the gate
Making a gate with your own hands at home is a fairly simple matter. Plus, it will save you money. After the materials and tools are purchased and prepared, the direct manufacturing process begins.

Columns on the sides. Do-it-yourself gate from a metal profile is fixed to posts that are mounted in the ground no less than 1 m. First of all, marking is done and the installation site is marked. Then the grinder cuts off the length of the pillar blank with the addition of 1 meter. Next comes the surface treatment. For this purpose, corrosion traces are removed from the metal profile using an anti-corrosion liquid and a grinder. After the pole dries, a plaque forms on it. white color which is removed with a rag.
By means of a hand drill, a hole is drilled in the ground, which can simply be dug, in places where markings are made. The diameter of the hole should be 10 centimeters larger than the diameter of the pipe. After that, a liquid solution is prepared. Grade 300 cement is mixed with sand (1:3). The mass should be homogeneous, it is necessary to bring it to a liquid state, gradually adding water. Installation of pillars is carried out in prepared holes, which are covered with rubble. You can also use other stones from the site. The rubble is eventually compacted.
Brick pillars. The gate can be fixed on brick pillars. For this it should hardware lined with bricks. It will be both beautiful and reliable. The building will look better. The solution is prepared in the same way as above, but it should not be liquid. The laying of the first row begins with a whole brick, and the second row is laid with 3/4 bricks, for a more rigid bond. After the solution dries, the rows are lined. On top of the pillars, metal or decorative caps are optionally installed. This will allow water to drain away from the product when it rains.
Frame. Do-it-yourself metal gate consists of a corner or a profile. The choice of frame material depends on the desire of the owner. In general, this is not a fundamental issue, because the installation is carried out the same way for everyone. This work requires special care.
In order not to violate the configuration, you need to carefully measure the dimensions. For competent do-it-yourself work, you need a good place to place the structure. The channel is laid along the perimeter. Its size should be 15-20 centimeters smaller than the product. It should ideally maintain the plane with a level. Adjustment is done by means of gaskets placed under the channel. In accordance with the indicated size, the corner / profile is cut off. Burrs are removed by a grinder. The blanks are laid out at the workplace and fixed. Then the joints are welded by welding. The bottom and top or side racks are also connected by welding - this way the rigidity of the structure is achieved. Only spot welding is used, the seams of which are cleaned by a grinder with a cleaning wheel. The final stage is the treatment with gasoline or anti-corrosion liquid.
Attachment to poles. Do-it-yourself fastening of the gate to the poles should be done only with the help of powerful fasteners. It is best to use a curtain with a built-in bearing.
fasteners sheet metal. This is the final touch of installing the gate with your own hands. It is necessary to carry out the following actions:
- cut a sheet from a metal profile of the desired size;
- remove burrs on cuts;
- fix the sheet on the frame of the product;
- treat the metal surface with an anti-corrosion liquid;
- paint and hang on loops.
After being carried out installation work with your own hands, you need to install a lock or connect an electric drive. This is already done at the request of the owner.


How to cook ham in the oven at home
Pain in the lower abdomen during pregnancy, reasons for what to do Can the lower abdomen hurt if pregnant
Protein for muscle gain
The best vitamins for men according to customer reviews
How to lose weight on a vegan diet?