Facade plaster for outdoor work is responsible not only for the aesthetic appearance of the house. It also acts as an additional protection of the walls from various atmospheric manifestations, such as: water, wind and UV radiation. There are a lot of options for mixtures today, under different types surfaces and conditions of use.

The plaster of the house on the outside is made using a silicone compound
For your information: there is another variety - decorative silicate-silicone external plasters. The binder here is composite, from copolymers of silicones and a dispersion of potassium silicates. By performance characteristics this finish for outdoor use is very close to silicone.Varieties of textures of decorative facade finishes for outdoor work
And now a little about what textures of external plasters are. Below are the options that can be purchased with all the decorative compositions described above.
- bark beetle. The working mass includes stone grains of a certain fraction, the size of which determines the intensity of the relief on the wall surface. Due to these grains, a textured surface is created, similar in pattern to a tree spent by a wood borer.
- Lamb. The filler contains stone grains of various sizes, which gives a decorative soft-hilly surface.
- Fur coat . Here the relief depends rather not on the characteristics of the filler in the working mass, but on the application technique.
- Pebble, or groats. The composition contains a large number of large stone grains of the same size. The surface is finely rough.
- Mosaic, with decorative stone. Unlike all the textures described, it comes only in acrylic and silicone formulations. The binder in such plasters is transparent, the surface looks like densely laid out stone chips.

Types of decorative textures for exterior finish


Front plaster for external works. How to choose the right mixture
Of great importance is the compatibility of one or another type of decorative plaster with the surface on which it is to be applied. The durability of the exterior finish directly depends on these parameters. So, cement compositions fit well on a wall of any quality. The only condition is that if the work goes on top of the insulation, a preliminary installation of a plaster mesh will be required.
Stability based on various factors. Each of the decorative mixtures is good in some ways, but in some ways it loses to the others. For example, acrylic perfectly withstands mechanical stress, but is prone to color fading. But if you plan to repaint the facade every couple of years, then this moment can be considered insignificant. That is, it is necessary not only to compare the qualities of plaster for the facade - which one is better, but also to evaluate its priority for yourself.

How to choose facade plaster for outdoor use: cement compositions are the most unpretentious
Note: when choosing, the covering power of the working mass should also be taken into account. Plaster mixtures in the work are divided into thick-layer and thin-layer. The former include cement and silicate decorative compositions, the latter - acrylic and silicone. Thin-layer options are the most demanding on the base on which they will be applied.


The technology of applying facade plasters for outdoor work on different surfaces. Consumption
In most cases exterior finish applied to the walls in the same way, as described in the next paragraph. The exception is the so-called "complex" surfaces - timber walls, OSB, chipboard and foam insulated.
Finishing facades made of aerated concrete and surfaces with a layer of leveling reinforced coating
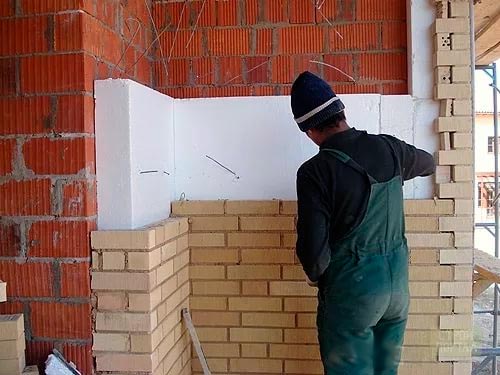
It is easiest to apply plaster mixtures to aerated concrete blocks and bricks. Apart from the usual leveling and adhesive primer application, no wall preparation is required. Additional work will be required when using thin-layer materials. In this case, you will have to use a roller to process the walls with a coloring primer, in the color of the future plaster of the facade.

Exterior facade finishing works
Manual application process step by step:
- Dry plaster for outdoor use is diluted with water in the required proportions, mixed well. Full readiness will come after 10-15 minutes of settling.
- If necessary, we tint the prepared volume.
- We scoop up the mass with a spatula and spread it on the lower edge of a wide trowel.
- We apply a trowel with a solution to the wall almost perpendicularly, reducing the angle during the movement of the tool almost to full parallel.

Works on stretching pebble decorative plaster for outdoor use
- Almost without pressure, we drive the trowel along the wall, stretching the decorative plaster to a layer of the desired thickness.
- Having passed an area of about 1.5 m 2, we take a plastic grater and rub the surface until the desired texture is formed.
Repeat steps 3, 4, 5 and 6 until the entire façade is finished. Below is a visual description of the process.
Do-it-yourself plastering of external walls. Bark beetle trim video:
For your information: it is best to work immediately by area, and not by square meters. So the finished coating will turn out to be uniform in texture. If the planned areas cannot be finished at once, the connecting seams should be drawn up using masking tape.
Facade plaster bark beetle, application technology. On the video you can see the process of organizing a connecting seam between areas processed at different times.
Exterior plastering on expanded polystyrene / polystyrene foam and mineral wool
Both of these materials form surfaces that are difficult to finish, so it will require preliminary installation of a facade mesh for plastering. The first mistake that is usually made when reinforcing insulation is applying adhesive only on top of the membrane. It will be correct like this:
We apply a special adhesive to the surface, immediately to an area of 1.5-2 m 2. We take a segment of the grid in our hands and fix it in the corners with small thin sticks.

Styrofoam plaster. Facade works require the installation of a reinforcing mesh
We take in our hands a wide (from 30 cm) trowel and with a little pressure we draw it along the grid, in different directions. The adhesive will show through, almost hiding the reinforcing membrane underneath.

Works on preparing the facade for decorative exterior decoration
The edge of the mesh for plastering the facade, hanging on the base, is bent down and glued with the same composition. For processing the bend, it is better to use a spatula with a surface folded into a triangle. So we pass all the walls of the house. After the glue dries, apply it again, already on top of the mesh.

Processing the bottom edge of the reinforcing mesh
Next comes the priming of the surface and coating it with decorative compounds for outdoor use. The process of finishing plastering is exactly the same as for aerated concrete walls, so we will not repeat it. The whole pie looks like this:

Applying plaster to wood walls
Plastering framed exterior walls on wood - timber, chipboard and OSB - involves two options for work. The first is exactly the same technology as when decorating walls with foam plastic, given above. The second one will be like this:
The outer surface of the facades is covered with construction paper, which will enhance the protection of the base from atmospheric manifestations. It can be attached with a construction stapler.

Before starting all work, the wooden facade is covered with construction paper.
Note: the tree is very hygroscopic, and the facade can “lead” from the moisture contained in the working mass. To avoid this, it is necessary to use special hydrophobic primers and wood impregnations for outdoor work.A metal large-mesh facade mesh for plaster is mounted on top of the paper. It can be fixed with the same stapler. The slope of the canvas and the degree of its fit to the outer side of the facade depends on the evenness of the latter.

Reinforcing plaster work
In this case, the plaster layer will be quite thick, so an aluminum limiter profile is attached along the bottom edge of the mesh.

The lower edge of the mesh for reinforcing the facade of OSB
The first layer of reinforcing exterior plaster should be such that it almost hides the mesh underneath. After drying, we apply a second layer on the facade - leveling. Fine finishing works are carried out in the manner described for gas silicate concrete.

Application work facade decoration for reinforcement
Consumption of working mixture for facades
The consumption of external plasters per 1m2 depends on several factors at once. This is the nature of the filler, binder, type and evenness of the base. On packages with working materials, data are provided taking into account the specified criteria. The average numbers will be:
- Acrylic - from 1.5 to 3.0 kg / m 2.
- Silicone - from 2.5 to 3.9 kg / m 2.
- Mineral - from 2.5 to 4 kg / m 2.
Plastering the walls of a house from the outside is a simple, easy, and cheap process, however, like any business, the ode has its own nuances and "pitfalls" that are dangerous for beginners. What is it about?
To save money and time associated with redoing or restoring plaster, you must clearly understand some of the main actions that will negatively affect the quality of the plaster:
The plaster should not be applied in several layers (that is, the layer is dry, you applied the next one) - it will have poor strength, and then, due to uneven drying of the layers, cracks form in the joints on the walls, which will lead to subsequent repairs.
It is strictly forbidden to apply plaster on walls that have not been treated with impregnations - this can lead to peeling of the plaster. This is especially common for concrete walls.
It is forbidden to plaster the walls when the temperature environment extremely high, for example, over 30 ºС. The erroneous opinion is that if the plaster dries quickly, then it is of high quality. Drying of the plaster should take place at 15 ºС, when direct sunlight does not fall on it. Compliance with these standards will allow you to get plaster that does not have cracks, stains and other “cutting eyes” blunders.
If a brick wall is being plastered, then the seams must be deepened. You must clean the seams with any metal tool. This is done so that additional heat losses do not occur and adhesion increases.

Work should not stop for longer than 1-2 hours. If you do not follow this rule, then the wall will have characteristic spots that do not give the building a pleasant appearance.
Plaster mortar for outdoor work must be well mixed, and have a uniform consistency, the application of plaster with visible lumps or with unmixed impurities is prohibited.
Both the wall and the plaster must not be exposed to water, dust or dirt. Any of these impurities will help the plaster peel off faster. This is especially important for external plaster, which is subject to precipitation and temperature changes.
Proper facade plastering video:

Plastering is often used to level brick walls indoors and out. Cement-sand plaster perfectly adheres to brickwork and creates a strong surface, and gypsum mixtures can prepare an ideal plane for finishing. In this article, we will analyze how to plaster a brick and how to do it right with your own hands.
Plaster or facing brick?
 The type of facade finishing must be chosen at the stage of laying the foundation. After all, facing brick significantly increases the load, so its weight will need to be taken into account.
In addition, such a brick will require a separate support, as well as dressing with load-bearing walls, and it is better to do this at the same time as the walls are erected. Digging out the foundation later and topping up the foundation is not the best solution.
Of course, brick cladding lasts a very long time; it will not be necessary to update it during the entire period of operation of the building. However, a partial replacement of the facade when choosing a low-quality facing brick is unrealistic - in this case, it will have to be completely removed and replaced with a new one.
Please note also that building codes brick finishing is allowed only in low-rise buildings. For high-rise buildings, it is not used. Old houses are lined with them if the walls need to be given additional rigidity. In this case, topping up the foundation or its complete replacement is necessary.
 There are also disadvantages when finishing with plaster. It will have to periodically cover up cracks and renew the painting. Though shrinkage cracks can appear not only in plaster, but also in brick.
Plastering will cost less. It does not require strengthening the foundation and support, and the cost of a cement-sand mortar is much lower. Further repair of plastered walls is not difficult - both small and large defects are easily corrected. In addition, plastering is not a difficult process that beginners can do.
What can be plastered
For the rough finish of brick walls, cement-sand composition is most often used. Its advantages are: strength, moisture resistance, low price, ease of self-preparation.
For outdoor work on bricks, only cement-based mortars are used. For work inside the house, you can take both cement and.
Gypsum solutions
Plasters based on gypsum are more plastic, better applied and less prone to shrinkage. Coatings from them are smooth due to the smaller particle size and require less finishing (sometimes you can do without putty at all). It is easy to work with them. They cost a little more than conventional cement ones (by 10-15%, if you do not take into account mixtures with improving additives).
But gypsum plasters absorb moisture well and lose strength, so they can be used in rooms with normal humidity. For bathrooms, showers, baths and pools, they are not used without additional waterproofing or tiling.
Inferior to cement gypsum plaster and in strength.
Cement Based Mixes
 The quality of the coating, of course, depends on the type of mixture used. For the manufacture of cement-sand mixtures for internal works cement M150-200 is used. More strong compounds make on the basis of cement M300 and above.
Coarse sand is used as a filler for rough plaster. More fine sand used in leveling finishes. It is not recommended to use solutions with its addition to create the main rough coating - too large a layer may crack.
The amount of sand introduced into the mixture depends on the brand of cement. Ready-made cement-sand mixtures often contain additives to give the mortar certain properties: plasticity, frost resistance, improved adhesion to the surface, etc.
The addition of gypsum to the solution allows not only to improve its plasticity, but also to increase the adhesion and thermal insulation properties of the plaster. It is also able to absorb excess moisture, improving the indoor climate. With its lack of gypsum, on the contrary, gives off moisture. That is, walls plastered with gypsum composition are able to "breathe" due to good vapor permeability.
Ready mixes for leveling

For a large amount of work, it will be cheaper to prepare the plaster on your own by purchasing necessary materials. But you need to be sure of the quality of the resulting solution. If the recipe has not yet been tested by you, then it is easier to opt for ready-made dry mixes, which are abundantly presented on the construction market.
Here are some examples of popular brands of cement-sand and gypsum mixtures:
- Ceresit CT29: based on cement with microfibers, has good hygroscopicity and resistance to temperature fluctuations;
- Knauf (Adhesive): cement with lime for rough work using mortar spray;
- Knauf (Unterputz) for rough finishing of wet rooms;
- Based on Flywell T-24: based on cement with a light filler, economical, can be used on any surface, including brick, has high heat and sound insulation;
- Prospectors: highly plastic cement-sand or universal cement-sand with the addition of materials that increase its frost resistance;
- Prospectors (Mixter): based on cement and gypsum for interior decoration;
- Hercules (cement-sand): very durable and moisture resistant composition with good adhesion;
- Hercules (lime-cement): used only for interior decoration;
- Volma (Akvaplast): with lightweight filler, can be used both for facades and interior work:
- Eunice (Silin facade): with special additives that increase frost resistance;
- Eunice for interior work and wet areas.
Wall preparation and priming
Preparation of brick walls for plastering consists in cleaning from old finishing materials as well as dust and dirt. The cracks are expanded, glued with a plaster mesh, and then covered with a strong cement mortar. It is also necessary to level out too large potholes.

To increase adhesion (adhesion) brick wall must be primed before plastering. Primers are of several types:
- compositions such as "Beton Aktiv", "Betonokontakt" with the addition of cementing additives and quartz sand; used for smooth concrete surfaces; after application, the surface becomes rougher;
- for hygroscopic materials (cellular concrete and bricks) it is better to use a deep penetration primer, such as Ceresit CT17, GLIMS -PrimeGrunt, Rusean Grunt, etc.;
- universal: it can be applied to different types surfaces, including brick walls.
You can prime with a brush or roller. But it will be faster, better and more economical with the help of a sprayer. How this can be done is shown in the video:
Plastering brickwork
An important question is when it is possible to plaster the walls after masonry? Several things affect this. If brick house new, then it will still shrink, the foundation must go through at least one freeze-thaw cycle. So external walls it is better to leave without finishing until spring.
The masonry mortar sets in hours, and gains full strength in about a week. Respectively internal walls from ceramic or silicate bricks can be plastered after the same time. With high-quality masonry, there will be almost no shrinkage. Many craftsmen start finishing 2-3 days after the wall is erected. This is due to the fact that the surface must be wet and not draw water from the solution, so that cracks do not start.
For better adhesion of plaster and wall joints brickwork they are cleaned by about 1-1.5 cm. Masonry is also done at the construction stage, if plastering was planned in advance.

Seam cleaning
Work must be carried out at a temperature of 5-30 ° C.
- Dry mixtures are diluted with water. Dosage and exposure time must exactly comply with the manufacturer's recommendations.
- Since the mortar is based on cement or gypsum mixture seizes quickly, breeds it too much is not worth it. Be guided by the consumption indicated by the manufacturer, this is approximately 15 kg / m2 for cement mixture and 10 kg/m2 for gypsum with a layer of 10 mm.
- After the primer has completely dried, to level the surface, plaster beacons are placed in the form metal profiles fixed with a small amount of putty. Lighthouses are aligned horizontally and vertically with building level until the putty has set.

- The solution can be applied manually or mechanically. In the latter case, special formulations designed for these purposes are used (the manufacturer indicates on the packaging that the mixture can be applied by machine).
- When plastering with your own hands, the solution is thrown onto the wall with a special bucket or spatula. Applying a layer with a thickness of more than 50 mm is undesirable - it may crack, if necessary, you can add a new layer after the first one has completely hardened. With even masonry, the thickness of the plaster on the brick will be 1-2 cm.
- Then, until the solution has seized, it is pulled with a rule (a construction tool in the form of a long metal strip) along the lighthouses. Start from the bottom of the wall and lift the rule up, moving slightly from side to side.

- If the mixture has not filled the entire space between the beacons, and pits remain, then another solution is added to these places with a spatula, and it is again leveled by the rule.
- For the final alignment of the walls, grout the resulting surface. Using a grater with sandpaper or a mesh, all irregularities, joints of layers, grooves, etc. are removed. Grouting cement-sand plaster can be carried out without waiting for it to dry completely, otherwise more effort will be required.
- Before finishing the room with wallpaper, painting or decorative plaster the leveled wall must be primed and puttied (gypsum or cement putty).
Putty differs from plaster in a smaller particle size, therefore it creates an ideal flat surface. But it is not always needed, for example, when tiling walls or applying textured plaster plastering is not necessary. More
Finishing the exterior walls is a responsible undertaking, which is designed to create a protective layer and an attractive appearance. One of the most popular methods is facade plastering. This method does not require professional skills and the use of sophisticated equipment. The material for work has an acceptable cost, which is much less than that needed for other types of cladding.
Finishing the facade of the house with plaster has many advantages that explain its popularity:

All advantages are supported by the affordable price of the material, even taking into account the purchase of modern polymer solutions.
Working with various surfaces
Facade plaster fits well on almost all types of surfaces, although in each case the process may differ.

Each material from which the walls are made needs an individual approach.
On a note! Plastering the facade of a house made of aerated concrete blocks is a responsible undertaking. The fact is that compositions that have lower strength indicators should be used for work. This is necessary in order to avoid internal stress between the materials.
 Direct plastering of cellular concrete requires the use of special formulations, but when installing insulation, you can use simpler and cheaper solutions
 Types of plaster
The question of how to plaster walls is an integral part of the workflow. Immediately identify suitable variety it is not always possible, since there are many options on the construction market that differ in their characteristics.
Outdoor plaster is divided into three categories.
Mineral compositions
This group includes mortars based on cement and gypsum.
The first variety is considered the most popular, due to its excellent performance and low price. But it has a number of disadvantages that make it difficult to use it on newly built houses.
 Decorative mineral compositions based on cement have an optimal price-quality ratio
 The gypsum composition is used much less frequently due to low resistance to precipitation, although mixtures have appeared that include many polymers in their composition. This leads to the fact that the vapor permeability of the plastered surface is disturbed.
Polymer solutions
The group includes the following varieties for facade plaster: acrylic, silicate and silicone. Each option has a different base, it is she who affects the properties of the material.
The most popular are acrylic mixtures. They have excellent environmental resistance. Their main disadvantage is considered to be flammability and a predisposition to pollution, which implies a loss of appearance.
 Acrylic compositions are highly resistant to impact ultraviolet radiation and wide color palette
 Polymer solutions have a high cost, so the finish is initially carried out with cheaper leveling materials.
Homemade mixes
This includes compositions made on the basis of mineral fillers, modifiers and plasticizers act as additives. Plastering exterior walls using such materials is complicated by the fact that it is almost impossible to achieve the correct selection of components. This limits the durability of the coating.
 The choice of one or another composition largely depends on the purpose of the building, so mineral and even home-made plaster is quite suitable for outbuildings, and for the front of houses it is better to spend money on polymer
 Technology
The technology of external plastering of a house with your own hands involves the division of work into stages that are performed in a strict sequence:
- The choice of a suitable composition depending on the type of surface and climatic conditions.
- Preparing the base and tools is a responsible procedure that avoids further problems.
- Installing beacons is the only solution for uneven walls. In addition, plastering a house outside becomes much easier, especially in the absence of experience.
- Wall decoration - applying the solution in a suitable way.
- Surface grouting allows you to eliminate irregularities and avoid cracks when using certain types of products.
Material selection
Exterior decoration of the house with plaster begins with the choice of a suitable composition. For this, the following rules are followed:
- Self-prepared mixtures are recommended for situations where the surface is supposed to be plastered partially or for a short time.
- Mineral solutions require a serious attitude. When deciding how to plaster the facade of a house that does not shrink, with minimal cost, it is to such compositions that attention should be paid. It should be borne in mind that the material is sold in dry form and needs to be prepared.
- Polymer compositions have good elasticity and adhesion. They are sold ready-made, which facilitates the process. But the work must be carried out without delay, since the mixture sets quickly.
 Dry mixes are cheaper and last longer, but home master it is better to choose a ready-made mixture, since it is much easier to work with it
 Attention! When buying, you need to pay attention to the expiration date and the manufacturer. It is better to refuse unknown firms, the cost of which material is lower than the rest.
Preparatory work
Plastering exterior walls involves careful preparation of the base:

If work is carried out on walls that have poor adhesion (for example, reinforced concrete slabs), then before plastering, they are covered with a reinforcing mesh. It is pulled around the entire perimeter, dowels and self-tapping screws are used for fastening.
 The reinforcing mesh can be steel or fiberglass, but regardless of the material, it must be pulled onto the wall without creases and overlaps
 Warming
Some doubts may arise when deciding how to plaster a house with a layer of thermal insulation. This situation occurs quite often. To do this, the following steps are performed:
- After preparation, the surface is impregnated with antiseptics.
- The work is carried out with the help of a rigid insulation: foam or polystyrene. Sheets in a checkerboard pattern are stacked on glue and fixed with special dowels.
- Joints are coated with sealant or mounting foam. This will avoid the occurrence of "cold bridges".
- A membrane and a reinforcing mesh are stretched from above.
On a note! The thickness of thermal insulation products depends on the climate of the area and the characteristics of the house.
 In the European part of the country, the thickness of thermal insulation for plaster is 50 - 70 mm, in the northern regions it starts from 100 mm
 Tool
To work, you need a simple set of tools:
- capacity (if the mixture is purchased in dry form);
- drill with mixer nozzle;
- a set of spatulas;
- rule;
- lighthouses.
 One of the advantages of self-plastering is an affordable set of simple tools.
 Installation of beacons
To make the plaster of the house look good from the outside, beacons are installed. They are necessary when applying the starting layer. Installation is carried out as follows:
- The wall is checked with a plumb and level. This allows you to determine the amount of skew and the location of the deviation. The surface may sink up or down.
- For work, metric profiles are used, they are cut to the desired size.
- Installation is made on the solution. The first element is mounted at a distance of 20 cm from the corner of the building. To do this, a mixture is applied vertically to the wall at intervals of 50 cm.
- The part sits on the solution and is leveled. The step between products is 60–100 cm.
- After setting, the voids between the profile and the surface are filled.
 It is better for a novice master to install beacons on self-tapping screws in the “Ushastik” mount, the solution is cheaper, but it seizes too quickly, and such installation requires skill
 On a note! Beacons are not installed when the layer is less than 5 mm.
Applying plaster
The solution is applied in two ways: manual and machine. The second option requires the use special devices or hiring experts.
Exterior wall plastering by hand is often divided into stages:

After drying, the beacons are removed and the holes are smeared.
Finishing work
The final layer is applied for final leveling. A fiberglass reinforcing mesh is preliminarily laid under it. The principle is that the solution is evenly distributed with a wide spatula over the surface. To make the plaster of the walls outside different texture, devices that leave traces are used, or a special textured mixture is used.
 Of the decorative types of facade finishes, it is easiest for the home master to equip the plaster under the “Fur Coat”
 Advice! You can plaster the walls of the house without prior alignment. An excellent result is obtained when creating a “fur coat” with a manual spray machine. This cover looks very original.
If you want to generate smooth surface, each plastered area is overwritten. To do this, a moistened spatula is carried out in a circular motion. And to outdoor plaster the house turned out to be more expressive, it is painted in a suitable color.


How to cook ham in the oven at home
Pain in the lower abdomen during pregnancy, reasons for what to do Can the lower abdomen hurt if pregnant
Protein for muscle gain
The best vitamins for men according to customer reviews
How to lose weight on a vegan diet?