Technological progress has replaced the once cumbersome entry gates used by our ancestors with convenient, practical doors. The need to constantly move stones and other heavy objects back and forth many times during the day in order to block the opening and protect it from the weather disappeared with the invention of canopies.
Modern doors tend to be installed for decades. How to assemble and install them correctly is an important question after all the parts are bought and laid out on the floor!

The order of work for the home master
The door is not just a plank blocking the entry hole. It is also not an archaic design. Nevertheless, after assembly and installation, it must meet a number of requirements:
- Open - close without significant effort, creak and rattle;
- Do not fall apart when slammed after nervous breakdowns;
- Do not open on its own;
- Not to be so thin, fragile that even a child will pierce it with a pen when he decides to draw on it.
We fasten the canvas to the canopies. Let's see what happened. We check the absence of distortions in the gaps. We glue the entire installed structure around the perimeter with construction tape.
We foam the free cavities between the wall and the box in several passes, first in several places (at 4-6 points of the internal gaps of the structure) we place pieces of cardboard so that the door does not jam and it can open freely.

We are waiting for complete drying, we do nothing more yet. We do not open, we do not check.

We upholster platbands along the contour of the door, hiding unaesthetic seams.


Thus, an interior door was installed with their own hands. Gained experience that can now be used to refine other doorways.

Photo of the process of installing interior doors with your own hands


Doors are one of the few types of joinery that does not forgive mistakes. If you took the dimensions incorrectly or cut the parts at the wrong angle - that’s it, you won’t be able to correct the dimensions, you will have to redo everything again and use new materials. If the sawing angle does not match, then it is useless to seal the resulting gap with sealant. It may become invisible (although this is unlikely), but the strength of the structure will be significantly reduced. The individual elements of the box will not touch over the entire surface, but only at a few points. Accordingly, the loads on the bars increase significantly, such a door will not last long. Moreover, you have to use the door very often and with various efforts.
We mean that all work on assembling the door frame must be done very carefully and carefully. Technological gaps between the canvas and the box, the threshold and the floor are 2 ÷ 3 millimeters, with the same accuracy it is necessary not only to measure, but also to cut off all individual workpieces, to make accurate allowances for the width of the cut.


You must know your instrument and its " specifications". The tool must be sharp and serviceable, and the hand "firm and confident." We strongly recommend that all cuts be made with an electric saw with a rotating table.

Why not in a chair? The answer is simple. If you use a miter box, then with great confidence it can be argued that you rarely do gashes, otherwise you would have bought it a long time ago electric saw. And since you rarely trim materials at an angle, then there is not enough practice.

How to measure
First, measure the doorway. Standard door leaf sizes are 2000 mm high and 900 mm, 800 mm and 700 mm wide. Inner dimensions of the door frame increase by 3 mm around the entire perimeter (technological gap), the outer dimensions of the frame are 70 mm larger than the dimensions of the door leafs. This is standard thickness rail box. If your rails are of a different size, then the external dimensions of the door frame also change. And the gaps between the doorway and the box should be at least three centimeters.


Now you can check if your doors fit the doorway. If not, you will either have to expand or reduce the doorway. This is the worst option doorways must be carefully controlled at the stage of assembling the log cabin of the bath.

Another important point in size - the gap between the door frame and the floor. Depending on the specific location of the door, this gap is regulated by the provisions of SNiP 41-01-2003.
Set of rules. Heating, ventilation and air conditioning
The gap varies within 10 ÷ 15 millimeters and should provide the minimum required air exchange rate for each room. Any natural ventilation rooms works on the principle of supply and exhaust. If there is no flow fresh air, then, of course, there will be no drawing of it.

Some owners, in order to save heat in the premises, want to put doors without a ventilation gap, for baths this option is possible, no one is going to spend the night in them. But here inexperienced builders can create a problem for themselves. The minimum gap between the door leaf and the floor within 1÷2 mm can cause them to jam or difficult to open / close. The fact is that flooring in baths it rarely has such horizontal accuracy. To avoid problems with the door leaf and not cut it after installation, you need to measure the floor level at the corners of the frame.


This is quite difficult to do, we will tell you in detail about two methods.
- With the help of a hydraulic level. Very carefully place two marks on the doorway on both sides. The distance from the marks to the floor level is approximately 20÷30 centimeters. Using an accurate ruler, measure the distance from the floor to the marks made. In most cases, the discrepancy will be at least 2÷3 millimeters. This must be taken into account during the manufacture of the vertical sidewalls of the box, and the minimum gap between the door leaf and the floor will increase by the amount of the discrepancy between the horizontalness of the floor. In one position, it will be, for example, two millimeters, and in the opposite place it will increase to 4 ÷ 5 mm. If you do not take into account the level of the floor, then the door frame may not open completely at all or will open with a large “creak”. You will have to remove and cut the canvas, and this is highly undesirable.
- With a laser level. Align the laser beam exactly horizontally at a distance of about 10 cm from the floor level. With a ruler (preferably on a square), take measurements at the corners of the doorway, take into account the violation of the floor height during the manufacture of the box. This method is much simpler, measurements are made faster, but on one condition - you have a rather expensive device available.

Door frames can be with or without a threshold. With a threshold, they are often installed as entrance doors and rarely as interior doors; without a threshold, doors are installed only as interior doors.


door frame prices
door frame
Assembling a door frame without a threshold
Let's start with the easier option. Initial data: box manufacturing material - profiled timber natural wood. For MDF doors, the technology is almost no different.
Step 1. Bring the elements of the doors into the room.
Very important. Never put them near heaters, you don't need to dry them, you need the wood to gain equilibrium moisture and stabilize its linear dimensions!

What is equilibrium humidity? It is necessary to dwell on this topic a little, it concerns not only door frames, but all wood products. Wood has two moisture indicators: absolute and relative, they depend on various conditions and processing technologies. But all varieties of wood have a sorption effect - the ability to absorb moisture from the air. Initially, the humidity can be at least zero, when it enters the room, the humidity rises to an equilibrium state under these specific conditions. If the products were stored in damp conditions in the warehouse, the doors will dry out a little, if they were stored in very dry conditions, the doors will pick up moisture until they stand in equilibrium. We hope that this is understandable and now you will not believe advertising that claims that the moisture content of their products is 8-10%. Such moisture may be at the exit from chamber or vacuum drying, but over time the tree will inevitably take on water and increase performance.
Step 2 Check the height and width of the openings, make sure that the box will fit into them with a gap of about 3 centimeters. Using a hydrolevel or laser level, find out the horizontalness of the flooring at the corners of the doorway.

Step 3. Back on circular saw with a turntable of the box blank - during transportation or storage, they could be damaged. You can cut with a regular hacksaw, but there is a high probability of veneer peeling. If you still have to work hand tool, then you need to cut the blanks from the side of the veneer, let the chips be on the invisible side of the bars. It is better to use a special hacksaw with fine teeth or a hacksaw for metal.

Step 4 Mark the top of the box. To do this, place a bar on top of the door leaf and make marks with a gap of 2 ÷ 3 millimeters. For the gap template, you can use packing cardboard, it will just fit in thickness. Markings can also be made with a pencil, but it must have a very sharp end. Cut off the workpiece better later, must first be set to door frame loops.


Step 5. Place the door leaf on its side in an upright position. You can rest it against the walls or make an elementary device to hold it in the desired position. On a piece of board at an angle, nail two spacers at a distance slightly greater than the thickness of the door leaf. To prevent the possibility of damage to the corners of the blade, place a piece of soft cloth on the fixture. The device is very simple, embedding loops with it is much more convenient.
Step 6 Measure the location of the loops.

It is recommended to place them at a distance of 20 centimeters from the bottom and top of the canvas. But make a specific decision yourself, it all depends on the characteristics of the door leaf. The main thing is that at the place of installation of the hinges, the sidewalls of the canvas are as strong as possible. Measure twenty centimeters at the top and bottom of the canvas, attach loops to the marks and make marks along their length.
Step 7 Now you need to mark the position of the hinges on the door frame.

In order for them to match exactly, put one of the boards of the box on the side of the door, measure the gap between the floor and the canvas at the bottom. It is recommended to do it within 10 millimeters.
Important. If you want to have a minimum gap between the door and the floor, then you need to take into account the indicators of the difference in floor height at the corners of the opening. With a sharp pencil or a construction knife, make notches on the location of the loops on the board of the box. On vertical bars, be sure to make a difference in floor height, otherwise one of them will either sag or not go into place. Watch from which corner of the doorway the floor is higher, from this side of the door frame the side board should be shorter by the same value.
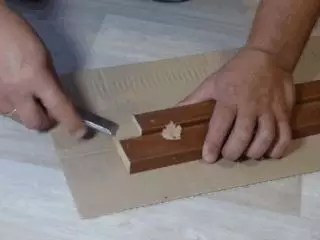
Step 8 Cut the door frame boards on the machine according to the marks made. If your door boards are veneered with natural veneer, then problems may arise during gashing. Natural veneer has a thickness of up to 1 mm, with the same slope the board will rest against the guide during cutting. With a sharp chisel, carefully remove the strip of wrapped veneer from reverse side boards. For the entire length is not necessary, only washed down in places. This is the only way to guarantee a perfect cut and the tightest fit of the individual elements of the box.
Step 9. Saw down two side and one transverse door frame blanks at an angle of 45 °. We remind you once again - check the dimensions several times, if the box came out shorter, you will have to throw it away and buy new materials.
Step 10 Install the hinges, they should hang with the manufacturer's logo up. Place the loops exactly on the notches made earlier on the bar and circle the outline. You can select the material for the hinges using the manual milling machine or an ordinary chisel.

We cut out the grooves under the loop with a chisel
If you have a hand saw, great. By the way, it will always come in handy during the construction of a bath, and not only a bath. Set the cutting width on the machine according to the width of the buttonhole and the depth according to the thickness of the buttonhole. Place the machine on the board of the box and mill the hinge seat according to the marks. Remove the roundness in the corners with a chisel. Work carefully, do not allow cracking of the material.
Video - Milling under the loop
Working with a chisel is somewhat more difficult. First, along the drawn contour, beat off grooves with a chisel, approximately equal to the thickness of the loop. Then carefully begin to select the material for the loop. If you have an MDF box, then work is somewhat easier. If the box is natural wood, then pay attention to the direction of the fibers. Never work against the wool with a chisel, you will always have deep scratches or cracks. The first layer of wood is removed by tapping the chisel with milk, a more precise fit must be done manually. The chisel should be sharp, while working, watch the angle of the tool. If the loop is a little drowned in the canvas, there is nothing to worry about. The main thing is that she does not speak, this can prevent the door from closing. The loop must enter the socket with little effort, otherwise a strip of material will be visible.
Step 11 Before screwing the hinges to the box, drill holes at the attachment points with a drill with a smaller diameter than the diameter of the self-tapping screws. This technique will prevent cracking of the box board.

Hinge attachment
Step 12 In order to not see the heads of the screws on the door frame, with which the door frame will be attached to the wall, you need to make a sweat under their heads under the hinges. Take a wood drill of the appropriate diameter and drill holes for the sweat on the loop nests made. You have already drilled holes for the screws, this will help you choose a place for a large screw or dowel so that its head does not fall under the self-tapping screws. Holes for screws or dowels should be located exactly in the middle of the box board.

Step 13 Gather together all the elements of the box. Self-tapping screws must enter at an angle of 90° to the surface of the cuts. Make sure that they do not overlap the technological slots of the telescopic box. During assembly, precisely align the parts, do not allow mutual displacement, then it is very difficult to correct this displacement. To facilitate the connection, you can first drill holes of a slightly smaller diameter than the diameter of the self-tapping screw.
Important. While assembling the parts, press them with maximum force. The fact is that a self-tapping screw can, before starting to screw into the second part of the box, turn a little in the first - a gap forms between them.
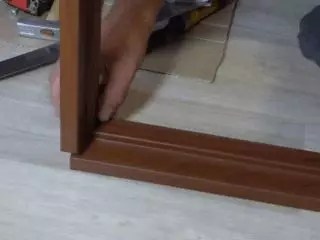
The box is assembled, now it needs to be installed in the doorway. The work is very important and accurate, we will tell you how best to do it.

door panel prices
door leaf
Installing a box in a doorway
Step 1. Carefully place the box in the doorway, temporarily securing it with pieces of Styrofoam or packing cardboard. By level, check the verticality of the box from the side where the hinges are attached. Wedges are needed to firmly install the box in terms of level and adjust the gaps. They can be cut from the waste bars of the box on the machine at various angles.
Step 2 Install wedges under the hinges, dowels will be placed in these places or fixing screw. Drive in one additional wedge in each top corner. To prevent the box from moving during wedging, two wedges must be driven in from opposite sides with the cut parts overlapping each other. Check the position of the box with a level, do not rush, accurately check the position of each element. The door frame must be flush with outer wall rooms, on the other hand, extensions will be installed. Make sure that the wedges do not protrude beyond the plane of the wall.


Step 3. Fasten the box through the holes made for the screws in seats loops.
Very important. There must be wedges next to these screws. Otherwise, the box will be deformed during the tightening of the screw. The feigned side of the box has not yet been exposed, but is only slightly fixed in the wall.

They are engaged in the installation of the feigned side after hanging the doors, in this way the maximum accuracy of dimensional compliance is ensured. When setting the side of the box, constantly check the horizontal position of the upper jumper. If you correctly take into account the problems with the horizontalness of the floor at various corners of the doorway, the horizontal part will lie in the correct position.
Step 4. To make the elements of the box more stable, when hanging the door leaf, you need to partially foam them.


Before this, the surfaces should be cleaned of dust and dirt and be sure to moisten with an ordinary sprayer with water. Most employees of construction companies neglect cleaning and wetting surfaces, but in vain. The coefficient of adhesion of foam to wet surfaces increases by an order of magnitude. Keep this in mind. Foam the feigned part of the box in only one or two places, it will still have to be moved.

Step 5 Attach hinges, latches or locks to the door leaf. The installation algorithm depends on the specific type of fittings. While you were doing this work, the foam on the door frame dried up, you can hang the door leaf on it.

Step 6 Place a lining of the desired thickness under the door leaf and first attach the upper and then the lower hinges of the door to the frame. Close the door and finally, with the help of wedges, expose the feigned part of the box. Everything is fine - foam the door frame around the entire perimeter.

Prices for mounting foam
polyurethane foam
Video - Assembling a door frame without a threshold
Assembling a door frame with a threshold
Now it is worth considering the process of assembling a door frame with a threshold. We will connect the elements of the box, for a change, not at an angle of 45 °, as in the case described above, but at an angle of 90 °. We do this on purpose in the hope that extra knowledge will not hurt anyone.


In addition, such a connection of the elements of the door frame is considered more durable. If in the first case the length of the screws was limited by the thickness corner connection, then now these restrictions are removed, the self-tapping screw can enter the body of the bar by 2 ÷ 3 centimeters. More strong connection increases the stability of the threshold of the door frame, and significant forces can act on it.

Checking the condition of the doorway, checking the level of the floor in the corners, taking measurements, preparing places for installing hinges and drilling for the screws for fastening the frame is no different from assembling a door frame without a threshold. And then the differences begin.
Step 1. Saw off the top horizontal bar of the box. Its length should be equal to the width of the door leaf plus 6 millimeters for gaps on both sides of the box. There are two such blanks to be made - one is used under the door threshold.

Step 2 On the vertical bars of the box, you need to remove the protruding persistent quarter. Keep in mind that when clean, the size of the vertical posts should be equal to the height of the door leaf plus 6 mm for gaps on both sides. In addition, the left and right vertical posts of the door frame must take into account the difference in floor height at the corners of the doorway. We have already described all the technological operations in the first example, there is no point in repeating.
To remove a quarter, attach a horizontal part to the end of the vertical post of the box and mark its width. Take measurements with maximum accuracy, do not allow gaps to appear in the connection. No matter how you close them up later, a real master will always see flaws. Carefully file the protruding quarter along the marked line, the depth of the cut should be equal to the height of the quarter. Saw only with a hacksaw with fine teeth, the tool, as always, must be in proper condition.


Step 3 Remove a quarter from the end of the vertical bars with a chisel. Do your work very carefully. The plane of the bar after removal should be perfectly flat across the entire width. While working, hold the chisel correctly. It has a bottom flat part, and the top is sharpened at an angle. The upper plane must always be visible, otherwise the chisel will spontaneously crash into the tree, a flat surface will not work. This rule applies to all cases of working with a chisel. Do the same work on all sides of the door frame.
Step 4 Put the details on flat surface and connect first the upper part of the door frame. Before screwing in, you must first drill holes in the parts with a slightly smaller diameter than the diameter of the self-tapping screws. This will eliminate the possibility of cracking or the appearance of a gap between the parts during connection.


Corner Assembly Diagram
Step 5 We advise you to check the conformity of its dimensions and the correct location before assembling the threshold. To do this, carefully place the assembled box frame of two vertical and one horizontal elements on a flat area and put the door leaf in place. Mark the exact position of the hinges on the leaf, check all the gaps around the perimeter of the door frame and leaf. While there is no threshold, the vertical posts can be moved a little. Check the distances again, check the correct manufacture of the threshold and, if necessary, correct the mistakes made, in this position you have the opportunity to slightly correct the dimensions.


Door frame installation - photo

Video - Assembling a door frame with a threshold
Pay special attention to the reliability of fixing the door frame from the hanging side of the doors. It is pointless to increase the number of dowels or screws, they should be used no more than two. Why? The loads on the door frame from the door leaf are transmitted only through the hinges, which means that the frame should be fixed in these places. No matter how many screws you put between the hinges, they won't work. Only drill extra and noticeable holes in the box. And under the hinges, fastener hardware can be hidden. The main thing is that these two hardware sit with maximum reliability. The slightest staggers were found - immediately eliminate them, do not hope that the foam will withstand. Only unscrupulous or inept builders can do this. The foam holds lateral forces well, but almost does not work in compression at all, always remember this.


Don't be discouraged if some of the self-tapping screws were a little too long and showed up on the back of the box. This does not affect either the strength of the fastener or the appearance doors. The main thing is that the frame does not crack.
If you have a door frame made of natural wood, then you need to use self-tapping screws with a large step, if from MDF - with a small step.
Video - Revolutionary mounting system for all types of door frames
Video - How to properly assemble a door frame
In this article, we will take a step-by-step look at how it is done correctly. Today, not every person is able to independently install interior and exterior doors, into doorways, or at least do it correctly. Turning to specialists will take a lot of money if you need to install, say, 10 doors in your new house or an apartment. To save extra money, I advise everyone to read this step by step instructions. Particular attention: we will talk about wooden doors for internal use. Do-it-yourself door installation from scratch consists of 10 steps.
Step 1.
Do-it-yourself door installation.
We start by unpacking the purchased set of interior or front door, and the door frame from it. This should be done very carefully, as often at this stage the door receives the first injuries. When opening the package with a knife, sometimes the surface of the door itself is touched, and if the above-mentioned door has a varnish or laminated coating, the defect is very noticeable, and it is not easy to eliminate it. Special attention: Initially, I advise you to unpack only the door frame. It is better to unpack the door itself before direct use, so as not to spoil its appearance even before use.

Step 2
Do-it-yourself door installation.
The unpacked door frame should be assembled. In the unpacked kit you will find three main components and one additional. Additional is a connecting wooden plank for temporary fixation.
At the ends of the door frame panels are plastic inserts hammered into special grooves.
These inserts must be knocked out, but this should be done very carefully so as not to damage the surface of the door frame. To do this, it is best to use a wooden peg, and not hit the insert with a hammer right away.

Step 3
Do-it-yourself door installation.
Details are assembled in a U-shape groove to groove. At this stage, it is important to keep correct geometry. Irregularities are not allowed here! The connected elements are fastened with previously knocked out plastic inserts described in step 2. They are hammered into the holes formed when connecting the door frame. this work done with a normal hammer. You should finish the bar using a peg, as before, so as not to spoil the wooden surface.


If, when inserting the insert, the elements of the box have shifted, they can be leveled with the same hammer. Beat on the body should be on the wooden plank attached to it.
The final result at this stage should be the same as in the photo.

Step 4
Do-it-yourself door installation.
At all subsequent stages, we will need a special power tool, which includes:
- screwdriver;
- drill;
- milling head.

Having completed all the steps described in step 3 and, thereby connecting the top of the door frame, we can move on to its bottom. The same additional element of the kit is used for this - a fixing wooden plank.
Having measured the width along the bottom of the box, we fix it with a wooden plank. We fasten it with screws in places that will subsequently be sealed with mortar into the wall. In this case, the screw should not be screwed in from the very edge of the bar, since at the place of fastening you will only split the bar. We twist at an angle approximately as shown in the photo.

See the photo below for the end result of step 4.


Step 5
Do-it-yourself door installation.
At this stage, you should measure the height of your doorway. It is necessary to take into account the height of the threshold or its absence. Having decided on the desired parameters, we cut off the bottom of the door frame. This is best done using a miter saw.


Step 6
We insert the door into the door frame prepared for installation for fitting. I remind you that even at this stage it is not necessary to unpack it completely. It is enough to cut out only the holes for the handles and the lock. How they are installed will be discussed later. If all is well, you can safely proceed to install the door frame in the doorway.

Step 7
At this stage, we proceed to the immediate. To do this, we need to set the door frame perfectly evenly in the opening. You can do this with a level. After that, we fasten the box to the opening. In our particular case, ordinary wood screws can be used, since wooden blocks are laid in the opening of drywall sheets. In other cases, you will have to use a dowel-nail, etc. materials.
Fasteners are screwed in at an angle in those places that will subsequently be hidden under mounting foam and finishing. In no case do not fasten your frame through front side. This will greatly spoil the appearance, and can also cause the door to malfunction, for example, it is difficult to open or close.
The gap between the door frame and the opening is foamed with mounting foam. After that, a slope is constructed in this place using dry construction finishing mixtures.


Step 8
While the mounting foam, with which we closed the gap between the box and the wall in the opening, hardens, we will begin to prepare the door leaf. We will cut a lock into it, install handles and hinges.
Using a measuring tool, we outline the location door lock at the end of the door. Based on the shape of the lock, we outline the contour along which it will be necessary to remove a layer of wood so that the front part of our lock is flush with the surface of the door leaf. To remove wood, use a milling saw.
In the photo below, there is a lock used in our particular case, as well as a cut layer of wood necessary for correct installation the aforementioned castle.


For the working part of the castle, more than deep hole, which is best done with a drill with a drill of a suitable diameter.


The work on installing the lock does not end there, since it is necessary to make more holes for the handles on both sides of the door to be installed. This is done with the same drill with a drill. As I said, it is important in both cases to take into account desired diameter drill.
At the same stage, we set door handles. In the hole in the canvas, in which the lock is installed, lay the core. We put handles on it on both sides. Next, we clamp all the necessary fasteners and clamps. In the described case, three screws and a bolt, which is screwed in with a hexagon, act as clamps and fasteners.


The final step in this step is the installation of loops. In the designated places, by analogy with the installation of the lock, loops are attached at the ends. As for the lock, a layer of wood is removed with a milling saw so that the attached surface of the hinge is flush with the door leaf.


Step 9
Having prepared the door, we return to the box. As on the door itself, on the box we mark the places for screwing the hinges with a measuring tool. Just as in previous similar cases, it is necessary to use a milling saw.
Next, we outline the place where it should enter the body of the door frame. In this place, using a chisel, we make a hole of the required depth and fasten the plug, which comes complete with hinges, a lock and handles.
Step 10
We hang the door leaf on the hinges screwed to the door frame and, admiring the result, we can deservedly praise ourselves.
The end result is shown in the photo below.

It is better to unpack the door itself before the very start of operation.
Generalization: In each of the stages where wood was sawn, drilled or cut, its bare areas must be covered with plain paint. This will enhance the look and also preserve and protect the surface of the wood. Do-it-yourself door installation is real. And also adds you experience in the field of repair.
I hope the article helped you gain the necessary knowledge and the right level of confidence to start installing doors yourself with your own hands. Good luck in all your endeavors.
Do-it-yourself step-by-step video for installing doors
Sooner or later you have to change interior doors. The procedure is not so complicated that it is necessary to hire a specialist. If you have at least some skills in handling a saw, a level and a plumb line, you can tighten a few self-tapping screws - you can handle it yourself. When replacing, before installing an interior door, the old one must be dismantled. And here, too, there are features. About all the subtleties - in the photo and video with detailed instructions.
Interior doors are made from different materials. Moreover, the material of both the door leaf and the frame is different. The door leaf is:
- From fiberboard. These are the cheapest doors. Represent wooden frame to which laminated fiberboard is attached. Differ in low sound insulation, are afraid high humidity are easily damaged.
- From MDF. They are much more expensive, but the quality is much higher. They are better in terms of sound insulation, are not afraid of moisture, are stronger and more durable.
- Wood. The most expensive doors They are made from different types of wood - from pine to oak or more exotic species.
Door frames are made from the same materials. The worst choice is fiberboard boxes, they even bend under their own weight, and hanging a door leaf on them is sheer flour. So try to take either MDF or wood. There is another material: laminated wood. The good thing is that you do not need to process and paint, but the service life depends on the quality of the film.
Dimensions and equipment
Interior doors are produced in standard sizes, it is a pity that the standards in different countries are different. For example, in our country swing doors make a width of 600 - 900 mm in increments of 100 mm. In some EU countries, the norms are the same - in Germany, Italy and Spain. In France, others are standard. Here the narrowest doors are 690 mm and further in increments of 100 mm.
Is the difference really that important? If you want to change only the door leaf without a box, then it is important that you have to choose from your segment or completely change it along with the box. There are much more interior doors of such a standard as in our country, as in France - many times less.

How wide doors are needed depends on where you are going to put them. In terms of standards, the following values are recommended:
- in the living room width from 60 to 120 cm, height 2 m;
- bathroom - width from 60 cm, height 1.9-2 m;
- to the kitchen, the width of the door leaf is at least 70 cm, the height is 2 m.
If, when replacing a door, it is decided to make the opening larger/smaller, permission is not required for this, but it is necessary to remain within the limits specified for each room.
How to determine what width to buy doors? Measure the door leaf that is available and you will know what you need. If there are no doors, find the narrowest place in the opening, by measuring it, you can find out how wide you need a door block. This is a door leaf + door frame. So the outer dimensions of the door frame must be less than the measured value. For example, you got 780 mm, look for a block with parameters of 700 mm. Do not insert wider ones into this opening.

The most complete set of interior doors - with a box, extensions and platbands
When choosing a door, pay attention to the package. There are three types of assembly:
- Door leaf. You buy the box separately.
- Doors with a box. Everything is included, but the box is in the form of separate boards. You will have to saw down the corners and connect, hang the loops yourself.
- Door block. These are doors ready for installation - the box is assembled, the hinges are hung. Just cut the sidewalls to the height, set them evenly and fix them.
With the same quality of the door leaf, the prices for these kits differ significantly. But the difference in time that you spend on installation is decent.
Step by step installation of interior doors
In general, there are many subtleties. We will try to describe and illustrate the most common moments in a photo or video material.
Step 1: Assembling the door frame
If you didn't buy a pre-assembled door unit, the first step is to assemble the door frame. It consists of two long racks located on the sides, and one shorter crossbar at the top - lintels.
Connection methods
There are at least two options for how to connect these strips to each other:

Regardless of which way you are going to connect the elements of the door frame, the first thing you do is wash down the racks and lintels on one side. Then they are put into a box on the floor, checking the correct connection. Next, you need to decide on the height of the side parts of the door frame.
We determine the dimensions
In the folded state, the required length is measured along the inside of the rack. Racks are not always made the same: the floor is often uneven and this must be taken into account. To do this, take the level and check how flat the floor is. If it is perfectly level, the racks will be the same. If there is a deviation, it must be taken into account: make one of the racks longer. Usually it is a few millimeters, but even this is enough to warp the door.
When calculating the height, keep in mind that the racks should be 1-2 cm longer than the door leaf (including saw cuts). A gap of 1 cm is made under the door, if they do not intend to put a rug under it. If there is a rug / carpet / carpet, it is better to make it bigger. Don't be afraid to leave gaps. They are required for . Once again, pay attention: the height is measured along the inside of the door frame - from the bottom edge to the cut. Having cut off, try on the racks in the doorway.

Now you need to saw off the lintel along the length and, if necessary, saw it down on the other side (if the joint is at 45 °). The length of the lintel should be such that, when folded, the distance between the uprights is greater than the width of the door leaf. The minimum gap is 7 mm, but more is often done. 7-8 mm are distributed as follows: 2 mm for hinges, and 2.5-3 mm for expansion gaps. Any interior doors - MDF, fiberboard, wood - change their dimensions depending on the humidity. Clearances are required to account for these changes. And 5-6 mm is not always enough, especially in wet rooms. For the bathroom, just leave a little more, otherwise, with high humidity, they can be difficult to open.
So, we decided on the minimum gaps when installing interior doors:
- on loops - 5-6 mm;
- top, bottom and sides - 3 mm;
- below - 1-2 cm.
After cutting off all the pieces and making the cuts, lay the box on the floor. If you notice any shortcomings in the docking - eliminate it with the help of sandpaper fixed on a bar. The more accurate the match, the smaller the gap.
Assembly
Regardless of the material of the box and the connection method, holes are pre-drilled for fasteners so that the material does not tear. The diameter of the drill is 1 mm smaller than the diameter of the self-tapping screw.
The box is folded, angles are set to 90 °. Holding the rack and the lintel in this position, drill holes with a drill. If there is an assistant, he can hold. If you work alone, temporarily fasten the correctly set box with two transverse bars - closer to the top and bottom. This will help not to make mistakes and make the right connection.

If connected at an angle of 45 °, three holes are made on each side. Two on top - stepping back a centimeter from the edge, and one on the side - in the center. A total of three self-tapping screws are required for each connection. The direction of installation of self-tapping screws is perpendicular to the connection line.

If connected at 90 °, everything is easier. Drill two holes from above, pointing the drill straight down.
Step 2: Insert hinges
Most often, 2 hinges are installed on interior doors, but 3 are also possible. They are placed back 200-250 mm from the edge of the door leaf. If the frame and door leaf are made of wood, choose a place where there are no knots. First, attach the hinges to the door leaf. The order of work is this:
- We apply loops to the selected places, outline the contours. The easiest way to do this is with a finely sharpened pencil, but experts advise using a knife blade. So it turns out more accurately and smaller gaps remain.
- If they have it, if not, they take a chisel and choose the material for the thickness of the loop. More sampling is not necessary, only for the thickness of the metal.
- A loop is installed in the prepared recess. Its plane should be on the same level with the surface of the canvas.
- The exposed loop is fixed with self-tapping screws.
Having fixed two hinges, the door leaf is laid in assembled box, set the correct gaps: from the side of the loops - 5-6 mm, 3 mm from the opposite side and from above. Having exposed these gaps, the canvas is fixed with wedges. Expose exactly in the horizontal and vertical plane (you can use lining, if necessary).
After setting, mark the location of the reciprocal parts of the loops. Sometimes it is more convenient to remove the already installed loop, and then install it in place. According to the markup, they also make a recess. Depth - so that the surface of the hinge is flush with the surface of the door frame.
Do-it-yourself door hinge is described in detail in the video.
Step 3: Installing the door frame
The assembled box must be correctly inserted into the opening. This is a very responsible task. Before you install an interior door, knock down everything in the opening that can fall off. If the wall is too loose, the surface is treated with deep penetration primers with an astringent effect. If there are too many big holes, they are covered with plaster, very large protrusions are hemmed. It is easier to insert an interior door into the prepared opening. If this is your first time doing this on your own, make your job easier.
The box is exhibited without a door leaf. It is oriented strictly vertically. The verticality is checked not only by the level, but also by the plumb line. The level often gives an error, therefore it is more reliable to check with a plumb line.

To prevent the box from warping during installation, install temporary spacers on the floor, in the corners - slopes which give a high degree of rigidity. In order for the doors to open, they are inserted in the same plane with the wall. Only in this way will it open completely. If the wall is uneven, put the box not on the wall, but vertically. Otherwise, there will be problems with opening or closing the door.

How to insert an interior door with your own hands - in the same plane with the wall
After the position is selected, you can fix it. This is done using mounting wedges - triangular wooden or plastic bars. First, the wedges are placed on both sides of the lintel - crossbars, then above the uprights. Thus, the position of the box relative to the doorway is selected and fixed. Next, the verticality of the racks is checked again. They are checked in two planes - so that they do not turn out to be tilted forward or backward.

Then the wedges are installed at the bottom, then after about 50-60 cm, checking that the racks are exactly level. Wedged additionally and the transverse bar - in the middle. They check whether the elements of the box are bent somewhere, if necessary, correct. You can start fastening.
Step 4: Attaching the frame to the doorway
There are also two ways of fastening: straight through to the wall and mounting plates. If the wall allows and you are not afraid of the fastener caps in the box, you can attach it through and through. It's safe.
To install interior doors, it is quite enough to screw two self-tapping screws into the cutouts for the hinges and, on the other hand, under the plate of the reciprocal part of the lock. Additional holes are drilled in the cut out recesses. They are made so as not to fall into the holes for fastening the hinges or the mate. Make sure that the head of the self-tapping screws is recessed and does not interfere with the installation of the hinges and lining.
Installation of interior doors according to this scheme is shown in the video. There are also some interesting nuances about the exposure of the door frame.
If such a quantity of fasteners seems unreliable, they drill through and close the holes with decorative washers matched to the tone. Or there is also a special MDF molding with removable slats. The fastener is installed in the prepared groove, and then closed with a bar.

The second method is hidden, the fasteners are not visible. First, mounting plates are attached to the back of the box. In principle, it can be used for drywall, but there are also special ones - thicker, although drywall is enough when installing interior doors.
Step 5: Foaming
After all the gaps are set and the wedges are installed, the gaps between the box and the wall are filled with mounting foam. For better polymerization, the wall is moistened with water from a spray bottle. After that, the foam is squeezed out, filling no more than 2/3. Too much a large number of foam may cause the box to blow inwards. Therefore, do not overdo it.

To ensure that the foam does not warp the doors, spacers are installed. But if you do not overdo it with foam, nothing should happen.

Spacers for fixing the box - with this installation of the interior door, the box should stand exactly
After the foam polymerizes ( exact time indicated on the bottle), the spacers are removed, the door leaf is hung and the operation of the door is checked. Next come Finishing work: and platbands, if necessary - extras.
You know how to install an interior door with your own hands. There is nothing super complicated, but we tried to describe the main nuances. There is a lot of useful information in the video - these are recommendations from practitioners.
So that it will serve for many years, regularly performing its function.
Read in the article
How to choose and install an interior door in size and configuration
Manufacturers offer products of various widths and heights, which allows you to choose the right model for any opening. Cloths for swing structures, made in Russia and most EU countries, can have a width of 600 mm, increasing in 100 mm increments. The minimum width of French-made doors is 690 mm. The resizing step is 100 mm.

When choosing a door leaf, the dimensions of the door frame should be taken into account. If the opening is of irregular geometric shape, the minimum width is taken into account. Otherwise, it will need to be expanded, which will greatly complicate the installation work.
Attention! The standard height of interior doors is 2 m.
When choosing a suitable product, you should also focus on the purpose of the room for which they are intended. For living rooms, canvases with a width of 60-120 cm are purchased, for the kitchen - at least 70 cm, for a bathroom or toilet - from 60 cm.

Items sold may vary. In the maximum version, the delivery set includes a door unit. The installer will only need to cut the sidewalls to size, level the structure and fix it. In the minimum version, all elements of the door system are purchased separately, and then mounted together.

How to install an interior door with your own hands, if you only change the canvas
If the door frame is strong enough, completely satisfied with the design and color of the owners, it is not necessary to completely change the system. It is enough just to replace the sash. Next, we will tell you how to install it yourself with a partial replacement of structural elements.

How to remove an old door leaf

How to install the interior door leaf yourself
When starting to install the sash, it should be raised to a small height and a board placed below. We combine the elements first of the upper and then the lower loop. When figuring out how to install it yourself, you should pay attention that it is better to do this work together. In this case, it will be possible to perform the installation better.

A video on how to properly install interior doors on your own will help you understand the nuances of replacing the door leaf.
Do-it-yourself installation of an interior door with a box - step by step instructions
If you plan to do the installation yourself, the step-by-step instructions will help you better understand the process. We offer you to find out the nuances that will help to carry out the installation qualitatively.

What tools and consumables are needed for work
List of tools, equipment and Supplies will depend on design features mounted system, and how it is planned to install interior doors. As a rule, you need to prepare:
- drill. If work is carried out in apartment building, then instead of a drill it is better to take a puncher;
- drills for wood by 3-4 mm and concrete by 4 and 6 mm;
- roulette;
- pencil;
- building level;
- for wood and concrete;
- mounting foam.

The procedure for dismantling the old door and carrying out work to strengthen the doorway
Do-it-yourself installation of interior doors should begin with the dismantling of the old structure. This must be done very carefully so as not to damage doorway. For this:
- remove the door leaf from the hinges;
- we remove cash. To do this, we insert an ax between the product and the wall and gently squeeze the fasteners;
- dismantle the box, after removing all fasteners. It is usually located near the castle and in the area of \u200b\u200bthe loops. Screws should be unscrewed at low speeds;
- we remove the allowance.

Having dismantled the door, you should carefully examine the opening. Remains of old material should be completely removed. In the presence of mechanical damage, the geometry of the opening should be restored. You can do this with .

If a heavy interior door is to be installed in the apartment, reinforcement measures may be required doorway, including:
- around the entire perimeter of the doorway;
- cutting to the size of the channels for the entire surface of the doorway;
- installation in prepared strobes of channels. To fix them in the opening, studs of a suitable diameter are used;
- in the corners, individual elements are welded together.

How to install an interior door frame
After the opening is fully prepared, we suggest figuring out how to install the door frame of the interior door. The procedure will depend on the form of delivery of this element. Manufacturers offer a box:
- assembled. In this case, the assembled structure can be immediately mounted in the opening;
- in the form of cut-to-size elements. By connecting them together, the structure is installed in the opening;
- like a curly bar. In this case, the elements are cut off first. right size, then interconnected and only then the box is mounted.
Consider last option settings in more detail.

Taking measurements and assembling the door frame
We measure the parameters of the doorway using a tape measure of sufficient length. When determining the height of the vertical posts and the length of the crossbars, the gaps between the frame and the door leaf should be taken into account. They are selected from the range of 5-10 mm. The gap between the floor and the sash can be larger.

Comment
Head of the team of the repair and construction company "Dom Premium"
Ask a Question" Measurements of the same parameter should be made at several points.
"| Illustration | Action Description |
 | We cut off the elements, ensuring the formation of the selected angle. The elements of the box can be located at a right angle or 45 °. There are other more complex options that you should not resort to when doing the installation yourself. It is better to entrust them to the master. |
 | We mark up the elements. |
 | We cut off the elements using a tool with fine teeth. |
 | We form landing grooves and connect the elements together. We check the correctness of the work performed by putting the sash into the assembled box. There should be equal gaps on all sides. |
Hinge installation
We mark the place where the loops will be located. Usually it is 20-25 cm above the lower edge of the sash and below the top. We remove a layer of material to the width of the fittings. In this case, the fastening will be flush. This can be done with a chisel or a special tool.
Attention! When forming a place for the hinges of an interior door, you should work very carefully so as not to damage the decorative layer.

Mounting the box in the doorway
We install the assembled box in the doorway:
| Illustration | Action Description |
 | We provide the required spatial arrangement with the help of pegs or timber. Auxiliary elements can be fixed in level before installing the box at the level of future hinges. |
 | We fasten the box using suitable fasteners. The space between the box and the wall can be filled with foam. |
How to install the door leaf of an interior door
Quite a crucial moment for those who learn how to install interior doors. First, the counterpart of the hinges should be screwed to the door leaf or the mounting holes should be marked if it is decided to use non-separable fittings. How to insert an interior door? You just need to put it on the loops. After that, you should make sure that it opens and closes well.

Installation of additional elements

Platband installation
Before installation, the platbands are sawn at an angle of 45 °. They are nailed to the box with finishing nails or nails without hats.


Sun skirt: types and how to wear it Black sun skirt with a T-shirt how to wear
Ground bird cherry Ground bird cherry cook
Own business: production of chips
How to care for your skin in spring Face masks in spring
Seizures in the corners of the mouth: causes and treatment in adults and children