Set the handle to interior door- an occupation that does not require special skills and secret knowledge. Any man can cope with this task, if at least once in his life he held tools in his hands. Difficulties can arise only if a person has never been involved in any repair and construction work and has not been interested. But even in this case, there is nothing to worry about: from our article you will learn how to correctly, quickly and efficiently install the handle on an interior door. We will also talk about how to decide on the model of the handle, and how to correctly calculate the required height of its placement on the door leaf.
What does it consist of
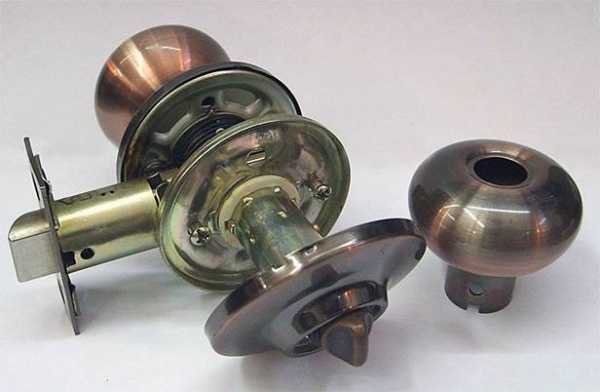
To make it easier to cope with the installation of door fittings, we will find out what parts and elements are included in the handle.
- Lever. This is the main decorative part of the product.
- Each handle has a special ring that is attached to the door.
- Rod and rosette- also two integral parts of the door handle.
- Stroke limiter. This element prevents the sash from hitting the wall when opened.
- Stoppers.
And here is how the handle is repaired plastic windows, can be read in this
In addition to the above, the following elements are also sometimes included in the "composition" of the door handle:
- lock mechanism;
- tongue;
- metal box overlay; (so be sure to know)
- screw for tightening the structure. This detail is necessary when the handle is installed on a hollow interior door.
It happens that the “composition” of the handle also includes a latch. In order to install such a model, you will need to insert an additional rotary screw. Keep this in mind.
How to choose
Let's find out what types of handles for interior doors are now on the market, what are their features and advantages.
On outlet
This type of handle is the easiest to install. A large hole is not required here, it is only necessary that the rod of the product freely passes into the prepared round opening.

On outlet
Outside, the hole is closed with a convex rosette handle, most often round and decorative.
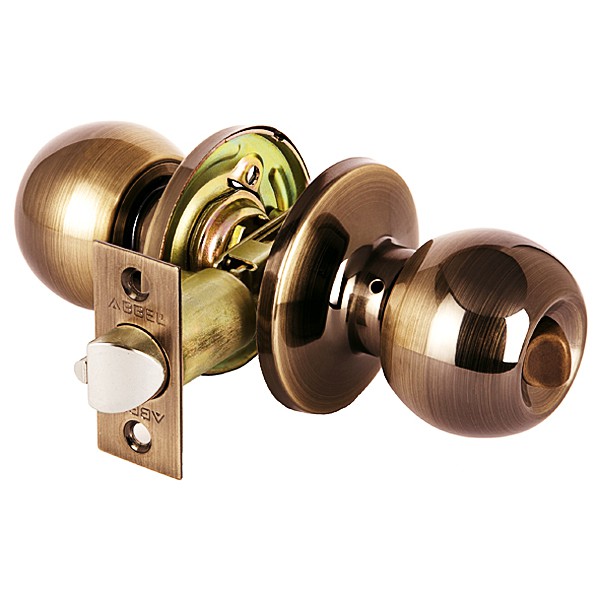
Noba
This is the name of a handle with a rotary system that has a latch or provides a keyhole. This is a convenient option for those interior doors that must be locked: to the bathroom, toilet.

However, the choice of such a model should be approached with particular care: a noba made of low-quality material with active use will quickly become unusable. You should also pay attention to how it looks and how it can be installed.
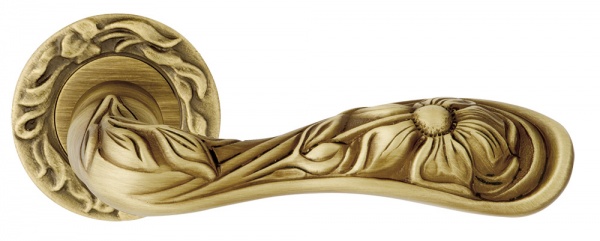
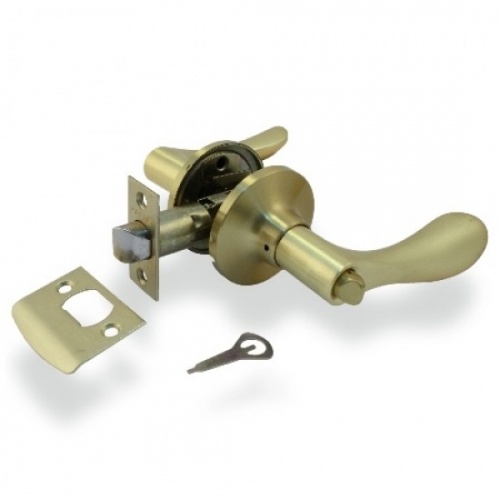
push
In order to use this handle to open the door, you need to press it and move the handle down.

push model
Everyone came across these types of structures when they visited the offices of officials in some government agencies: it is in such offices that these concise and practical models are most often found. But they are also installed at home, especially if the style of the home is also concise and minimalistic. But how to choose a lock for the entrance metal door, can see
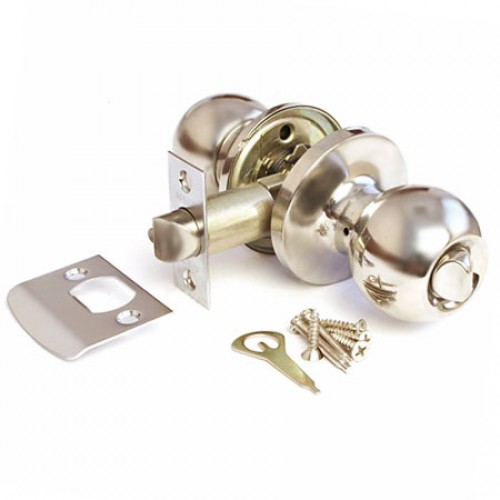
Latch
This type of handle consists of two parts, each of which requires a separate mortise. This type of door hardware can be made with or without a latch. If the product is not equipped with a lock, the door will not lock from the inside. The latch allows you to both lock yourself in the room from the inside, and close the room from the outside with a key.

handle latch
In addition to choosing the principle of operation of the handle mechanism, it is necessary to take into account the external design of the product, its shape, and the material from which the product is made. But this is what a multi-point lock looks like on an aluminum door, and how you can install it yourself, this one will help you understand
Most often, handles for interior doors are made of wood or metal.
But there are specimens made of glass, plastic, and even stone. A lot of people choose metal models with different types of external coating: chrome, nickel, brass, etc. In addition, please also note that some types of handles are designed to be installed with right side doors, and some - on the left. Check this point with the seller.
You may also find it useful to know
Instruments
What arsenal of tools will be needed to professionally and efficiently install a door handle. 
- A drill and a screwdriver are indispensable tools for drilling holes and tightening self-tapping screws.
- Various drills. Necessarily - a pen, as well as crowns of different sizes.
- A hammer is a tool that is in every home.
- Self-tapping screws.
- A pencil and a square will help position the handle on the door leaf perfectly even.
- Stationery knife, as well as an awl.
- A tape measure will help determine the height of the handle to be installed.
- The conductor is also useful - a kind of template used to install handles. It will make it easier to take measurements and drill holes.
Here's what it looks like and how you can install it
Determination of the desired height
We will find out what tips will help you correctly calculate the required height for installing the handle.
But it should be noted that if we start from GOSTs, then these standards clearly indicate the height of the handle - this is one meter from the floor. Of course, we are not at all obliged to follow such recommendations in our apartments and houses, since in this case they are intended rather for professional builders.
It is best to observe the same height of the handles throughout the apartment, especially if the doors are located nearby. And in general, this approach is much more convenient, because, having got used to it, you will already be “on the machine” to open the doors throughout the house.
If you install the handle in the nursery, and the child is still small, it will not be superfluous to take into account this nuance and provide the door to the baby's room with fittings located within its reach.
How to install
We will find out what steps you need to take to install the handle on the interior door yourself.
Before starting work, it is necessary to mark up so that the product is located correctly, evenly and at the required height. For measuring work, you need a simple pencil and a square. First, measure the desired height from the floor. As already mentioned, this height varies from 90 to 100 cm. Consider your height and arm length - choose given parameter individually, guided by your feelings: the main thing is to be comfortable.
In order to properly markup with your own hands, draw a horizontal line at the desired height using a square. The handle usually cuts 6 cm from the end of the door. Mark this point on the resulting horizontal line. Do all the same actions on the other side of the door, having precisely determined the area where the product will be installed. It is possible at the same stage to mark a place for inserting a recess under the tongue, if it is provided by the model.
Having decided on the height and exact location of the handle, attach the jig from the end of the door in this place. He will make it easier further work by drilling. Take a drill and do it through hole in the door leaf: it is clear that in the place where you intend to place the fittings.
With a pen drill or a crown of a smaller diameter, make another hole in the same place, but from the end. Inside the resulting “tunnel”, insert the tongue of the product with a lock, and immediately check on the spot how it works. How to install email code lock on the front door, and how to do all the work with your own hands, this will help you understand
On the video, how to install a handle on an interior door:
Draw around the contours of the lining with a simple pencil, and then remove a small layer of material so that the part is installed aesthetically. Screw on the cover with self-tapping screws.
Place the core of the product inside the lining, and put the handle itself on top of it, equipped with a ring and decorative rosette. In the event that the ring fits too tightly against the door and rubs against it, it is necessary to grind off a little of the door covering with a chisel so that the ring turns out to be recessed in the door array.
Screw the mechanism with self-tapping screws (usually three are enough), or secure with special pins. Fasten the overlay with the decor on top of the structure. This most often requires a hex wrench of a suitable size.
Latch Installation

Sometimes for doors in a house it is very convenient to use a model with a latch, which will allow you to close the door tightly and securely if necessary, providing a person in a separate room with peace and privacy. Let's find out how to install a handle on an interior door with a latch lock.
Drill a hole in the door leaf - it must necessarily coincide with the area where the latch mechanism itself will be located.
If the latch has a tongue, then you need to cut another hole on the door frame for it. But in the case when the lock works by fixing the so-called latch tongue, there is no need to cut an additional hole.
We examined the features of installing a handle on an interior door leaf. And, as mentioned at the beginning, there is nothing complicated here. Therefore, having chosen the right product, armed with simple tools and our recommendations, you can easily equip the doors in your house with stylish and necessary fittings.
Sections of the article:
Today it is difficult to imagine an entrance or interior door without a handle. Of course, there are some types of doors that do not require this element. But in most cases, the handle is simply necessary for the convenient operation of the door leaf. What are the handles and how to install handles on interior doors on your own?
Types of door handles and methods for their installation
Door handles are classified according to several criteria. According to their purpose, they can be divided into those that are not responsible for the operation of some other device and those that are installed in combination with a latch or lock. The simplest type of handles is considered to be stationary models. A feature of such products is the ease of execution. Stationary handles are rarely distinguished by special grace or elegance.

Such fittings rotate or spin only if it is out of order. The installation process of stationary handles is not very difficult. Special attention should not be given to the description of the installation of such products. They are simply fixed on the door leaf with screws or screws. Another option for installing stationary handles is to secure them with a threaded stud. The latter method involves drilling a hole through the door leaf at a height of 800-900 mm from floor covering. Well, then everything is elementary - a hairpin is inserted into the drilled place, onto which handles are screwed on both sides of the door leaf.
Another type of handle is used in combination with a lock or latch. The installation process of such products is more complicated, due to the presence of a locking system. These knobs are either rotary or push. The first are made in a spherical shape and they are also called knobs. Part of their design is a simple locking mechanism. In addition to the above differences, door handles differ in the type of material from which they are made, as well as in their design characteristics.

There is also a number of not particularly important nuances which allow the door handles to differ from each other. To describe everything existing species and subspecies of these attachments, a separate material will be required. In this case, it is more expedient to deal with the principle of installing one of the main types of handles, namely fittings with a locking mechanism in the design.
Required tool
To install a door handle with a latch, you will need to prepare some tools in advance. So, during the installation process, you will need an electric drill or a screwdriver, a hammer, a chisel and a chisel, as well as a set of drill bits of different diameters. In addition, it is necessary to prepare a sharpened pencil, measuring tape, square.

It would be nice to say that the best tool for creating seat under the decorative lining of the latch is a manual milling machine. But, given the fact that this equipment is rarely found on the farm, if you install the handle on the interior door yourself, you will have to be content with chisels and a hammer. It should be emphasized that the chisel is a rather clumsy tool and the quality of the work performed with its help directly depends on the experience and skills of the master. When installing the handle, it is very important not to damage the decorative coating of the door leaf. Therefore, wielding a chisel and a hammer will have to be as accurate and verified as possible.
Door handle installation guide. Process Features
The first step is to get ahead of the place to install the handle. There is a certain height standard at which it is recommended to fix such fittings. This parameter is 800-900 mm from the floor covering and was introduced based on the average height of a person. Of course, when installing the handle on the door leaf, you should take into account physiological features inhabitants of the dwelling. If we are talking about short people, then standard height need to be reduced. For tall residents of the house, on the contrary, it is advisable to fix the handle above the established norm. The process of installing a door handle consists of several successive stages, which will be discussed below.

The first step is to mark the place under the handle. This is not the most difficult operation, which includes a number of steps. First you need to put a mark on the door leaf. This is where the handle will be placed. Then this mark needs to be moved to the center of the end of the door leaf. In this place it will be necessary to drill a hole for the latch latch. To unmistakably get ahead of the location of the handle itself, you should measure the distance from the edge of the latch to the middle of the hole in the mechanism into which the square fastening rod will be inserted. Then the resulting size must be indicated on the door leaf. As you can see, the entire marking process for installing a latch handle comes down to obtaining these two points.
At the next stage of installing handles on interior doors, you need to drill holes. The first step is to prepare a place for a square fastening rod on the side of the door. After this hole is ready, it will be possible to start creating a recess on the end side. So, to drill the side of the door leaf, you will need an electric drill and a feather drill with a diameter of 25 mm. Drilling is required on both sides. This will avoid damage decorative coating door leaf. After the drill appears from the back of the door, you need to continue drilling in the opposite direction. When this hole is ready, you can start creating a recess at the end of the door leaf.

To do this, use a drill with a diameter of 22 mm. After drilling the first hole, it is necessary to make a sweat from the end of the door for a decorative lining on the latch. To do this, it is necessary to install the mechanism in the prepared end hole and outline the plank with a sharp pencil. After that, the latch can be removed with a hammer and chisel right size create a shallow groove for flush installation of the decorative trim.
by the most the best option will be used for these purposes manual router. But such a tool is a rarity for ordinary apartments, but there is a chisel and a hammer in almost every home.
In the future, installing a handle with a latch on the door involves assembling the entire mechanism inside the canvas. To do this, first of all, a latch is inserted into the door through the end hole. The mechanism is fixed with a pair of screws or screws. By the way, it will be emphasized that during this operation it is advisable to control the performance of the latch. It should not jam, which sometimes happens due to wood dust and shavings getting inside the mechanism. To avoid such troubles, it is recommended to properly clean the end hole before the final fixing of the latch.

The next operation is the installation of a square rod. There is also nothing complicated here. It must be passed through a square hole in the latch to the side of the door leaf. After that, a handle is put on the square on one side of the door. By the way, the kit comes with one right handle and one left handle. It is important not to confuse them here. The handle is put on the square and fixed on the door leaf with screws. Usually, three fasteners are provided for each side.
The second handle is installed on the door leaf in the same way. After fixing both handles, it is necessary to verify their proper functionality. If everything, including the latch, works as it should, then you can proceed to the final phase of the installation. It consists in winding special decorative caps onto the handles, which hide from the eyes the places where the fittings are fixed and give the product aesthetics. In addition, under the handle you will need to tighten a hidden screw for fastening. It is usually screwed in with a hex wrench.
This completes the installation of the handle on the interior door. To use the mechanism for its intended purpose, it remains only to install the counterpart in door frame. This operation is performed according to a certain technology, which will not create difficulties even for beginners. The first step is to transfer the location of the middle of the latch to the door frame. This should be done with the door leaf not tightly closed. Then, in the part of the box where the door closes, it is necessary to drill a hole about 10 mm deep exactly in the center. A decorative overlay is installed on top, which should come with a latch. It is not necessary to deepen it into the body of the door frame, just screw it on. After that, you need to check how the latch works.

On this, the process of installing a door handle with a latch can be considered completely completed. According to the same algorithm of actions, the installation of a handle with a lock is carried out. The difference in these two processes is only in the size of the end seat and the need to drill another hole on the side surface of the door leaf. In this place the locking system cylinder will be installed. Otherwise, the process of installing the door handle is similar.
When buying interior doors, you need to be prepared for the fact that the accessories for them may not be included in the kit. You get a canvas and racks from which doors are made. And in this canvas, a hole for the handle will not even be drilled. The thing is that the product can be very different, have a peculiar design and size. And the handle, which will be installed in advance, may not please the residents. In this case, you need to install a door handle on the interior door. This work can be done by hand. You just need to buy a suitable handle and install it.
What types of pens are there? What is the difference? How to install a handle on an interior door? You will learn all this by reading our article.
Interior door handle
To begin with, let's consider what a similar pen is in general. We are all familiar with them, but it is unlikely that the majority thought about it. design features. It is important for us that she helps to open the door. However, during installation it would be nice to get acquainted with its design. Here's what's in a standard doorknob:
- Handle for opening doors (2 pcs.).
- Decorative rings that cover the bolts and fasteners of the handle.
- One rod or bar of metal that connects one and the other handle of the handle.
- The socket is the body of the mechanical part of the structure, in which locks, springs and a tongue cannot be dispensed with.
- Stoppers that limit the movement of the tongue and handle.

But, in addition to the standard configuration, all handles for interior doors differ in the installation method, their shape, principle of operation, material and the presence of a lock. If we talk about the installation method, then there are two types of door handles:
- overhead or stationary;
- mortise.
Overhead - fairly simple products that are enough to attach to the door leaf. The work is easy and fast. But the mortise door handles are installed in the canvas in the mortise holes. Here you will have to work hard.

As for the way the door handles work, they are divided into the following types:

If we talk about the materials from which they are made, then there is plenty to choose from. Some are made of wood, others are made of metal (aluminum, brass), there are even glass, plastic and stone interior handles. The most popular are metal products coated with chromium, nickel, etc. The material guarantees the wear resistance and service life of the handle.
Note! Products can be equipped with a lock or sold without it. This is chosen according to the needs of the user. When the doors often have to be closed as needed, it is better to stop at models with a latch and put it on.
Nuances before installing the handle
Have you ever wondered how high the handle is? This is very important, because if placed incorrectly, it will be inconvenient for users to use it. If it is high, it will be difficult to reach, and if it is low, you will bend down. In fact, there is no single standard that is used to guide the installation of a handle with or without a latch. However, there are some recommendations.

During operation, it was noticed that the best option for placing a handle for interior doors in terms of height is a distance of 1 m from the floor. But, each owner can raise or lower this value, based on their own preferences and the growth of family members. It is important to remember one more thing - focus on the height of the handles that you already have in your home. Then it will be easier to choose the best option. Having all the knobs at the same level will make them easier to use.
Tools to get the job done
Before proceeding with the installation of handles on the door, it is important to take care of the availability of all necessary tools for work. They are simple and can be found in everyone in the house. Here is the list:
- chisel;
- pencil or marker, square and tape measure;
- drill;
- drill, crown;
- screwdriver

With this set of tools, the job will be much easier. It is clear that you can embed the handle fittings without a crown with a screwdriver, but this will take more time and effort. A crown is an attachment for a drill, thanks to which a perfectly even hole can be made in the canvas in just a few moments.

It is more convenient to work when the door is removed from the hinges. This makes it much more convenient to work. Therefore, do not rush to install it in its place immediately after purchase. When it is impossible to remove it, then you need to properly fix it so that the canvas does not move during operation. This is how you can clearly and correctly mark up and embed the lock.

Another important point- Familiarize yourself with the instructions for the pen. We are accustomed to resorting to it only after wrong actions. However, to avoid them, you just need to read the instructions first. It will indicate all the dimensions, thanks to which it will be possible, ideally, to choose the diameter of the pen and the crown.
Now you can consider the installation instructions, which will help you cope with the task quickly, easily and without errors. And for those who take up such work for the first time, a visual video will be provided.
What's to be done
Consider the list of steps after which the door handle will be installed in its place. All work consists in performing 6 steps. Here they are:
- Marking the canvas.
- Creating a hole for the lock.
- Lock installation.
- Handle notch.
- Applying markings on the loot.
- Creating a groove in the loot.

This is how the handle is installed on the interior door. Not to miss important details, let's look at each step separately.
Stage 1 - marking the door leaf
Have you already decided on the height of the handle fixation? If not, then it's time to do it. After all, the markup will be performed based on this indicator. To properly mark up, you will need a square, tape measure and pencil. With their help, you need to mark on the canvas the places for the holes for the handle. You should measure the distance from the floor and draw a horizontal line with a marker. They are already moving further from it, transferring the markup to the end of the canvas and to the opposite part.
Now you need to mark the place on the end where exactly the hole for the lock tongue will be located. On the same line, on each side of the door at an equal distance from the beginning (approximately 60 mm), a place is marked for installing the handle itself.

Stage 2 - creating a hole for the lock and handle
Using a drill and crown, a hole is created for the handle. You will need to drill the canvas on each side, deepening exactly half the thickness of the door. To make the work more convenient to perform, experienced craftsmen recommend making a mark on the crown with a marker. Why not just drill a hole on one side? So the crown can go to the side and the hole will be uneven. In addition, on the opposite side, the door trim can be damaged and damaged. The drill is held strictly at an angle of 90 degrees. It is important to avoid deviations in any direction. And with a chisel after work, you can remove and smooth out all the bumps.

As for the hole for the lock, it is made with a drill with a pen desired diameter The work is done carefully, because the distance between the corner of the butt and the pen itself is not very large. There is an opinion that it is better to make a hole for the latch first, and then deal with the handle. But, in what sequence to carry out the process is everyone's business.
Stage 3 - installation of the door lock
This is a simple task when the lock hole is completely ready. It remains only to insert the lock into it. The lock pad is applied on top and circled around the edges with a pencil. Next comes the chisel. With its help, a layer of wood equal to the width of the lining is removed from the marks. Then it can be drowned in the end of the door. To simplify the task, chisels of different widths are used.

The overlay is fixed in the prepared place with screws. it is recommended to make holes for them in advance using a thin drill. It is enough to attach the overlay to its place and mark the attachment points with a pencil.

Stage 4 - handle insert
It's time to get on with the pen. They come with screws on the outside. It is not necessary to disassemble this type of handle. It is only necessary to stop one part in place, falling into the latch hole with its two guides. They have screw threads. After that, the second half is attached and the two parts are pulled together with each other by means of bolts. Twisting is done evenly so that the handle works without problems, and the latch has a simple move.
If the handle has a hidden screw, then it will need to be disassembled. How to disassemble the door handle of an interior door? Often, such handles come with assembly and disassembly instructions, as well as keys for this. Based on it, we disassemble the structure, fasten the collapsible part with bolts and install the handle in its place. You should not use brute force, if everything is done correctly, then the assembly will be easy.

Stage 5 - marking on the loot
At this point, the door handle is ready. It remains only to complete some details regarding the loot. It will need to cut a hole for the tongue and lock (if any). If you want the door to open and close easily, you will have to make high-quality markings.

To do this, you will need to close the interior door and mark the location of the tongue and lock on the loot from the front, marking their top and bottom. The exact middle of the castle is determined for the squares and the marking is transferred to the end of the loot. Now everything is ready for the final step.
Stage 6 - creating a groove in the loot
Focusing on the markup, using a drill and a pen, a hole is made for the tongue and lock. All excess is removed with a chisel. Next, the overlay is installed. But, before installing it, it is important to check the performance of the handle for interior doors. You will have to close the door and check if the tongue from the handle and the lock enter. Don't be surprised if closed door will be a little loose or wobbly. The thing is that the groove is not yet equipped with an overlay.

Now it's time to fix the bar. It is fixed flush so as not to interfere with the smooth running of the door. In fact, the work is no different from fixing the overlay on reverse side. Everything superfluous is removed with a chisel, holes are drilled, and the overlay is fixed with the bolts included in the kit.
To help the inexperienced cope with the task, we have prepared a visual video that will show how to install door handles on interior doors.
Conclusion
Do not be upset when the door you bought does not have handles. On the contrary, this is good, since you can choose a product that will be convenient in your case. And since there are so many options, there will be plenty to choose from. With the installation of the handle on the interior door should not be a problem. Thanks to the step-by-step instructions, it will stand in a few hours.
Most people think that installing a doorknob is a very simple task and does not deserve serious attention. But when it comes to installation, these "competent" masters are often lost. So that such a misunderstanding does not happen to you, let's take a look at how to install a modern door handle on an entrance metal and light interior door.
When installing door handles, the main thing is to understand the principle.
With the current range, choosing a doorknob can be quite difficult. The topic of choice with photos and videos is covered in more detail, and now we are talking about installation, so we will go through only the main positions of the direction.
- Overhead handles are considered the simplest, their installation is really extremely simple, you need to choose the right installation location and screw in a few screws. The handles themselves can be wooden, metal or plastic, but the installation technology is the same for everyone;

Even a person without training will be able to install the overhead handle.
- The push-through overlay handle is no more difficult to install than the previous version, only you need a drill instead of a screwdriver. A through hole is drilled here, into which a metal threaded stud is inserted, and handles are screwed onto this stud on both sides of the door leaf;

- Knobs and rotary models are considered the most complex structures. I am glad that the device, respectively, and the mounting technology for all these handles are similar, so we will focus on these designs.

Installing a rotary type door handle is the most difficult.
Subtleties of self-installation of different models
If you do not go into the design features of some specific models, then mounting most of these devices are similar, but before embedding this or that handle, let's figure out the place of its installation.
A few words about the installation site
If we are talking about a private house or apartment, then where the handle should be installed, you have the right to decide for yourself, the main thing is that you and your household should be comfortable. But when choosing a place, experts recommend focusing on 2 things:

- First of all, you need to measure at what height all the other handles in your house are. After all, when one handle falls out of the general ensemble, it is very striking and spoils the interior;
- If you choose a place for installing all the handles in your house, then you need to focus on the arm bent at 90º at the elbow. Naturally, it is worth considering the growth of all family members and choosing something in between.
The installation height of the door handle according to GOST is quite another matter. The documents state that such structures are installed at a height of 1 m, plus or minus 100 mm. This information should be well remembered by office owners and housekeeping workers of administrative buildings. Otherwise, the fire inspector will have another reason to find fault.

Entrance door handle
Good quality handles entrance doors from good producers break extremely rarely, this misunderstanding mainly happens with the goods from the friendly Chinese people. Fortunately, it is easy to find a replacement in the store, the average price of such a kit fluctuates around 500 rubles.

Finding a suitable handle for a metal door is not difficult.
When buying a new set of handles, it is advisable to remove the old pad completely and take it with you to the market.
Removing an old handle from a metal door is not difficult. In this case, it is not necessary to completely disassemble the entire mechanism, it is enough to unscrew the 2 fixing bolts that are located on the inside.

So, the pens are bought, now it remains to insert them. We have removed the inner lining, respectively, the outer lining also holds practically nothing. If you pull a little harder on the handle, it will come out with a square pivot pin and connecting studs.
When buying a pen, it is better to choose models with an internal armor plate, they are more expensive, but the protection against hacking is an order of magnitude higher.

Further, on the outer part of the new set of handles, screw 2 connecting studs. Separate armor plates can be provided on the keyhole, if they fit the holes in the new set, then change them or not, decide for yourself.

Now we insert a square pivot pin into the core of the handle and mount the outer trim in its place. Keep in mind that the square pivot pin should almost reach the bottom of the hole on both handles. Otherwise, there is a high probability that the handles will break again.

When everything is inserted and screwed, the gasket is installed last inside the structure. Gaskets can be rubber and plastic, and so, try to take rubber ones, such as in the photo below.

The outer lining with a pivot pin and studs is inserted first. Further, the inner lining is combined with it and all this is fixed with a pair of bolts from the inside.

Handle with a latch for an interior door
Often, several types of handles can be installed on a lock embedded in an interior door. This is especially true for light latches, any rotary knobs are generally suitable there. The main thing is that the rotary mechanism works with a square pin.
The technique of inserting a light latch and a capital lock into an interior door is shown in detail with photos and videos, and we will only analyze the installation of the handle.
The handle mechanism is screwed to the doors with self-tapping screws, but so that the fixing washer does not spoil the view, it is covered with a decorative overlay, after which the handle is installed.

In round knobs, both the knob itself and the decorative overlay are fixed with the help of an inconspicuous inner tongue. This tongue needs to be drowned down with the help of a special key that comes with the kit. The tongue itself is equipped with a spring and after removing or installing the handle, it returns to its original position.

In rotary handles, the system is slightly different, after installing the handle, you need to fix it with a small screw on the side, and then screw or simply put a decorative overlay on the latches (depending on the model).

The screw fixing the rotary knob can be either a Phillips screwdriver or a hexagon screwdriver. In the latter case, the hexagon must come with the handle.

Conclusion
As you probably noticed, the installation of door handles on entrance and interior doors is, in general, similar. The main thing for you is to understand the principle of the three options shown in the article, and then you will deal with any model.

Interior doors are sold without fittings, the delivery set includes only the door leaf and racks, from which the door frame is to be assembled. There are no factory-made holes in the canvas for installing locks and handles. This is due to the fact that pens, being standardized, have various designs and sizes. In addition, the choice of accessories depends entirely on the preferences of the buyer. Therefore, a person who has started repairs with the replacement of interior doors faces the problem of choosing whether to invite a master or install handles on his own. It should be noted that, having decided to install doors with your own hands, you will definitely cope with the installation of door handles.
Types of handles for interior doors
Door handles for interior doors can be classified according to the installation method, operation method, shape, material, and the presence of a lock.
According to the installation method, stationary (overhead) and mortise models. Overhead are attached to the door leaf, and for mortise it is required to drill holes in it.
By way of work there are:
One of the most popular door handle materials is brass. In addition to excellent aesthetic properties, brass is practical and durable.


As a rule, complex locking systems are not installed on interior doors. An exception is the sanitary lock installed in bathrooms and toilets.

Installing a handle on an interior door
Consider the installation features of the most popular model for interior doors - knob handles. Handles are usually installed on a hinged door, however, many experts recommend removing the canvas for installation. True, this is not always easy to do.
Advice. If the canvas is not removed from the hinges and the installation is done in the hinged position of the door, move a chair or some object to it so that the door is stationary during your work.
Installation Tool
The tool will require the most common, which is in every home:

A marking scheme is attached to the door latch, but it is easy to make marks for the holes without it. From the bottom edge of the canvas on both sides, 1.0 meters are measured. 6 cm must be measured from each edge of the door and a mark is made. With the help of a square, a strictly horizontal line is drawn that will connect these two points. At the end of the canvas, a mark with a pencil and an awl is placed on this line in the center. A latch bar is applied and the veneer is cut with a sharp knife. Remember that the bar must be recessed into the door leaf so that it forms a single surface with the leaf.
Some experts advise starting drilling from the end of the canvas with a pen drill. With this sequence of work, the chips, when drilling with a crown, will fly into an already made hole, and not clog the teeth of the crown.

The pen drill should go to the depth of the blade, no more. The drill is pressed to a point on the end of the canvas and a hole is drilled. Then, with the help of a crown, holes are drilled alternately on each side of the canvas; it is not necessary to make them through. As soon as the tip of the crown appeared on the opposite side, the drill must be stopped and drilling started on the other side. So the veneer will not be damaged when the crown exits.

After the holes are ready, with the help of a chisel and a hammer, we make a selection along the line cut with a knife under the latch bar. Install the latch and tighten with two self-tapping screws. It is better to take self-tapping screws not "regular", which are attached to the latch (they have ordinary soft metal), but high-quality ones.

Using the key that is included in the kit, we disassemble the handle into two parts so that it can be installed. To do this, one fixing screw must be loosened, the other unscrewed. The central rod is inserted into the hole and on one side the fixing screw is tightly tightened. Then the second half of the knob is put on the rod, and the second screw is tightened. Self-tapping screws are screwed on both sides, which will close the decorative overlays and the screws will not be visible.

After installing the knob-knob, it remains to install the "return" on the box. The door is covered, but not completely, and the upper and lower edges of the tongue are marked with a pencil. Using a square, the distance from the edge of the leaf to the center of the latch bar is determined, and this size is transferred to the door frame. Then a “return” bar is applied to the box, the veneer is cut with a knife, and a cutting is made under the bar and tongue with a chisel. The door is closed and the operation of the latch is checked.

Then a bar is installed on the box. Special “pockets” are sold for recesses under the tongue, they are made of plastic or metal. Self-tapping screws that fix the "return" bar can be closed with self-adhesive plugs. After that, the installation is complete.
How to disassemble and assemble the door handle of an interior door?
The installed handle-knob can be disassembled in two ways, depending on its design. Unfortunately, most of these models are of rather low quality and often fail.
Disassembly of one structure begins with the fact that you need to carefully pry and remove the decorative trim. The lining has a special groove, usually it looks down. The ball-shaped handle will interfere with unscrewing the screws, so you need to press the locking pin and at the same time, with a little effort, remove the handle from the central rod. Once the handle ball is removed, it will be very easy to remove the screws.

To disassemble the second structure, which does not have a locking pin, it is necessary to press the spring pin through the technological hole with the key from the delivery set and remove the handle ball. If the key length is not enough (it happens), use a simple nail. Then the decorative overlay and self-tapping screws are unscrewed. If you can't find the spring pin through the access hole, the knob has not been assembled correctly. Rotate the decorative trim 180° and the problem will be solved.

The handle is assembled in the reverse order.


Sun skirt: types and how to wear it Black sun skirt with a T-shirt how to wear
Ground bird cherry Ground bird cherry cook
Own business: production of chips
How to care for your skin in spring Face masks in spring
Seizures in the corners of the mouth: causes and treatment in adults and children