Wood is a wonderful, proven building material for thousands of years. But at the same time, we have to admit that, in comparison with other building materials, wood is characterized by the least resistance to the negative effects of the external environment, which adversely affects not only its appearance, but also its working qualities. In this regard, it is highly desirable to provide for wooden enclosing structures effective protection and for this purpose, siding is most often used today. Next, we will talk about how to choose it and how to properly perform wall cladding. wooden house with your own hands.
Before finishing
When planning to decorate a house made of wood with siding, some features of such buildings should be taken into account:
- If the house is built from logs or solid timber that has not been processed in drying chambers, it will shrink for a long time. This means that the geometry of the structure will change in some way. To the naked eye, the shrinkage will be imperceptible, but if the finish is fixed on the walls, it will certainly deform and in some places may even collapse. Shrinkage is also taken into account when erecting a roof: the rafters are not fixed rigidly, but according to a sliding pattern.
- Depending on the design, wooden walls can have vapor permeability from 0.06 (across the fibers) to 0.32 mg/m*h*Pa (along the fibers). Siding, even vinyl, even metal, has zero vapor permeability. If we fasten the cladding panels close to the wall, then the steam that has penetrated into it from the inside, having no way out, will turn into condensate on the outer surface (under the siding).
Moisture is dangerous for anyone building material, as it increases the thermal conductivity of the structure and, when frozen, creates gradually increasing cracks in it. And in the case of wood, it also leads to decay.
Therefore, it is very important to ensure effective steam removal: the siding is mounted so that between it and the wooden wall there is a ventilated (builders say - ventilated) gap.
There is no need for a ventilated gap device only if the wall from the inside is covered with a vapor barrier film or finished with some absolutely vapor-tight material, for example, pasted over with vinyl wallpaper. But this solution has a drawback: to remove excess moisture, it is necessary to increase the ventilation capacity, which leads to an increase in heat loss and, accordingly, heating costs.
Houses from glued laminated timber, as well as those built using frame technology, shrinkage is unusual: all the wooden elements from which they are built are thoroughly dried before starting construction work.
Material selection
Siding today is available in three varieties:
- fiber cement (second name - cement fiber);
- metal;
- polyvinyl chloride (for short called vinyl or simply plastic).
The most popular is vinyl siding - it accounts for 70% of all sales.
This is due to a number of advantages of this material:
- Low cost.
- Low weight, which eliminates the need to strengthen the supporting structures and the foundation, and delivery and installation are extremely simplified.
- Widest choice of colors and textures. PVC plastic, like any other, can easily be given any shape, which manufacturers successfully use: siding is produced that imitates wood, brickwork, straw and other materials.
- Resistant to all weather conditions.
- Sufficient mechanical strength.
When choosing vinyl siding, consider the following:
- Wood-imitating panels are the cheapest. They are also the most in demand - they account for approximately 80% of consumer demand. Siding with a more complex texture may cost more.
- You should not buy cheap siding from a little-known manufacturer out of a desire to save money. Some buyers think that there is not much difference, they say, siding is just a piece of plastic. In fact, a lot depends on compliance with the technology: low-quality siding does not burn out evenly, but in spots. In addition, the material itself is less resistant to ultraviolet radiation, which causes the destruction of polymers.
Pastel-colored siding is considered the most preferred. Compared to brightly colored panels, it has the following advantages:
- does not fade so quickly and less noticeably in the sun;
- less susceptible to thermal expansion;
- has a lower cost.
Among the producers of vinyl plastic, Russian companies Alta-Profil, Docke, FineBer, Grand Line, Nordside, Belarusian Atlantic, U-Plast, Vox, Polish Royal, Canadian Vytec, Mitten and American Elixir, Variform.
Equipment
Here are the parts included in the cladding kit:
- Narrow long panels are the main element from which the cladding is assembled.
- The corner is external, usually has a length of 3 m.
- The inner corner has the same length.
- The starting bar, in the ledge of which the lowest cladding panel is laid. It is installed above the plinth and above the window / door openings. Usually has a length of 3.8 m.
- Plank with a J-shaped section. This detail closes the ends of the panels if the cladding is open. For example, if the siding is not mounted around the entire perimeter, or an extension adjoins the house, which it was decided to leave without finishing. In addition, the J-plank is used as a frame for the finishing of gables, and if desired, it can also be used as a finishing strip.
- Planks with T-shaped and H-shaped sections. They are used to design joints between siding panels - mainly when they are built up in length. The length of one piece is 3 m.
- Planks near the windows. They are used in cases where windows and doors are recessed into the wall. Length - 3 m.
- Platbands. They are used for finishing openings, the filling of which - a window or a door - is in the plane of the outer surface of the wall.
- Window drains. Before buying, you should make sure that you do not already have them installed: these parts are usually supplied with metal plastic windows.
- Drain plank. Additional accessory designed for installation above the window.
- Wind board.
In addition to the above, you will need spotlights - perforated panels, with which the space under the cornice overhang is hemmed. Thanks to the perforation, the ventilated gap under the roof is blown through.
Calculation of the number of siding elements
Siding for finishing a wooden house is best purchased at a time. If later some parts have to be bought in addition, they may not match the color of the main set, since two batches of even the same color usually differ somewhat in shade. And the additional time and money spent on transporting the missing elements is unlikely to please the homeowner. Based on this, it is very important to calculate the required number of all parts with sufficient accuracy before buying.
Number of panels
Determined by the formula: N \u003d (Sst - Sok - Sdv + Sfr) / Spanels,
Sst - wall area;
Sok - total area of window openings;
Sdv - total area of outdoor doorways;
Sfr - the total area of all gables;
Spaneli - useful (!) area of one siding panel.
If the panels in a row are joined end-to-end, then the useful area should be taken equal to the actual one. This value is indicated on the packaging and in most cases is 0.85 m 2. If the panels are supposed to be installed with an overlap, then when calculating the S-panel, the overlap must be subtracted from the actual area.
Number of outer and inner corners
- Economy option: sum up the lengths of all the outer corners of the building and divide them by 3 m (the length of one corner). But with this approach, the framing of all corners, except for the first one, will be made of several fragments of corners (at least two), unless their lengths are exactly 3 m. virtues. If the user wants to get a flawless finish, you should not be stingy and purchase one whole corner for each corner.
- As a compromise, you can purchase whole parts for the corners from the side of the street, and lay out those located from the side of the courtyard or hidden, for example, by green spaces, from a few pieces left after trimming.
Total length of starting bars
It is calculated according to the following formula: Lst = P + Wok,
P is the perimeter of the building;
Wok - the total width of all window openings.
Example: for cladding a house that is a rectangle with dimensions of 10x6 m in plan and has 8 window openings 1 m wide, the starting bar will need:
Lst \u003d 10 + 6 + 10 + 6 + 8x1 \u003d 40 m.
The number of parts is not difficult to determine by dividing 40 m by their standard length of 3.8 m. For the house in our example, 11 starting strips will need to be purchased.
Calculation of the need for other elements
The calculation of the number of other elements is carried out as follows:
- The number of J-strips, if any, is determined by dividing the total length of all ends, except for those converging at the corners, by the length of one piece of 3.8 m.
- Planks with a T-shaped and H-shaped section are counted individually on the lining scheme, which must first be drawn.
- Near-window strips are calculated individually so that they, like corners, are used only in one piece. The same applies to platbands.
- When calculating spotlights, their area is determined in m 2: the total length of all parts is multiplied by the width determined by the design features of the cornice.
The length of the wind board is taken equal to the total length of the slopes of the gables.
Experienced craftsmen add 7-10% of the stock for scraps to the calculated volumes. It is better for a novice installer to throw 15%.
Advice. Instead of manually calculating, you can use special online calculators posted on the websites of some siding manufacturers and suppliers. It is enough to enter into the program several sizes that she is interested in, and she will instantly give the exact number of panels and additional elements.
Preparatory work
Before direct installation of the cladding, you must perform the following steps:
- The main material of the walls is freed from the old cladding, as well as from dust and dirt present on it.
- Rotten or moldy places are cut off and cleaned with sandpaper to “healthy” wood. Inspection should be carried out with the utmost attention: even a small colony of microorganisms hiding under the siding will have time to cause considerable damage to building structures before it is discovered.
- Next, the walls must be thoroughly lubricated with antiseptic impregnation.
- After the impregnation has dried, the walls are covered with a waterproofing vapor-permeable membrane. Be careful: such a film must be installed on the correct side. At this stage, it will be enough to grab it slightly, for example, construction stapler. In the future, the membrane will be more firmly fixed by the frame.
Note! Plaster, if it is in good condition, can not be knocked down. During the installation of the siding frame, it can fall off in places, but this does not threaten anything special building structures.
Frame installation
First of all, you need to decide on the material of the frame. Wood is cheaper and easier to work with, but two things must be taken into account:
- The maximum permissible humidity for the timber is 20%, and it must be dried on outdoors. Finding such material is not so easy, since, as a rule, freshly sawn wood with a moisture content of over 50% goes on sale. The frame made from it will undergo the shrinkage already mentioned here, that is, it will dry and deform at the same time.
- Even after treatment with the most effective antiseptic impregnation, the wooden frame will not be durable, since it does not have waterproofing protection.
Reiki in a wooden frame has to be installed quite often - every 30 cm.
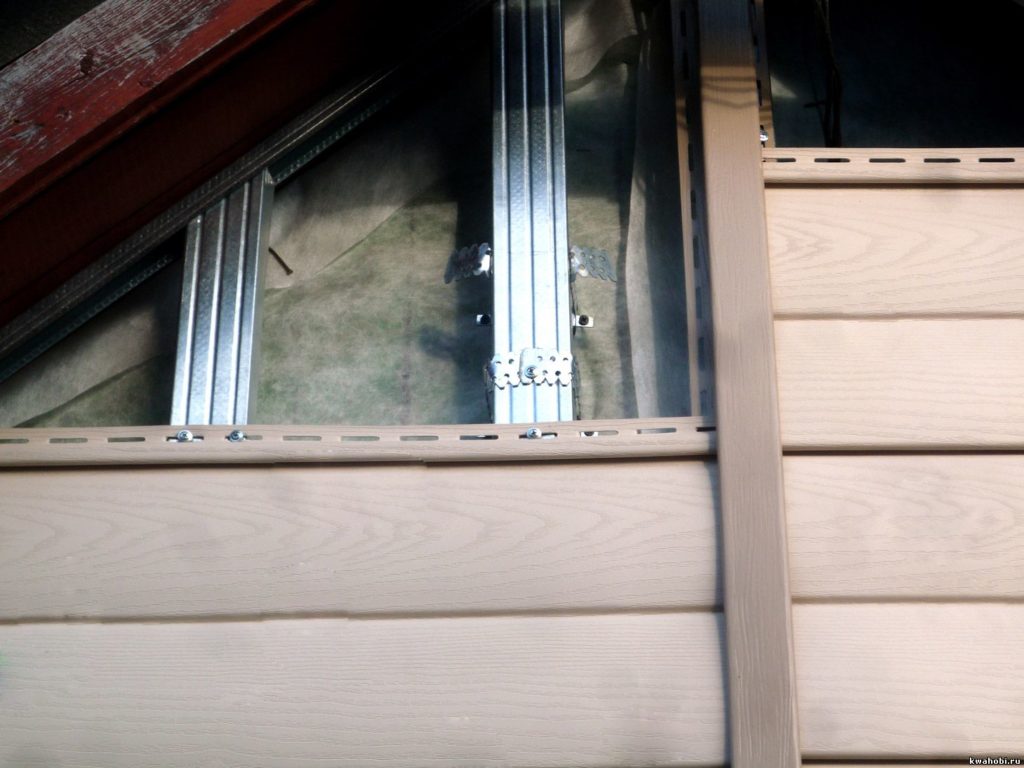
A more practical material is galvanized steel. The profiles made from it are not afraid of moisture, under no circumstances will they change their shape and can be installed in increments of 40 cm.
Frame elements are installed perpendicular to the siding panels. That is, if the cladding will be mounted horizontally (the most common option), then the rails or frame profiles should be screwed to the walls vertically. The construction of the frame begins with the installation of elements at the corners of the building, then the profiles framing the window and door openings are screwed. After that, you can install intermediate elements.
With a vertical arrangement of profiles, their installation is controlled with a plumb line, with a horizontal one - with the help of a building level.
Do-it-yourself wooden house siding: step by step instructions
A feature of PVC plastic is a relatively high coefficient of thermal expansion. Therefore, vinyl siding must be installed in such a way that it remains able to change in size with changes in temperature. The master must adhere to the following rules:
- Leave a gap of 1–1.5 mm between the surface of the plastic and the head of a nail or self-tapping screw. The fastener should be located in the very center of the oval fastening hole.
- Expansion joints should be left between adjacent elements of the siding.
The guaranteed clearance depends on the ambient temperature during installation:
- at a minimum temperature (for most brands of siding it is -5 degrees, for some - up to -20 degrees C), parts must be installed with a gap of 9-10 mm;
- when installed in warm weather, the joint width is 6 mm;
- in hot conditions, the gap should be reduced to 3–4 mm.
If the siding parts are tightly clamped or installed close to each other and to other elements of the building, the cladding will warp when it gets warmer.
Step by step instructions for installing siding
Step 1: installation begins by fixing the starting bar. With horizontal installation, it is allowed along the bottom, controlling the position with a building level (if there is no reference point like a basement).
Step 2: install the first panel. With one edge, it starts under the protrusion of the starting bar, with the other it is screwed or nailed to the frame. In this case, there should not be any forces and tensions in the panel.
Advice. Siding can also be fastened to a wooden frame with nails, but it is better for a novice master to use self-tapping screws - hammering a nail with a hammer, it is very easy to damage the plastic panel.
Self-tapping screws should be used galvanized 25–30 mm long, equipped with a press washer. Their approximate number is 20 pcs. per 1 m 2 of cladding. As already mentioned, the screws should not be tightened all the way, so that the plastic part has some freedom of movement.
Step 3: continuing the installation of the first row, screw the second panel. It can connect with the first in two ways:
- Overlap. In this case, both edges of the panels (they are called lock and nail) are cut so that the overlap is 25 mm.
- Butt joint with temperature gap. In this case, the ends of the panels at the junction are closed with a T- or H-shaped profile. Do not forget that this profile should also be free to expand: a 3 mm gap is left between its upper end and the cornice (or soffit), and 6 mm between the lower end and the plinth, porch or similar restriction. In this case, the lower end of this part should be 6 mm below the lowest edge of the starting bar.
Note! If the house was built recently and has an extension, it is necessary to take into account the different amount of shrinkage of the foundations of both structures. Based on this, their lining should be made separate, even if the extension wall continues the wall of the house. In this case, the panels on the border between the structures are necessarily joined using an H-shaped profile.
Step 3: Start laying the 2nd row. Having placed the panel with the locking edge down, it must be coupled with the panel of the previous row; while the nail edge is screwed to the frame. The subsequent rows are laid in the same way.
Step 4: having reached the window openings, the panels that will be located under them are cut by an amount equal to the width of the opening plus one expansion joint on each side. Further, on these panels, it is necessary to arrange hooks (cut out and squeezed out with a special punch), with the help of which they will engage with platbands or near-window strips.
The panel located above the opening is also cut and equipped with hooks, through which it will “grab” the upper frame of the window. You can screw the starting bar over the opening - then the hooks will not be needed.
Step 5: having laid the penultimate row, we fasten the upper edging close to the cornice or soffit - the finishing bar, J-profile or inner corner. Next, you need to figure out how much to cut the width of the panel of the last row: for this, we measure at several points the distance between the lock of the penultimate row and the recess in the final part, subtracting the temperature gap of 1–3 mm from this value. In accordance with the obtained size, it is necessary to narrow the panels of the last row by cutting them from the side of the upper (nail) edge. For fastening in the finishing bar or a part installed instead of it, hooks squeezed outward are made in the upper part of the panels. Their pitch is 20 cm. The upper edge of the panel with hooks is inserted into the finishing bar, and the lower edge into the lock of the lower row. The panel is then pushed up so that the lock at the bottom and the hooks at the top click into place at the same time.
Step 6: move on to facing the gables. To do this, the ends of the panels must be cut at an angle equal to the angle of inclination of the slope. The easiest way to do this is using a pre-made template.
Before starting work along the overhangs, it is necessary to fix the J-profiles, under which the ends of the panels will be hidden. Further actions are performed in the same way as when facing walls. The panels must be positioned so that there is a gap of 6 mm between them and the J-profiles.
Step 7: it remains to fix the spotlights with which the under-eaves space is hemmed. It is done like this:
- We draw a line on the wall, which is a projection of the lower edge of the eaves.
- Along this line, we fasten the receiving profile for the soffit to the wall and another one along the edge of the eaves.
- We measure the distance between the inner walls of the profiles and subtract 6 mm from the resulting figure.
- We cut the soffit in accordance with the calculated value and install it between the profiles.
Vertical installation of siding is carried out in a similar way, only the frame profiles are screwed horizontally, and the starting bar is laid vertically so that its position coincides with the central axis of the wall.
Insulated siding installation
If the walls of the house do not consist of insulated sandwich panels ( frame technology), and from a solid log or timber - they should be insulated. The heat insulator is chosen taking into account the vapor permeability of the wall:
- if inside it is lined with a vapor barrier or finished with a vapor-tight material ( vinyl wallpapers or polymer plaster), you can use foam;
- if nothing prevents the penetration of steam into the wall from the inside, insulation should be done with basalt wool. The vapor permeability of the foam is 0.05 mg / m * h * Pa, so if it is installed on top of a wall that passes steam well, moisture forms on its outer surface.
Basalt wool is produced in the form of flexible mats (this design is also called rolled) and rigid slabs.
The mats are glued to the wall, then covered with a vapor-permeable waterproofing film and finally fixed with frame profiles.
Plates - both basalt and foam - are mounted a little differently:
- A wooden frame is fixed on the wall, the bars of which are placed parallel to the siding panels. That is, if horizontal installation of the cladding is supposed, then the wooden frame for the insulation should be installed horizontally. The step between the bars should be equal to the width of the heat insulator plates, and the height of the bars should be equal to the thickness of these plates.
- Heat insulator plates are laid between the frame elements. For convenience, they can be grabbed with glue.
- From above, the insulation is covered with a waterproofing film, which is sewn to the frame with a construction stapler. Please note: it should be vapor-permeable only if basalt wool is used as a heat insulator. Styrofoam can be covered with a cheaper film, such as polyethylene.
- A siding frame is installed on top of the insulation frame, the profiles of which are already perpendicular to the cladding panels (in our example, vertically). At the same time, these profiles will keep the insulation in the gap between the bars.
Do not finish at temperatures below those indicated in the siding documentation. Under such conditions, the material becomes brittle and will crumble when cutting parts.
Installation of vinyl cladding should begin from the back of the house, that is, the one that is not visible from the street. At first, novice masters, until they get their hands on it, always make mistakes, and here they will be the least noticeable. Such an installation order is all the more desirable if the panels are overlapped in length, since the joints from the side of the street will be practically invisible.
Every 3rd row must be checked for horizontality using a level.
Video: do-it-yourself wooden house siding
Installing siding is a wonderful way to finish a wooden house, which provides protection to the main building material, allowing you to give the house the desired appearance. The most popular is PVC siding, which is easy to install yourself.
Siding is a popular material for facade cladding. A practical homeowner chooses this particular type of decoration for the exterior walls of the house. Siding has a lot of undeniable advantages. Among them, the presentable appearance of the panels and the ease of their installation.
The market offers two types of siding: vinyl and metal. There are no fundamental differences in the installation of these materials. But there is a significant difference in characteristics.
Vinyl significantly more affected by ambient temperature. When heated, it expands; when cooled, it contracts. This feature is taken into account in the panel production technology: they are designed in such a way that during installation, the damping gap necessary to compensate for the expansion and contraction of the lamellas remains.


Vinyl siding has a significantly lower frost resistance than metal siding. Therefore, with prolonged exposure to low temperatures, it becomes brittle. This feature of vinyl must be considered by those homeowners who live in regions with a harsh climate. When hitting a fragile frozen vinyl lamella, cracks will certainly appear on it.

Unlike metal, plastic panels are not fire resistant. But they can be used as additional insulation of the facade.
In recent years, a modernized version of vinyl siding has appeared that is more resistant to UV (does not lose its color from sunlight) and has a lower coefficient of thermal expansion. It is a siding "under the rounded log". It looks more attractive than the flat panels that are sheathed in kiosks and industrial buildings. Therefore, it is able to make the facade of a residential building cozy and spectacular.


It has a wide range of colors, but is much less often used for cladding private houses.

There are several reasons for this:
- it has the property of heating up in the cold, thereby reducing the thermal protection of the walls;
- during rain, quite loud sounds characteristic of metal appear.

In order for the cladding of a wooden house with vinyl or metal siding to be of the highest quality, along with the panels, additional elements are purchased that are required for finishing window and door openings, gables, slopes. These are elements such as:
- start and finish line;
- spotlights;
- J and H profile;
- external and internal corners.


For sheathing a wooden house with siding, it makes no sense to buy full set additional elements. In choosing their type and quantity, they are guided by architectural and design features building. But start and finish bars are always required, no matter what. A set of panels begins with the installation of the starting bar and is completed with the installation of the finishing one.

Siding prices
The appearance of the cladding of the house depends on how well the crate is built. A frame assembled in accordance with all the rules is able to hide any flaws and irregularities in the walls and gables of the building. The crate is the base to which the canvases of the finishing material are attached.
When installing metal and vinyl lamellas, two types of frames are used:
- from wooden bars;
- from a metal profile.

Any one of them is suitable for mounting. facing material on wooden walls. A properly installed frame allows you to lay any of the modern heat insulators on the walls. The crate also provides the ventilation gap required to eliminate excess moisture.

Installation of the frame is not needed if the walls of the wooden house are perfectly even. On such a surface, you can safely mount siding without using the structure of additional supports.

Prices for mineral wool
Rules for mounting a metal frame
For the device of this type of crate, a metal profile is required, which is used for the installation of plasterboard walls, ceilings and partitions. These are PN 28x27 and PP 60x27. These planks will be attached to the wall of the house with the help of special suspensions, which the craftsmen call "pawns".

If you need to mount a two-tier metal carcass, suggesting the presence of a protrusion under the roof or in the upper part of the wall, special “crab” fasteners are used to connect metal strips. They are designed for strong docking between vertical and horizontal strips. As fasteners, self-tapping screws SMM 3.5x51 are used, which experts call "seeds".

Stages of installation of a metal crate

Step 1: drawing up a scheme of the crate
At this stage of work, it is necessary to decide which step between the racks of the crate will be optimal. This distance depends on what material is chosen for wall insulation. If it is mineral wool in rolls, then the step between the racks of the frame should be 3-4 cm less than the width of the canvas. This will allow you to lay the insulation in the openings between the racks of the crate so that there are no gaps between its canvases.

Step 2: Markup
Markings corresponding to the scheme are applied to the wall. Use a marker.
Step 3: Hanger Mounting

With the help of wood screws and a screwdriver, hangers are attached to wooden wall at home. These metal strips are placed horizontally, aligning the marking point with the center of the wide slot in the middle of the suspension. At the initial stage of siding installation, the perforated "legs" are not bent, but left pressed against the wall.
Step 4: installing the corner posts of the batten


Corner posts consist of two planks of profile PP 60/27 connected at a right angle. They will serve as the basis for installing the external and internal corners of the siding. When installing the corner posts, it is important not to make a mistake, and set the corner exactly as needed: for external corners, the protrusion is outward, for the internal corners, the protrusion is inward.
Step 5: installation of intermediate vertical racks of the crate


It is important that all vertical supports of the frame are located in the same plane. If a thread is pulled between the corner posts, the installation of the intermediate posts will be easier and faster. The lower and upper ends of the profile PP 60/27 are inserted into the guides PN 28/27 and fixed with self-tapping screws. Thus, the frame acquires the required rigidity.


Step 7: Mounting the frame for windows and doors


The metal frame around the window and door openings should be a solid frame of the correct geometric shape, exactly following the contours of the opening. It should be noted that slopes and low tide should have a slight slope from the window installed in the house. Therefore, the frame is mounted in such a way that its vertical and horizontal strips are indented 1-2 cm from the window lines. The same requirements are set for doorways.

Prices for popular models of screwdrivers
Screwdrivers
Rules for mounting a wooden frame
Having figured out how to make a metal frame for siding, it is easy to mount a wooden crate. It is set according to the same rules. But other materials and tools will be required:
- wood screws;
- hacksaw;
- bars with a section of 3x4, 4x4 or 4x5 cm.
Lumber is necessarily treated with an antiseptic solution that prevents premature destruction of wood. It is recommended to apply a double or triple layer of this composition. The bars should be well dried and even. A planer is used to eliminate flaws.

The device of a wooden crate for siding does not provide for the installation of guides. The ends of the vertical racks are interconnected by similar wooden bars.


Features of mounting the frame for sheathing the plinth with siding
Siding is suitable not only for facing walls and gables. It is also suitable for covering the foundation. Since the plinth is more often exposed to mechanical stress than walls and gables, it is recommended to mount a metal crate. It should be noted that each basement siding panel must be installed on 4 vertical posts. The distance between them must be the same.
Installation of siding on the crate

During the installation of the panels, their trimming will inevitably be required. Sawing is performed using a grinder and a circle for metal with a thickness of 1.5-2 mm. It is suitable for both metal and vinyl siding. For cutting panels and additional elements, you can use scissors for metal.
Step 1: Installing the Starter Bar
The quality of all further work will depend on how correctly the starting bar is set. Therefore, this process must be taken with all responsibility. The starting profile must be installed strictly horizontally along the entire length of the wall. In order to fulfill this condition, self-tapping screws are screwed in at the bottom of the corner posts of the crate so that the thread stretched between them is located strictly horizontally. It will serve as a guide when installing the starting profile.
It is important that when building up between the strips, there is a gap of 0.8-10 mm wide.


Video - Installing the starting bar
Video - How to insert siding into the homepage, installation using the example of Docke siding (Docke)
Step 2: installing the corner profile
The lower border of the profile should be 0.5-1 cm below the starting bar. When building up the corner profile, the side perforation is trimmed. The optimal overlap of the lower part on the upper one is 2.5 cm. There should be a gap of 8-9 mm between the perforations of the upper and lower corner profile.
If during work it turned out that the length of the corner profile is not enough to sheathe the corner, you should not rush to the store. You can use existing starter strips. They need to be connected to each other so that the desired angle is obtained: internal or external.


Step 3: decorating window openings
If the opening is in the same plane with the facade, two vertical and two horizontal near-window profiles are installed.


If window openings are recessed into the facade, installation of slopes and low tide will be required. It is important to correctly connect the near-window strips to each other so that water does not get inside the facing layer.

Step 4: Mounting the first panel


Siding panels are simply inserted into the H-profile with a gap of 5-6 mm
When fastening the siding and any of the additional elements, it is necessary to leave a gap of 1-2 mm, without screwing the self-tapping screw tightly into the frame. Otherwise, the skin will be deformed under the influence of compression-expansion forces.
The end face of the first panel is brought into the corner profile and the locking connection of the starting bar. After that, proceed to attach the siding to the crate. When building up the panel, cut off 4-5 cm of perforation.


Step 5: Panel Set
During the installation of the panels, it is necessary to regularly check the correct position of their position using bubble level at least 80 cm long.


Step 6: Mounting the Finishing Plank
When you reach the top of the wall, you will find that there is not enough space to mount the entire panel. In this case, measure the distance from the locking of the last installed panel to the top of the wall. Then they take a new panel, apply the appropriate markings on it with a pencil and cut off the excess. Fasten the siding to the crate and install a finishing bar on top of it.


Under the window, everything is about the same - the topmost bar is cut to size and simply snaps onto the bottom lock of the siding
Prices for aluminum stairs
Aluminum ladder
How to properly and economically install window adjoining
To form slopes, a plastic or metal L-shaped bar (L-profile) is used. Measure the length and width of the window block and cut the strips for the top, bottom and sides of the window.
In order to compensate for the difference between the thickness of the manufacturer's window strip and the width of the L-profile, two strips of the same length will be required for each side of the window. One will be inserted into the other, which will simultaneously strengthen the profile.
Take one bar and attach it to the top of the installed window block. Use self-tapping screws SMM 3.5 / 51. Similarly, the L-profile is fixed around the entire perimeter of the window.
In order to form the protrusion necessary for installing the near-window strip, the same, similar length is inserted into the profile fixed on the window. But first apply super glue on it. It is important not to forget that the glued profile must be dry and clean. The L-profile is inserted towards the one fixed on the window so that the short shelf is connected to the long one.
At the lower corner points of the window towards the crate, it is necessary to strengthen similar double strips of such a length that it corresponds to the width of the slope required in this case. These double short slats must be on the previously installed metal trough.
Measure the desired length of the near-window strip and cut it with scissors for metal. On each side of the plank, you need to make a saw cut at an angle of 45 °, which will allow you to form a beautiful slope. Before attaching the strip, cut off the excess perforated abutment.
The near-window plank is inserted into the L-profile so that its rectangular perforated protrusion closely adjoins the adjacent rack of the crate. Perform fastening.

Self-tapping screws, with which the siding is attached, must be screwed strictly into the center of the factory holes. But the last top skin panel can be fastened directly through vinyl or metal.


The finished result - the pediment is sheathed, spotlights are installed
Video - Step-by-step installation of factory window connections
Video - How to cut a near-window profile
Video - Installation of overlapping siding on a wooden frame
Video - How the siding ends at the top
Wooden houses are very popular structures that have a long service life, high quality, environmental friendliness and other positive parameters. Most often, people choose such structures because of their unusual and attractive appearance, however, it is often necessary to attach siding to wooden house. This is due to the need to create protection for the walls from various negative factors, as well as to ensure additional insulation structures. Sheathing a wooden house with siding is quite simple, if you understand this process well.
This is due to its availability, efficiency of work with it and ease of work. Facing can be done with materials created from different raw materials, and with a variety of colors and textures.
Before sheathing a wooden house with siding, it is important to decide what kind of material will be used for these purposes. You can choose from the following options:
- vinyl is considered the most popular because it is resistant to various weather conditions, it is light and inexpensive;
- the basement is suitable for the basement of the building, as it easily copes with high loads, exposure to high humidity and other factors;
- metal siding is very popular because it has a low price, attractive appearance and long service life;
- wooden allows you to get a beautiful view of the structure, which is especially important for people who prefer drawing natural wood, however, the tree tends to quickly collapse under the influence of numerous atmospheric factors, so such a cladding will not be durable;
- cement is considered inexpensive.
Which siding to choose? Each type has its own characteristics, so before buying a particular variety, you should evaluate the parameters of each option. It is important to pay attention to its characteristics, appearance, method of fastening and texture. Before you choose siding, you should decide on the available budget for these purposes. The most expensive material is copper or wood, and the cheapest is vinyl. What kind of siding is best for sheathing wooden houses is decided only by their owners.
Material calculation
Before sheathing a wooden house, you should calculate the number of panels for work. This allows you to immediately purchase the required number of parts, so that in the process of work you do not waste time purchasing different elements.
The calculation is based on the parameters of the structure itself. For cladding, it is important to consider the height of the structure and its area. Two methods of calculating parts for sheathing can be used:
- the area of \u200b\u200bthe walls that need to be faced is determined, and from it the area of \u200b\u200ball available openings must be subtracted, then the resulting amount must be divided by the area of 1 panel;
- a drawing is formed, according to which the required number of parts is determined by the piece, which will be attached to the outside of the walls, and the locations of the trimmings are also marked.
Important! An additional 10% must be added to the calculated value to guarantee the ideal number of cladding elements.
In addition to the siding itself, it is important to purchase accessories for its fastening. A heater and elements are bought to form a frame to which the panels will be attached. It is important to choose only high-quality elements, since the durability and reliability of the cladding depend on them.
The main components include:
- external corners, thanks to which the competent design of the corners of the house is carried out;
- ebbs for each window;
- starting bar, the length of which is determined by the perimeter of the structure;
- planks located next to the openings;
- planks called finishing and used for fastening to wallslocated on the roof;
- profiles for the formation of the frame.
Important! When choosing external corners, it is desirable to use integral elements, and not segments, so the longest parts on the market are purchased.
Preliminary work before fixing panels
Sheathing a wooden house with siding begins with preliminary stages, which include:
Preparation of the walls of the building. Here it is important to determine the condition of the walls. It is necessary that there is no dirt or other interfering elements. Filmed miscellaneous details which may interfere with operation. If there are cracks, they must first be repaired mortars. Each property owner knows his house well, so he can easily cope with the work.

Frame formation. It must be reliable and durable. For this, the most commonly used wooden slats with optimum moisture content. A metal substructure is ideal for wall cladding with siding. The length of the brackets must be the same so that there is no distortion of the cladding. The distance between the vertical guides should be no more than a meter to prevent sagging of the cladding.
Fixing the waterproofing layer. A special facade membrane is suitable for this, and before attaching it, you should make sure that the frame is completely ready and fixed. The most optimal, which not only has good waterproofing properties, but also allows steam to pass from the room to the outside.
How to sheathe a wooden house with siding? To this end, attention must be paid quality wall insulation. To do this, it is important to choose the optimal insulation, and different thermal insulation materials. Most often accounted for or stone wool. They must fit into the available spaces tightly. good option considered, although it must be protected on both sides from possible exposure to moisture. It is produced both in plates and rolls, and it is important not only to insert the material tightly into the cells, but also to fix it with mechanical fasteners. Wall insulation increases the comfort of living in the house, and much more is spent on heating it. less funds. It is important to choose a material that will have optimal parameters in terms of thickness. For insulated walls, you can even choose modern version work - the use of polyurethane foam, which is applied to the log house by spraying, therefore, specialized equipment is used for these purposes.
Windscreen fixing. Sheathing a log house with siding involves the preliminary fixation of special membranes that provide excellent protection of the structure from the wind. The outer layer is fixed to the frame elements.
After all preliminary and preparatory work, you can begin to mount the siding, for this it is important to follow clear instructions.
Frame sheathing process
The technology of siding a wooden house is considered simple, if you carefully understand it. The whole process is divided into the following steps:
- it is recommended to start cladding the walls after finishing the window and door openings;
- initially, the starting profile is fixed, which acts as an element to be guided by during sheathing with metal siding, which will allow you to get a perfectly even and high-quality coating;
- the first panel is inserted into the starting profile, after which it is securely fixed with self-tapping screws;
- the next part is laid with a small overlap, not exceeding 1.5 cm;
- you can evenly sheathe a wooden house with siding by fitting the panels to each other, for which they are cut with a knife or a hacksaw;
- the number of fasteners per panel may be different, since this factor depends on the size of the panel, as well as on the features of the crate made in advance;
- special attention is paid to the corners, which must be completely covered by the corresponding corner elements;
- do-it-yourself facade decoration is decorated with special decorative corners and extensions, which should have the same color as the panels;
- if any shortcomings or errors are found in the process of work, they must be immediately eliminated in order to sheathe a wooden house with your own hands attractively and correctly.

Thus, the process of finishing buildings using siding is a simple and understandable job. Many people who are wondering if it is possible to sheathe a wooden house with siding can see the results of this work on the Internet, which look very beautiful, and the resulting cladding lasts a long time. The work is done very simply, so it is allowed to implement it on your own, without having any experience. So, finishing a wooden house for siding is considered an excellent solution for any owner of such a structure. With its help, you can improve the appearance of the structure, increase its thermal insulation parameters, and also significantly extend the service life due to the fact that the walls will be reliably protected from various negative and destructive atmospheric factors.
Siding is already widely used in construction as a finishing material. Thanks to its beautiful appearance and ease of installation, siding has gained its popularity. Such a finishing material is used during the construction of a private house, cottage, bathhouse or other auxiliary building. Do-it-yourself sheathing of a wooden house with siding does not differ from sheathing of a house from another material, the technology of work is the same.
Reasons for using siding


Required Tools

House siding work is simple and do not require special knowledge, but still it is necessary to get acquainted with the sequence of work, as well as their features, especially if a person has not encountered this type of work. Before sheathing a wooden house with siding, it is necessary to purchase material, check the availability of everything necessary and perform preparatory work.
Tools that will be needed to complete the work:


Types of siding
There are several types of siding:


When ordering a finishing material, it is necessary to measure the finishing area and the number of openings. Sheathing windows with siding provides for additional material consumption.
In addition to the panels themselves, additional mounting elements will be required:


Preparing for installation
Preparation for the installation of siding includes the implementation of several mandatory items:
- Inspection of geometric indicators. Often, siding is used to trim not only new buildings, but also buildings that have been in operation for a long time, which could “sag” and change their geometric shape. Therefore, it is necessary to measure the diagonals of the walls so that they have a square shape. Also check the geometric shape of window and door openings. Using a plumb line, you need to inspect the perpendicularity of the walls to the base.
- Surface preparation. It is necessary to remove all protruding elements from the surface of the facade, it can be a lattice on the windows, a platband or shutters. Also, it is necessary to remove the falling off plaster or tile.
On the wooden surface paint, dirt and dust are removed, and the walls should also be inspected for the presence of fungus and mold. If present, be sure to thoroughly clean the surface with coarse sandpaper. Wooden house after cleaning treated with antiseptics, in order to further preserve the material from rot and fungus, as well as fire retardants to protect against fire in case of fire.
- Frame device. Step-by-step instruction mounting the frame is quite simple, first of all, you need to decide on the material of the frame. It can be wooden or metal.


For a horizontal siding device, the frame is installed vertically; if the siding is installed horizontally, then the guides are also mounted horizontally. Vertical siding is non-horizontal, installed vertically, and products of the corresponding design.
- Wall insulation. It is convenient to use mineral wool as a heater. The mats are cut to the desired length and placed between the guide posts. The insulation needs to be slightly larger in order to be firmly fixed in place. In addition to mineral wool, glass wool, polystyrene foam or extruded polystyrene foam can be used as a heater, but it will take more time to install such a heater.
- Waterproofing device. For finishing a wooden house, the presence of a hydro- and wind-insulating membrane is mandatory. If there is no insulation, then the film is mounted directly on the wall before mounting the frame. In the presence of thermal insulation, a hydro- and wind-insulating membrane is arranged on top of the insulation and frame. Under the installation of siding, the technology provides for the presence of waterproofing for the entire area of finishing.


Installation technology of siding and its structural elements
The technology of siding sheathing causes the device of additional decorative and functional elements. Mounting is done from the bottom up. Finishing the plinth can be plaster, tile or special siding.

Low tide- this is decorative element, which performs the function removal of atmospheric precipitation from the facade. The ebb is installed according to the level, observing the horizontal, and is attached to the special nail holes to the frame using self-tapping screws. If the nail holes do not fit on the guide post, then you can make a hole in the right place with a punch. The ebb is mounted in such a way that it can easily move within the nail hole, this will prevent deformation of the mounted siding. Low tide installed along the perimeter of the building above the basement. After installing one element, the next one is mounted with an overlap of 2.5 cm.

External and internal corners installed in one element to the entire height of the building. An element of an external or inner corner measured to size and cut with a grinder. Then it is installed in the appropriate corner and fastened with one self-tapping screw. In this position, you need to adjust so that the corner element is located strictly perpendicular to the foundation. When the level is set, the corner is attached to the frame with self-tapping screws in increments of 200 mm. Fastening is carried out in the same way as fastening the ebb. The correctness of the installation is checked by moving the element along the axis.

Start profile it is installed slightly above the ebb and fixed with screws to the frame in the same way as other elements. The correctness of fastening is checked by horizontal movement of the profile. If it does not move, then you need to loosen some fasteners a little.

The platband is cut to the size of the window opening. For each element, it is necessary to provide for cutting at an angle of 45 degrees. Thus, the size of each casing is taken with a margin of 150 mm. In the upper casing, special tongues 20 mm long are arranged to protect against atmospheric precipitation. First, the lower element is attached, then the vertical, side ones. The upper trim is attached last, the tongues are inserted into the vertical elements. Fastening is carried out in the center of the nail holes, and all elements must be able to move along the axis.

Siding installation starts from the bottom panel. The lower part is inserted into the starting profile, and the upper part is screwed to the rails with self-tapping screws. Fastening siding to a wooden house starts from the yard. Work starts from high traffic areas: doors or gates. If the length of the wall is greater than the length of the siding, a connecting element is installed, it is used as it, the ends of the profile are inserted into it.

After attaching the first panel the second one is installed, in the same way. The installation of the last panel is carried out only after the installation of the finishing profile. If the last panel does not fit, it can be cut off with a knife. The cut line is marked and drawn several times along it with a knife, and then the excess part of the panel is broken off with pendulum movements. Window and door openings are cut in the same way.

Soffit for finishing open gables of roofs gives the building a finished look. To install them, j-profiles are used. One is mounted against the wall, and the second parallel to it at the plumb roof. The distance between the profiles is measured and the soffit is cut along it, but it must be 6 mm less for possible thermal expansion. The soffit is mounted between the profiles.
Such a question as siding a wooden house worries almost every owner of such buildings. Finishing material is very popular due to its reasonable cost, simple installation technology and interesting appearance. But not everyone seems so, people who first encountered it have no idea not only how to fix the panels, but also about the performance.
Do-it-yourself installation of the crate
Any do-it-yourself siding installation on a wooden house begins with the preparation of the main coating. As is often the case in our country, the walls of the house outside are not perfect, so a crate is needed to compensate for unevenness. The base can be assembled from galvanized, aluminum profile or wooden beams. In this case, you can be guided by several principles:
- The metal crate will last longer and will not warp it from temperature changes and changes in air humidity like wood;
- The tree, in turn, significantly saves the budget, and the material is easy to work with (for an inexperienced worker).
Common vinyl siding, block house and basement siding are very popular in our country. All these types are mounted horizontally, from the bottom up. Therefore, in our case, we will consider mounting the frame directly under these types of materials. On our own, we add that the boards made under the “chopped log” look very nice.
General provisions
When finishing the house for siding, vertical racks must be placed at a distance of 50 - 60 cm from each other (mount the crate on which the basement siding will be fixed, you need at intervals of no more than 40 cm).
Before starting work, it is desirable to remove any irregularities from the surface of the walls that may interfere with the installation of the frame, and, if necessary, insulation.
As mentioned above, the location of the siding profile must be vertical, so the procedure should be as follows:
- A vertical is hung from each side of the wall, and 2 profiles are set along it;
- The top of one is connected to the top of the other with a fishing line. Similar actions are performed with the bottom.
- Following the specified interval of 0.5 or 0.4 m (depending on the type of material), the following verticals are fixed, on which the siding will need to be fixed;
- The frame around the window and door openings must be assembled from all sides, as the siding will be attached to it.
Wooden beam cladding

A wooden crate for siding on a wooden house will save you some money. In this case, you should be very careful about the condition of the wood. The beam should not have the following defects:
- Fiber bundles;
- deformations;
- Traces of rot, black or blue spots.
Immediately after purchase, all material must be laid in the shade, in a horizontal position and treated with an antiseptic.
useful at work
Since the repair is being done in a wooden house, it does not hurt to treat all the walls with these liquids.
Galvanized profile crate

In the case of using a metal profile, at a distance of 50 or 60 cm from each other, you should mark the lines along which you will need to fix the suspensions or brackets (this is necessary so that the fasteners are located strictly vertically relative to each other). The number of elements per 3 meters of the profile should not be less than 6 pieces. The convenience of their use lies in the fact that the unevenness of the walls of houses can be compensated for by numerous holes in the suspension.
Do-it-yourself warming of the house with mineral wool under siding
How to properly perform insulation, and not throw money away? This question is asked by many building owners. There is only one correct answer in this situation; the only heat-insulating material that is recommended to decorate the house from the outside is mineral wool and its analogues (stone, slag). The use of expanded polystyrene in this case is not recommended. Styrofoam does not have sufficient vapor permeability, which does not allow it to be used as an insulating material for wooden houses.
Step-by-step instructions for installing thermal insulation depend on the material from which the crate will be assembled. In case of use for these purposes wooden elements, the insulation plates are pressed against the surface of the walls of the house by the timber itself, on top of which another frame is mounted, it is on it that the siding for the wooden house is attached. 
Using metal material (profile and hangers) for mounting the battens, the situation with the insulation of the facade is somewhat simplified. The ends of the suspensions, fixed on the wall of the house, are bent perpendicular to the surface, and thermal insulation plates are put on through them. This must be done carefully, gradually piercing a hole with each side of the suspension. The greater the density of the insulation, the more difficult it is to do.
 Having fixed all the plates with the help of special dish-shaped nails and closing the wall, you can begin the installation of the crate. The only thing to remember is to check the tight fit of the thermal insulation to the surface. In some cases, the insulation is additionally fixed with glue.
Advice from the "facade"
Do-it-yourself insulation of the foundation (damage) of a wooden house
 Often for wooden houses, finishing the foundation and the so-called dam is a headache. Due to the fact that the houses are very old, their lower part was significantly dilapidated, and in some cases rotted, therefore it was lined with bricks. In such cases, they can be insulated using extruded polystyrene foam. The material is not afraid of moisture and rodents, therefore it is ideal for these purposes.
Installation of plates is carried out in the same way as in the case of mineral wool. The only difference is that it is recommended to foam the joints between the sheets. This will allow us to talk about the complete sealing of the foundation. In the future, you can sew up this part of the house with basement siding imitating brick.
Installation of siding on the crate
The technology of sheathing a wooden house with siding implies the exact fulfillment of the manufacturer's requirements for working with the material (the conditions are indicated on the packaging). The main one is compliance with temperature gaps. 
The fact is that plastic panels, when heated, are able to expand by 1 - 2 cm, while cooling, on the contrary, they narrow. You need to know this and leave free space between the trim elements, depending on the ambient temperature.
Basic Steps
In order to transform your house on your own, you need to know how to sheathe siding in accordance with all the rules, so you should follow this work in the following order:
- Corners should be set along the edges of the wall surface. External or internal it depends on each building individually.
It doesn't matter what material is used: ordinary vinyl siding, basement or metal siding, the work begins with fixing the corners, the starting profile and the planks.
- The following steps required to sheathe a wooden house with siding involve installing a starting profile. The bar must be fixed on the wall strictly according to the level. The quality of the work performed depends on this;
- If the length of the walls exceeds the size of one panel, you need to choose the installation location of the connecting "H - profile". It is desirable that it be placed symmetrically to another or edge of the surface. For example, in the middle of the window, doorway or that he divide the whole surface into equal sections;
- Siding installation technology involves the sequential installation of panels into each other from the bottom up. For this, there are special locks that firmly fix the connection. The first strip must be installed in the starting strip by snapping the connecting lock;
useful at work
In case of uneven ground level, the “J-trim” bar is used as a starting profile. Such a bar will allow you to cut the first strip of the panel diagonally and fix it without violating the appearance and technological requirements. The following bands are fixed sequentially.
- Vinyl siding is fixed to the crate with self-tapping screws. It does not need to be fully screwed in. There should be a gap of 2 - 3 mm between the cap and the panel. It is necessary so that the element can narrow and expand when changing temperature conditions(finishing the house with metal siding does not require compliance with such conditions);
- Having reached the upper strip, you need to install a finishing bar on the wall;
- Having measured the distance from the upper edge of the fixed panel to this bar, cut a blank from the new strip and special knife make locks for latches that are available in the finish;
- Install the topmost panel and make sure that the locks cut into it snap into place and prevent the strip from falling off. Finishing the wall outside with siding, it is imperative to cut out such latches. This will prevent the top element from falling out in strong winds;
Installation of siding on a wooden house is carried out sequentially, according to the instructions indicated earlier, until it is completely closed. flat surface walls.
Finishing the gable with siding
Having completed sheathing a wooden house with siding, you should finish the upper protruding elements, gables. First of all, the outer corners and the “J-trim” strips are fixed on them. If the place for setting the angle is clear, then the situation associated with the bar needs clarification.
It is mounted on the lower horizontal ground part, covering the finish, which ended the main surface. Another element must be fixed to the upper vertical "step", it is advisable to raise it as high as possible, pressing it against the roof covering with inside. Sheathing with gable siding can be done using special strips or by “cutting” the remnants of the material from the common surface. In this case, there will be practically no waste left, and the color of the whole house will be the same. The work procedure is similar. Finishing, performed without insulation, short pieces are cut right size and are fixed on self-tapping screws with the obligatory "under-tightening" to the stop.
Additional useful information
Knowing superficial information on how to sheathe a wooden house with siding with their own hands, many do not think about the many nuances associated with this work. They are no less important, so it is recommended to take them into account:
- Plinth siding installed close to the ground can warp (burst) due to the movement of the ground when the temperature changes. It is advisable to leave a gap of 1 - 2 cm;
- Before you start finishing a wooden house with do-it-yourself siding, it is recommended to visually check the joints between logs or timber. The outer wall is often damaged by insects or fungus. If necessary, replace the rotten area or foam it;
- Installation of siding on a wooden house built less than 1 year ago is not allowed. The walls must shrink;
- Basement siding is mounted in only one order. Strictly left to right and bottom to top. In the event that an incomplete panel is required to complete the row, an additional crate under it may be required. The horizontal jumper is installed without hangers, on the 2 extreme verticals;
- Renovating an old village house with new plastic windows can be a bit of a problem. Sometimes, the frame can be installed "not level, but along the wall." This is done in such cases when the differences in the thickness of the slopes between the top and bottom are very large. In this case, this opening should be trimmed only after a careful assessment of the situation. In any case, this error will come out somewhere. Or the thickness of the slopes will be uneven or the takeoff will pop up in some other place. This is the difficulty of finishing a wooden house with siding.
Sheathing your own wooden house outside with siding is not so difficult. To do this, you need an assistant and small skills in working with the tool. But after the completion of the work, the design of the walls will become individual and will definitely not leave anyone indifferent.


Do-it-yourself coal melting furnace
DIY rowing machine
Stone and brick cutting machine
How to make a vibrating table for paving slabs with your own hands
When is the new year in China. Blog about China. When does Chinese New Year start and end?