Having your own sauna is the dream of most homeowners. Many of them start independent construction to make the dream come true. One of the most important points in the construction is the organization of water drainage. A well-designed and installed structure will protect the foundation and wooden details from destruction, prevent possible appearance fungus and bad odors. How to make a drain in the bath according to all the rules? Let's figure it out.
Wastewater collection in the bath can be carried out different ways. The choice of the best option depends on what floors are planned to be laid. They may or may not leak. In the first case, it is planned to equip a special reservoir for collecting water, from which effluents will go into the sewer. In the second case, an inclined floor is equipped, and gutters and ladders are mounted along which water will drain.
In any case, the sewerage system must be equipped before laying the floors. General scheme its installation looks like this:
On this, the installation of sewage inside the bath can be considered completed. It remains only to connect to the system sanitary equipment and a toilet if needed. Now it's time to tackle the outdoor sewerage.

Video - the process of installing a sewer in a bath with your own hands
Prices for pipes for external sewerage
pipes for outdoor sewage
How to choose a waste disposal method?
There can be many options for organizing an external bath sewer. When choosing one of them, be sure to consider the following points:
- estimated intensity of use of the bath;
- building dimensions;
- type of soil on the site;
- soil freezing depth;
- the presence or absence of a sewer system on the site;
- Possibility of connection to the centralized sewerage system.
These are the most important aspects that will determine the best way to divert water. For example, for small bath, where two or three people will wash once a week during the warm season, it is not worth equipping a complex sewer system using soil filtration. This will be enough drain pit or even a pit under the building. Whereas for a bath in which it is planned to wash all year round, a more complex drainage system will be needed.

The type of soil is also important. For well-absorbing sandy soils, a drainage well is the best solution. This is not suitable for clay soils. Here the best option there will be an arrangement of a drain pit, from where drains will be periodically removed. When installing the system, one should not forget about the level of soil freezing. If it is not taken into account, water in pipes laid above this level will freeze in severe cold and destroy the sewer.
Methods for arranging wastewater disposal
There are several effective and relatively low-cost ways to organize the draining of water in a bath. All of them are fairly easy to do on your own. Consider their main advantages and disadvantages.
Drain well
It is a sealed container in which drains from the bath accumulate. When the well is full, it is emptied using a special machine. System advantages:
- simplicity in arrangement;
- It does not require special care;
- low cost.

The disadvantages include the following:
- the need for regular calls cesspool machines, which incurs certain costs.
- organization of convenient access for special equipment to the well;
- the drain well should be equipped at the lowest point of the site.
drainage well
It is carried out in the form of a pit filled with filtrate, which cleans the drains. As a filler, you can use sand, crushed stone, small pieces of brick or furnace slag. Design advantages:
- low cost;
- simplicity in arrangement.

Drainage well - as an element of diverting water from the bath
The system has one drawback - the need to change the contaminated filtrate or clean it every six months, which requires serious labor.
Pit
A hole dug directly under the floor of the washing room in the bath. Its bottom is filled with filtrate, through which runoff passes, is cleaned and gradually passes into the lower layers of the soil. System advantages:
- the use of pipelines and other structural elements is not required;
- low installation cost.
A pit is the easiest way to equip a sewer in a bath
The disadvantages include:
- low throughput;
- the technology is unsuitable for use in the construction of a bath with a slab foundation;
- suitable for use only on highly absorbent soils.
Using the Ground Filtration Method
It is a system consisting of a septic tank and pipes diverging from it, through which purified water is discharged. Pipes are laid at a slope so that the liquid flows by gravity and is absorbed by the soil. Design advantages:
- completely autonomous work;
- can be used to equip a full-fledged sewer system with several points for collecting wastewater;
- the possibility of cleaning not only "gray", but also "black" drains, in this case at least an anaerobic septic tank is installed.

Significant disadvantages:
- the need to allocate a site for a septic tank;
- time-consuming installation process, the need for a large number land works;
- rather high cost of equipment and consumables.
As an option, you can consider connecting to a centralized sewer. This is the optimal solution to the problem of wastewater. In this case, no external devices for receiving and processing wastewater will be needed. Another plus is the ability to connect several points of water intake at once. The disadvantages of this option can be considered the high cost of the services of contractors and bureaucratic red tape, which often occurs when issuing permits.
Drain well: manufacturing technology
Drain hole - practical solution for sewage disposal. It can be set up in a variety of ways. The easiest is to dig a plastic or metal container into the ground. You can make a hole from reinforced concrete rings, fill the walls with concrete or lay them out with bricks. Let's consider the last option in detail.
Drainage well - an excellent solution for draining sewage
We start by choosing the right place. It should be located at the lowest point of the site, since the sewage will have to move by gravity. In addition, we take into account that the pit will regularly need to be freed from drains, so it is necessary to provide a convenient access for cesspool cars. Having outlined the location, we get to work:
The drain pit is ready for use.
drainage well
Such a system can only be installed in a site with deep groundwater. Otherwise, due to design features drainage well, it will be constantly filled ground water, and there will no longer be room for stocks. Before starting work, we determine the place where the well will be located. It is optimal to take it from the wall of the bath by 2 meters. If the distance is greater, certain difficulties will arise with the organization of the necessary slope of the drain pipe, which is necessary for the drains to drain by gravity.

The drainage well is great way sewerage arrangement in the bath
In addition, the close location of the well threatens the foundation with wetting or subsidence. Having decided on the installation site, we find out what materials we need for installation. It depends on the type of soil. If it does not crumble, we will not need to strengthen the walls of the pit. However, such soils are not found everywhere. Most often, the walls need to be strengthened. You can do this in different ways:

Let's get to work:


The drainage well is ready for use.
Tip: If the site has sandy, well-absorbing soil, instead of a well, you can equip a horizontal drainage pad. It is a trench about 1 m long, 0.3 m wide and 1 m deep. A crushed stone pillow 20 cm high is laid out on the bottom, soil is poured on top. Drainage is brought directly to this pillow, cleaned and absorbed into the soil.
Prices for a drainage well
drainage well
Pit
The pit is a reservoir for wastewater, located directly under the wash room. You need to understand that such a system will be effective only for small baths that are used infrequently. Pit construction work is carried out in the following sequence:
- We dig a hole under the future floor, the volume of which will be enough to collect water.
- We strengthen the walls of the pit with any accessible way: brick, wild stone or slate.
- At the bottom of the resulting tank we lay a filter pad. First, a layer of crushed stone, broken brick or expanded clay is laid. We put sand on top of this layer.
- We mount logs on top of the pit. We lay a wooden floor on them, the floorboards of which should not fit snugly against each other so that water can drain into the pit.
Tip: The floorboards of the wooden floor laid over the pit do not need to be nailed to the joists. In this case, they can, if necessary, be removed and taken out to dry.

There is another option for arranging a pit, which in this case plays the role of a water collector, from which the effluents, having reached a certain level, are discharged into a sewer or septic tank. Such a system is usually arranged under "leaking" floors. Let's get to work:

Installing a water seal. This element is necessary to prevent the penetration of unpleasant sewer odors. The simplest option homemade water seal - a metal plate installed with an inclination. We fix it to the pipe in three places, leaving the lower part unfixed. Important: there should be 5 cm from the bottom of the pit to the bottom edge of the plate. Another option for a home-made water seal is a children's rubber ball fixed above the pit drain. When the tank is filled with water, it floats up and opens the drain. As soon as the water drains, the ball drops and closes the pipe.

Ground filtration
One of the main elements of such a system is an autonomous septic tank, which is both a sump and a distribution well. Depart from him drainage pipes, which distribute purified water throughout the site. A septic tank can be purchased at the store or assembled by yourself. In the latter case, the simplest option for self-manufacturing- construction of plastic or metal containers. A septic tank made of concrete rings, as well as a structure made of concrete or brick, works effectively.

A septic tank is an excellent solution for the removal of sewage
In any case, the installation of the system begins with the installation of a septic tank. We install the tank to a depth of 1.2-2.5 m. It is not necessary to lower the tank deeper, otherwise there may be a problem with the post-treatment of wastewater, which is carried out by anaerobic bacteria. We bring a sewer pipe to the septic tank. It should be buried below the freezing level of the soil. After installing the septic tank, we proceed to the preparation of drains, the so-called drainage pipes.
Their length and diameter depend on the number of drains. The most commonly used standard plastic pipes 11 cm in diameter. You can take ordinary plastic sewer pipes and make holes in them. You need to know that in the upper part of the part, the diameter of the holes should be smaller than those located in the bottom. This is done to ensure that the outflow of water is uniform. The number of holes at the beginning and at the end of the pipe also differs. At the very beginning, perforation is performed more often, and at the end - less often, and most of them fall on the lower half of the pipe.

For proper arrangement of drainage, several rules are used:
- the length of each drain cannot be more than 25 m;
- the pipe laying depth is about 1.5 m, always below the level of soil freezing;
- minimum distance between drains - 1.5 m;
- the minimum width of the trench for the pipe is 0.5 m, the optimal width is 1 m.
After the pipes have been prepared, you can proceed with their installation:


Scheme - the use of a septic tank as an element of arranging a sewer in a bath
Important: The soil filtration system requires periodic maintenance. It consists in replacing the silted sand and gravel cushion and the soil under it. Depending on the workload of the system, such work is carried out once every 10-15 years or less.
Properly organized draining of water in the bath is the key to its long and trouble-free functioning. It will protect the building from the damaging effects of moisture and prevent contamination of the site with sewage. Even for small baths, the arrangement of a sewer system is necessary, especially for large rooms with a separate shower room and toilet. The organization of the drain should be treated with all responsibility, avoiding mistakes and imperfections. And then the new bath will only please its owner with a long, impeccable service.
Despite all the benefits of civilization carried out on each garden plot and in a private house, the bathhouse remains a popular place for relaxing and taking water procedures. In order for the building to be reliable for many years of operation, it is necessary to observe building codes including water supply. Therefore, the arrangement of a drain pit for a bath plays an important role.
It is very important to properly organize the removal of contaminated water from the bath and the place of its collection. Since the presence of a centralized sewage system during the construction of a bath is not provided, and it is forbidden to dump waste into the ground or natural reservoirs, a special drain pit is necessary. This is a laborious process, but it is quite within the power of any homeowner who has enough strength to carry out earthmoving work.
According to the type of cesspools for a bath, there are three main types:
- A sealed recess, which is equipped in areas with shallow groundwater. This is a cesspool, which periodically needs to be emptied from the drains accumulated inside it. To collect contaminated water from the bath, a sealed container of large volume is installed inside the recess. This option differs from others in its environmental friendliness, since there is no contact of wastewater with groundwater and the soil itself. However, this design is inconvenient in that it makes it necessary to constantly monitor the level of filling with drains in order to empty it in time. In addition, regular services of a sewer are not cheap.
- Drainage pit with a leaky bottom, covered with drainage. Used as a filtering bulk layer construction material- crushed stone or gravel. Holes are often made in the side walls of the recess so that water from the pit penetrates into the soil. This is the most common and simple design bath drain. However, its arrangement is possible only in areas with deep groundwater.
- A septic tank is a more complex drain system consisting of several chambers. Most often, this design is equipped in cases where it is planned to use a drain pit to collect not only polluted water from the bath, but also the entire drain from the house. One of the chambers of the septic tank is sealed and serves to collect, filter and treat waste, during which solid particles settle to the bottom, and liquid particles are clarified and moved to another chamber through the overflow pipe. The second chamber is based on the principle of a drainage well, which filters polluted water and sends it to the soil. If there are more than two chambers, deeper water purification is performed.
Cesspool for a bath: the nuances of construction

Before starting construction, you should decide on the depth and size of the pit: the more people in the family, the larger should be the drain pit for a do-it-yourself bath. The quality of the soil and the depth of the aquifers should also be assessed. The type of drain construction will depend on this, as well as the answer to the question of whether it is necessary to strengthen the edges of the pit.
Before you make a drain hole, you should consider some of the nuances:
- The pit must be built before the construction of the bath itself begins.
- If the pit is located directly under the bath, the following conditions must be met: the presence of a pile or column foundation, the elements of which are carefully waterproofed; and ensuring good ventilation between the base of the bath and the pit.
- Drain pipe is installed under the required slope even at the stage of laying the foundation of the bath, it must be well thermally insulated.
If it is decided to make a drain pit at a distance from the bath, you should choose its location in advance.
How to make a drain hole for a bath

The simplest option for a drain pit, subject to the presence of strong soil, is a pit with a drainage cushion at the bottom. If the soil is unstable, the walls of the pit are reinforced with various materials: brick, slate, concrete rings, metal or plastic tanks. A small pit can be made from tires. For laying communications, metal or plastic pipes are used.
Construction stages:
- Drain pipe lining.
The drain pipe should be installed at the stage of laying the foundation of the bath. It is located at the bottom of the foundation with a certain slope towards the drain pit. The correct slope is 2-3 cm per meter of pipe length. If it is observed, its warming may not be necessary.
- Pit device
Simultaneously with the trench under the pipe, a pit is pulled out under the drain pit for the bath. A do-it-yourself cylindrical pit for a bath distributes the load on the ground better, so this form of pit is preferable to a cubic one. At the same stage of work, an overflow pipe is laid through the trench from the bath.
- Wall strengthening
To strengthen the walls of the sand pit, you can use ordinary slate. If it was decided to use brick, it is better to choose ceramic as it is more resistant to water. Laying is done in half a brick, and gaps are left between the ends for the effect of drainage. Laying should be carried out until 40 cm is left to the ground.
After the pit is ready, a drainage layer must be poured to the bottom. For this, a mixture of crushed stone with sand or gravel is used. The thickness of the drainage layer must be at least 20 cm. The pit is closed concrete slab or a sheet of thick metal.
Often barrels are placed inside the pits - metal or plastic. The second option is preferable, since plastic is not subject to corrosion, and this directly affects the duration of the structure's service life. In addition, a plastic barrel is easier to find, and it can have any volume.
Drainage pit for a bath of tires

The tire pit is very strong and very easy to build. For this, tires of any size can be used, but the larger the size of the pit, the larger the diameter they should be. During construction cesspool of tires, the level of groundwater should be taken into account, which should be one meter below the bottom of the pit.
One of the tires can be used as a template for a pit in order to dig a hole along its diameter. When the hole is dug to a sufficient depth, in the center of its bottom you need to make deep hole, it is desirable to reach the aquifers. A tube is inserted into it, which will serve as additional drainage. The visible part of the pipe should be at least a meter, many small holes should be made in it, and the top should be covered with a polymer mesh. The space around the tube is covered with crushed stone and gravel.
Next, the tires are stacked inside the channel on top of each other. Part of the top tire is cut off to make it easier to pump out water, and the inlet pipe is in a more stable position. Tires are fastened together with clamps, the seams between them should be treated with silicone sealant. The top bar should be slightly elevated above the ground. From above, the drain pit of tires is closed with a metal or polymer lid.
A bath is an almost obligatory attribute in a summer cottage. No shower cabins and bathtubs can replace the healing effect of a steam room, so a bathhouse is often erected even before a house is built. Do not forget that even the smallest bathhouse requires the disposal of used water. The simplest and, at the same time, practical option for local sewage is a drain pit for a bath. Consider how this structure can be built.
There are many ways to organize the removal of waste water from the bath. If it is possible to connect the drain to the central sewer or organize the discharge of water into a common drain ditch, then this option would be preferable.
But, if this is not possible, it is necessary to build local systems for receiving wastewater. Let's consider how to equip a drain pit, if this particular option for arranging a sewer is chosen.
What needs to be done before construction begins?
Everyone knows that the construction of any object or communication must begin with design. The building will not be an exception. treatment plant for a bath.
GWL assessment
First of all, you need to find out at what level the underground soil waters lie. If this level is high enough, then the construction of a traditional drain pit will have to be abandoned, since it will be filled with soil water.
How can you determine at what distance from the surface the groundwater occurs? As a rule, to obtain this information, it is necessary to carry out a hydrogeological study, including the drilling of ores. However, a preliminary assessment of the situation can also be made using ancient folk methods:
- If there are wells nearby, then by the level of water in them, one can draw a conclusion about the GWL.
- Another sign is that with a high GWL, many plants grow on the site that need moisture in large quantities. For example, horsetail, coltsfoot, reed, sedge, etc.
Determining the volume of chambers and other nuances of construction
The volume of the receiving chambers depends on how the bath is designed for the person - the drain pit should be the larger, the more people will use the washing room. With insufficient volume of the pit, wastewater simply does not fit in it and will flow over the edge.

Also, the quality of the soil on the site should be assessed, it depends on whether it will be necessary to strengthen the edges of the pit. If the site is small, then it makes sense to place a drainage drain hole under the bath. But this is possible under the following conditions:
- the pit must be built before the construction of the bath begins;
- the bath building will be raised above the ground, that is, it will be necessary to build a pile or column foundation, and the foundation elements must be very well waterproofed;
- need to provide good ventilation between the floor of the bath and the surface of the earth;
- the pipe laid between the drain of the bath and the pit must be insulated with high quality.
As can be seen from the above, the location of the drain pit under the bath is associated with great difficulties and involves a significant increase in labor costs for construction. Therefore, in most cases, a pit is built at a distance from the bath building.
The location of the treatment tank should be determined in advance. As a rule, it is recommended to place the pit at a distance of 2-2.5 meters from the bath. Otherwise, it will be difficult to build a pipeline with the required slope. In addition, you need to make sure that the pit is at a sufficient distance from the source of drinking water.
Laying a drain pipe from a bath
The arrangement of drain pits begins with the laying of a drain pipe, which will lead from the bath to the treatment plant:
- The construction of the drain pipe begins with the construction of the foundation for the bath.
- When laying the pipe, turns, bends and joints are not allowed. If this requirement is not observed, there is a risk of blockages.

- After installing the drain pipe, the floor is poured in the bath concrete screed, while the floor is made with a slope towards the pipe. After the screed dries, you can put on the floor tile or other moisture-resistant finishing material.
- The drain hole of the pipe should be protected with a grate to prevent debris from entering the pipeline.
Advice! Insulation of the floor in the bath, as a rule, is not done. Since a properly constructed floor warms up quickly when the stove is fired and does not let in the outside cold. The drain pipe, laid with the necessary slope, also does not require insulation.
Drainage pit construction
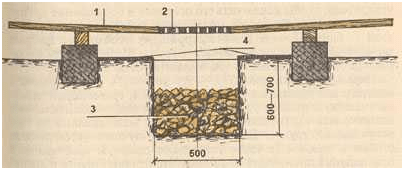
If the soil on the site is strong and, at the same time, has excellent filtering properties, then the construction of the pit consists in digging a pit and constructing a drainage layer of crushed stone or gravel.
However, such ideal conditions are extremely rare. As a rule, well-draining soils tend to crumble, so when building a pit, it is necessary to provide for the strengthening of its walls. Options for materials that can be used to lay out the walls of the pit:
- The brick is moisture resistant (ceramic).
- Slate sheets.
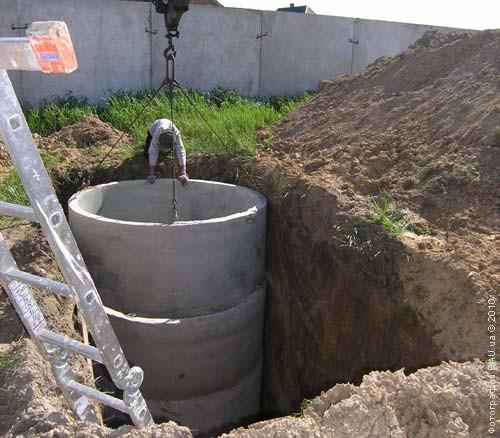
- Rings from reinforced concrete are well.
You can also use improvised materials:
- Old tires with a rim cut off on one side.
- Barrels made of plastic or metal. The bottom of such barrels is removed, and holes are made in their lower part for the passage of water.

Installation steps
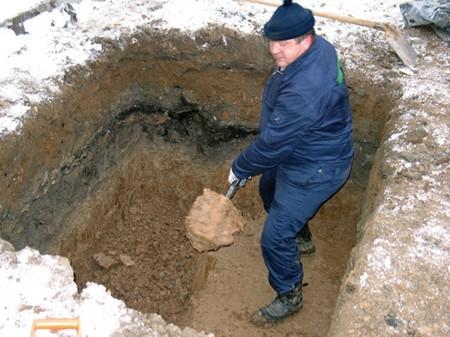
- The first and most time-consuming stage of construction is the preparation of a pit for a pit and a trench for laying a pipe. The excavated soil should either be scattered over the site (if it is high-quality soil), or taken out of it.
- During the construction of a brick tank, the walls are laid half a brick thick - this saves material. In the rows of brickwork, five-centimeter gaps are made to drain the liquid.
Advice! Masonry can be made not only from brick, but also from natural stone.
- When constructing a tank from concrete well rings, perforated products should be selected. If it was not possible to buy them, then you will have to form holes yourself with a puncher.
- After completing the process of strengthening the walls of the pit, the formation of a drainage layer at the bottom should begin. To do this, sand and gravel are poured into the pit, the layer thickness is at least 20 cm.
Advice! If there is no crushed stone, construction waste - broken brick or concrete can be used to form a drainage layer.
- Strengthening the walls of the pit is completed at a distance of 40 cm from the surface of the earth. At this level, an overlap should be arranged - put the finished reinforced concrete slab or pour the solution along the pre-built formwork.
- An opening should be provided in the ceiling, which will be used to control the filling of the pit with drains, and, if necessary, to pump out water. The hole is closed with a secure hatch. After that, the drain pit in the bath is ready.

Option to build a drain pit from barrels
If the bath will be used 1-2 times a week and it is not planned to install a toilet bowl in it, then a do-it-yourself drain pit for a bath can be built quickly and simply from plastic barrels. The use of metal drums is not recommended due to their tendency to corrode. There are two ways to build a drain pit for a bath from barrels. Option one:
- preparing a pit;
- at the bottom we form a filter layer, pouring crushed stone 40 cm high;
- a barrel without a bottom and walls perforated in the lower third of the height is installed on the prepared filtering layer;
- a drain pipe is connected to the barrel, going with an inclination from the bath;
- the pit should be larger than the barrel, after its installation, about 10 cm of free space should remain on all sides, which must be covered with fine gravel mixed with sand.
The second option is more complicated; two barrels are required to build a drain pit. The second is installed below the first by 200 mm. The barrels are connected using an overflow system.
Such a drain pit works on the principle of a septic tank. The first barrel is airtight, solid sediment settles in it. The second barrel is draining, how to make this option is described above. Water drainage from the second barrel can be organized into drainage ditches.
When building a bath, a system for discharging used water should be provided. An inexpensive and practical option for waste disposal is a drain pit for a bath. You can build this structure on your own, without involving teams of builders, since there is nothing complicated in its design.
One of the stages of building a bath on personal plot is the construction of a sewer. Draining in a wastewater bath can be done in many ways, but the most popular at the moment is. Due to the fact that the wastewater of the bath is slightly contaminated, this option is the most appropriate.
Finished brick drain pit
Since a simple drain pit drainage system is able to cope with the filtration of wastewater containing, as a rule, only water and detergents, the construction of other types of sewage for a bath is not economically justified.
The only thing that needs to be foreseen is the level of groundwater - if they lie shallow, then the drain in the bath will have to be organized in some other way. If there is a drain pit not far from the bath, intended for other buildings of the site, then it is possible to use it, it is only necessary to lay the necessary communications.
For those who want to make a drain pit on their own, the task is. It is not at all necessary to be a designer for this, it is enough to have some building skills.
 Diagram of a drain pit for a bath
 To begin with, you need to decide on the following parameters:
- The volume of water that will be used for water procedures in the bath. Depends on the frequency of visiting the steam room and the number of people washing in it;
- Type of soil on the plot;
- You also need to know how deep the groundwater is.
For an average family of four, as practice shows, the volume of water used will be small, and its visit will not be everyday. Consequently, optimal size the drain pit will be two meters deep and one and a half meters wide. If it is planned to receive more visitors in the bath, then it is best to increase the size of the drain pit.
It should be understood that baths, in which pools, fonts and other water reservoirs are provided, consume much more water, due to the need for periodic purification of them.
An important issue in the preparation of construction drain bath is to determine its location.
 The project of a bath from a bar with a pool
 There is a recommendation to locate a drain pit no closer than three meters from the building. With its closer location, there is a threat of destruction of the base of the bath, in addition, bath procedures can be overshadowed bad smell Wastewater.
It is also not recommended to make a drain far from the building, as this will entail unnecessary expenses for laying communications. Because the pipes from the bath to the drain must be laid out at a certain slope, this operation is very difficult to perform.
As noted above, if there is shallow groundwater on the site, it will be impossible to make a drain hole - otherwise it will be constantly filled with water. To solve the issue of sewerage in such areas, sealed tanks should be used, which will have to be emptied from time to time, or other types of wastewater disposal should be provided.
Read also
Barbecue bath projects
Materials needed for construction
If the soil on the plot is strong enough, then there is no need to strengthen the drain pit. In this case, construction is limited to digging a hole in the ground and arranging a gravel-sand cushion for drainage.
However, the type of soil does not always favor such a development of events. Typically, some strengthening work will be needed. The walls of the drain pit are best reinforced with bricks or slate. You can also make plastic or iron tanks.
Drain holes must be provided at their bottom so that water goes into the ground. Concrete rings are also used, but their use will entail significant costs. In any case, a gravel-sand cushion is needed at the bottom of the drain pit. 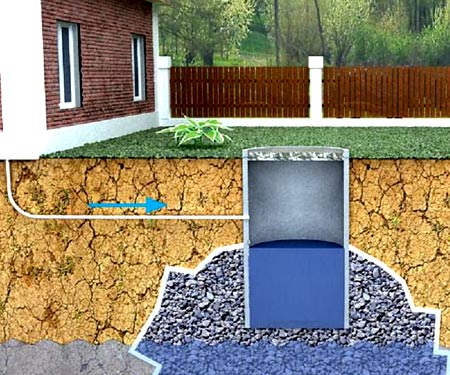 For laying the necessary communications, pipes from various materials: metal, asbestos. However, plastic pipes are the most acceptable in terms of quality and price.
The process of building a drain pit
When all preparatory work carried out, it is necessary to excavate and build a pit with a trench for communications. Further, the pit is strengthened, if brickwork is used, it is recommended to do it in half a brick.
When strengthening the walls of the pit, holes should be made after a certain distance to drain water into the ground. Natural stone is more preferable than brick, as such material will last much longer. It is worth noting that limestone is not recommended for use in conditions of high humidity.
 An example of a cinder block cesspool
 After the work to strengthen the walls is completed, a gravel-sand cushion about 20 cm thick should be made. Then the drain pit is covered with a concrete slab, or a screed is poured on top. Highly important point- this is the organization of a hole in the "lid" of the drain pit for the removal of gases.
In order for the owners to have the opportunity to control the filling of the pit, it is necessary to make an inspection hatch on top. In order to disguise an impartial drain hole on the site, you can place a flower bed on its cover.
Communications are laid in the ground at a depth not less than the depth of soil freezing, as a rule, not less than 0.5 meters.
Always requires the organization of a device for draining water. It is necessary to take care of the drain even before the start of its construction. The drain pit is the basis of the entire drain system. The option of water drainage with a drain pit is very popular among summer residents. If close to suburban area there is a sewer communication or a ditch, then making a hole will become impractical. In such cases, it makes sense to run drain pipes to the sewer system and or to the ditch. It is strongly not recommended to make a drain hole on plots of land with a high level of groundwater, as this will not lead to any good, and efforts will be spent in vain. Therefore, before proceeding with the construction of the bath itself, there is no need to rush to prepare the drain pit. If a drain pit is still required, then we begin construction.
So where do you start? Like any other building - from the design. Specialists in the field of engineering are not required here, but several calculations are needed. Answer the questions:
- How many people will visit the bath?
- What are the characteristics of the land on the site?
- How high is the groundwater level?
About what at high level it is better not to make a drain pit for groundwater, it has already been said. But how do you measure the level itself? The most accurate method is drilling a well. But not everyone has a drilling rig lying around in the garage. Take a closer look at areas where the vegetation is not watered. If moisture-loving plants grow there, then there is definitely water in the soil. The vegetation is dense, which means that the hole needs to be dug deeper. The volume of the cesspool will depend on how intensively the owners will use the bath. The more people will visit the steam room and shower, according to calculations, the larger the volume of the pit will be required. In the event of a deficiency, wastewater may eventually overflow. Is the earth loose? Then you need to strengthen its edges. If the soil is solid, then a plus in the piggy bank of time.
Having determined all the characteristics of the land and the "performance" of the future bath, you can choose a place for a pit. Specialists in the construction of baths advise digging a hole two meters from the walls of the bath itself. Too far - then the necessary slope will not be provided and the water will stagnate.
Materials that will be required for construction
With dense and well-absorbing soil, a lot of source materials not required. In this case, it is not necessary to strengthen the walls of the pit. The bottom can be laid with rubble and lath sand. However, cases with such an ideal land in our country are not common. In the vast majority of cases, the walls of the pit have to be strengthened, otherwise it may crumble. Brickwork, slate, or similar material works well for this. Another option: a plastic or metal barrel with a carved bottom, in the lower part of the walls of which you will need to make several holes so that the drain water is filtered through the ground.
An advantageous option for the shape of the pit is a cylinder. A pit made in this form distributes the load on the soil evenly, making it possible to reduce the risk of structural failure to a minimum. The cube-shaped camera is inferior in this.
Trench preparation and earthworks
Where to put the excavated earth? If the soil is of good quality, pour it onto an area with vegetation. Stones, sand and clay for export. Thinking about making a hole brickwork, ceramic bricks- that's it. durable material, which does not have "hydrophobia". You can save on bricks by laying bricks edge up. Between the ends you need to leave holes - this is an outlet for water. simple and useful advice- use natural stone not to spend money on bricks, profitable.
Laying completed? Then we proceed to the formation of the bottom, the waterproof bottom! The same gravel and sand will serve as backfill. Construction waste is also suitable. It is better not to underestimate the bedding layer, at least 20 cm. The upper part of the masonry should exceed the ground level by 30-40 cm. The pit is covered with a concrete slab or metal sheet.
If vehicles pass over the site above the pit, then the thickness of the slab should be at least 30 cm. If the soil does not absorb drain water well, then holes can be left in the slab so that when the pit is overflowing, drains can be pumped out. Only this hole needs to be covered with something, otherwise you can accidentally get into it. The fortification is completed, it remains to fill its outer part with already excavated soil (fill the unusable part of the pit with sand). In place of the former pit, you can grow plants or arrange a passage.
Pit from old tires

As a rule, drains do not contain solid waste, which means that arrangements can be very simple. Special materials may not be required at all. Improvised means will also fit. BOO car tires perfect for this. The larger the tire diameter, the better. The sidewalls of old tires must be cut with a grinder or a jigsaw. So, the prepared tires are placed on top of each other in the pit. The lower part of the pit is also covered with rubble. In the tire lying on top, you need to make a hole for the drain pipe and adapt it. After that, you need to put on the cylinders a metal sheet and fill it with earth according to the level.

Drain hole made with slate
Wave slate is perfect for filling the drain hole. The first sheet is placed on the bottom. The second is superimposed on the first so that their waves are in contact with each other high points. Subsequent sheets are also laid until 30-40 cm remain to the top of the pit. The drain pipe is inserted into the gap between the upper quarter of the slate masonry. You can strengthen the structure by filling in beaten pieces of slate, and then filling the remaining empty space with soil. This method is mostly suitable for sandy soil.
The last two methods should not be used if it is assumed that vehicles will pass at the site of the pit.


How to atone for your sins. How to atone for sin
The Crime of the Soviet Power and the Treasure of the Russian Orthodox Church - New Martyrs and Confessors of Russia Who are the New Martyrs of the 20th century
Prayer Easter Week
Can a husband and wife be godparents of the same child, for different children from the same family?
What prayers should be read in the morning and evening