Do-it-yourself ottomans can be made even by a beginner who did not hold a hammer in his hands. And for this it is not at all necessary to cut and screw something.
The ottoman itself came to us from eastern countries, where it was used both as a table and as a small chair. The ottoman, which gained popularity, served as a footrest for royalty, and in Soviet time not a single small apartment could do without an ottoman, because it did not take up much space.
A do-it-yourself ottoman has many advantages over ready-made models. Firstly, for the manufacture, you can use used things, for example, plastic bottles. Secondly, you can choose the desired color and shape of the ottoman.
This ottoman is lightweight, portable and easy to use. It can be carried from place to place without much difficulty. But to make it, you will need at least some skills in owning a needle and thread.
So, for sewing a soft ottoman with your own hands, you need:
- selected fabric;
- filling material (synthetic winterizer, holofiber);
- scissors, thread, needle;
- large decorative button;
- pattern.
How to sew a soft ottoman with your own hands: a master class.
 ottoman pattern
 - Cut out the details of the ottoman: in our example, there are only 12 pieces for each side of the ottoman. Cut corners on each piece as shown. Using this example, you can sew an ottoman from 6-8-10 or more parts by dividing the circle into the required number of sectors. The diameter of the circle depends on the desired size of the ottoman.
- Sew all the details first on one side, then repeat the same on the other.
- Sew both sides of the pouffe together from the inside, leaving a small opening for stuffing, turn the pouffe on the front side.
- Place the stuffing inside and sew up the opening with a blind stitch.
- Sew a button in the middle, pulling it a little inside the ottoman.
 How to sew an ottoman with your own hands: a master class
 A soft ottoman can be sewn differently. To do this, 2 circles of the same diameter and a strip of fabric are cut out of the fabric, equal circle circles, and a width equal to the desired height of the ottoman. Don't forget to leave seam allowances. For stuffing, a synthetic winterizer, holofiber or old clothes. The cover is sewn like this:
- Sew the long part to one of the circles of the future pouf around the circumference.
- Do the same with the other circle.
- Fill the ottoman with the selected material and sew up all the holes. If desired, a handle can be sewn on the side, for which the ottoman can be carried.


You can also sew a soft ottoman with your own hands in another shape, for example, a cube, or a hexagon. The main thing is to choose fabrics that are suitable for the interior of the room, dense and not elastic. You can also decorate the ottoman in different ways: sew on a canvas along the edges, embroider, sew on all kinds of ribbons and lace.

Pouffe from plastic bottles
Another original way, who conquered the Internet, how you can make your own pouf is the use of plastic bottles for making a pouffe. Either one large capacity from PVC with a volume of 19-20 liters.
For the manufacture of the ottoman you will need materials:
- plastic bottles (about 30 pcs);
- scotch;
- cardboard or plywood;
- cover fabric;
- synthetic winterizer;
- foam rubber.
Foam rubber is desirable to use thicker. so that the frame of the product is not felt through it. To decorate such an ottoman, ribbons, embroidery, lace, buttons, canvas are also suitable.
By the way, a cover for an ottoman can not only be sewn, but also knitted!
The procedure for making an ottoman from bottles will be as follows:
- The containers are wrapped with adhesive tape. The shape can be either round or square.
- Cut out a circle or square from cardboard or plywood, slightly larger than the bottle frame, and connect with it.
- Wrap around the perimeter of the ottoman with foam rubber, and on top with padding polyester. A synthetic winterizer is needed in order to hide the irregularities of the foam rubber.
- Sew a cover. For the cover, you can use any dense fabric of a suitable color.

Instead of a large number of plastic bottles for the frame, you can use one large bottle with a volume of 19-20 liters:
 Do-it-yourself ottoman from a plastic bottle
 Bus ottoman - master class
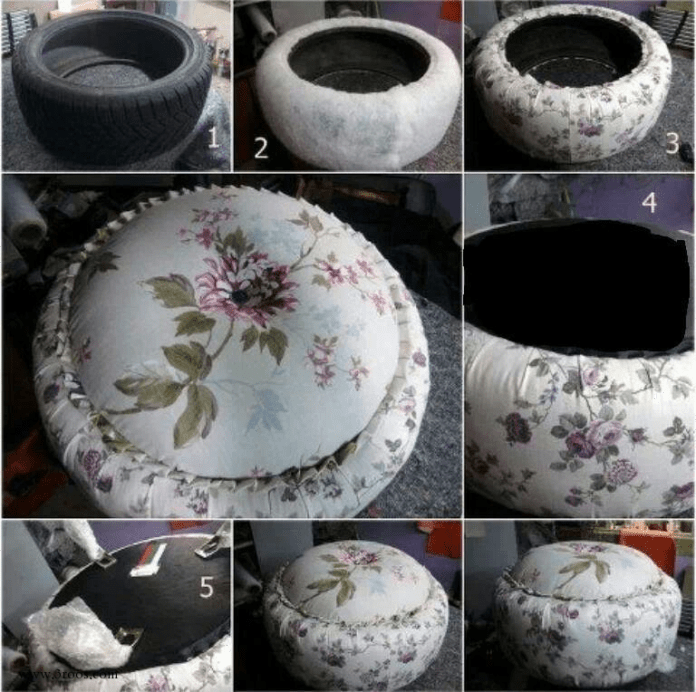
Who would have thought that an old car tire could serve as a piece of furniture! There are many ways to make an ottoman from a tire: use a plywood bottom and top, glue the tire with a rope, sheathe it with fabric or fur, even attach legs. However, one thing must be remembered: before use, this item must be thoroughly washed.
 Do-it-yourself ottoman from a tire
 So, to make an ottoman from car tire will need:
- old tire;
- plywood;
- twine or fabric cover;
- glue gun;
- screwdriver;
- wood screws;
- varnish and brush.
The master class for making an ottoman from a wheel is quite simple:
First you need to cut out 2 circles from plywood: one is slightly smaller in diameter than the tire, the other is in diameter (but so that the plywood does not protrude beyond the edge).
Then, with self-tapping screws, attach plywood circles to the bottom and top of the ottoman. Using hot glue, glue a rope or decorative cord in a circle. And then cover the product with varnish. Legs can be attached to the bottom if desired.

There is another option for making an ottoman from old tire, without the use of plywood (for those who are not friends with a jigsaw) and a screwdriver. In order to make the ottoman soft, it is wrapped with padding polyester, gluing it directly to the tire. Then the cover is sewn, as in the previous versions. In order to close the hole in the tire, you can use the same foam rubber or a regular pillow, having previously decorated it:
It is very practical to have a round ottoman in home interior. You can make such an ottoman with your own hands, but you will need a special tool. The manufacturer is not responsible for the quality of work.
For the production of an ottoman, materials will be required:
- Chipboard or plywood sizes 16, 18 mm;
- Wooden pine beam 20 × 40 mm, but there may be other sizes;
- Self-tapping screws 45 mm long, they fit best in size;
- Fiberboard 3.2 mm, 2.5 is possible;
- Foam rubber 40 mm, 1 mm: density 25;
- Sintepon 10 mm, possibly thinner;
- Leatherette (eco-leather), or fabric, genuine leather;
- Interlining;
- Odorless glue;
- Threads;
- Staples or nails.
After the procurement of materials, we proceed to the production of an ottoman
- First, cut out the bottom of the pouffe. This takes two halves. chipboard, connect and cut out two circles. The seat is ready.
- For the manufacture of legs, we cut a pine beam 45 cm long, 7 pieces.
- On two circles, we evenly mark places for attaching 7 beams. We drill 2 holes on one beam. With self-tapping screws, 45 mm long, we connect the legs with circles.
- A small frame came out.
- We cut the fibreboard into 2 parts according to the height of the ottoman.
- The plate is fastened with 16 mm brackets along the bars, as well as along the bottom and top around in a circle.
- The frame is ready. We begin to upholster the ottoman.
- First, we smear the top of the pouffe with ALIMP glue. ECO glue "and glue the foam rubber 4 cm thick. Then we lubricate the sides and glue the foam rubber 1 cm thick.
- Further, the entire soft surface is sealed with synthetic winterizer.
- From leatherette we cut out the upper part of the pouffe according to the size of the chipboard, as well as the sides and sew on sewing machine.
- We pull the finished upholstery onto the pouffe. The bottom is fixed with a staple gun.
- Flizelin close the bottom of the pouf.
- We fasten the plastic legs with a screwdriver and wood screws 3 cm in size.
Cut out chipboard desired diameter. A beam of the desired height, depending on the required height of the pouffe.


We upholster fiberboard around the perimeter.


To align the folds on the upholstery material, we use a synthetic winterizer.


Apply with a spray gun or just by hand.

Foam rubber thickness from above - 4 cm


We put on a cover and hammer it with a stapler or nails.

Screw on the plastic legs.

The round pouffe is ready.
When old interior already bored, and I want changes, it is not necessary to start repairs. Various additional items can change and revitalize the interior. Do not immediately go shopping in search of something new and unusual. Do not forget that with your own hands at home you can create many masterpieces. One of the practical and interesting things in the room is the ottoman. It comes in all shapes, sizes and colors.
You can enter it in any of the rooms and in different styles. If you are thinking about how to make an ottoman with your own hands, you will need a few useful ideas on this account. But the main advantage of such an item lies in the wide choice of materials for creation.
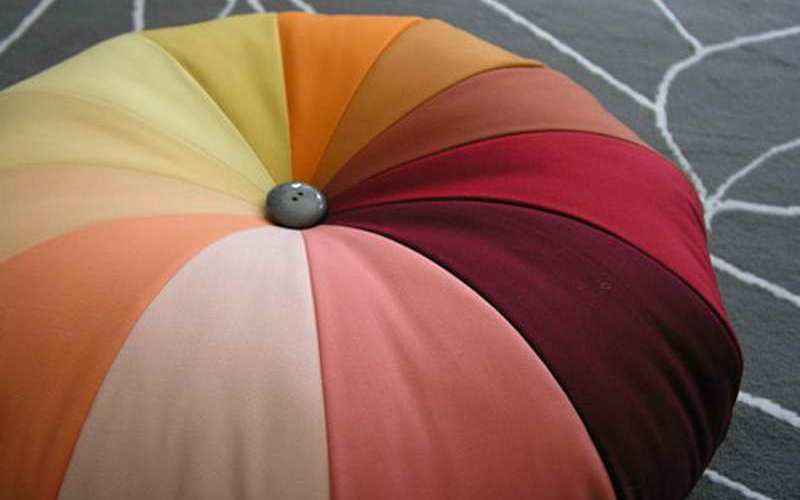
Multicolour fabric ottoman
Sewing a bright ottoman from fabric is not a difficult task.
Before starting work, prepare:
- fabric of different colors;
- lining fabric;
- filler;
- sewing machine;
- a needle and thread;
- 2 large buttons.
As a filler, you can take a synthetic winterizer or thick foam rubber. Then the pouf will turn out to be moderately soft and will keep its shape.

The first stage of work is a pattern. Draw a circle on paper the size you want the pouf to be. Divide this circle into 12 equal parts. Do you have fewer colors? You can alternate them or make a division into 6-10 parts. Finished patterns are applied to the fabric and triangular patches are cut out. Cut them out with a margin that will go to stitching. The fabric for the lining is cut in the same way.

The next step is stitching. Grab the petals of the circle between each other with threads on the sides, and then sew them on a sewing machine. You should get two round multi-colored bases - the top and bottom. They need to be sewn from the inside out with high quality. Leave one piece open to fill the pouffe.

The final step is filling. Put the required amount of filler inside the cover. The pouf will immediately become voluminous. There should be a lot of synthetic winterizer or foam rubber so that the pouffe does not significantly change shape when pressed. Carefully sew the last piece. And close the place of stitching the petals in the center of the circles with large buttons. Do-it-yourself multi-colored pouffe is ready.

Plastic bottles as a basis for a pouffe
Plastic bottles have many uses in everyday life. When a considerable number of them have accumulated, you can make an ottoman with your own hands.
You will need:
- about 40 pieces of bottles with caps;
- soft foam lining;
- cardboard;
- wide tape;
- cover fabric;
- needle, thread.

Take bottles with tightly screwed caps and use tape to connect them to each other so that they form a filled circle. Cut out 2 circles from cardboard. Their diameter should match the diameter of the bottom of the glued bottles. Tape the cardboard tightly to plastic containers. The frame for the ottoman is ready.

Then you should prepare the foam for the lining. 3 blanks are cut out: 2 circles of the same size with cardboard blanks and 1 rectangle. It will wrap around the ottoman vertically. You can fasten the workpieces with threads or construction stapler. It remains only to sew a cover for a pouffe from the desired fabric. This is not difficult if you have minimal sewing skills. A cute do-it-yourself ottoman is obtained quickly and cheaply.

Non-standard use of a plastic bucket
An old unnecessary plastic bucket can easily turn into a useful and beautiful thing- in an ottoman.
For the ottoman you will need:
- jute rope or rope;
- construction glue gun;
- cardboard;
- the cloth;
- stapler;
- big button;
- microfiber cloth.
A bucket without a handle should be turned over and tightly wrapped around with a rope. When winding, each stitch must be planted on glue so that the rope subsequently sits tightly.

When the task is completed, you can begin to build a soft seat for the pouffe with your own hands. Take the cardboard, attach it to the ottoman and cut out a circle from it the same size as the bottom. It is also necessary to cut a circle from the fabric, but with a diameter larger by 10 cm. Connect the fabric to the cardboard in the middle with a button. Roll the microfiber into a tube and start wrapping it between the cardboard and the fabric around the button. Use a glue gun to fix. Wind the fabric until you reach the edges of the cardboard. Attach the top fabric with a stapler to the back of the cardboard. The ottoman is ready, it remains only to connect the lid and base with glue or Velcro tape.

Functional ottoman with a box inside
The task becomes a little more complicated if you want to do it yourself and use the ottoman as a place to store things. Having a ready-made box will greatly facilitate the task. But it is also possible to do it yourself.
Prepare for him:
- 4 rectangles of chipboard of the same size. They will be the faces of the pouf;
- 2 squares of chipboard for the base and cover;
- wooden blocks for fastening and small legs;
- screwdriver and screws.
If you do not have the skills of a carpenter, then it is better to ask for help in collecting the box from a more experienced and strong man. Assemble the structure from the parts, use self-tapping screws and glue to fix.

The seat is not attached to the ottoman, it must be freely removed and put on. So that during operation the seat does not move out, on inside stops are attached to it. It is necessary to attach the stops at such a distance that when removing and putting on the cover, they do not rub against the edge of the chipboard and do not touch the bars inside.

The frame of the box must be covered with a cloth, you can fix it with a stapler. Inside the box is sheathed too. Thick foam rubber should be laid in the cover under the fabric for comfortable seating. This is how it turns out a practical ottoman with legs that will fit into any style of interior. You just have to choose the right fabric.
Video gallery
You can make an ottoman for the house with your own hands, even using different materials and techniques: crochet or knitting, sew from improvised means or even from an old sweater.
Our review presents interesting workshops on how to make an ottoman for a hall or hallway and non-standard ideas use of the product in the interior. So, let's learn how to create a stylish piece of furniture step by step and what you need for this.

There are many fillers for making frameless furniture. Each material has its own characteristics and features. 
If synthetic materials are not suitable, you should choose natural:
- Wood sawdust and shavings from waste cedar and pine. Raw materials repel pests, have a healing effect, but it needs to be changed periodically.
- Pooh Presents is a lightweight filler.
- Buckwheat husk is popular. This filling allows you to create comfortable furniture.
To the benefits natural fillers should include the absence of harmful chemical components.

Synthetic materials are also used as fillers:
- Styrofoam looks like small balls. Elastic granules allow you to create additional volume.
- holofiber is a lightweight filler. It allows you to get upholstered furniture.
- Polyurethane foam is an elastic material that does not provoke allergies.

ADVICE: It can also serve as a filler - an old blanket, pillow or rags
Products filled with balls can be used outdoors, because the material does not absorb moisture. For creation items furniture improvised means are also used. The original materials include cereals, legumes, dry grass and cotton wool. Options for furniture fillers a large number of
Knitted square ottoman with knitting needles
Let's find out how to make a knitted ottoman with your own hands. Yarn furniture handmade- an original solution for the interior and a soft object for a comfortable pastime. Stylish item looks like a sample from the store.

To make a soft ottoman with your own hands, you need to knit six squares of wool of the same size. Knitting is crocheted. The “sampler” texture and bobble ties are applied. You can see the knitting method on the video.
ADVICE: Such a pouf is suitable as an addition to an ottoman, as well as an item for decorating bedrooms and living rooms.
- Lyon brand yarn, 450 grams, gray - 5 skeins;
- needles for creating tapestries;
- crochet hook, size 6.5 mm;
- filling for a pouffe;
- special fibers and foam;
- plastic bags.
 Step-by-step instruction:
- Connect the squares with seams. To do this, you need a double thick thread.
- You can check the shape of the product on the box.
- Filling a piece of furniture. For the strength of the product, it is worth using materials such as plastic bags, foam or newspaper.
ADVICE: So that the filler does not penetrate through the knitted pattern, it is recommended to place a pillowcase or soft lining inside.

After filling, connect the two remaining sides. The yarn product is ready for use.


Master class from an old sweater
Let's figure out how to make an ottoman with your own hands from an old sweater. The lower part of the garment can be used to decorate the upper surface of the product. Even when cutting off the sleeves, ugly seams will not appear.
 Assembly technology:
- Turn the sweater inside out and cut around the collar.
- Sew up the hand holes with strong threads.
- Then turn the product inside out.
- The bottom should be slightly rounded.
- Place a special polyester lining inside the sweater. Then cut out two circles and connect these elements.
- The product must be filled with soft filler.


TOTAL: After stuffing the pouffe, sew up the hole. The decorative item has many uses in the home. This is a great solution for home interior design.


Crochet an ottoman
A round pouffe can be knitted with your own hands. For knitting a product with a diameter of 50 cm, you will need 2-3 balls of Bobbin yarn. A detailed description is presented in the photo below.

But the knitting technology is as follows:
- First, a basket or bag is knitted
- Filled with filler
- And then the “lid” is knitted separately and sewn to the base of the ottoman


How to sew an ottoman bag with your own hands: photos and ideas
An interesting product can be made for your child. Do-it-yourself ottoman bag is suitable for creating a cozy place for leisure activities.

A soft piece of furniture can be made from two pieces of fabric, bean granule filler and a zipper. Like option not suitable for small children as the filler granules may fall out of the zipper when opened. There is a risk that the child will choke. If necessary, the zipper can be sewn up.


IDEA in that we sew like a bag - BUT we sew the OPPOSITE corners and get the design as in the photo
Master class: how to sew a fabric ottoman
Universal products can be made from fabric. This is an additional seating area and a place to rest your legs. In this master class, you will learn how to make a round ottoman with your own hands.
For the manufacture you will need the following components:
- 1.25 meters of dense woolen fabric;
- lightning;
- scissors;
- measuring tape;
- sewing pins;
- a piece of skin;
- filler;
- sewing machine.

The process of creating ottomans
- Cut out a circle (46 cm), a rectangle (length 142 cm, width 40) and a square (side 48 cm).
- Cut the square into two pieces.
- Sew a zipper to two sides. The zipper should connect the two halves.
- Then cut out a circle from the square using the template you already made.


- Rectangle fold in half along the short side.
- After that, this part must be sewn to one circle, and then to another.
- From a strip of leather can you make a pen.
- Additionally, buttons are attached to the leather strap.


As a filler, you can take polystyrene beans. Foam or polyester is also used. Fastener - zipper is recommended to be sewn before use. Round do-it-yourself ottoman is ready to use.
Ottoman - bench in the hallway for shoes
To create an ottoman in the hallway with your own hands, you will need two drawers and some other materials. Such a product is not only practical, but also functional. Inside, you can install shelves and put shoes or things there.

You will need the following components:
- two wooden boxes;
- batting and foam for drapery;
- fasteners;
- sheet and burlap;
- special paint;
- plank of wood;
- wood glue;
- instruments;
- brush;
- stapler.

To make an ottoman in the hallway with your own hands, you need to follow these steps:
- The boxes are glued along the long side.
- A bar is attached to the bottom, where it will be possible to attach the rollers.
- Then foam and batting are fixed on the upper surface.
- The burlap is sewn together with the sheet. The sheet plays the role of a lining.
- The box is covered with special paint. Optionally, you can apply the effect of aging.
- The cover is put on over the boxes.

From the boxes you can make other do-it-yourself ottomans, the photo shows the original options. One of the options involves opening drawers, inside which you can place shelves for shoes. And on top is attached a soft pillow with a filler.

- A practical option can be made from one box. First, the box must be sanded and painted with spray paint. Filler is laid on plywood, and fabric is laid on top.
- The material is fixed on the reverse side with a stapler. W
- The plywood is then attached to the surface of the box. Rollers can be attached at the bottom.


How to make an ottoman from a stool
When deciding which ottoman you can make with your own hands from improvised means, it's worth a try. For creative manipulations, you will need an old stool.

Let's start assembling:
- Disassemble the chair and remove the seat.
- Cut out the blanks. Circle in plywood and paralon.
- Use glue to attach the foam to the board.
- Put on a fur cover on top, and secure the ends with a stapler.
- Assemble a chair.

It is necessary to let the chair stand for at least a day for the glue to harden. The fur needs to be combed.
Detailed in this article.
Ideas for ottomans from improvised means
Consider options for ottomans with original design. As a filler and frame, ordinary objects, tire bottles and rags serve here.
bottles
An unusual creation do-it-yourself ottoman from plastic bottles. Bottles need to be fastened in a round shape and fixed with tape. The bottom and top of the product are made of cardboard.

The bases are made of foam. They are fixed with tape. The cover is made of beautiful fabric. You can see the design of the bottles on a photo. A similar item is suitable for decorating a living room.
Tires
Interesting models can be made from tires. How to make an ottoman depends on the availability of improvised materials and skill. Tires need to be fastened together. Inside is placed a material similar to foam rubber. Then the holes are closed with thin boards. A soft base is mounted on top and a cover is put on. To design the design, you need to use dense fabrics.

Ottomans for children
To make an ottoman with your own hands, you can use the drawings and diagrams. For the manufacture of products used bright and colorful fabrics. Try these options:
- It looks interesting model made of two pieces of material different color. Solid color fabric can be used at the bottom.
- A wonderful solution - square-shaped designs.
- The original composition will be obtained by using fabrics of different colors.
- Kids will love the cone shaped ottoman.
- You can even sleep on a long ottoman. To make it, you will need flat pillows and a long blanket. Pillows are placed in a fabric cover and are fixed in place.


Ottoman in the interior with different designs
The choice of ottoman option largely depends on the type of room. For the hallway, you should choose frame models with a rigid base. Cylindrical designs allow you to smooth out the angularity of the room. For comfortable rest in the living room, models with soft upholstery are suitable. To create an accent, you should choose a product from a material with a bright color palette.


Round puffs - perfect option for small spaces. Rectangular is recommended to be placed near armchairs and sofas. The product for the kitchen should be made of moisture resistant fabrics. For a child, you need to choose safe, comfortable and soft models.


We hope that our master classes will help you find out in detail how to make an ottoman yourself from simple materials. Homemade products will add comfort and coziness to any room. Original seats are suitable for different interiors.

How to make an ottoman with your own hands without throwing money away? Of course, you can buy it in furniture store, but looking at the cost of a simple chipboard product, there is a desire to do crafts at home. If we consider furniture sets as a whole, then most of them belong to rather complex structures.
To make something from this list with your own hands is within the power of experienced craftsmen, and only an ottoman is made without special skills and knowledge from improvised means. A practical thing will turn out when a strong and high-quality upholstery fabric is chosen, which can be wiped, cleaned, washed.
Such materials include leather or upholstery fabric sold in specialized stores. It remains only to view step by step instructions for the manufacture of ottomans of various shapes.
So:
- An ottoman for seating several people is comparable in height to an armchair and more like a soft bench. For the home, such a model is inconvenient, and not needed, but in the fitting and waiting areas it is very relevant.
- Ottoman in addition to something with a certain height. From the definition itself, it becomes clear that it is not an independent product, but serves as an application. Models that barely rise above the floor are not designed to sit on them, but are used as footrests for adults. Children love such things in miniature and are happy to use them in their games.
- Complementing armchairs, sofas, beds, sliding under the table or being a component in a non-standard combination (beach cabin with a pouffe), ottomans firmly occupy a niche in furniture stores. We can say more, there is a fashion for designer items that make the interior fashionable, complementing it.
- The video in this article introduces poufs with advanced features. Looking through it, you remember the plot of the film, when “with a slight movement of the hand, the trousers turn into shorts”, and here the ottoman transforms into a full-fledged chair with a table, a bed with a lamp stand and others. necessary items while taking up minimal space.
Before you start making an ottoman with your own hands, you need to have an idea about this seemingly unpretentious furniture family.
So, poufs are classified according to materials, construction, functions and forms:
- Textiles, leather are used on soft products. It’s nice to throw your legs on a do-it-yourself ottoman, and when sizes allow, then fall apart on it.
- Rigid designs of ottomans are made of rattan, wood, often varnished, cork bark. Rigid ottomans, made by hand, are not very suitable for long-term sitting, but they bring liveliness and intrigue to the interior.
Attention: The ottoman definitely refers to the right thing, and its need is felt at the entrance to the house, more precisely, to the hallway.
- How to make, sew, knit and what design of an ottoman to choose is not an easy task. The ottomans can be with exposed frames made of steel tubes or wood.
- The ottoman may have closed frame , and the legs are hidden under the frills of a decorative skirt. Such products are popular with the British and Americans.
- Pouffe on barely visible legs when copying a chair without armrests and backrest.
- Do-it-yourself ottoman with a back- Not only comfortable armchair for members of the whole family, regardless of body weight, but also an excellent support for a sore back.
- What could be simpler than an inflatable ottoman, consisting of a textile cover with a zipper and an inflatable chamber inside it? Ottomans differ not only in materials, designs, but also in shapes.
- Do-it-yourself square ottoman, round, triangular, combined from different geometric shapes, can be made from improvised means.
Improvised tools in the house
How to make an ottoman yourself if you don’t have the skills and desire to cut, cut, twist? Craftsmen offer a lot of ideas and proposals brought to life. The work of making a cute ottoman is not difficult, but quite exciting, and a hand-made thing radiates special warmth and has an aura of home comfort.
Soft ottomans
The most simple circuit how to make a soft ottoman with your own hands is as follows:
- Two circles are cut out of the fabric with a diameter equal to the diameter of the upper and lower parts of the product.
Tip: When cutting out the details, you should not forget to leave allowances for the seams.
- Two rectangular parts of the same size are cut out:
- width along the height of the pouf;
- a length equal to half the circumference of the top and bottom of the pouffe.
- Rectangular parts are sewn together on one side along the width to obtain a long ribbon.
- One of the circles is swept to it and stitched along the seam.
- The same is done with the second round.
Tip: If the seam is not too even or neat, it is sheathed with a decorative border.
- The resulting pouf cover is stuffed with any suitable material.
- A zipper is sewn into the unstitched edges remaining in the rectangular tape.
The photo shows a scheme for making a pouffe in the simplest way.
Similarly, you can make an ottoman having the shape of a cube. The difference is in the manufacture of parts that must have a square shape, and for the manufacture of the sides it will be necessary to make four parts from the fabric, not two.
Then:
- The details fit together.
- To more clearly indicate the edges of the cube, you can use a canvas of a different contrasting color.
- Additional strength, elasticity will give a denser fabric.
- The stuffing of such a pouffe can be done with synthetic winterizer and foam rubber. These materials hold their shape perfectly and do not deform.
- A hole for stuffing the material is made at the bottom of the pouffe so that it is not visible.
- If desired, it can be stitched tightly after stuffing the pouffe, or a zipper can be sewn in, so that the material can be replaced if necessary.
Sewing an ottoman
- The video in this article demonstrates the procedure for sewing an ottoman of 8 elements. To do this, a sheet of paper is folded four times, a template is drawn and cut out on it according to the diagram below.
- The unfolded template is fixed on the fabric and cutting of blanks in the amount of 8 pieces begins.
Attention: It is not necessary to purchase for a pattern new fabric, you can use old deposits of knitted clothes, old sweaters.
- The photo below shows that the sharp end of each hexagon is bent inward by about 5-6 cm and stitched on a typewriter, which allows you to get an octagonal hole for stuffing the finished product after assembling all the elements.
- The blanks are attached in pairs to each other with an indent from the edge of about 1 cm. The pairs are added front side so that the seams are obtained from the wrong side, there are 4 segments of 2 blanks in the stitched form.
- Similarly, they are sewn together in 2 sections and 2 halves of the future ottoman are obtained.
- The halves are connected to each other on a typewriter, the cover is turned inside out.
- The ottoman is stuffed with prepared filler (holofiber, foam rubber, synthetic winterizer), and the hole is closed with a cap of the appropriate size. The edges of the lid should already be finished, and it is manually, carefully sewn on top of the stuffing hole.
- The instruction for beginners recommends sewing an ottoman with literally three seams. Why cut out 2 circles, the diameter of which is about 50 cm or 2 squares, if you like clear lines more. Geometric shapes will serve as the top or bottom of the future product.
- From the same material or from another, a strip is cut out with a size corresponding to the circumference or perimeter of the square, the width of the strip depends on the height of the ottoman. The height of the ottoman, in turn, is selected depending on the function that the product will perform, whether it is a footrest, a seat in the hallway, a toy for young children or a structure in the living room.
Attention: Cutting the strips for the sidewall of the ottoman is done taking into account the allowances for the seams.
- The work is carried out in such a way that the seams are on the wrong side, the strip is sewn first of all to the bottom of the product and only then to the top.
- After stitching all the seams, the ottoman is turned to the front side and stuffed.
- According to the same patterns that are presented above, for the first option and for the second, covers for an ottoman with a zipper are cut out. This will allow in the future to wash the cover or clean it without unnecessary problems and time-consuming, and not solve the problem of how to sheathe the ottoman with fabric if it is already made of fabric.
Reliable base for plastic bottles
- Plastic bottles are available in every home in unlimited quantities. Take at least bottles of beer and water with a capacity of 1.5 - 2 liters, their color in the finished product does not matter, and they will help to unload the rubble in the yard and house.
- To make a good, stable ottoman, you will need at least 16 bottles with a capacity of 1.5 liters or 9 pieces of 2 liters.
- Packaging cardboard from household appliances also waits for its turn and is not thrown away for years, what if the refrigerator breaks down, how to take it for repair? The video in this article will show how cardboard is used in the manufacture of an ottoman from plastic bottles.
- It is necessary to stock up on tape, foam rubber and upholstery.
- Hot glue gun, zipper for case.
Attention: From round bottles you can make an even larger circle, square or rectangle, that is, the shape of the product is chosen from your preferences.
- For ease of use, if a very large ottoman is planned, the bottles are connected into separate sectors and sections with adhesive tape, and then the formation of the overall structure begins.
- If the future product is planned to be round, then the ottoman needs to be made starting from the middle.
- For this, a bottle is taken and, with movements along the radius, new elements are attached to it, which are carefully fixed with adhesive tape to each other.
- After the circle is completed, the base is cut out of thick cardboard. It should be slightly larger than the bottle design.
- Cardboard is also fastened with adhesive tape in several layers. Once again, there is no need to dwell on the point that 2 grounds should be prepared, and so everything is clear.
- It's the turn upholstery, for which two parts for the top and bottom are cut out of a dense web of foam rubber, which are glued in place.
- From the remaining part of the foam rubber, a rectangle is cut out according to the size of the circumference line of the side part, which wraps around the pouffe.
- There remains the final stage of sewing a cover made of furniture fabric, preferably with a zipper. This operation will not only allow you to easily remove the laundry cover, but also make several options and update from time to time appearance of your product.
Ottoman from a grandmother's rarity
How to make an ottoman out of a stool so that grandmother's rarity will serve for more than one year?
Indeed, a stool made of solid wood, well-knit at one time, painted oil paint, may please the owners for many more years, but the appearance does not correspond to the modern situation. Reworking an old stool into a stylish ottoman will help to balance the interior.
- The design of the stool is pre-strengthened with self-tapping screws.
- The legs are a little shortened - do not forget to check the level so that the ottoman does not stagger later.
- The frame of the future ottoman is being assembled, for which 4 sheets of plywood are used. They are attached with screws to the legs of the stool.
- The fifth sheet of plywood is screwed from below and serves as the bottom of the future craft.
- The foam for the seat is cut out with an allowance of 5 cm.
Attention: The upper part of the ottoman is smeared with glue, then the foam rubber will not stray over time into an untidy lump.
- The upholstery fabric on the seat is fastened together with foam rubber using stapler staples.
- The foam rubber on the sides can be attached with slats, which help to give the ottoman a round shape and make it more beautiful.
- The remaining part of the structure is made out with a fabric, fixed with staples.
- The wheels are screwed on or, as in the photo above, cute little legs of an updated stool peek out from under the coquettish upholstery.
- The task of how to make an ottoman from a stool was solved in a short time.
For lovers of knocking
The rich Russian language causes many associations and questions. How to knock, where to knock, when to knock? For those who like to hit a nail with a hammer, it is proposed to make an ottoman with your own hands from boards and chipboard.
- Pre-prepared rectangular pieces of 40x30 cm from chipboard in the amount of 4 pieces.
- Circle with a diameter of 30 cm and wooden blocks 4 pieces.
- Glue for wood.
- Furniture wheels with special fasteners.
- Metal corners, self-tapping screws.
- Foam rubber and upholstery fabric.
As you can see the set the right materials does not differ much from each other when we make an ottoman with our own hands, even in different ways:
- A box is assembled from rectangles. They are on the move metal corners, self-tapping screws, all corners of the structure are aligned, they must be straight.
- On the lower part, the bars are fixed with glue, on which the wheels will be located in the future.
- From above the base on individually picked up form fastens.
- The finished frame is upholstered according to the same type of technology using foam rubber, fabric and a zipper on the cover.
For lovers of knitting and stuffing
How to make a frameless ottoman with your own hands and therefore soft. Crocheted needlewomen will be able to knit a soft ottoman much faster, but not everyone may like their appearance.
Lovers of working with knitting needles present interesting models of ottomans, knitted specifically on them:
- For work, you will need the thickest knitting needles that are available in stores.
- Quite thick wool is suitable for knitting needles with a diameter of 9 mm.
- Ordinary threads offered in stores are too thin. The price for them is not high, but due to the fact that you have to make thicker ones, weaving them together, you will have to purchase a sufficiently large amount, which will add to the cost of the product.
- Of course, you can cut, unravel, twist unnecessary knitwear, which takes a lot of time, and it’s quite problematic to find the right amount of plain knitwear that has fallen into disrepair at home.
- It seems that the solution to the problem of how to make an ottoman with your own hands has reached a dead end, but cotton clotheslines caught my eye.
Warning: Synthetic clothesline is not suitable for this job, and cotton ropes are difficult to obtain in small towns.
- For a soft ottoman of sufficient size, 20-30 of these ropes are required, which are tied into a long rectangle.
- The side is fastened with a rope to get a spacious, wide skirt.
- The bottom is pulled together with a rope of the same color and a bag is obtained that needs to be stuffed with something. There are 2 options here - use junk neatly folded on the shelves in the closet or go to the store and purchase foam rubber or holofiber.
- From unnecessary junk, the ottoman turns out to be heavy and not as round and lush as from store materials, but it frees up space in the closet for new clothes.
- The top of the ottoman is made out with the same rope and you can try out your product.
Ottoman from an old bucket
Here's another one interesting solution, for which we will need: an old plastic bucket, a thick jute rope, a hot glue gun, a stapler, scissors, a furniture locker handle, Velcro tape, upholstery fabric and several new microfiber cloths. You will also need cardboard, but it will be better if you replace it with thin plywood.
- First of all, wash the bucket and remove the metal handle from it.
- Next, use hot glue to glue outer surface bucket rope, starting from the bottom.
- Cut the end of the rope and carefully hide.
- Place the bucket upside down on cardboard and circle it. According to the intended pattern, lay out the upholstery fabric and cut off a round blank with a 5 cm outlet.
- We make a hole in the center of the cardboard and fabric. We pass through them a bolt from a furniture handle and wind the knob.
- Next, we roll the fiber into tubes and wrap the bolt radially between cardboard and paper, creating a kind of roll. To prevent the fiber from unwinding, securely fix it with glue.
- Then the fabric is stretched and fixed on the back side with a stapler.
- To hide the traces of cardboard, close reverse side seat with another piece of fabric that needs to be glued on.
- Cut the Velcro into four equal lengths and stick them crosswise on the bottom of the bucket and the base of the saddle - with the bristles to the bucket, and the fluffy part to the seat. Connect the two pieces. Hooray! The pouf is ready!
The result is such a useful craft, which you can comfortably sit down on.
Various options provide an opportunity to solve the problem of how to make an ottoman yourself from improvised materials, which are available in abundance in any home. The only thing I wanted to focus on was the floor in the room.
Laminate is quite sensitive to mechanical stress, so it is better to make an ottoman without wheels and legs, that is, with a solid bottom. On a soft surface, carpet, carpet, ottomans on rollers are appropriate, but there are no restrictions for tiled flooring, unless forged legs can be an exception.
Chipboard ottoman
In one toast, the hero of the "Prisoner of the Caucasus" expressed the very essence of being, so that "our desires coincide with our capabilities." There is free time and a desire to make an ottoman with your own hands from chipboard - you need to prepare opportunities.
- Tools and necessary materials stock up in advance.
- A good ottoman cannot be made without a solid base from a chipboard sheet. Optimal size construction is within 400x400x500 mm.
- You can make a wooden ottoman using a simplified technology, making a frame in the form mailbox from the timber and fasten it with the cuts of the side, but since the ottoman is made for yourself, you can try.
Work with pleasure
With bad mood you should not take up work: something will fall on your foot or you will hit the wrong nail with a hammer.
- It is marked out, cut out from a sheet of chipboard 5 squares 400x400 mm for the manufacture of the walls of the structure and the bottom.
Attention: The bottom of the ottoman should not be made of plywood, small children like to hide in secluded corners, they can break through thin plywood and get injured.
- The cover is made of any geometric shape: square, round, oval. Beginners may not experiment and stop at the square cover. It will have dimensions slightly larger than the main box 430x430 mm in order to protect it from falling inside.
- The height of the finished product is made up of the constituent elements - the height of the structure is 400 mm, plus the rollers are 50 mm, the bottom and tire are 32 mm thick, the upholstery is laid in 50 mm, a total of 532 mm.
- From the prepared elements, the formation of the structure begins.
- The sides of the ottoman are fastened with metal corners. To strengthen the rigidity and reliability will help the bars, which are glued to all internal corners.
- From the front side of the ottoman, self-cutters are screwed into the bars, the caps of which must be recessed into the tree, so that later there will be no problems with torn upholstery.
- The lower part of the box along the perimeter is smeared with carpentry glue, capturing the ends of the bars.
- The bottom of the ottoman is attached, and the cutters are again screwed into the ends of the bars. The assembled structure should dry well.
- The base of the ottoman is made, but there are no wheels and a lid yet, on which you can sit in the future.
- The cover is fixed with 4 bars screwed from the inside. The work is carried out after there is confidence that the lid closes smoothly and the stiffeners on the side do not interfere with the closing of the lid.
- The finished structure is turned over, and the wheels are fastened with cuts.
Attention: They are fixed through the bottom to the ends of the bars, for which small holes are drilled in the bottom.
Before continuing work, it is necessary to make sure that the resulting structure is sufficiently stable, holds the person sitting on it well and there are no flaws that interfere further work otherwise it makes no sense to start upholstery.
The ottoman is getting dressed
Do-it-yourself ottoman made of wood, chipboard or generally soft needs clothes on top. This function is performed with honor by a solid, upholstery fabric, neatly attached to the crate of the structure.
- First, the cover of the ottoman is made, for which a soft lining is cut out of foam rubber, synthetic winterizer, batting. The size of the lining should match the parameters of the seat so that it is neatly, without hanging down, glued into place.
- From the fabric intended for upholstery, a blank is cut out somewhat larger than the cover. This is done so that the edges can be bent under the lid and fixed from the inside with a stapler or furniture studs.
- The instruction prescribes to further decorate the sides of the ottoman.
- The detail is cut out upholstery fabric 400 mm x 4 = 1600 mm with a margin for connection. Also in height, the material must have an allowance at the top and bottom.
Attention: The fabric must be trimmed, stretched, tucked inward, the edges secured with furniture studs or a stapler.
- The seat is decorated, the niche is upholstered, all edges are carefully closed and you can present the finished product for control to demanding family members.
- Do-it-yourself plywood ottoman is made according to the same scheme, if this simple design option is chosen.
- The work becomes a little more complicated when an opening drawer is provided on the ottoman, then the stop bars are replaced with door hinges.
Getting acquainted with the design of this simple piece of furniture, one detail catches your eye: despite the difference in the shapes of ottomans and their types, the base is a rigid frame, there is a seat and legs. They are decorated in different ways, but quilted leather or leatherette give the products an elite, luxurious look and you can’t immediately determine that the price of the product is within reasonable limits.
Although, it should be noted that a neat ottoman, sheathed in a different material, is able to bring comfort and convenience to the room and looks no less elegant than leather.


Chocolate biscuit: the secrets of cooking in a slow cooker and oven
Chemical composition and nutritional value
Apple chips at home
Braised cabbage with white beans, recipe
How to reduce the ass, hips and stomach at home?