Decorative plaster is the most demanded material for do-it-yourself wall decoration. Throughout the existence of this material, its style, method and method of application have changed, but the technology has always remained the same.
Due various ways applying decorative plaster, the room can be changed beyond recognition. The interior of the house can be kept in one style or mixed.
A characteristic feature of plaster is the originality and uniqueness of the pattern, so each room will be original and unique.
Decorative plaster can be painted in any color. Therefore, a few years after the repair, you can easily change the color of yours.
One of the advantages of decorating walls with decorative plaster is ease of use. Without professional experience, but following our advice, you can easily do all the work yourself without the help of specialists.
Below we describe the detailed step by step instructions for finishing with decorative plaster with your own hands.
When encountering this material for the first time, the question arises: “How to apply decorative plaster on the walls? There is nothing difficult in this.
First, let's figure out where you can buy decorative plaster. As a rule, it is sold in dry form, but there are also ready-made formulations.
The composition of decorative plaster includes t:
- filler,
- binder material,
- various additives.
After purchasing the necessary tool, you can safely proceed to decorating the walls with decorative plaster with your own hands.
Surface pretreatment
Fill a bucket with water and pour in the mixture. Using a drill with a mixing attachment, mix the contents to a creamy consistency. Leave the finished solution for 15 minutes so that it reaches and acquires all the necessary properties. Mix decorative plaster.
Don't mix too much material. Over time, it will begin to dry out and lose its plasticity.
Applying decorative plaster to walls
The final stage of work is painting. You can choose two options: paint the finished plaster, or add the selected color at the stage of preparing the mortar. In the latter case, the plaster is already applied in color.
Various techniques for applying decorative plaster and the subtleties of work differ from each other.
The general concept of "decorative plaster" combines the most diverse materials in their composition - this is flock, and liquid wallpaper, and "Venetian", and textured, and imitation various materials- wood, stone, leather, fabric and many others. Decorative plaster forms original style premises and often becomes its basis. Wall decoration with this material combines art and painting work.
We offer you some tips on how to properly apply decorative plaster on your own.
Wall preparation
Before applying decorative plaster, it is necessary to thoroughly clean the wall of old wallpaper or loose pieces. old plaster. Then the surface of the walls is rubbed sandpaper, bulges and uneven walls are removed. All the dust that has settled on the walls during work is carefully swept away with a brush.
Under decorative plaster, it is necessary to apply primer. The usual primer is applied with a spatula, and the impregnation primer is applied with a roller. After the wall has completely dried, you can start working with decorative plaster.
Stages of work

The preparation of decorative plaster is carried out in accordance with the instructions printed on the packaging, which is a plastic bucket of various capacities. Usually it all comes down to thoroughly mixing the composition with a special nozzle inserted into the drill. If you don’t have a drill, then mix the contents of the bucket manually with a narrow board or a piece of rebar.
A subtle point in the simple work of applying plaster is the addition of dye. You have several options:
- add the dye immediately to the bucket with the composition in a ratio of 1:10;
- add colorant to the finish composition
- at the end of the work in equal parts dilute the dye with the composition of the plaster and apply uneven, chaotic strokes to the wall with an ordinary sponge or roller.
The third option, of course, is the most time-consuming, but the plaster made in this way looks very impressive.
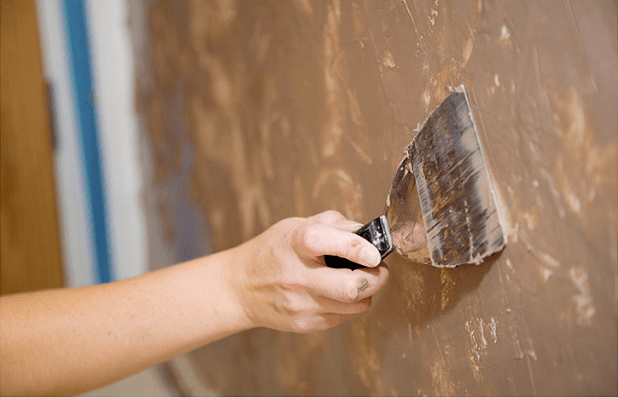
After you have decided on the colorant, you can start applying the plaster. With a spatula or trowel, a layer of the composition is applied to the primed surface of the wall. Layer thickness 2-5 mm.
Now, of course, you will already notice and understand why it was necessary to apply a primer:
- the composition falls on the surface of the walls very easily;
- not absorbed by the pores of the wall;
- the surface of the walls is quite smooth and has good adhesion.
The composition is applied to the wall with a tool in one direction - either from the bottom up and vice versa, or in a circular motion.


Right now is the right time to show your artistic imagination. The applied layer of plaster can be brushed into a striped structure.

You can make relief. For this, toothed trowels or figured rollers are used. It is very convenient to work with a wide tool that immediately covers a large area.

A very interesting relief, reminiscent of the lunar surface, is obtained if you take a plastic bag crumpled in a lump and lightly press it on the wall.

In addition to the above tools, various applicators and stamps are used to create relief patterns, with their help, repeating reliefs are obtained.
Decorative plaster dries from 8 to 48 hours, depending on the thickness of the layer. On a dried wall, be sure to lightly walk with a medium-sized emery cloth in order to remove sharp embossed edges. All dust must be swept away again.
In conclusion, the plastered surface is covered with a finishing solution, which must be selected for compatibility with the composition of the plaster. Instead of a top coat, builders often use a special wax that makes the wall highly water resistant. It can also be coated with a coloring composition.

Finishing the walls is a very troublesome and responsible event. Especially if the corners and walls are uneven. Pasting such surfaces with wallpaper or decorative tiles is a difficult task and it is rarely possible to solve it qualitatively.
In such situations, decorative plaster comes to the rescue.
What it is
At present, the dominance of dry mixes is the same free-flowing composition as the usual mass for interior wall decoration. The properties of the decor are given to it by various additives specially introduced into the recipe. It can be small stones, and even wood fibers, which give the lined surface a completely original pattern and texture.
Even an experienced plasterer, starting to finish the walls, will not be able to imagine at the beginning of work what will happen in the end. Therefore, the masters prefer to make a test application on a small flat surface before starting work, for example, on a piece of drywall. The test allows you to immediately determine the methods and techniques of coating to identify the most advantageous characteristics of the decorative coating.
Cost of decorative plaster
The presented material has many varieties. Depending on the composition, the price of the material in the form of a dry mixture ranges from 200 to 600 rubles per square meter. The consumption rate of the finished composition is presented by the manufacturer and indicated on the packaging. And the price of work for m 2 invited specialists is from 250 rubles.
At the same time, it should be borne in mind that the use of this method of wall finishing eliminates the need to perform a number of preparatory operations on their surfaces, which reduces the cost of the final cost of the coating. In addition, with minimal skills to perform finishing works, you can do them yourself, excluding a significant part of the costs.
Types of decorative plaster
Several types of classification of such material for wall decoration are used:
- By type of binder.
- Depending on the type of filler, which determines the texture of the surface.

On the first question, you can get advice from the manager of the building materials store. The choice depends, first of all, on the texture of the finished surface and the operating conditions of the coating after application.
Depending on the filler, the classification may be as follows:
- textured surfaces. As the name implies, the finish surface is uneven. The material successfully hides almost any defects on the wall and allows the performer to independently apply it even with zero skills in such work. Actually, this determines the high popularity of this particular type of coating. And the price of the material is at a minimum level for this type of coating.
Plasters of this type, in turn, are divided into several varieties:
- "Lamb". This design gives an idea of a soft woolen surface when viewed from the side. It is well combined with substrates of mineral origin.
- "Fur coat". The surface is similar to the previous one, but looks like fleecy.
- "Bark beetle". When applied on a plane, grooves are formed, surprisingly resembling traces of a bark beetle, with the right choice of tone, the texture corresponds to aged wood.
- Structural. This type of coating is characterized by the almost absolute unpredictability of the nature of the surface that will be obtained during application. The previous option still allows you to somehow predict the result. In this case, at the beginning of work, you can be sure of only one thing - some kind of structure will still appear on the surface.
- Venetian. In terms of its decorative capabilities, this plaster surpasses other types. One of the features of such a coating is the need to create an almost perfect flat surface, which is not always available even to experienced craftsmen. The application process takes a lot of time. A distinctive characteristic is also the translucency of the material. With the right setting of lighting, the effect of an internal glow of the surface is created. This property allows you to design solutions, in which the image on the wall looks like in a haze or fog.

In addition to the types of decorative plaster mentioned here, others are also produced. All of them differ in the nature of the fillers that imitate one or another surface that is inaccessible at a cost. Such characteristics can be imitation wood or silk fabric.
These materials also include colored plaster, produced in a wide range of tones.
Do-it-yourself plaster wall decoration
With the exception of some cases (application of a Venetian coating), plastering work is quite simple and any developer, if there is time and desire, tends to do this work on their own. The desire is quite reasonable and understandable, but you need to take into account a number of circumstances, which are outlined below:
- You need to carefully consider the selection of material. Here, the advice of an experienced specialist is not only desirable, but also mandatory. And it would be better if it was not a store manager responsible for sales, but an uninterested person from the outside. Ideally, it is better to see a sample of the execution of a particular interior. The calculation of the amount of material based on the recommendations of the manufacturer is not always correct. In an effort to assure the buyer of economic efficiency, he shows the minimum consumption, which in the conditions of real performance is not always achievable. Therefore, it is better to purchase the amount of material with a small margin.
- If there are no gross defects on the surface to be coated, fine finishing can be neglected. Only rough chips and cracks should be repaired. The rest will be effectively eliminated by a layer of plaster, for which it was originally intended. But the application of a primer is mandatory - it significantly improves the adhesion of the plaster composition to the wall surface. It is generally accepted that the finer the structure of additional inclusions, the higher the surface quality should be.

- After the final drying of the primer, and it needs at least half a day for this, you can start plastering. With a complete lack of experience, no instructions, including videos, will help. But a lot of time to master the profession is not required. It is only necessary to start work from the least important place, for example, where the furniture will subsequently stand. It is also useful to practice on foreign material from waste building materials.
- At the end of the application of plaster, it can be given additional charm by adding additional relief, which will require additional tools. The untinted surface can be painted additionally, choosing the paint to your liking. This method is used to ensure uniformity of tone throughout the room, which is often impossible with the inevitable frequent kneading of the plaster composition.
Plaster is generally a waterproof coating. Therefore, it can be washed without fear. In this case, you should refrain from using aggressive detergents. A mild detergent is used with elastic sponges, hard brushes and products containing abrasives are not applicable for the care of such a coating - the surface quickly loses appearance becomes matte due to a large number of scratches. As an additional protection, the surface is covered with a thin layer of wax, which protects it from moisture, but not from mechanical damage.

If you want to change the interior, the walls can be repainted, and if you plan to use wallpaper, the walls can be additionally plastered.
Plaster tool
Tools and accessories for professionals are quite diverse. It should ensure not only the productivity of work, but also their quality.
The range of tools used largely depends on the choice of the nature of the coating. In the very simple version you can get by with a minimal set of spatulas different size. You will also need a trowel, and for more complex options, it is desirable to use textured rollers. If surface painting is envisaged, you need to stock up a painting tool.
Applying plaster to the wall
How to make decorative plaster with your own hands? For self-execution by a person without experience, a coating of the bark beetle type can be recommended. It does not require careful preparatory measures. Due to its texture, it is not necessary to diligently align it during the application process. To work with such material, several spatulas of various widths and a small skill in plastering are enough. It is almost impossible to spoil the bark beetle. The technology involves the production of various options, which directly depends on the size of the inclusion grains. Larger ones will require a thicker coating layer.

The device of the "Venetian" without a solid knowledge of skills is impossible. When performing it, it is necessary to apply several ideally even layers of plaster on a perfectly prepared surface, each with its own properties.
Silicone materials also require special skills. This is painstakingly delicate work that requires incredible patience and artistic inclinations. But the result also corresponds to the invested work.
Applying decor to the wall can be done in the following order:
- In accordance with the instructions on the packaging of the mixture, a solution of the desired consistency is prepared. Its quantity should provide for the possibility of developing at a time. Additional stirring with the addition of water is not possible - the thickened residue will have to be thrown away.
- A spatula and a grater become a universal tool. The applied layer of plaster is evenly distributed over the surface. As soon as the mass shows the first signs of hardening, it must be rubbed with a grater, while creating a pattern.
- For beginners in this business, there are several simple tricks that allow you to get a beautiful decorative design with simple operations. This can be grouting with undulating movements, beveled or straight lines that mimic rain, various closed curves or intersecting stripes. Movements during the performance of work must be confident, soft, not allowing corrections.

- An interesting surface texture can be obtained by using the most unexpected items, from crumpled paper to brushes or washcloths. Most in a simple way is the use of textured rollers with various patterns. Given the limited hardening time of the plaster, the drawings also need to be done as quickly as possible, there will be no opportunities for correction.
- After 15 - 20 minutes after drawing the pattern, the coating begins to lose its luster, which indicates the beginning of the crystallization of the solution. It is necessary not to miss this moment, and walk along the surface with a wet trowel, smoothing out irregularities and removing too sharp changes in the relief. The tool needs to be cleaned more often and moistened abundantly.
- To separate sections of the coating with different textures, it is advisable to use construction tape. It must be removed before the applied mortar has cured to ensure a clean, tear-free interface line.
- Complete drying of the solution occurs within a day. After this time, you need to treat the surface with a fine emery cloth. In this way, excessively protruding parts and uneven coatings are removed.
- A protective coating in the form of varnish or wax is applied to the surface approximately three days after the decorative layer is applied. Before applying it, you need to carefully clean the surface of dust using a vacuum cleaner.

- When finishing exterior walls, a concrete-like surface using river pebbles is popular. After applying the composition to the wall, when it shows the first signs of hardening, you need to wash off a small part of the outer layer of the solution with a wet paint brush. The pebbles exposed at the same time are a wonderful decorative design for the wall.
Decor in alternative ways
To give decorative properties to the putty coating, you can use the following techniques:
- Purchase a dry putty mixture and dilute it with water, taking into account the recommendations on the package. The most convenient are materials based on gypsum or cement. Possessing high strength properties, they allow you to successfully level out irregularities on the base.
- For the base layer, a thickness of 2 mm is sufficient, there is no need for careful leveling of the surface, since the decor will visually hide almost any irregularities.
- In the process of creating a textured surface, you can use various tools and techniques. A common way is to use a spatula or trowel
- Various stamps and embossed rollers with ready-made patterns are widely used
As a finishing operation, surface painting is most often performed. It is produced paint roller in two passes, the first time - with a long pile, the second - with a short one. Such a coating best highlights the texture of the finish.
Texture elements are applied to the front layer of the same putty. Its thickness should not exceed 3 mm. Otherwise, cracking during operation is possible.
Drying of the putty layer is mandatory when closed doors and windows. Drafts are not allowed. Accelerating the process by turning on the heaters can lead to cracking and collapse of the finish layer. The essence of the process is the crystallization of the mass of the finishing material, in which air moisture also takes part. Therefore, its premature removal will lead to disruption of the process.
As you can see from the data above, the process of finishing with decorative plaster can be very simple, even easier than creating a smooth base surface. But individual materials and methods require special attention and skill, as well as artistic taste. Realistically assess your strengths and capabilities. I wish you success!
There are many ways to decorate a house, but recently decorative plasters have become more and more popular. They are very diverse, allow you to create walls and ceilings that are unique in appearance. different types give different effects, plus the application of decorative plaster can also be different. As a result - a huge number of variations for any interior in any style.
Types of decorative plaster
Decorative plaster - a marvelous interior decoration
Decorative plaster is used for finishing walls and ceilings in the room, facades of buildings. The basis can be various substances of both natural (gypsum, cement, marble dust) and artificial (acrylic, silicone, silicate) origin. It is called so because it forms an externally attractive surface with a different texture - from smooth like marble Venetian plaster to embossed stone or "under a fur coat". The number of options is endless - applying decorative plaster is a creative process and it is unlikely to be repeated exactly. This is another plus of this type of finish.
By the type of surface formed, the following types of decorative plaster are distinguished:
- Embossed. After applying such compositions, some kind of heterogeneity and irregularities are often formed on the surface, that is, they create a relief. Their plus is the low requirements for the preparation of the base. It must be strong and must not crumble. There should also be no significant differences, but perfect smoothness is not required.

- Smooth. In this category, only one subspecies is Venetian plaster, but they allow you to create surfaces with different appearances. It is a plastic mass, often translucent. It contains dust of marble, malachite and other natural materials. With its help, you can imitate marble, cork, leather, silk, precious woods, various metals, malachite, granite finishes.

It must be said right away that textured and plastic plasters are often difficult to separate, since different techniques can be used on the same composition. The photo below shows options for only one type of plaster - different techniques for applying decorative plaster make it possible to obtain surfaces that are very different in appearance.

Some decorative plasters are so plastic that they can be used to create work of fiction. It turns out very beautiful and original panels.
A few touches...
By changing the application of decorative plaster, all these various reliefs are obtained - from simple to complex.
It is worth considering further dividing them by area of application. There are two large groups- for outdoor and internal works. meet and universal formulations, but rarely. Almost all the compositions discussed above are for internal work. These are more interior solutions. Some are abrasion resistant, some are washable detergents and even brushes, but harsh operating conditions on outdoors they won't last.
Some types of textured plaster are suitable for outdoor use - bark beetle, for example. This type of finishing material just belongs to the universal. It can be seen on the facade, indoors. In apartments, these are usually corridors and, in offices and institutions, corridors or service rooms can be finished in this way.

An example of decorating a house with decorative plaster outside: stone plaster on the basement, above - on the walls - bark beetle
Putties for outdoor use generally have a rougher structure, contain components that increase resistance to ultraviolet radiation and other climatic influences. In this category there are specific plasters - stone. They are made up of small pieces. natural stones in a binder solution. The application of this type of decorative plaster is simple with a spatula or a stainless grater. Other elements are rarely used. On facades and fences, the creation of reliefs is not best idea- dust will clog and spoil the appearance, and it is not easy to wash it out.
Surface preparation
For different types decorative plaster requires varying degrees of surface preparation. But we can definitely say that it is necessary to remove everything that can fall off. The surface must be strong, dry and clean, must not crumble. Also a mandatory step is a primer. And not with any composition, but with a special one that creates a rough coating. It increases adhesion (adhesion).
For relief (structural and textured)
Under all relief, you can not especially level the walls or ceiling. The composition is applied in a fairly decent layer - up to 1 cm, so it hides differences up to 8-9 mm. But, in order to reduce the consumption of an expensive composition, it is still recommended to remove large irregularities. The protrusions are squeezing, the pits are being covered up suitable plaster. The next step is to apply a primer. After drying, you can start applying decorative plaster.

Structural plaster is usually applied in two layers. The first - basic - is laid evenly and dried. The layer thickness is indicated by the manufacturer, usually set with some tolerance. This layer also serves as a leveling layer, but again, in order to reduce costs, it is better to pre-level the surface. The second layer is already applied a little thinner, and a relief begins to form on it.
But not all structural plasters are two-layer. On many, you can form a relief immediately after application, without a base layer. Usually the recommended layer in this case is somewhat thicker.
Under Venetian plaster
The compositions of this group require a perfectly flat surface. Not as smooth as for painting, but almost the same. Small differences are allowed - no more than 2-3 mm per square meter. standard - first, a layer of plaster (ordinary) is applied to the walls, a paint grid is embedded in it. After drying, a leveling layer is applied - to a perfectly even state. Next - a primer, and after the drying of this layer - the application of Venetian plaster.

Application techniques
It is impossible to tell about each method of applying decorative plaster - a lot different parts and nuances. The simplest case is with textured plasters. They are simply applied with a spatula. The whole difference is in the direction of movement of the spatula, in the depths of the beards that leave inclusions, and in color. But this is in the base version. No one bothers to experiment on these compositions. Another thing is that the structural effect of the same actions is more impressive - more plastic compositions.
What can be used to create a decorative effect
Applying decorative plaster is possible with many tools and common household materials and fixtures made from them:
- Trowels and graters made of metal. They are used not only for applying the composition in an even layer, but also for forming geometrically chaotic patterns on it.

- Construction graters made of plastic, polystyrene. They level out the freshly formed overly protruding relief.
- Sandpaper with fine grain. Also for leveling the relief, but on already dried material. When compared with the previous method, the effects are different.
- Foam sponges. They are multifunctional. They can:

- Cellophane films and bags. Also a multifunctional tool:
- Spreading on freshly applied decorative plaster thin soft polyethylene film, you can form a relief with your hands. It can be some kind of abstraction or something with some motives. When the relief is ready, the film is carefully removed, the relief is left to dry.
- Crumpled paper is wrapped in cling film. Get a simple but effective tool for the formation of a heterogeneous and chaotic pattern. You can use different application techniques - circular movements, short “pokes”, waves, strokes, comets, tails, etc.
- Just crumpling the cellophane, but already more rigid and “poking” it into the plaster, we get a surface that is somewhat reminiscent of the moon.
- Rollers. Ordinary foam rubber or fur rollers are used, as well as special ones with some kind of pattern. Regular ones are used to create a basic relief, on top of which more pronounced strokes are then applied. The type and shape of the "basic" relief depend on the length of the pile. When rolling with a foam roller, small protrusions-cavities are obtained. When rolling hairy - more pronounced. The longer the pile, the greater the difference.

Different rollers - different surfaces
- Hands in rubber gloves. any pattern can be made. The task is to repeat more or less similar on the rest of the plane.

- Brushes. You can get stripes, waves and a bunch of other appearance options.
Principles of relief formation
Decorative plaster is attractive because it allows you to create a unique pattern - you can use own fantasy. To make this drawing look harmonious, you need to know some general rules. At good producers in the description of each composition there are rules for working with it. It describes the procedure, methods of application, methods of forming decorative surfaces.

A simple way - rolling with a roller with a pattern formed on it
Large firms (manufacturers or shopping centers) hold master classes, where everyone can try to work with a specific decorative plaster, which is also provided there, and not experiment “on the spot”. Therefore, before buying, be sure to read the entire available material, watch the videos, which are also often available, and in in large numbers There are really many ways to work. Describing in words is difficult and often incomprehensible. Much easier to do everything in video format. We will try to briefly summarize the techniques.
- When working with structural plasters dyed in mass (the color is added to the composition), a thin base layer is first applied. It can be smooth, maybe - slightly textured - rolled by one of the rollers. This layer is allowed to dry (6-24 hours depending on the manufacturer). Then, one of the reliefs is formed with the same or clarified composition (an uncolored composition is added, obtaining a mass several tones lighter). Further options:
- Immediately after formation, while the plaster has not dried, the parts that are too protruding are lightly smoothed with a stainless or plastic trowel.
- Wait until the layer dries. sandpaper attached to a holder or a wooden block, they clean off some part of the relief.
- When working with textured plasters, one layer is applied. Without waiting for drying, they immediately take the grout and form the desired relief. An example is working with bark beetle plaster. This composition is widespread, but basically all surfaces are made the same - with vertical strokes formed by inclusions. There are some very interesting techniques in the video.
- When working with structural plasters dyed in mass (the color is added to the composition), a thin base layer is first applied. It can be smooth, maybe - slightly textured - rolled by one of the rollers. This layer is allowed to dry (6-24 hours depending on the manufacturer). Then, one of the reliefs is formed with the same or clarified composition (an uncolored composition is added, obtaining a mass several tones lighter). Further options:
- The most difficult technique for applying Venetian plaster. The layers are very thin, translucent, there are many of them and are applied in different ways:
- An even, thin base coat is applied first. He dries up.
- Thin chaotic strokes are applied, which gradually fill the surface. In this case, a certain, not very pronounced relief is obtained - strokes of different thicknesses are obtained, different directions.
- The layer is left to dry for 4-5 hours.
- They take a large stainless spatula or grater and rub (iron) the surface. In this case, the sharp edges are slightly erased, the surface becomes smooth in places, in places it looks velvety. The "marble effect" begins to appear.
- The next layer is almost the same, but you just need to level the surface as much as possible.
- The layer is left to dry for 1.5-2 hours.
- Smooth down with a smooth, burr-free spatula with rounded ends (so as not to accidentally damage). At this stage, the surface acquires a glossy sheen.
- The final stage is the coating with decorative wax. This layer increases the moisture resistance of the coating, the glossy sheen becomes more pronounced.
Applying decorative plaster: video tutorials
Not all the nuances of finishing work can be clearly described in words. Previously, everything was passed from the master to the students with the help of an internship. Modern technologies allow you to make the process more massive - video tutorials and master classes give an idea of how to move, which is very difficult to describe in words. This section contains several interesting ideas for decorating walls with embossed plaster.
As you understand, applying decorative plaster is a creative matter. But without experience, it is difficult to imagine what results one or another of your actions will lead to. We look carefully, we try to copy the movements. First, it is advisable to practice on a piece of puttied drywall - to work out the technique. When the result suits you, you can start decorating the walls.
Repair and decoration of the walls of an apartment or house is often an unpredictable thing. Sometimes, during do-it-yourself repairs, a lot of new ideas are introduced into the original plan that can change designer style home environment. This happens when, after applying decorative plaster on most of the walls with your own hands, new ideas for decorating walls appear.
Ample opportunities for decorative plaster - it's good and bad
Especially if you are lucky to see interesting and fresh photos or videos about what is best to use and how to properly apply decorative plaster on the wall plane.
Before you enter into the temptation to change the original idea in the design of the walls with your own hands and apply a new pattern, it is worth soberly assessing a few main points:
- The cost of repairs, even if the main work on decorating the walls with your own hands and strictly following the original idea and estimate, always grows by 10-15% at least;
- It is not difficult to apply a new pattern in one room, but such a move may require reworking most of the plaster finish. Apply it with your own hands in other rooms, to preserve the style of wall decoration;
- Repair costs can double and result in a significant loss of time and effort.
Thanks to new materials and techniques for applying decorative plaster, even with your own hands you can achieve impressive results.
Advice ! With all the desire to make the most of the expressive possibilities of decorative plaster, it is worth dwelling on one initial idea for decorating walls and completing repairs at minimal cost.
All interesting thoughts about decorating the walls with your own hands can be collected and postponed until the next time. Perhaps there will be new money, new premises and new ideas.
When and how to apply decorative plaster
Modern wall design options allow you to create the most realistic imitations of various decorative surfaces, from broken stone to bas-relief images. But the main advantage of decorative plaster is the incredible flexibility in choosing the texture of the plane with your own hands. In fact, the use of plaster decor made it possible to apply real artistic images and whole paintings to the walls. Even 15 years ago, individual wall painting with their own hands was within the power of artist-designers, and such a pleasure cost a lot of money.

We use the possibilities of decorative plaster
New decorative materials for wall decoration with plaster can be called more like a decoration method than a means of leveling and protecting masonry walls. Polymer binders, water-soluble paints and various fillers are used as components and bases of plaster materials, which, in fact, determine the appearance of the decorative component of the walls.
Among the many approaches to the process of applying decorative plaster, there are several dominant areas:
- If you have a steady hand and good skills in decorative modeling or drawing, perhaps with a little practice you will be able to apply ornament or abstract drawings to the surface in a theme that matches the style and purpose of the room. It is expensive in practical implementation, and even more expensive then to remake what has been done into something new;
- With good taste and sufficient financial resources, you can use a combination of specific shades and colors with a monotonous relief applied to the plane. This is easier than the previous version. decorative finishes, but will require serious design skills to coordinate and combine all the premises of the apartment into a single plan;
- Simpler and more practical compositions make it possible to apply plaster decors with a simple structure with a restrained relief or even a simple imitation of natural stone, brick or classic decor options.
Advice ! If the reserves of time and finances do not allow you to apply decorative plaster in all rooms, you can, as an experiment, select the most crooked and nondescript plane in an apartment or house and try to apply different kinds plasters. This will allow you to personally understand and see the advantages of different methods over a general overhaul.
Works with decorative plaster
The first two areas of work with decorative plaster will require you to accurately understand all the nuances of the colors and textures of the walls, so before applying a complex decorative pattern with relief images, it makes sense to first make sketches or pick up a photo of the relevant design solutions.

The more intricate the pattern, the more difficult it is to apply it to the walls. For example, without practice, not everyone can do decorative plaster with a moire effect, as in the video
A decorative composition in the style of a panel will require a good knowledge of the properties of the plaster and a lot of patience in working with it, but the resulting effect is worth it. The beauty and accuracy of the work can be assessed by the video
In such cases, it is better to apply the decor by the hands of specialists; it is very difficult to achieve such quality on your own.
Important ! In addition to artistic taste and knowledge of the technological intricacies of working with decorative plaster, it should be understood that applying the material to the surface is physically difficult, and the process will require considerable effort and endurance.

In the first experience of using decorative plaster, it is still better to choose the simplest version of the pattern and try to apply it yourself.
How to apply decorative plaster the easiest way
One of the most popular options for decorative plaster is lime composite compositions that imitate natural materials. Most often they use proven practice and long-term use of plaster:
- "Venetian composition", giving the texture of the wall in the form of an unimaginable number of intertwined relief elements;
- "Marmorino" and "Marseille", similar to the surface of marble calcite, with a network of inclusions and cracks and polished surface transitions;
- Imitation of the surface of natural limestone with an uneven, deliberately rough and scratched surface known as "Travertino".
Important ! All of the above decorative plaster compositions are very easy to apply on the wall with your own hands, obtaining almost 100% surface quality.
Venetian pattern of decorative plaster
The secret of the recipe is to use ordinary ready-made plaster mixtures - starting and finishing - to obtain decorative plaster. This cuts costs by about half. The initial plaster mass is prepared by mixing both mixtures in a 50/50 ratio in the amount necessary to apply the composition to 1-1.5 m 2 of the surface.
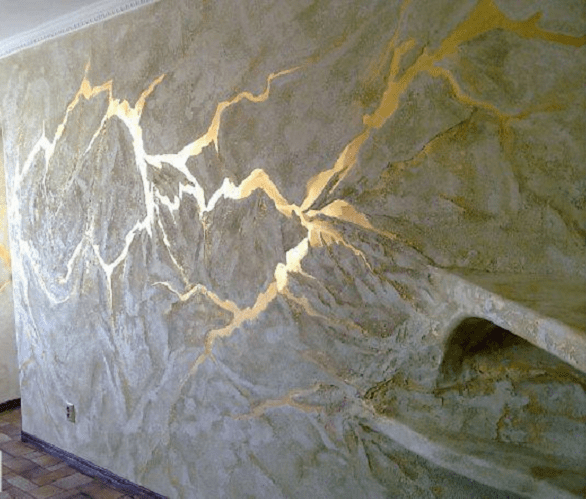
Before applying the composition, the walls are primed with an acrylic primer, and the composition is carefully applied with a spatula and trowel to a slightly dried surface. The thickness of the layer of decorative plaster is on average from 3 to 6 mm. As the decorative base is applied with a trowel on wet material, it is necessary to apply a relief pattern. The specifics of such work is well understood from the video
Important ! Sometimes there is a problem of the correct connection of two sections of the wall, on which a solution of decorative plaster is applied with a gap in time.
Most often this is due to the need to prepare a new portion of the plaster mass. Therefore, the boundaries of the sections have to be “passed” by the tool several times.
After a little drying, the relief pattern is rolled with a special tool that makes the pattern flatter and more expressive. As a finishing operation, which is the "highlight" of Venetian plaster, a tinting paint is applied to the surface of the wall with a roller, giving the plaster the color of "old silver". To do this, in 250 gr. primers add about 50 grams of dye.
After the drawing dries, it is necessary to apply acrylic varnish with a small amount of glitter. Decorative plaster dries for quite a long time - up to two days, after final drying it acquires a slightly lighter shade.
Travertino, what could be easier
This is a plaster composition based on lime and calibrated quartz sand. If it is important for you to combine the beautiful texture of the surface with the benefits of lime plaster, then the choice is obvious. Among the advantages of the Italian formulation is the possibility of applying plaster even on cement soil, concrete or brickwork, subject to preliminary cleaning of the surface from dirt and deposits and applying a special primer mixture based on sandy quartz dust.

Such a primer will level and hide the "flaws" of the wall and improve adhesion to the decorative layer. On a prepared surface, such as drywall sheets or plastered walls, decorative plaster can be applied in one layer, but with an acrylic primer beforehand.
The decorative composition is applied with a spatula and a wide trowel, achieving a uniform layer, 3-4 mm thick. The plaster pattern must be applied with a roller with a porous surface, the process of surface formation itself is well understood from the video

If you like "brick" wall surface ornaments, with the help of Travertino you can get a pattern of brickwork. To do this, strips of construction tape are glued onto the previously prepared wall surface, imitating the seams between brick blocks. Next, you need to apply plaster and separate the strips from the main layer, due to which a texture is formed that imitates silicate or ceramic bricks.
Conclusion
Simple compositions of decorative plasters do not mean their primitiveness in beauty or design. Most often, these options are used to apply the basis for hand-painting, painting or applying bas-reliefs from putty mass.


Why dream of stealing a car and is it worth being afraid of a repetition of this in reality?
What is transmitted genetically to the child from the mother and what is the father From whom the genes are transmitted to the child
How to get rid of snails in the garden forever with folk remedies?
Lavender tea drinking: benefits and recipes of lavender tea
Economic strategies review and description House building games