Having a sharpening machine at home solves many problems with sharpening metal equipment, but, alas, the cost of such a machine is quite high. We will consider how to design a homemade grinding machine further.
Functional features of work and the device of the grinding machine
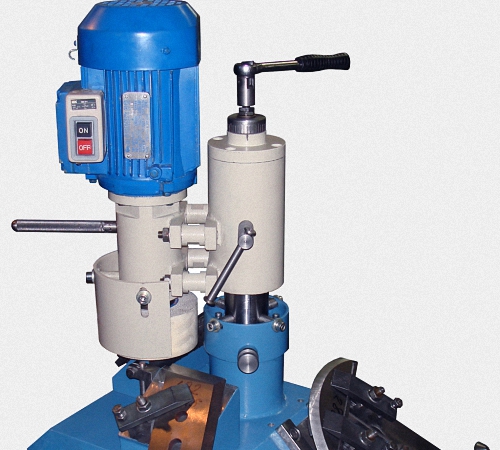
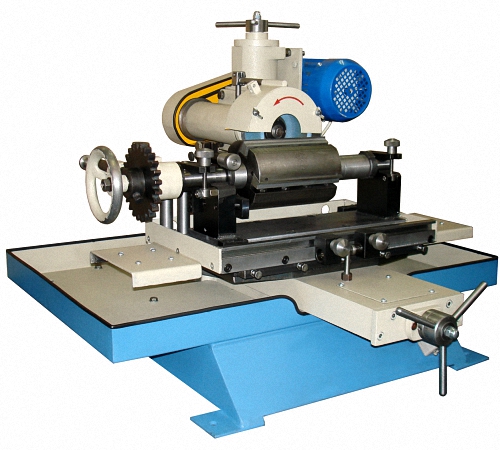
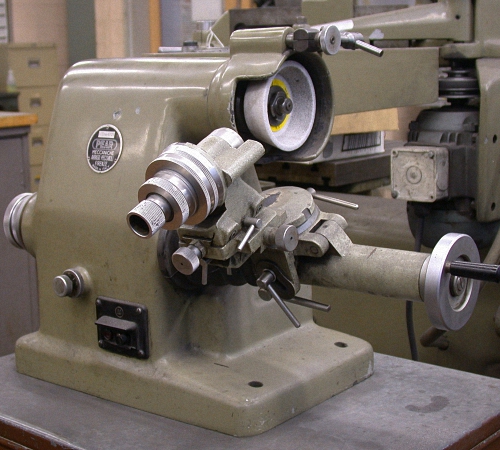
In order to sharpen a variety of steel products, a grinding machine is used. This unit consists of a frame to which an electric motor is attached. The engine is mounted with an axis shift of 1.5°. A unit with a grinding device is attached to the motor shaft. If you move the assembly manually, it is possible to sharpen the part in the horizontal and vertical directions.
The guide, which is located on two column parts, carries out a horizontal feed. It moves due to the presence of a worm-type gear, which is located on the frame. On the end part of the worm shaft, a limb device is attached, which performs the direct movement of the grinding wheel.
Longitudinal feed should be done manually by moving the part to be sharpened. The mandrel is another part of the grinding machine that is attached to the racks. Fixation of the nodal holder occurs due to the presence of screw clamps.
The holder contains a handle that allows the workpiece to pass through the machine. To carry out circular sharpening of the part, there is a hole to which an attachment is attached, which allows you to sharpen knives. On the holding device there is a hand-type component, with the help of which the tool is sharpened.
In relation to the type of work that is done on the grinder, there are several fundamental differences in the way tools are sharpened. Allocate:
- sharpening using a holding device;
- radius version of sharpening with an attachment;
- sharpening with an assistant.
The first option allows you to process an absolutely flat canvas, with a straight edge. It includes having:
- hand planer,
- jointers,
- jointer metal plates,
- chopped,
- bits.
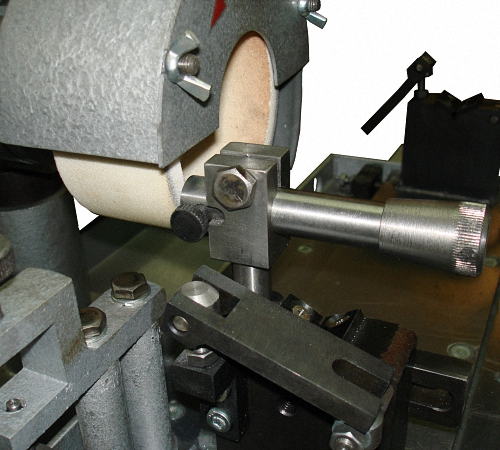
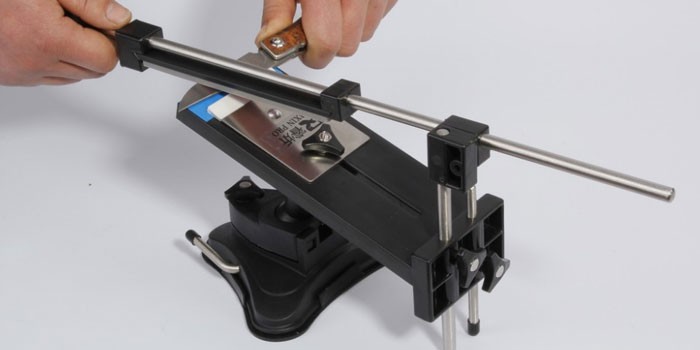
Before starting work, you should pay attention to the location of the slider. It must be installed in the extreme left position. Next, the part is fixed with a bracket in the form of the letter P, fixation and clamping screws. The edge that chamfers must be parallel to the working end of the grinding wheel. The gap between these parts should be 0.1-0.2 cm.
This is followed by turning on the device and sharpening. The person who works with the part must ensure that it is in light contact with the grinding wheel. Wherein left hand is responsible for the rotation of the transverse gear, and the right one moves the part longitudinally. The movement of the part occurs exclusively along the working end of the grinding wheel.
During sharpening of the radius type, a part of the attachment is used, which makes it possible to obtain extraordinary sharpening on a tool with cutting-type edges.
If sharpening is performed using the attachment, then the clamping brackets and fixing screws are disconnected. The attachment axis is mounted on the center of the machine and then fixed with a clamp screw.
If the console rotates easily, then it is installed correctly. Next, you need to fix the holder and move the slider to the middle of the grinder.
Advantages and scope of use of the grinding machine
Grinding machines of the electromechanical type have a large number of advantages compared to manual devices:
1. Ability to carry out many sharpening operations various instrument independently, without the involvement of a specialist.
2. Long service life allows the sharpening machine to be used for 10-15 years.
3. Mechanization of the sharpening process saves time and makes this process easier.
4. The ease of use of the sharpening machine allows you to perform a variety of sharpening and grinding operations. metal parts even for non-professionals.
5. Another advantage of this device is the ability to self-manufacturing: This will save a lot on the purchase of this device.
6. The universal type grinding machine is characterized by high productivity and working efficiency.
There are grinders that can sharpen only one tool, and universal grinders that are suitable for sharpening almost any equipment.
Sharpening machines are able to sharpen a knife, chainsaw, drills, milling cutters, cutters, cutters, broaches. They also carry out internal and external grinding of a metal surface.
Sharpening of any tool is required almost anywhere, and therefore the scope of use of the sharpening machine is quite wide. They are used both in the private sector, in garages, service stations, workshops and in large industrial installations.
The main types of grinding machines
In accordance with the method and subject of sharpening, machines are distinguished:
- universal type,
- specialized type.
Universal grinding machine allows you to process parts, different types. They are equipped with regular and special devices, which fix and fix a variety of tools. Such machines are capable of grinding: reamers, shaped cutters, cutters, drills, dies, etc.
A specialized grinding machine differs from a universal one in the ability to sharpen parts of only one type. They are characterized by high performance, as they do not require constant replacement. structural elements. Specialized machines are characterized by a more precise quality of processing parts. Such machines are used in enterprises that grind parts or spare parts, or in the case when sharpening is universal machine is inaccurate.

Universal type machines do an excellent job of sharpening blade equipment such as cutters, cutters and reamers. They provide an opportunity in the processing of gear heads, cutters or hobs.
Specialized grinding machines are divided into machines:
- for chainsaws,
- for drills
- for knives, etc.
Grinding machines for chainsaws are divided into two types: electric and manual. Sharpening on a manual machine involves precise sharpening of the chain. It is possible to fix the position of the file, so all the teeth are sharp and have the same size.
In workshops specializing in sharpening chainsaws, equipment is used electric type. It includes a grinding wheel that, by means of a setting, precisely defines the angle for sharpening.
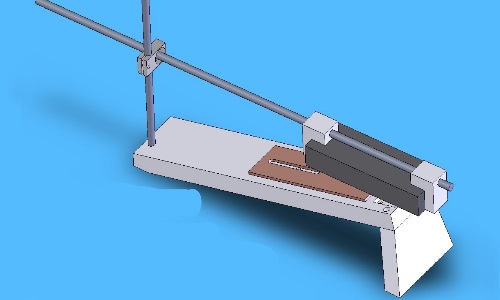
DIY universal grinding machine
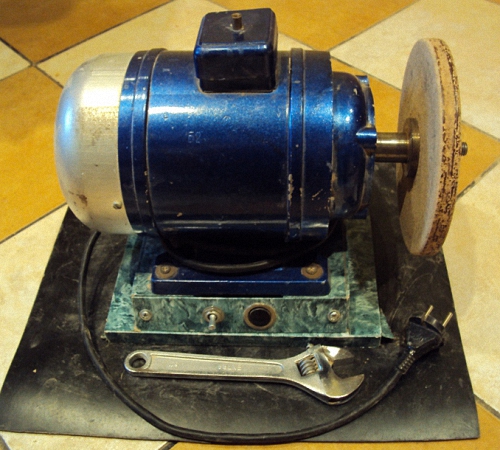
For the manufacture of a grinding machine, an electric motor is required, the power of which does not exceed 1 kW, two pulleys, bearings with a shaft.
These parts are mounted on a frame, which is easiest to make from steel corners.
For the handpiece, you need to build a swivel bar that adjusts the inclination of the part in relation to the grinding wheel.
In the process of sharpening, you should install the part so that it is in minimal contact with the circle. Gradually bring her closer.
The scheme of the grinding machine is based on the correct calculations for the installation of the grinding wheel and hand rest.
1. Use the protective cover to close the clearance circle.
2. When working with the machine, use safety glasses to protect yourself from getting a splinter in your eyes.
3. The maximum distance between the plate and the grinding wheel is 0.3cm.
4. The length of the flanges responsible for the clamp must be no less than a quarter of the diameter of the circle.
5. A paronite gasket should be installed in the nut-flange space, it will ensure the tightening of the nut on the gross section.
DIY drill grinder
To save money on buying a drill sharpening machine, try making it yourself.
For this you will need:
- tumbler,
- grinding wheel,
- plugs,
- powerful electric motor
- coasters,
- electrical wires,
To protect yourself during work, it is recommended to install the machine on a frame that will be closed, only the grinding wheel and axis will be visible from the outside.
This unit will operate on electricity. The best place to install such a machine - a steel table.
Sharpening machine instruction:
1. Put the granular disc on the motor shaft. In the event that the diameter of the disc does not match the diameter of the shaft, use a washer.
2. Then fix them with a fixing nut or use a special nozzle that will ensure reliable sharpening of the drill.
3. In the event that the shaft size is smaller than the disc size, a bushing is required. It is attached to the shaft with a bolt, in a pre-prepared hole.
Tip: When choosing an electric motor, a device from an old washing machine would be an excellent option.
4. The next step involves connecting the motor to the wires and the outlet. It is possible to use wires from old unnecessary electrical appliances.
5. Connect the wire to the starter. It should have three open contacts. Connect them in such a way that you can easily turn the machine on and off with the help of a button.
6. To protect the electric motor from dirt and dust, a protective box should be made for it.
Sharpening machine for knives: manufacturing instructions
Consider several options for the manufacture of home-made sharpening machines, with which you can sharpen a knife.
The first option is a manual machine. For the manufacture of which you will need:
- wooden planks or boards,
- screws,
- sharpening bar.
Take two wooden squares and fasten them with screws, and insert a bar between them. It must be securely fixed in the device. The size of the angle is calculated in relation to the required angle of sharpening the knife.
The main disadvantage of such a device is that the angle of the bar cannot be adjusted. It is required to disassemble the entire structure.
Another option consists of a threaded washer that holds the bar in a secure position. Use heat shrink tubing to cover the threads.
Use the two paper clips to secure the stand to the desired height. Thus, while holding the beam in your hand, independently select the required level of inclination and sharpen.
Another option manual machine allows you to sharpen not only knives, but also chisels and planers. Fix the device to be sharpened in the bar. The choice of sharpening angle depends on the angle at which the bar will be located in relation to the tool. For ease of sharpening and to protect the surface from damage, place a wooden board or glass.
- Determination of sharpening angles depending on the purpose of the knives
- A few tips to keep in mind when sharpening blades
There are many ways to sharpen knives. Modern industry, promptly responding to the requests of professionals and just private craftsmen who want to use quality tool, has developed and introduces into production special grinding devices.
Via homemade sharpener for knives, you can sharpen the knife at any angle, since the sharpening angle is independently adjustable.
But it happens that the factory device, for one reason or another, does not suit the customer. In this case, you can make a device for sharpening knives with your own hands. It will most likely be much cheaper and, it is possible, much more convenient for its creator.
Necessary condition for the correct sharpening of knives
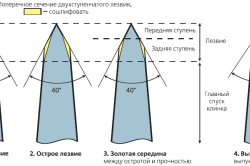
The purpose of any sharpening of a dull tool is simple and clear at first glance. But making the knife sharp is only part of the solution. The most important factor for long and efficient operation of the product is the angle of sharpening.
Figure 1. Cross section of the blade: 1 - cutting edge (RK), 2 - approach, 3 - sharpening angle, 4 - descent, 5 - butt.
The significance of this factor can be assessed in practice. It would seem that the smaller we make the angle between the edges of the blade, the sharper the knife becomes. But such an action leads to the fact that our object will not be able to demonstrate its improved cutting qualities for a very short time. Moreover, the sharper the knife is, the faster it becomes dull, since a direct pattern appears here - the smaller the sharpening angle, the less strength the cutting edge of the blade has.
Thus, the task of high-quality sharpening of knives is reduced to restoring the sharpness of the blade while maintaining the correct sharpening angle. In a sense, sharpening is the process of restoring a previously set angle. And it can be considered correct in the case when it fully complies with certain technological standards and most effectively, freely and quickly cuts the material for which the knife is intended.
Therefore, each blade is sharpened at its own optimal angle for it.
However, it is generally difficult to do this without having a special device. The fact is that, holding the knife with your hands, it is difficult to ensure uniform sharpening with the given angles of inclination of the cutting edges.
To eliminate this problem, there are special tools for sharpening knives that you can make yourself. It is worth noting that usually their designs, despite the great variety, do not differ in any way. increased complexity, and the manufacture of such devices takes relatively little time.
Back to index
Materials and tools needed for sharpening knives
![]()
The following blanks and tools will help to make simple and quite solid adaptations:
- wooden bars;
- a set of abrasive bars (musats);
- hacksaws (for metal and wood);
- electric drill;
- chisel;
- files;
- plane;
- clamp;
- a set of various sandpaper;
- marking devices;
- screws, nuts.
Back to index
What are sharpening devices: a few examples
It is quite difficult to describe in detail all the grinding devices that exist today. Let's dwell on some of the most characteristic and common.
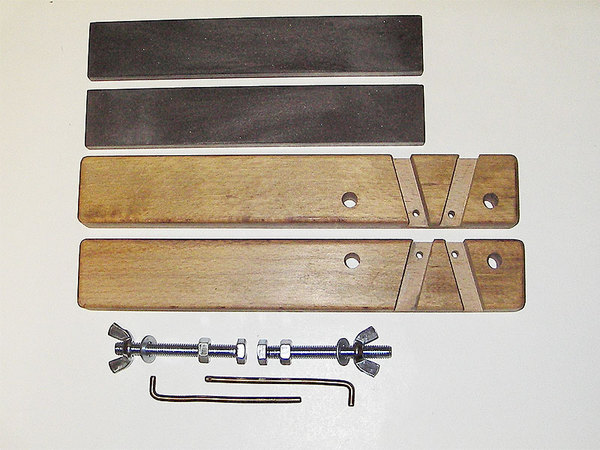
The first fixture is made from two wooden and two abrasive bars of the same size. WITH wooden blanks all burrs should be carefully removed with sandpaper. Then, depending on the required angle of sharpening knives, a preliminary marking of wooden bars is made. To do this, a corresponding line is drawn on the bar.
![]()
Methods for sharpening knife saws: a - jointing of saw teeth (1 - file, 2 - block, 3 - saw blade), b - soldered the sinuses with a hacksaw to a shallow depth, c - setting of saw teeth, d - sharpening of saw teeth (1 - rubber pipe , 2 - rubber safety cover, 3 - wooden clamp, 4 - vise).
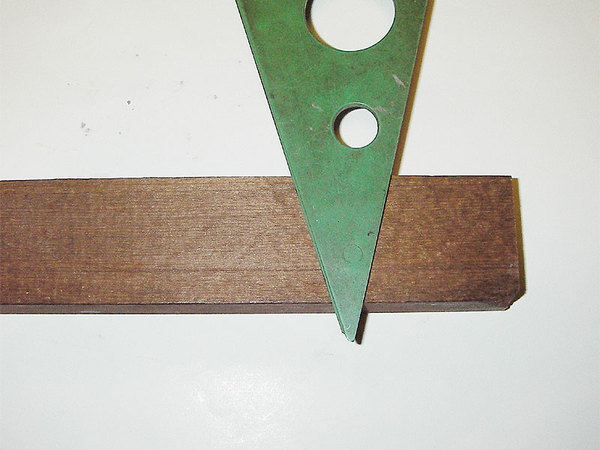
Further, a whetstone is applied to the intended line in order to fix its width on the wood. On the opposite side of the wooden block, the corresponding lines are applied according to the principle of mirror reflection.
On the marked lines on both wooden bars cuts are made with a depth of 1 cm to 1.5 cm. Bars of abrasive material are inserted into the recesses thus obtained. When performing these operations, you need to make sure that all the grooves coincide with the grindstones. After that, the abrasive elements are fixed with bolts. In order for the resulting sharpening device to be stable and not slip on the desktop, a piece of rubber can be attached to its lower surface.
The second device is based on the principle of a vertical arrangement of the knife blade. In this case, the blade being sharpened will move along the abrasive bar, which is fixed at a certain angle to the horizontal and vertical surfaces. As shows practical experience, keeping the blade in a vertical position is much easier and more functional than driving the blade along the horizontal plane of the abrasive bar, while trying to maintain a given sharpening angle.
This device is very easy to make. To do this, you need to take a pair of ready-made, identical in size wooden squares. You can also make such square blanks yourself, providing strictly right angles in them. In several places of both squares, holes are drilled symmetrically, into which clamp screws are inserted.
Then it is necessary to mark the horizontal and vertical bars with a centimeter scale. According to it, the angle of inclination of the abrasive bar will subsequently be set. After setting the desired angle, the sharpener is rigidly fixed in the device by means of clamping screws.
Using this type of device in his practice, the grinder will have to make friends with trigonometry. With the help of its formulas, it will be possible to accurately determine at which points of the horizontal and vertical bases of the square the edges of the abrasive bar should be fixed. So, for example, with a sharpening angle x = 30 °, the horizontal extension of the bar should be 4 cm, and vertically - 15 cm.
The third version of the device for sharpening knives considered here is somewhat similar to the previous one. In this case, it is made wooden base, on which two side and one central lining are then placed. They are also made of wood, so that it is easier to cut their side edges at the angle that will be needed for high-quality sharpening.
This option involves the rigid fastening of two side plates on the base and a removable (with a screw) central plate. This pad will act as a clamp for the bars. The mating inclined faces of the side and central elements must have the same cut angles.
Thanks to this, it will be possible to clamp the bars at the required angle for sharpening. But, unlike the previous version with square clamps, this way does not involve smooth adjustment of the angle of inclination of the grindstone. Therefore, it is possible to sharpen the knife blade here only in two rigidly fixed positions.
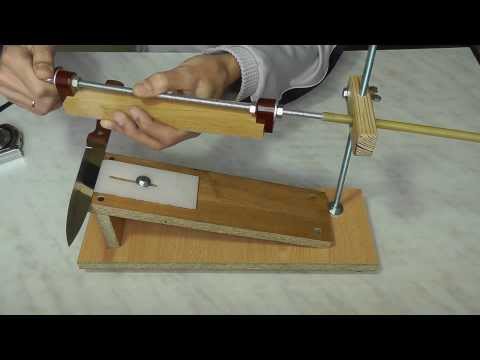
The following device is based on a principle that is directly opposite to the two previous options. In this case, it is not the abrasive bar that is rigidly fixed, but the workpiece to be sharpened. The sharpening element is mounted on a sufficiently long rod.
With its supporting side, the bar is attached to a vertical rack through swivel joints. In this case, the connection of the rod with the rack should provide free horizontal movement of the bar together with the rod in different directions. Defined is set by the height at which the movable bar is fixed on the vertical stand.
This sharpener is presented in the form of two metal corners, which are connected to each other. The sharpening angle is determined by the hole into which the needle is inserted, at the end of which there is a nozzle. Of all the options that will be considered, this one is the least convenient to use, but no less easy to manufacture. So that the work is not in vain, we will improve the device. Let's try to make a tool for sharpening knives with a wider range of pressure angle degrees.
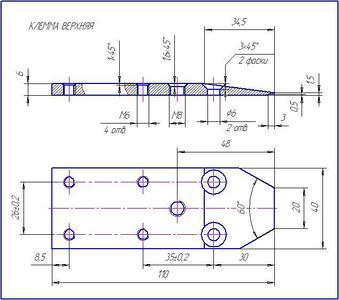
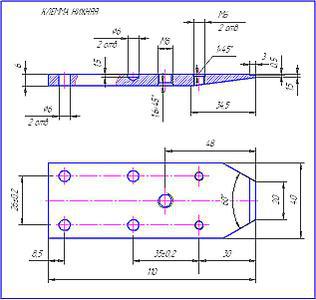
We take ordinary metal plates, the dimensions of which are 4x11 cm. It can be a little more, anyway, during operation, the parts will be filed and adjusted to the desired parameters.
With the help of a grinder, sharp corners are removed at the ends of the parts (the sides that will subsequently play the role of clamps). Using a file, grind the edges of the clamps, you should get a smooth bevel from the middle of the base to the edges of the plates.
According to the drawing, we make markings for future holes. We drill them and cut the thread. We round off all sharp edges and corners on the plates with a file (not only for the sake of nobility appearance, but also for the sake of comfortable use, so that nothing crashes into your hands).
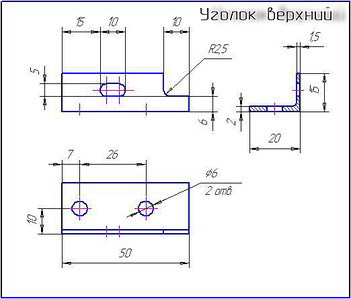
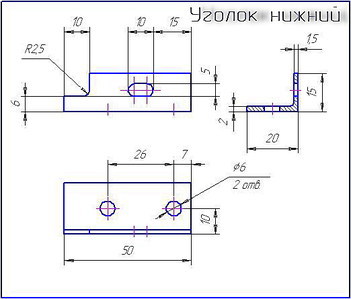
We purchase a standard aluminum corner, and make holes in it in accordance with the drawing above. In the holes intended for the entry of the stud, we cut the thread. And the hole that is intended to support the spokes must be expanded with a needle file.
Next, you will need two cuts of a metal rod about 15 cm long. We insert them into the extreme holes and fix the entry depth with two nuts of the appropriate diameter. In our case, these elements are equal to the size of M6. We screw a bolt (length about 14 cm) of size M8 into a hole of a larger diameter, on which a lamb nut is already screwed, and on top of it a pair of ordinary ones, but of a larger diameter than the bolt itself. It will be used as a support post for the structure. The remaining holes are for bolts, which will be used to adjust the clamping force of the blade.
Nuts are strung on the ends of the rods, then corners are put on, which are again pressed with nuts. By lowering them up or down, we can adjust the required sharpening angle.
The element that will hold the blade for sharpening is assembled from a thin metal rod (in the shape of the letter “G”), two holders (the last one with a through hole for the knitting needle), a wing nut and an M6 threaded rod.
We imitate a sharpener model from Spyderco
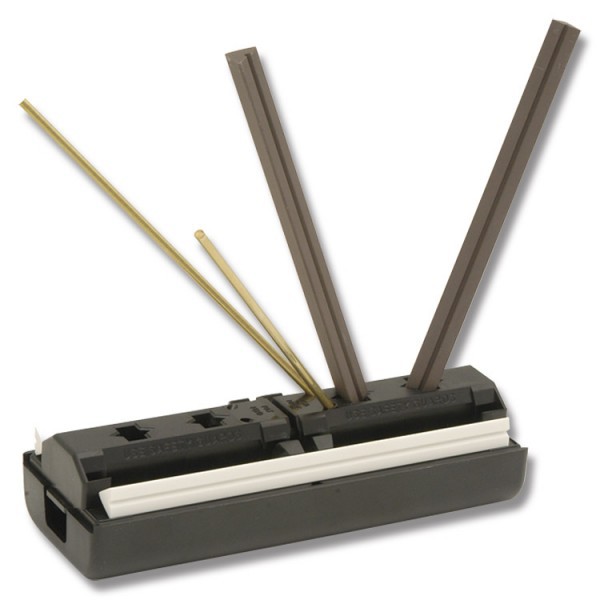
This version of the sharpener is presented in the form of a plastic horizontal holder with several holes. And each nest has its own angle of inclination.
Of all the options that will be considered, this one has the lowest level of sharpening quality. The problem is that the blade will be pressed manually, unlike the first option, without additional fixation on the support. But, despite this, this device for sharpening knives is quite suitable for domestic use, and plus - it is very simple in terms of manufacturing.
In the process of work, we will need two wooden bars with dimensions of 6x4x30 cm, two bolts and wing nuts with dimensions M6 or M8, two thin knitting needles (curved in the shape of the letter “L”).
Of the tools you need a hacksaw blade, a chisel and a hammer, a file with sandpaper, school protractor and drill.
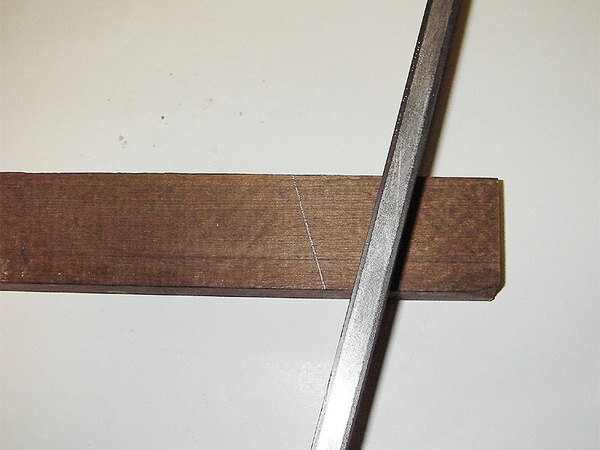
Using a conventional protractor, we apply markings with the required angle of inclination. We take the canvas and file the first mark on one of the parts. It is not necessary to go deeper than the width of the canvas itself.
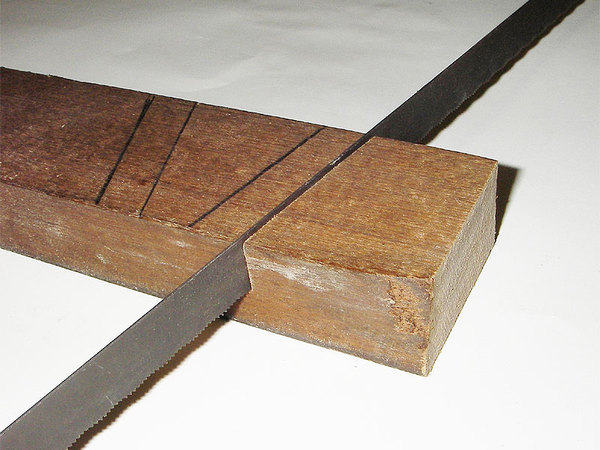
We turn the hacksaw over and insert it with the blunt side into the sawn slot. We apply the second part from above and make sure that both the edges of the elements themselves and the markings on them match. Next, we saw through all the remaining lines in the same way.

We apply a chisel to the excess wood that needs to be removed. With a hammer, tap lightly on the top of the chisel and knock out small chips. When the bulk of the wood is removed, we bring the site to the required evenness with a file.
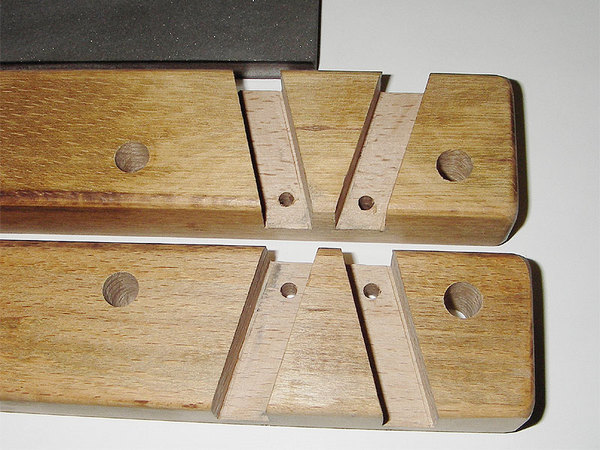
We drill holes for the entry of bolts and spokes as shown in the figure. Using fine grit sandpaper, smooth the edges of the holes, the corners of the parts and their entire surface.
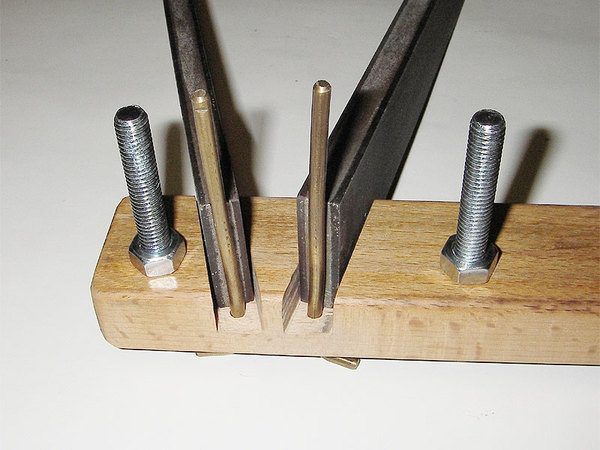
We thread bolts into larger holes, then string regular nuts and tighten them up. In smaller ones, locking needles pass (necessary so that the canvases do not move down during operation). We insert the canvases themselves into the grooves and press them against the second half of the product. We fix everything at the end with a pair of wing nuts.
We imitate a sharpener model from Apex
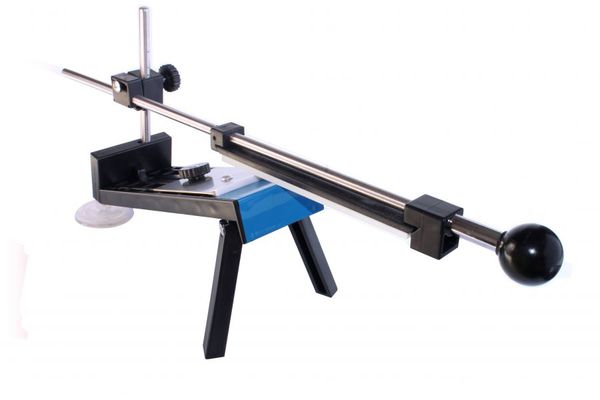
This version of the sharpener is presented in the form of a fairly massive device with a stand and a platform placed on it at an angle, a rod is mounted on the side, on which the end of the nozzle rests. This type of grinding device, despite its dimensions, in comparison with the previous ones, is the most successful.
It is easy to use and the quality of sharpening is high. In addition, making such a knife sharpener with your own hands is very simple.
To work, we need the following:
- chipboard sheet (not a whole, even a quarter is enough);
- magnet (with slots for bolts, if it is not possible to drill them yourself);
- metal rod M6 or M8;
- small wooden block;
- a small piece of plexiglass;
- two bolts and three wing nuts;
- 10 self-tapping screws;
- 4 rubber feet;
- saw;
- drill;
- sandpaper;
- ceramic clips (or wood blanks).
First you need to cut three small blanks from a chipboard sheet. Dimensions of the first: 37x12 cm. Dimensions of the second: 30x8 cm, measuring 6 cm from the edge on the longer side, we drill a hole. Dimensions of the third: 7x8 cm. We saw off an element 8 cm long from the bar (section 4x2 cm).
Drilling in section two through holes perpendicular to each other. The first at a distance of 3 cm from one edge, the second at the same distance from the other. Starting from the edge of the bar to the very hole, we cut out a bunch of wood 1 cm thick. At the cut of plexiglass, the following parameters are: 6x12 cm. A slot is drilled along the middle of the canvas.
We take the first largest chipboard blank and drill holes in the corners for the future legs of the product. At a distance of 4 cm from its edge, we put the smallest workpiece perpendicularly and connect them together using 2 self-tapping screws.
On the top of a small workpiece, we put the edge of a medium-sized part and again connect them with 2 self-tapping screws. The hole in the middle part should be closer to the top of the smaller one. The free edge of the medium-sized workpiece is rigidly attached to the site great detail again with 2 screws.
Using a drill, we drill a shallow depression on medium-sized parts. It should be almost on the very edge of her highest point, and the dimensions correspond to the parameters of the magnet.
We mount the magnet inside (so that it does not rise above the level of the surface of the plank) and fix it with small self-tapping screws.
We put a piece of plexiglass on a medium-sized board, so that their hole and slot coincide with each other. We pass a bolt through them with a washer put on it and screw the nut from below.
A hole is drilled on the free edge of the largest chipboard part with a diameter corresponding to the diameter of the iron rod. The rod itself is fixed with two nuts: a regular one and a lamb. So that they do not crash into the surface of the board, we separate them with washers.
A blank from a bar is wound onto a fixed rod. A bolt is inserted into the hole to which the cut was made, screwed with a nut from the outside. Tightening the lamb, we fix the part at a certain height of the rod, release it - move up and down freely. The sharpening angle is regulated precisely with the help of this bar (raise or lower along the rod).
The element for clamping the grinding blade is assembled from a cut of a metal rod of two ceramic or wooden blanks and 4 nuts with washers. They are strung in the same order as in the photo. At the very end, rubber feet are screwed for greater stability of the product.
We have considered three various options sharpening devices. And each of them has its pros and cons. You should choose a particular option based on your needs, as well as skills in a similar work plan.
A necessary condition for the safe use of knives is their high-quality sharpening. If a blade is handled incorrectly, it can bring a lot of trouble to the owner, ranging from irritation to injury, so it is important to always keep the tools in working order with quality care.
Types of knife sharpeners
Depending on the scope and principle of operation, professional sharpening tools are divided into mechanical and electrical. Also on the abrasive surface sharpeners are:
- natural;
- ceramic;
- with diamond coating.
A tool for sharpening knives is also chosen by price, scope of use and blade material. So, for ceramic, only the same abrasives are used, for restaurants, electric tools are more often chosen, because. They can easily save you time and effort. The professional knife sharpener can also be used at home, and choosing it is easy thanks to the modern assortment sharpening tools.
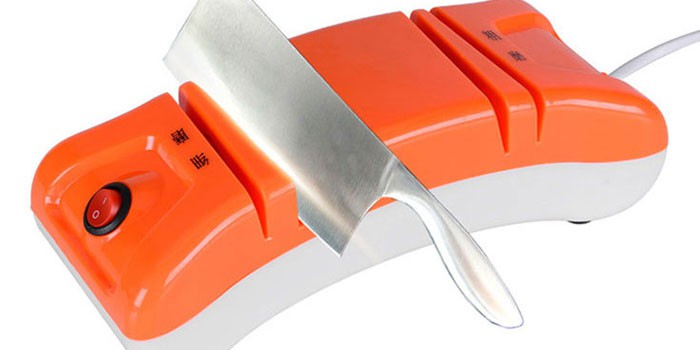
Electric knife sharpener
Easy to use is an electric knife sharpener. It is a small machine with gaps in which abrasive discs are placed. The angle of the sharpener with gaps can be different, set by the manufacturer. Such a kitchen device can be sharpened not only kitchen appliances but also scissors. A professional knife sharpener with ceramic discs is used in the restaurant business, although often chefs use hand sharpeners to work with personal tools in order not to ruin them.
Mechanical knife sharpener
The concept of a mechanical blade dresser includes different kind instruments, ranging from musatov, ending with special installations. main feature- during work, the application of effort is required. Most of the assortment is represented by mechanical cutlery with different types of abrasive surface:
- grindstone;
- musat;
- mechanical sharpener.
The whetstone can be of any size and origin: Japanese water stone, Arkansas, novoculite. Musat is a metal rod with an abrasive coating and a wooden or plastic handle, a very simple tool used more often at home. It is important to use the fastener correctly: the movement of the handle must occur along the tool at an angle of 20-25 ° so that it becomes sharp.
How to choose
A professional knife sharpener is chosen according to the type and grit of the abrasive material, which can be natural (for example, diamond), or a granular coating of synthetic origin. By particle size, abrasives are:
- coarse (with large grains) - used for regrinding;
- medium and fine-grained - ordinary sharpeners;
- especially fine-grained - blade polishing.
Next - the choice of sharpener design. For home use, musat or small whetstones are often chosen. On trips, you can take special pocket sharpeners with you, which have a convenient size, folding design. Mechanical sharpener has become popular recently due to a set of possibilities for sharpening different types of tools. This setup has the following features:
- selection of the desired abrasive stone;
- fixation in the required position of the blade;
- setting the desired angle of the sharpener, etc.
The mechanical installation may be called professional sharpener for knives. To operate it, you first need to understand the features of the work, having studied the instructions, then practice sharpening. An inexperienced user can ruin a blade by choosing the wrong force, angle, and sharpening material. The easiest device to use is electric sharpening, since everyone can use a sharpener by setting the necessary settings in advance.
How to use
To understand how to sharpen a knife correctly, you must first figure out what the correct blade should be. The blunt surface of the cutting part of the blade under the microscope looks loose, not even. Before using the tool, you need to assess the degree of damage to the cutting part in order to select abrasive material: very blunt instruments must first be ruled with a coarse abrasive, and only then polished. On different knives, the way of working is different:
- musat - the movement of the blade is made along the rod at a small angle without strong pressure, which can allow a minimum application of effort;
- whetstone - you need to sharpen, starting from the area near the handle, gradually moving to the tip of the blade, applying force with the handle at an angle;
- mechanical knife sharpener - with sharp movements, the blade is held between the stones.
Overview of popular manufacturers
- Apex edge pro is a professional knife sharpening united in a tool in the form of a machine. Made in the USA, this tool is designed to work with a wide range of blades. Widespread due to high quality and reasonable price.
- Ganzo is a Chinese manufacturer of knives, sharpening systems, whose product is popular due to its low price and decent product quality.
- Lansky is a popular American manufacturer of sharpening systems that compare favorably with quality, as well as simple sharpening technology.
- Ruixin is a manufacturer from China. The systems of this company are cheaper than those of the competitor Ganzo, but differ in that the stones must be leveled before using the grinder.
- Abrasive stones, manual, mechanical knife sharpeners for professional work and home use are produced by Gerber, Wenger, whose products occupy an expensive segment in the market.
Where to buy and how much does a knife sharpener cost
You can buy professional sharpening systems and machines in offline stores such as Eldorado. Easier to find at specialized points of sale in Moscow and others big cities or buy using the Internet, in specialized online stores and on the websites of official dealers of manufacturers. The cost of such systems ranges from 900 to 3000 rubles. depending on the manufacturer:
- Gerber - 2000-2500 rubles;
- Wenger - 1000-1500 rubles;
- Ganzo - 2500-3000 rubles;
- Lansky - 3000-9000 rubles;
- Ruixin - 2000-2500 r.
How to make a do-it-yourself knife sharpening machine
For those who want to build a professional sharpening system with their own hands, it is easy to fulfill their dream without using a drawing. From improvised means, having a manual device with an abrasive coating for sharpening, you can build it at home. The main thing is to find a basis for fastening, to build a hinge system with adjustable height and tilt. Additionally, you can add polishing surfaces to the base for professional blade work.
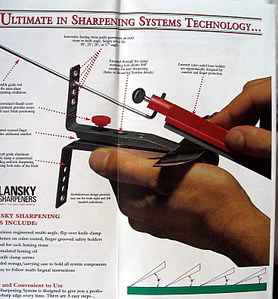
Do-it-yourself knife sharpener drawings. Knife sharpener Lansky drawing. How to make a Lansky knife sharpener. I needed a knife sharpener. Mostly out of curiosity, what kind of animal it is and what it is with. I can sharpen any knife with my hands, but the convenience, and the need for which device in the household should be clarified. Searching the Internet, I found several suitable designs. The simplest and most famous of all was the LANSKY knife sharpener. Any person can sharpen a knife on such a device without special knowledge and skills. It is enough to understand the principle, but it is elementary and any knife will be razor sharp.
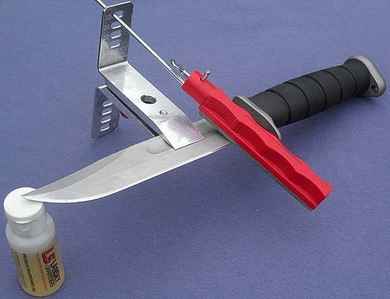
As it turned out, Lansky's sharpener is quite expensive. 1400 rubles minimum for a basic set of a clamp, three stones and a jar of oil. The photo is shown below.
Cursed greed: They ask for a lot of money for a sharpener, and there are three pieces of iron bent at the knees, two screws, and a few pebbles. The hucksters are real. Additional sharpening stones can be purchased separately, but not up to them yet.
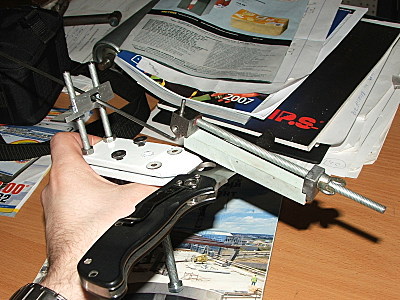
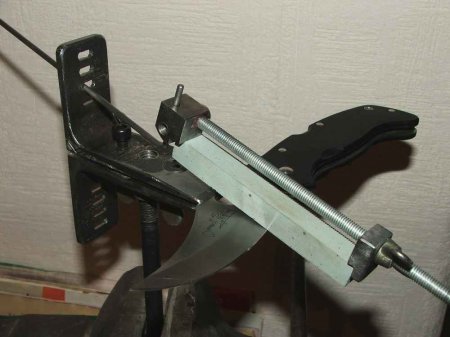
A sharpener seems to be needed, but I don’t want to pay money for it at all. Therefore, it must be done by yourself. I carefully examined the design of the Lansky sharpener, and came to the conclusion that there are no problems to make such a piece of iron at home from improvised materials.
The principle of operation of the sharpener is very simple and can be seen in the picture. With the translational movements of the grinding stone, we form a smooth cutting edge on the blade of a knife fixed in the jaws of a special clamp. By successively changing the grinding stones with coarse grain to fine and very fine, we bring the knife to razor sharp. stone movement
By rearranging the guide from the grinding stone in the holes in the terminals, you can get several sharp sharpening angles on the cutting edge. But since the cutting edge of the knife can be fixed at different distances from the jaws of the clamp, the sharpening angles float. And they are, in fact, close to necessary. This in turn affects the cut of the knife, but only slightly that the user does not notice the difference, so you can close your eyes to the floating of the angle.
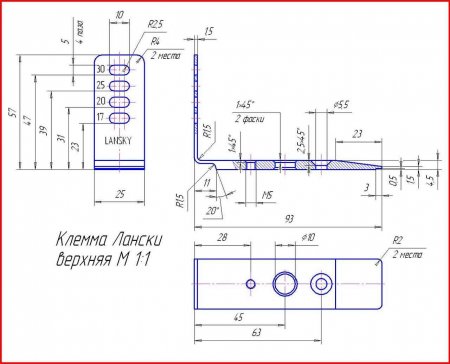
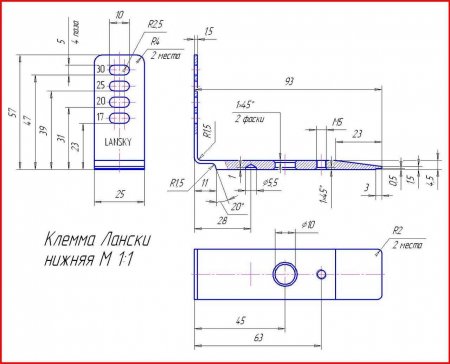
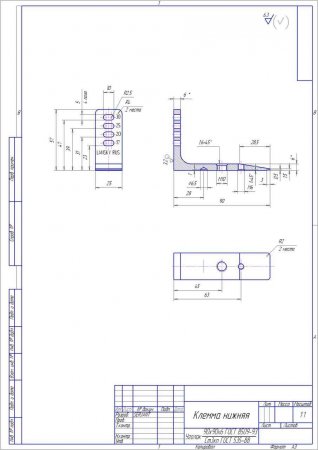
After rummaging through the bins of the Internet, I found drawings of clamping jaws. I redrawn it in a more readable form and converted all sizes to millimeters, since Lansky's sharpener is made in the USA, and there, as you know, they use the inch system, not the metric system. Everything is pretty simple.
I drew in detail my own design of a clamp for a grindstone on a computer. And did the detailing. This design has a number of advantages. Grindstones can be of different lengths, a pebble can work alternately with four sides, and not one like Lansky's branded stones, which affects the sharpening time. The greasy side of the whetstone can be quickly changed to a clean one, and the Lansky stones will have to be cleaned.
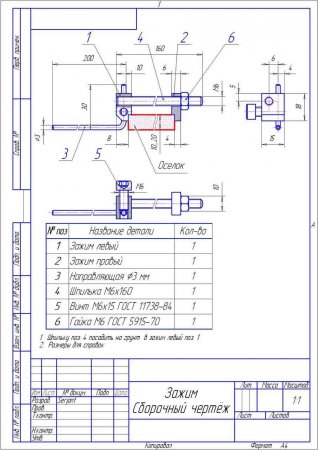
I bought a hairpin with an M6 thread in a store, it cost 20 rubles per meter rod, sawed off a 160 mm long hairpin with a hacksaw and processed the ends with a file, removing burrs.
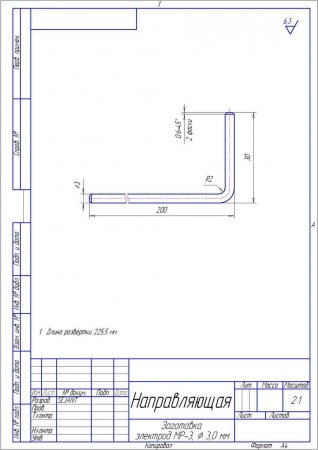
The guide was made from an electrode for manual electric welding, I asked for it in the welding shop, they gave me several pieces without any problems. Also, electrodes can be bought on the construction market, they are sold by the piece, they cost mere pennies, they give 3-5 rubles apiece. The brand of the electrode is not important, the main thing is a straight, elastic, smooth and thin cylinder. He beat the flux with a hammer and lightly cleaned it with sandpaper, removing burrs and flux residues. I bent the letter G with the help of pliers and sawed off the excess with a hacksaw, according to the drawing.
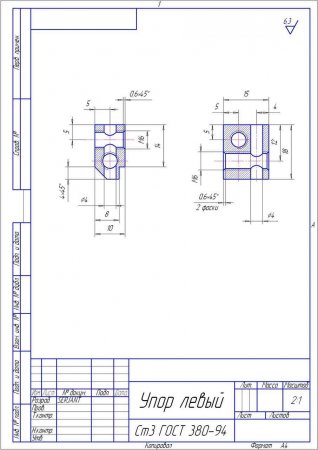
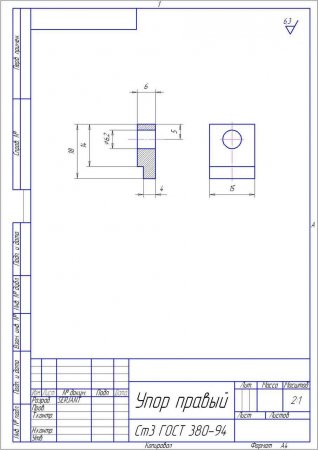
Taking advantage of his official position, he ran to the machine shop, rummaged through a box with scraps of metal, since there are a lot of scraps, he found pieces of iron that were suitable in size, from some kind of raw carbon steel, type steel 3. Sawed off to size with a hacksaw, processed the burrs with a file, and marked the centers of the holes. Using drilling machine, drilled holes in the clamps and then cut the threads with a hand tap, remembering to add a drop of engine oil to the hole to reduce friction. I sawed the steps on the clamps with a hacksaw and adjusted them with a file, after which I polished the surfaces of the clamps on sandpaper.
I washed the glands in soapy water, thereby getting rid of the remnants of oil and shavings on the thread, dried it and heated it over the flame gas stove, zavoronil in liquid machine oil. Used for this event a "fishing rod" made from an electrode for manual welding and a piece of steel wire found in wire stocks. Clamps were used as "bait". Each detail was burnished separately. I cleaned the threads from oil residues with a long bolt and thoroughly washed the finished parts in soapy water.
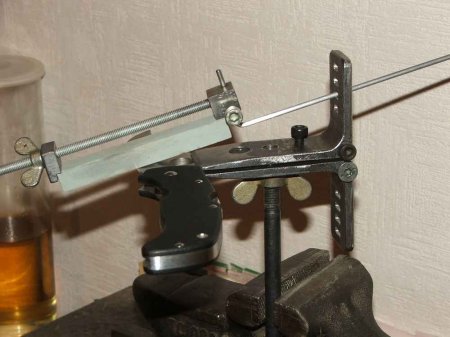
I twisted together, according to the drawing, the clips and the hairpin, not forgetting to drop a drop of nail polish (I stole the vial from my wife), into the connection of the left clip and the hairpin. So that the hairpin does not spontaneously unwind, and eliminate play. After the varnish had dried, I inserted the donkey between the clamps, carefully tightened the nut and aligned the guide pin along the bottom plane of the stone.
![]()
At the nearest construction site, I found a piece of ordinary metal corner with a shelf width of 90 mm and a thickness of 6 mm. However, such iron can be bought on the construction market or found at the nearest construction site. If you politely ask, they will saw off blanks to size for a small fee or "liquid" currency. Such goodness is also in bulk at construction waste dumps, at scrap metal collection points you can be asked to give way for a small amount of money, that is, finding suitable blanks is not a problem.
I redrawn the original dimensions of the Lansky sharpener for the corner 90x90x6 mm. Since I already had an M6 tap at my disposal, I replaced the thread in the original Lansky clamp with an M6 thread for my sharpener. The uniformity of the dimensions of fasteners reduces the cost of manufacturing the structure. In addition, there were small stocks of M6 screws for an Allen socket of a suitable size.
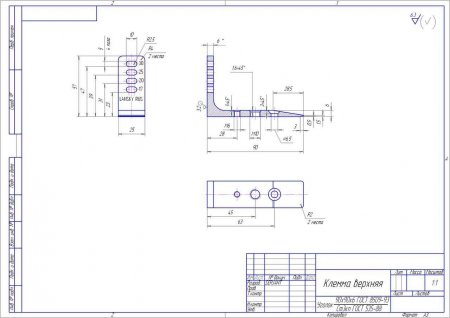
And I drew the entire assembly and drew a 3D model of the sharpener in detail on a computer. Here's what happened


Having filed the corners with a grinder, processed the cuts with a file from burrs and cleaned the surfaces of paint with a metal brush and sandpaper. I leveled the planes from irregularities with a file and put sandpaper on a piece of chipboard and brought out the ideal plane. I marked and drilled holes in the horizontal shelves, according to the drawing. With the help of a grinder and a file, I grinded off the bevels on the sponges so as not to interfere with the movement of the grindstone. Carefully sanded the marks with sandpaper. I removed the radii in the corners with a file. I found a long bolt and an M10 wing nut in stocks of fasteners.
I marked and drilled holes in the vertical shelves. From the outside of the corner with a drill large diameter removed large chamfers, and bored holes with needle files to an elongated groove.
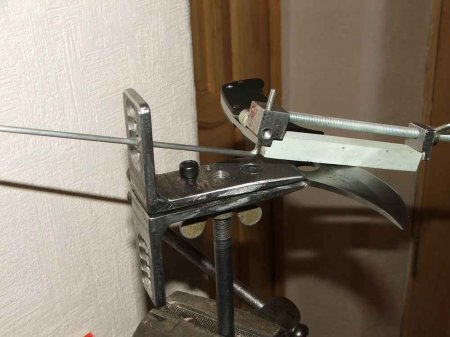
I scrolled the holes in the sponges and cut the M10 thread under the rack. The stand will serve as a large bolt with a nut. For this bolt, the entire system will be mounted in a desktop vise. A tightened nut on the strut will prevent the structure from turning and play.
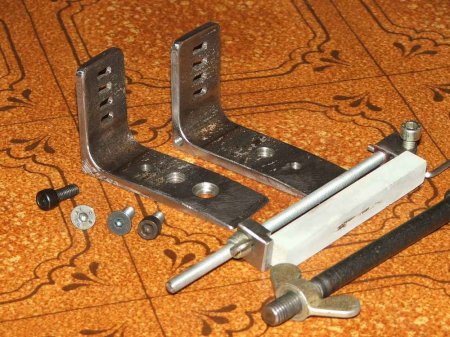
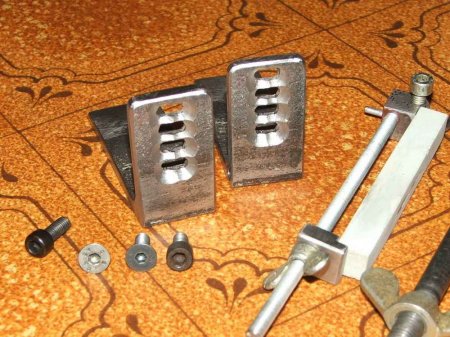
Gathered everything together, fixed the knife, everything, you can use it.
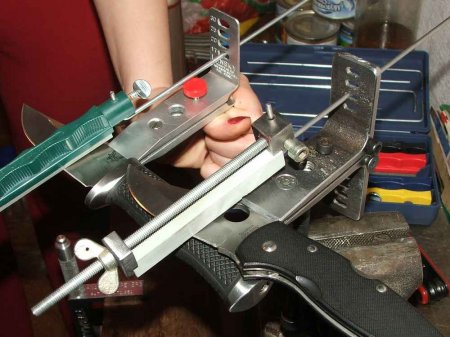
After a few days of operation, I made minor adjustments to the design of the terminals. I drilled a couple of holes in the side planes and cut the M6 thread. Inserted spare screws into these holes. Knives come in different thicknesses, and the sharpener guide catches the screws. Having selected short screws from the stock of fasteners, he screwed them into place in the terminals. The stock pocket does not pull and is always at hand.
On occasion, I got hold of a wing nut with an M6 thread. With such a nut, it is more convenient and faster to tighten the grinding stones on the stud.
For complete set I will buy whetstones of various grain sizes. They are not expensive, from 20 to 50 rubles apiece, they are sold on any construction market or collapse. Again, you can use Lansky's branded stones.
It remains to find a suitable box for storing the sharpener. Gift tin and plastic boxes made of sweets or cookies, which are quite widely represented in pastry shops, are suitable for this role. Finding the right one isn't hard. Goodies to gobble up for the end of creating a sharpener, and the jar is in business. In order for the sharpener not to hit the walls in the jar, the stones do not deteriorate, it is useful to glue pieces of dense fabric or thin foam rubber onto the walls and bottom. Or cut grooves in a piece of plywood and pack all the iron and pebbles into them.
The sharpener is on my desk, and I spent minimal money, mostly on whetstones. We can say that I paid only for the donkeys, but for the M6 threaded stud.
I don’t see any point in paying our huckster-sellers. The sharpener is done for several hours, half a day maximum, and then only because the paint dries for a long time.
In online stores, which is much cheaper than in regular stores, the Lansky sharpener costs at least 1,400 rubles. And here is almost a useful device.
Of course, the Lansky sharpener has a number of disadvantages, such as a limited number of sharpening angles, which are slightly offset by the position of the cutting blade relative to the clamp, and the high cost of a branded product. These shortcomings are relatively easy to eliminate at home in the presence of an elementary metalwork tool, ingenuity and a little bit of free time.
During the production of the clip, when the terminals were almost ready, I was presented with a real Lansky sharpener. So, in homemade device the need has disappeared. Thanks KonstP. Terrible revenge, for this irresponsible element, was in the form of a delicious dark beer.
During the production of the terminals, I came up with a simpler and more functional design of the knife clamp, but more on that in the next chapter of the Notes.
The surface finish of the terminals is far from perfect, since there was no task to set up a marafet. The product can be painted, since there is paint in the can.


Mixed Personality Disorder: Causes, Symptoms, Types and Treatments
GTA 4 control settings
FAQ on Smuggling in GTA Online
LSPDFR - welcome to the police
The huge map of Grand Theft Auto San Andreas and its secrets