In a wide range of plumbing work, drilling is perhaps the simplest and most accessible operation for everyone. As a rule, in production, drilling work is carried out using various drilling machines.
Depending on the tasks performed, these can be the most common single-spindle units, and multifunctional multi-spindle machines with numerical control.
Although the drill is a very versatile device, it does not only reach its limits during the screwdriving process. As soon as you drill the holes of this machine, you know that particularly hard materials such as granite, solid brick or pure concrete cannot be processed so easily - even if the drill is running at high power. However, in order for the result to be satisfactory, it is important that the so-called pressure force be suitably high. This is not particularly gentle on the mechanics of the drill.
Purpose of the drilling machine
The drill, which is very often used for concrete walls, in most cases wears out relatively quickly and therefore needs to be replaced sooner. In such a case, you'd better use the impact drill directly. It usually takes very few blows to drill through a wall with this device - without undue stress. The force is generated in the impact mechanism of the machine, which usually works with compressed air.
Homemade desktop drilling machines
However, we will not be distracted by the description of all kinds of industrial drilling installations, especially since home master, for whom this article is intended, will hardly be interested in the subtleties of the design of a universal vertical drilling and boring machine. But the design of the simplest home-made drilling machine, which can be assembled from improvised material at home, will interest any "handy" master.
Therefore, to work with a rotating hammer, you need much less of your own energy than with a conventional drill. In any case, it's always good to know what you'd like to work with it before buying a drill or rotary hammer. For example, if it is already clear that mostly solid concrete walls must be perforated hammer drill is definitely the best investment. On the other hand, continuous handmade should not be missing from any toolbox. It doesn't have to be a high-end device, but a certain quality is still to be expected and not lacking in any toolbox.
 To perform drilling work at home, in most cases, it is enough to have a conventional electric drill.
However, when performing work that requires high accuracy or drilling many holes of small diameter, which is especially important for radio amateurs in the manufacture of printed circuit boards, a drilling machine will be required, since an electric drill will not provide either the required accuracy or the quality of drilling.
It is better to consult about this in a specialized store. Especially when you buy such an instrument for the first time, it is even more important to know the individual types comprehensively. It can also be useful for viewing customer reviews online. In principle, however, it's always worth investing a little more and getting a device that doesn't work too hard - and that works reliably for several years.
How and how often should you clean your drill?
The drill is a powerful tool that not only artisans but also many home improvement enthusiasts are unlikely to want to get by with. However, it is also a device that works with high impact force and therefore inevitably creates dirt such as chips and dust. These coarse and fine particles can settle inside the case and damage it in long term. For this reason, it is important not to skip cleaning the device in order to use it for as long as possible.
Of course, today in any specialized store many models of various machines are sold, including drilling machines, designed for use in home workshops. However, their cost is considerable, and not everyone can afford such a purchase, especially since with certain skills and desire, the simplest drilling machine can be made independently.
How to properly store a drill? The drill - unless you use it professionally, but rather privately - is used in most cases, quite rarely. However, it doesn't matter how often it is used: proper care and cleaning is essential to keep it performing its services reliably. This also includes proper storage: most people store their tools in a tool room in the basement or garage. It is important here that the rooms are as dry as possible. High humidity can damage the engine in the worst case.
The most common types of homemade drilling machines are:
- Drilling machines based on an electric drill
- Drilling machines based on an asynchronous motor from household electrical appliances
Consider in in general terms manufacturing technology of each of these machines.
Drilling machine based on an electric drill
Due to the ease of manufacture, drilling machines based on an electric drill can most often be found in home workshops.
In this case, the entire device will be unusable. Ideally, you store your drill in a suitable tool box, which usually comes directly from the manufacturer. Even the most powerful and high quality drilling machine needs proper care and attention. Because: if you do not remove the deposited dirt in the machine, but simply leave it there, it may happen that the tool will overheat after a short time because the vents are also blocked - this can render the entire engine unusable.

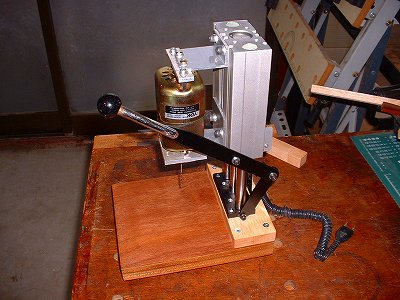
The weight of the electric drill is small, so for the manufacture of a vertical stand you will not need any particularly strong materials, it can even be made from boards or chipboard.
The design of the drilling machine consists of 4 main elements:
Dirt resulting from drilling can often simply be removed by hand, for example when it comes to rough chips. However, the bill is deceptive very often, because when drilling, even the finest dust is formed, which can penetrate the body and, of course, also settles on a surface that does not look pretty at all.
If you want to use a drill, you must first remove the drill from its socket and then clean it with a very fine cotton or microfiber cloth. In this way, dust can be optimally absorbed. If you have taken the exercise from the feed, you can often see more dust residue that needs to be removed. Because you are unlikely to be able to get to this hard to reach place with a rag, this is good idea- a narrow brush with stiffer bristles or even a vacuum cleaner. Important: you must first unplug electric forklifts and similar electrical equipment, otherwise serious injury may occur!
- Base (bed)
- Vertical stand or beam
- Feed mechanism
- Electric drill
The choice of the base of the machine, the frame, should be taken very seriously. The more massive it is, the less vibration will be felt during operation. If your farm has an old photographic enlarger for developing pictures, it can be adapted after a little refinement as a base with a stand. In the event that you did not find anything that could be adapted as a bed with a stand, this element can be made from a furniture plate with a thickness of at least 20 mm.
It also makes sense to wipe down the drill with a small amount of lubricant after about the fourth use. This has a nourishing effect on the metal and also protects the drill from corrosion damage. Although it can also be lubricated with a quick chuck, experts advise against this if you have already lubricated the drill - this is generally completely absent because the drill is grease in some respects to feed once you get it used again.
When cleaning the surface, you should never work with chemicals or cleaners, as this can destroy the case or make the material porous. Here, depending on the degree of soiling, a dry or damp cloth is sufficient. If you notice that over time too much dirt has accumulated between the parts, you can use a compressed air compressor to clean it. This requires a special essay, which is also well suited to hard-to-reach places. Hold this between the blinds of the drill press and blow it inside - the dust can thus be driven by the air directly from the outside.
When attaching the rack to the frame, it is extremely important to get a right angle, since the accuracy and quality of drilling will depend on this. With the help of screws, two guides, cut out of metal strips, should be fixed to the rack, along which the block moves up and down, to which the drill is attached. The block should be made in such a way that the drill can be tightly clamped with metal clamps.
If you want a device that will help you work reliably and comfortably, then you should not compromise your purchase and opt directly for a model that is also high quality. Of course, it costs a little more, but the investment always costs money. Cheap offers appear again and again in discounters or in stores household appliances that you would like to access the most. However, these are often inferior tools that don't really deliver what the manufacturers promise.
Even if you rarely use the exercise, so you have at best several decades of pleasure with the same device - if you maintain it correctly! Also make sure the manufacturer supplies the appropriate accessories, such as various attachments and a protective case. All these things need to be bought separately, which is often more expensive than a complete set.
To reduce vibration, between the body of the electric drill and the shoe, you can install rubber gasket. The vertical movement of the block with a drill is carried out using a lever. To ensure the convenience of work, the feed mechanism should be equipped with a sufficiently powerful spring, which could bring the block with the drill to its original position. One end of the spring will rest against the block, and the other against a fixed beam, which should be installed on the rack.
If you are not sure which model is correct, you should seek the advice of a specialist at a specialized store or hardware store and try various devices in place. It may also be helpful to read customer reviews online or include reviews from consumer portals.
How do you change the exercises on the exercise?
How can you easily create precise holes in wood or stone? Probably, people were already working on answers to this question in the Stone Age. Presumably on early stages it was also recognized that a solid rotating rod was literally drilled into the ground. Of course, it took a long time before the first real drilling machine was produced. It was not until the end of the century that the first electric drill entered the market. Of course, it was possible to drill holes of various sizes, as is customary in modern devices.
If the drill will not be used autonomously, for greater convenience, you can disassemble its switch and install the on-off button directly on the frame.
Drilling machines based on asynchronous motor
In many home workshops, there are various electric motors that have been preserved after the use of electrical appliances. For the manufacture of a drilling machine, the most suitable would be asynchronous electric motor, which is set to washing machines drum type.
But: How do you actually change the exercise? Each drill has an adjustable tip that can hold drills of different lengths and thicknesses. This tip is called a drill chuck. How precisely the drill is held in the drill chuck becomes apparent upon closer inspection: 3 Clamping jaws surround the drill so that it sits exactly in the middle - and it stays even with heavy use. Exists various ways locking and releasing the clamping jaws. Thus, in addition to the modern keyless chuck, the well proven toothed chuck still exists.
It should be said that the design of such a machine is much more complicated than the above-considered design using an electric drill. Among other things, the motor from the washing machine is quite heavy, which creates increased vibration and requires mandatory installation powerful rack.
To reduce vibration, place the engine as close to the rack as possible or choose a fairly heavy, powerful frame.
Both options allow you to quickly change drills, but the functionality is significantly different. Attention: not every drill is suitable for every application and every material. In case of doubt, the following always applies: first inform, then drill! Reliability and reliability: notched chuck.
Drilling machines have been produced with this cartridge for many decades. With the help of a special chuck key, which operates in a ring gear that goes around the chuck, the jaws can be locked and released again. This will open the chuck depending on the diameter of the drill. The drill is then advanced from the front into the chuck before it is locked in place by the reverse rotation of the key. After drilling, the drill is released from fixation with a key. A special advantage of the dental drill is that it cannot be turned on when the drill is rotated to the left.
However, it should be noted that when the engine is located close to the rack, the design becomes much more complicated, since it becomes necessary to install pulleys with a belt drive. When assembling, it is necessary, if possible, to fit all the details as accurately as possible, since the performance of the machine will depend on this.
Therefore, many craftsmen still prefer a well-established system, although manufacturers want to slowly say goodbye to it. In this version, manufacturers do not have an asterisk: the drill chuck can be easily rotated with bare hands, causing the jaws to move towards each other or move away from each other. To change the drill, the drill chuck is opened with a simple movement of the hand until the drill is free. Subsequently, the desired new drill can be advanced into the drill chuck from the front before it is closed again, again with a few turns in the opposite direction.
For the manufacture of the pulley structure, you will need:
- hexagon
- Steel clamp ring
- two bearings
- Two pieces of thin tube, one with internal thread
- Gear
The movable part of the mechanism can be made from a hexagon, a tube of the appropriate size, a clamping ring, bearings, a tube with a threaded female thread to which the cartridge will be attached. The hexagon is an element of the transmission mechanism on which the pulley is put on.
Compact drilling machine
In most cases, the complete fixation of the drill can be felt and heard: depending on the composition of the drill, when the drill is tightened, clicks are heard, which only stop when drilling is stationary. For machines from other manufacturers, the jaw adjustment is silent until the click sound reaches a perfect drill fit.
Changing the drill is very easy. However, it is important to clamp the drill bit to the appropriate depth: if the jaws of the drill chuck can only cover the drill bit up to a few millimeters, it can loosen during drilling or, in the worst case, break off. If, however, it is inserted too deeply into the drill chuck, the cutting edge of the drill may be damaged. Therefore, many exercises have a useful assessment.
 To ensure a reliable connection with the hexagon, deep cuts are made at the ends of the tube. A compression ring and bearings are driven into the tube. It is necessary to ensure that the structural elements are fastened to each other very tightly, otherwise, the structure will collapse from vibration.
To manufacture the adjustment system of the machine, you will need a pipe with cuts of the appropriate size and a gear, the teeth of which must freely penetrate into the cuts on the pipe. In order not to be mistaken with the places of the cuts on the pipe and their size, you should roll out the plasticine on the pipe and drive the gear along it. The length of the ladder pipe must correspond to the height to which it is necessary to raise the chuck with a drill. The axis with a hexagon is pressed into a pipe with slots.
The design described above is rather complicated in execution, and, let's not dissemble, not everyone will be able to make it. Therefore, the easiest way is when manufacturing a machine with asynchronous motor, pick up a powerful steel frame and assemble the machine by analogy with a unit with an electric drill. True, it will not be possible to completely avoid vibration, in any case, and it is not necessary to count on obtaining holes of a particularly precise size when using this unit.
Of course, this article indicates only the general principles for the manufacture of home-made drilling machines, and it cannot serve as a guide to action. Therefore, before proceeding with the assembly of the machine, it is recommended that you familiarize yourself with the drawings of various designs.
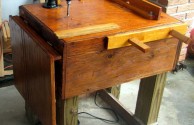
In addition, radio amateurs, who, as a rule, drill holes of extremely small diameter in printed circuit boards, are recommended to assemble these structures in miniature, replacing the electric drill with a microelectric motor. Together with a voltage regulator, a microelectric motor will allow you to get almost perfect holes. An example of the construction of such a machine can be seen below in the photo.
Drilling work is not particularly difficult and often does not require other equipment than a conventional drill. Therefore, in home workshops, a drilling machine may not be available. However, if you have a DIY bench drill press, you can breathe a sigh of relief, as part of your worries will resolve itself.
Purpose of the drilling machine
Sometimes there are situations when an electric or hand drill is not able to provide the desired parameters of the hole being drilled. Often in amateur radio practice it is necessary to make printed circuit boards where you need to drill a lot of holes that have a small diameter. Drilling holes with a diameter of 0.5-1 mm with a hand or electric drill or a large drilling machine is inconvenient, and the drill may break.
Buying industrial drilling machines is not always economically feasible, and then you can make a homemade drilling machine. Many people choose mini drilling machines, because, despite the apparent complexity of the design, they are actually very simple equipment and consist of four parts.

A home-made drilling machine is designed for drilling through and blind holes in solid material, for example, drilling, reaming, countersinking, cutting out sheet materials discs and internal threading. Drilling and milling machines can perform milling, surface grinding, bevel milling and horizontal milling.
To perform the above operations, a countersink, drill, tap, reamer and other tools are used. Applying special devices and additional tools, you can cut a hole with a large diameter, bore a hole, and accurately lap the hole.
Types of drilling machines
Drilling machines are of the following types: single and multi-spindle semi-automatic, vertical drilling, jig boring, radial drilling, horizontal boring, horizontal boring, diamond boring. Models are designated by numbers and letters. The first digit indicates the group to which the machine is assigned, the second - the type of machine, the third and fourth - the dimensions of the machine or the dimensions of the workpiece being processed.
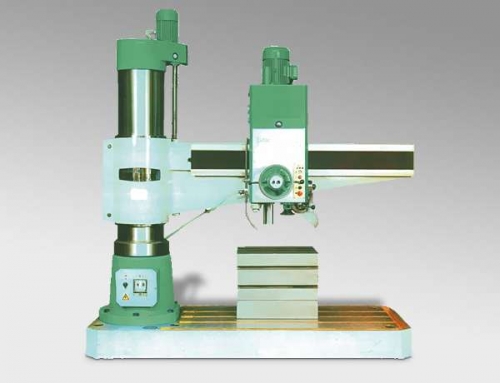
The letter that comes after the first digit means that a certain model of the drilling machine is upgraded. If the letter is located at the end, then it should be understood that, on the basis of the main model, a drilling machine different from it was made. It is possible to distinguish from all drilling machines such main varieties of universal machines: multi- and single-spindle, radial and horizontal drilling.
Depending on the area of use, a distinction is made between special and universal drilling equipment. Specialized machines for mass production and large-scale industry have also found wide application, which are manufactured on the basis of universal machines by equipping them with multi-spindle thread-cutting and drilling heads and by automating the work cycle.
Drilling machine design
Drilling machine, like others technological machines, consists of constituent parts: transmission mechanism, engine, controls and working body. The transmission mechanism is designed to transmit movement from the electric motor to the working body, which is considered to be a drill, which is mounted in a chuck mounted on a spindle - a rotating shaft.
Rotation to the spindle from the electric motor is transmitted by means of a belt drive. By turning the handle, the chuck and drills can be lowered or raised using rack and pinion.
On the front panel of the drilling machine there are buttons for switching off and on the electric motor. The device of the drilling machine is quite simple: the machine is turned on by pressing one of the extreme buttons, depending on the desired direction of rotation of the spindle, you can turn off the machine by pressing the middle red button.

A fixed vertical screw-column is attached to the base of the machine. By turning the handle, you can move the headstock up or down along the screw, the second handle serves to fix it in the required position. Control the depth of blind holes using the provided scale.
Depending on the workpiece material, different drilling speeds are required. To do this, it is customary to set a certain spindle speed by transferring a belt drive belt to pulleys of various diameters. More than complex schemes drilling machines than were just discussed.
The principle of the machine
Before drilling with a homemade machine, you need to remove everything superfluous from the desktop. The workpiece with the marked centers of the holes must be fixed in a vise. Then insert a drill of the desired diameter into the chuck and fix it with a special key. To check the correctness of the work performed, the machine is turned on for a while.
If you have correctly installed the drill, when rotating, its tip will not describe a circle. If it is installed with a warp and its beating occurs, then the drilling machine must be turned off and the drill must be fixed according to the instructions of the drilling machine. Then turn the feed handle, lower the drill and set the vise with the workpiece in such a way that the core coincides with the tip of the drill.

Turn on the machine and drill a hole, press the feed handle smoothly, without much effort and jerks. When drilling through hole install the workpiece on a wooden block so that the drill does not break and the machine table does not deteriorate.
When drilling deep hole take the drill out of the hole from time to time and cool it by dipping it in a bowl of coolant. It is recommended to reduce the pressure on the handle at the end of drilling. After drilling a hole, smoothly turn the feed wheel, raise the spindle to its highest position and turn off the machine.
Drilling machine manufacturing
A drilling machine is easy to make with your own hands. In everyday life, it is beneficial to have fixtures and tools for carpentry and plumbing work on hand. After the obsolescence of many household appliances, many useful spare parts and electric motors remain in the arsenal of the owners, from which, if desired, you can make such useful equipment as a drilling machine.
Drilling machine from a drill
by the most simple solution for you there will be an assembly of a mini drilling machine with your own hands using a drill. The drill weighs a little, so the rack can be made from chipboard, boards or sheet metal. For comfortable work on such homemade machine it is necessary that it turns out to be quite massive to absorb the vibration of the drill and sufficiently stable.
It is important to get a right angle between the holder and the base. Usually, the drill is attached with two clamps (it is better to place a rubber gasket between the clamp and the drill) to the board, which moves along the guides that are fixed on this movable board and on another fixed board. The downward and upward movement of the movable board is controlled by a lever associated with it.
The downward movement of the lever can be limited by a bar supporting the lever in the lower position. A fixed board is attached to a horizontal pipe through a flange. A horizontal pipe through a square is attached to a vertical pipe, which is attached through a flange to the base of the machine (to a thick wide board) or to a workbench.
The height of the bar, which limits the lower position of the lever, is adjusted, which allows you to change the depth of drilling. Make 4 holes in the movable board, which are intended for clamps fixing the drill. On its side, which faces the fixed board, narrow rails are glued, which are lubricated with wax for better glide.
The drill, in addition to clamps, is fixed with two rods that support it from below. Since with such a fastening, the shape of the drill does not strictly ensure the vertical position of the drill, it is necessary to glue a lath to the board to compensate for this.
To ensure the free movement of the drill, the guides must be prepared strictly in the vertical direction. They can be a protrusion of aluminum metal profiles, which are screwed with threaded screws to the boards along the entire length. Having assembled a solid and stable structure, it is necessary to fix the profile guides strictly perpendicular to the plane of the base and parallel to each other.

In the photo of self-made drilling machines, the places of attachment to the movable platform of the drill and the method of mounting the guide profiles are clearly visible. The guides must ensure high-quality pressing of the movable to the fixed board. The main condition for this is the absence of distortions and backlash.
When assembling the lever, remember that you cannot tighten the moving parts; it is customary to use a second nut to lock the nuts. The rail that leads to the movable board from the lever should be rounded at the end. After reducing the pressure forces to automatically raise the drill to the upper position, it is necessary to put the springs on compression or tension.
One end of the spring is attached to the horizontal pipe with a wire, and the other end is attached to the bottom of the movable board. When the spring is not flexible enough, and a fixed board interferes, then this is done through a rope.
Machine from a motor from a washing machine
The drawing of a drilling machine, which is assembled on the basis of a motor from a washing machine, differs from the one discussed above in the most complex mechanics and the type of electric drive. The asynchronous motor from the old washing machine is heavier and has more vibration. The shaking will be stronger the farther from the rack the engine is located.
Intense vibration provokes inaccurate drilling and breakage of the drill. There are two ways out - to make a powerful frame so that when the drill is lowered, the drive also falls, or the motor is placed motionless closer to the holder post, then it will only walk working part drilling machine.
The second method involves a more complex implementation. Here you need a pulley and a belt that allow you to adjust the speed of rotation. There are many solutions without a belt drive with a drive located against the wall. They are much easier to assemble, but the assembly, which will be discussed below, is characterized by an unconventional approach, and certain applied techniques may be useful.

Vibrations still remain, but they are so minimal that when drilling iron with a 0.7 mm drill, the drill remains intact. At home, you can only dream of high precision in the manufacture of such mechanisms, but you still need to strive for maximum fitting of parts. The characteristics of the drilling machine and its performance will depend on this.
The moving part of the machine consists of an axial hexagon, a tube right size, a clamping ring and two bearings and a tube with an internal thread to secure the chuck. On the hexagon, part of the future transmission system, a pulley is subsequently put on. The tube must first be cut with a grinder along both ends, and make the cuts on top deep enough to ensure a secure grip with the hexagon.
The entrance must be made tight, driven in with a hammer. If donning occurs without much effort, then you need to pick up another tube. Then stuff the compression ring and bearings. The height adjustment system consists of a pipe with cuts and a gear. To make the cuts accurately, you need to roll out the plasticine and drive along it with a gear.
An imprint will appear, which is easy to measure and make the appropriate markup on the adjusting pipe. The length of this ladder should correspond to the maximum height to which the drill can be raised. Press the axle with hexagon and bearings into the slotted tube.
Such a design will go back and forth vertically in the stationary tube of the bed when the gear is scrolling. At the same time, the axis is rotated in a horizontal plane through a belt drive. The bed is made from metal corner with bolts. The whole structure is attached to the wall.
And finally, remember that the first option for assembling a drilling machine is preferred. The proposed second version of the assembly can be supplemented or improved. However, such a simplified solution deserves attention.


 Recipes in English with translation")


Stuffed eggplant with chicken and mushrooms baked in the oven with cheese crust Cooking eggplant stuffed with chicken
How to cook ham in the oven at home
Pain in the lower abdomen during pregnancy, reasons for what to do Can the lower abdomen hurt if pregnant
Protein for muscle gain
The best vitamins for men according to customer reviews