Pretty easy to make (if available) the right tools) and according to its parameters professional sharpener for knives brings to your attention one of the masters who became interested in this topic after studying numerous experiences of this kind of crafts on the Internet. He had the idea to create a powerful sharpener with high performance with his own hands.
In his household, a piece of channel 80, 25 cm long, was lying around. On the edge, he made a groove in the channel with a cutter for neodymium magnets 10 mm wide, 2 mm deep. The magnets were purchased online. You can buy them in a Chinese online store. Magnet holding force 3.2 kg.
Usually this is a small disc grinder. The position of the blade, and therefore the angle of the blade, is usually determined by the angle of the notch in the blade cap towards which the sharpening is sharpened. These small grinders are either powered by electricity from the grid or by a battery. These batteries don't have much power, or they can't last too long. On the other hand, you can use it anywhere. The efficiency and quality of these grinders always depends on the quality and grain size of the grinding wheel and how well the grinder is kept.
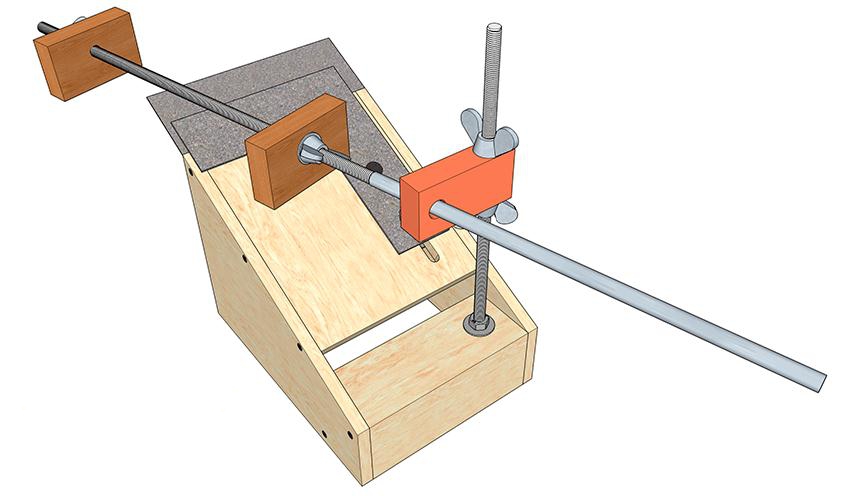
I made holes in the channel and cut the M10 thread. M6 for fastening the stop. A threaded rod is fastened with a hexagon guzhonchik. The other node is the swivel mechanism. An M8 nut is welded inside. A bushing with a welded bolt is screwed into it. A nylon bushing is installed inside. It is a cap from the heater engine from the car. It fits perfectly in diameter. It is screwed on a carving and freely rotates.
Next up is the knife holder. This is a plate measuring 80x70 mm. With a slot, the groove is milled. It is fastened with an M6 bolt.
Steps for making a sharpener
Last interesting feature- miniature belt mill. The theoretical advantage of belt grinders is the flatness of the chamfer, the grinding wheel always makes a hollow cut. In practice it doesn't matter, on a small chamfer surface the radius of the grinding wheel has little chance of showing.
but grinding machine offered a wide range of abrasive belts different sizes including fine polishing tapes. Whatever tool you choose, learn how to use it. If possible, still at home, in the workshop. This will be a tool for use in the field. And, of course, the best sharpening or product won't do you any good if you're not good with the knife. Keep in mind that a knife should be stored at all times, not when it's hopelessly dull. You should also be confused by the fact that sharpening takes some time.
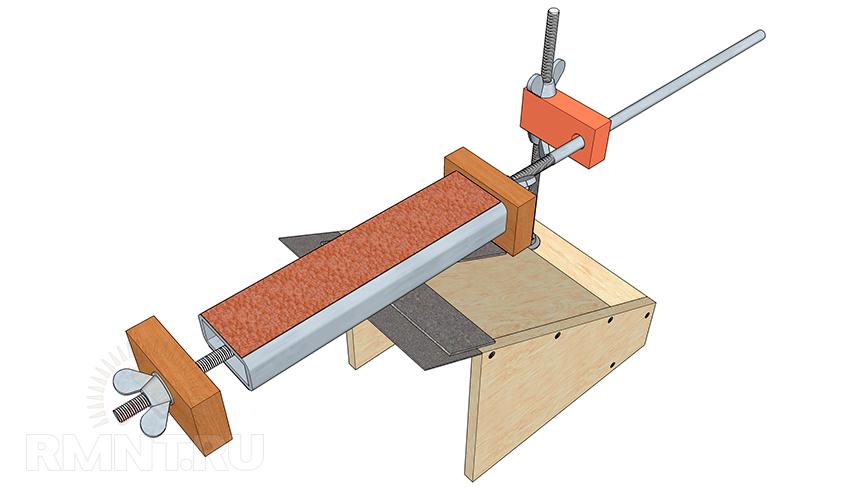
Now let's install the spring. We press with a little effort so that the turn knot does not bounce.
A polished 25 cm rod with a diameter of 8 mm was used. Attach a ball to the end of the rod.
Next is the threaded bushing. A bent plate is welded to it. The rod is 34 cm long. On the opposite side, it also has a sleeve without a thread. A plate is also attached to it by welding.
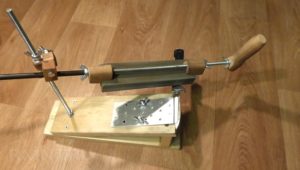
Spring. And the knob from the tractor lever. It all comes together. Well, here is the finished result, the sharpener is assembled.
The bars are oak slats, sandpaper 800 is attached with one glue. Sandpaper 800 is attached to the other. Grooves for the plates are made at the end.
Getting the sharpener ready to go. To do this, we fix the bar. First, we insert it on one side, then we pull the spring and install it on the other side.
The sharpener is ready to go. We attach the knife to a magnet, which perfectly holds the metal. We sharpen movements towards ourselves. You should not sharpen from yourself, because in this mode it cuts off the sandpaper.
Do it for this purpose, he will come back many times when working with a sharp tool. Finally: River Knives Columbia and a tool company offered a knife called Edgey a few years ago. At first glance, a simple, simple shipyard-style knife. But the knife has a diamond surface tablet in it. Each time the blade is opened or closed, the blade slides down the planer and drags on. The blade is not perfect, but it is constantly maintained and functions unexpectedly. For example, a boy or a simple working knife in the workshop or in the garden is almost perfect.
Please use a different device.
In this TechnoSHOW channel video you will see several useful ideas for sharpening knives.
Now we have various kitchen knife sharpeners, but at one time they were, which are based on sharpening the cutting edge of a blade of a softer alloy on a hard one. The same life hack is sharpening a knife on a knife. This method is not the most ideal, but quite effective. Surprisingly, if you have nothing on hand other than a lighter, you can easily sharpen a knife with it. You don’t even need to disassemble anything, just move the knife blade along the rough surface of the ignition wheel. As you can see, the knife has become noticeably sharper.
Unfortunately, the market did not accept it, and the knife disappeared from the company's offer. Damn it. One of the first swallows were the so-called "wheels". In the case of anodized aluminum, it was alternately mounted on two shafts with a crossover of hardened steel wheels. The case was topped with a cutout that inserted the knife blade inwards. The blade sat in the valley between the wheels, the blade was compressed from above, and the blade bent down. Behind a massive screech, the sharp edges of the wheels scraped off the sides of the blade and, thanks to the overlap, formed a new cutting edge.
The whole product can be attached to the edge of the table with screws or the product is equipped with a handle. With the words: "Be sharp." He then took the knife and showed me what the "wheels" had done to the blade. Then there was a thorough lecture, as it would be nice to sharpen the knife and what was on the market today. The problem with the above product was that the wheels on the shafts were placed with a relatively large will, which was negatively noted on the resulting blade. Also, the wheels were mean, hump.
One of the most ancient ways is to sharpen the blade on a whetstone or whetstone. If you do not have a tactical, but an ordinary knife, then when sharpening, you must adhere to an angle of 25-30 degrees to the surface of the bar. One or two minutes and your knife is perfectly sharp. Did not find a sharpener, a file will help you. Its rough surfaces are no worse than whetstones. There is nothing but sandpaper - sharpen boldly and the result will pleasantly surprise you.
It has no wheels, but two straight short "blades" of sintered carbides. And after the premiere of Lanus, many preparations were made, from an unfortunate copy, possibly of Asian origin, to really good products from well-known manufacturers. However, blade preparation is best suited for pulling the blade quickly. The brush is very thin and the blade is also quite good. All of the above products are bent in some way, the blade usually better quality cut after use than before use.
However, none of the products sharpened the knife to meet the "shaving" criteria. They work, but the quality of the blade will always depend on the grain size of the abrasives used. In the middle of the century, Lansky produced the first grinder. The preparation provides a relatively constant blade angle relative to the entire length of the blade. There are several holes for the guide rod in the holder, corresponding to different angles of the blade.
Do you want to know how welders and assemblers sharpen knives? Bulgarian! Nothing is faster and easier sharpening knife edge with an angle grinder 6000 rpm, a couple of moments and you're done! But this way is dangerous. Safety precautions must be impeccable!
If you find yourself in nature, and a dull knife refuses to help, find a stone nearby. Making the same movements as on the abrasive grindstone, you will sharpen without any problems.
In addition, there are several grinding stones in the set, from the coarsest to the finest. Each one is molded into a plastic case with a guide holder. The color of the holder also codes for the size of the stone grain. The stone is also supplied with grinding oil. The entire product is stored in a practical plastic case. The use of the product is very simple and the result that can be achieved by a low-skilled novice is professional. If any abrasive stone is damaged or worn, Lansky sells the stones separately.
It also offers a diamond abrasive stone and a special profiled stone for grinding knurled knives. Another stone profile is for grinding tips fishing hooks, darts, darts and sharp tools. You can also purchase a simple stand that can be attached to a table top. This product has found several followers and has many copies and clones in the world today. Then she suggested a diamond grinding stone - a needle file with a leash for grinding knurled knives.
Ceramic surfaces that are free from varnish and glaze can also help us with sharpening. Take a cup or saucer and feel free to sharpen your knives on their rough surfaces.
The best option for giving your knives perfect sharpness won't be the easiest way. First you need to make a rough sharpening of the blade using any of the above methods. Then you have to do fine processing about sandpaper with fine abrasive. Next, apply GOI paste on a leather surface, for example a belt, and polish the blade. After such a tool, you will forget about sharpeners for a long time and you will use knives for their intended purpose with great pleasure.
By using this type of product, it can be guaranteed that the razor blade will be guaranteed. He realized that while it may be difficult for a beginner to maintain the same angle of the blade relative to the horizontal plane, maintaining a vertical blade position is instinctive and relatively simple. Its essence is two rods of excellent abrasive material with a high alumina content, held in position, open in a plastic holder. On one surface, a cutout is created for grinding studded tools.
Currently, there are several types: a machine for sharpening knives, for a hairdressing machine and others. This article talks about how to make a knife sharpening machine at home: detailed drawings with dimensions, photos and videos (2-3 videos) are presented.
Often, when sharpening knives at home, households use abrasive whetstones. However, in order to use them in practice, you need the necessary skills and experience with them. After all, if the knife is sharpened at the wrong angle, then the blade remains dull.
The main steps in the manufacture of the device
They are interchangeable and can be secured in the holder so that the cutting blade slides along the slightly rounded edges of the triangle or blade surface. In addition, medium grit or fine grit rods are supplied as standard. Diamond abrasive rods are also available for sticks intended for hard, rough comparisons of severely dull instruments. Working with the product is relatively simple. Insert the rods of the selected grain into the holder. Depending on the degree of wear, the blade is oriented either with the help of an edge sliding along the blade, or on the surface.
Scheme of the location of the block to the blade.
Before the direct manufacture of the machine, you need to listen to the advice from the sharpeners.
When sharpening a knife, the master performs the following actions:
Defines the angle between the working area of the blade and the block. Moreover, for each model, the angles are different;
The knife is located at an angle of 90 degrees to the direction of the bar. The grooves that are formed when the razor blade rubs against the bar should be at 90 degrees to the knife line. The angle in such a situation is equal to half the sharpening;
Take the product and press it on the table. Now take a knife, put it between the sticks. Hold the knife in the normal working position, i.e. blade down vertically. Alternate strokes on both sides of blade to blade. The triangular profile of the blades also makes it easy to sharpen knurled knives. Later, a modification was made, now the body is made of a black plastic box, which also serves as a holder for a sanding stick. Thus, the rods are better protected from damage in the transport position.
They just needed something with enough active surfaces. At the same time, they did not object to reduced aid mobility. On the contrary, it would be useful if the help could be permanently attached somewhere to the side of the work surface, and the nodal connection of the knife would require only rubbing the blade and rolling over the abrasive element. Custom abrasive changed appearance on two rods of high-quality ceramic with a high alumina content, about 30 cm thick and 25 mm wide.
Typically, the angle is 25 degrees;
The locksmith starts processing from the beginning of the foot blade;
When adjusting the grinding angle, the master paints over part of the foot blade with any marker. As a result, the mechanic directly controls the work area.
As a rule, after sharpening, the working blade has non-uniform deformations. Therefore, with self-processing, the “reference point” should not be the sharp part of the knife.
Their cross section is lenticular. In the holder, they can be placed either by sliding the blade or along the edges of the lenticular profile or slightly curved surfaces. The holder itself is a small plastic element equipped with two big holes. They can be screwed to the work surface or elsewhere as required by the cook. Focusing with this aid is almost comparable to a drawbar, but there is material removal. For more blade editing, classic stones or brushes should be used.
The choice of whetstones for sharpening a knife
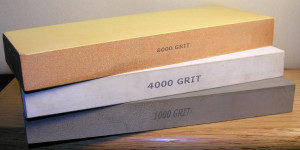
The main indicator of a bar is granularity.
The block is the main component that makes the blade thin and sharp. As a result, before choosing a design, you must select the desired bars.
This product tried to further complicate the dimensions of the sanding composition in the transport position. The substance remains the same as in the preparations described above, only the method of holding the rods at a constant angle has changed. Laansky tried to design the bracket so that it could be folded and distributed as easily and quickly as possible, and took as much space as possible. less space. As a result of his efforts, there are three rails connected by joints. Two bands use round grinding wheels.
When rails are transported, they lie side by side and form a relatively small package that fits into the thigh pocket of military trousers. If you want to use the tool, simply open the two rods with the grinding rods to the desired angle and secure them in that position by placing the free end of one rod into the hole in the top bar. The cutouts in the top panel are two, so you can choose from two blade angles. However, for extra compactness, you only pay for one grain of sanding elements.
At self-sharpening knives, the household uses these types of whetstones
which have a high grain size. By using such bars, the shape of the foot blade is corrected.
with medium grain. With the help of such bars, the locksmith removes the grooves that form during the initial processing of the knife.
In addition, sharpened sharpening of the blade is not possible, the diameter of 6 mm is too large. The blade is naturally dry. This rider moves the rider, which is pushed upwards by a spring wrapped around the sanding beam. Slanted slots are created in the slider to define the blade angle. Insert the blade into the slot in the slider, hold the wand on the pad and pull the blade along the entire length of the blade, sliding along the sanding bar. Sanding stones are available in two sizes. The limiting factor is the width of the notch for the edge of the blade.
whetstone, which is covered with GOM paste. In such a situation, the locksmith polishes the blade.
When processing knives for the kitchen, two types can be used - with medium and high grain. And also in this case it is necessary to use a touchstone.
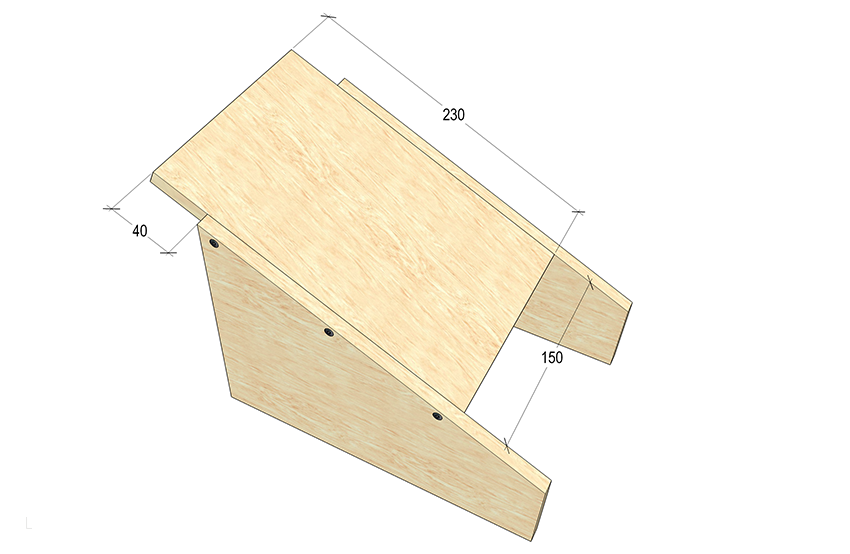
Base
In the manufacture grinding machine at home, you can use various parts. In particular, you can use laminated box plywood 12 mm thick, which was previously used to create radio equipment cases.
If it's too loose, it won't bend exactly like a stone blade. If you have a knife with a strong, really massive blade, then you don't need to fit into the notch. Overall, this product looks rather funny, but it has a lot of storage and, above all, it works. At least for work, pulling on the blade, no doubt. It won't be a big breeze. During use, it does not change its shape, there is no need to decorate it like standard discs. They are ground in the same plane all the time, and there is no unwanted gradual deformation of the blade by wear or localized groove grinding as with conventional grinding wheels.
When building a machine at home, the household performs the following actions:
Selects a base for such an installation, which must weigh at least 5 kg. Otherwise, the machine will not be able to sharpen cutting devices and tools. Therefore, in the manufacture of such equipment, the tenant uses various steel corners measuring 20x20 mm;
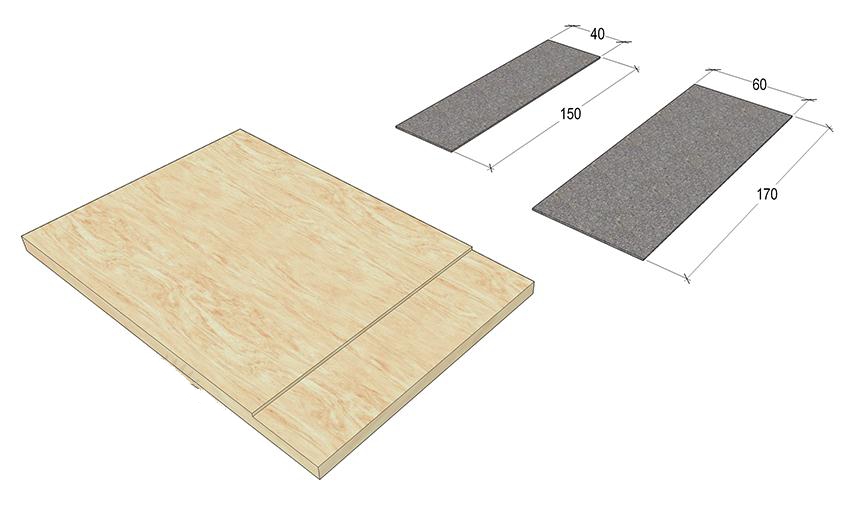
Further, he cuts 2 parts from plywood with a jigsaw, which have a trapezoidal shape, the base is 170 by 60 mm, and a height of 230 mm. When cutting, the locksmith makes an allowance of 0.7 mm for sharpening the ends: they eventually turn out to be straight and fit the markup;
Installs between the inclined walls on the sides 3 parts - an inclined surface made of plywood of such dimensions 230 x 150 mm.
In such a situation, the trapezoidal sides are on the side on a rectangular surface.
The result is a base - a wedge. In such a situation, a protrusion of an inclined surface with a size of 40 mm is formed in the front;
Then, along the side wall ends, the locksmith marks 2 lines with a thickness gauge. At the same time, it retreats by half the thickness of the plywood;
Drills the ends of the inclined surface and for some time connects the details of the base;
At the back of the structure, the locksmith connects the side walls with a 60x60 mm block, which is attached to the end with two screws from 2 sides; - makes a 10 mm gap in the bar.
In such a situation, it recedes 50 mm from the center - 25 mm from the edge. To maintain a vertical position, it is first drilled with a non-thick drill from 2 edges, and then expands;
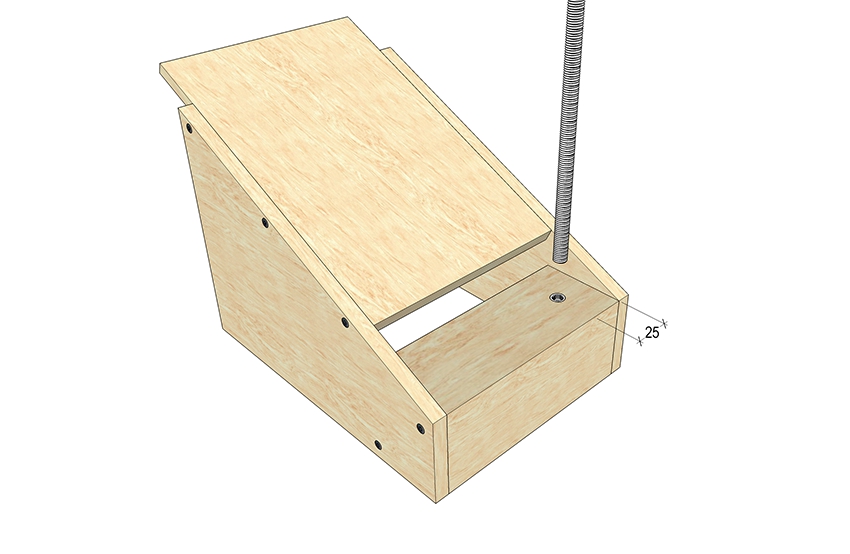
Then, at the top and bottom, two threaded fittings-futors are screwed into the slot, and in the fittings - a stud 10 mm in size, the length of which is 250 mm.
If the threads do not match the studs, the lower futorka is adjusted.
Handpiece device
In the manufacture of the handpiece device, the following actions are performed:
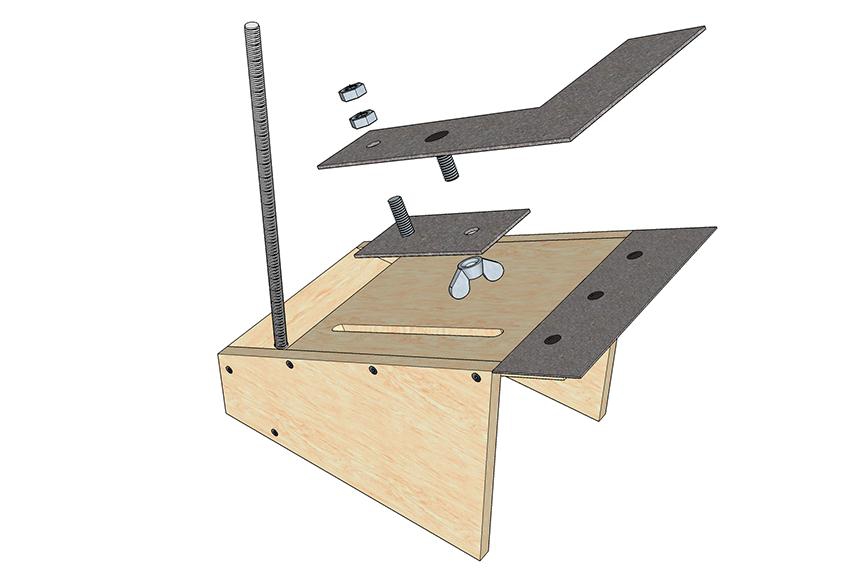
Removes an even inclined part from the base, refines it and installs a fixation device on it, as well as a clamp of the device used;
He measures 40 mm from the edge in front and, using a garden saw, cuts a groove at this mark, the depth of which is 2 mm;
Using a shoe knife, the top 2 veneered layers are chipped from the end of the board. The result is a sample in which the locksmith inserts a 2 mm steel plate flush with the common surface;
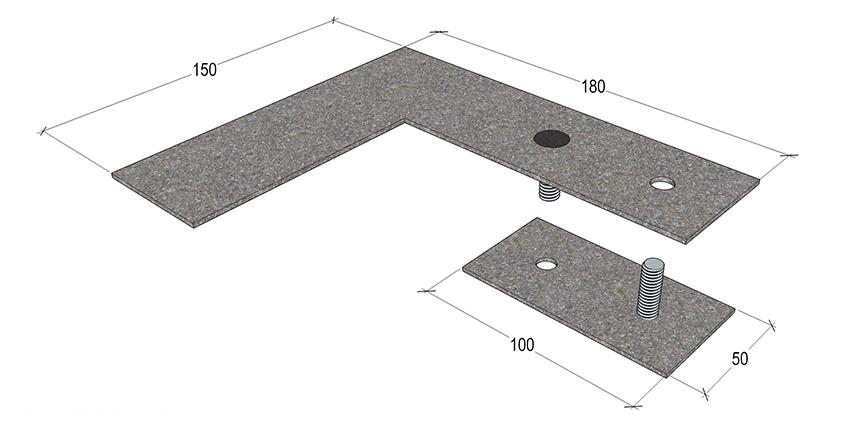
The armrest has in its composition 2 strips of steel with dimensions of 170x60 mm and 150x40 mm. The machine operator connects them along the large end, which has equal marginal indents, and makes 3 through slots of 6 mm.
With the help of bolts, it tightens the slats along the slots made. In such a situation, the machine operator leaves the bolt heads on the side of the large top plate;
Then he removes metal defects of the weld in the form of sagging and grinds the plate until it has a smooth surface;
![]()
Attaches a small reciprocal bar to the edge sample, transfers the slots with a drill and fixes the handpiece with bolts.
fixing device
Second important detail a handpiece is considered a clamping bar. It can be made from 2 parts.
L-shaped bar measuring 150x180 mm, the width of the shelves of which is 50 mm (upper);
Reciprocal plate in the form of a rectangle measuring 50x100 mm (lower).
In the manufacture of the clamping bar, the machine operator performs the following actions:
Sets the bottom bar on the far edge of the top;
Makes 2 holes in the center and retreats 25 mm from the edges of the part, connects the parts through the holes with two 8 mm bolts;
Screws in 8mm bolts on 2 sides. In a similar situation, the hat of the near bolt is located near the top bar;
Welds the caps of the bolts to the plates and pre-grinds until roundness is formed;
Yes, the inclined board retreats 40 mm from the edge and draws a line with a thickness gauge;
Makes along the edges at the bottom and at the top one 8 mm slot in 25 mm;
Using markings, he connects the edges of the slots and makes a cut with an allowance with an electric jigsaw. File expands the groove to a width of 8.5 mm;
It fastens the planks by means of a groove, which is in the board, tightens the top bolt with a nut and, thus, firmly fastens the plank.
Then tighten the connection 2 with a nut;
When pressing the lower bar (in the niche of the base), he screws a wing nut onto the second bolt.
Sharpening angle control
When adjusting the sharpening angle, the locksmith performs the following actions:
On the stud, which is located in the bar of the machine base, he throws a large washer and tightens the nut.
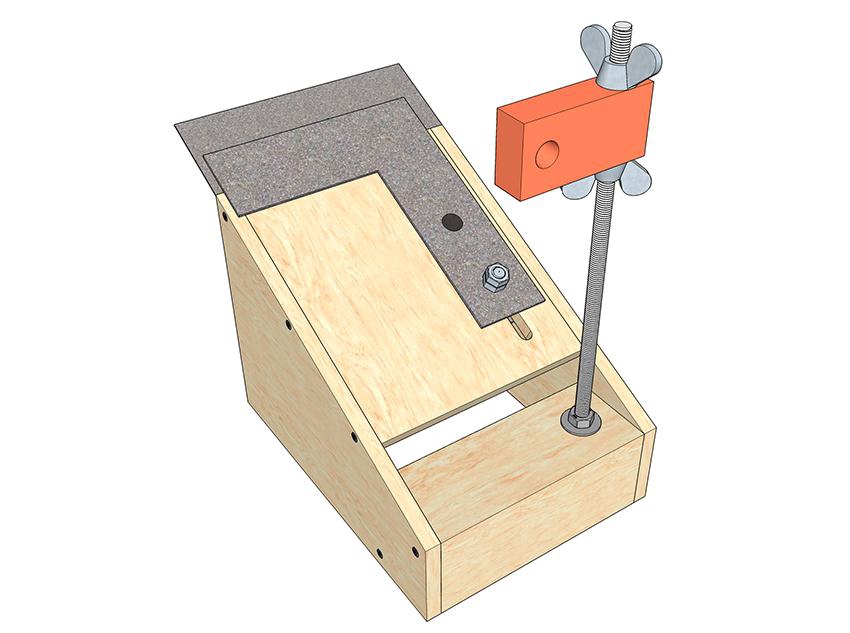
The rod does not turn in the futorka makes a block for adjusting the grinding angle from a small carbolite bar, the dimensions of which are 20x40x80 mm.
At 15 mm from the block edge, it drills a 20 mm end from 2 sides, expands the gap to 9 mm, then makes a thread inside;
50 mm retreats from the axis of the new slot and drills another one in the flat part of the workpiece - 90 degrees to the previous one. Such a gap has a diameter of 14 mm. In such a situation, the locksmith strongly flares the hole using a round rasp;
Screws the block onto the spire - sets the desired eye height without the use of fixing screws;
Fastens the block from 2 sides with M10 hex nuts.
The use of interchangeable blocks and the manufacture of the carriage
In the manufacture of a grinding carriage, the machine operator performs the following actions:
Welds 30 cm M10 threaded studs with a smooth rod, the thickness of which is 10 mm;
Uses 2 solid bars 50x80 mm and the thickness of which is 20 mm. In all the bars in the center and on top, 20 mm recedes from the edge, and then makes a gap 10 mm wide;
Screws a wing nut onto the bar, then a large washer and 2 bars, then a nut and a washer;
Between the bars, he clamps rectangular grinding stones or makes several interchangeable grinding stones.
As a block base, the machine operator uses a rectangular tube from a profile or a piece of cornice, the width of which is 50 mm;
It sands the flat machine part and cleans it of grease, glues strips of sandpaper with a grain size of up to 1200 grit with Super Moment glue.
The sandpaper should have a fabric base, and on 1 of the bars you need to glue a strip of suede to apply polishing to the blades.
A simple homemade machine
The most common version of the machine design are 2 pairs of wooden rails, which are fastened together with screws. Between such parts, the machine operator sets the bar.
The main reason for the popularity of the usemanual homemade machine for sharpening various knives is its stability. During operation, the machine structure does not move along the workbench.

When fixing the bar, the locksmith uses support strips that are located between the wooden elements.
However, such homemade machine has the following disadvantages:
The master exposes the blade to the stone manually. With prolonged work, it is difficult to keep track of the sharpening angle;
In the manufacture of such an installation, it is necessary to use a fixing unit. The machine structure must be stable, so it must be firmly fixed on the workbench;
In the process of work, the screeds weaken and the location of the bar changes.
Another advantage of such a scheme is the ease of manufacture. Such a machine design is more often used when sharpening knives for a jointer and for the kitchen.
Wooden slats can be of various thicknesses. At self-manufacturing a simple grinding machine, you can use various improvised components.
During the initial study of all the nuances of manufacturing, you need to watch thematic videos that describe in detail how to make a machine at home.


Chicken in kefir - recipes for marinated, stewed and baked poultry for every taste!
Simple Chicken Recipe in English (Fried) Recipes in English with translation
Chicken hearts with potatoes: cooking recipes How to cook delicious chicken hearts with potatoes
Recipes for dough and fillings for jellied pies with mushrooms
Stuffed eggplant with chicken and mushrooms baked in the oven with cheese crust Cooking eggplant stuffed with chicken