On the initial stage construction, when even far from the approval of the project, the potential householder considers many options of different sizes, number of storeys, layout in search of the most rational option. Time-tested, as well as the experience of thousands of people, that space is most fully and efficiently used in houses with an attic. Thanks to the residential attic space in houses with a sloping roof, the cost of one square meter in them is one and a half to two times lower than in two-story dwellings of similar usable area.
However, the traditional triangle shape is completely unsuitable for attic equipment. Since its rather steep slopes hide the available space, leaving only a narrow strip with a ceiling height suitable for comfortable living.
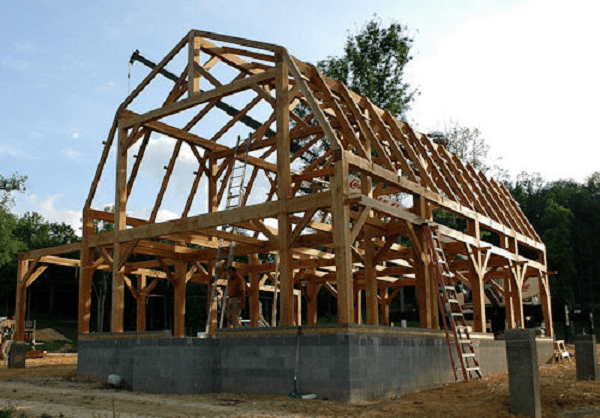
Therefore, most often the construction of an attic means that the house needs a sloping roof. This design is technically more complicated than that of a conventional gable, so it is very important to understand its structure. truss system, installation features, if you plan to do it yourself.


Basic structural elements
The sloping roof, resembling a pentagon in shape with an upper point on the ridge, is visually divided into an upper and lower part. In the upper part, the slope of the slopes is more gentle, it is no more than 20-300, and in the lower part it is steeper, within 50-60 degrees. For its assembly, a mixed rafter system is used, consisting of hanging and layered rafter legs.
To form the necessary geometry of the slopes, to give the structure rigidity, it is used a large number of elements, in view of which the sloping roof has an impressive weight. Main constituent parts roofs are rafters, mauerlat, floor beams, and additional - racks, headstock, struts, puffs. All of them are made of solid coniferous wood, pre-treated with flame retardant, antiseptic.

- Mauerlat is a square bar that is laid at the base of the roof to distribute its weight evenly along the load-bearing walls, and also protects the rafters from tipping over.
- Rafter. Rafter legs made of even, reliable boards form a slope, converging in the ridge. In a sloping roof, the upper rafters are layered, as they have additional support on the racks. And the lower ones are hanging, because they seem to sag between the floor beams and the puff. The distance between the rafters is chosen in the range of 60-120 cm, depending on the weight roofing material or insulation width.
- Puff. Also called a crossbar, a horizontal beam that connects the upper rafters to reduce their expansion. It also serves as a frame for creating an attic ceiling.
- Racks. Vertical supports made of timber, transferring the load from the layered rafters to the load-bearing walls through tightening. After they are sheathed with plywood, they will become the walls of the attic, so the length of the racks is determined by the desired height of the ceiling. Although 1.5-1.7 m is enough for a living space, a ceiling of 2-2.5 m is considered the most comfortable, which can well be provided by a broken mansard roof.
- Grandmother. A vertical suspension that connects the skate to the puff, compensating for its deflection.
- Struts. Also known as rafter legs, corner supports that prevent deflection of hanging rafters.


Mauerlat installation rules
Before you do broken roof, you need according to building codes lay the Mauerlat. The larger the roof area, the greater its weight, the thicker the timber should be. If for small buildings material with a section of 100x100 mm is quite enough, then for houses of large footage, a bar of 200x200 mm is used.
Before installation, waterproofing of the attachment point is carried out; for this, a roofing material folded in half or several layers of film is laid. The method of mounting the Mauerlat depends on the material from which the house is built. Most often it is installed on a block concrete screed using metal studs.

So that the strength of the broken roof Mauerlat is not lost, it is necessary to make as few holes as possible in it. And the location of the studs should be calculated in such a way that they are not between the rafter legs, and not under them. Otherwise, the tie-in holes will be too close to each other, which can lead to cracks, as well as the complete destruction of the Mauerlat.
Assembly sequence of the truss system
Many instructions on how to make a sloping roof do not describe in too much detail the assembly process of the truss system, the construction of which occurs as follows:


Additional thermal insulation
Since the attic room under a sloping roof is used for residential purposes, it is imperative to insulate it. Experts recommend using basalt-based mineral wool in the form of rolls or slabs.
For middle lane For Russia, a layer of insulation equal to 150 mm is enough. You will also need a vapor barrier film, a moisture-proof membrane and a frame on which all this will be attached.

On the inside slopes, a counter-crate is being established. For this, a board is used, the width of which is a couple of centimeters larger than the thickness of the insulation, since the insulation should never be rammed.
That is, for the layer mineral wool in 150 mm, a board 50x200 mm is suitable. This gap is also necessary for air circulation, providing natural ventilation. The insulation is placed at a distance between the bars of the counter-batten, and inside it is sewn up with the selected material.
Construction of gables
A pediment is a part of a wall bounded by the slopes of the roof, and below by a cornice. At the sloping roof, it has a pentagonal shape. For the construction of the pediment, it is necessary to strengthen the first truss truss, supplement the structure with racks, so that a frame is obtained.
- If windows are located on the pediment, openings are left for them. The rest of the space is sheathed with an "inch".
- The pediment of a sloping roof can be mounted before roofing or after. The first method is good in that the slopes will not complicate the work, and the second in that the geometry of the slopes is already set.
- The gable space also needs insulation, which is most often carried out inside.
- Professional roofers advise using basalt mineral wool or polystyrene foam insulation for thermal insulation of a sloping roof.

The next step is to install the cornice boards around the perimeter of the building. The size of lumber can be 25x150 mm. Next comes the time of installation of the drainage system, which needs a sloping roof.
It is not difficult to install the structure with your own hands, however, after laying the roofing material, it will be more difficult to do so. If metal gutter clamps are used, then they must be fixed directly to the rafters for waterproofing, and if plastic - to the frontal board.
Lathing construction
The crate of a sloping roof is a kind of base, on which the roof is subsequently laid. It can be solid or lattice, depending on the type of material.
- Solid. They are made from sheets of moisture-resistant plywood, which are laid flat on the rafters. It is used for fastening ondulin, shinglas, slate.
- Trellised. Made from unedged board, which is laid perpendicular to the rafters. It is used when laying metal tiles, corrugated board.

It is more convenient to make a crate on a sloping roof if scaffolding has already been established around the perimeter of the house, in any case they are necessary for the construction of the roof. First, a waterproofing film is fixed on the rafter legs, for this it is useful construction stapler. The film is laid with an overlap of 10-15 cm. Then the slats of the counter-batten and the batten itself are attached. The length of the boards must exceed the length of the roof to form a gable overhang and a gable tide.
roof decking
The sequence of roofing work on a sloping roof is determined primarily by the selected material. Let's talk about the installation of metal tiles, as it is the most popular in private construction. For laying, you need a powerful screwdriver, a tool suitable for cutting metal, a hammer, a tape measure, a marker, galvanized self-tapping screws with a rubber head. First, the sheets of metal tiles are cut, and then the installation, starting from the ridge.
Important! Self-tapping screws should be screwed in at the bottom of the pattern wave. Otherwise, the sheet is deformed, the mount comes out fragile, which is why the roof will “buzz” in windy weather.

- In addition to roofing material, a sloping roof must be equipped with other important elements: ridge board, snow guard.
- The ridge is installed with an overlap of 10 centimeters on the metal tile on both slopes.
Snow retainers serve to prevent snow from falling, it is a small cornice. They are fixed at a short distance from the end of the slopes to self-tapping screws, taking into account the fact that snow retainers must withstand a large load, especially during snowfalls.
Breaking the roof with your own hands will not only save on the wages of a team of workers, but will give confidence that the processes were carried out correctly, since the construction was carried out in compliance with the technology.
Video instruction
If you want to maximize the usable area of the house without spending fabulous money, you should definitely consider projects with an attic. The experience of developers suggests that this is the best way to plan economy class housing, because one square meter housing in it is several times cheaper than in two-story buildings. There is a misconception that the attic is suitable only for seasonal use in the warm season.
However, it is erroneous, since a qualitatively insulated broken line mansard roof perfectly retains heat in winter, its temperature regime no less comfortable than in the heated rooms on the ground floor.
Even without additional thermal insulation, the attic is a kind of " air cushion”, which maintains the optimal temperature inside the house.


A sloping mansard roof is considered a technically complex structure, and it is advised to entrust its construction to a professional team. Nevertheless, a person who is familiar with roofing works using the example of a traditional gable roof is quite capable of overpowering its construction with his own hands, with the help of two auxiliary workers, assistants. The main thing to understand is that this is a process that requires a serious approach, which is reckless to start without preliminary calculations.
Varieties of mansard roofs
Attic - a heated or cold space under the roof, which is used as a living space. According to building codes, in the attic it is necessary to equip windows for natural light and ceilings of sufficient height for a person.
Rooms under the roof, in which these conditions are not met, are called the attic. The following types of roofs are suitable for the attic device:


broken roof
Installation of a mansard roof suitable for habitation provides for mandatory thermal insulation, organization of natural lighting using attic or vertical windows and forced ventilation.
Benefits of a broken structure
Of course, the attic can even be equipped by building an ordinary triangular roof with your own hands. But due to the steepness of the slopes, in order for the ceiling to learn, the height of such a roof must be very large. This is not economical, and also impractical, because a roof with a variable angle of slopes allows you to more effectively manage the available space.
The flatter top makes the ceilings appear higher. According to building codes, if the distance from the floor to the ridge connection is less than 2.5-2.7 meters, the room is not considered residential, it cannot be called an attic, it is rather just an attic. The sloping roof design has the following advantages:
- Possibility to build higher ceilings.
- High level of protection against atmospheric precipitation, wind.
- Light snow removal from slopes.
- Helps to keep warm.
- Rational use of roof space.


Construction stages
Create a project
When drafting a broken mansard roof for do-it-yourself construction, it is better to draw up drawings with different projections, which will comprehensively show the location of its elements. Based on the length and width of the house, you need to determine the size of the attic room, as well as the roof. First of all, the geometry of the slopes is built:


In order for the project calculations to be correct, it is important to accurately make primary measurements, as well as maintain scale. Can make design easier computer programs, in which it is enough to enter the dimensions of the building and the desired type of roof, they perform the rest of the work automatically. If access to such software No, it is better to use ready-made projects.
Calculation of the truss system
Rafters are the main supporting elements of a broken mansard roof, a kind of its backbone. They are subjected to enormous loads, so they are subject to special requirements.
The choice of the section of the rafter legs is not random, but in accordance with the installation step, the distance between the supports, the values of wind and snow loads. If the first three indicators can be easily determined from the drawn up drawing, then the last two need special explanation.
- The territory of Russia is divided into 8 zones with different snow loads. For each specific roof, this value is adjusted by the angle of inclination of its slopes. Since the slope of the slopes is different, two indicators are calculated, respectively, the upper and lower rafters can have a different section.
- There is also zoning for wind load, which also includes 8 zones. With the help of a coefficient that takes into account the height of the building, amendments are made to the tabular value of this indicator.
- The values of these two indicators are summed to determine the total load. Numbers should be rounded up to provide a small margin of safety. Based on them, according to the reference tables, the required section of the boards is determined.
Mauerlat installation
The beginning of work on the equipment of a broken mansard roof - the installation of a mauerlat, a durable beam measuring 100x100 mm or 150x150 mm. It is fixed at the end of the side outer walls.
Its main task is to distribute the weight of the roof structure, transfer it to the foundation, as well as protect the slopes from tipping over. Mauerlat is laid on the upper part of the wall along a pre-laid waterproofing, which is used as a roofing material folded in half or several layers of a special film.

Fastening is carried out using metal studs, they must be placed in concrete screed. If we are talking about the reconstruction of the roof with our own hands, it is mounted with anchor bolts to the wall to a depth of 15-17 cm.
For timber and log houses use wooden dowels. Please note that the installation is flush.
Assembling the truss system
Assembly truss system of a broken mansard roof happens in the following order:

The fulfillment of the above points forms one truss truss. In the same way, the rest are installed in increments of 60-120 cm.

Waterproofing and roofing
When the do-it-yourself installation work is completed, you need to organize its waterproofing. This requires a waterproofing film or membrane, which is usually produced in the form of a roll.
Fasteners are selected depending on the type of material. For tiles, galvanized self-tapping screws with rubber heads are used, which are deformed in the process of twisting in such a way that they waterproof the hole.
In order to speed up the process, you can use a screwdriver. Shinglas or ondulin is fixed with nails 100 mm long. After the completion of the roofing work, gables and overhangs of the mansard sloping roof are drawn up.
Summing up, we can say that a broken mansard roof will help to expand the area of \u200b\u200bthe house with your own hands. You can build it with your own hands, however, this will require special skills and costs, which, no doubt, will pay for themselves.
Video instruction
For country house or summer cottages garden plot the most commonly used two-story architecture of the building with a living space under the roof. The most suitable for arranging the attic floor will be the roof of a broken pattern.
The four-slope version resists the winds better, is lighter and simply prettier than the huge dual-slope schemes. The design received this name because of the characteristic appearance of the roof slope, which has, as it were, a “kink” formed by two planes.
cute design
The decision to make a sloping roof at home is made at the stage of designing and considering the device of the building. The larger the box of the building, the more questions need to be resolved before building a sloping roof with your own hands. There are many factors that affect the cost and complexity of construction. There are several ways to make a sloping roof at home:
- Build an attic frame on the roof, install layered rafters, and only after that proceed to the roof ridge and hanging rafters. In this way, roofs are assembled in large brick houses with long floor beams and increased weight of the roof structure;
- To assemble a sloping roof in the classical way, but to install and align the stacks, use a system of steel corners and profiles as a temporary assembly frame. In some cases, a steel frame is used if it is planned to build a terrace or balcony in the attic;
- Gables future roof and truss assemblies are knocked down on the ground, lifted to the roof, leveled and installed on the prepared base of a beam or Mauerlat. This option is very good if you need to build a sloping roof for a small house.
For your information! In any of the methods, very thorough knowledge and experience in carpentry with a large cross-section timber will be required.
Before choosing a way to make a sloping roof, you need to understand that in the first two options you can make a sloping roof for a house with your hands by a team of at least three trained people. The amount of work and adjustments is large, so you should not count on leveling and building a sloping roof with your own hands.

Another thing is if a broken version of the roof is supposed to be built for small house or a log house, in this case it’s really possible to make a sloping roof with your own hands, I act step by step and take a photo.
Build a simple sloping roof with your own hands
Before starting work, it is necessary to perform a small list of operations and a sketch of a sloping roof made on paper. The sequence of operations and the work plan made will help to think over the procedure and purchase the required amount of lumber.
Any construction must begin with a project and estimate. Consider the project of a sloping roof for a house made of timber, with a box size of 6x6 m. A sloping roof option is simpler and easier to build using three main types of lumber - a large 150x50 timber - 8 pieces, as well as a 100x50 board and softwood lining. A hundredth board will need at least 30 pieces of a standard six-meter length, the cost of lining must be specified based on the details of the project.
The procedure for the construction of a sloping roof
We stand a sloping roof in the following sequence:
- We mark and cut out the base for the rafter assembly from the timber, cut out and knock down the frame from the hundredth board under the walls and ceiling of the attic. Next, we mark and cut out from the board - weaving rafters for the left and right parts of the roof. We knock all the elements into a rafter blank;
- For a sloping roof, we need at least 7 pieces of such assemblies, so we cut out all seven blanks and assemble them on a specially prepared site, treat them with an antiseptic and dry them thoroughly;
- We raise two front truss assemblies to the roof, sew up their surface with clapboard and install them on the front and back walls of the house. After leveling, we fix it on the Mauerlat or the upper beam of the walls;
- It is necessary to install the remaining truss assemblies, align and build at the same distance from each other, we attach the frame to the wooden base of the walls;
- We fill the crate of the flooring, lay the vapor barrier, insulation, waterproofing and lay the roofing.
Trimming the board and the edges of the stuffed lining is best done with an electric manual circular saw. To work with timber, you will need gasoline or electric saw, building squares, levels, tape measures, a drill, a certain amount of 200 nails, self-tapping screws and nails for stuffing lining.

Cut and knock down the truss assembly
At the initial stage, we need to assemble the base of the truss assembly from a bar. A beam of a standard six-meter length must be increased by at least 70 cm, otherwise it will be impossible to make skylights and overhangs of a broken roof on a sloping roof. For splicing, cut out two additional pieces of timber. We install one at the end, the second is applied over the spliced sections and fastened with hidden screws or studs.

By splicing, we use a spare 8th beam, the remaining seven beams will go to the manufacture of the base of each assembly. The length of all beams must be the same up to millimeters, otherwise it will be difficult to build a broken frame.
Advice! Instead of nails, use 8 mm studs with nuts and washers to mount and connect the rafter assembly elements.
To build a truss blank for the frame of a sloping roof, based on the size of the future attic room, we cut out two vertical racks and a ceiling beam from a weaving board. We mark the base beam in the middle and fasten the previously cut out elements of the walls and ceiling with nails and self-tapping screws. Everything corner connections necessarily reinforced with metal L-shaped overlays on self-tapping screws.
At the next stage, we need to cut and knock down the rafters themselves. First, in the center of the ceiling beam, we fix a vertical stand-support for the roof ridge. It is important to install it perpendicular to the ceiling beam with maximum accuracy.
Next, you need to select two six-meter boards - weaving and lay them as indicated in the diagram. Align their position at the reference corners of the attic frame and fix with a clamp. On the ridge support, the ends of the rafter boards are laid on top of each other and washed down on both beams of the contact line. Then we saw down the top of the vertical rack and fasten all three elements with a clamp. The longer the boards, the more difficult it is to build a blank.

After that, we saw off the rafter board so that the cut surface of the rafter beam rests on the upper edge of the ceiling beam, and fasten it with self-tapping screws or nails reinforced with a steel plate. After fixing the second side, we knock down or twist the ridge connection of the rafters with self-tapping screws. At the junction, it is desirable to install an additional overlay made of metal or wood.

In a similar way, we set the position of the second lower part of the rafter along the edge of the vertical rack and the end of the lower beam from the beam. We file the joints and fasten them with nails and overlays.

More details about the details and manufacturing technology of the truss assembly, how to build rafters, can be seen on the explanatory video

We install and assemble the structure of a sloping roof
Each of the truss assemblies will weigh at least 30kg, so the installation procedure will require at least one, and preferably two assistants. We lift the assemblies to the roof through the side wall. One worker lifts and guides the structure from below, the other two, located at the top of the building, carefully lift the truss assembly and lay it on the ceiling beams.
The installation begins with facade assemblies, the first to lift the one that is heavier and requires large amounts of refinement. Both facade assemblies are sewn up with clapboard, after which the protruding ends of the boards are cut along the edge of the rafters with a circular saw or a chainsaw.

Do not use the installed and assembled rafters to lift the remaining parts. The best option he will build a ramp from boards with a support on the wall and drag weight onto the roof along them. If you have lifting equipment at your disposal, then more rational decision will build and sew facade assemblies on site and lift the finished structure to the roof with a crane or winch.
Before installation, it is necessary to mark and build a center line on the facade and ceiling. To do this, you can pull the cord or use a laser pointer. Before installation and fastening, we align each truss structure with a plumb line and a center line. After leveling the first facade assembly, it must be fixed with nails to the outer row of wall beams, with the simultaneous installation of slab spacers.

After the facade put ordinary rafters. The horizontal distance between the rafter legs is not more than 85 cm. If the staircase for climbing to the attic is supposed to be built indoors, then ordinary rafters must be installed from the exit point of the flight of stairs to the second floor.
Next, the knocked down rafters must be leveled and built along the plumb line and the center line, the lower beam is grabbed on the walls with a pair of two-hundredth nails and the upper parts of the assembly of the rafters with the beams of the facade are spliced with boards. At this stage, it is necessary to use the longest possible boards, and it is better to sew them to the rafter assemblies using self-tapping screws.
Once again, the correct position of the structure is checked, and the constructed frame is fixed to the walls, hammering five nails into the beam at each point of support on the wall.
To continue further work it is necessary to build a "belt" of rigidity of a sloping roof, for this we will sew a clapboard on the celestial overhangs, we will fill a crate on the lower parts of the roof slopes to a height of about a meter. This is enough to work with the upper parts of the structure.

Next, you need to build a ridge run and strengthen the junctions of the two inclined rafters in each assembly. This is done by tamping the ridge and breaking the flooring line on each side of the roof with two boards. To increase the rigidity of the ridge of a broken structure, the joints of the upper ends of the rafters can be reinforced with a beam, thereby building an upper load-bearing belt.
Conclusion

1.
2.
3.
4.
The most popular private house construction project in countryside a building is considered to have dimensions of 6 by 6 meters and 3 windows along the facade. Therefore, for an additional increase in residential or utility space, the owners choose
Attic broken line gable roof with your own hands, as in the photo.
This type of roof has a truss structure that allows you to build vertical walls in the attic room and equip a horizontal ceiling. In the free side space, built-in wardrobes are made or niches are equipped for storing various things. Above the ceiling of the attic floor, a small ventilated attic is usually left.
Sloped roof lower rafters
When a do-it-yourself gable sloping roof is being built, the truss system can be made from layered and hanging elements, or only from layered ones. If presented in the form of geometric shapes, then it will be 3 triangles. Two of them are on the sides of the room, and one is above its ceiling.
The side slopes on the roofs of a broken shape are made with a large slope, so the snow mass does not linger on them. When building houses in areas with low rainfall during the cold months, when they are performed, the snow load is not taken into account (read: ""). As for wind indicators, they are certainly included. We should not forget about the load on the walls of the building and the foundation, since the side ones are the supporting frame for the walls of the attic.

The design of the sloping roof provides for the use of layered rafters for the side slopes, based on the Mauerlat and girders. Runs are mounted on racks that abut against the beams of the ceiling of the main room of the house (read: ""). To ensure additional stability of the racks, contractions are used that connect them to the rafters, and in turn, struts that abut against the bottom of the racks give reliability. Due to this, the side runs are unloaded, which are supporting for the upper rafters.
If a gable sloping roof is created, to perform the lower fastening of the rafter legs, use slippers or a slider. When ceiling beams are made from lumber, they need to be calculated for a concentrated load (read: ""). In the event that the floors are reinforced concrete, no calculations are made. Using reinforced concrete slabs a bed is placed on the waterproofing material under the racks, it is placed in a strictly horizontal position with the help of wooden linings or brick columns.
Sloped roof top rafters
It will help you figure out how a sloping roof is built, a drawing that is performed when developing a house project. The upper triangle formed by the truss structure, during the construction of the attic roof, in contrast to the two side triangles, is made of layered rafters, you can also use hanging rafters (read also: ""). When it is supposed to use hanging rafters, then additional suspension will be required to compensate for bending stresses. Such tension is created in the puff.

Rafter hanging trusses create a ridge by means of a rigid connection of the rafter legs without the use of a ridge run. To evenly distribute the load, struts and a crossbar are used.
When layered rafters are involved, the upper triangle has a completely different device. In this case, the puffs act as ceiling beams, and the racks necessary for the ridge run rest against them. For this, wood materials with a large cross section are used. It will also require the construction of a solid ceiling structure. According to experts, in houses where a gable sloping roof is planned, it is advisable to build rafter systems by combining the lower layered and upper hanging rafters.
Construction of a sloping roof
The work on creating a broken roof is performed in the following sequence:

The procedure for calculating the roofing cake
As an example of the calculation of a roofing pie, the installation of a sloping roof using a metal tile is taken.
The following materials are required:
- waterproofing;
- heat-insulating;
- vapor barrier;
- roofing;
- fasteners;
- additional elements;
- water products.
For vapor barrier, it is planned to use Izospan V, as a standard, its roll has a width of 160 centimeters. According to the manufacturer's instructions, the overlap should be at least 10 centimeters, hence the working width is 150 centimeters. With considering standard sizes roll produces 70 "squares" of material. After that, the area of the roofing surface is divided by the area of \u200b\u200bthe roll and their required number is determined.

The material for waterproofing when a gable or shed sloping roof is being built is calculated similarly.
A one- or two-pitched sloping roof can be insulated in one of two ways: the material is laid either on its entire surface or only on the walls and ceiling of the attic room. The second method is cheaper in cost, but since the insulation is placed between the rafters, breaking the material layer contributes to the formation of cold bridges. When choosing a tile "Ecover Light 35", having a thickness of 5 centimeters, a width of 60 centimeters and a length of 1 meter, you need to divide the surface area of \u200b\u200bthe roof by the area of \u200b\u200bone sheet and multiply the result by 3, since the thickness of the insulation layer should be at least 15 centimeters.
To calculate the sheets according to the length, it is taken into account that the length of the picture (maximum) is 6.1 meters, the standard length of the sheet is 2.95 and 2.25 meters, the overlap along the end is 15 centimeters, 7 centimeters must be added to the overhang. Given that the height of the side run usually corresponds to a room height of 2.5 meters, it is desirable to use sheets having a length of 2.95 meters.
A broken line is called two- or hipped roof, the slopes of which are divided by additional ribs into several planes. This technique allows you to create additional useful space under the roof, where you can place an attic, or build a roof over buildings of the most complex architectural form. Most often in individual construction there are broken gable roofs, which are also called mansard.
Roof design
For arranging living space under the roof, it is desirable that the width of the house be at least 6 m. This is also important for creating a strong one. Think in advance what the ratio of the parts of the slopes will be, whether there will be on the roof skylights and determine their exact location. Calculate the required amount of roofing material, insulation, waterproofing according to the dimensions of the roof, scaffolding for rafters, as well as fasteners, create detailed drawing or use standard project roofs.
There are special programs that allow you to calculate required size beams for the truss system and the step between them, depending on the type of roofing material, that is, its weight, the amount of precipitation in winter and other parameters.
The construction of a sloping roof must be foreseen in advance, since under it, when building a house of brick, gas silicate blocks or foam concrete, it is necessary to pour a reinforcing belt. Threaded studs are preliminarily laid in it in increments of 1.5-2 meters.
materials
- For rafters, you will need a high-quality timber (for legs and braces) 5 * 10 cm and edged board not less than 3 cm thick, for Mauerlat timber 25 * 25 cm. Preferably coniferous wood, well dried, with a residual moisture content of at least 22%. In general, rafters for a broken roof should be more massive than for a gable roof, which is caused by its greater weight. Calculate the beam strength.
- Between themselves, the bars and boards are fastened with steel brackets and studs measuring 8-12 mm. Also at all stages you will need bolts, screws, nails and metal staples for roofing.
- The lathing and counter lathing are made of wooden slats 5 * 2.5 cm. Parts cut from thick plywood are used as connecting elements.
- Insulation, hydro and vapor barrier films are needed.
- Roofing material for a sloping roof should not be too heavy. Suitable metal tile and metal profile, ondulin,.
Roofing work requires a standard set of carpentry tools, ladders and safety equipment.
truss system
Before assembling the rafters, all wood is treated according to the instructions with an antiseptic and impregnated with fire-fighting solutions. For better penetration, all parts of future rafters are covered twice. Before proceeding with further assembly, you need to wait until it is completely dry. At the same time, it is advisable to carry out the processing of laths for battens and counter battens. Holes are drilled in the Mauerlat bars with the same pitch as the studs are installed.
 The truss structure is a section connected according to the modular principle. Each of them can be assembled on the ground, lifted up, and then already installed according to the drawing, which greatly simplifies the work. The rafters are connected to each other at a certain angle, and the geometry and reliability of the roof as a whole depend on the accuracy of the cut and compliance with the dimensions of all parts. To do this, it is convenient to use plywood or metal templates made in advance according to the project.
On the long walls at home, 1-2 layers of roofing material are laid and beams for the Mauerlat are installed, which are attached to the studs with nuts. It is important that they run strictly parallel to each other, and their inner part matched the inside of the walls. If the wall is thicker than the beam for the Mauerlat, then a protective row is laid out with a brick from the outside. If the house is built from timber or logs, then the Mauerlat is replaced by upper beams or logs.
Vertical racks are fixed to the Mauerlat with temporary struts. First, two extreme racks are installed in a row, then a rope is pulled between them, along which the rest are exposed. The optimal step between the racks is 2.5 -3 m. The height of the racks should be 10-15 cm higher than the expected ceiling level. The upper sections are attached to the vertical racks, which are connected at the top. All connections are fixed with plywood pads fixed on the beam with self-tapping screws.
On the racks of the boards, runs are attached, on them - crossbars. The crossbars are fixed with a temporary support and then fastened with boards. In the upper part, a beam-girder is mounted, braces are installed and fixed.
Insulation and waterproofing of a sloping roof
Under the rafters, from the inside of the room, with the help of brackets, a vapor barrier is fixed, monitoring its uniform tension (more). A counter-lattice is stuffed onto the rafters. Sheets of mineral wool or expanded polystyrene are laid between the rafters, followed by waterproofing. It is fixed with counter rails going from the eaves to the ridge and overlapped. Thanks to these counter-rails, ventilation of the entire “pie” is ensured and the integrity of the film is maintained. Waterproofing, laid with several layers of overlap, minimizes the risk of roof leakage. Some (up to 2 cm) sagging of the film is acceptable.

Roofing
After waterproofing, a crate is mounted on the rafters. The step between the rails depends on the selected roofing material, so that it is convenient to mount it. Usually it is 20-25cm for soft roof and 30-35 for tough. In order to avoid problems with laying roofing material in the future, pay attention to the straightness of the arrangement of the lathing laths.
Laying of roofing material on a sloping roof occurs according to the same technology as on a gable roof.
- The sloping roof is quite complex structure, compared to conventional gable. When designing and erecting it, it is better to turn to professionals if there is little experience in construction.
- Tiling is not the best the best choice for a sloping roof because of her heavy weight. It is better to replace it with an alternative - bitumen tiles or metal tiles.
- It is necessary to provide ventilation in the roof and install vents in the ridge part.
- If you plan to use the attic as a living space, you need to be especially careful about its insulation and not save on vapor barrier.


Chicken in kefir - recipes for marinated, stewed and baked poultry for every taste!
Simple Chicken Recipe in English (Fried) Recipes in English with translation
Chicken hearts with potatoes: cooking recipes How to cook delicious chicken hearts with potatoes
Recipes for dough and fillings for jellied pies with mushrooms
Stuffed eggplant with chicken and mushrooms baked in the oven with cheese crust Cooking eggplant stuffed with chicken