In a market economy, each person is the master of his own wealth. Now anyone can lead a decent life, because there are more than enough opportunities to earn money, for example, you can make an egg incubator yourself. This will allow you to create a small farm that will become a source of income in the future.
After you make an egg incubator with your own hands, you will have the opportunity not only to earn extra money, but also to provide for your household. Nevertheless, for this to become a reality, it is necessary to approach the creation of this device as responsibly as possible. After all, the success of the whole idea depends on how well it will work.
The design of the egg incubator itself is not particularly complicated. If you have been breeding poultry for a long time, then you know that a chicken can hatch even under the light of a lamp. However, if you set the temperature too low, nothing will happen. Elevated temperature conditions also will not lead to anything good.
Therefore, before making an incubator yourself, it does not hurt to thoroughly study all the drawings, and most importantly, to understand how the thermostat works. After that, you just have to select the appropriate mode and load the tray.
Of course, you can just buy an egg incubator, but the price of a device for such a simple design is really too high. It is much more practical and cheaper to do everything yourself.
Requirements for the design of the incubator
There are many different drawings of an egg incubator that you can bring to life with your own hands. Nevertheless, in order for everything to go as it should and the device you built can adequately perform its functions, the following conditions must be met:
- You should focus not only on the temperature of the eggs, but also on the number of degrees around the future chicken. According to the agriculture According to the norms, the temperature two centimeters from the egg should be in the range from 37.3 to 38.6.
- For a chick to hatch, you cannot use eggs that have been stored for more than 10 days.
- It is important to monitor the humidity in the incubator. Before biting, it should be at least 40%. In the process of excretion, this figure increases to 80%. If you do everything right, you yourself will be able to breed healthy and strong chickens. Immediately before the brood, the humidity will need to be slightly lowered.
- Eggs in the incubator, which you make yourself, should only be vertical. And the sharp end always goes down.
- During incubation, all trays must be tilted to the left.
- Eggs should be turned at least three times a day. They must not be touched before hatching.
- When you make an incubator yourself, take care of ventilation. It is necessary to make sure that the movement of air equalizes humidity and temperature. A speed of 5-6 meters will be more than enough for this task.
Before you make an incubator with your own hands, watch the video below. Despite the seeming primitiveness, the incubator works great and allows you to breed chickens at home.
Drawings for the incubator
To make a truly high-quality incubator yourself, you need to approach this matter with the utmost responsibility. First, study the drawings, do without them good project definitely won't work.
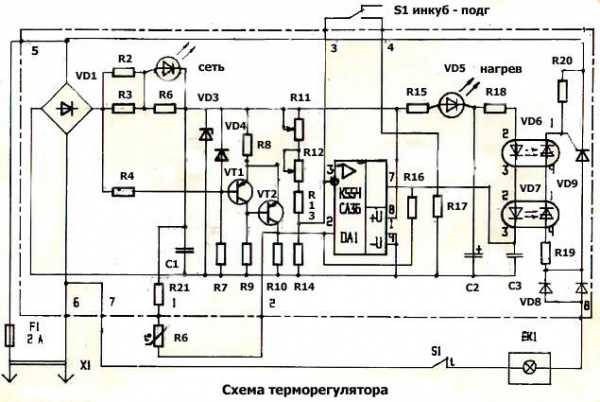
The project documentation should contain information including the thermal control scheme. It should indicate where the heating elements are located. Then you can make an incubator yourself, which will serve you for many years, allowing you to breed chickens.
You yourself will have to study the mechanism for rotating the structure, you need to choose one that will simultaneously provide stable operation and at the same time be quite simple to manufacture.
Important ! When you create the structure yourself, consider the possibility of laying eggs in the cells different sizes. This will allow future expansion of the household at minimal cost.
The fact is that the market is very flexible. At one time, chicken meat may be popular, tomorrow everyone will start asking for goose. The day after tomorrow, the fashion for quail eggs will reappear.
In the drawing, you must consider temperature control mechanisms. The fan should be installed exactly where it will be most useful. Also, it doesn't hurt to think about alternative source Sveta. Even a short period of time without heating can cause improper development of chickens.
Based on all of the above, when choosing a drawing of a future design or making it yourself, it is best to focus on the following parameters:
- The capacity of the incubator is best done on average. Firstly, this will allow you to place about 100 eggs in it, and secondly, you can always fill in more cells, the supply does not hurt.
- The design for 108 cells is considered optimal. The size of each should be 45 mm (diameter). In this case, the height cannot be less than 65 mm. Also, the design should provide for the possibility of replacing the internal grille. Then you yourself can change it at any time, reorienting the device to other eggs.
- It is best to install 6 lamps as heating elements. Four of them should be 100 watts, and two should be 60 watts. New LED or fluorescent lighting elements that do not heat up are better not to use. Serial wiring diagram following 4 and 2.
- The temperature sensor must have a resistance of 1.8 K.
The turning speed is best set to one hour. This will achieve the greatest effect in the operation of the entire system.
We make an incubator with our own hands
Frame

In most cases, people who themselves want to make an egg incubator with their own hands use a refrigerator as the initial workpiece. The fact is that its design is ideal for this task. Besides financial expenses with this option will be minimal.
So, if you are interested in how to make an incubator at home yourself, start by looking for an old refrigerator. It is from this point that the implementation of this project will begin.
First of all, in order to make a high-quality and durable incubator yourself, get rid of the freezer. You will also need to get rid of all other built-in hardware. Fortunately, you can easily do all this yourself. For further implementation of the project, you will need a KR-6 contactor-relay and a thermometer with electrical contacts.
Attention ! The coil in the device must have such a resistance that it will limit the power to 1 watt.
After you pick up all these devices, you can connect the power grid yourself without any difficulties. Power must be supplied from a mains voltage of 220 V.
Working mode

The first four lamps turn on first. Their task is to raise the temperature to 38 degrees. After that, you will need to close the contacts of the thermometer. As a result of this action, the coil KR will receive power. Additionally, contact KR2 opens. As soon as the temperature drops, the process is activated again.
As you can see, making a quality incubator yourself is quite simple. The main thing is to correctly set the temperature regime, take care of the turning system, and so on.
Uniform heating is provided by the L5 lamp. Moreover, it is needed to provide the desired humidity. Moreover, its presence reduces the load on the relay contactor. So be sure to install it. Luckily, you can easily do it yourself.
Attention ! After the air inside the incubator heats up to the desired temperature, 2 lamps will need to be turned off. Without automation, you will have to do it yourself.
The calculated power of the incubator that you need to make will be 40 watts. This is if without ventilation and a rotary mechanism. They can be excluded from the design for greater savings, but in order for the result to be satisfactory, you first need to take care of creating natural circulation air inside. Extractors will help you with this.
If you want to abandon the rotary mechanism in the design of the incubator in which the eggs will be placed, you will have to turn the cells yourself. This must be done at least 3-4 times and only in daytime days. However, the rate of maturation with this approach will drop significantly.
Attention ! As cells for eggs, it is best to use ordinary trays.
On the ninth day in the incubator, you will need to lower the temperature yourself to 37.5 degrees Celsius, 19 to 37. If you do not want to spend money on an uninterrupted power supply, then put a few bottles of hot water. This should be more than enough to maintain the desired temperature.
We create an automatic temperature control system

The heating elements in the incubator that you make yourself can be placed not only above the tray, but also on the side, and even under it. Many experts agree that the best option will most place the lamps around the perimeter. This will provide the most uniform heating.
Attention ! The distance between the bulbs cannot be less than 25 cm.
Some poultry farmers go to tricks, they buy nichrome wire. This is a fairly powerful heating element, which makes it possible to reduce the distance between heat sources to 10 cm.
There are three types of thermostats that provide the correct temperature inside the incubator, which you will make from a once refrigerator with your own hands:
- Electrical contactor. In fact, this is an ordinary thermometer, inside of which there is mercury. Only a special electrode is soldered into the tube. Mercury rises when heated. As a result, the electrical circuit is closed. Then the incubator turns off.
- The bimetal plate can also provide uniform heating in your absence. Unfortunately, after you make an egg incubator with your own hands with this device, the reliability of the system will decrease several times. The principle of operation of the plate is quite simple. Upon reaching certain temperature it bends, touching the electrode. As a result, the circuit is closed.
- barometric sensor. Imagine a cylinder that is made of flexible metal, the container of which is filled with ether. When heated, excessive pressure is formed inside, due to which the circuit closes.
If you are thinking about how to make a do-it-yourself egg incubator, consider an automatic thermostat. Of course, its installation will take more time, and money for the purchase is still needed. Nevertheless, this will provide almost complete autonomy.
What is a quail egg incubator

It is worth recognizing that it is desirable to warm up quail eggs in special conditions. First, you need to use a water tank as a heating element in the incubator that you make yourself. It will provide sufficient heat.
The tank is best made from iron. The wall thickness will be about 4 mm. Remember to carefully solder the seams. The height of the upper nozzles must be 30 mm. Pipe diameter not less than 4 mm. They are welded into the top cover.
And now the most important thing. 100-watt lamps are lowered into the resulting design. The flasks must be immersed in liquid up to the cartridges. Moreover, it is necessary to make sure that the two heating elements duplicate each other in the quail egg incubator, which you will make yourself.
Results
As you can see, making an incubator yourself is more than realistic. To do this, it suffices to find old refrigerator and remove all equipment from it. The average tray in the incubator is enough to hatch about a hundred chickens.
Of course, to make a quail egg incubator, you need to make a little more effort. But their market value justifies this step. The main thing is not to forget to include these costs in the business plan.
A homemade incubator can be made in several ways from improvised materials. It will work no worse than the store counterpart, but it will turn out much more economical. The capacity is chosen based on personal needs, and the tray rotation mechanism can be either manual or automatic.
At home, you can assemble an incubator from:
- Styrofoam,
- thick cardboard,
- plywood sheets,
- washing machine,
- Old refrigerator.
The dimensions of the incubation machine are selected individually, and depend on:
- The required number of eggs for laying,
- Location of heating elements.
Medium incubator with dimensions: 45 * 30 cm contains:
- up to 70 chicken,
- up to 55 duck,
- up to 55 turkeys,
- up to 40 goose,
- up to 200 quail eggs.
Regardless of the material or dimensions, each apparatus consists of:
- Covers (with or without a window),
- Corps,
- Tray and lattice,
- lamps,
- Containers with water to maintain humidity,
- thermometer.
Models with automatic or semi-automatic tray rotation are also equipped with a digital timer.
Models with manual tray rotation
To make simple incubators at home, you need a minimum of materials and tools, and you can make them in a few hours. Cons - insufficient thermal insulation, fragility and manual overturning of lattices with eggs.
Foam Incubation Machine
The advantages of this model are: lightness and compactness, low cost and ease of manufacture.
You can make a foam incubator as follows: the walls are cut out of a sheet of expanded polystyrene, at least 5 cm thick. The recommended sidewall size is 50 * 50 cm, the end is 50 * 35 cm. The drawings will help to assemble the case and correctly distribute the internal space. The walls are fastened with glue, or they can be glued together with a wide adhesive tape. There are 3-4 ventilation holes in the bottom.

The foam incubator is equipped with a lid with a glazed viewing window. The glass does not need to be firmly fixed: if there is a need to lower the temperature, it can be moved away. To make the lid fit more tightly and not loosen the structure, you can glue the sides of wooden blocks. The thermostat and thermometer are installed next to the window.
Incubation chicken eggs in a foam incubator, it occurs under the influence of three incandescent lamps with a power of 25 watts. In this volume, this is enough to maintain the required temperature. A water tank is installed at the bottom of the chamber. The egg grate is assembled from a single piece of galvanized mesh with a mesh size of 2.5 * 1.6 mm. Each side of the tray is sheathed with strong gauze: if this is not done, the chicks may be injured. To install the trays on top of each other along the perimeter, the sides are increased, with a height of at least 10 cm.
Air circulation inside the incubation chamber will be better if you attach a regular computer fan to the bottom.
The foam incubator for chicken eggs can be equipped with an additional indicator with heating, which are placed under the grates.
Incubation machine out of the box
Cardboard chicken egg incubator is economical and simple, and the assembly of this design does not take much time. The apparatus is made from an ordinary box from under household appliances. It is not recommended to take a large one - it will be difficult to warm up the volume, and it is dangerous to use more powerful lamps. At a distance of 4-5 cm from the bottom, 6-7 ventilation holes are cut out, with a diameter of 3 to 7 mm.
From the inside, to the side walls at a height of 9-10 cm from the bottom, they are attached wooden slats. The bottom itself is covered with cellophane or oilcloth, and placed on top wooden bars. A bath of water is placed on the resulting pallet, and a regular store egg tray is placed on the slats. For admission fresh air 3-4 more holes are made in the top of the lid, with a diameter of about 5 mm. A thermometer is hung next to them and one additional hole is punched under the wire from the lamp.
For heating the incubator, incandescent lamps with a power of 25 W or more are used. Humidity is regulated by opening the lid.

plywood incubator
This model differs from the previous ones in greater strength and better heat-saving characteristics. How to make an incubator:
- Walls are cut out of a sheet of plywood. Greater thermal insulation can be achieved by making them double,
- The dimensions of the device are selected individually,
- The lid is also cut out of plywood, and is made removable,
- To control the process, a small window is sawn in the lid,
- Along the perimeter of the lid - holes for ventilation, with a diameter of not more than a centimeter,
- From the inside, rails are mounted to the walls of a home-made incubator for installing trays,
- For air exchange, 4-5 holes are drilled in the floor,
- The heating element for the incubator is usually incandescent lamps, but for a large volume, a tubular electric heater (heater) can also be used,
- The minimum distance between lamps or heating elements and eggs is 25 cm,
- The minimum distance between the trays (if there are several) is 15 cm,
- The frame-type egg tray is assembled from a metal lattice and sheathed with gauze mesh,
- At the bottom, containers of the same size for water are installed.
- The finished egg incubator is placed in a warm room with good ventilation on flat surface, and connected to a conventional electrical network.
Automated Models
There are several ways to make a do-it-yourself incubator with automatic egg flipping, uninterrupted power supply and good heat saving.
Incubation apparatus from the refrigerator
How to make an incubator with backup power: the body of the incubator is assembled from the refrigerator. To do this, the interior space is cleaned and washed well with a disinfectant solution. A pair of observation windows are cut out in the door, which are glazed from the inside and outside.

From the inside, the chamber is divided into two parts. Lower - incubation, equipped with trays. The upper one is output, a fixed shelf is installed in it. The partition is cut out of a sheet of plywood, and several holes are punched in it for air exchange. For air circulation, a small fan is installed at the bottom of the incubation chamber, and next to it a pair of holes are drilled in the side wall, about a centimeter in diameter. Similar holes are made in the upper part of the case for air to escape.
The electrical circuit looks like this:
- Temperature controller for hatching and incubation chamber,
- emergency thermostat,
- Voltage stabilizer for 10 V,
- Heater for the incubation compartment,
- Hatchery heater,
- Spare heater connected to the backup power supply
- Backup battery for 12 V incubator,
- Psychrometer,
- Tray turning mechanism
- Humidity level regulator inside the hatching and incubation chamber.

In automatic mode, the operation of the incubator with backup power is provided by the control unit, which controls all the main components. The set temperature in the chambers is maintained by independent thermostats and heating elements, and electronic thermometers are responsible for temperature control. You can assemble them yourself using various ready-made circuits, but if you have little experience with microelectronics, it is better to buy. The heating system is assembled from light bulbs with a power of 20-25 W, or a heating cord is laid around the perimeter to save electricity.
The automatic egg turning mechanism in the incubator operates every two hours, turning the trays 45°.
A temporary electronic relay, which is assembled from a low-speed motor and a gearbox, is responsible for the operation of the mechanism. The output gear shaft must make a complete revolution around the axis for 4 hours. You can replace a homemade relay with a similar device from an old drum washing machine. The mechanism is driven by a motor from the windshield wiper of the car. To lower the speed, it is supplemented with a step-type chain reducer.
On the main axle, to which the gear sprocket is attached, a lower egg grill is installed. Two additional ones are hung above it, and the distance between them is at least 15 cm. For simultaneous rotation, all trays are connected by a rod.
The egg incubator circuit assumes the presence of two power sources: universal and uninterruptible. The reserve power supply of the incubator is carried out from a battery or a power supply unit. The power of the power supply is 120-150 W, and the battery for the incubator is from 12 V.
To maintain humidity, a container with water and a fan are placed at the bottom of the incubation chamber.
Automatic incubator
Another option is how to make an incubator with automatic egg flipping yourself. The frame can serve as a frame from a washing machine or an old bee hive.
The device of the incubator looks like this:
- Frame,
- tray system,
- heating system,
- Fan,
- Lattice rotation mechanism.
In order to maintain the set air temperature inside, it is necessary to insulate the walls of the incubator. For this purpose, they are sheathed with foam. To ensure air exchange, we make holes on one side of the wall at the bottom, and on the other - at the top. Diameter - no more than a centimeter. Holes can be equipped with plugs. Cut through the lid viewing window, which is glazed. The glass is not firmly fixed: if it is necessary to reduce the temperature inside the chamber, it is moved away.

The trays are assembled from a metal grid with a cell pitch of about 2.5 cm, and covered with a mosquito net so that the hatched chicks do not damage their paws. Do-it-yourself auto-rotation for an incubator is done like this: holes are sawn in the lattice frame, and they themselves are attached to the axis. All parts of the mechanism are fastened together, and reduction motors with a power of up to 20 W are used as a drive. For smooth movement of the tray, it is recommended to take a chain with a pitch of 0.52 mm. A time relay is responsible for automating the process.
It remains to install the heating system of the entire structure. The heating element for the incubator of this model is a spiral from old irons. The spirals are attached to the walls with ties or staples so that they can be easily replaced if necessary.
The minimum distance of the heating element from the tray is 20 cm.
In a do-it-yourself chicken incubator according to this scheme, a thermometer must be hung, and a container of water is placed at the bottom. For better air circulation, a fan can be attached to the lower grille. The chamber must have a psychrometer. The device measures humidity indicators, and you can buy it at any pet store.
If you want to buy an egg incubator for yourself, but you do not have money for this device, since this equipment is professional. There are many homemade incubators on the Internet, but they are difficult to make and require a lot of materials. I will show you one good idea how to make an incubator with your own hands and not spend a lot of money on its materials. In such an incubator, your chicks will hatch within 21 days.
Required materials and tools:
- foam boxes
- bulb socket
- 4 wooden blocks
- highly breathable fabric
- heat and humidity sensor
- hacksaw for metal
- screws
- knife
- a regular frame with glass from under the photo
- duct tape or tape
- construction stapler
- water tank
Step 1: First we need to measure the dimensions of our box. Each size may be different, it depends on what kind of box you have.

Step 2: From wooden blocks, you need to make such a frame. The height of the frame should be a little more than the height of the container you have chosen under the water.

Step 3: Now take a fabric that is breathable. We lay the fabric on the work surface and cut it off a little with the rest to stretch it.

Step 4: Next, we stretch the fabric and fasten it to paper clips using a stapler, or whoever does not have one, to small carnations.

Step 5: Drill a small hole in one side of the box for the cartridge. It should be above the screen so that the light bulb does not come into contact with it. The power of the light bulb depends on the size of the box. For example, the size of the box is 30 * 25 cm, a 10-40 W light bulb is enough.

Step 6: Next, you need to insert the cartridge into the hole and screw in the light bulb. The light bulb must not come into contact with the foam box.


Step 7: Now you need to cut 2 holes in the wall of the box and 4 more in the lid.

Step 8: To observe what happens in the incubator you need to make glass. On the lid we cut a window under the glass.

Step 9: Take the frame apart and secure the glass with duct tape.

Step 10: Now let's start assembling. Place a container of water at the bottom of the box. Set up a screen. Install the air humidity sensor and place the eggs on the cloth. Close the lid.
Homemade incubator can be made at home. To do this is quite simple. There were cases when chickens were hatched even just under the included table lamp. But it is preferable to make an incubator according to some of the rules presented below.
Creation features
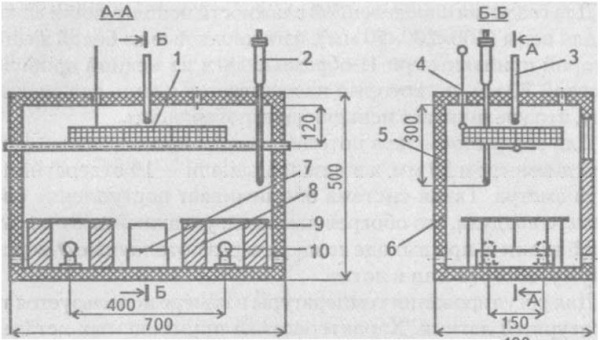
Quite a few poultry farmers use factory-made incubators, which, of course, can be purchased, but it will cost much more than if you make a similar design yourself. The frame of this unit is made using wooden beams, the cladding on the outside can be made with plywood. For insulation, it is permissible to use foam. Under the ceiling of the chamber in the center, you need to place an axis on which you should tightly fix the tray intended for eggs. On the axis, by means of a steel pin, which must be brought out through the top panel, it will be possible to turn the tray with eggs. It is recommended to use the following dimensions as the dimensions of the tray: 25 x 40 cm, while the height should be 5 cm. This element can be made using a strong steel mesh, the cells of which have dimensions of 2 x 5 cm, the thickness of the wire should be equal to two millimeters.
From below, the tray must be covered with a fine mesh based on nylon. Eggs should be laid vertically with the blunt end up. A control thermometer should be installed above the tray intended for eggs, which will prevent contact between objects and the heating element during turning. The temperature reading scale should be brought out through the top panel.
Second stage of work

A homemade incubator at the bottom of the case should have four lamps, the power of which is 25 watts each. Each pair of lamps can be protected with a steel sheet, the thickness of which is 1 millimeter. Their installation must be done on two red bricks. In order to ensure the required level of humidity, a water bath must be installed, its size is 10 x 20 x 5 cm. Steel can be used as its basis. U-shaped tapes made of copper wire should be attached to the bath, fabric should be hung on them, which will significantly increase the evaporation surface. At the next stage, you can start working on the ceiling of the chamber, in which about ten holes are drilled, each with a diameter of 30 mm. When making a homemade incubator, in its lower part you need to make the same holes in the amount of twelve pieces. This system will provide access to fresh air.
Features of the manufacture of the incubator body

The base of the case may be an old refrigerator. Such a chamber is already insulated, which eliminates the need to carry out work on its compaction. It will be necessary to supplement the structure with legs in order to provide it with more impressive rigidity, two boards must be strengthened on the body, in the lower part they must be paired with bars, screws can be used as a fastener.
It is recommended to make a recess in the board for the flanges. A bearing is installed in the central part. To prevent axle displacement, a threaded bushing must be installed. Fastening is done with long screws to the axis. The frames should consist of two elements, each of which has the projections necessary to hold the trays in the position in which they were installed.
When a homemade incubator is made, a cable must be threaded into the upper hole, which is fixed on the engine. Inside the case should be sheathed with insulation, which can be used as fiberglass. In all ventilation holes you need to install pieces of plastic tubes. Refrigerators have a chute for water drainage; in the manufacture of this design, it must be mounted in the opposite direction.
Features of the compaction

Self-made incubators, created with their own hands, are quite often made using wooden bars, they will have to be sheathed with sheet steel on the outside, while inside the structure must be insulated with foam, other insulating material can also be used.
heating system

It is important to arrange the heating elements in the structure correctly. If the installation is manufactured independently, then these works can be done in different ways: from the side, from above, under the egg, above it or around the perimeter. The distance from the heating element will depend on the type of heater. If light bulbs are used, the distance to the eggs should be 25 centimeters, but no less. If nichrome wire is used, then ten centimeters will be enough. It is necessary to exclude the occurrence of drafts, otherwise the brood will die.
thermostat

Do-it-yourself home-made incubators are made with a certain temperature regime, which must be maintained within half a degree. It is possible to use bimetallic plates, barometric sensors, as well as electrical contactors as a heat regulator.
Comparison of homemade thermostats

An electrical contactor is a mercury thermometer with an electrode installed in its tube. The second electrode is a column of mercury. During the heating stage, mercury begins to move along glass tube reaching the electrode, which closes the electrical circuit. This becomes a signal to turn off the heating. If we talk about a metal plate, then it is considered the cheapest, but also the most unreliable way. Its fundamental action is that when heated, the plate begins to bend and touches the second electrode, thereby closing the circuit.
A self-made thermostat for an incubator can be a barometric sensor, which is made in the form of a cylinder of elastic steel, its height is less than its diameter, in addition, it is filled with ether. A cylinder acts as one of the electrodes, while the other cylinder is a screw fixed close to the bottom. The ether vapors during the heating process increase the pressure, and the bottom begins to bend. This completes the circuit and turns off the heating element. The thermostat can also be purchased at the store.
Humidity control
A homemade incubator from the refrigerator should be equipped with a humidity controller, for this it is recommended to use a psychrometer, which can be bought at a veterinary pharmacy or hardware store. An alternative solution is to manufacture the humidity controller using two thermometers, which must be mounted on the same board. The nose of one thermometer should be wrapped with a sterile medical bandage, which is strengthened in three layers, the other end should be lowered into a container filled with distilled water. The second thermometer must remain dry. By the difference in the readings of these thermometers, you can determine the level of humidity inside, so a home-made automatic incubator can even be compared with what was purchased in a store.
Incubation mode
Immediately before incubation is started, the system should be analyzed for reliability for three days, during which it is necessary to try to establish the required temperature. It is especially important to ensure that overheating is not carried out, this is due to the fact that the embryo dies if it is exposed to a temperature of 41 degrees for ten minutes. It should be noted that an industrial incubator works on the principle of turning eggs every two hours, but it will be enough to perform such a procedure about three times a day.
In order to increase the percentage of hatchability, it is necessary to ensure proper storage of eggs. This must be done in a horizontal position, while they will need to be turned over periodically, the external conditions must be special, so the temperature should not be higher than twelve degrees, while the humidity should not exceed 80 percent. An egg should not be used if it is damaged, its surface is uneven or rough, or its shape is irregular. When using an ovoscope, it is necessary to exclude the use of eggs that have two yolks, in addition, eggs that have a large air chamber should not be used.
Homemade incubators, the drawings of which must be studied before starting work, must be used correctly. Before laying an egg in an incubator, it cannot be washed, as this will damage the outer shell, which has certain properties. Eggs that are too large should also not be used for incubation. You need to start controlling the process after five days of finding the eggs inside the cubature, you need to use the same ovoscope for this.
Different temperature regimes for different types of birds
A homemade foam incubator must work in different temperature conditions for different types birds. For example, a chicken egg should be kept for two days at a temperature of 39 degrees, from the 3rd to the 18th day the temperature should be maintained at 38.5 degrees, from the 19th to the 21st day the temperature should be maintained at 37.5 degrees. As for the duck egg, from the 1st to the 12th day the temperature should be maintained within 37.7 degrees, from the 13th to the 24th day - 37.4 degrees, but from the 25th to the 28th day, this indicator should be at around 37.2 degrees.
Before you make a homemade incubator, you need to prepare the materials and choose the best ones. To carry out work, you can use not only the camera, but also a box and a suitable box. The basis of the product can be not only wood, but also plastic, as well as cardboard. Sheathing can be done not only with plywood, but also with fairly thick paper.
In order to eliminate heat loss, all cracks must be sealed with a sealant. Trays can be made of planed boards, the height of the sides of which should be equal to seventy millimeters. The whole structure should resemble a bookcase. In order to heat the unit, five light bulbs can be used, one of which can be installed from below, which will ensure an even distribution of heat.
In no case should the thermometer be taken out of the installation, this will allow you to monitor the state of the conditions in the incubator. A viewing window must be provided in the upper part, it is necessary in order to additionally control the egg. In the course of the work, a scheme of incubators will be needed. A homemade incubator will be made using the drawing correctly. Good luck!
There is a great opportunity to save money - to make an incubator with your own hands. It is not as difficult as it seems at first glance. From the article you will learn about the features of creating an incubator from available materials, what are the requirements for this process, and how to choose the right eggs for laying.
Description and types of homemade incubators
Incubators are made in various sizes according to the number of eggs that are used when laying. Plays a role and the location of the device. But even the simplest incubator must be equipped with a thermometer to fix the microclimate, ventilation, and egg trays.
Did you know? A day old chick has the same skills and reflexes as a 3 year old.
pros
- Among the advantages of such "hens" experienced poultry farmers call:
- savings in energy consumption;
- reliability;
- the ability to lay large volumes of eggs;
- versatility (equally suitable for all types of birds);
- microclimate suitable for the survival of chicks.
Minuses
- A home incubator has certain disadvantages:
- when creating it, it is important to take into account the requirements for such devices, otherwise the result will not be achieved;
- the appearance of such a device is often inferior to purchased;
- if you are assembling the incubator for the first time, then there is a possibility of making a mistake when assembling it.
For example, before you start assembling a fixture, you need to provide for every little thing. It is possible to eliminate some of the shortcomings, since it is in the power of everyone who is going to create an incubator. Then you can not think about purchasing a purchased one.
Requirements for homemade devices
In order for a structure to perform its functions effectively, it must meet the following requirements:
- temperature. When assembling the incubator, remember that it will have to maintain a microclimate at + 37 ° C ... 39 ° C;
- humidity. During the entire period of eggs in the device, this parameter will need to be changed according to the phase of the process;
- ventilation. The appliance must be equipped with a fan so that a constant air flow contributes to an optimal ratio between heat and humidity.
Important! It is the complex of these three components that provides the eggs with the same conditions as under the wing of the mother hen.
General manufacturing rules
Today, home incubators are made from the most various materials and appliances (there are examples of such devices made even from a microwave). 
However, their manufacture must always comply with a number of general rules:
- it is necessary to work only with dry, clean materials;
- when making the casing of the frame, make sure that there are no cracks and holes for heat leakage (if necessary, use a sealant);
- at the planning stage, consider where to put a container of water to maintain humidity in the device;
- it is important to remember about heating: to ensure it, several 25 W lamps are used, one of which should be fixed at the bottom for uniform heat distribution;
- do not forget to make several holes for outlet ventilation;
- you should definitely place a thermometer and a viewing window with a light bulb (for example, 12 volts) on the lid to control the situation inside the incubator.
Did you know? U n The rooster has many functions in the chicken herd: it encourages chickens to eat, protects them from small predators, and prevents conflict between birds.
How to make your own egg incubator
Now in more detail about how to make a home-made device for incubating chickens and other birds.
To assemble the device, you will need diagrams and drawings with dimensions, as well as a set of tools and various materials from which it is planned to create an incubator.
With automatic flip
If there is no desire to independently assemble a mechanism for an automatic flip (as described in the example above), then you can buy a ready-made design: it is fixed in any home-made device.

The principle of operation of the automatic turning mechanism is simple and effective. It not only performs the functions of a hen, but also allows you to keep the temperature inside the device, because the lid opens less often. With such equipment, you do not have to worry about turning the eggs in time in the device.
From the fridge
An equally popular option for a homemade incubator is the manufacture of those from non-working refrigerators. To do this, you can use both two-chamber and industrial devices, because their design provides for careful preservation of temperature (which is extremely important for an incubator).

In addition to the refrigerator, to create a device you will need:
- cardboard box;
- wooden bars to create a frame;
- incandescent bulbs (at the rate of 4 pieces per 100 eggs);
- egg trays (wooden, plastic, metal);
- fan;
- thermometer;
- thermostat;
- motor reducer;
- clamp bearings;
- hygrometer (it is designed to measure humidity, so if the thermostat has such a function, then you can do without a separate device).
It is worth preparing a number of tools for work:
- jigsaw;
- pliers;
- electrical tape.
Assembling a device from a non-working refrigerator involves several steps:
- First, holes are drilled from above - for light bulbs and ventilation.
- For the same purpose, 3-4 openings with a diameter of up to 1.5 cm are made in the lower part of the refrigerator door.
- With the help of cardboard, the walls of the device are insulated.
- At the bottom of the structure, a container with liquid is installed to maintain moisture in the device.
- Fix and connect the fan to the electricity. The optimal speed for it is 5 m/s. Just do not direct the air flow to the trays, otherwise the eggs may deteriorate.
- Insert the wires for incandescent lamps into the holes made on top and fix the heaters.
- It is necessary to equip the incubator with thermostats. In such a large device, 3 types are usually used: a bimetallic plate (closes electricity when a certain level of heating is reached), an electric contactor (it turns off heating at a given temperature) and a barometric sensor (closes the circuit when excessive pressure is reached).
- Make sure you have a mechanism to rotate the eggs. In nature, the mother hen turns them over 3-4 times a day, which means that the incubator must also have a special design. For it, install a gearbox at the bottom.
- Place on top wooden frame for trays so that they move 60° forward and backward.
- The reducer with trays is connected by a rod.
Video: How to make an egg incubator from the refrigerator
Styrofoam
Styrofoam (or expanded polystyrene) is considered one of the most cost-effective and suitable materials for creating a home incubator. It holds heat well, is lightweight and easy to work with.
Did you know? The chick embryo needs oxygen already on the 6th day of incubation.
To make a foam incubator, you will need the following materials:
- 2 sheets of foam (foam);
- a sheet of transparent plastic for a window;
- 4-5 lamps and cartridges for them;
- thermostat;
- glue;
- trays (quantity - depending on the wishes).

Also prepare the tools:
- stationery knife / scissors for cutting foam;
- soldering iron;
- corner and ruler.
Let's start assembling the device:
- Cut the sheet into 4 identical parts, measuring everything with a ruler / square: these will be sides corps.
- Glue them. This is the frame of the future design.
- The sheet should be divided into 2 equal parts, one of which is additionally cut into pieces 60 cm wide (device cover) and 40 cm wide (its bottom).
- The bottom layer is glued to the finished frame. Tighten the entire structure with tape, giving it rigidity.
- Cut out a 12 x 12 cm square in the upper part. Cover it with plastic: this will be the window and ventilation of our incubator.
Important!Some amateur poultry farmers also install a fan in the incubator so that air circulates better. Only the air flow from it should be directed to the lamps, not the eggs: this makes them dry out.
- From the remaining foam, cut out 2 beams 6 cm high and 4 cm wide, then glue them to the bottom along the long sides (these will be the legs on which you will place the egg trays).
- On 40 cm walls, make 3 holes (1-2 cm in diameter) at the same distance at a level of 1 cm from the bottom.
- To prevent the material from crumbling, it is necessary to burn the edges with a soldering iron.
- We mount the roof. To keep it more firmly on the frame, thin (for example, 2 x 2 cm) foam boards should be attached to it from the inside at a distance of 5 cm from the edge.
- Having finished with the design, it's time to deal with its internal arrangement: mount the lamp holders in random order (as it suits you).
- Fix the thermostat 1 cm above the tray. It is not difficult to choose it - just focus on the number of eggs in the planned bookmark. Today, there are devices on sale that can control devices for 20 eggs, 30 eggs, 1000 eggs. If possible, you should choose thermostats that simultaneously measure temperature and humidity.
- Place trays. Between them and the side walls you need a gap of at least 4-5 cm, otherwise there will be no high-quality ventilation.
Video: DIY foam incubator
Having assembled the incubator, you can start selecting eggs for laying. Not all of them are suitable for poultry breeding.
Therefore, it is important to know how to choose the right ones:
- pay attention to the shell: it should be without cracks, dents, bumps or marbled color;
- shine the eggs on the lamp and leave those of them that clearly show the formed yolk on a transparent background without extra inclusions and spots. When turning the egg, it should move slightly;
- choose eggs larger, the correct shape.
Important!If you plan to place eggs in one tab various kinds(chickens, geese, ducks), then use trays at different levels for this. Each bird has its own requirements for timing, temperature, and it is important to adhere to them for a successful result.
But it is important not only to choose the right planting material, but also prepare them for bookmarking:
- eggs should be stored in a cool place for no more than 7 days;
- immediately before laying, you need to transfer them to a room with room temperature for 8-12 hours (otherwise condensation will form on them in a warm incubator, and this can lead to the development of mold and the death of the embryo);
- there are no exact recommendations regarding laying chicken eggs in trays: place them vertically, horizontally. As for larger specimens, they can be placed with a pointed end down or even at an angle. Although most experienced poultry farmers claim that eggs warm up better when placed horizontally.

After laying eggs, periodically check their quality. Already 6-7 days after the start of the process, it is worth shining them through a lamp: blood vessels in the protein and a dark embryo should already be visible.
Temperature regime for different types of poultry
Temperature is the most important condition for hatching eggs. The lack of heat slows down the growth of embryos, and prolonged hypothermia leads to death. Overheating can lead to the same consequences. If the embryos survive, then the chicks will have deformed body parts and organs as a result.
Different types of birds have their own parameters for a suitable microclimate:
- for chickens, at first it is worth keeping the level + 38 ° C - + 39 ° C, eventually dropping to + 37.6 ° C;
- ducklings will feel better at +37.8°C with a gradual decrease to +37.1°C;
- goose eggs require at least + 38.4 ° C, and closer to the end of incubation, you can lower the temperature to + 37.4 ° C;
- for a turkey, the fluctuations are lower: in the first days it is worth warming up to +37.6°C, gradually lowering the level to +37.1°C;
- quails like the same temperature (+37.5°C) during the entire incubation process.
Did you know?Chickens cackle for a reason: they constantly exchange information about what is happening around them, including their own well-being.
So, making an incubator with your own hands is not so difficult and expensive. But you can create a device that is ideal for your conditions in terms of size, number of eggs for incubation. Read the rules carefully before assembling sanitary norms regarding such devices, otherwise the success of the enterprise will be in doubt.


Chocolate biscuit: the secrets of cooking in a slow cooker and oven
Chemical composition and nutritional value
Apple chips at home
Braised cabbage with white beans, recipe
How to reduce the ass, hips and stomach at home?