Cutting glass tubes, sticks, bottles, blanks and flat glass is one of the most common operations in laboratory and glassblowing. It in most cases precedes all glass blowing operations. Only a correctly cut tube is suitable for further processing (soldering of tubes, melting of tube ends, soldering of processes, etc.). The end of a correctly cut tube in the cross section must be strictly perpendicular to its length, not have notches or fibrous, as well as short cracks located at a slight angle to the cut. Depending on the diameter of the tube or workpiece, apply various ways cutting.
Rice. 27. Cutting tubes to break
Fracture cutting of tubes. In this way, tubes with a diameter of 20-23 mm and glass rods are cut. In this case, the glass tube is placed on the edge of the table and its protruding part is held with the left hand. In the simplest case, the tube is simply clamped in the left hand. A knife (cutter) made of hard alloy or a sharp file with a fine notch is taken in the right hand. Having placed a cutter or file on the tube in the intended place strictly perpendicular to the length, with the left hand rotate the tube towards itself by about a quarter of the diameter (Fig. 27, a). To reduce surface tension at the incision site, the tube can be moistened with water or soapy water.
The incision can be made in another way. With the right hand (the pipe is clamped in the left hand), they put the knife on the pipe and, with a slight pressure downwards, make a scratch, then push the knife back up, without taking it away from the pipe, and again down towards themselves. In this case, an even cut is formed, equal to a quarter of the diameter of the tube. The incision can be made differently by placing one end of the tube on right knee and pressing the other end with the left hand to the left leg.
Glassblowers often use the following technique to apply labels. The glass tube to be cut is tightly grasped with the left hand, holding it between the thumb and forefinger. A cutter or file is taken in the right hand (Fig. 27, b). The pillow of the thumb of the right hand should rest against the sharp edge of the file. Then the tube is tightly clamped between the sharp edge of the file and the thumb and a slight twist is made: right hand- towards yourself, and with the left - away from you, making a cut on the surface of the tube.
For beginners in glass cutting, this technique should be used with great care, since with strong pressure, the tube, especially thin-walled, can break and injure the hand. After applying the label, the tube is taken in both hands with a label; up so that the mark is at the same distance from the right and left hands, and smoothly, stretching the tube in different directions, break it (Fig. 27, c). If the tube does not break, make a second mark on the old mark using one of the indicated methods and break it again. To reduce surface tension, the mark-slot is moistened with water. The tube breaks more easily. Until students have acquired some skill in cutting pipes, this operation should be carried out with a towel or rag wrapped around their hands to prevent cuts. When cutting, glass rods are broken with a sharp movement so that burrs do not form at the ends.
If it is necessary to cut off the tube near its end, use the following method. A deep incision is made on the tube with a cutter, the tube is placed on the tip of the edge of a metal prism or on the edge of a trihedral file with the mark up. Care must be taken that the scratch applied to the glass falls exactly against the sharp edge of the prism. Then, with a light blow of a knife or file on the short end, they achieve its cut.
Glass rods can be cut in the same way by placing the short end of the rod on the corner of the table.
Works on wood and glass Korshever Natalya Gavrilovna
Cutting glass tubes of various diameters
When it is necessary to cut a product such as a glass tube, proceed as follows.
In the place of the required separation, the tube is sharpened with a file. In the event that the diameter of the tube is more than 1 cm, you must first make a cut over the entire surface, that is, form an even ring. On glass tubes of smaller diameter, it is sufficient to make a linear cut. But to get a more even cut edge, it is also desirable to machine the tube around. It is necessary to break the processed tube carefully, it is better to put on gloves on your hands.
This text is an introductory piece. From the book Rules for the installation of electrical installations in questions and answers [A guide for studying and preparing for a knowledge test] author Krasnik Valentin ViktorovichUtilization factor of the main types of insulators and insulating structures (glass and porcelain) Question. How should the utilization factor k of insulating structures made up of insulators of the same type be determined? Answer. Should be defined as k = k and
From the book Works on wood and glass author Korshever Natalya GavrilovnaBending glass tubes Using the method described below, you can bend a tube with a diameter of up to 1 cm. To do this, you need to heat the tube well, holding it above the flame and at the same time turning it around its axis. When the tube turns red at the intended bend, it is bent, and then
From the book A Brief Guide to a Gas Repairman author Kashkarov Andrey PetrovichChapter 3 Gas analyzers for various purposes This chapter will discuss the devices of household gas analyzers and their technical
From the book Materials Science. Crib author Buslaeva Elena Mikhailovna25. Dependence of mechanical and physical properties on the composition in systems of various types A property is a quantitative or qualitative characteristic of a material that determines its commonality or difference with other materials. There are three main groups of properties:
From the book of the Roof. Device and repair author Plotnikova Tatyana FedorovnaTypes of glass roofs Glass roofs can be of several types:? Victorian in the form of a dome like a tent or a circus roof, it is suitable for round or oval rooms;? Georgian has the form of four interconnected slopes, crowned with a turret on
From the author's bookFeatures of the construction of glass roofs The latest construction technologies make it possible to realize any wish of the homeowner regarding the choice of form future roof. But the shape of the roof will differ depending on the region in which it is produced.
There are several easy ways to cut the neck glass bottle. Why is this necessary, you ask? From a beautiful cropped bottle, you can make a cool glass, a flower vase or a stand for various little things. But, before you start cutting beautiful bottles, I still recommend practicing at ordinary beer houses, since this business requires experience and some skill: it doesn’t always work out exactly the first time.
So, I'll tell you the most simple ways cut off the neck of a glass bottle.
Method 1 - use a glass cutter
This will require a glass cutter. You can use the factory model or make your own. Design homemade device can be different: the main thing is that the bottle and the cutting element are securely fixed, but the bottle rotates freely.


Important! When cutting, you need to make one pass: this will provide the most even edge.
Next, you need to prepare hot (boiling water) and cold (possible with ice) water. We spill along the cut line first hot water to warm up the glass.

After that, immediately pour the bottle with cold water.

From the temperature contraction, the glass should break off along the line of the preliminary cut. If this does not happen, the procedure must be repeated (pouring first with hot and then cold water).

Method 2 - candle flame
This method will require a candle and a piece of ice (you can use a container of very cold water). To break off the neck, a straight line is drawn on the bottle with a marker, along which the glass warms up well over the candle.

Then the cut line is cooled with ice, after which the glass breaks with a light tap.

Method 3 - nargev from friction
Another way to break off a bottleneck is to use frictional heating of the glass. To do this, two plastic ties are put on the bottle, which serve as limiters. Three turns of twine are wound between them, after which the twine begins to move forward / backward by the free ends.

After 2–3 minutes, when the glass is sufficiently heated, the bottle is placed in cold water, and with light tapping, spallation occurs along the heating line.

If you make a small incision with a glass cutter before rubbing the twine on the bottle, then you do not need to use cold water: the glass will crack when heated on its own.

Method 4 - filament installation
This method will require a transformer, for example, with microwave oven with the secondary winding removed, instead of which three turns of a powerful power cable are installed.The free ends of the wire are closed through a thick wire. The stand (base) must be heat-resistant and dielectric.

The next step is to connect the transformer to the electrical network. When the transformer is turned on, the thread will heat up: a bottle is applied to it and gradually rotates. When the glass is heated, the neck will detach along the heating line, so you need to ensure that the heating is uniform and along one line.


Method 5 - burning rope
This method will require natural twine and some refined gasoline for lighters. A piece of twine is cut off to the length necessary to wrap around the bottle at least 3 times. Then this piece of twine is soaked in gasoline so that it is completely soaked.
The twine soaked in gasoline is wound around the bottle in the place where it is necessary to chip and set on fire.

When the gasoline almost burns out, the bottle is lowered into cold water, where the glass bursts along the heating line due to the temperature difference.

Method 6 - use specialized equipment
This method is to use electric machine for cutting tiles. The diamond blade cuts thick glass well and evenly. It is recommended to work with gloves, a protective mask and goggles, as glass dust is very dangerous. The advantage of using a cutter is the ability to cut the bottle into small washers, which is not available with other methods.This article is about how we tested different ways cutting glass tubes.
The actual production of pipettes comes down to two operations:
- Cutting long glass tubes into 70mm pieces.
- Fusion of the edges of the segments, one edge to obtain a dosing hole, and the other to smooth the sharp edges of the glass.
There were no issues with the melting of the tubes. We have rich experience in equipment development. But we encountered cutting glass tubes for the first time.
First of all, we looked on the Internet “How to cut a glass tube”. The most common way looks like this:
- In the place where you need to cut the tube, make a small incision with a diamond file.
- Take the tube from both sides and break it, stretching it to the sides.
There are also methods with glass heating and rapid cooling. Some not very technological methods.
We tried like this:
- They filed a tube with a diamond file.
- They put it on the edge of the table, so that the place of the file protruded slightly beyond the table.
- Pressed down part of the tube to the table.
- Pressed on the protruding part.
- A piece of tubing broke off easily.
The edge is even. Tried different variants incisions. It was found that when breaking off, the edge of the glass is even if the cut is deep enough or long enough along the perimeter of the tube.
We decided to make a long incision along the perimeter with a diamond glass cutter. We made a layout of the device according to this principle.
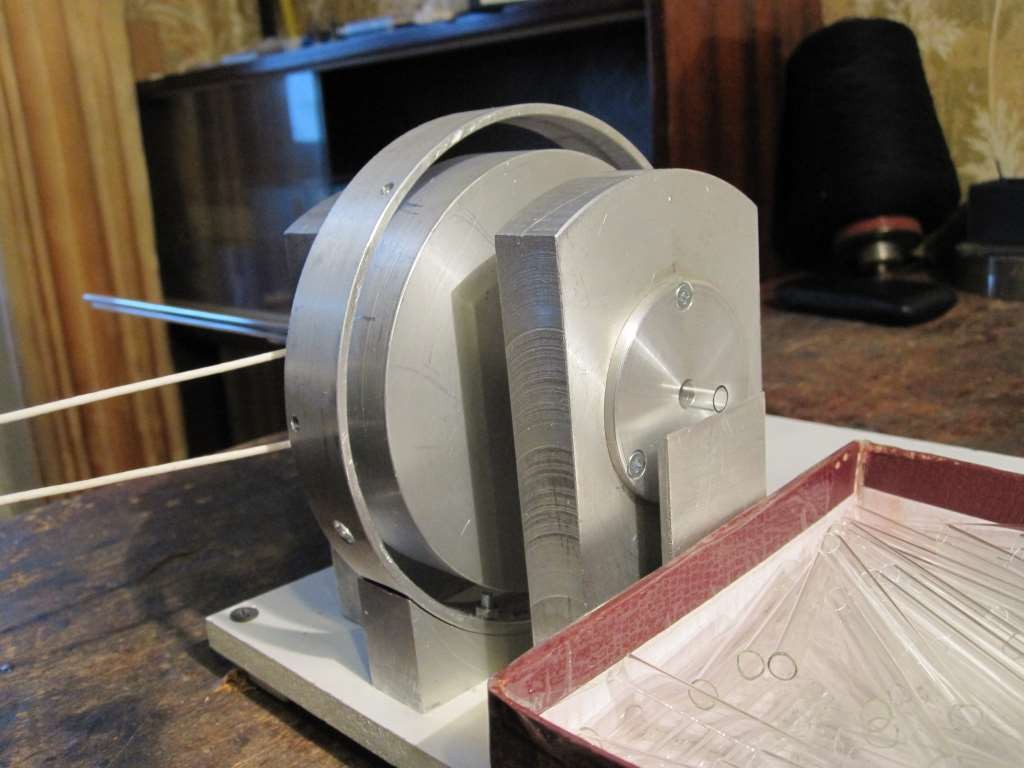
As a cutting element, a diamond was used for a glass cutter, the service life of which is at least 500,000 cuts, according to the manufacturer. The cutting unit is consumable, easily replaceable by service personnel, with a cost of not more than 600 rubles.
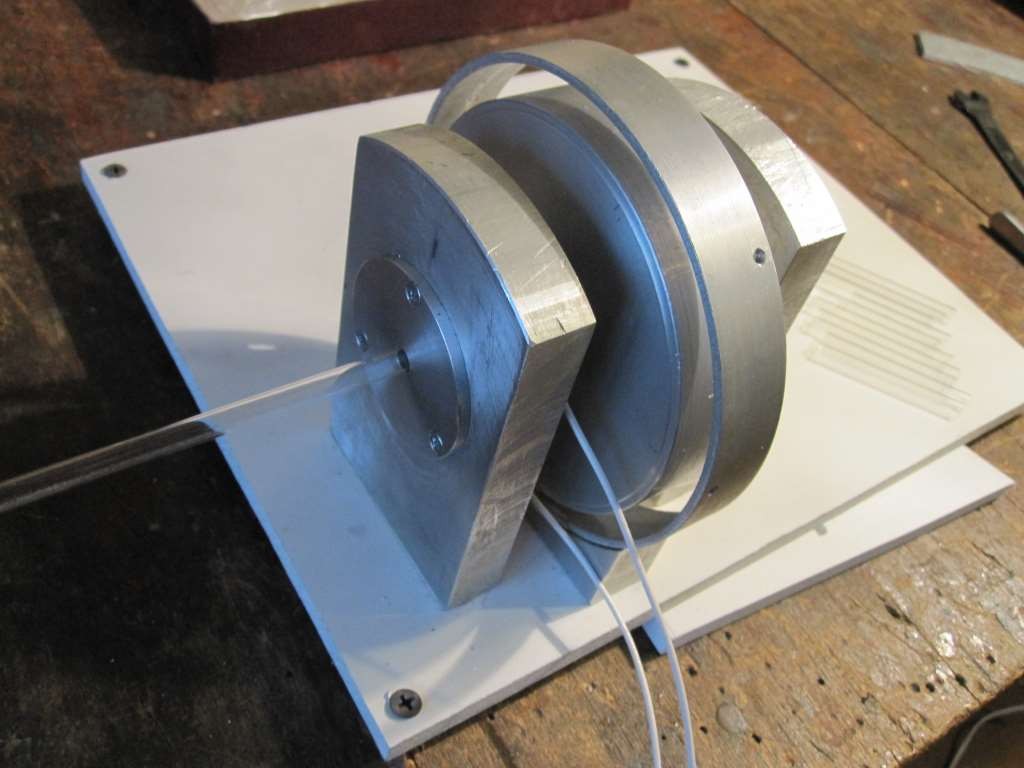
At this stage, a simplified layout was assembled. The rotation of the cutting mechanism disk was carried out manually. Will do it in the future stepper motor controlled by . There was also no cutter pressure electromagnet, tube feed rollers, and a feed stop sensor.
During the testing of the cutting unit, the following operations took place.
The disk of the cutting mechanism through the cable manually rotated 180 °. There was an incision in the glass of the tube.

The tube was pushed forward so that the notch fell on the edge of the stop.

With a vertical push of the hand, the tube broke off.

500 pieces were broken off.
The cut quality is just amazing.

We even developed a tube cutting unit according to this principle and installed it on the machine.

When they began to test the mechanism in combat mode, they revealed shortcomings.
- The disk turned out to be inertial. This problem was especially aggravated by a heavy electromagnet (black cylinder). It took considerable time to turn the disk 180° and back, even with a powerful stepper motor.
- An abrupt stop of such an inertial mechanism caused an unpleasant knock and vibration.
- It was very difficult to expose the diamond, to hit its cutting edge.
- The result is poor performance and reliability.
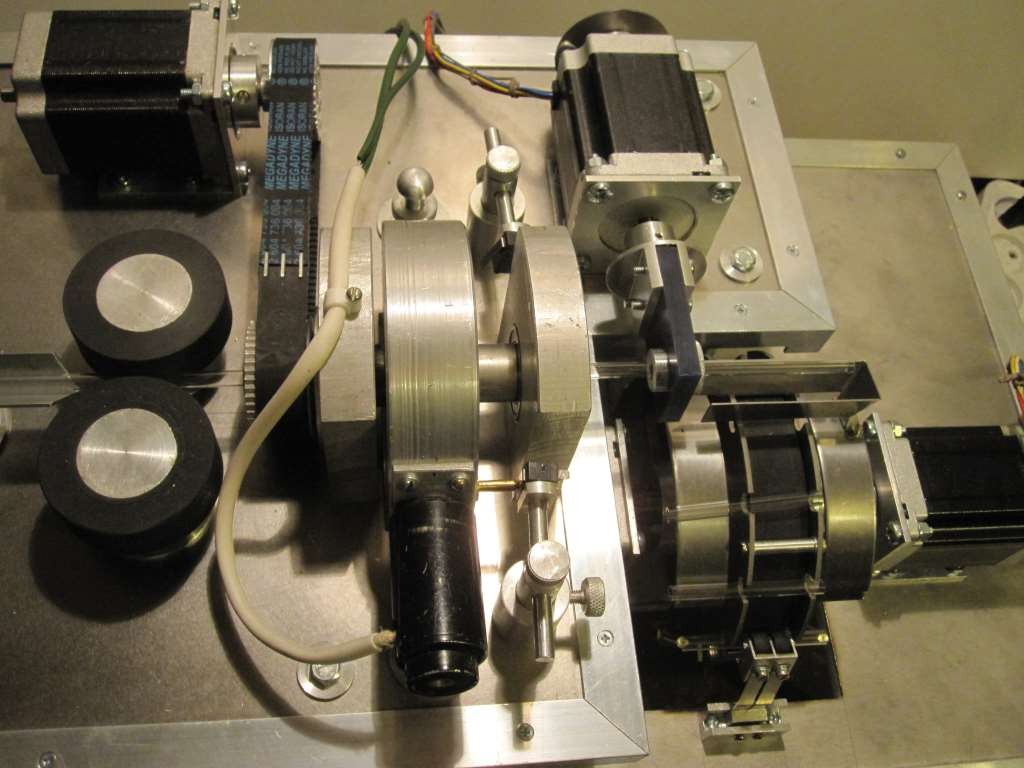
Then it was much easier and more technologically advanced. The saw was made with a diamond disc.

The disk went down, made a shallow incision, about 0.5 mm. Then the tube entered the breaking unit, the cut piece broke off and fell into the bunker.
The cutting unit turned out very successful. Yes, and also. According to this principle, various equipment for cutting glass tubes can be created. Equipment of small dimensions, reliable, productive, cheap.
Those. ideal equipment for small businesses.
To obtain a sharp small flame, the inner tube is moved closer to the outlet of the cap 4 and the air supply is increased. By removing the nozzle 5 from the outlet, a very noisy wide high-temperature flame 8 can be obtained.
When igniting the soldering torch, first of all open the gas cock, ignite the gas and only after that turn on the air supply.
If there is no laboratory blower, then a household vacuum cleaner is used instead, inserting a rubber plug with a glass tube and a rubber hose into its outlet. A tee is placed near the air valve 1 with a piece of rubber tube put on it, clamped with a screw clamp (see Fig. 37). This will allow excess air to be expelled when working with low airflow.
If the laboratory has a compressed air network, then the need for blowers, of course, disappears.
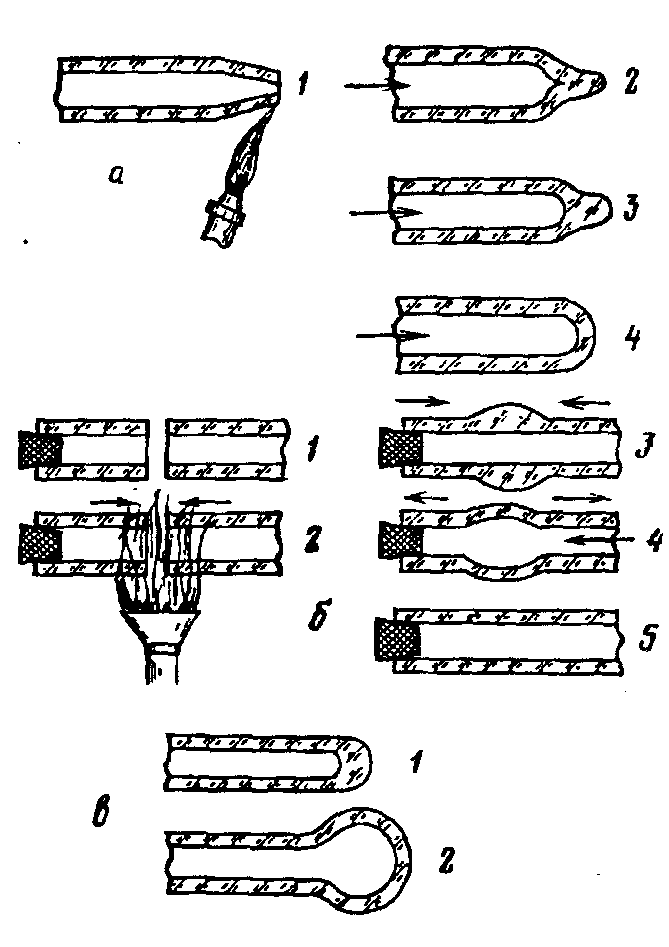
Cutting glass tubes. To cut a glass tube with a diameter of not more than 12 mm, first make an incision or scratch in a chosen place with a diamond, glass cutter or the edge of a triangular file. There is no need to cut the tube around the entire perimeter, one quarter of the circle is enough.
Repeated sawing is impractical, since it only weakens the effect of the first cut. Then take the tube with both hands as shown in Figure 1, b. Vigorous bending of the tube in the direction opposite to the notch and its simultaneous stretching cause the tube to break along the circumference. It is recommended to pre-moisten the incision site with water or an aqueous solution of soap. In this case, the glass breaks more easily, and the fracture edges are smoother. If a file is used to make a scratch, then the tube at the incision site should not be sawn, but only a scratch should be made.
To cut tubes with a diameter of more than 15 mm, a scratch is made around the entire circumference of the tube, and then a red-hot iron wire about 3 mm thick and bent in the form of a semicircle is drawn around the tube along the scratch. In this case, almost always a deep crack forms under the scratch, and the tube breaks easily. If a crack does not form, then the tube, having been removed from the wire, is quickly cooled by blowing strongly on the heated part or by directing a stream of air at it. It is more convenient to fix the iron wire in a tripod, heat it up, and then, placing a scratched tube on it, slowly rotate it along the notch. After a while, the tube breaks.
Sometimes a tube with a diameter of 20-25 mm is cut in the same way as tubes with a diameter of less than 15 mm, but they do not break it with their hands, but by placing it on the edge of the table, and the cut should be on top, and the sharp edge of the table should be on the bottom. With one hand they hold the end of the tube lying on the table, with the other they take its second end and, at the same time pulling and bending, break the tube.
Some chemists prefer a different technique for breaking notched tubes. Two asbestos cords of the same length are moistened with water and wrapped around the tube on both sides at the same distance (4-5 mm) from the circular incision, observing the parallelism between the cords, otherwise the cut will be uneven. Then, a sharp flame 7 of a soldering torch is directed to the incision site (see Fig. 1, a) and the tube is uniformly rotated in the flame until an annular crack is formed. This method cuts glass tubes of any diameter from glass of any heat resistance.
If the laboratory has a diamond saw, then it will replace all the above fixtures for cutting glass tubes.
Thick-walled capillaries and glass rods with a diameter of 3 to 10 mm are cut in the usual way for fracture if their length exceeds 50-100 mm. To cut off a small part of 10 mm or less from the capillary, the capillary is placed on
Rice. 2. Bending of a glass tube: a - heating in a dovetail flame; 6 - incorrectly bent tubes; c - ways to close one end of the tube
one of the sharp edges of the prism (Fig. 1, c) with the notch up so that the edge is exactly under the notch. Then, holding the long part of the capillary with your hand, sharply hit with a knife on the part that needs to be cut off. The capillary breaks off exactly along the incision.
The cut edges of the tube are melted in a burner flame or carefully cleaned

file with a fine notch. However, it is more convenient to grind off the edges by grinding. To do this, use an emery disc or emery powder. Powder moistened with water, oil or glycerin is placed on a thick glass plate. The tube to be ground in a vertical position is driven in a circular motion along the plate and at the same time the tube is gently pressed against it. To receive smooth surface the end of the tube is polished with a finer emery powder.
Tube bending. Tubes up to 30 mm in diameter are bent on a gas burner with a wide flat flame, to obtain which gas burner put on the dovetail nozzle (Fig. 2, a). The tube is heated in such a flame over its entire width, rotating evenly at a speed of approximately one revolution per 2 s. After softening, the tube is bent upwards outside the flame. Before bending, the tube is stopped rotating in the flame and only the lower part of the softened glass is heated. In this case, a certain amount of glass will flow down into the heated zone - the future outer side of the bend. This increases the thickness of the walls of the outer side of the corner. It is not recommended to bend a strongly softened tube, since a fold is formed at the bend (Fig. 2, b). To avoid unevenness at the bend, one end of the tube is closed before heating with a piece of asbestos wool or a piece of rubber tube with a glass rod (Fig. 2, c). When bending into the open end of the tube, do not blow too hard
air. dents with inside the corner is eliminated by reheating the inner part of the tube in the flame, blowing and leveling it, while not softening the outer side of the corner.
For the manufacture of U-shaped tubes with a diameter of up to 20 mm, the tube is heated with a soft wide flame, constantly rotating and squeezing the glass along its length somewhat more than when bent at an angle. Having received the thickened walls, the rotation is stopped and, having slightly bent the tube at an obtuse angle, the lower part of the thickened glass is heated. The tube is then removed from the flame and bent into a U-shape, holding the heated end down. After bending, the softened part is immediately inflated to a diameter equal to the diameter of the original tube. If a inner part The U-shaped tube turned out to be not quite even, then they align it on the narrow flame of the burner, blowing and upsetting.
In the process of work, the place of the fold sometimes begins to become cloudy (devitrification). Then a piece of asbestos wool is introduced into the flame of the burner, put on an iron wire and soaked in a concentrated aqueous solution of sodium chloride. The flame acquires a bright yellow color and the flow of NaCl vapor, hitting the cloudy part of the tube, forms fusible glass on its surface, which stops devitrification. Therefore, a glass with an aqueous solution of sodium chloride and a piece of asbestos wool on a wire should always be at hand.
The bent still hot tube must be smoked in the luminous flame of the burner and placed on asbestos cardboard, protecting it from drafts.
Pulling the tubes and obtaining capillaries is carried out by heating the tube in the desired place with its continuous rotation until it softens. If you need to get a capillary, then the tube is removed from the flame and slowly stretched with both hands. Depending on the degree of softening and the speed of stretching, capillaries with different wall thicknesses and diameters are obtained. The longer the heated part of the tube, the sharper the cone obtained during stretching and, conversely, for a steep neck of the tube, it should be heated on a sharp burner flame (see Fig. 1, a). When the tube has cooled, it is cut in the right place and melted. For the first time working with glass, it is recommended to keep the tube vertical when stretching the tube, then there will be no danger that the capillary will bend.
Soldering the end of the tube. For sealing, first pull the end of the tube and cut off the resulting capillary 1 (Fig. 3, a). Then the resulting end of the tube is heated again with a sharp flame of the burner, rotating the tube, and without removing it from the flame, the cone of the tube is melted as close as possible to its end (position 2).
Rice. 3. Sealing the end of the tube (a), connecting the tubes (b) and blowing the ball (c)
After that, the end of the tube is heated in a noisy flame (see Fig. 1, o) and to eliminate the thickening at its end, air is carefully blown into the tube, only with the help of cheeks, until a correct rounded end is obtained (positions 3 and 4 in Fig. 3 , a). It is necessary to blow in air at the moment when the glass is still soft enough and can be inflated.
If the soldered end is not swollen, but a thickening remains (item 3), it may burst when cooled or then after a while.
Tube connection. Only tubes of similar chemical composition, having approximately the same coefficient of volume expansion and the same softening temperature, can be soldered. Otherwise, the tubes cannot be soldered well or, when cooled, they again disintegrate at the place of soldering. All glass tubes must be thoroughly washed and dried before soldering. Contaminated ends of the tubes should be cut off.
To connect, two tubes of the same diameter with evenly cut ends are melted in the burner flame at the same time (position 2, Fig. 3, b). The other end of the tube, which is held in the left hand, must be closed with a cork or asbestos swab. As soon as the ends of the tubes begin to narrow after softening, they are removed from the flame, carefully connected so that they form a straight line and pressed against each other. the junction is slightly inflated by 3-5 mm more than the diameter of the original tubes (position 4). This operation is carried out in order to equalize, as far as possible, the wall thickness.


Chocolate biscuit: the secrets of cooking in a slow cooker and oven
Chemical composition and nutritional value
Apple chips at home
Braised cabbage with white beans, recipe
How to reduce the ass, hips and stomach at home?