Good afternoon, three related common theme roofing questions.
Four-pitched roof, the total area of the slopes is 150 m2, metal tile pattern Monterrey.
1. On one side there is a pipe for ventilation. The pipe is light (inside there are four light pipes made of galvanized steel, fastening the interfloor ceiling and insulation). The pipe is rectangular, starts almost at the ridge, descends 1.5 meters, width 40 cm. Maximum height 1.2 meters. The frame of the pipe is made of 50x50 bars and 50x150 boards, fastened it about truss system. The framework is sheathed by a professional sheet. In general, the question of joining a pipe with a metal tile: the guys cut an opening in the crate, cut a hole in the rolled waterproofing, made a pipe frame, sheathed it, let the pipes through, insulated, then made only the upper apron, wide (about 40 cm overlap on the metal tile) . From below, the gap between the metal tile was lined with a bar and tucked up with scraps of rolled waterproofing. We have been living in the house since November, the rain does not penetrate, but I noticed that snow is blowing into the attic through this gap. It’s clear that it’s bad that they didn’t make the lower apron (I didn’t know then, but the guys didn’t offer it) - how can you get out of this situation with little bloodshed? The guys do not refuse their work and are ready to fix it for free, they offer to embroider waterproofing from the side of the attic, plug the gap between the outer apron with sealing tape (PSUL) and, to be sure, coat it with sealant. It'll do? Or wait for the summer, remove the metal tile and redo it with a lower apron?
2. The joints of the slopes on hipped roof covered with a bar (I forgot what it is called, it looks like a ridge). In the rafter system, reinforcement is made in this place - so that sheets of metal tiles can be fixed on both adjacent slopes. So the question is - at one joint, through the waterproofing, I see light along the entire length of the joint, i.e. apparently there is a noticeable gap between the plank and sheets of metal, or the sheets themselves are joined to the gap in this place. There is no snow there, the rain does not seem to fall (i.e. if you knock on the waterproofing from the side of the attic, you don’t hear the characteristic sound of rolling snow or frozen drops) - is this normal? Do these strips need to be sealed?
3. I wrote earlier that in order to remove moisture, we expanded the waterproofing with a thin strip (about 30 cm) along the entire length of the ridge. The attic is dry - the humidity is equal to the street, it is well ventilated (an additional pipe with a fan was installed). Snow does not blow. sew up? Or can you leave it like that? it seems that the air rising from the side of the attic freely penetrates outside through the junction of the ridge strip and the metal tile.
When examining leaky shingle roofs, it is not surprising that it often turns out that most problems are not the result of wear or other operational damage, but the result of installation errors. soft roof. Some of these flaws are difficult to correct, others can be corrected even several years after the installation of the roof.
When a customer reports a leaking roof, he often has his own (not always correct) ideas about the causes of leaks. After listening carefully, we begin our survey with a series of clarifying questions. How long does the roof leak? Have there been leaks in this area before? How long has the roof been in operation?
If a leak appears and disappears over a long period, the cause is most likely a design flaw or improper choice of materials. If the roof is 20 years old, the matter is most likely in its dilapidation. If the house is new (2-3 years), then the reason lies, as a rule, in the errors of roof installation. First of all, we ask you to show traces of water in the house and try to determine whether the roof is to blame. Sometimes leaks that seem to be related to the roof actually turn out to be wall or window cladding problems.
Having examined the house from the inside, we go to the roof, where we narrow the search to an area with a radius of 3-4 m with a center in the area where the leak occurs inside the house. Then we check the coating - evaluate its condition, look for punctures from nails or tree branches.
Inaccurately removed ventilation risers and chimneys, cable glands, satellite antenna mounts - all this may be among possible causes leaks. We especially carefully check the valleys, which are prone to leaks. If the problems lie in the valley, we replace it entirely, without even trying to do small patching of holes.
Poorly fixed flooring
The most common problem I encounter when inspecting a structure. If the flooring sags, then the fasteners "self-pull out", as a result of which protruding nail heads damage plates soft tiles and cause leaks. However, pushing out nails is quite possible with time and on a well-made roof. When I find a problematic nail, I pull it out and then replace the damaged plate.
The first row of bituminous tiles is incorrectly laid
It's amazing how often I find leaks due to the fact that the joints of the plates in the starting and first rows coincide. Such an arrangement will certainly leak along the lower edge of the slope and lead to decay of the ends of the rafters and other structural elements.
If the structure is not damaged, then the repair in this situation is simple: you need to pull out a few nails and insert metal inserts between the roofing plates of the starting and first rows, covering the unprotected joints. These plates can be fixed with nails or drops of sealant.
Of course, if the decking is damaged, then you will first have to remove several rows of roofing plates, replace the damaged wooden details, lay a waterproof membrane coating and only then restore the roof rows.

If the roofing plates are loose, the wind lifts the edges, allowing water to penetrate under the roofing. The number of cases of improper fastening should include a lack of fasteners, their location too high or low on the plate, and other shortcomings. Always follow the recommended plate fixing pattern and storm plate on all roofs in windy areas and on roofs with slopes greater than 10:12.
Position your nails correctly. They should pass through the fastening strip directly under the adhesive strip, where they will be covered by the petals of the plates of the next row. Open nails are the right way for water under the roof.
The causes of leaks are often flaws in the roof structure, which usually occur at the design stage. Design errors include improper placement of gutters or valleys that direct water to walls, poor location dormer windows, an illiterate choice of a place for a chimney, which prevents the flow of water, and an overly intricate outline of the roof.

It is almost impossible to correct such flaws in the project, since the house has already been built, but it is imperative to pay close attention to areas where leaks are likely due to this.
It may seem strange, but plates with a continuous adhesive strip can themselves cause leaks. Water, having fallen under a plate with a continuous adhesive strip on the side, will not be able to flow down and will move to the side until it finds an exit point, which is, as a rule, at the junction between the plates. This is where the leak starts. Valleys, chimneys, internal drains, vents are the most vulnerable places for water, allowing water to penetrate under the roof. Such leaks are very difficult to detect and eliminate their cause. Therefore, it is better not to risk it and use plates with an intermittent adhesive strip. If you must use plates with a continuous adhesive strip, make sure that the aprons of the valleys and chimneys do not direct water into places where it can find its way under the coating.

Avoid using plates with a continuous adhesive strip. Water that has fallen under the plate on the side has no way out. Plates with intermittent adhesive strip allow water to drain through every interval.
"Fracture" of the package
Some roofers make the big mistake of loading a package of plates onto the roof, laying it down with the package folded over on the ridge. This can cause the plates to break and separate their layers, which will certainly affect the life of the new roof.

Always place packages on a flat roof surface. And further. Because cold sheets are more prone to cracking, try to avoid roofing in cold weather, except in an emergency.

Do not bend the roofing plates over the ridge. This can lead to damage to the underlying material and reduce the life of the roof. Place packages on flat roof, and use a stop to prevent them from slipping.
Connection errors
One of the causes of leaks may be incorrectly installed adjoining elements. For example, if the apron covers the adhesive strip of the roofing plate, then the plate of the next (upper, above the adjoining, row) will not be glued to the bottom.
|
The apron, when driving a nail into its upper edge, lifts the lower edge of the next row of roofing plates. An additional nail fixing the bottom edge of the apron is a potential leak site |
The apron should be flush with the top edge of the roofing plate and fixed with only one nail in the top corner. Between themselves, the adjoining elements should overlap by about 5 cm |


Sometimes they try to solve this problem by moving the apron slightly up so that its upper edge is higher than the edge of the roofing plate. When a nail is driven into the junction element, the upper edge of the roofing plate turns into a fulcrum. As a result, the flashing raises the bottom edge of the next row of roofing plate, creating a gap into which water can enter. The roofer attempts to remedy this by driving a nail into the bottom edge of the junction that will not be covered by the next row, which can also cause a leak.
Many leaks are caused by poor waterproofing. chimneys. However, before fixing this problem, check the condition of the masonry and make sure there are no loose bricks. The most common mistake when waterproofing chimneys is that roofers do not seal the apron flanges into the masonry.

The junction here should be made only from a sheet metal strip curved on the machine, strictly L-shaped in profile, carefully embedding the apron into the mortar between the rows of masonry. Connection made without the use of bending machine, - a serious signal, indicating the inattention of the master to details. If you find a roof with a carelessly made chimney insulation, immediately look for other defects nearby.
Chimney waterproofing is a job for a professional. The places where chimneys and roofs meet are potential areas for leaks. If the masons did not put the aprons into the mortar between the rows of masonry, and the connection was made with nails and putty, this is very bad. The seams should be grooved with an angle grinder so that the apron can be securely patched between rows of masonry.
Leakage can easily occur due to operational damage to the roof. Television or satellite dishes, skylights and ventilation hatches should not be installed at random, but this happens quite often.

Overgrown tree branches can also destroy the integrity of the coating, and excessive shading of the roof contributes to the growth of moss on its surface, which also leads to damage to the roof.
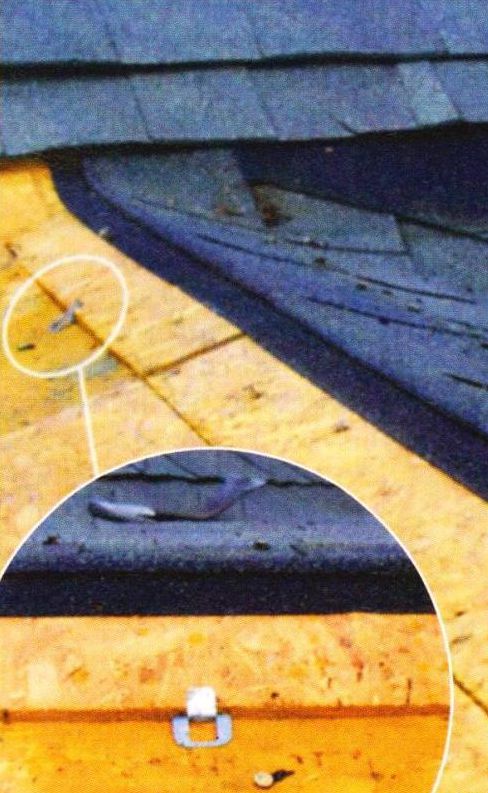
Careless covering of valleys
One has only to be surprised that most of the valleys do not flow, given the widespread use of self-adhesive waterproof films in the practice of roofing as a coating in the valleys. Some inexpensive films have a warranty period of only 5 years. Roofing plates with a service life of 50 years over a film with a resource of 5 years are nonsense. The only one reliable way eliminate the leak in the valley - completely block this problem area. When repairing valleys, always use not only a waterproof film, but also a metal apron.

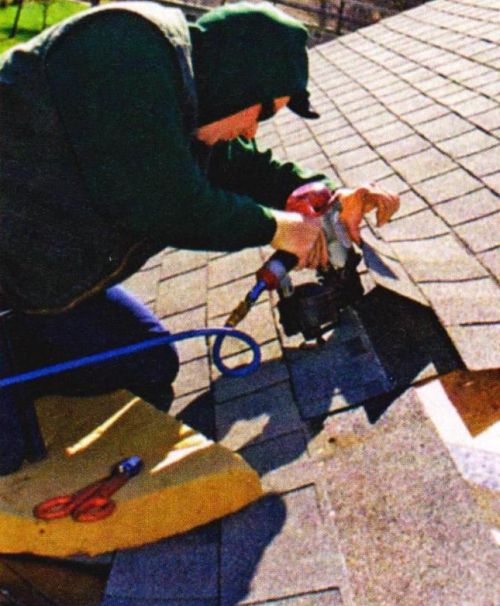
Repairing a valley usually means covering it completely. Starting at the top, remove one entire roof plate from each side of the valley. Accuracy is extremely important here, since how well it can be reassembled depends on the thoroughness of disassembling the roof.

Roofing with undercut blades in valleys is often done incorrectly (left). Valleys with a metal apron are reliable (on the right).
Removing a damaged plate without harming its undamaged neighbors is not an easy task. This job is best done when the plates are cold enough that they won't buckle under your feet, but also warm enough that they won't crack during use. In summer, such repairs are best done in the early morning. In winter, such work should be avoided, except in urgent cases.
 |
Separate the glued plates in a row below and two rows above the plate to be removed. This may not be easy. Roofing plates, the service life of which is up to 50 years, are glued very firmly. In such cases, the adhesive strip will have to be cut. |
 |
After the plates are separated from each other, you can remove the nails holding the damaged plate. |
 |
Before removing the plate, you need to pull out four more nails in a row |
 |
Now you can pull out the damaged plate, put a new one in its place and again fix the previously freed plates with nails. |
When fixing the repair plate, do not drive new nails into the holes from the previously pulled ones - they will most likely be squeezed out. Hammer nails next to the old holes, and put a little sealant into the last ones. Also glue all torn edges of the plates with sealant.
How to fasten a metal tile: fastening scheme and installation rules.
It would seem a simple, insignificant step, but in fact, fastening a metal tile is a responsible process that has strict rules, on which not only the neatness of the roof depends, but also its service life, reliability from leaks, and resistance to strong gusty winds.
For fastening the metal tile to the crate made of wooden planks use special roofing hexagonal screws 4.8 × 28 mm with a rubber gasket, the caps of which match the color of the roof. You can buy them together with metal tiles, and in case of a shortage, you can buy them at the nearest construction market or in a store.
Tool for fastening metal tiles
For fixing metal tiles, use screwdrivers and a hexagonal nozzle for self-tapping screws. Wherein the best way for a screwdriver - cordless. When using electric screwdrivers, metal tiles may be damaged in the form of scratches left by extension cords. It also greatly affects the convenience and speed of installation.
The nozzle for self-tapping screws is used in the size corresponding to the size of the screw head. As a rule, these are nozzles with a magnet.


Fastening of a metal tile
Initially, you need to adjust the torque limit of the screwdriver so that when the sheet of metal is finally pressed against the crate rubber gasket was slightly compressed.

You need to tighten the self-tapping screw perpendicular to the boards of the crate. With a reduced torque of the screwdriver, the compression of the gasket required for sealing will not be achieved.
Incorrect screw tightening
With increased torque on the screwdriver, the gasket will be compressed too much, which may result in reduced gasket life.
In addition, with an increased torque of the screwdriver, there will be a danger of turning the self-tapping screw in the crate and loosening the fastening.

During the fastening of the metal tile, the degree of compression of the rubber gasket is constantly visually controlled.
If a self-tapping screw gets into denser wood, for example, into a knot, with the "regular" setting of the screwdriver, the self-tapping screw may turn out to be under-twisted. In such cases, it is necessary to increase the torque limit of the screwdriver and tighten the self-tapping screw. Then restore the previously set torque limit on the screwdriver.
The main rule for attaching metal tiles to the crate
When fastening sheets of metal tiles, along the slope area, the screws are screwed into regular places located 10-15 mm below the stamping line - in the middle between the crests of adjacent waves.

With a correctly mounted step crate, you can safely screw the self-tapping screw into any regular place, since there is guaranteed to be a step crate board under the regular place.

At the same time, the metal lies on this board without a gap, and when the self-tapping screw is tightened, the metal tile sheet will be securely pressed against the crate without deformation of the sheet. At the same time, the self-tapping screws will be almost invisible on the roof, since they are located in the shadow of the "step".
Step crate- this is a crate of boards of the same size, mounted at equal distances from each other with a step equal to the step of the metal tile. The eaves and ridge boards of the batten may have a different thickness and can be installed outside the general rhythm of the step batten.
Incorrect fastening of the metal tile to the crate
The figures below show typical common mistakes when attaching a metal tile to a crate.
Self-tapping screw 5 mm from the edge of the board:

Fastening to the edge of the board leads to the fact that the self-tapping screw splits the edge of the board, which makes the fastening itself extremely unreliable.
The step of the crate is observed, but at the same time the step crate is displaced from its regular places:

When the gasket is pressed, the metal tile sheet is deformed (deformation between the stamping lines):

When the gasket is pressed, the metal tile sheet is deformed (deformation along the stamping line):

Rule number 1. Joining sheets of metal tiles along the waves
The fastening of metal tile sheets together along the waves is designed to protect the slope plane from the effects of side wind and to make the entire slope plane uniform. appearance. Drive self-tapping screws in each row below the stamping line to any place in the "sector" from the crest of the wave to the outer edge of the top sheet, as shown in the figure.

In order for the longitudinal joints of the sheets not to stand out on the plane of the roof, tighten all the screws of these joints until the sheets are finally attached to the crate.
Rule number 2. Docking sheets of metal tiles in rows
Docking of sheets in rows always takes place on the board of the step crate. Screw the screws into regular places in each wave.

The figure shows the places of fastening of the metal tile along the area ( main rule) and along the perimeter of the sheets (rules 1-5).
Self-tapping screws are screwed along the area of the slope with a uniform "breakdown" along the slope, moving, for example, from the cornice to the ridge through the row, twisting the screws in every third wave, with a shift to the left or right by one wave when moving to the next fastened row.

To protect the roof from the effects of wind load, it is additionally fixed with self-tapping screws:
- sheets of metal tiles between themselves when docking along the waves (rule No. 1);
- sheets of tiles between themselves when docked in rows (rule No. 2).
- sheets of tiles to the crate along the ridge line (rule No. 4);
- sheets of tiles to the crate along the end lines (rule No. 5).
The total consumption of self-tapping screws is on average 8-10 pieces per 1 m².
Rule number 3. Fastening metal tiles on the eaves
The most common method of forming a cornice unit, in which the lower regular cut of the metal tile protrudes beyond the edge of the cornice strip by about 50 mm, and rainwater enters the gutter directly from the metal tile sheet. The eaves bar serves to protect wooden elements splash proof structures.
In order for the lower wave not to sink down, the cornice board must be 10-15 mm thicker than the others. The center-to-center distance from the cornice board to the first board of the step lathing is 250 mm with a board width of 100 mm.
Self-tapping screws are screwed along the cornice line 60-70 mm above the stamping line in every second wave.
When using the second method of forming the cornice assembly, the regular cut of the metal tile is located on top of the cornice strip and rainwater enters the drain from the cornice strip.
This method can be useful for finding a way out of difficult situations, for example, when installing metal tiles with a stepped cornice and unsuccessful steps, or with broken roof geometry.
Rule number 4. Fastening metal tiles when approaching the ridge
When installing the roof with warehouse sheets, the top board of the step lathing will be the supporting board of the ridge. In most cases, you will need to mount an additional ridge board above the top board of the step batten, while ensuring a gap between the ridge boards of adjacent slopes of at least 80 mm to ensure under-roof ventilation.

In order to make it possible to bring the ridge strip at the ends of the house over the end strips, a ridge support board with a thickness increased by 10-15 mm is mounted. If you mount a ridge board of normal thickness, the ridge will “sag” down relative to the end plank line.
Fastening the ridge strip to the metal tile
To fix the ridge (spine) plank, it is pulled with self-tapping screws to the very high points sheets of metal.

Since these points are located at the same distance from the crate, the ridge bar will not deform when the screws are tightened to the nominal compression of the gasket. The distance between the screws should not exceed 0.8 m.
Rule number 5. Fastening of metal tiles on the ends of the slope.
The self-tapping screws are screwed along the end lines of the slope into regular (corresponding to the main rule) places of the metal tile in each wave.
End plate fastening
To fix the end strip, it is pulled with self-tapping screws to the highest points of the metal tile sheets in every second wave.

Since these points are located at the same distance from the crate, the end plate will not deform when the screws are tightened to the nominal compression of the gasket.
In addition, the end plank is attached to the gable board with self-tapping screws in increments of no more than 0.8 m. Since these self-tapping screws will be clearly visible, they are screwed with self-tapping screws in accordance with the markings in order to maintain the rhythm.

Possessing reliability, strength, durability and excellent aesthetic appearance. In order for the roof of the house to reliably protect the building from the weather and serve for a long time, it is necessary to properly carry out
There are common mistakes when performing this type of work, the following recommendations will help to avoid them.
Firstly, it is unacceptable to produce without first leveling the crate. This is a very common mistake. As a result, the joints of the sheets will be visible, and the tightness of the coating will make you expect the best. Ultimately, these flaws will lead to the premature end of the life of materials.
In some cases, the installation of metal tiles is carried out for waterproofing, without performing counter-lattices. You should not rely on the assurances of insufficiently experienced installers who say that this can be done. Laying a roof on waterproofing without a counter-lattice will also prematurely disable the coating.
A very common gross mistake is to use a grinder with an abrasive wheel to cut a metal tile. This action burns out the polymer at the cutting points, and it should protect the metal from premature wear. In addition, hot sawdust, flying in different directions, spoil the coating, sticking to its surface. As a result, rust begins to form in damaged areas.

During the installation of metal tiles, cutting is not allowed using a grinder equipped with an abrasive wheel. This leads not only to burning out the polymer, but also the zinc layer. As a result of violent corrosion, rusty smudges appear.
When such actions are carried out, the product is removed from the warranty, and no manufacturer will accept claims.
Correctly cut the material should be done with scissors or Sometimes you can use a hand saw equipped with carbide teeth. The sawdust formed after work must be carefully removed with a broom, trying not to damage the polymer layer.
High-quality metal tile installation technology involves the use of special self-tapping screws. Otherwise, even the most expensive coating will disappoint during operation. Self-tapping screws must have a sealing washer made of rubber material. The rubber washer can dry out over time, causing the roof to lose tightness and rigidity.

Installation should be carried out in the lower parts of the wave using self-tapping screws with a length of 20 to 35 mm. If the metal tile is fixed over the wave to the crate, then this, in addition to unnecessary noise, will cause unreliability of fastening.

When it is unacceptable to use mounting foam. To fill the void between the ridge and in other places where debris and snow can get, as well as to arrange thermal insulation, it is necessary to use a special sealant.
Like any job, the installation of metal tiles requires skills and experience, so to avoid mistakes, it is better to contact trusted professionals.
One of the most difficult and no less expensive work in the construction of suburban housing is the construction of a roof. That is why it is best to entrust the installation of the roof exclusively to professionals who can guarantee a long service life of the structure. Do not try to save on this, because very often the work on the mistakes made by amateurs is more expensive than the services of qualified craftsmen.
By the nature of their activities, craftsmen often encounter situations where owners country houses complain about the quality of the metal roofing. Often such problems do not even depend on the manufacturer of the metal tile, but the essence lies in the violation of the installation technology or not correct design rafter and batten systems. In this article we will try to point out the main mistakes when laying metal tiles and their consequences.
1. If you notice that immediately after installation or after some time, the sheets of metal tile sagged and the roof took on the appearance of some kind of "wrinkling". If you see that the sheets are poorly joined, then most likely some mistakes were made during the installation of the crate - an uneven crate, its step was increased, etc. You will have to redo the poorly laid metal tile not only because it does not look aesthetically pleasing, but also because due to the lack of tightness between the sheets, dust, insects and, most importantly, moisture can penetrate there. These factors will inevitably lead to accelerated destruction of the supporting structures of the roof.
2. It is often seen that there is no counter-lattice in the design. In this case, due to insufficient ventilation of the under-roof space, moisture begins to accumulate there, which negatively affects the insulation and leads to the formation of mold and rot of the roof truss system. In this case, it is also necessary to correct the mistakes made when laying the metal tile.
3. Depreciation of the truss system due to high humidity in the under-roof space often occurs due to the fact that during the installation of the metal tile, self-tapping screws with ordinary sealing rubber were used. The fact is that when attaching sheets, it is necessary to use only galvanized self-tapping screws with a washer and an EPDM rubber gasket. Otherwise, after several years, ordinary rubber loses its elasticity, cracks, crumbles and ceases to provide the roof with the necessary tightness. Self-tapping screws without galvanization quickly rust, and then transfer corrosion to sheets of metal. The roof is rapidly losing beautiful view, as well as its tightness.
4. There are errors when the fastening of the metal tile was carried out through the upper wave. This is a serious mistake, which, moreover, does not allow fixing the metal tile securely. The noise of the roof in this case increases significantly, but most importantly, gaps may appear at the joints of the sheets through which moisture enters the space under the roof, causing irreparable harm to it. If you press the screw harder, then the wave of the metal tile can be deformed. Chips in the protective coating may appear and, as a result, corrosion of the metal tile. To redo mistakes in this case, as well as in the situation described above, will be more expensive than laying a new roof.
5. To increase the speed of work, some "hacks" unknowingly or deliberately neglect the basic rules for working with metal tiles and use a grinder to cut sheets. The cut point overheats and burns out the galvanized layer. During operation, corrosion forms in this place, which quickly spreads over the area of the entire sheet. The metal tile loses its attractiveness, and over time, tightness.
6. The absence of a waterproofing film is also a fairly common mistake that amateurs allow themselves. The waterproofing film protects the truss system from excessive moisture that can form on inside roofs due to temperature changes and changes in humidity, and is an indispensable element in the construction of a roofing pie.
7. Not being professionals, such "unfortunate masters" often cannot distinguish vapor and waterproofing films from each other. In addition, when laying, it is important to understand in which direction each side of the membrane should be facing and why. So quite often we have to observe a situation where the laying places are simply mixed up or the material is laid, but on the other side. This is important because threatens to disrupt the movement of air in the space under the roof. As a result, moisture accumulates in excess under it, which quickly disables thermal insulation and destroys the supporting structures of the roof.
8. A common mistake is to use bituminous materials as a waterproofing layer. The most innocuous outcome in this case might be bad smell, which occurs when the roof is heated by the sun. Worse when due to overheating roofing bitumen begins to melt and flow, which leads to a violation of the waterproofing of the roof. In addition, the use of such materials increases the risk of fire.
9. Excessive moisture under the roof leading to wetting of the heat-insulating layer, rapid corrosion of metal tiles, weakening or change in the geometry of the rafter system - all this may be the result of insufficient ventilation of the under-roof space. Very often the mistakes of "random specialists" are that the ventilation of the roof is broken due to the fact that there is no ventilation of the roofing ridge or ventilation slots under the eaves are not provided.
10. A mistake is also the rigid fixation of the first sheet to the crate ahead of time. This makes it impossible to align other sheets, which in turn leads to a deterioration in the aesthetics of the entire appearance of the roof, namely, to the formation of distortions or gaps.
11. When joining several sheets of metal tiles, it is necessary to take into account up to 3 mm per bevel. Otherwise, when laying a horizontal row, if the length of the eaves is 10 meters, the accumulated error can lead to a 3 cm protrusion that will crawl out of the roof overhang.
12. An error during the installation of metal tiles, which is made by non-professional craftsmen, is the lack of a sealant, which is necessary in the valleys and on the roof ridge. This leads to the ingress of debris, insects and water into the under-roof space. During the rains, the noise rises at times, which creates discomfort for the household.
13. Experienced craftsmen never use polyurethane foam, which cannot be said about "masters from ads." It is not uncommon to see a picture when the space under the ridge is filled mounting foam. This is unacceptable in the presence of an attic. It happens that for fastening skylights foam the space between the window and the rafters. In a short time, this can lead to jamming of the frame, because. wooden structures throughout the entire period of operation can be deformed in one direction or another.
14. In no case is it recommended to save on insulation. To create a favorable microclimate in the attic, the thickness of the insulation should be 150 mm. If a layer of thermal insulation of 100 mm was laid, then in this case the dew point may be in the insulation. Of course, in such a situation, the thermal insulation will get wet very quickly and become unusable. Excess moisture can drain through the vapor barrier and the owners get the feeling that a leak has formed in the roof. In fact, the reason for such a "leakage" was savings on insulation. Alteration and correction of errors during the installation of the roof in this case will cost much more than it was possible to "save" on thermal insulation.
15. Also, the most common mistakes when laying metal tiles are a violation general rules, which are necessary for long-term operation roofing material. Among these rules: careful and proper storage of metal tiles, accurate loading and unloading of roofing material, careful attitude during installation work. Failure to comply with these points leads to the formation of dents or worn places on the material, scratches, deflections, chips, etc. It is no secret that any of these defects contributes to the fact that the roof ahead of time will fail.
In no case do not try to save on the qualifications of craftsmen and trust the installation or repair of the roof only to construction companies. Remember that private masters are almost never responsible for their mistakes and it will be impossible to bring them to justice. Only construction companies guarantee a long service life of the roof.
If you need to complete


Mixed Personality Disorder: Causes, Symptoms, Types and Treatments
GTA 4 control settings
FAQ on Smuggling in GTA Online
LSPDFR - welcome to the police
The huge map of Grand Theft Auto San Andreas and its secrets