Most apartments and living quarters have not undergone any changes for more than half a century. Renovation turns any room into something amazing, but batteries tend to stay in place, as replacing them is a laborious and expensive process. That is why battery decoupage has spread so much in our time.
Technology details
This process has certain features, but everyone can do it with their own hands. To do this, you will need certain knowledge and materials.
But before you start decoupage, you need to find the answer to a few questions:
- Will the radiator fit into the environment?
- What kind of creativity do you have for battery decoupage?
- Should this element be primary or secondary?
After you find the answers to these questions, you will be able to clearly understand which method is right for you and what the battery should look like as a result of this process.
We do everything ourselves

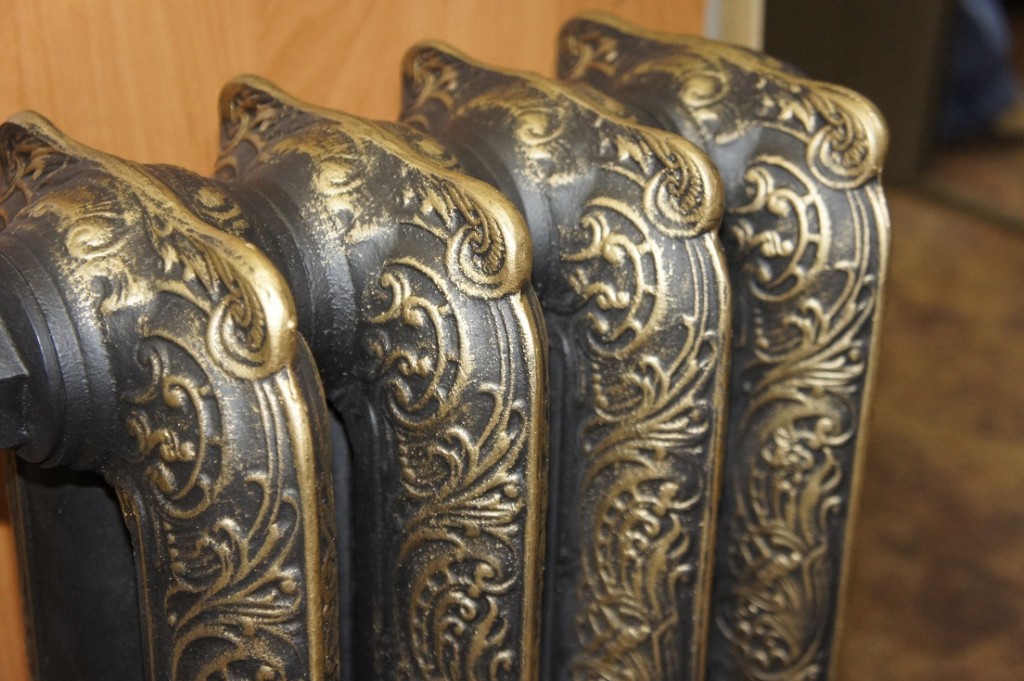
Battery decoupage examples
In order to decoupage the heating battery with your own hands, first of all, you need to clean it from old paint and rust.
You can do this with a brush or a piece of sandpaper. You can even not completely remove the old paint layer - it is enough for the surface of the radiator to become smooth.
The second stage of preparation will be washing the battery from paint residues, as well as drying it. After that, it needs to be covered with white enamel again to restore its normal appearance.
While the enamel dries, you can start looking for the pattern you need. It is enough to take a decoupage card and start measuring the size of the sections. After you have measured the dimensions, it should be drawn on the back side and cut along the outline you have drawn.
A motif must be glued onto a dried battery. The important thing is that the motif should be placed in the middle of the section. It is best to glue it on PVA.
Tip: if you dilute PVA with water in proportions of 1: 1, then it will be better to lay down on paper.
After you have glued the motif, you should let it dry. The dried battery will serve as the basis for painting the rest.
Acrylic paints are perfect for this. With their help, you can repaint the radiator in desired color to create a complete picture.
If you want to extend the life of your creation, then you need to cover the radiator and decoupage pattern with a heat-resistant varnish that will protect it from the effects of temperatures.
An example of decoupage must be seen in the video below.
Read also:
 Cold batteries - causes and their elimination
 Cast iron batteries - are they popular today?
 Aluminum batteries - their advantages and disadvantages
Heating radiators are made from various metals and alloys (see also the article - a thermostat for a heating radiator). The shapes and sizes of batteries are also not uniform. However, not all elements heating system houses are in harmony with the interior, often negating all the costs of repairs and furnishing.
Particularly annoying look cast-iron "accordions", reminiscent of the times Soviet Union. Old batteries heat well, but do not differ in proper aesthetics. There are many ways to disguise radiators protruding from the wall, most of which are quite economical and original.
- Fabric cover for radiator. With a little work and spending a certain amount of dense fabric, pieces of fur, leather, accessories, you can sew an interesting case that will hide the radiator underneath and serve as additional protection for little fidgets.

Fabric cover for radiator
- Similar products various forms and colors in a wide range of stores, but if you are leaning towards this option, learn that even through thick frosted glass an old battery will be visible, and the wooden lining on the radiators will become completely similar to “patches”. Metal screens are more aesthetic, but you should take care to combine the shade of the wall behind the radiator with the color of the metal, so as not to attract attention with contrasting surfaces.

- False walls and niches from plasterboard. Drywall constructions are not difficult to make. Accordingly, you can hide heating pipelines behind a neat false wall with your own hands. However, it is not worth completely covering the entire battery with panels, because this will lead to heat loss and a decrease in the useful area of \u200b\u200bthe room.
- This method is creative and does not require large financial costs. Apply beautiful pattern, turning the radiator into an element of decor, is very simple. But it will take preparation and a responsible approach to the quality of materials for work.

Decoupage is an imitation of painting. And every painting needs a level ground. Brand new radiators are made with smooth-walled sections, so the pattern will fit perfectly. But you will have to work on old cast-iron rarities in order to level the surface as much as possible and remove layers of old paint, streaks and rust spots.

Old batteries require preparation for decoupage
Step one. Removing old paint
Old paint is not easy to remove.
You can try using a solvent, applying it to the surface of the radiator and scraping off the softened enamel with a metal spatula. But if there are too many layers of paint, the option is too tedious. Plus, the pungent odors of solvents are detrimental to health.

Another way is mechanical. Sandpaper with different grain sizes and an angle grinder with abrasive nozzles will go into business.
Many craftsmen advise cleaning the surface of batteries using a drill and a brush nozzle (wire or polymer-abrasive). Old paint will fly off in no time, but it is worth coordinating noisy work with neighbors.

Repair and auto repair shops often offer sandblasting services. This method is highly effective, but will require the dismantling and transportation of a heavy radiator.
And another option - thermal. Old paint can be removed by heating the surface of the radiator with a blow dryer and then scraping off the loose enamel with a spatula. If there is an opportunity and desire to dismantle the radiator and take it out of the room, then a burner is applicable for cleaning. Just a little walk sandpaper on a cast iron surface.
Note! If the old paint could not be removed for any reason, then the surface is leveled with putty and polished with fine sandpaper. It is not recommended to apply a thick layer of putty, as this will reduce the heat transfer of the radiator.
After removing the old paint, the radiator should be degreased with white spirit, and then coated with a layer of anti-corrosion alkyd-based primer to improve the adhesion of the paint layer to the metal. The drying time of putty is from 20 minutes to several hours.
Step two. Radiator painting

First of all, you should choose a paint that will meet the following requirements:
- wear and heat resistance;
- non-toxicity;
- no change in the shade of the coating over time.
In addition, it is recommended to choose a paint that matches the wall behind the radiator. Plus, it is advisable to purchase matte water-dispersion paint (marked “for painting radiators”), decoupage will look more spectacular on it, and unpleasant chemical odors will not annoy.

It is most convenient to apply paint with a double-sided fur mitten. A rubber glove is put on the hand, and a fur mitten is worn on top. Thus, it is very convenient to paint over hard-to-reach areas. Do not forget to place an oilcloth or newspaper under the radiator so as not to stain the floor.
Note! Coloring and decoupage are carried out strictly after the radiator is disconnected from the heating. Close the valve and wait for the battery to cool down. Otherwise, the paint will lie unevenly.
Video - Painting a radiator
Step three. Preparation of materials

First, take a napkin with the desired pattern and separate the layer with the pattern. We measure the sections of the battery (length and width) in order to cut the napkin exactly to size. We cut the napkins, starting from the measurements obtained.

If there are no ready-made napkins, you can make them yourself. To do this, we find the desired pattern on the Internet. We take a two-layer white paper napkin, apply it over the printed pattern and fix it on one side with masking tape. Cut off the excess napkin. Now we print the drawing we like on a piece of paper with a napkin attached. Peel off the tape, the napkin is ready.

Video - How to make a napkin for decoupage of a radiator
For the living room, it is best to select images of nature and abstraction, cartoon characters are appropriate in the nursery, and floral motifs and still lifes will look best in the kitchen.
This completes the preparation. Let's get creative.
Step four. Do-it-yourself decoupage of heating batteries

We take a strip of napkin and glue it with the wrong side to the section of the radiator smeared with glue. We smooth the napkin with a hand or a wide brush with a soft pile. If some sections of the strip do not stick, we coat these areas with glue directly on top of the napkin. We make sure that bubbles and bumps do not form in the process.

Work should be done carefully, since in case of an error it will not be possible to remove the damaged strip without damage.

We rinse the brush from the glue and open the acrylic decoupage varnish, which can be glossy, matte or with various holographic effects. With light, clear movements, varnish the battery. The varnish will fix the drawing and give the work a finished look.

Optionally you can acrylic paint apply any lines, additional drawings on top of the napkins to make the work truly exclusive.
We wait until the varnish dries and turn on the heating. Work completed.

In continuation of studying the technology of decorating interior items, we suggest that you study metal decoupage using different surfaces for this. So in a simple way you can easily transform home radiators or other metal objects. Just choose the right image and get started. To help you, we have collected several tutorials with photos for beginners, where you can consistently follow the entire process of decorating these products.


This master class for beginners offers you a simple and easy way which helps to quickly decoupage the battery.
To transform a heating battery in any of your rooms, prepare:
- in three layers (choose images and color combinations matching the style of your interior);
- scissors;
- PVA glue.
Before using napkins in decoupage, take an iron and iron them carefully. Next, try them on the battery and cut into strips, as in the photo. Now, take PVA glue and dilute it with water in a ratio of one to one.
Then, take the prepared strips of napkins and separate their first layer with your own hands, on which the pattern you need is directly applied. This image is glued on the surface of the battery. Then give free rein to your imagination, you can stop at an intermediate stage and decoupage the battery to half, or continue and apply the motif along the entire length of the sections, as in the photo.


As a result, to decorate such a radiator containing ten sections, you will need twelve napkins.
At the final stage, cover the decoupage of the battery with several layers of acrylic varnish.


The next small master class demonstrates the decoupage of a battery that has more modern look and form. In addition, with such flat surface much easier to work with.
Necessary items for decoupage on the metal surface of the battery:
- the battery itself;
- primer for metal surfaces;
- white paint suitable for battery painting;
- sandpaper of different sizes;
- PVA glue;
- napkins.
Decoupage on metal and the master class begins with surface preparation. To do this, you need to sand off the previous layer of paint. After that, prime the surface and leave the battery to dry.


It is easiest to decorate such a heating battery with decoupage using a file. Experienced decoupagers have already managed to evaluate the benefits of such an item in this type of needlework. So, the top image of the napkin is transferred to the entire plane of the product using a file. Following her, slats are also decorated. After applying the image, the drawings are covered with glue on top. Next, the product is dried. The remaining parts of the napkin are sanded along the edges. And at the last stage, such decoupage for metal is varnished to securely fix the image.


Master class on decoupage coffee jars
Another lesson will help you turn an ordinary metal surface of a coffee jar into a wonderful decorative item that will organically fit into the interior of any kitchen.
 To make such decoupage on metal, you should prepare the following materials and tools:
- tin can for coffee;
- acrylic-based paints in two contrasting shades;
- special decoupage glue;
- craquelure varnish (one-step);
- varnish with a glossy structure for coating;
- napkins for decoupage with a specific motive;
- brush;
- scissors;
- sandpaper.
At the first stage, the master class proceeds to grouting the plane of the can with sandpaper. This is necessary for better adhesion of the surface and paint. Remember to wipe the jar so that there are no dust particles on it.
Further, the surface is covered with acrylic-based paint. Here you independently select the desired shade, the color of which will determine the future cracks obtained using craquelure. This master class uses brown paint. After applying it, leave the metal surface to dry. Drying time will be approximately twenty minutes.
Take a wide brush and use it to apply a varnish designed for one-step craquelure all over the plane of the jar. Alternatively, you can only varnish the areas where you plan on getting cracks. Please note that the size of the cracks depends on the thickness of the craquelure layer. Thicker layers will help you get larger cracks. Let the surface dry for twenty minutes. After that, paint in the specific direction you want the cracks to appear. Try to work with a brush carefully and carefully applying an even layer. Repeated application of paint in the same place can lead to the fact that you do not get craquelure. Now leave the item to dry in the usual way or speed up the process by using a hair dryer.


It's time for decoupage. A cooked napkin is taken and separated from it upper layer with color picture. You must tear out the motives you need with your own hands or cut them out with scissors. Attach the resulting fragments to the jar and with careful movements of the brush, apply glue over them, while moving from the middle of the picture to its borders. There should be enough glue so that the motif can move freely along the plane of the can. The folds formed in the course of fixing the pattern can be eliminated by expelling the air from them and carefully smoothing it out with your own hands.
 At the last stage, a glossy acrylic-based varnish is applied to the resulting decoupage on the metal. This completes the master class. The photo shows what an interesting jar for coffee in vintage style turns out to be.
Video: Battery and metal surface decor
White cast iron batteries- an indispensable attribute of a public place, especially a state one. You can also find such batteries in residential buildings and apartments. This is due to the fact that cast iron is a durable and practical material. However, what to do when such a battery does not want to fit into the interior of the room, completely contrasting with it? There is an answer - this is the decor of radiators. Every jack-of-all-trades or do-it-yourself lover will be able to revive their cast-iron batteries with practically improvised means, using our master class and tips.
Decor radiators
Decoration method No. 1
Decorating radiators is not such a difficult task, and soon you will see it. The first method is the most common staining. You don't have to paint your radiators white. Indeed, today you can find paints of a wide variety of shades and colors on the market.
Before doing this, you should dismantle the batteries, remove rust, degrease with acetone or burn blowtorch or a burner.
Places that do not need to be painted should be sealed with masking tape. If the radiator has not been painted, then it must be treated with an alkyd base primer with pigment.

Decorating radiators with staining is almost an old method. And earlier, a mitten was used for this, such a device helped to do such work efficiently and without unnecessary smudges and layers. The paint also mixed well.
Let's talk a little about this method: the mitten itself is made of fur - a piece of it is taken, folded in half, sewn together to make a bag. Now the mitten needs to be put on the hand - but first a rubber glove is put on so as not to smear the hand. Next, you can paint the batteries with a mitten - the paint falls evenly and in a thin layer.
To make the design of heating radiators, you can use special composition for patination of metal surfaces.
Black and red colors are taken, mixed, the resulting bronze color is applied with gauze to those places that are marked. So, we get a heating radiator that looks like jewel. And such decoration of heating radiators can be additionally decorated with drawings.

Decoration method number 2
The second method is the decoupage of the heating battery. This method is quite popular, because the output is a stylish product, original and unique. It all depends on your imagination, the materials used and the ability to create the simplest work. So, do-it-yourself decoupage of heating radiators will require some materials:
- Matte white paint.
- Acrylic paints.
- Tassels.
- Decoupage paper with the pattern you need.
- PVA glue.
- Heat resistant varnish.

Decoupage of heating radiators involves following the following steps:
- First of all, the surface of the heaters should be washed, treated with fine sandpaper.
- Now we need to wipe our batteries from dust and dirt, then we paint them matte paint. You should not take nitro paint, because initially your batteries were coated oil paint, and if you cover them with nitro paint, they will be covered with bubbles.
- After 18 hours, when the paint dries, we will begin to glue decoupage paper on the radiators. We dilute the glue in order to be able to evenly distribute it over the plane. We start gluing from the middle of the motive.
- When the whole drawing is pasted, you can paint whatever you want with paints, make a background and detail the drawing.
- Now we need to cover our drawing with heat-resistant varnish.
Do-it-yourself decoupage of a heating battery is ready! Now we have stylish batteries that will complement the interior and emphasize it. On the a photo you can see decoupage options.

It is worth noting that at present you can choose special stickers for the heating battery. Such stickers are designed specifically for radiators, so their material tolerates high temperatures well. Stickers and drawings on radiators should be selected from quality material so that they do not deteriorate when heated.
Decoration method number 3
To keep the style that you have chosen for your premises, you can also choose a decorative screen for radiators. How to arrange a heating battery using a screen or grate? Just hooked on the radiators special device that will give your interior a finished look.

Screens for radiators are different. By design, they are flat, hanging, hinged, in the form of a box. All this decoration of radiators is selected based on the design of the radiators themselves, on the features of the interior, on the wishes and financial capabilities of the owners of the house or apartment.
As for the material of manufacture, the screens are metal, wooden, plastic, MDF panels, glass.
Such gratings are an excellent decor for heating radiators, which will perfectly complement the interior, emphasize its beneficial aspects. Installing such devices is very simple, and caring for batteries will be even easier. And if you change the interior design, you can simply change the screen to a new one.
If you draw beautifully, then you can paint a pre-painted battery with various patterns and colors.
Design options modern interiors are very diverse, and if you have applied skills, then you can easily decorate your home the way you want. Gaining more popularity different types needlework. These decorative elements are highly valued. They bring personality and comfort to the house. If you have been thinking about how to refresh the interior without resorting to repairs, do the decoupage of the heating radiator with your own hands.
To do this, you need nothing at all: a primer, patterned napkins, glue and varnish. And, of course, a little patience and perseverance.
What is the essence of decoupage technique
Decoupage is a technique for transferring drawings from colored paper to any surface: wood, ceramics, metal, etc. In this way, you can decorate anything, from dishes to pieces of furniture. The technology itself is several hundred years old. The fashion for such jewelry arose in the Middle Ages in France and does not fade to this day. Some craftsmen even decorate clothes in this way.
Decoupage elements usually try to update old furniture or decorate unsightly interior items. Many people are especially dissatisfied with old cast-iron radiators. They can not be hidden behind furniture, as it can block access to warm air. Does not save the situation and painting. White color brings boredom. The craftsmen found a way out of this situation and turned ordinary radiators into a work of art, decorating them with beautiful and stylish patterns.
How to choose the right decor
There are a lot of options for drawings for decoupage batteries. In needlework stores you will find hundreds of different napkins. The most interesting compositions are obtained from combined fragments and colors. Here you are only limited by your imagination.

Before you plunge into creativity, decide what exactly you want to do: disguise the battery or make it a bright accent in the interior?
For the first option, it is better to choose paper to match the main colors that you use in the interior. For example, you can take colors and patterns that match wallpaper or curtains. To isolate the heatsink as a separate decorative element, use contrasting shades and original drawings.

Preparatory stage
Before you start decorating a radiator using decoupage technique, clean the radiator with soapy water. Don't be lazy to clean everything hard-to-reach places. The surface must be perfect. Depressions and gaps between sections are best cleaned with a brush. Let the radiator dry completely and sand the surface well, getting rid of bumps and cracks. It is not necessary to get rid of the old paint entirely. It is enough to wipe the places where there are cracks or the paint has begun to peel off. After you finish sanding the battery, wipe the surface with a dry cloth to remove any remaining dust and dirt. Grease spots removed with a solvent.

The last stage of preparation is the application of a white primer. Choose for these purposes a heat-resistant enamel that will not burst when heated. The paint should not be glossy and shine under the decor. When finished painting the battery, let it dry completely. This will take days.

Decoupage process
The most simple technique, with which you can perform decoupage - pasting. You will not require special artistic talents, you just need to do everything carefully and harmoniously select materials. This method will not take you much time, but the result will be gorgeous.

In decoupage, rice paper or simple printed napkins are used. Paper parameters 34x100 cm. This is not enough to close all the edges. You will have to join several sheets with your own hands or finish the pattern with a brush. If you doubt your artistic abilities, choose paintings where the upper and lower elements are extremely simple: sky, grass, etc.

Measure the width of the heating radiator section, draw a pattern on paper and cut into strips required size. Paper strips are glued using the simplest PVA. Make sure there are no bubbles left. When the glue dries, you can finish the pattern with acrylic paints in places where there is not enough paper.


You can use ordinary table napkins for decoupage. In this case, only the top layer is glued to the battery. It is very thin, so working with it requires special care. It is better to practice on a small area, because in 90% of beginners, napkins are torn during the gluing process.

In order for the paper to hold well and not fall off the battery, it must be fixed with two layers of varnish. Choose a coating that can withstand heating up to 150 degrees. If you want to achieve an interesting effect, use craquelure varnish. After drying, it will be covered with tiny cracks, like in old paintings.

Additional decor
You can also decorate radiators with your own hands using mixed media, combining decoupage with painting with paints or stucco.
Paints
Acrylic paints do not fade for years, and therefore are great for decorating surfaces. You can complement the design on the napkins with new patterns or brighten individual details by highlighting them with silver, gold or copper paint. When choosing a paint, pay attention to the fact that it is suitable for indoor use.
stucco work
For volumetric patterns, a self-hardening mass is used. It can be applied using stencils, and then additionally painted with paints. Some types of such a mass are produced in different colors: with mother-of-pearl, metallic effect, etc. Stucco is not afraid of high temperatures, easily adheres to a metal surface and dries quickly.
- If you apply wipes in several layers, do this only after the glue has completely dried. Otherwise, the paper will warp and you will have to redo everything.
- If you made a mistake and noticed it already when everything was dry, do not be upset. Paint over the defect with white acrylic paint, and then glue a new layer of paper.
- Too sharp transitions of color or fragments can be softened, gently in tone, gently tapping with a brush. You can use a sponge for this purpose.

Do-it-yourself decoupage of heating radiators is not only a quick and inexpensive way to refresh a boring interior, but also an exciting action that the whole family can do.


 in women Total viral")


Chantilly Castle - the second in France after Versailles Chantilly Castle how to get from Paris
Amusement park "The Land of Legends Theme Park" in Turkey
Holy places in Greece. Greece Orthodox. Pilgrimage to the feast of St. Nicholas
Picodi: All discounts in one place!
How to get to Dolmabahce Palace