While doing repair work in an apartment or scrap each House master faced with the need for wiring. This is necessary for the installation of new outlets. Many people think that for wiring it is enough to buy a cable and invite an electrician. However, shaving can be done independently. It is enough to carefully read the instructions on how to ditch the walls for wiring.
How to ditch the walls
First you need to draw a drawing of the future wiring location. To do this, take a pencil and clean paper. It is necessary to draw a diagram according to which the wiring will be mounted. However, before compiling it, you should definitely familiarize yourself with the rules for conducting wiring. Various Requirements recorded in SNiP 3.05 06-85. The master's confidence in the accuracy of the actions performed is not always supported by real experience. At best, in such a situation, the home craftsman will be at an impasse. Therefore, it is very important to find out the main subtleties of gating at the planning stage.

It is important to comply with six basic requirements:

Important! It is forbidden to make horizontal strobes in load-bearing structures. This principle of work is applicable to any region. If it is a panel house, each wall is the carrier.
By following these rules and drawing up the correct wiring layout, gating can begin. It is worth remembering the safety rules. All construction work is carried out carefully and carefully.

Preparing the walls before chipping
First you need to understand if there are hidden wires in the wall that are located in the path of the strobe. For this work, you need to find a special device. It will help determine exactly where the old wiring is located. This should be done for security reasons. So the power tool does not stumble on a wire that is energized.
Marking lines are marked on the wall, which represent the route of the strobe. The marking starts from the junction box and goes to the switches, sockets, light sources.

Before starting chasing, be sure to close the doorways with a cloth soaked in water. So the dust will not scatter around the house.
Choice of tool for chasing
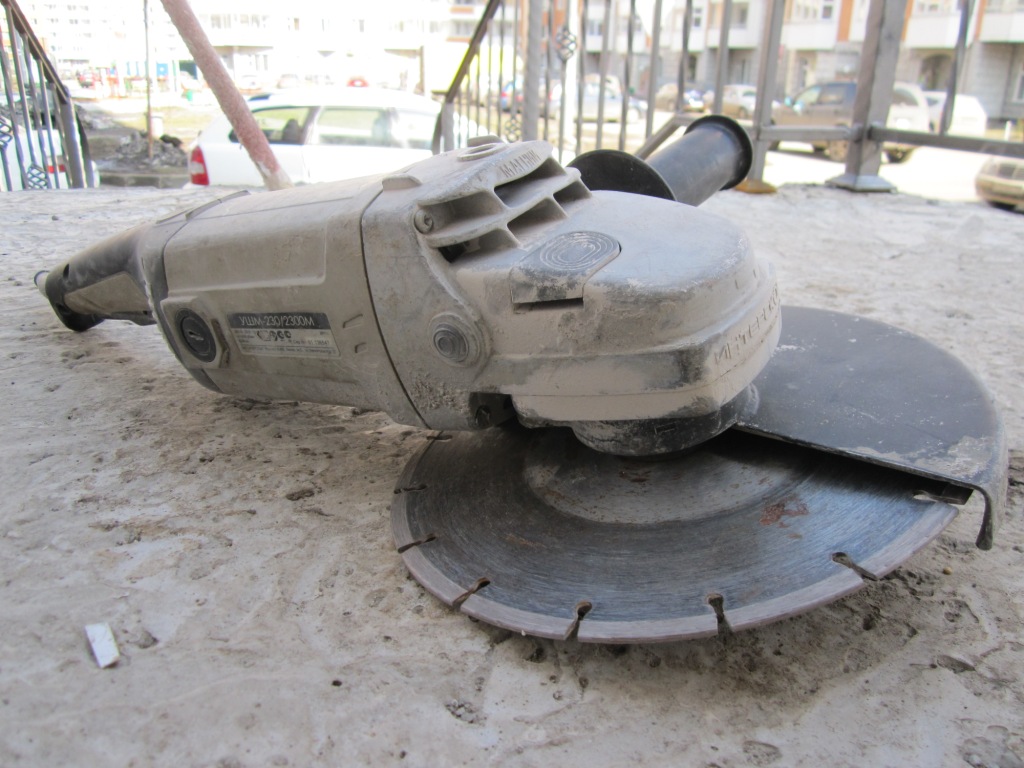
There are many tools that can be used for chasing a wall. For this purpose, a simple chisel and hammer, wall chaser, grinder and perforator can be used. When using a wall chaser, the work will be expensive, but the furrows will turn out perfect. When working with a perforator, the price of gating will be average, and the procedure will be completed fairly quickly. In the case of a grinder, you can get fairly even furrows, but there will be a lot of garbage. The cheapest method is using a hammer and chisel. However, this is its only advantage.

The choice of tool for chasing depends on the preferences of the owners of the house and their capabilities. It is worth remembering that it is better to choose quality tool, with which it will be possible to create the perfect strobe. In this case, you don't have to redo it.
Punching walls with a perforator
When performing a strobe using a perforator, a lot of money and time are not spent. Wall preparation is also carried out when choosing other tools. The steps of the procedure are very simple. Every home master can perform them:

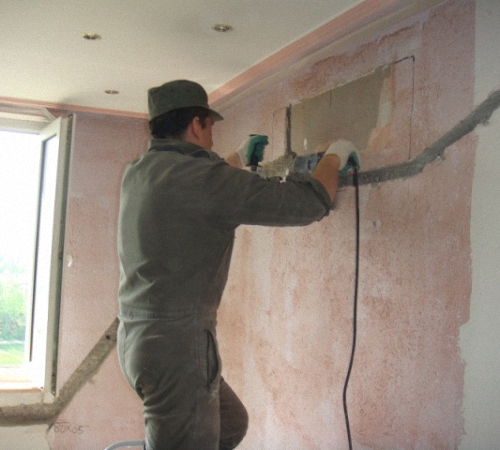
After finishing the preparation, you can start chasing the walls. For this, a puncher is taken and several holes are drilled along the marked line. They must be placed 1.5 cm apart. Then the tool switches to another mode of operation - specifically for strobes. To do this, you need to put on a certain nozzle. The holes are connected to each other, resulting in a single furrow.

Important! In the absence of experience in such work, do not neglect the implementation of holes. Otherwise, it will not be possible to make the strobe even.
Bulgarian for shtroblenia
Another popular tool for making shtrob is a grinder. It is quite simple to make furrows in which the wiring will be placed using this tool. How to perform shaving a concrete wall with a grinder? It is necessary to prepare a diamond-coated disc. This is due to the high strength of the concrete wall. The main advantage of a diamond blade is its durability. Plus, it's pretty fast to work with.

First you need to cut two strips on the section of the wall that is already marked. It is necessary that the slots are parallel to each other. A distance of 2 cm should be made between them. Then you will need to use a puncher to remove the wall material between the cuts. After completing the strobe, the wiring can be laid in the opening and sealed with plaster.
Important! The recess for the wires should have such a depth that, upon completion of the work, the plastering of the wall is comfortable. When the cables are hidden quite deep under the finishing material, it is much easier to finish the wall.
Chasing a wall with a chisel
If chasing is performed in a concrete wall, you should not use a chisel and a hammer. Concrete is a fairly strong material that cannot be pierced by such means. However, when working with brick wall this method is optimal. Work is carried out according to the following scheme:
- First you need to outline the recesses along the edges of the future furrow.
- The chisel is placed across the groove and hammered into the wall.
- The strobe is deepened in layers by 2-2.5 cm.

When the gating is completed, the grooves should be cleaned. Then you need to open the surface with soil. When the composition dries, the wires should be laid in the groove and sealed with plaster. Only with the right tool for making strobes can you do the job quickly. With modern devices, you can carry out all the procedures yourself. This will make repairs cheaper.
Dust-free chipping
These shaping methods have common disadvantage- when they are selected, a lot of dust is generated. Its layer often becomes too large, which does not allow to completely clean the room even when using special equipment. Those who care about keeping cleanliness during work will be interested in the dust-free strobe method.
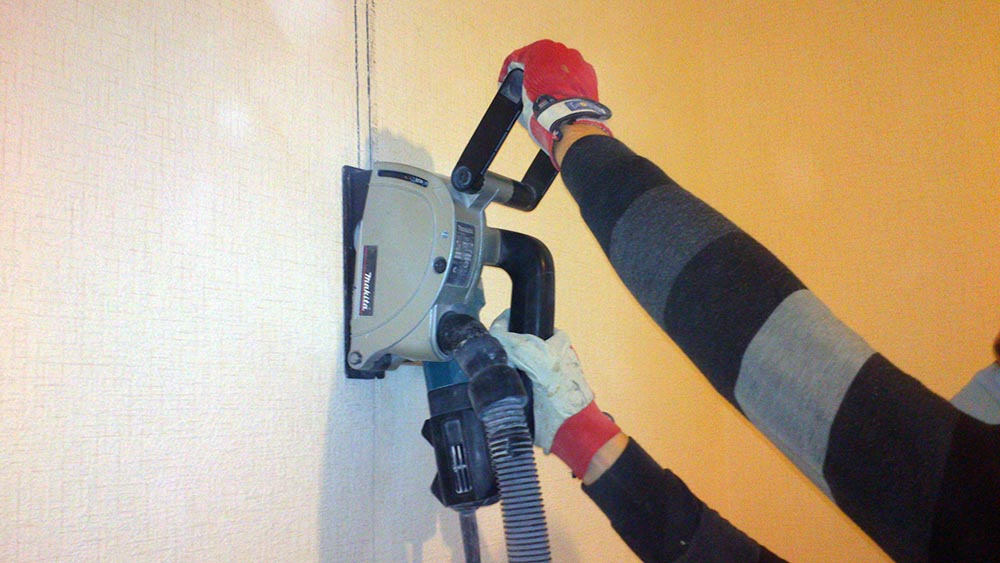
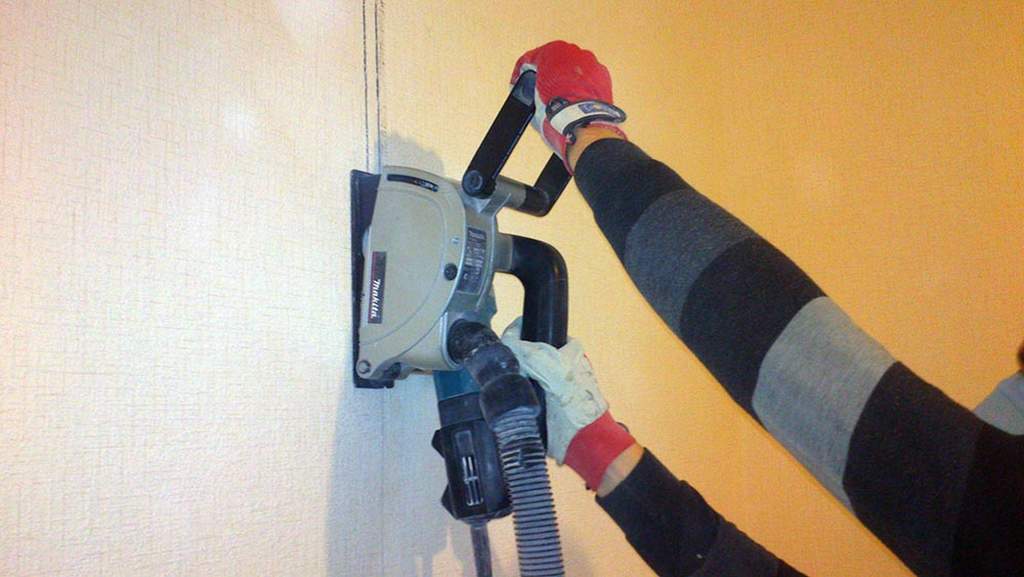
To do this, you need to prepare a wall chaser for making slots. This device resembles an ordinary grinder. However, it is already equipped with diamond wheels. The device is equipped with a casing that allows you to adjust the thickness of the strobe. In addition, the depth of the created furrows is also controlled. A vacuum cleaner is installed in the wall chaser, which draws in the resulting dust during operation. This allows you to make repairs as clean as possible.
The only drawback of such a tool is its high price. For a one-time strobe, buying a strobe is an unwise decision. However, the device can be rented. These tips will help you figure out how to ditch walls for wiring without dust. Some craftsmen make a wall chaser from a grinder. However, this tool has some limitations in its use.

Before work, it is important to remove wallpaper from the walls, as well as other interfering elements. If the surface is not prepared, wallpaper particles will become clogged into the casing of the apparatus. In this case, the dust outlet will be blocked, which may lead to emergency. Thorough cleaning of the walls will help to avoid this situation.
Before finishing the walls, it is important to mark the distances from the corners of the ceiling and walls to the furrows with a marker. Then their photo is taken. The next time a repair is needed, these photos will help you locate the wires.

Holes for socket boxes or boxes should be made in this order:
- a hole with a diameter of 8 mm should be drilled in the center;
- using a crown, make a notch to mark the contours of the future hole;
- in accordance with the contour, make 10 of the same holes;
- drill a hole with a crown.
When creating such holes, you can get on the bars of the reinforcement. AT panel houses it is strictly forbidden to damage them. This will negatively affect the strength of the walls of the entire house. If the socket is installed at a low height from the floor of the room, the amount of work is reduced. In this case, the wiring is laid in the floor.
Gating cost
The procedure for making a strobe in a concrete wall has a certain price. The indicator may differ depending on the criteria for the performance of the work. It is more profitable to do the process yourself. However, for this it is necessary to prepare tools and materials. The cost of the entire event depends on their price when creating a strobe with your own hands. When choosing a perforator, only the price of wires and finishing materials will be included in the final amount. Usually such a device is available in every household.
You can order shtrobleniye from professionals. However, in this case, the cost of work cannot be called acceptable. You have to pay a large amount. Such work is dangerous, therefore, the price for it is set accordingly.

conclusions
When repairing a home, you can not do without the implementation of channels for conducting electricity. Therefore, it is important to know the main rules for wall chasing in advance. In addition, you need to follow the safety requirements.
Each home master can do the wall chasing for wiring in a concrete wall with his own hands. To do this, you need to prepare certain tools and finishing. Working time depends on the experience of the master.
How to ditch walls for wiring without dust? This question is relevant for those who are just going to make repairs in the room.
The need to work with walls arises when replacing electrical networks. The owner of the premises may not be satisfied with the way the sockets and lamps are located. If it became necessary to transfer them, then you need to ditch the walls for new wiring.
The channels through which the electrical wiring will pass must be of sufficient width and depth. An important point will be the execution of work in such a way that the process does not appear a large number of building dust.
There are several ways to lay electrical wire. The following can be listed:
- using a perforator;
- grinder;
- wall chaser.
A beginner in the construction business should know that building dust will be with any method. You can only slightly reduce its amount by taking protective measures. It is possible to reduce the pollution of the premises by using professional equipment. A good option would be to use a wall chaser with a vacuum cleaner connected to it. This is the most efficient method.
Using a puncher and grinder in repair
First you need to determine where the sockets will be located in the room. After that, you should outline the path along which it is necessary to lay the electrical wire. Having marked the walls, you need to take a puncher, drill holes strictly along the line. The step between them should be from 1 to 2 cm.

When the holes are ready, they should be connected. To do this, the puncher must be switched to a special mode called "hammer". Baffles between the 2 holes are best removed by holding the instrument at a 90°C angle.
In the work, you can use a drill or a special wedge-shaped tool that works on the percussion principle.
Having chosen the application of strobes with a perforator, you need to remember a number of disadvantages of this method. Among them it is worth mentioning the following:
- Loud noise that occurs when the tool is running. If the repair will take place in residential premises, then you need to inform the neighbors in advance about the upcoming work.
- It will take a lot of time to drill the walls. The process is time-consuming, it will require experience from a specialist.
- As a result of manipulations, strobes are obtained, the edges of which are of poor quality.
- Debris and debris are generated in the room.
You can replace the traditional method by choosing a grinder equipped with a diamond blade. This method will allow you to make edges good quality. First, along the markup, you need to make 1 furrow. Then, stepping back from it by 3 cm, make the 2nd furrow. After that, you need to take a puncher, switch it to a "hammer" and remove the material that is between the previously outlined furrows.

The result will be strobes with fairly high-quality edges, but with an uneven surface. It can damage the electrical wire insulation. In addition, this method has several more disadvantages, and the main one will be a large amount of building dust.
Using a wall chaser for work
An electric wall chaser will allow you to quickly make furrows in the wall. The repair will not take much time, and the edges will be of high quality. This device is good because after its use it is not necessary to additionally remove the material in the gap between the furrows. Physical effort is not necessary, but a large amount of dust is generated during operation of the device.
Professionals working in the construction industry solve this problem by using a wall chaser with an industrial vacuum cleaner. But the cost of the device is high, so it is rarely used when repairing apartments.
Can be done manually. But this process is laborious and at great expense labor. To speed up repair work, it is better to use equipment.
How to prevent the spread of dust
Having decided to make repairs on your own, it is important to make sure that dust does not get into other rooms. by the most accessible way can be called abundant wetting of the working surface with water. It is possible to use a household vacuum cleaner to capture fine dust.

The following steps will help reduce the spread of dust:
- Floor protection. They are covered with construction film. When the strobe installation is completed, it can be carefully rolled up and taken out of the room.
- Before starting work, it is necessary to close the entrance to the room in which the repair work will be. The opening can be protected with a special industrial curtain or hung with a damp cloth.
- Before entering, you need to put a damp cloth, then the dirt will not spread throughout the room.
Cleaning up after renovations. After the strobes are completely made, they should be cleaned. Dust can be swept away with a broom, and then go through the channels with a vacuum cleaner. Before laying the electrical wire, the channel is primed. Then a cable is placed in it and carefully fixed. The surface is sealed with plaster or plaster.
The wall chaser differs from the grinder in that the cutting of the material is carried out with 2 diamond wheels. They are isolated by a casing that covers the place of contact with the surface. Increasing or decreasing the degree of overlap makes it possible to make furrows of different depths.
The suction pipe of an industrial vacuum cleaner can be installed in a special outlet, which is made in the casing. As a result, the cuts and the bottom of the channel are smooth. Electrical cable will not be damaged when laying.
The disadvantage of such a tool is: it lies in the high cost of equipment. For home use, it is not worth buying, but professional builders cannot do without it.
Is shredding always necessary?
This process can be chosen by those apartment owners who do not want to engage in full-fledged repairs. The choice of this method is due to the desire to save on building materials and hiring specialists.

Replacing wiring without gating can be done in the following ways:
- public method;
- use of old strobes;
- old wiring.
In the first case, the wire is placed in baseboards. Corrugations and cable channels are widely used in the repair process; install boxes. Wiring in an apartment without gating can be done by a specialist for a small fee. But laying channels in the wall for an electric wire will entail significant financial costs. In addition, you will have to allocate funds for the purchase finishing materials. The work of a professional plasterer will also require expenses.
Using old strobes will be a good option if you do not have to change the location of the outlets. In this case, the wiring can be done independently.
You can make strobes manually and with the help of equipment. It is best to use a wall chaser with an industrial vacuum cleaner connected to it. The disadvantage of such a device is its high cost, so at home you can use a grinder with a diamond disk to lay channels. Can be wired without breaking walls. Many apartment owners will be attracted by this option due to the lack of dust.
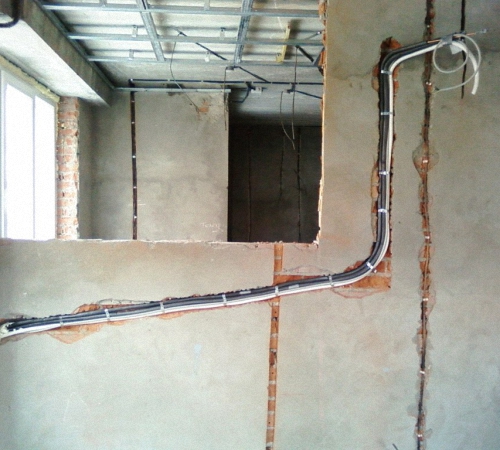
Holding overhaul, redevelopment, new construction of a house or utility room are associated with the issue of summing up or transferring sockets, switches, laying a new cable, masking pipeline systems. AT wall panel hide all communications up to 1/3 of the thickness of the overlap.
Overview of tools for chasing walls for wiring

- The classic tool is a hammer and a chisel. The variant is suitable for chiseling short grooves in a soft, pliable volume. It is not rational to use this method for concrete or brick. Disadvantages: high labor costs, lengthy work, low quality final result.
- Perforator with a special nozzle. Works are carried out in solid volume, reinforced concrete and brick. The final result is of average quality: the edges of the grooves are uneven, with chips, additional refinement is required. Lack of tool - publishes high level noise over 100 dB.
- Bulgarian with a diamond disc. Excellent option, perfect quality strobe. The disadvantage of this option is the emission of dust disproportionate to the quality. Advantages: perfect result, fast execution of work, productivity, low-budget method. An easy to use tool.
- Wall chaser. Counts the best option for laying wiring in the walls. The device comes complete with replaceable disks, with a dust collector. Disadvantage of the method: expensive tool.
Tips from professional craftsmen on the rules for chasing walls for wiring with your own hands
- Load-bearing wall structures, floor slabs, horizontal joints are unsuitable objects for wiring.
- When drawing up a drawing for laying wiring, an important condition is taken into account - the wires are located strictly horizontally or vertically. The strobe is marked on the surface with a level or plumb line.
- Horizontal wiring is carried out by maintaining a distance of 15 cm from the floor slab.
- In designs from 8 cm, the wire is laid along the shortest path.
- Do not lay wiring in corners, close to window or doorways. The recommended distance from such places to the strobes is at least 100 mm.
- For laying wiring in old walls, check the places where a current-carrying cable can pass. Use a screwdriver-indicator or finder to control.
Wall chasing technologies for wiring
Laying wiring in concrete is carried out on early stage repair work. Walling in a populated area is undesirable due to the high concentration of cement dust. Preparation for work in the living room provides for the tight preservation of office equipment, furniture, flowers, the presence of a construction vacuum cleaner for collecting debris and dust. Before starting work, they check with the plan for laying the old wiring, de-energize it or bypass these places. There are several concrete crushing technologies:
- Chasing with a hammer and chisel. For simplicity, the process is divided into several stages. At the first stage, a recess along the edges of the chisel is marked with a chisel to the width of one or two of its points. Next, the chisel is placed transverse to the furrow and one part of it is driven into the wall with a hammer. Removed first upper layer according to the marking, and then deepen the groove made by 25 mm along its entire length. This sequence of actions is not so important, since deepening is allowed immediately during the making of the groove. This method is completely unsuitable for slicing. concrete walls for wiring, as the material is too hard for hand made holes.

- The next method is chasing the walls for wiring with a perforator. Work begins with the marking of the required area. The nozzles necessary for making the strobe are a small length drill and a spatula. Along the entire length of the line along which the strobe will be made, holes are made with a depth of 25 mm. 10-15 mm recede from each hole made and do the following. Next, a ditch is made along the finished holes. When arranging it, the spatula is not placed across the intended line, as this leads to chipping off extra pieces of the wall covering. With the help of a perforator, a groove for wiring of the required width and depth is made, and these indicators are very accurate. The only drawback is that the edges of the strobe often turn out to be torn, it does not have a very neat appearance. With the help of a perforator, chasing is carried out as quickly and accurately as possible.
- Shtroblenie walls for wiring grinder. To perform this work, you will need a diamond-coated disc. It makes it easy to work on concrete and brick, unlike conventional nozzles, which are difficult to cope with these types of materials. Even if the work will be carried out on plaster, a diamond blade will make the groove faster and easier. At the beginning of the work, the necessary lines are marked, then two parallel lines are made according to the marking, the width between which is equal to the required width of the strobe. Between the finished cuts, a groove is knocked out with any convenient tool - a chisel or a puncher. The groove is knocked out to the required depth. This method differs from the previous two only in the use of a grinder, which greatly facilitates the process of making cuts for a strobe. During sawing cuts with a grinder, a large amount of dust is released. It is recommended to use an industrial vacuum cleaner to collect dust, or simply to protect all objects in the room from construction debris.
- Making a groove for wiring with a wall chaser. As the name of this tool implies, it is designed specifically for making strobes and is used by professional builders. The wall chaser is similar to a modified version of the grinder, it has connectors for installing two diamond discs at once, with the ability to adjust the distance between them. The tool guard is also adjustable to fix the depth that the discs will groove to. Often the tool has a special dust outlet on the casing, to which the vacuum cleaner pipe is attached. Shtrobleniye is carried out easily and quickly, at the same time a small amount of dust is added. When the cuts are ready along the edges of the strobe, the excess material between them is knocked out with a perforator or chisel. The disadvantage of using a wall chaser is that the price for wall chasing for wiring increases if this device is used. It is quite expensive, and is used only for specialized work. For domestic chasing, it is best to opt for the option for which all the necessary tools are available.

The completion of work has the same actions, regardless of which technology was used to make the strobe. When the groove is completely ready, it is cleaned of construction dust with a vacuum cleaner or a broom. The groove cleared of debris is treated with a primer. Laying cable into the wall is another difficult technological process which must be approached with the utmost care. The laid cable is fixed in a strobe and sealed with plaster, putty or gypsum.
Some rules for chasing in a concrete wall
Most buildings are made of concrete, therefore, when laying electrical communications in the wall, you most often have to deal with this material. General principle work on concrete is no different from the technologies described above. All the tools described are suitable for it, except for a chisel. However, there are some general rules chipping on concrete.
When choosing a gating technology, choosing between the option of performing work with a grinder or a puncher, it is better to stop at the second option. Rotary hammers are more powerful machines that are designed to work on hard surfaces. In addition, when making holes, such an amount of dust will not be released as from working with a grinder. Works in high-rise buildings recommended to be done in daytime and only by weekdays. The noise level from the perforator is so high that its work will be clearly audible even through several overlaps.
During work, it is recommended to use the services of an assistant who will moisten the work surface when making holes. This method is widely used by builders, it allows you to reduce the amount of dust flying around the room. The disadvantage of this method is the complexity of the work, a wet wall is less amenable to gating.
For work on concrete, builders do not recommend using a wall chaser, since in this surface it will not remove a significant part of the material and it will be necessary to clean the remains with a perforator. Therefore, to facilitate concrete work, the puncher is immediately used as the main tool.
Chasing work in a load-bearing wall
The possibility of chasing work in a load-bearing wall is a moot point. It is forbidden by law and all architectural norms to carry out any work in the load-bearing partition that weakens it bearing capacity. Shtrobleniye refers to this type of work. During the removal of the top layer, the reinforcement is exposed, it becomes subject to various influences and the formation of corrosion. If corrosion of the reinforcement begins, the entire structure of the house is weakened.

To carry out such work in a load-bearing wall, it is necessary to obtain a special permit for this. If we are talking about a panel house, then, most likely, a work permit will be denied. AT brick houses such work is most often allowed. After receiving the papers, all work is carried out very carefully in order to reduce damage to the wall to a minimum level. To determine the location of the reinforcement elements in the wall, use a standard metal detector. He talks in more detail about how walls are shredded for wiring, the video at the end of the article.
Installation of wires in the strobe and installation of sockets
The wires in the strobe fit in two ways. The first involves laying cable channels for wiring. In this case, the pipe itself is first laid in the strobe, and then wires are pulled through it to the location of sockets or switches. The wire is pulled into the pipe with a dense steel wire. If the installation of wires is carried out without using a pipe, then they are fixed in the groove with gypsum, plaster or putty. The wires connected to the sockets are cut, leaving a length of 10-15 cm, the left end is tucked into the hole for the socket.
The most convenient installation of sockets - blocks in one frame. In one block, not only electrical sockets are placed, but also connectors for cable television, telephone, Internet, etc. Such blocks can significantly save space and create an attractive aesthetic technical corner in the room. The blocks are mounted on special latches, they are combined before installation, and only then they are installed as a whole block into the prepared holes.

The holes for the block are drilled solid, a gap of no more than 1 mm is left between them, and the central partitions are removed. Thus, the unit is mounted in the wall as a whole. Frames and metal frames sockets must be in close contact with each other. After equipping the unit and connecting communications to it, plastic frames of sockets are installed. this work carried out after laying the finishing materials on the wall, since the rosette frame is designed to hide all the shortcomings of the decorating elements. When wallpapering under the outlet, their edges are wrapped, but if the wall is painted, the overlay will hide the seams and chips at the place where the opening for the outlets was made.
To install the switchboard, a hole is drilled in the wall rectangular shape. The size of the hole in depth, width and height is adjusted to the size of the future shield, leaving a small margin. In the niche, the body of the shield is first installed, it is fixed with a solution of gypsum. At this stage, the installation concealed wiring considered completed. The switchboard equipment belongs to electrical work and carried out in accordance with the instructions in the user manual.
Wall chasing is required when the wiring in the room must be laid hidden. They start working after marking the tracks. An integral part of the gating process is increased dust formation. Therefore, do not forget to use respiratory and eye protection. For shtrobleniye you can not do without special devices and tools. With small volumes, you can even get by with a simple chisel and hammer, with a major replacement of the wiring in the entire apartment or house, more serious things will already be needed.
Chasing tools

If you are renovating only one of the rooms, and you still live in others, then use a puncher and a chisel. From the wall chaser, dispersed dust is formed, which will penetrate everywhere and can ruin things. 
For chasing with a puncher, first drill holes d-8mm along the marked route. Distance between holes 1 cm. Then put a strobe nozzle on the puncher and, going into impact mode, break the strobe between the holes.  Of course, it may not be economically feasible to purchase a wall chaser. However, chasing walls with a simple grinder is a rather dangerous job. I advise you to purchase the most inexpensive wall chaser even for work in one apartment. It is very important that high-quality discs are used for both grinders and wall chasers. In this case, it will take much less time to work, and the work process itself will be safer.
 The purchase of industrial vacuum cleaners can only be afforded by people who are constantly engaged in repairs.
For everyone else, you can be advised to purchase bags for vacuum cleaners and wind them on the wall chaser nozzle. The amount of dust generated during chasing will be drastically reduced. 
If the purchase of a wall chaser + vacuum cleaner kit is too expensive, try renting these tools from professional builders. Some craftsmen adapt a homemade water supply to the discs to reduce dust:
The main nuances of working with storming:
- ⚡ before starting work, remove everything superfluous from the surface of the walls (old wallpaper, posters) - they can clog the wall chaser;
- ⚡ before strobe, check the route of the future strobe for the absence of old wiring. This can be done with a special tool. If possible, power the power tool from the neighbors, and completely de-energize your apartment;
- ⚡ the strobe should run parallel to the building structures - horizontally or vertically;
- ⚡ vertical strobe is cut from top to bottom;
- ⚡ the distance of the horizontal strobe from the ceiling is no more than 40 cm;
- ⚡ the distance of the vertical strobe from doors, windows, corners - at least 10 cm;
- ⚡ the maximum depth of the strobe is 2.5 cm;
- ⚡ if you come across a rebar, change the strobe route. Cutting down reinforcement, you break the integrity of the plates, reducing the bearing capacity of the building;
- ⚡ try to cut narrow strobes 3-5mm wide to fit one cable. When laying several cables in one strobe, its width increases by the width of the cables being laid.

Gate width
Cons of a wide strobe:
- it needs to be cut
- knock out concrete
- drill holes 6mm for the dowel clamp
- nail the cable
- plaster the strobe using a large amount of mortar and time
- cut through the strobe
- to clean the strobe, use the maximum force of a powerful screwdriver or a narrow chisel
- drilling holes and nailing the cable is not necessary
- use the minimum amount of cement mortar
- save time
Remedies
Don't forget safety precautions when cutting. Be sure to use:
- ⚡ gloves
- ⚡ headphones
- ⚡ protective glasses
- ⚡ respirator
- ⚡ stable ladders
At the end of the work, clean the strobes from dust with a vacuum cleaner or a broom.
You can view the current prices for wall chasers and attachments for chasing a grinder or.
Before starting to prepare the walls for gating, an apartment power supply project must be completed, namely a wiring plan with installation locations for switches and sockets.
Chasing walls for wiring is a rather labor intensive process. Most often, the need to create new cavities for electrical wiring arises when switches and sockets are installed in a new place, as well as new lighting devices when redeveloping an apartment.
A lot of dust is released during the gating process, therefore, in order to prevent dust from spreading to other rooms, it is recommended to cover the entrance with a moistened cloth, such as a sheet.
Of the tools you will need:
- - level (can be laser), tape measure and pencil;
- - chisel and hammer;
- - perforator with two crowns 80 and 65 mm (for junction boxes and socket boxes);
- - a grinder with a diamond disc or a wall chaser.
Before starting the chasing, you should check if there are old cables in the way of future strobes. And if there are any, is there any voltage on them.
In this case, a special device is used to check the walls - an indicator. In addition, we must not forget about safety measures when working with power tools.
Choosing tools
Very often, many people associate the process of gating, first of all, with a puncher, because almost everyone has such a tool. But there is another, special technique designed for just such work.
#one. So, a grinder with a diamond disc has a high productivity, the edges of the recesses are smooth and quite easily brought to an aesthetic appearance. The disadvantage of such a tool is a very large dust emission - as soon as you start working, the whole room will be enveloped in a dense curtain of corrosive building dust.
At the same time, a respirator and glasses, open windows and the complete removal of furniture from the room do not help much - brick dust can penetrate even through doorways sealed with foil.
#2. With the help of a chisel and a hammer, it is quite simple to make a strobe in plaster of great depth (1.5-2 cm), but it is almost impossible to make a groove in brick, and even more so in concrete, with a chisel.
#3. As a more acceptable tool, you can use a combination of "perforator-chisel" - in fact, this is a mechanized hammer. The main disadvantages of this tool are a lot of noise and vibration - all the neighbors will immediately know about the work carried out in your apartment.
As a result of impacts, the new plaster will be covered with unnecessary cracks, and the old one may bounce off in whole layers. The result is a rough and sloppy strobe, as if cut out by the claws of an unprecedented animal.
#four. The optimal tool for wall chasing is a wall chaser. It is a modified grinder equipped with two discs, a platform for moving along the wall. A construction vacuum cleaner can be connected to the tool casing.
The wall chaser is specially designed for such work, with its help you can make high-quality and accurate strobes in a matter of minutes. Two disks give twice as much dust as one, so when working with a wall chaser, you can not do without a construction vacuum cleaner that connects to the tool casing.
Dust harms not only a person, but also the instrument itself. To perform one-time work, it is not profitable to purchase a wall chaser with a construction vacuum cleaner, since these are quite expensive tools. If possible, it is better to rent these tools.
Work order
Often performed with a perforator. First you need to prepare the wall surface - mark with a pencil the wiring paths and the installation locations of switches and sockets.
When planning the wiring, it should be taken into account that the intersections of the wires are not allowed, and the cable length should be as short as possible.

To make holes for switches, sockets, boxes, nozzles for a “crown” puncher are used. In the process of working with a perforator, you should use personal protective equipment - glasses, a mask to protect your eyes and face.
For execution grooves for wiring along the marked line at the minimum possible distance from each other, holes of the required depth are drilled with a puncher. To remove the jumpers between the holes, a flat chisel is installed on the puncher and the mode without drilling is turned on.
After that, wires are laid in the strobe, socket boxes and junction boxes are installed in the corresponding holes. Then all wiring elements are fixed with alabaster.
Chasing a brick wall
To work on hard brick wall a chisel and a hammer are not enough - you will need a more powerful tool - a grinder with a diamond disc or a puncher, and with the help of a hammer and a chisel, only some details can be finalized.
If the brick wall is not yet covered with plaster, then the task can be much simplified. All wiring is marked along the brick wall, holes for dowels are drilled along the lines every 25-40 cm.
In these places, with the help of self-tapping screws and special fasteners, the wiring is attached to the wall. As fasteners, you can use pieces of the same wire. For the installation of sockets and junction boxes appropriate holes must be drilled.
The wiring mounted in this way protrudes 4-5 mm above the surface and is easily sealed with a fairly thin layer of plaster.
Before starting work, the remains of old wallpaper and other elements that may impede the movement of the wall chaser should be removed from the walls. Pieces of wallpaper can clog the casing of the tool, blocking the exit of dust, as a result of which an emergency may occur.
If repairs are needed in the future, using these photos, you can easily find the wiring bookmarks. You can also refer to these photos when you need to drive a nail or dowel into the wall so as not to accidentally get into the wire.
It is best to make holes for boxes or sockets as follows:
- 1. - drill a small hole in the center (8 mm);
- 2. - make a small notch with a crown to indicate the contours of the future hole;
- 3. - drill 8-10 thin holes along the contour;
- 4. - drill the hole to the end with a crown.
When making holes for boxes or socket boxes, you can stumble upon fittings. It is strictly forbidden to damage fittings in prefabricated houses. This will lead to a violation of the strength of the walls and structures of the house as a whole, which in the future can lead to cracks in the walls and their complete destruction.
If the sockets are installed at a low height from the floor, then wall chasing work can be significantly reduced by laying the wiring in the floor.


Happy birthday dear pastor Julia
Venerable Seraphim of Vyritsky, who repeated the pilgrimage of Seraphim of Sarov
Icon of the All-Seeing Eye of God - meaning, what helps, history
How to atone for your sins. How to atone for sin
The Crime of the Soviet Power and the Treasure of the Russian Orthodox Church - New Martyrs and Confessors of Russia Who are the New Martyrs of the 20th century