The arch is considered one of the key architectural forms. Moreover, despite the long history, vaulted structures remain more of an ornament, and are not found in dwellings as often as before. Rounded openings have always been theirs feature, and now the variety is limited only by technological capabilities. Nowadays, the use of round elements is relevant for high bulky doors, gates, entrance areas, transitions between rooms. The shape of the vault is also characteristic of windows. public buildings and improved houses. In general, there is a trend towards more frequent use of arches anywhere. At the same time, they become less and less elegant. Designers continue to introduce the design of the arch into the doorway. Vaults without doors have their own strengths, and practical designs with door leafs are not only comfortable, but also retain an attractive pattern.
Arch - origin and history
The most ancient ruins with arches are about 4 thousand years old. Thus, the date of the appearance of vaulted structures is considered to be the beginning of the 2nd millennium BC. e. The impetus for the development of architecture was given by technology ancient egypt and Mesopotamia. The peoples of these civilizations built the first arches from bricks. They were able to build not only open, but also more complex closed structures. The techniques were mastered by other states, including Greece and Rome. Extant architecture Ancient Greece and its colonies is represented by countless buildings. When Roman times came, much was destroyed, but new buildings appeared. The peak of the development of ancient architecture falls precisely on the period of the Roman Empire. Arches were erected everywhere, and the engineering complexity of the structures increased significantly. The environment for the development of architecture was the architecture of the Gothic and Renaissance.
Features of rooms with arches
Arched rooms are often left without doors, but given the practical inconvenience of such a layout, residents have to use alternatives. In places with high traffic, structures with an empty section are designed, and doors are installed for private rooms. In large houses, the arches of the guest rooms are decorated with curtains. The side posts are made of improved materials, ideally from logs. A simple flat box does not look in the best way. The vaults are made more decorative against the background of other elements. All these features do not apply to the arched entrances to the kitchen, spans in the corridors of Brezhnevka. They can be simple and harmoniously fit into the environment. At the same time, the vast majority of designs are characterized by the absence of a threshold, although theoretically it can even improve appearance arches. Vaulted openings are active, that is, connecting several rooms, and passive, opening a view of several rooms at once.
Advantages and disadvantages of arched structures in the doorway
The arched span in the wall is primarily a decorative technique. Moreover, the very idea of design is often developed, and instead of an arch, housing gets something else, for example, doors with a blank glass transom. In addition to aesthetic advantages, they note the increased stability of vaulted openings. They crack less often, warp to a lesser extent and do not shrink. The frame of arched structures, in turn, has greater strength. Do not forget about additional opportunities for ventilation. Additional square meters in doorways will improve ventilation in the hot season. At the same time, the disadvantages of the design are felt even at the installation stage, because the assembly technology is more complicated than that of square boxes. This disadvantage is associated with a high price. It should also be understood the practical inconvenience of open arched passages in terms of sound and heat insulation, visual accessibility of the room.
A few more useful qualities of arches:
- zoning;
- visual expansion of space and raising ceilings.
Types and forms of arches
Distribution received:
- Classic.
- Romance.
- Trapeze.
- Portal.
- Modern.
- Ellipse.
- Semiarka.
Each version of the arch has its own name, most often logically associated with the form. A classic is an ordinary arch with a rectangular span and a semicircular ceiling. They harmoniously blend into the interior or exterior and make the space perfect from a geometric and aesthetic point of view. Romantika is a rectangular vault with rounded top corners. Suitable for wide openings. The name "trapeze" was assigned to the arches with the corresponding intrados. But a span like a portal is almost no different from a rectangular opening. Moreover, its name is the same as that of the ceiling - the latter is also called the portal. Arched structures of the "modern" type act as a transitional form between the classics and the portal. The ellipse, which has a slightly larger radius of curvature, practically does not differ from it. It should also be noted semi-arches - a small architectural form in which an arch and a straight wall coexist.
Round
So called arches with a semicircular or rounded overlap, as well as different variants with a pronounced pattern "under the circle", and even buildings that exactly repeat this figure. Round vaults have become popular in recent years, as they are increasingly used in various ceremonies and processions. They are collected and decoratively decorated for events in the spirit of the "English wedding". It's about round metal structure with supports and openwork forms, which are covered with flower arrangements. Round arches become the backdrop for the bride and groom. However, round vaults are the same round-roofed openings that people see almost every day. Arches with a rounded entablature were widely used in ancient Greece, Egypt and Rome. If in our time the arches have portals only with inside(intrados), then at that time they often also had an external (extrados).
Rectangular
Rectangular arches are a solution to the problem of design incompatibility. They are appropriate in almost any interior, and especially in technological and modern ones, where semicircular vaults may turn out to be meaningless. Straight lines will correctly complement the environment with the same smooth furniture and transitions. Portal-type structures are formed with four right angles, but the top two are sometimes slightly rounded. The platbands are made wide, with a pronounced volume, and glued lumber is suitable for this. It is also cheaper when compared to solid wood. Systems are also assembled from drywall. Working with these materials is carried out according to a simple scheme, and the frame is neat, perfectly even. The finished passage will not interfere with the decor, but again with smooth features. Among the door models, sliding and folding doors are most suitable.
Forged arches are suitable for delimiting zones in a summer cottage.
Ellipse arches
Elliptical openings have more stylish qualities than other options - the owners will be able to emphasize their good taste. Elliptical structures are a kind of intermediate version between a round vault and a portal. Elements are sometimes erected up to the very ceiling, because the larger it is, the better the view of the room becomes. An arched opening with an elliptical top also goes well with doors. The uniform has a place in an antique setting like a castle interior or in something reminiscent of it in a loft with an industrial finish. There are options with shoulders, horseshoe arches and other varieties with a special entourage. The elliptical arches are in many ways similar to the romantic version with a flatter top and modern with a pointed one. Without elliptical shapes, masterpiece interiors in the Art Nouveau style - modern trends would not be possible.
Trapezoidal arches
The advantage of the variant is that it is easy to make, and at the same time - this shape is more perfect than a simple rectangle. The trapezoidal passage contains a certain geometry that it would not hurt to beat with other lines. Elements like the shape of the ceiling, various angles, countertops and columns. In terms of decorative possibilities, trapezoids are slightly inferior to rounded options, but much still depends on the configuration of the upper element, its size, severity and proportions. The lower or upper corners of the intrados can be rounded off. The trapezoidal arch can be completely converted into a complicated version with an abstract angular pattern. The increased stability of the upper transverse beam is used in long passage corridors and structures made of heavy building materials, and these include houses made of logs and timber.
curly arches
When creating something like this, you should “weigh” all the points about the decorative component and compatibility with design and furniture. Bold and interesting solution on the sketch in reality may look out of place and strange. This is especially true for cascade options with several slots. In practice, arches with a discreet patterned pattern and without additional holes have proven themselves well. Compositions are formed in studio apartments with a distinct design direction, in retro or space style, for example. Many try to repeat the idea in a less accented interior, and sometimes it doesn't work out. And yet, adherence to simple design canons opens up opportunities for universal application. You should start by adding one, maximum two elements to the arc: a flat figure or curved lines. It's best to keep the symmetry. Compositions are equally good as asymmetric and balanced.
Figured structures are transformed with the help of stained-glass windows on some segments.
Dimensions
The height is limited only by the level of the ceiling - there must be a margin. The parameter is also coordinated with others doorways so as not to violate the integrity and organicity of the design. For round and curly shapes, in fact, an exception is possible, since this is an eye-catching element. The width is selected in connection with the main idea interior decoration, her message. We are talking about the severity of the interior space and openings between rooms. As for the exact parameters, the height of the top of the arch (lifting boom) should end at a level no higher than 2.9 m for a room with a height of 3.2-3.3 m and up to 2.2 m for a room with an indicator of 2.5 m For an ordinary arch, a ratio of height and width of 2:1 or 3:1 is considered harmonious. For design ideas, the indicator does not matter. If it was not possible to choose an individual option, then it is better to stop at a ratio of 1.6: 1 - a ratio calculated back in the Middle Ages.
Materials for the manufacture of arches
Apply:
- tree;
- timber;
- drywall;
- a rock;
- brick.
The first arches were assembled only from stone, and this is how the famous masonry techniques appeared. Now the stone is used only with highly effective fixing and adhesive materials. V last years drywall is popular. The structure is assembled metal carcass and often supplement with shelves, niches. The resulting systems are suitable for the organization of built-in lighting. The low cost, combined with all this, explains the high demand among consumers. Wood options, in turn, have advantages in terms of environmental friendliness and durability. At the same time, mold can ruin the look of the box. For a simpler interior, arches are assembled from lightweight materials that imitate stone, wood or something else. Last option, a brick arch, it will not be easy to assemble, and it will take a lot of work on its appearance.
Materials for decorative finishing
On budget options, plastic corners are installed, sometimes covered facing material, and the ends are trimmed with decorative molding. In the most expensive interior options, stucco is added. The castle stone area is often emphasized. They also resort to finishing with valuable rocks and minerals. For example, travertine, marble, granite, malachite and the like. In a luxurious interior, the opening and platbands are sure to be decorated. In this sense, a win-win option would be Venetian plaster. If the design matches a less "flashy" style, then you can do the geometric component. In the Art Nouveau style, decorative strips and linings, glass are used. A simple setting does not require any decorative notions. It is enough just to emphasize the texture of the material of the arch, and finish the space near it with flexible acrylic tiles.
Design and objectives of the arch
The element performs the following functions:
- Aesthetic: masking imperfections, visual expansion of space, interior improvement.
- Practical: strengthening walls, storing things (curly compositions), dividing zones, combining rooms.
Vaulted passages are ordinary incised and shaped. The second subspecies includes options with side columns, original ceilings, additional figured holes, sectional structure. Intrados and racks are decorated with decorative relief. It's hard to imagine without beautiful arches classic interior with motives of the XVIII century, which remains relevant for large private estates. With a vault, you can strengthen the wall or organize new passages / corridors between rooms at a convenient angle. Arched compositions become a new place of storage: the surfaces of the room can be freed from excess load, for example, from unnecessary decorative items. The arch system will combine several rooms into one thoughtful composition. In the studios big size these structures are used as space delimiters.
Room zoning element
The object performs the function of zoning in 2 senses: as a way of combining space and as a separator. Apartments modern layout have many combined rooms and short hallways. Therefore, their space should be divided into segments for relaxing, dining, cooking, working at a computer, watching TV. In addition to such ideas for application, the arch will come in handy in the vestibule, which are increasingly "appearing" next to the living rooms. Vaulted structures easily solve the problem of inefficient use of space near the doors: just remove them and make a free passage or hang curtains. Arches also regulate the level of isolation. The narrow arch in the wall gives high rate, and wide - it reduces it. An opening of more than half a wall will connect two rooms into one, removing the feeling of a border.
It is far from always necessary to separate rooms with closing shutters, sometimes it is much more preferable and more beautiful than an open opening in which a spectacular door arch with your own hands.
Beautiful do-it-yourself arch
The passage from the hallway to the living room or from the library to the office can look much more original than the usual door leaf, hung on metal hinges that regularly require lubrication from creaking. In particular, the opening can be left completely open, which will provide convenience, due to the absence of obstacles, and give aesthetic completeness to any design. Proponents of monumentality for the construction of the arch usually choose a brick, since it can be used to finish the opening with a hint of the Middle Ages, with a keystone and other related touches.
However, more practical people prefer simplicity and efficiency, preferring chipboard and drywall. That's just from the last arch with your own hands can be made the fastest, but how - it will tell you this master class. First you need to decide what type of arch you want to see in the interior wall (this can be not only a door, windows can also be made in the same style). There are 4 main options: classic, modern, ellipse and portal.
The first type includes arches, the upper curved part of which is a regular semicircle. The second type in its upper part looks like a small segment of a semicircle, the radius of which is much more than half the width of the opening. The elliptical version does not require any extra comments, it resembles an egg in shape. And the portal is an ordinary opening, only slightly larger than the standard size and ennobled with decorative trim. However, we will consider the usual classical type.
How to make an arch with your own hands - practical instruction
The most common and easily processed material today is drywall, it is from it that we will build an arched structure. It is most convenient to do this in the gap between the two walls, where the opening is completely absent, that is, the entire clearance from floor to ceiling is available. In extreme cases, before making an arch in the wall with your own hands, in a house or apartment, you can hollow out a wall above the opening, at the same time expanding it as much as possible. The thing is that we need space for mounting aluminum profiles. Having determined the scope of work, we make an arch with our own hands in order to ennoble the passage between the rooms.
Do-it-yourself massster class arch - step by step diagram
Step 1: Markup
We measure on the inside of the opening from both edges a distance equal to the thickness, put marks near the ceiling and near the floor.
With the help of a plumb line and a coated thread, we beat off the lines between the markers. We perform the same operation on the ceiling and floor. If the arch is located in the corner of the room, and one side of it is a transverse wall, we transfer the markings to it indicating the thickness of the drywall sheet.
Step 2: Mounting the rails
Along the lines made with an indent under the skin, we fasten aluminum profiles to the walls and ceiling with self-tapping screws, leaving a gap for wiring if necessary.

During installation, the markings made earlier should remain on the outside of each of the two rows of guides. Vertical details should be duplicated, you will need "copies" later.
Step 3: Determining the Width of the Arch
On the floor, we measure the required distance from the wall opposite the vertical profiles and put marks on which we then draw a transverse line. This operation is carried out on both sides of the opening. Further, according to the markup, we fasten short profile trimmings to the floor, the length of which should correspond to the distance between the lines along which the vertical guides are screwed.

Step 4: Installing the frame profile
We insert the prepared parts into the trimmed on the floor, identical to the guides mounted on the wall earlier.

The difference is only in the position, we turn the frame metal profiles by 90 degrees, with mounting surfaces to the premises. We fix each with two screws.


At the top, we fix it to a horizontal rail screwed to the ceiling.


Be sure to use a plumb line and a level so that every detail of the frame is level.
Step 5: Trim one side
On the resulting structure, we fix drywall, sawn to size, on the top with self-tapping screws, mounted on the sides vertical stripes for which waste can be used. If there is not enough material for the upper part, you can use a narrow fragment under the ceiling or directly above the opening.

Step 6: Making a compass from improvised means
You most likely do not have at hand (and there is no way to get) a classroom teacher's compass, which is usually used in geometry lessons to draw circles with chalk on a blackboard. Therefore, we propose to make this tool on our own just for our case.

We measure half the width of the opening (we put a marker on the edge of the drywall) and get the radius of the future arched arc. Now we take a rail of a slightly longer length and screw a self-tapping screw from one end a centimeter from the edge. We screw the second same screw exactly at the previously measured distance, determining its position using a construction tape measure.

Step 7: Marking the Arch
If you put a marker by measuring half the width of the span, you can immediately proceed to drawing the arch line, otherwise we apply the tape measure again and find desired point. A centimeter above the edge, we stick one self-tapping screw of our compass, and with the second we draw an arc from the upper corners of the portal.


Step 8: Shaping the Arch
Using a hacksaw (manual or electric), we cut the drywall along the line and get an arched passage.


It remains to strengthen it, for which we measure the length of the arc from the sawn-off fragment with a construction tape measure and take a profile of the same size (for the speed of the process - a couple). Every 5 centimeters we make cuts in the guides and carefully bend one of the parts along our arch, successively screwing it with screws.


TO ceiling profiles we fix the curved part with two guides of the appropriate length.

On the sides attaching drywall strips
Another fragment, cut along the length of the arc, is abundantly moistened and processed with a needle roller on both sides.

We pause for a few minutes so that the material is slightly saturated with moisture. Then we set the previously cut one vertically, put a strip on it, and it itself slowly bends under its own weight.

When the process stops, we gently help with light pressure on the ends, after which we let the material dry a little and screw it onto the bend of the arch.

In no case should drywall be allowed to soak strongly, since there is a high probability of internal or external defects.
Do-it-yourself arch installation - original solutions
A less common type is a semi-arch, when half of the arc in the highest part rests against the wall. It can be either classic or elliptical, or completely irregular shape. There is an option called "romance", these arches resemble portals, but have rounded upper corners. Also, those who want something original install trapezoidal arches between the rooms, the upper part of which has the shape of a corresponding geometric figure.
And, finally, a rather curious version of the eastern arch is quite rare, when the upper part of the opening sharply expands into a horizontally oriented oval or ellipse. Do-it-yourself arch installation is possible, whichever option you choose, although the classic one is the most easily doable. However, upon completion of the installation of the structure, you can continue to work, this time in the direction of design.
To finish the arched openings today there are many ready-made solutions, for example, wooden or plaster trim, half-columns for the sides of the opening. You can decorate with tiles, artificial or natural stone(if the construction is made of drywall, it is advisable not to abuse the cladding, in order to avoid deformation). Also on the inside of the arch, you can mount small shelves for flower pots or figurines.
In ancient times, arches symbolized the sky, the road of life, freedom, victory ( triumphal arches among the Romans), protection (the arched form of the city gates among the Slavs). And now constructions of this type are not forgotten, and most importantly, they are easy to make. So, a unique arch in the apartment and at the same time - with your own hands!
Create an arch of any shape
In standard-plan apartments, the arch performs both decorative and practical functions - it separates neighboring rooms, making them more spacious, original, and organic. It also highlights functional areas, creates an atmosphere of coziness and comfort in the interior.
If the decision to make an arch with your own hands is made, you will first have to solve a number of questions, the answers to which will affect the cost and time.
Do one arch or several? A successful design move is to make both the door and the window opening arched. An interesting choice is in favor of identical door openings and niches in the wall. The column and arch look original together.
What size to make an arch? Its parameters coincide with the dimensions of the doorway or slightly exceed it. If the design is made on the entire wall, then we are talking about a vault, and not an arch.
The choice of the shape of the arched structure depends on the design and style and is limited only by imagination. From the main directions choose:
- round (semicircular) arch - a classic, common option;
- Arabian (Moorish, resembles a horseshoe);
- lancet - two arcs intersect in one corner;
- concave - convex arcs go inside the opening;
- keeled - a semicircle with a pointed corner at the top;
- elliptical - the upper part of such a design is an ellipse;
- parabolic - the upper part is made in the form of a parabola.
These are not all options, but if the goal is to make an arch with your own hands, then preference is given to the traditional semicircular shape.
 Classical (round or semicircular) arch
 The choice of material is not limited: everything is used - from plywood to brick, but drywall remains the "top" due to its relative cheapness and versatility (it allows you to make an arch of any complexity and shape in doorway), ease of finishing and speed of do-it-yourself installation.
Arched drywall (GKLA) is used in the work, due to the use of durable cardboard and reinforced fiberglass, this material is easily bent without damage.
How to make a drywall arch in a doorway with your own hands?
The algorithm of work is as follows:
1. Preparing the cardboard layout
The first stage in the work on finishing the doorway is preparatory. It is associated with taking measurements and making a template for the future arch.
Experiment by drawing the outlines of the planned structure on the wall, this will allow you to clearly visualize the result.
The installed arch will visually reduce the opening by 20 centimeters, so if its size cannot be increased, it is better to abandon the idea of \u200b\u200binstalling the arch. Otherwise, instead of a noble arched structure, you get a "hole in the hole."
Removing the door frame
So, the arch visually reduces the opening, the conclusion is to increase the size if the ceiling height allows. How to determine how much? Do this so that the height of the expanded opening exceeds the top point of the planned arch by five centimeters.
An important condition for ensuring a good result is the evenness and verticality of the walls. Otherwise, the arch will turn out skewed. Conclusion - the walls are pre-finished with plaster and allowed to dry.
After widening the doorway, prepare the surface by smoothing out any irregularities, get rid of excess material by removing dust and dirt.
Doorways in a load-bearing wall must not be altered without appropriate permits.
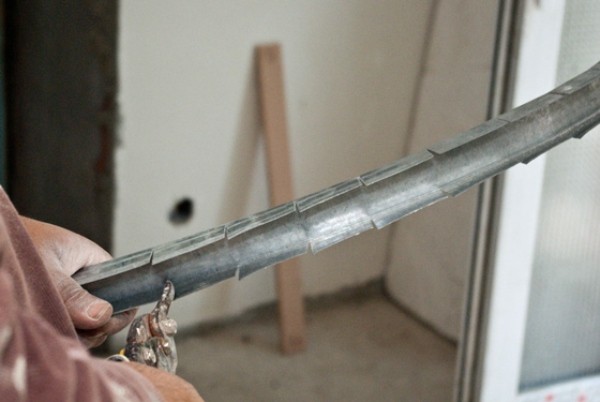 This is how the profile is cut
 Installation of an arched structure
Making a frame yourself is not that easy, but quite realistic. For this, builders recommend using a P-type metal profile (the so-called pawn, or more precisely, a 27/28 guide profile).
The size of the guides is determined by the width of the arch, the number is 2 pcs. Install the frame on both sides of the doorway, slightly deepening inward (after fixing the drywall and applying putty, it will become flush with the wall).
Starting from above, the first profile is fixed, then the second is necessarily mounted parallel to the first. Then they are fixed on the sides, from the upper corner to the point of rounding of the arch.
In order for the profile to bend effortlessly, cuts are made on it with an average interval of 6.5 cm, for which metal scissors are used.
You can give the desired shape to the profile by bending it along the layout. When the frame arc is ready, it is attached to the ceiling and walls.
 An example of bending a metal profile according to a layout
 They fasten the profile frame to the walls made of brick or concrete with dowels, self-tapping screws are also suitable for wooden ones.
Preparation of drywall for installation in the design of the arched frame
Draw an arched arch line using two identical drywall sheets. If there is no compass, use improvised means - an awl (or self-tapping screw), a thin rope and a simple pencil, or a ready-made flexible blank.
Make two identical halves along the intended line using a metal saw (simple or electric jigsaw).
 The process of cutting drywall along the arc line
 Drywall bending
To finish the lower end side of the arched arc, cut a strip of a given size and bend it. For deformation, it is recommended to put a load on the sides of the strip. To simplify the procedure, drywall is moistened with water and the surface is pierced with a needle roller.
Further, the still wet deformed strip is fixed, starting from the middle of the arch, fixing with metal screws along both sides. In accordance with the technology of work, drywall is allowed to dry. The time allotted for this is 12 hours.
 Bending drywall with a load
 Treatment
The final stage of the main work is finishing. All joints of the arch are finished with putty, glued with reinforcing tape and puttied. Next - phased grinding and priming.
decorative trim
The culmination of the process of making an arch with your own hands is its decoration.
Video to help craftsmen:
How to finish the arch
The smooth shape of the arched structure in the apartment is half the success, finishing is no less important. You can finish the finished arch with a decorative narrow stone. A budget option- the use of plaster, wallpaper, paintwork materials, decorative plaster. Flight of fancy is not limited. Decorate arches by installing lighting or stained glass.
In contact with
When you have an apartment, you certainly want to make it cozier, more comfortable and bigger. Currently, one of the ways to visually enlarge your home is to create arches instead of doors.
Various photos of arches show how diverse they are and how much they change the appearance of housing. It is about how to make an arch with your own hands that will be briefly described below.
arch types
The arch is an opening in the wall that does not have an overlap in the form of a door. Their views differ only in the upper part, or rather in how the corners are built (straight, rounded or curly).

V modern world There are 7 types of arches:
- classic;
- "modern";
- "romance";
- ellipse;
- trapezoid;
- "portal";
- semi-arc.

The first four types have rounded corners and differ only in the form of rounding.
So the classic arch is a semicircle with a radius of half the width of the opening; "modern" has a small corner radius; "romance" and ellipse are similar to each other and represent the usual rounded corners.

Another thing is the trapezoid and the portal. These two types use sharp corners. In the trapezoid, the top, respectively, represents this figure, and the “portal” is an ordinary opening without a door.

However, even an unremarkable "portal" can be made to sparkle with new colors, giving the pillars the appearance of columns in the ancient style (Greek or Roman).

The trapezoid, although it is a rather unusual solution, is not suitable for any style, therefore it is used much less often than other arch options.

The last type is a semi-arch, as the name implies, it consists of 1 rounded and 1 right angle. This type of arch began to be used recently, but it has already gained popularity.

It is up to you to decide which arch to install in the apartment, but we will dwell in more detail on drywall arches, as the most convenient material for building.
Step by step instructions for creating an arch
We choose the future shape of the arch. It is important that it fits general style premises that will connect.

We clean the opening from the plaster and level it. It's simple here - the cleaner the surface of the work, the more reliable the mount.

We fix the arch frame. We build the frame itself from a profile (it can be made from wood bars).

We attach a cut-out drywall arch to the frame (one side). To get an arch desired type, in the middle of the drywall base we make a hole for the nail. We tie a rope to it and get a homemade compass. Now, by changing the length of the rope, you can change the radius of rounding corners and their appearance.

We apply drywall on the other side and mark on it, as if on a stencil, an arch, after which we cut it out and attach it to the frame.

In no case should this be done on the floor, since the opening is usually asymmetrical, which has the most detrimental effect on the accuracy of one-to-one markings.
Note!


We measure the resulting arc and make a tape for fastening from the profile. After that, we attach the resulting tape to the arch of the arch with self-tapping screws.

Install jumpers. Their size is calculated simply: the depth of the arch is minus 1.5 centimeters, the material of manufacture is a metal profile, less often wood. We attach a sheet of drywall to the end of the opening with self-tapping screws.

We spend Finishing work(we level with putty, overwrite possible holes, paint, or glue wallpaper).

Other ways to make an arch
You can also make an arch in the opening in two other ways. The difference between these methods of creating an arch in fixing drywall.
In the second version, it is attached to the jumpers not with a whole sheet, but with specially cut pieces (set) using a special solution (water, putty plus PVA glue) and this must be done without delay, since the solution hardens very quickly.

Note!

The third option provides for wooden lintels planted on glue. Drywall in the opening to the lintels is also glued.

How to bend drywall?
In addition, the question may arise: how to bend drywall? Thin cardboard (6 mm) is best suited for this.
And there are at least 2 ways to bend it:
Method 1 - roll a roller on cardboard to break the gypsum in it, soak it in water and gradually screw it to the tape with screws.

Method 2 - make cuts on drywall every 4-5 centimeters. When you attach to the end of the opening, the material at the place of the cuts will burst and better adhere to the wall surface.

We wish you good luck with your work!

Do-it-yourself arch photo

Note!


Chicken in kefir - recipes for marinated, stewed and baked poultry for every taste!
Simple Chicken Recipe in English (Fried) Recipes in English with translation
Chicken hearts with potatoes: cooking recipes How to cook delicious chicken hearts with potatoes
Recipes for dough and fillings for jellied pies with mushrooms
Stuffed eggplant with chicken and mushrooms baked in the oven with cheese crust Cooking eggplant stuffed with chicken