A mini drilling machine, despite its miniature dimensions compared to other machines, perfectly performs the tasks assigned to it, not inferior in quality to large machines. Some desktop machines also have milling functions and are often used in repair shops or in educational institutions. Mini drilling machines are used for drilling holes in microcircuits, as well as circuit boards.
The rotation of the drill is the main movement that is used in the operation of the drilling machine. The drill holds the spindle. The drill is fed in a vertical plane, and the part itself is located on the desktop.
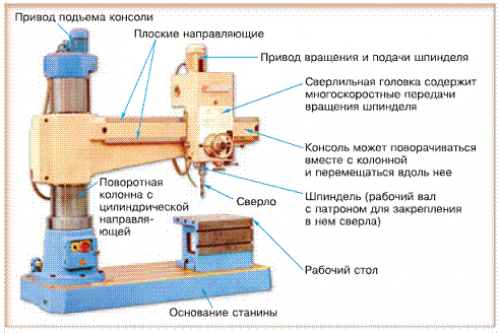
All elements of the drilling machine are located on a stand placed on a massive frame, which is the base. The working head with the spindle moves along the rails, and the engine is located in the column. In the event that it is possible to switch the speed, then this is done using the buttons on the handle. In modern units, these parameters are monitored by an electronic system.
The working head must be lubricated with oil, which is supplied to it by means of a pump (the pump also supplies the coolant for the head). The working head is made mainly of cast iron. In the head, as a rule, the feed and speed device is located. The gearbox works with the help of gears that are switched by the handle. Job mini drilling machine carries out from a standard household network with a voltage of 220V.
Operation of the mini drilling machine
When the machine is turned on, the spindle starts to move. The power of the desktop machine can be from 150 to 300W. A belt drive is mainly used, but a gear transmission system can also be used on very small units. The feed rate is changed using the handle.
The working element, the drill, is inserted into the chuck (collet or cam), which tightly clamps its end. In a collet chuck, the drill is clamped automatically, and in a cam chuck with a key.
With the help of the feed handle, the drill is lowered to the material being processed. The handle resembles a lever in appearance and, as a rule, is located to the right of the head. Thanks to the built-in spring, after drilling the hole, the head returns to its original position by itself. Also, in some machines, the head can be fixed in a certain position.
Machine characteristics
An important parameter that affects performance and economy is power. The minimum power for simple work - drilling a hole for printed circuit boards, is 150W.
The drill rotates from 200 to 3000 rpm. This happens thanks to the gearbox, which gives the master 12 speed modes.
50 centimeters is the maximum height of a part that can be used to work with a mini drilling machine. The head with the drill moves vertically along the rails, this happens as a result of manual control and, having reached the desired height, the head is fixed.
You can make a homemade miniature drilling machine yourself, with your own hands. Often, the need to create this unit arises when periodically there is a need for drilling holes, which is often the case with radio amateurs, since they need the device for drilling printed circuit boards. It is worth saying that a home-made mini machine may have high level work, but only if everything is done correctly and correctly.
It is worth saying a few words about printed circuit boards. Drilling holes for printed circuit boards is a rather laborious task, since the diameter of the holes is very small. Therefore, on an industrial scale, laser equipment is increasingly being used to drill boards, but for an ordinary radio amateur, a home-made drilling machine with small diameter drills may also be suitable for processing boards.
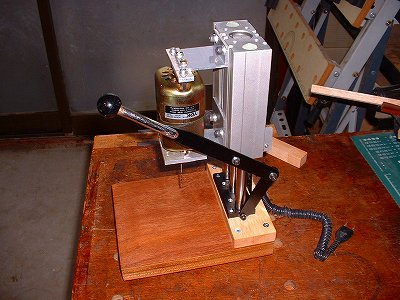
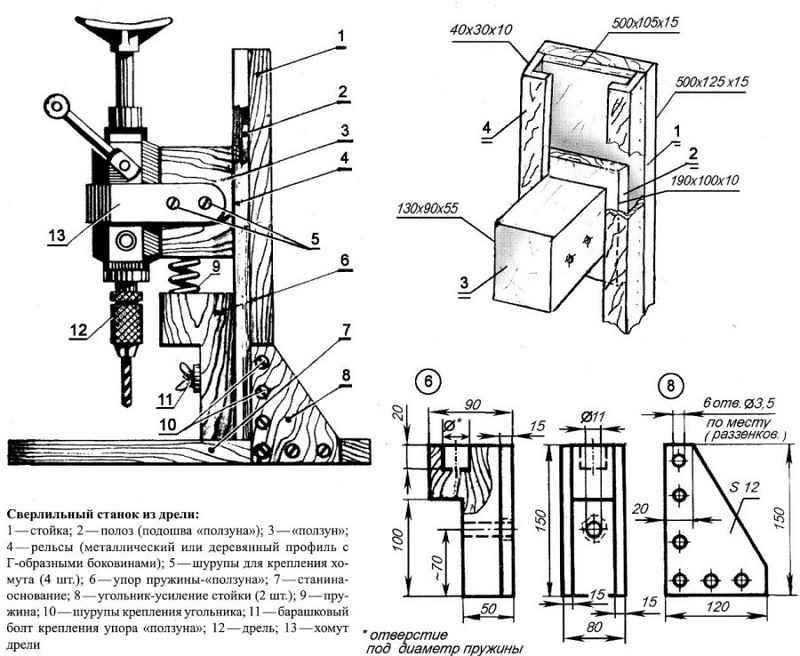
Homemade mini drilling unit from a drill
In order to make a homemade mini machine, you do not need to have special components or materials. The whole structure of this unit consists of the following units:
- The bed, which is the base.
- The mechanism of rotation of the working element.
- Feeder.
- A vertical post to which the rotation mechanism is attached.
bed under homemade apparatus can be made of wood, you can use chipboard. The only thing to consider when creating a bed is that during operation, a home-made unit can vibrate, so the base must be heavy enough so that this unwanted vibration does not occur.
The quality of work will directly depend on the reliability of fastening the frame to the vertical stand. Important details that a home-made drilling unit should have are the guide rails along which the working mechanism will move (in our case with a drill). It is best to make guide rails from two steel strips that must be fixed to the rack.
When creating pads with your own hands, you can use steel clamps. They will securely attach a drill to the block. To avoid unwanted vibration, a rubber gasket can be placed at the junction of the drill and block.
The next step is to create a feed mechanism that should move the drill in a vertical position. There are plenty of options for making a feed mechanism and circuits with your own hands, but usually it consists of a lever and a spring, which is attached on one side to the block with a drill, and the second to the frame. The spring allows you to make the feed of the mechanism more rigid.
If you do not need a drill for further operation, you can disassemble it and make the unit more convenient. To do this, remove the switch from the drill and make a separate button attached to the bed. This button will always be under your control and will give you the opportunity to turn off the drill in time. That's all, making a mini drilling machine with your own hands is not difficult, just watch videos and photos on the Internet, in which the whole process of creating a machine from a drill with your own hands is perfectly shown.
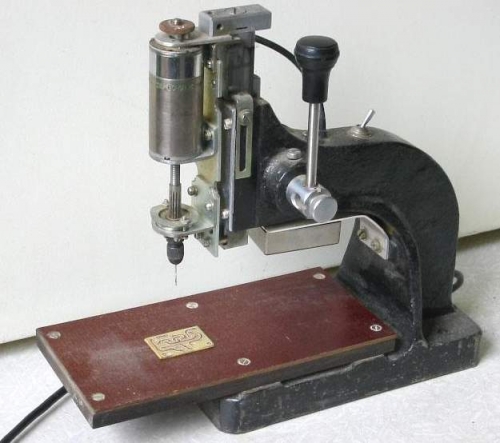
Mini drilling machine W10005
Amateurs and professionals often have to work with drilling machines at home, in their workshops. Often it is also necessary to drill a very small hole diameter, for example 0.3mm. Perfect option for such cases, the W10005 mini drilling machine. The idle speed reaches 2000 rpm and is ideal for drilling wood, soft aluminium, brass, copper, plastics and other soft, non-ferrous and precious metals.
The content of the article:
Amateur radio is a multifaceted occupation, for some it’s a simple repetition of other people’s schemes, for moral satisfaction, for some it’s a sport, for some it’s development intellectual abilities, and to whom it is creativity, the embodiment of ideas and designs, self-affirmation. But be that as it may, this process is closely related to the mechanical perforation of foil material, whether it be textolite, getinaks or fluoroplast. Of course, our (and Chinese) industry produces a lot of products that can make 1-2 holes before a breakdown, but we, radio amateurs, are creative people, and we will not get hung up on other people's buzzers and buzzers, but we will try to make our own, which is warmer to the soul and works more reliably . However, the question arises, what to do? And on what? Not every radio amateur has a workshop stuffed with machine tools and materials at hand, and the specialists have now become different, you can’t get off with a bottle.
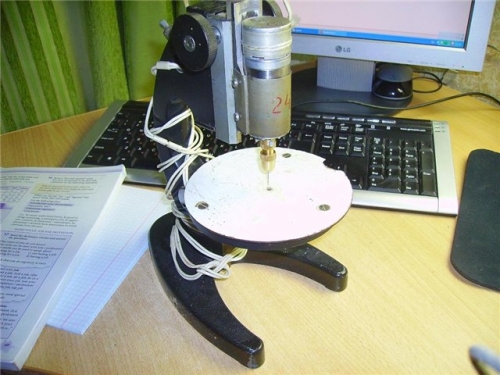
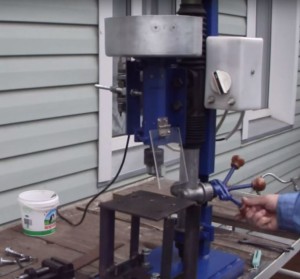
But it was a saying, now in fact. Faced with the aforementioned problem, the idea arose to assemble such a drilling machine that can be made even without special tools. It’s not that there was nothing to drill with - I’ve been drilling for a long time, about 30 years ago, I tried a lot of hand drills, but when I was faced with the need to make an adapter board with many sockets, I decided to make a machine that would greatly simplify and speed up this business. The first thing that came to mind was to google the Internet. For almost a week on slow traffic I leafed through what I found, but I didn’t come across anything suitable, or rather I came across a lot, but one didn’t suit me because of the need to break the microscope, which, moreover, didn’t exist yet, the other is too primitive, the third requires special equipment.
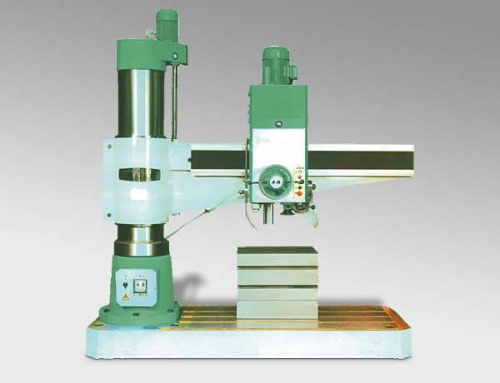
Here, for example, is a machine that I liked in terms of design, but frightening with the complexity of manufacturing. Having seen enough of other people's designs, I decided to connect the brain bone and do something from available materials. In general, let me bring to your attention an amateur radio drilling machine with, available for repetition with minimal experience in assembling such devices.
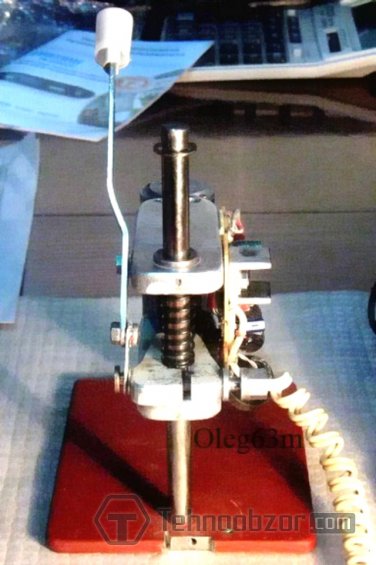
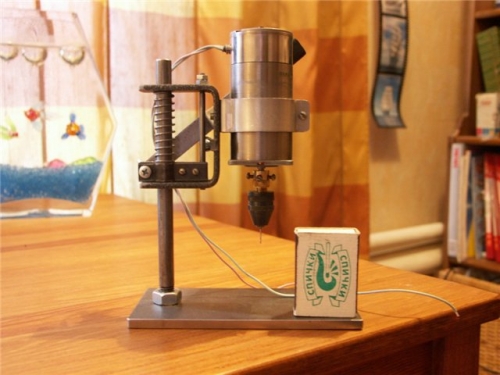
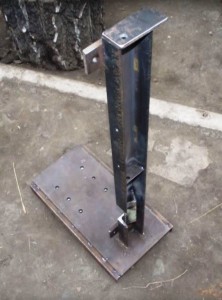
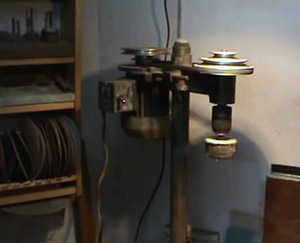
Drill stand
First of all, the bed, the basis of any machine. It must be strong and stable. The choice fell on iron. there was none, I had to ask for a piece in the workshop. The guide rod was used from a failed printer. Slightly trimmed with a "grinder", welded to the bed through a hole drilled in advance. To reduce friction, I used bushings from the same printer, but this is not necessary.
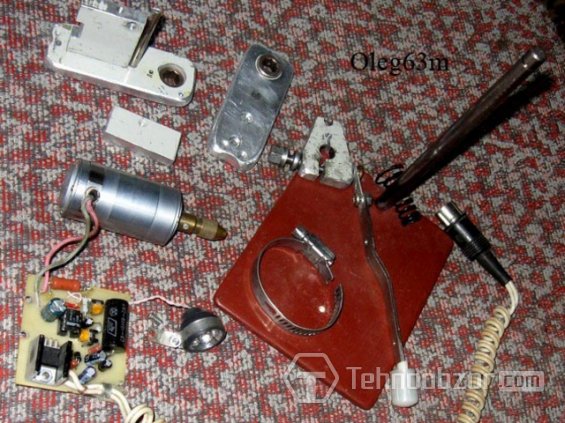
So, the first thing that caught my eye, found once on scrap metal (then they didn’t sweep so carefully) an duralumin panel, 8 mm thick from some kind of disassembled device, suited me, but it was necessary to cut it into narrow strips. I loaded a new blade into a hacksaw for metal, an oiler, so that the teeth would not clog and forward, sawed the strips, first of all folding the upper and lower strips and clamping them firmly in a vise, drilled holes for the rod. then, inserting the rest of the rod into this hole (so that there is no displacement), I drilled the remaining holes.
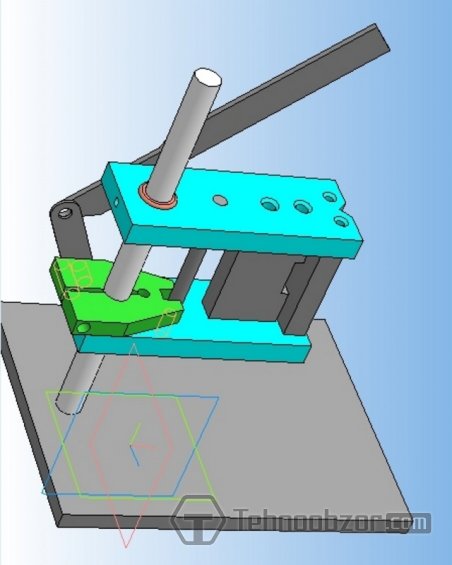
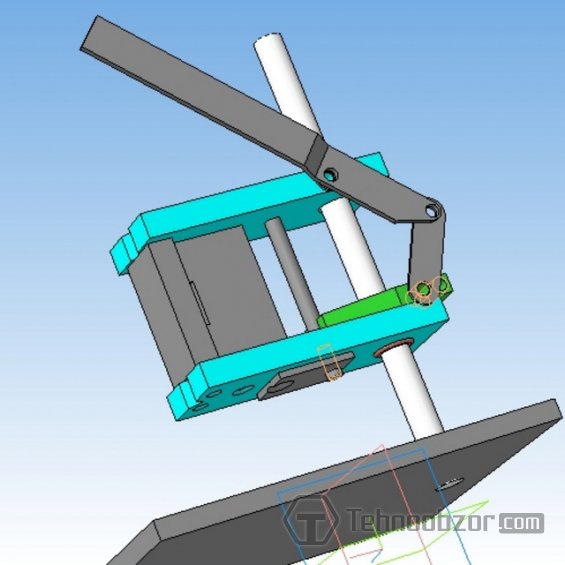
The next step was to insert the cross brace, drill holes in it and cut the threads. Having fastened the upper, lower slats and the transverse strut with screws through the regular holes, we proceed to the longitudinal strut. We drill it in the same way as the transverse one, in place through the existing holes in the slats. We look and do the rest, according to the drawings.
I want to note that it is not necessary to use the materials that I used. Several of my friends repeated this design using plex, iron rod for welding, and even wood, and it all worked out great. I’ll also add for accuracy, the return spring was used from a desoldering pump, and the backlight was from an LED flashlight key fob.
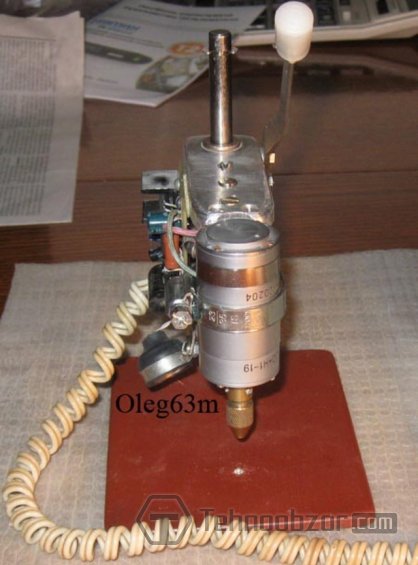
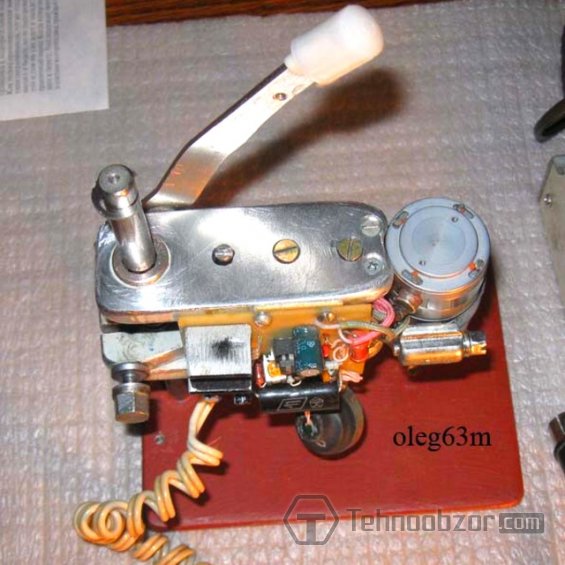
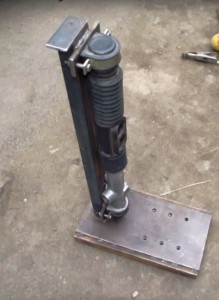
Electric motor for drilling machine
We finished with the mechanics, now the heart of any machine is a fiery motor. In my design, it is called DPM30-n1-19, but in principle it does not matter, others can be used. We will not heat it up to the flame, so we will use the speed controller. Here I will not give advice, how many people, how many opinions. Some people like to drill, so that with a constant moment, others - with a stop for "aiming", others somehow. At first, I was also a supporter of putting the drill at the drilling point and then turning it on smoothly. Convenient and accurate if you drill by hand. But we have a machine. At first I tried without a regulator, at a stable speed. If the drill "beats" a little, the picture is deplorable. But drills, as they are, sometimes you don’t have to choose, so I decided to try the scheme that I found on one radio site, with positive feedback.
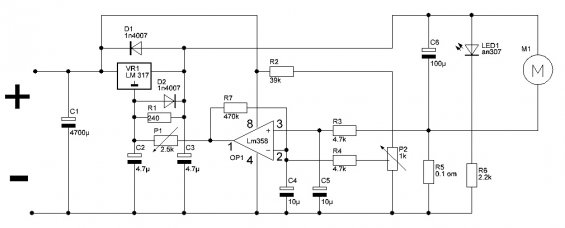
The essence of the process is that when there is no load on the drill, it rotates at a low speed (about 300 rpm), and when you press it, the load on the drill increases and the maximum speed is turned on. This method of management seemed to me (and not only) the most effective. The printed circuit board has been redesigned to fit its dimensions.
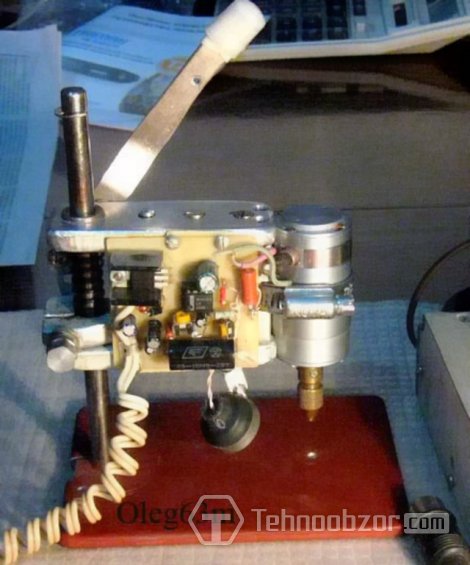
Any power source of suitable power and voltage can be used to power the device. I used a power supply from the same printer, modified a little so that the output voltage could be changed. It can then be used to connect, say, a soldering iron or other devices, for more full use IP. Video demonstration of the device:
After the demonstration on youtube, Semenchuk Viktor Stepanovich contacted me by e-mail with a proposal to make high-quality drawings in Compass in exchange for freehand drawings with dimensions, which I did, thank you very much for this. File to PDF. The file in Compas format can be obtained from the author (Viktor Stepanovich) or from me :)
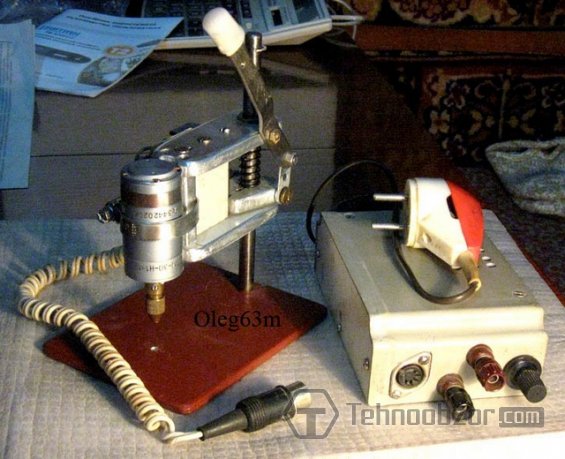
I hope my simple design both radio amateurs and the administration of Technoobzor will like it :) Ask questions on the forum. Sincerely, Oleg63m.
Watch the video on how to make a drilling machine with your own hands:
Drilling work is not particularly difficult and often does not require other equipment than a conventional drill. Therefore, in home workshops, a drilling machine may not be available. However, if you have a DIY bench drill press, you can breathe a sigh of relief, as part of your worries will resolve itself.
Purpose of the drilling machine
Sometimes there are situations when an electric or hand drill is not able to provide the desired parameters of the hole being drilled. Often in amateur radio practice, it is necessary to manufacture printed circuit boards, where many holes should be drilled, which have a small diameter. Drilling holes with a diameter of 0.5-1 mm with a hand or electric drill or a large drilling machine is inconvenient, and the drill may break.
Buying industrial drilling machines is not always economically feasible, and then you can make a homemade drilling machine. Many people choose mini drilling machines, because, despite the apparent complexity of the design, they are actually very simple equipment and consist of four parts.
A home-made drilling machine is designed for drilling through and blind holes in solid material, for example, drilling, reaming, countersinking, cutting out sheet materials discs and internal threading. Drilling and milling machines can perform milling, surface grinding, bevel milling and horizontal milling.
To perform the above operations, a countersink, drill, tap, reamer and other tools are used. Applying special devices and additional tools, you can cut a hole with a large diameter, bore a hole, and accurately lap the hole.
Types of drilling machines
Drilling machines are of the following types: single and multi-spindle semi-automatic, vertical drilling, jig boring, radial drilling, horizontal boring, horizontal boring, diamond boring. Models are designated by numbers and letters. The first digit indicates the group to which the machine is assigned, the second - the type of machine, the third and fourth - the dimensions of the machine or the dimensions of the workpiece being processed.
The letter that comes after the first digit means that a certain model of the drilling machine is upgraded. If the letter is located at the end, then it should be understood that, on the basis of the main model, a drilling machine different from it was made. It is possible to distinguish from all drilling machines such main varieties of universal machines: multi- and single-spindle, radial and horizontal drilling.
Depending on the area of \u200b\u200buse, a distinction is made between special and universal drilling equipment. Specialized machines for mass production and large-scale industry have also found wide application, which are manufactured on the basis of universal machines by equipping them with multi-spindle thread-cutting and drilling heads and by automating the work cycle.
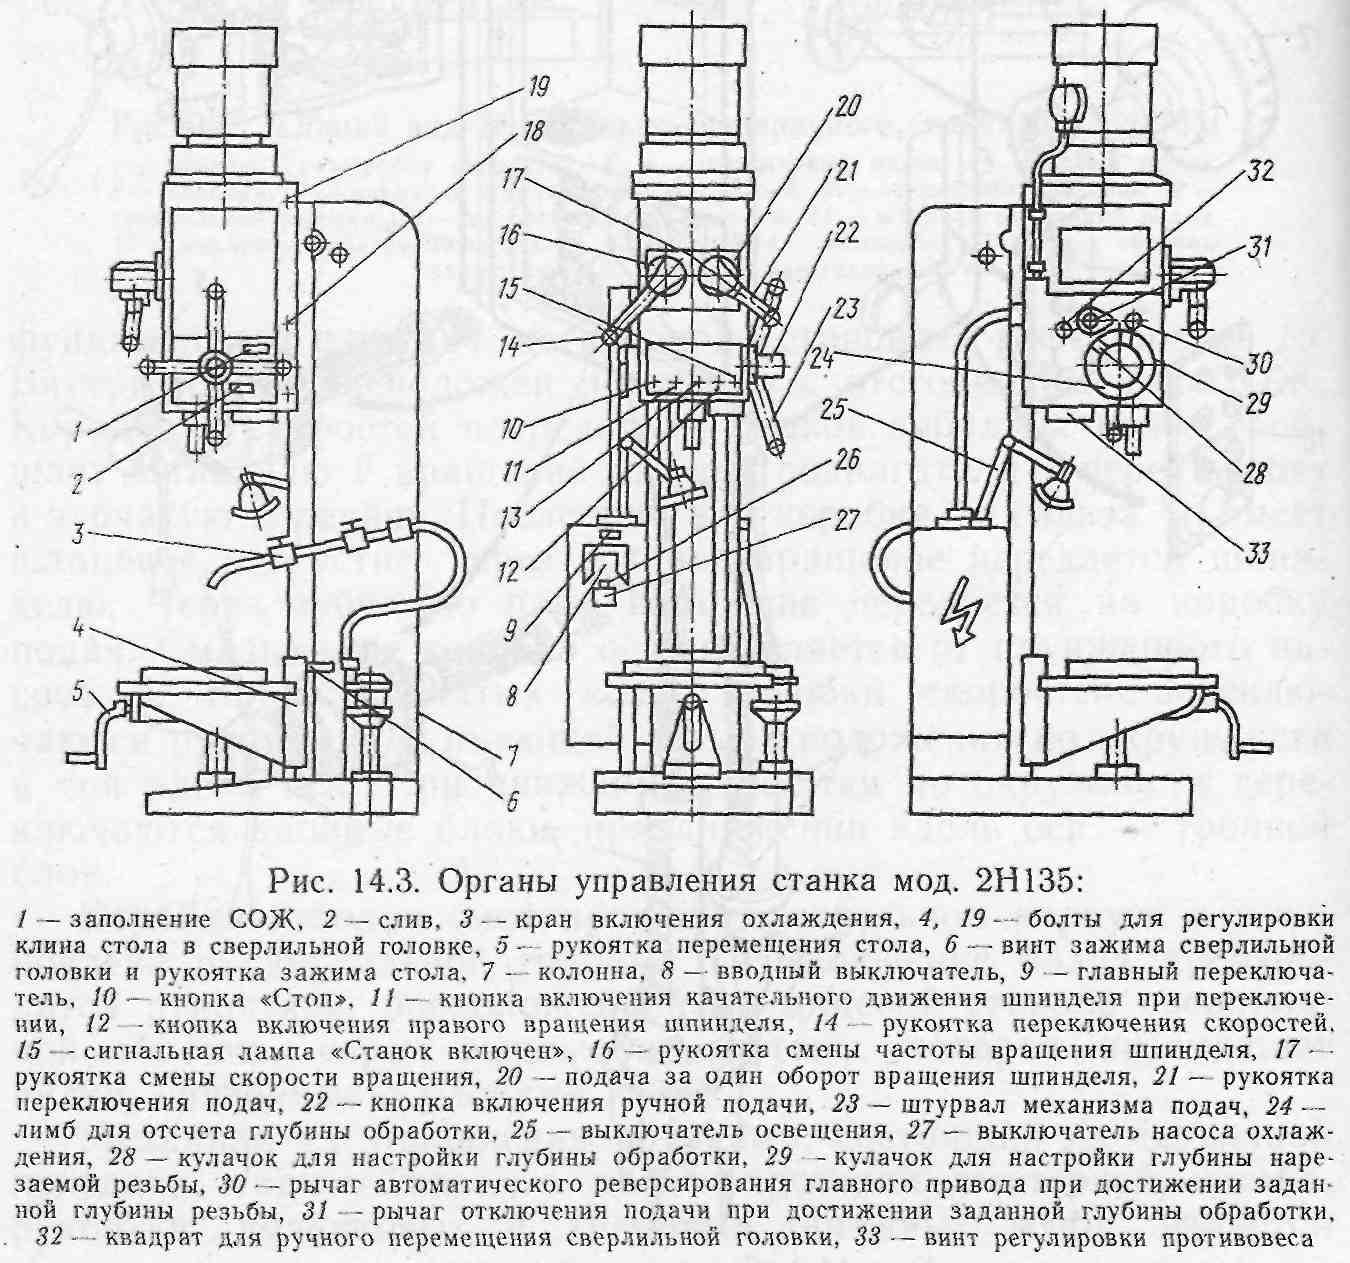
Drilling machine design
Drilling machine like others technological machines, consists of constituent parts: transmission mechanism, engine, controls and working body. The transmission mechanism is designed to transmit movement from the electric motor to the working body, which is considered to be a drill, which is mounted in a chuck mounted on a spindle - a rotating shaft.
Rotation to the spindle from the electric motor is transmitted by means of a belt drive. By turning the handle, the chuck and drills can be lowered or raised using rack and pinion.
On the front panel of the drilling machine there are buttons for switching off and on the electric motor. The device of the drilling machine is quite simple: the machine is turned on by pressing one of the extreme buttons, depending on the desired direction of rotation of the spindle, you can turn off the machine by pressing the middle red button.
A fixed vertical screw-column is attached to the base of the machine. By turning the handle, you can move the headstock up or down along the screw, the second handle serves to fix it in the required position. Control the depth of blind holes using the provided scale.
Depending on the workpiece material, different drilling speeds are required. To do this, it is customary to set a certain spindle speed by transferring a belt drive belt to pulleys of various diameters. More than complex schemes drilling machines than were just discussed.
The principle of the machine
Before drilling with a homemade machine, you need to remove everything superfluous from the desktop. The workpiece with the marked centers of the holes must be fixed in a vise. Then insert a drill of the desired diameter into the chuck and fix it with a special key. To check the correctness of the work performed, the machine is turned on for a while.
If you have correctly installed the drill, when rotating, its tip will not describe a circle. If it is installed with a warp and its beating occurs, then the drilling machine must be turned off and the drill must be fixed according to the instructions of the drilling machine. Then turn the feed handle, lower the drill and set the vise with the workpiece in such a way that the core coincides with the tip of the drill.

Turn on the machine and drill a hole, press the feed handle smoothly, without much effort and jerks. When drilling through hole install the workpiece on a wooden block so that the drill does not break and the machine table does not deteriorate.
When drilling deep hole take the drill out of the hole from time to time and cool it by dipping it in a bowl of coolant. It is recommended to reduce the pressure on the handle at the end of drilling. After drilling a hole, smoothly turn the feed wheel, raise the spindle to its highest position and turn off the machine.
Drilling machine manufacturing
A drilling machine is easy to make with your own hands. In everyday life, it is beneficial to have fixtures and tools for carpentry and plumbing work on hand. After the obsolescence of many household appliances, many useful spare parts and electric motors remain in the arsenal of the owners, from which, if desired, you can make such useful equipment as a drilling machine.
Drilling machine from a drill
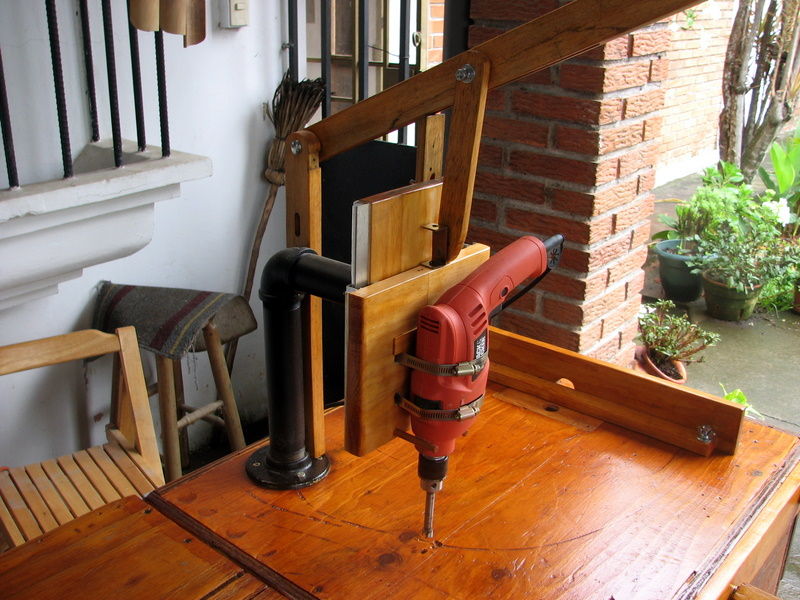
by the most simple solution for you there will be an assembly of a mini drilling machine with your own hands using a drill. The drill weighs a little, so the rack can be made from chipboard, boards or sheet metal. For comfortable work on such homemade machine it is necessary that it turns out to be quite massive to absorb the vibration of the drill and sufficiently stable.
It is important to get a right angle between the holder and the base. Usually, the drill is attached with two clamps (it is better to place it between the clamp and the drill rubber gasket) to a board that moves along guides that are fixed on this movable board and on another fixed board. The downward and upward movement of the movable board is controlled by a lever associated with it.
The downward movement of the lever can be limited by a bar supporting the lever in the lower position. A fixed board is attached to a horizontal pipe through a flange. A horizontal pipe through a square is attached to a vertical pipe, which is attached through a flange to the base of the machine (to a thick wide board) or to a workbench.
The height of the bar, which limits the lower position of the lever, is adjusted, which allows you to change the depth of drilling. Make 4 holes in the movable board, which are intended for clamps fixing the drill. On its side, which faces the fixed board, narrow rails are glued, which are lubricated with wax for better glide.
The drill, in addition to clamps, is fixed with two rods that support it from below. Since with such a fastening, the shape of the drill does not strictly ensure the vertical position of the drill, it is necessary to glue a lath to the board to compensate for this.
To ensure the free movement of the drill, the guides must be prepared strictly in the vertical direction. They can be a protrusion of aluminum metal profiles, which are screwed with threaded screws to the boards along the entire length. Having assembled a solid and stable structure, it is necessary to fix the profile guides strictly perpendicular to the plane of the base and parallel to each other.
In the photo of self-made drilling machines, the places of attachment to the movable platform of the drill and the method of mounting the guide profiles are clearly visible. The guides must ensure high-quality pressing of the movable to the fixed board. The main condition for this is the absence of distortions and backlash.
When assembling the lever, remember that you cannot tighten the moving parts; it is customary to use a second nut to lock the nuts. The rail that leads to the movable board from the lever should be rounded at the end. After reducing the pressure forces to automatically raise the drill to the upper position, it is necessary to put the springs on compression or tension.
One end of the spring is attached to the horizontal pipe with a wire, and the other end is attached to the bottom of the movable board. When the spring is not flexible enough, and a fixed board interferes, then this is done through a rope.
Machine from a motor from a washing machine
The drawing of a drilling machine, which is assembled on the basis of a motor from a washing machine, differs from the one discussed above in the most complex mechanics and the type of electric drive. The asynchronous motor from the old washing machine is heavier and has more vibration. The shaking will be stronger the farther from the rack the engine is located.
Intense vibration provokes inaccurate drilling and breakage of the drill. There are two ways out - to make a powerful frame so that when the drill is lowered, the drive also falls, or the motor is placed motionless closer to the holder stand, then it will only walk working part drilling machine.
The second method involves a more complex implementation. Here you need a pulley and a belt that allow you to adjust the speed of rotation. There are many solutions without a belt drive with a drive located against the wall. They are much easier to assemble, but the assembly, which will be discussed below, is characterized by an unconventional approach, and certain applied techniques may be useful.
Vibrations still remain, but they are so minimal that when drilling iron with a 0.7 mm drill, the drill remains intact. At home, high precision in the manufacture of such mechanisms can only be dreamed of, but it is still necessary to strive for maximum fitting of parts. The characteristics of the drilling machine and its performance will depend on this.
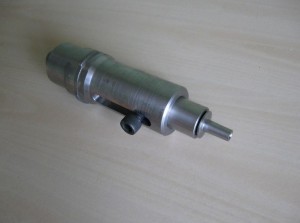
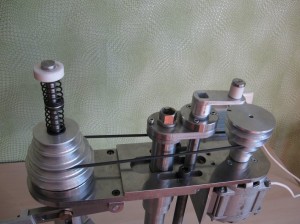
The moving part of the machine consists of an axial hexagon, a tube right size, clamping ring and two bearings and a tube with internal thread to secure the cartridge. On the hexagon, part of the future transmission system, a pulley is subsequently put on. The tube must first be cut with a grinder along both ends, and make the cuts on top deep enough to ensure a secure grip with the hexagon.
The entrance must be made tight, driven in with a hammer. If donning occurs without much effort, then you need to pick up another tube. Then stuff the compression ring and bearings. The height adjustment system consists of a pipe with cuts and a gear. To make the cuts accurately, you need to roll out the plasticine and drive along it with a gear.
An imprint will appear, which is easy to measure and make the appropriate markup on the adjusting pipe. The length of this ladder should correspond to the maximum height to which the drill can be raised. Press the axle with hexagon and bearings into the slotted tube.
Such a design will go back and forth vertically in the stationary tube of the bed when the gear is scrolling. At the same time, the axis is rotated in a horizontal plane through a belt drive. The bed is made from metal corner with bolts. The whole structure is attached to the wall.
And finally, remember that the first option for assembling a drilling machine is preferred. The proposed second version of the assembly can be supplemented or improved. However, such a simplified solution deserves attention.
Having your own drilling machine at home is the dream of any master. The most popular are designs from a hand drill. But this option has a drawback - if necessary, use a drill as an independent tool - you have to disassemble the machine.
However, there are a number of solutions for the manufacture of a drilling machine without the use of a ready-made power tool.
Powerful steering rack drilling machine
For manufacturing you will need:
- steering rack from a car, with dismantled elements of the amplifier. Of course, used, but preferably not very loose;
- Several steel corners and profiles of different sizes;
- Steel sheet 2-3 mm for the manufacture of the bed. You can pick up a suitable finished spare part from old large household appliances;
- Drill chuck;
- Electric motor and pulleys with a belt. The ideal option is from the Soviet;
- Bearings in good condition;
- Access to welding machine and lathe.
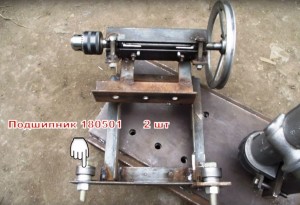
The most critical part is the axle with the pulley. Turned on a lathe. In this embodiment, the chuck mount is threaded, so the corresponding thread is cut on the bottom of the shaft.
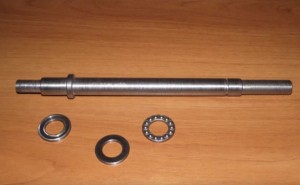
For mounting, 4 bearings are used, 2 regular and 2 thrust. Pulley used from the same washing machine.
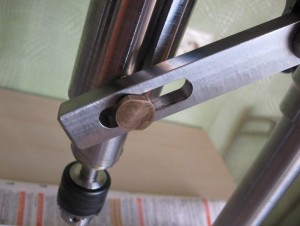
We assemble a carriage from suitable corners, on which the working shaft and engine will be fixed. We pay special attention to the placement of bearing surfaces for thrust bearings. The load must be evenly distributed, otherwise one of the bearings will wear out faster.
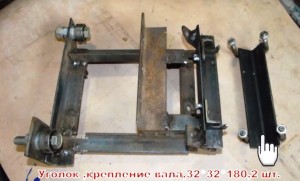
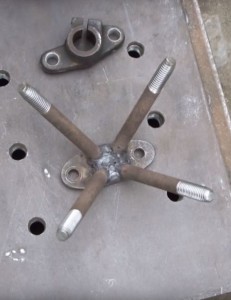
The bed is welded from a 4 mm steel plate and similar corners. A support rod made of a metal profile is welded strictly vertically. On a horizontal surface, we make 6 holes for attaching a vise or support stand. WITH reverse side nuts are welded on.
With the help of powerful clamps, the steering rack is installed on the profile. Installation is carried out once, with strict control of the vertical movement. At this stage, a decision is made on which side the steering wheel will be - under the left or right hand.
The fact is that the direction of rotation of the rack mechanism is somewhat unusual for those who worked on a classic drilling machine.
A carriage with a cartridge and a bracket for the engine, additionally supported by two bearings on a profile rod. This is done to compensate for steering rack play.
We collect the mechanism, check the verticality of the course. If necessary, adjust it by placing washers under the rail mounts.
IMPORTANT! If the direction of movement of the cartridge is different from the vertical, the drills will always break.

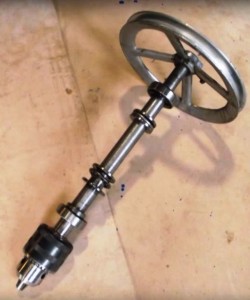
The steering wheel is made of a steel bar of 10 mm. For aesthetics, you can carve knobs. The travel of the carriage is 160 mm, which is quite enough for most drilling jobs.
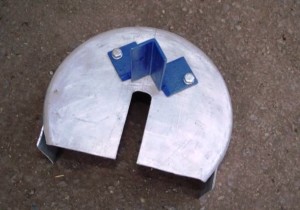
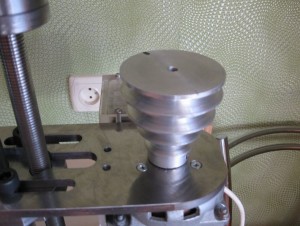
For safety, a protective cover made of thin metal. You can use an old pot of a suitable size.
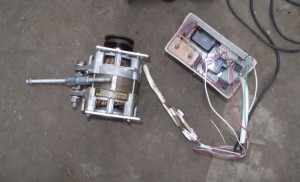
We assemble the engine control unit in a separate box. You don’t need to invent anything, the speed controller is left from the washing machine. This variant has a reverse rotation, which adds functionality, especially when threading or milling work.
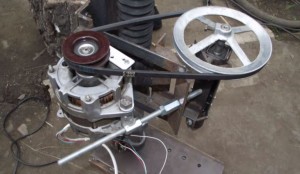
We install the motor on the carriage. On the one hand, a hinged suspension, on the other - a hairpin, a belt tension regulator. Given the age of the washing machine, it is better to replace the wedge-shaped drive belt with a new one, and at the same time, the distance between the pulleys can be set to a more convenient one.
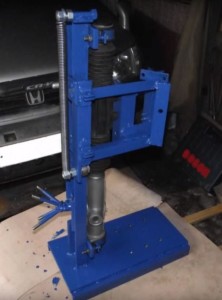
After setting up and final assembly, we cover the metal parts with paint, and the homemade drilling machine is ready to go.
To secure the workpiece, you can use a vise or stand, which is made to fit the specific dimensions of the machine.
IMPORTANT! The metal case must be grounded.
In the video, a home-made drilling machine, a demonstration of work on metal and wood.
Compact drilling machine
A home-made machine for metal does not have to be large and powerful. Most jobs can be done on a small table fixture.
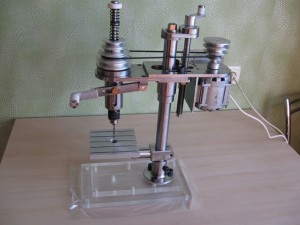
The tool is completely made of metal blanks, except for the electric motor and fasteners from finished parts. All structural elements are made using a CNC milling machine and a lathe. If you do not have access to machines, you can pick up components in a furniture fittings store.
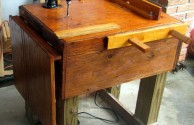
The bed is made of plexiglass 20-30 mm thick, the base is two-layer. The bottom layer is attached to the table (workbench), on the top we provide a place for installing the heel under the column.
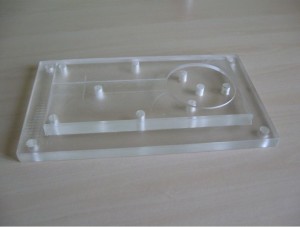
The heel and the column itself were purchased at a furniture fittings store.
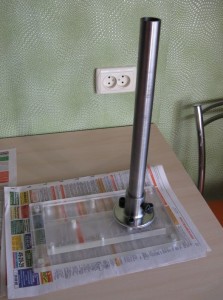
The retaining sleeve is made on lathe, and finalized on the milling machine. At the rear, a mother brass nut is installed to adjust the vertical position of the carriage. The sleeve is fixed on the column with a locking screw.
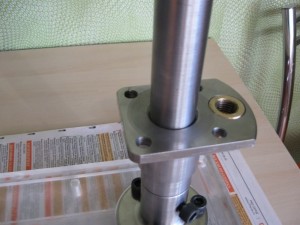
The spindle plate is made on milling machine with CNC. Don't let the manufacturing technology scare you, the same part can be easily made with a drill and a file. The plate is mounted on a retaining sleeve.
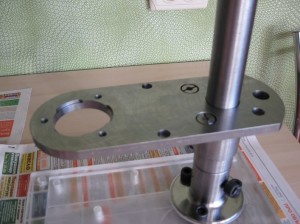
A bracket for the engine with grooves for longitudinal movement is installed on top. This is necessary to tension the drive belt, and rearrange it along the pulleys when changing the rotation speed. The bracket is made similar to the spindle plate.

The motor used is asynchronous, with a power of 60 watts. The capacitor starting block is made in a separate box.

The spindle plate, together with the engine, moves vertically with the help of a lead screw, the mechanism is visible in the photo, the element is optional, but it adds convenience.
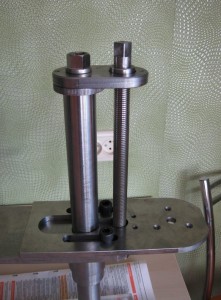
The spindle consists of a housing with bearings and a shaft on which a chuck is mounted using a Morse taper.
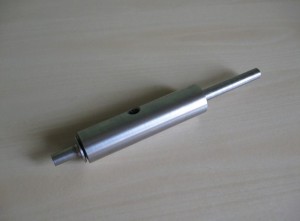
The spindle body is mounted in a sleeve along which it will move vertically when drilling.
Movement is carried out using a lever in which a longitudinal groove is cut.
A pulley with variable diameters is put on top to adjust the speed of rotation and torque.
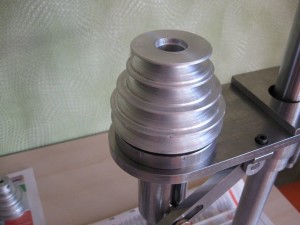
A similar design, only inverted, is placed on the drive motor shaft. By rearranging the belt from one pulley to another, you can easily achieve the required rotation speed.
We assemble the structure, check the performance. The drive belt can be round or flat, depending on which pulleys you will use.
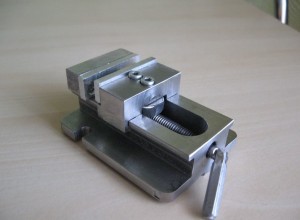
Initially, the desktop machine was created for drilling printed circuit boards, but was subsequently upgraded to be more versatile. For drilling holes at any angle, a three-dimensional coordinate vise for a drilling machine is made.

The design consists of a coordinate plate, machined on the same CNC router and a vice, also made by hand.
We looked at ways to make a drilling machine from improvised materials. There are many execution options. You can make a frame from a photographic enlarger or use the mechanism of an old microscope. The principle of operation will not change from this.
The main condition is a reliable working surface with a plate or vice, and a mechanism for moving the spindle vertically. The presence of backlash of the mechanism and the overall comfort in work depend on the accuracy of manufacturing.
In the video, a homemade drilling machine from an old photographic enlarger. To work took a tripod and mount.
You can develop a drawing and order the manufacture of components at the factory, or pick up items from junk in a barn and garage. A machine made with your own hands will not get worse from this. You still make it “for yourself”, which means that there are no universal designs.
In a wide range of plumbing work, drilling is perhaps the simplest and most accessible operation for everyone. As a rule, in production, drilling work is carried out using various drilling machines.
Depending on the tasks performed, these can be the most common single-spindle units, and multifunctional multi-spindle machines with numerical control.
Homemade desktop drilling machines
However, we will not be distracted by the description of all kinds of industrial drilling installations, especially since home master, for whom this article is intended, will hardly be interested in the subtleties of the design of a universal vertical drilling and boring machine. But the design of the simplest home-made drilling machine, which can be assembled from improvised material at home, will interest any "handy" master.
To perform drilling work at home, in most cases, it is enough to have a conventional electric drill.
However, when performing work that requires high accuracy or drilling many holes of small diameter, which is especially important for radio amateurs in the manufacture of printed circuit boards, a drilling machine will be required, since an electric drill will not provide either adequate accuracy or drilling quality.
Of course, today in any specialized store many models of various machines are sold, including drilling machines, designed for use in home workshops. However, their cost is considerable, and not everyone can afford such a purchase, especially since with certain skills and desire, the simplest drilling machine can be made independently.
The most common types of homemade drilling machines are:
- Drilling machines based on an electric drill
- Drilling machines based on an asynchronous motor from household electrical appliances
Consider in in general terms manufacturing technology of each of these machines.
Drilling machine based on an electric drill
Due to the ease of manufacture, drilling machines based on an electric drill can most often be found in home workshops.
The weight of the electric drill is small, so for the manufacture of a vertical stand you will not need any particularly strong materials, it can even be made from boards or chipboard.
The design of the drilling machine consists of 4 main elements:
- Base (bed)
- Vertical stand or beam
- Feed mechanism
- Electric drill
The choice of the base of the machine, the frame, should be taken very seriously. The more massive it is, the less vibration will be felt during operation. If your farm has an old photographic enlarger for developing pictures, it can be adapted after a little refinement as a base with a stand. In the event that you didn’t find anything that could be adapted as a bed with a stand, this element can be made from a furniture plate with a thickness of at least 20 mm.
When attaching the rack to the frame, it is extremely important to get a right angle, since the accuracy and quality of drilling will depend on this. With the help of screws, two guides, cut out of metal strips, should be fixed to the rack, along which the block moves up and down, to which the drill is attached. The block should be made in such a way that the drill can be tightly clamped with metal clamps.
To reduce vibration, a rubber gasket can be installed between the body of the electric drill and the shoe. The vertical movement of the block with a drill is carried out using a lever. To ensure the convenience of work, the feed mechanism should be equipped with a sufficiently powerful spring, which could bring the block with the drill to its original position. One end of the spring will rest against the block, and the other against a fixed beam, which should be installed on the rack.
If the drill will not be used autonomously, for greater convenience, you can disassemble its switch and install the on-off button directly on the frame.
Drilling machines based on asynchronous motor
In many home workshops, there are various electric motors that have been preserved after the use of electrical appliances. For the manufacture of a drilling machine, the most suitable would be asynchronous electric motor, which is set to washing machines drum type.
It should be said that the design of such a machine is much more complicated than the above-considered design using an electric drill. Among other things, the motor from the washing machine is quite heavy, which creates increased vibration and requires mandatory installation powerful rack.
To reduce vibration, place the engine as close to the rack as possible or choose a fairly heavy, powerful frame.
However, it should be noted that when the engine is located close to the rack, the design becomes much more complicated, since it becomes necessary to install pulleys with a belt drive. When assembling, it is necessary, if possible, to fit all the details as accurately as possible, since the performance of the machine will depend on this.
For the manufacture of the pulley structure, you will need:
- hexagon
- Steel clamp ring
- two bearings
- Two cut thin tubes, one of which is internally threaded
- Gear
The moving part of the mechanism can be made from a hexagon, a tube of the appropriate size, a clamping ring, bearings, a tube with a threaded female thread to which the cartridge will be attached. The hexagon is an element of the transmission mechanism on which the pulley is put on.
 To ensure a reliable connection with the hexagon, deep cuts are made at the ends of the tube. A compression ring and bearings are driven into the tube. It is necessary to ensure that the structural elements are fastened to each other very tightly, otherwise, the structure will collapse from vibration.
To manufacture the adjustment system of the machine, you will need a pipe with cuts of the appropriate size and a gear, the teeth of which must freely penetrate into the cuts on the pipe. In order not to be mistaken with the places of the cuts on the pipe and their size, you should roll out the plasticine on the pipe and drive the gear along it. The length of the ladder pipe must correspond to the height to which it is necessary to raise the chuck with a drill. The axis with a hexagon is pressed into a pipe with slots.
The design described above is rather complicated in execution, and, let's not dissemble, not everyone will be able to make it. Therefore, the easiest way is when manufacturing a machine with asynchronous motor, pick up a powerful steel frame and assemble the machine by analogy with a unit with an electric drill. True, it will not be possible to completely avoid vibration, in any case, and it is not necessary to count on obtaining holes of a particularly precise size when using this unit.
Of course, this article indicates only general principles for the manufacture of homemade drilling machines, and it cannot serve as a guide to action. Therefore, before proceeding with the assembly of the machine, it is recommended that you familiarize yourself with the drawings of various designs.
In addition, radio amateurs, who, as a rule, drill into printed circuit boards holes of extremely small diameter, it is recommended to assemble these structures in miniature, replacing the electric drill with a microelectric motor. Together with a voltage regulator, a microelectric motor will allow you to get almost perfect holes. An example of the construction of such a machine can be seen below in the photo.


How to cook ham in the oven at home
Pain in the lower abdomen during pregnancy, reasons for what to do Can the lower abdomen hurt if pregnant
Protein for muscle gain
The best vitamins for men according to customer reviews
How to lose weight on a vegan diet?