The organization of autonomous water supply is a very troublesome and responsible business. It includes a whole range of activities for drilling a well and its arrangement. If the first is better to entrust to specialists, especially when it is planned to use the received water as drinking water, then the second is quite possible to do it yourself. In this case, it should be borne in mind that the arrangement of a well for water involves competent installation special devices that will provide a constant supply of water. Therefore, before proceeding with the installation, it is worth getting acquainted with their design and principle of operation.
Types and features of installation of caissons
The uninterrupted operation of the well is designed to provide a caisson, an insulated waterproof container with necessary equipment inside.
Usually a pump, shut-off valves, measuring instruments, automation, filters, etc. are mounted in it. Constructions are made from different materials. The most common:
- Plastic. They are distinguished by excellent thermal insulation, which allows even without additional insulation maintain the temperature inside the caisson at 5C. Durability, excellent waterproofing characteristics, which makes it possible to avoid additional costs for insulation work, reasonable price, especially in comparison with other options. In addition, mounting the system is quite simple due to its light weight. The main disadvantage is low rigidity, which can provoke deformation of the structure and damage to equipment. However, it is easy to deal with it, filling the container around the perimeter cement mortar layer of 80-100 mm.
Plastic caissons have excellent thermal insulation, which allows them to be installed without additional insulation.
- Steel. Most often, the arrangement of a water well is carried out with just such a design. The material allows you to make a caisson of any desired shape, without the need special efforts. It will be enough just to weld the parts together and treat the structure from the inside and outside with a special anti-corrosion coating. For a high-quality container, metal 4 mm thick will be quite enough. You can also find ready-made structures on sale, but their purchase will cost much more than self-production.
- Reinforced concrete. Very strong and durable installations, previously extremely common. Due to their shortcomings, today they are used much less frequently. Their cost is very high, and special equipment is required for installation, which is due to the large weight of the equipment. For the same reason, over time, the concrete caisson sags, deforming the pipelines inside it.
Concrete has insufficient thermal insulation, which can cause the water in the pump to freeze in very coldy, and poor waterproofing, since concrete is hygroscopic
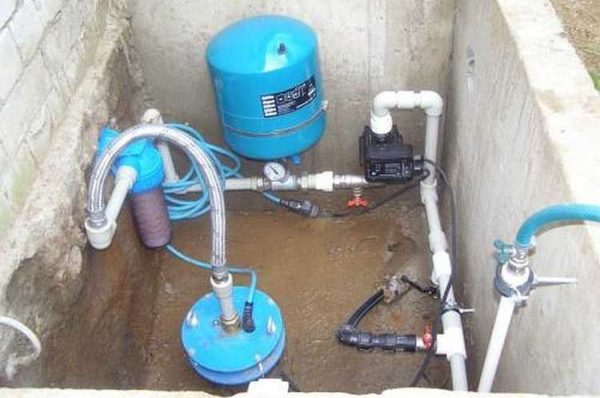
Here is an approximate scheme for installing equipment in a caisson and connecting communications:
Scheme of installation of equipment in the caisson
If you are going to complete the arrangement of the well with your own hands, it is worth getting acquainted with the stages of installing the caisson. They are almost the same for any type of structure, with slight nuances depending on the material of the equipment. Let's consider the stages of installing a steel tank:
- Pit preparation. We dig a hole, the diameter of which is 20-30 cm greater than the diameter of the caisson. The depth must be calculated so that the neck of the structure rises about 15 cm above ground level. This way, it will be possible to avoid flooding the tank during the flood and heavy rainfall.
- Casing sleeve installation. We make a hole in the bottom of the container. It can be positioned traditionally in the center or shifted as needed for equipment installation. A sleeve 10-15 cm long must be welded to the hole. Its diameter must be greater than the diameter of the casing pipe. Be sure to check that the sleeve can be easily put on the pipe.
- Installing outlet nipples water pipes. We weld them into the wall of the container.
- Caisson installation. We cut the casing pipe at ground level. We put the container on the bars above the pit so that the sleeve on the bottom of the container is “dressed” on the pipe. We check that the axes of the caisson and the casing exactly match, then carefully remove the bars and carefully lower the structure along casing pipe down. We install the container in the pit strictly vertically and fix it with bars. We weld a pipe to the bottom, while sealing the caisson. Through the nipples we start water pipes into the structure.
Backfilling of the building.
The caisson is “put on” on the casing pipe and carefully lowered into the pit
It should be noted that, in principle, it is possible to equip a well without a caisson, but only if a heated building is located near it, in which the equipment is located.
The convenience of such a system is undeniable - all nodes are easily accessible. However, the disadvantages are also significant: it takes up a lot of space in the room and most often makes a lot of noise.
More detailed instructions for the installation of a caisson for a well, you will find in our following material:.
Selection and installation of a borehole pump
The selection of a pump is the most important stage in the arrangement of an autonomous water supply. Equipment should be selected taking into account many factors: the degree of load on the well, the desired water flow, the depth of the aquifer, etc. In addition, the types of mechanisms must be taken into account: for wells with a depth of less than 9 m, a self-priming surface device is usually chosen, for marks located below 9 m, install special borehole pumps.
For depths of more than 9 meters, special borehole pumps are chosen
In the future, the arrangement of a well in a country house or in a private house involves the installation of a device for supplying water. It consists in the fact that the pump is lowered into the well to a mark located below the static water level. Along with it should be omitted:
- a cable that supplies energy to the electric motor of the device;
- plastic pipe for water supply;
- stainless steel safety rope for the pump.
The cable is firmly fixed on the head of the well. In case the systems automatic control and water-lifting equipment is supposed to be placed in the house, a cable and a pipe for water supply lead directly into the room. It is also possible to place all the equipment inside the caisson, but then its area should be larger.
Hydraulic accumulator and automatic control systems
When calculating how to equip a water well, you need to remember about a hydraulic accumulator, without which the system will not be able to work efficiently. It is a pressure tank designed to reduce the load on the pump and maintain the pressure in the system at a given level. draws up a certain supply of water, with a decrease in which the pump automatically turns on to restore the reserve. The volume of the tank depends on many factors and can vary from 10 to 1000 liters. The equipment is installed either in the caisson or in the basement.
Last installed and configured automatic systems management. Most often, this is a relay that maintains the required pressure level in the system, and an automation control panel.
The device is necessary to control the operation of a thermal relay, a pressure switch, a “dry run” sensor, to start and turn off the pump. Also, the fuses built into the remote control protect the equipment from possible power surges.
The accumulator can be installed both in the caisson and in the building - it all depends on the preferences of the owner and the specifics of the system
In our next article, you will learn what parameters are important to consider when choosing pumping equipment for a well:.
Thinking about how to equip a well, you need to soberly assess your capabilities. This process is quite complex and requires special knowledge and skills. If you have doubts about your own abilities, you should entrust the work to professionals. They will drill and equip a well with high quality, the owner of which will only be happy to use autonomous water supply.
For high-quality and long-term service of the hydraulic tank, it is necessary to calculate the water consumption in the house. The data will give the exact answer - how much tank is needed!
A modern artesian well will not be able to work without certain equipment.
It includes a pump, a filtering system, a caisson, communications. This list also includes a hydraulic tank.
This is a special container general scheme pump. A hydraulic tank is needed to equalize the water pressure in the system. It ensures a uniform flow of water to the consumer - after all, the flow rate of a well is not always capable of producing the required amount. It is naive to believe that this is a simple barrel. The hydraulic accumulator has a membrane and an automation system to it. When it is filled with water, automation is triggered, the pump stops pumping.
It may happen that there is no light, and the well has stopped producing water. But there is always a reserve in the tank: for some time you will be with moisture. Theoretically, one can imagine a well without this device. But then the water will flow unevenly. And the worst - submersible pump will fail. Its repair or acquisition will be very expensive.
Hydraulic accumulators are horizontal and vertical. According to the volume they are divided into small and large. The average division threshold corresponds to one hundred liters. Large ones (more than 100 liters) are more complicated. They have an additional membrane. And the more complex the device, the more likely it is to fail. For the optimal purchase of a hydraulic tank, an analysis of the water flow in the room should be carried out. For this, it is better to turn to professionals. And they will tell you exactly which drive it is desirable to buy: for 50, 80, 100 or 500 liters.
It is a mistake to assume that the larger the hydraulic accumulator, the better. And it's not just about saving money (small is cheaper). If the volume of this device is several orders of magnitude higher than the usual flow rate, well silting may occur. And the water itself in the tank will stagnate, over time it will turn out to be unsuitable for consumption: poor flow will contribute to this. The reserve of such water can only be used for watering the garden. But then it's better to just stock up on a barrel or other simple container.
After many years of well operation, the accumulator may need to be repaired or replaced.
Owners are interested in: how much does it cost to replace a hydraulic accumulator? The cost of work with a complete replacement of the tank depends on the volume of this device. The larger it is, the more expensive it is and the higher the price for the work. Remember: replacing a hydraulic accumulator with your own hands is a thankless task! Not every person has good experience and skills of similar operations. Often such repairs end in equipment damage and additional losses.
Contact only specialists! The services of professionals are beneficial in that you will save a lot on the cost of the hydraulic accumulator itself. At the enterprise "Water to the people!" there are excellent suppliers of these devices. The company buys many types of equipment without intermediaries - directly from manufacturers! - not the only service of the company "Water to the People!" The list of services includes drilling and well construction, well repair, chemical analysis of water, video inspection of the source.


Most of the work related to the development and installation of water supply systems requires a certain amount of experience and a clear understanding of the specifics of the operation of a water supply system based on an artesian well. But even in such a difficult matter, there are many individual elements and nodes that are quite capable of being installed with your own hands. For example, connect a hydraulic accumulator and a pressure switch to a pump. The complexity of such work is minimal, the installation of a hydraulic accumulator for water supply systems does not require special skills or knowledge of electrical installation;
What and how to adjust in a system with a pump and a hydraulic accumulator
There are three classic options for the layout of pumping and accumulator equipment for a well:
- In the first case, a submersible pump is used, located in a well under a layer of water of 1-2 meters, automation, a filter and a hydraulic accumulator can be located in a caisson at the head of the well, but with the same success for all equipment, installation can be performed in the basement of the house;
- In the second case, a surface pumping system and a hydraulic accumulator are used, which do not have the pressure capabilities of submersible units, so they are tried to be located as close as possible to the well and the water level. Most often, a pump with a water pressure switch and the accumulator itself are mounted in the caisson;
- In the third variant, also called dacha-garden, water from the well is lifted by a surface pumping unit or a simple vibrating “Kid” into a huge water tank. Water can be supplied to the water supply at home without using an additional pumping device, only the natural pressure of the water column, water the beds and refill the outdoor shower, wash the equipment, in general, use the installation at your discretion.
For your information! In any case, before setting up the accumulator pressure switch, you will need to correctly calculate the required water pressure in the house, taking into account the requirements of household appliances and the existing height difference between the pump level and the maximum water withdrawal point in the house, most often it is a heating system air discharge valve.
The sequence of work when installing a hydraulic accumulator with your own hands
Immediately after drilling the well and determining the debit, they begin to equip it. Based on the depth of the aquifer and the degree of its contamination with salts and sand, they decide on the method of designing the head, where it is necessary to put the pump, and which version of the pumping system and pumped storage installation fit better Total.
Installing a hydraulic accumulator paired with a submersible pump
The submersible pump unit has always had a lot of advantages, but the more powerful and perfect the pump, the larger the volume of the pumped storage unit must be used to compensate for pulsation and water hammer. Therefore, when choosing a scheme for installing pumping equipment and a hydraulic accumulator device, the system parameters were successively determined:
- The required pressure and water flow to ensure normal water supply to the house, taking into account the depth of the well and the distance from its head to the building of the house;
- What pump power and the volume of the accumulator tank will provide the necessary performance and smooth operation of water supply systems;
- Where to locate the main components of the equipment of the water supply system: pump, accumulator, automation and filters.
For your information! To ensure the operation of expensive and powerful pumping systems of Danish, German and Italian manufacturers, hydraulic accumulators from 50 to 100 liters are most often used, which are installed in a well-equipped basement or basement.

The high pressure and pressure of "European" models make it possible to install pumped storage units at a considerable distance from the well, even if the building has a second floor and household appliances that require increased water pressure in the water supply system.
The standard piping connections are shown in the diagram.
This option of installing a hydraulic accumulator in a water supply system provides a number of significant advantages:
- A well-ventilated and partially heated room helps prevent condensation on the surface of the accumulator and electric automation systems;
- It is convenient to maintain the accumulator tank and filter; according to existing standards, it is recommended to check the pressure gauge readings in the air chamber of the accumulator cylinder and the settings of the pressure switch for the accumulator at least once every two to three months;
- If necessary, you can drain the water from the water supply system directly into a reserve tank or into a sewer.
Important! Installation of a hydroaccumulation device in separate room requires that polypropylene pipes be laid in the ground to a depth not less than the freezing depth with a slope towards the well of at least 2o. This will allow air bubbles to escape to the filter and the connection point of the hydrostorage tank.

The basis for the construction of such a node of the water supply system is a hydraulic accumulator tank, most often of a vertical design on supports. At the bottom of the tank, a five-pin fitting is screwed in, through which the pump line, outlet line, pressure switch sensor and pressure gauge are connected. The pumping line, most often from the well to the accumulator, is made of polypropylene pipe. In small water systems, connections can be made with flexible hoses, and the relay and filter are usually located on a special mount at a height of at least a meter above the floor.

The disadvantages of such schemes include the sensitivity of submersible pumping systems to a high content of sand and salts. The non-return valve in submersible systems is most often located at the outlet of the pump at great depths. After raising a certain amount of water, the sand remaining in the outlet pipe slowly settles, sinking to a depth, and gradually accumulates on the body of the check valve, gets inside the device, which leads to the failure of an expensive unit.

For domestic submersible pumps of the "Vodomet" type, you can install in a caisson or head well. Most often, such a scheme is used for low-power pumping systems, with a shallow aquifer.
In the photo you can see the classically correct installation of a submersible pumping system and a hydraulic accumulator in a well.
The output from the wellhead is fed to the filter, then to the accumulator, and only after that to the pressure switch submersible pump. The output from the well to the filter and accumulator is made with a flexible hose, all other fittings are soldered from plastic pipes. What gives such a scheme? Such an installation allows you to issue sand-free water to the accumulator and relay.
By connecting the system to the water line through a filter, the reliability of the automation is significantly increased. The relay should be freed from dirt and sand as much as possible, otherwise, after a couple of months there will be interruptions in operation.
In the central part of the outlet line, going from the pressure switch to the entrance to the water supply system of the house, there is a ball valve with a tee, which allows you to solve a rather difficult question: how to drain the water when adjusting the pressure of the automation relay.
For large height differences, or if the water in the well is of very low quality, additional pumped storage devices are installed with volume separation clean water and technical water. The system consists of two hydraulic accumulators and a clean water tank. In a set for the pump in the well, a standard hydraulic accumulator-accumulator of raw water is installed, from which the liquid through the filter of dirt and neutralization of suspensions enters the inlet of the vortex pump, which pumps water through membrane filters into the accumulator for clean water, located in the house or basement. Water is taken from the tank and sent to the place of use in the water supply system by a conventional network pump.
A pumping device that takes untreated water from a well should be as insensitive as possible to the content of hard salts and clay suspension in artesian water.
Easy installation of accumulator with surface pump
It is best to install a properly tuned centrifugal pump with an ejector and a small hydraulic accumulator for these purposes. The first accumulator will not be used as a backup source of water, so you can limit yourself to a small membrane model of 10-12 liters.
There are no special differences in the use and installation of a hydraulic accumulator with a surface pump, except that:
- The installation of the accumulator and pressure switch should be carried out as close as possible to the pump;
- Between centrifugal pump and the accumulator must have a filter and a check valve, otherwise every time you turn on faucet with noise and vibration you will get a mixture of air and water.
Country-garden option for installing a hydraulic accumulator
The country-garden option, for all its primitiveness, makes it possible to very rationally use the capabilities of pumps with high water flow and get by with the minimum size of the accumulator.
The advantages of the pump installation option shown in the photo are obvious. Firstly, there is no need to install a large and expensive accumulator, which does not always make sense to purchase for the needs of a summer residence. Secondly, the relay on the pump can be connected with a flexible hose to the place where water is taken from the tank and adjusted to the minimum 0.1 and 0.2 atm off and on, respectively. In some cases, the pressure switch membrane is replaced with an electromechanical timer that allows you to pump out a certain amount of water from a well or well at a programmed time interval.
Conclusion
All of the listed options for installing a hydraulic accumulator have been tested in practice and proven to be reliable. If the quality of water in your estate or private house leaves much to be desired, use the pump method described in the article with two accumulators and a membrane water purification filter. Most branded hydraulic accumulators have a certified rubber sheath in which you can store a supply of purified water for a long time. drinking water. For technical needs, you can use a conventional tank, described in the last subsection, complete with a small and cheap vortex pump.
The device of a well near the house solves the problem with its uninterrupted water supply. But in order for this source to work normally, it is necessary to competently organize the entire process - from drilling a well to equipping it and putting it into operation.
With permanent residence in the house, the most reasonable solution is to equip a well with a caisson. This version has a lot of advantages, which you will learn about from our article. It will also talk about step by step implementation project.
With year-round use of the well, one cannot do without installing a caisson at its mouth. This enclosing structure is a waterproof chamber located in water-saturated soil. From the point of view of ease of maintenance and operation, a well with a caisson is the best option.
In addition to the caisson, the integral elements of a water well are a surface or pump, pipes, shut-off and control valves, if desired, the owners and a head.
In winter, a stable temperature is maintained inside the caisson. It usually does not fall below 0°C. Under such conditions pump equipment can be used all year round
This solution has a number of advantages:
- All plumbing equipment is placed compactly in the chamber and there is no need to allocate a separate place for it in the house. As in the case of central water supply, only a pipe will need to be brought into the house, as well as a supply cable for the pump.
- If the house is intended exclusively for summer living, then to remove water from the water supply for the winter, you just need to open the drain valve located in the caisson.
- When it is necessary to supply input at several points on the site, then this idea is very simple to implement by removing the required number of pipelines from the caisson. The regulation of the process is carried out by means of valves.
- A winch mounted in the upper section of the chamber will simplify the process of extracting the pump from a deep well in case it needs to be repaired or replaced.
- The chamber will protect the downhole equipment located in it from freezing. If the installation of the caisson is done correctly, you can not worry about the safety of its filling even at a temperature of -35°C.
Thus, in the presence of a caisson, unfavorable external factors will not affect the quality in any way.
The main requirement for the caisson is tightness. If this condition is violated, oil can get into the aquifer through the casing pipe into the aquifer. dirty water from the camera. Pollution of the aquifer is unacceptable, so the head of the well and the caisson must always remain dry.
This device in the water supply system performs the same role as the compensation tank in heating system. In itself, in its normal state, there is always a certain amount of water under stable pressure. Its presence in the system guarantees slower wear of pumping equipment, since it is turned on less often.

The hydraulic accumulator performs 3 functions: protective, preserving, limiting. The first is protection against water hammer, the second is the presence of a certain supply of water, the third is the limitation of the number of pump starts
The material from which the accumulator casing is made, as well as its individual elements, does not react with water, therefore it does not affect its quality in any way. The basis is the use of compressed air. It is pumped under a pressure of 1.5–2 atm into the gap between the casing and the rubber membrane.
The workflow consists of the following steps:
- pressurized air acts on the membrane when the water tap is opened;
- the membrane is compressed and displaces liquid through the outlet valve;
- the inlet valve opens when the water volume reaches its minimum and the cavity begins to fill with water again;
- the process is repeated from the zero position.
There are two types of this equipment according to the installation method: vertical and horizontal. If you have to choose between these two types, then you should know that the valve for relieving excess pressure in the vertical unit is at the top. The whole process happens automatically.
If you place the well closer to the house, then:
- the volume of earthworks will decrease;
- less pipes required;
- you will need a pump of small power, sufficient only to raise water to the surface.
You can also save money when choosing a drilling method. To make a well for personal use, you can do the work using a hand drill. Sometimes they use an electric tool, percussion devices.
Nuance # 1 - the choice of a well drilling method
When choosing a specific tool, you need to proceed from the characteristics of the soil. With an independent manual method, you will have to make considerable efforts, but under favorable conditions you can get to the aquifer lying at a depth of up to 15 m.
A well of shallow depth can also be drilled with an auger. Its rotation is carried out both manually and with the help of mechanisms. In any case, a tripod-shaped tower is built above the future well to facilitate the lifting of the tool. When choosing the second method, you will also need an electric motor that is suitable in power.
For drilling a well, they use shock-rope method. The working tool here is a pipe, the edges of which are sharply sharpened (a driving glass with a strong edge along the lower edge). Due to its considerable weight, it crashes into the ground with great effort, then it is removed using a rope system and freed from the ground.
- from reinforced concrete rings;
- metal;
- plastic;
- brick.
Reinforced concrete rings and bricks. This type of caissons practically does not provide tightness on long time. This threatens the equipment with flooding and subsequent loss of performance.
Metal. If all the requirements were met in the manufacture of metal caissons, they will have good tightness.
Earth in relation to metal is aggressive environment, therefore, the enclosing structures of such chambers are subject to oxidation, as a result of which depressurization may occur.
Plastic. Caissons made from polymer materials convenient, light weight, easy to install and operate. The probability of depressurization is rather small, because the material is not subject to corrosion. Plastic caissons serve much longer than metal ones.
Conclusions and useful video on the topic
Arrangement of a well with a concrete caisson:
A visual aid for the installation of the caisson and equipment for the well:
Making a well with your own hands is a responsible and time-consuming process. It is possible to perform the work competently only if you have certain knowledge and skills. But nothing is impossible, the key to success is the right approach and careful preparation.
It is necessary to adopt a key rule: there are no secondary nodes in the well device. If at some point is problematic for you, entrust the solution of the issue to specialists so that later you do not have to equip a new well.
Tell us about how the caisson was built over the wellhead on suburban area with my own hands. Share technological nuances that will be useful to site visitors. Please leave comments in the block below, ask questions, post photos on the topic of the article.
To organize the normal operation of the water supply in country house from a well or similar source, a number of special equipment must be installed. The package includes a pump, automation, hydraulic accumulator and other equipment. In this article, we will tell you about how the process of connecting and installing a hydraulic accumulator for water supply systems with our own hands takes place. We will offer you several working connection schemes. But first, let's find out what this equipment is.
Hydraulic accumulator - why is it
There are several main purposes that a hydraulic accumulator serves in a water supply system. First of all, its installation allows you to create required pressure online. Also, a small amount of water is stored in the accumulator. For example, if for some reason the pump cannot pump water, then you can use it. The volume of water determines the internal volume of the accumulator. And most importantly, its presence in the water supply system of a private house prevents the formation of water hammer.
A hydraulic accumulator means a special metal tank. In order to maintain stable pressure inside it, it is equipped with special equipment. The water supply scheme for a well with a hydraulic accumulator is relatively simple, and if you follow all the instructions in this article, then you can do the connection yourself.
In most cases, the hydraulic accumulator for water supply systems uses the principle of compressed air energy. It consists of a partition, for example, it can be a rubber membrane or a rubber pear. So, the essence of the operation of the entire water supply system with a hydraulic accumulator is as follows. Pumping equipment pumps water into the tank. As the tank fills up, pressure forms inside it, as the water presses on the pear. This whole process is controlled by a pressure sensor. This is important so that the pump can turn off. As soon as a faucet is opened in a room with water, the water is pushed out by means of the energy of a rubber bulb or membrane.

As soon as the pressure in the accumulator drops, a sensor is activated that sends a signal to the pump, and it turns on. Thus, the accumulator is filled with water again. Pumping is carried out until the shutdown signal is triggered.
As you can see, in addition to connecting the accumulator itself, it is important to correctly calculate the pressure in the water supply accumulator. For this purpose, you can use the manufacturer's recommendations, which are indicated in the passport.
Today, there are two types of hydraulic accumulator:
- Open type.
- closed type.
Concerning open type then it is rarely used. And this is not surprising, because he has a number of negative sides, among which:
- High water evaporation rate. As a result, it is necessary to constantly pump up water.
- Moreover, installing a hydraulic accumulator for open-type water supply systems with your own hands will be much more expensive. This is due to the fact that it is necessary to take measures that will exclude the possibility of freezing water. Moreover, it is necessary to install additional automation, which will eliminate the possibility of water overflow.
- An important minus is that when water comes into contact with oxygen, its aggressiveness in relation to metal parts. As a result, this leads to the formation of corrosion on the metal, and this significantly reduces the service life.

Among other things, there are models that are placed in a vertical or horizontal position. If the area of \u200b\u200bthe caisson or other room where the installation and connection of the accumulator to the water supply system is minimal, then the vertical direction is selected. For horizontal, a special platform is required. The tank itself has special mounting feet for mounting.
Important! On sale you can find a hydraulic accumulator for a water supply system in blue and red. Blue color for cold water. It differs from red in that the tank itself is capable of operating under conditions of much greater pressure. Plus, food rubber is used inside the structure.
Placement method

Before connecting, you need to understand the installation method, or rather, the location. The choice of location will depend on the power of the unit. To create the best possible pressure, it is recommended to choose the most highest point in the house, for example, an insulated attic.
The selected location must be dry and free of moisture. Otherwise, condensate will appear on the surface of the accumulator for the water supply system, which can cause corrosion. And though the tank is covered paintwork material sooner or later the rust will take its toll. Plus, the selected surface must be solid and even.
Wiring diagrams
Now let's take a closer look at how you can install a hydraulic accumulator for water supply systems with your own hands. Consider two schemes with a submersible and surface pump.
Connecting a hydraulic accumulator with a surface pump

First of all, the pressure level in the tank is checked. As a rule, it should be less than that of the pump, which is set on the relay up to 1 bar. To connect, you need a special fitting, which has 5 different outlets. Each output is intended for a specific purpose. Plus, you should buy a pressure switch.
As for the special fitting for five outlets, the following elements are connected through it:
- To connect the pump.
- Pressure switch.
- Pressure gauge.
- For plumbing connection.
To begin with, the connection can be made through a rigid hose. After that, a pressure switch and a pressure gauge are screwed to the fitting, indicating the pressure level. You should also connect the pipe that will be directed to the pump.

When connecting a pressure switch, it is extremely important to consider the following points. The device itself has a top cover. It should be carefully removed. Below it you will find four contacts. Each contact will be labeled pump and network. This greatly simplifies when connecting the device to the network of wires coming from the pump. The connection is made strictly according to the specified labels.
However, not all manufacturers sign such a plan on the relay. This is done on the assumption that the installer is fully versed in this. If you are new to this business, then be sure to consider this factor. For example, when buying, make sure that there are inscriptions. In this case, you will not need to call a specialist in this profile.
Important! Absolutely every connection on the device should be made with a sealant. Every joint must be sealed. Usually, FUM tape or tow is used for this purpose.
Upon completion of these manipulations, you just have to turn on the pump in the network and adjust the pressure level in the accumulator. Plus, you should make sure that there are no leaks at all joints.
Connecting a hydraulic accumulator with a submersible pump

In this case, the pumping equipment is lowered into the water. All water coming from the well will be pushed out through the vertical pipeline by the pump. With this design, the well water supply circuit with a hydraulic accumulator must include a check valve. As a result, water will not leave the membrane to the pump. In most cases, a check valve is installed immediately after the pump. Next comes the pressure pipeline to the surface.
Some pumps may have a female fitting. In this case, it is necessary to purchase a special adapter, which will have two external threads of the corresponding diameter. This is important, because check valve also internal thread. The rest of the connection is the same as in the previous case. A special adapter for five outputs is used.
We determine and set the pressure in the accumulator

Regardless of the method and variant of the hydraulic accumulator installation scheme for the water supply system, the correct pressure adjustment in the entire system and in the tank itself plays an important role. So, in one part there is compressed air, in the second water. Upon purchase, at the factory, the pressure in the chamber with air is set to 1.5 atmospheres. It is important to note that this is a basic setting, regardless of the type of model and the cost of the accumulator.
Checking and correcting pressure
So, just before connecting, it is recommended to check the pressure level in the accumulator itself. Due to this information, you will be able to correctly configure the pressure switch. Moreover, it is extremely important to carry out future control of the pressure level. For this purpose, a manometer is intended. Some home craftsmen temporarily use a car pressure gauge. Its error is minimal, so it is quite a normal option.

If necessary, the pressure level can be reduced or added. For this purpose, there is a nipple on the top of the accumulator. A car or bicycle pump is connected to it. Due to this, the pressure rises. If the air pressure, on the contrary, needs to be lowered, then there is a special valve in the nipple. You should take a sharp and thin object and press on it.
What pressure should be
So, it is important to decide what pressure should be in the accumulator. If in a private house will use Appliances, then the pressure range should be in the region from 1.4 to 2.8 atmospheres. To eliminate the possibility of a membrane rupture, the pressure in the system should be slightly higher than in the tank itself, at least by 0.1 atmospheres. That is, if 1.8 atmospheres are installed in the accumulator for the water supply system, then the system should have about 1.9 atmospheres. To expose this, use special device, known as a pressure switch.

When determining the pressure level, it is important to take into account the number of storeys of the building. If you have cottage, then the pressure will be lower than if you had to raise water to the second floor. It also takes into account the fact how many water intake points are in the house, how many people live and what is the probability that several taps will open at the same time.
If all these nuances are not taken into account, then the following picture may occur. You are showering while someone else is doing the dishes or is using the water for other purposes. As a result, the level of pressure and pressure of water in the tap will drop sharply. Agree, not a very pleasant situation. To prevent this from happening, it is important to correctly set the pressure on the accumulator and other equipment. And this will be possible if all the above details and more are taken into account.
Conclusion
So, here we have considered with you the features of using a hydraulic accumulator in a water supply system. We also brought you simple circuits hydraulic accumulator connections. As you can see, there is nothing complicated in this matter. The most important thing is to correctly calculate the pressure level and choose the tank itself for the needs of the house. We hope that this article will help you understand this difficult matter. We are confident that you can handle this job on your own. To consolidate all the theory provided, we offer you to watch the prepared video material. It will help you visually see everything how the process of connecting the accumulator to the water supply system takes place. If you already have personal experience in this case, be sure to share it by leaving comments on this article.


Chicken in kefir - recipes for marinated, stewed and baked poultry for every taste!
Simple Chicken Recipe in English (Fried) Recipes in English with translation
Chicken hearts with potatoes: cooking recipes How to cook delicious chicken hearts with potatoes
Recipes for dough and fillings for jellied pies with mushrooms
Stuffed eggplant with chicken and mushrooms baked in the oven with cheese crust Cooking eggplant stuffed with chicken