Now, when painting walls, special stencils are often used, which make it easy to create interesting pictures on them. With the help of stencils, you can create both fairly simple patterns of the same type, as well as large-scale drawings with an abundance of small details. Different variants decorations are perfect for decorating a nursery, living room, bedroom, kitchen or hallway.


What are they for?
Many people like ornamental painting or paintings on the walls, but not everyone can boast of the skills of a professional artist. For modern decor walls do not need to be an artist - the main thing is to show patience and accuracy. Stencils are reusable templates made of paper or similar material. They are fixed on the wall and simply paint over the contours. The result is a stylish and interesting drawing without much effort.

If your interior seemed too boring and monotonous to you, you can easily refresh it by making drawings on the walls. Stencils can be used on smooth wallpaper for painting or on the walls themselves, applying paint to them after plastering. In addition, staining with texture, for example, with spraying or with decorative strokes, can look very interesting with stencil drawings.
All these options are very easy to implement with your own hands without the involvement of professionals.

Drawings created using stencils can look good in any type of interior: from classic to high-tech. Everything will depend only on the images that you choose. If your room has a free wall, you can choose a complex large-format picture. If the furniture is arranged tightly, it is better to give preference to small decorative patterns and patterns.. Such images can help you highlight the semantic center in the interior or visually divide the room into several zones.


An unusual finish with drawings can also hide minor flaws in the rough finish of the walls for painting. If you have slightly uneven walls, you should not make them light and smooth - this will make all the flaws obvious. If you pick something interesting color combination and paint with the image using a stencil, the flaws will become almost invisible.
To hide flaws, it is worth choosing mostly abstract ornaments without straight lines or complex paintings.

Kinds
All templates for drawing on the walls are made of thick cardboard, paper, oilcloth or similar materials. If you wish, you can even make them yourself by choosing the picture you like, printing it, and then carefully cutting it out along the contour. All possible stencils can be divided into the following types:
- Simple stencils involve applying a single-color pattern. Most often these are large or small templates for simple patterns or contours of landscapes, city outlines, which can be depicted in one color. To apply such stencil drawings, a conventional roller is used. One paint is the easiest to work with - you can apply it in wide strokes and not think, because everything that does not cover your stencil should be painted over. You end up with a simple color image on a painted wall or wallpaper.

- Complex stencils allow multiple colors to be used. For such an unusual coloring of the walls, complex landscapes and bizarre patterns are suitable. Sometimes a list of recommended shades of color is attached to the stencil, and sometimes you have to choose the colors yourself. Even if you have a bright picture, it is extremely important that the colors are in harmony with each other and not be overly catchy. In addition, when working with stencils that involve the use of more than one color, it is better to apply paint with a small brush. It is important to do this very carefully, without going beyond the edges of the outlines.

- Anti-stencils are used to paint over the wall space, and leave the pattern unpainted. Typically, such stencils are used for large shapes with complex shapes. Working with anti-stencils is no more difficult than with ordinary ones, but you need to decide right away whether you want to paint over the entire wall or just circle the image along the contour. In the second case, you will need to use another stencil that limits the area that you want to paint over.

Design
The design of modern stencils for walls for painting can be very diverse: for almost every interior, you can find unusual images that will help diversify even the most boring design project and add a unique zest to the room's decor. There are many factors to consider when choosing a design.
First of all, the size of the picture should be compared with the free space in your room: large-scale paintings will be good only if you have a wall free of furniture.


In addition, in small spaces it is better to use the most concise drawings. This applies to both form and color.
Now it is fashionable to apply various ornaments to the walls using stencils. If you choose a shade that differs slightly from the main color of the walls, such ornaments can be placed evenly over the entire surface. If you make bright patterns on your walls, they should occupy a small area, and they should be placed thoughtfully: Often, such ornaments visually divide the room into zones, form frames on the walls, or highlight the semantic center of the room.
Very often all kinds of floral and floral ornaments are used, as well as oriental motifs, but now you can also find abstract geometric stencils that are perfect for modern interiors.


Simple monochrome images are also popular. So, silhouettes of characters from fairy tales and cartoons are often drawn in children's rooms, images of butterflies, flowers, fish and trees would be appropriate in the bedroom and bathroom, and images of city houses or abstract wild animals can be perfect for the living room. You can find both fairly standard and typical drawings, as well as very unusual ones - for example, ornamental trees, images of birds, a map of the world and silhouettes of people.


Depending on the color you choose, a monochrome image can look very different: it can be highlighted or, on the contrary, made less noticeable in the interior.
There are stencils that involve the use of several colors. With their help, you can create very realistic pictures. For example, very often such stencils are used to draw the outlines of a night city, a picturesque branch of a flowering tree, or an interesting animal. At the same time, such templates are not used very often.
First of all, this is due to the fact that making such a drawing on your own is quite difficult: you need to clearly follow the instructions, carefully apply the paint exactly along the contours, and sometimes use several stencils that will overlap each other.


In addition, realistic wall paintings rarely look organic in modern types of interior; rather, these options are only suitable for rooms with traditional furnishings.
Any of the stencils listed above can be used in different ways. Take note of a few relevant design decisions:
- Very often, with the help of stencils, photographs or mirrors hanging on the wall are emphasized. For example, you can make an image of a house around them, and photos will be instead of windows - this design is perfect for a living room.


- If you like to display flower pots on the walls, you might like the idea of painting a tree or individual branches on the wall, which will create an organic interior.

- Sometimes images are placed not only on the walls, but also on mirrors, wooden cabinets and even on the ceiling. This allows you to maintain the design of the entire room in a single style.


- If you have arches, partitions or beams in your house that delimit space in a spacious room, they can also be easily highlighted with interesting images.


- In the kitchen, all sorts of simple images of cups of coffee, bottles, vegetables and fruits can be very relevant. AT modern kitchens such drawings look very organic, and in studio apartments in this way it will be very easy to separate the kitchen area.

- Often, with the help of stencils, beautiful life-affirming inscriptions are made on the walls or hieroglyphs are drawn. If you want to write own words, you can make a stencil yourself or order its manufacture. However, it is often possible to choose suitable inscriptions from the proposed assortment in stores.

- With the help of drawings made according to templates, you can easily decorate a children's room. The process of such drawing is simple, so you can even do joint creativity. In stores, you can find a wide variety of stencils for depicting children's cartoon characters.

Stencils can be made independently or to order, but most often they buy ready-made models in stores. You can buy stencils in almost any home and repair market - if wallpaper, paint and various finishing elements are sold there, stencils should also be there.
Now online stores have become very popular: although you cannot see the goods live, the variety of assortment and low prices compensate for this inconvenience.

To do right choice, even before going to the store, you should decide what image you are looking for. Well, if the wall decoration is already completely ready - this is how you will select a template for a drawing for a specific interior. If you are not sure about the details, both in ordinary stores and on Internet sites there are consultants ready to help you. However, It is important to determine not only the form, but also the quality of the product.

Ready-made templates are usually made of thick cardboard or thin plastic. Make sure the material is strong enough. This is especially important if you are going to use the same template over and over again. At the same time, the lightness and flexibility of the material is important so that it is convenient to fix it on the wall.

Pay attention to the size of your stencil - if your wall space is limited, measurements must be taken very precisely to realize your design idea.
In fact, any stencils can be used for walls, ceilings, floors, and furniture. Only paint will matter - for the floor, mirror and wooden surfaces, special coloring compositions will be required.

Application technology
If you are working with walls after plaster, with walls already painted in one tone, or with wallpaper for painting, you will need the most ordinary wall paint. Variants from different manufacturers may vary in color saturation, possible smell and durability, but they will all work. For the ceiling, you can use the same paint.

If you are going to make drawings also on the floor or on furniture, you should choose a special coloring composition, depending on the materials.
Most often, the paint on the wall with large simple stencils is applied with a roller. This is a fairly simple way to quickly paint over large smooth surfaces. The size of the roller can be selected depending on the image you want to take. The technology of working with a roller is very simple: you need to pour a little paint into a flat container, roll the roller over it so that it evenly acquires the desired color, and then apply the paint according to a stencil previously fixed on the wall.

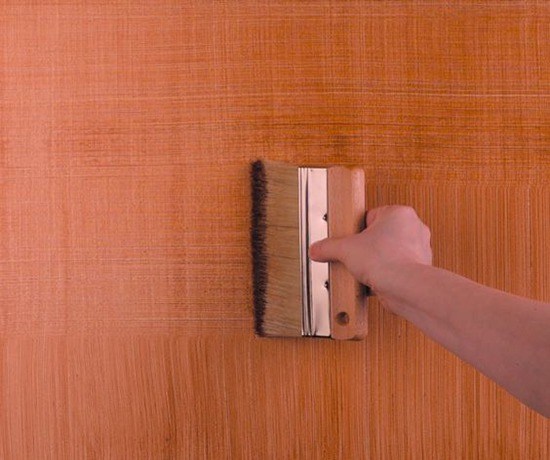
If you are stenciling textured wallpaper, it can be difficult to work with a roller: individual protrusions on the wallpaper will be painted over, and gaps may form between them. It is best to use a sprayer to apply stencil paint on such wallpapers.- so you can easily evenly cover the entire desired area.

You can make the image textured. For this on smooth surface with a stencil attached to it, you can apply paint with large or small splashes, textured strokes or drops. Nozzles for such application can also be purchased at large hypermarkets for repairs. It is no more difficult to distribute paint in this way than with a conventional roller or brush.

Now stencil rollers are popular. They have a prominent convex pattern on their surface, which is imprinted during application. Such stencil rollers are suitable if you want to cover an entire wall with small ornaments.

Finally, if you've chosen a complex stencil that uses multiple colors, a brush is usually the best choice for these types of images. The size of the brush should be chosen depending on how small details are to be drawn according to your stencil.
Don't choose a brush that is too small, which will take much longer to work with, but a brush that is too large can make the drawing messy.
Today's selection contains stencils and wall decor ideas. Textured painting is a very modern way of transforming your home. The monotony of the coating inspires despondency, but the multidimensional layers are very creative. The whole question is how to apply them. Let's talk about this today!

By the way, it is not at all necessary to buy some exquisite rollers and stamps. On a simple paint roller you can screw the fabric and get the original texture.
Handy stencils for wall decor

However, even without a roller, you can create a very interesting structure on your walls.

Use a large sponge or washcloth as a stencil for wall decor.

You can use rollers with pimpled film, some kind of nets or twine.

An old dust fan will help create a light, airy pattern on the wall.

Painting through tulle or mesh will make your walls look spectacular.

Tulle as a stencil for wall decor
By the way, you can create vertical stripes on fresh paint with brushes or brushes. The depth of the stripes can be changed by pressing the brush. The pattern will depend on the thickness of the pile and on its rigidity.


You can do both vertical and horizontal stripes. And you can combine them.
Plain polyethylene film when painting the walls will help to give a very curious texture.

Film as a stencil for wall decor
Using thin transparent paper, you can decorate the walls like this.

Additionally, you can apply a patina over the paper.

In addition to abstract backgrounds, you can also experiment with normal wall decor stencils.

Stencil for wall decor - scales

You can cut out stencils from thick cardboard or from floral wrapping film.

Stencils for wall decor made of cardboard
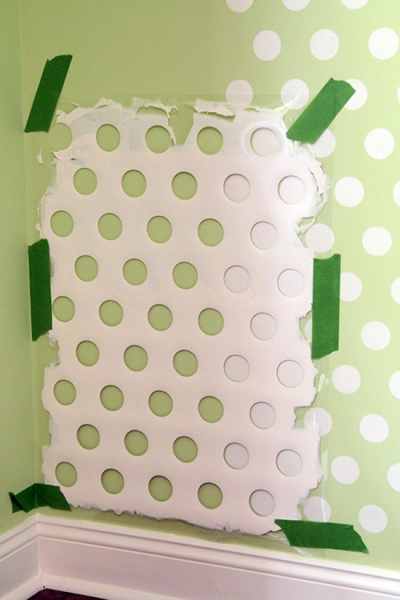
Stencil for wall decor - polka dots

Stencil for wall decor - monogram
You can even use some items from the kitchen as stencils.
Related article: Unusual view needlework - carpet embroidery

By the way, the functional idea of a reusable stencil is made of canvas stretched over a stretcher. You can cut both simple and complex patterns.

Wall decor stencils

Stencil with astel pattern

Stencil for wall decor - ornament

Stencil for decorating columns

Ornament for wall decor

Stencil for wall decor - quadrangular ornament

Stencils for wall decor - diamond pentagons
If you use several colors when painting through a stencil, you can get spectacular transitions along the walls.
Multicolor Wall Decor Stencils


In the end, I propose another original idea - a mountain landscape on the wall. Gradient with a transition from dark to almost transparent.

Stencil for wall decor with a landscape
For wall decor with two-tone painting, you can use ready-made stencils. You can print the stencils below by scaling them. If you know how to draw, then you can redraw the stencil on very large paper and then you will be able to decorate a large area of \u200b\u200bthe wall.
Now you can also print large format stencils in print shops. For the money it will come out quite budget. By the way, you can also order a slot, so that later you can simply peel off the excess, leaving the right one. Explained chaotically, but I think it's clear ...
Below you see stencils for wall decor "Africa". There are two of them, they differ in the width and size of the elephant. As well as a stencil for the walls "Giraffes".
How to make stencils
You can use stencils by cutting them out of paper with a breadboard knife, attaching them to the wall with tape, and stamping them with an acrylic paint sponge.
It is much more interesting to create your own stencils than to download ready-made ones. That way you don't show your personality. But, of course, in a circle of friends, if no one has seen them before, even common patterns will be like the original ones.
Related article: Crochet summer hats with a visor: patterns with photos and videos
Video - how to make a single-layer stencil from a photo
Another option - you can order a vinyl stencil from any company involved in outdoor advertising- they have special plotters and they will cut you a stencil from self-adhesive vinyl film. You can decorate the wall with a vinyl decal, or again, use this as a stencil by stenciling with acrylic paint and a foam sponge. In a word, there are a lot of options for drawing a picture on the wall.
Video - do-it-yourself stencil for wall decor
Pavel Perederiy tells more intelligibly, watch his master class and your knowledge will increase significantly.
By the way, on my website you can also see corner stencils or butterfly stencils.
Decorating your home is one of the ways to give the room individual style and unique image. There are many ways to achieve this, but wall decor using stencils is gaining popularity due to their affordability and ease of use. Such an ornament highlights one zone without overloading the entire space. A well-chosen pattern will emphasize the style of the room, emphasize where necessary, and create a special mood. The article will discuss how to make a stencil for wall decor with your own hands and how to work with it correctly.
The stencil ornament is universal. It can be applied not only to walls, but also safely used for floors, fireplaces or windows. Everything is limited solely by the imagination of the owner of the premises.
Types of stencils
plain. The most common type, one tone of paint is taken and applied to the wall. Simple, fast, beautiful.

Multicolor. Creating a real pattern, with many shades. This type requires a certain skill and patience, since many stencils need to be made and the surface painted, laying one on top of the other. It is important not to get confused here.

Volumetric stencils for wall decor. The stencil is applied using putty, 1-3 mm thick. Despite the ease of application, it looks very beautiful and unusual, giving the impression of a velvety surface.

Anti-stencil or reverse stencil. It is called so because the surface is not painted inside the stencil, but outside it, creating a backlight effect. Perfect option for muted bedroom colors.

Stencil selection
Of course, the stencil should be chosen based on the general style of the room in which the ornament is created. Since there is no dispute about tastes, then it is a thankless task to advise the choice of one or another stencil. However, it is worth giving a few general recommendations.
- Accuracy to a large number details. A beautiful painting on the wall can turn into a kind of graffiti if you get too carried away with decorating the room. Conciseness is a trend that is always in fashion.
- One room - one type of ornament. Butterflies do not go well with geometric patterns, and damask ornament loses its charm surrounded by trees and flowers.
- No overly small details. Firstly, they are difficult to paint over, and secondly, from a distance they can look sloppy, just like paint stains.
- The more jumpers and lines in the stencil, the more beautiful and clearer the picture will be after application.

Sample stencils for wall decor


Choosing a place for a stencil
As in the case of choosing the type of pattern or ornament itself, it is impossible to give clear recommendations that a stencil will be appropriate in one corner and inappropriate in another. Only a sense of beauty will tell you where it is better to place the pattern.
To begin with, you can make small stencils for wall decor, and decorate the places next to the switches with an ornament. Usually the patterns around the mirrors, above the table or near the bedside tables fit well into the design of the room.

How to make a stencil with your own hands
The market is replete with a huge number of ready-made stencils for wall decor, for every taste and budget. Almost every hardware store, especially large chains retail building materials, offer a wide range of ornaments and patterns. But the more valuable will be a drawing created by oneself.
For self-manufacturing stencil will need the following tools:
- original drawing;
- stencil material (film, plastic, cardboard);
- stationery knife;
- marker, pencil;
- scotch;
- a glass (or other) surface on which it is convenient to cut a stencil.

First of all, it is necessary to decide on the pattern according to which the stencil will be made. Those who have artistic abilities can design and draw it themselves. Those who are not lucky enough to have a talent for drawing, having figured out in what style they would like to decorate the walls or ceiling, can search for a suitable image on the Internet and print it out on a printer. If the pattern is large, divide it into parts, and then fasten the parts together with adhesive tape.
The next step is to choose the material for the stencil. It could be plain paper or cardboard, self-adhesive film or thin plastic, depending on the type and size of the ornament. To simplify the task, you can contact any advertising agency, where they will help you create a stencil from the image and print it.
To transfer the ornament to the material, you need to use carbon paper, or, if transparent plastic is used for the stencil, simply circle it around the contour with a marker. To prevent the drawing from “leaving”, it is attached to the stencil with tape or paper clips.

When the drawing is transferred, in some cases it is required to complete it by drawing the lines and jumpers along which it is cut. If the stencil is depicted on paper or cardboard, then it is better to paste over it with adhesive tape on both sides or laminate it so that the paint does not absorb and the jumpers do not twist. This will extend the life of the stencil.

It is important to cut the stencil in such a way that cuts and burrs do not form, otherwise the final drawing will look untidy. Another subtlety - all small details must be attached to larger ones, otherwise they will disappear when cut. Only the areas to be painted are cut out. For this, a stationery knife or blade is used, and glass (or any other hard material that is not a pity to cut) is placed under the stencil, then the cut lines will be clearer and even.
Working with a stencil
Required tools:
- stencil;
- screen glue;
- brush, roller or sponge for applying paint;
- acrylic or spray paint.
First of all, it is necessary to prepare the surface on which the stencil will be applied. Clean it from dust and dirt, if you can wash it, if not, wipe it with a clean dry cloth or vacuum it.
The second step is marking. If possible, it is better to use a level, with it there will be confidence that the drawing will not be skewed or crooked. Pencil marked extreme points for the stencil, in order to later attach it evenly.
It is recommended that you first practice before responsible drawing a picture on the wall. This can be done on a piece of wallpaper or a large drawing paper. A preliminary sample will allow you to practice the application technique and choose the color of the ornament. It is advisable to make several options for different shades, and try on how each of them will look in the future, attaching the resulting pattern to the wall.
Also, ready-made reusable stencils for wall decor are on sale. They are made of a polymer film that is easy to clean and does not tear, allowing you to train on paper as many times as you need.
Aerosol adhesive
In order to fix the stencil on the wall, it is best to use a special spray adhesive. It leaves absolutely no traces, and when using it, you can not be afraid that wallpaper or paint will come off the wall along with the stencil. The glue is sprayed in an even layer onto the stencil, which is then carefully pressed against the surface, especially in places of thin bridges.

What is important to know about working with glue:
- on different surfaces, it holds the stencil differently, the more Smooth surface, the better the adhesive properties of the adhesive;
- after removing the stencil, the glue does not remain on the wall;
- glue is applied to the stencil, and provides maximum adhesion with it;
- after washing the stencil, the glue can retain adhesive properties, so if reuse is planned, then the glue can not be completely washed off;
- the larger and heavier the stencil, the more difficult it is to keep it only on glue, in such cases you may need a “safety net” in the form of masking tape;
- it does not prevent paint from flowing under the stencil.
Coloring
Coloring is an activity that does not tolerate fuss.
For stencils, it is recommended to use acrylic paint, it dries quickly and is suitable for all types of surfaces. The paint is applied with a brush, sponge or roller. It is important that when working with a stencil, there should be a minimum amount of paint to eliminate the possibility of leakage.
When working with a brush, it is held directly perpendicular to the wall, the paint is applied by stuffing, to prevent lint or paint from getting behind the stencil.

If staining is done with a sponge, then the first prints are best done on another sheet of paper, this will allow you to remove excess paint.
When working with a roller, it is necessary to ensure that the paint is distributed evenly, especially in the corners and small details of the stencil. It is more convenient for them to work with large stencils.

for spraying spray paint the spray can should be kept at a distance of about 30 cm from the wall. It is possible that the surface will have to be additionally protected from accidentally getting paint outside the stencil.
Saturation of the picture with color occurs gradually, in several passes. If its boundaries are not clear enough, they are drawn with a thin brush after removing the stencil.
Creating a three-dimensional drawing
To apply a three-dimensional pattern, you will need a special acrylic putty. It is applied with a spatula, gently layer by layer, until it reaches the desired thickness. Volumetric drawing is usually achieved with a thickness of 1-3 mm. A couple of minutes after application, when the putty has already set, but has not completely hardened yet, the stencil must be carefully removed so as not to damage the ornament. If the layer turned out to be not very even - it's okay, after the putty has completely dried, it is easy to level it with fine skins. Then the drawing can be colored or toned.

When the work is completed, the stencil must be washed and dried, if possible, for reuse.
Avoidable Mistakes
The most common mistakes that happen when working with a stencil are:
- stencil offset;
- paint leakage.
To avoid such troubles, you need to securely fasten the stencil, spray glue is the perfect assistant here. And also to collect the minimum amount of paint. Accuracy and patience will undoubtedly help to achieve the perfect result.
Practice shows that those who have studied the stencil manufacturing technology and carefully read the instructions for use and coloring are always satisfied with the result.
Stencils for wall decor photo


Stencils for decorating kitchen walls

The modern industry of goods for creativity offers a huge selection of ready-made templates, fixtures and various decorative accessories. They can be used to form interesting and original compositions, stickers, applications. But perhaps the most striking and unusual option will become handmade stencils for decoration original templates , which will allow you to create the most unique pattern and embody the individual ideas of the author and interior decorator.
Man-made stories and unique combinations reflect the character of the occupant of the room or house, distinguish the decor from the background of typical apartments and create a certain mood for everyone who admires an ornament or an interesting plot composition on a door, wall or furniture.
What are templates for?
Surely many of you have seen in construction and furniture stores interesting sets with ready-made stencils for the walls. Plant, animal, fabulous ornaments enliven walls and wallpapers, add zest to the interior and any environment.
The stencil and template can be useful for different decorative works: in the kitchen, children's room, on the ceiling. They create an unusual space, give volume and depth to the plane, realize the creative skills of the owners, and inspire unusual solutions. Stencils can be used to add zest. This is an economical way to bring something new to the look of the room without a big investment. You can create a unique template yourself - then the value of the picture increases significantly.

You can use templates not only for home decoration, but also for other purposes:
- creating creative postcards, posters;
- decoration of paintings with vignettes, corners;
- in order to create calligraphic compositions;
- for congratulations and holiday collages, captions for photos.
Stencil technology
Making your own template at home is not difficult - a simple set of materials and tools is enough, and the result will be visual, non-standard and very interesting. To make a high-quality, reliable stencil, perform a few simple operations:
- prepare the wall bearing the pattern as for painting;
- stick wallpaper for painting work;
- achieve smoothness and even coverage;
- use sponges, rollers, paint in spray cans of different shades.

Ready-made stencils from a design store are, of course, more professional. But a unique drawing is a real find for a decorator. Therefore, we proceed to create our own sketch. If drawing does not work out too well, you can download a suitable sample from the Internet and print it on a printer - the main thing is that it allows you to make cuts for paint and does not tear. Apply an impression with acrylic paints through a template on cardboard or vinyl.
Helpful Hint: Any patterns will work, but drawings that are overly detailed will be a poor choice. The paint will merge, small details will become illegible and smeared, and the view will become unpresentable.
Having prepared a drawing, you need to choose a good one, quality material for the base of the stencil. The easiest and cheapest way is to take a sheet of thick cardboard or plastic. The main condition is that the material should not tear, especially at the junctions of different elements, and not get wet from the paint. If paper is used, then it can be mined - there are laminating devices for homework. The laminated sheet can be used repeatedly.

Patterning technology
In order for the paint to lie on the surface successfully and not spread, it is important to choose the right technique with which the drawing will be applied. There are several basic techniques:
- pattern using one color. In this case, the result will be a monochrome drawing;
- multicolor combo palette. Several different colors are used here, but it takes more time and patience to dry different layers of paint. This method is suitable for more experienced decorators who have already worked with the monochrome method;
- holographic, or volumetric method. Here putty is used, which is applied with a special spatula. So you can achieve a "velvet" effect and a certain thickness of the image (1-3 millimeters), which even creates the appearance of a three-dimensional image.
Useful advice: if the putty layer did not lie very evenly, you can use sandpaper, wiping excess paint around the image with it.
- reverse stencil. While ink is normally applied inside the slits, reverse stenciling achieves the opposite result - the ink covers the space outside the pattern. Due to this technique, the impression is obtained that the drawing emits a slight glow. Usually here it is convenient to take paint in spray cans. In the process of work, a clipping is used - part of the template, which will then be thrown away. It is glued to a wall or other surface, spraying with paint.

Choosing a place to place a picture
In general, the territory for the template is not limited by anything. But to achieve the maximum decorative effect, you can use traditional techniques.
Most often, a large, spacious plane, empty and free of furniture, is used to apply a template pattern. A large and bright stencil is chosen for her, which will create an attractive pattern - it will help to interestingly beat the situation and add color to the atmosphere of the room.
Useful advice: do not take modest, small drawing for a large and empty wall - it looks mean and poor. Too large a stencil looks unsuccessful on a small wall, where there will be an effect of tightness and disproportion of space.
A good way is to play with humor on already standing furniture with the help of a applied stencil. Above the table, you can draw a vase, a socket or a candle in a candelabra, as if they are standing on a tabletop. Above the shelf interesting idea will be the image of the spines of books or silhouettes of figurines.

Template Creation Tools
The available set of items will be a useful set for creating a stencil:
- selected image;
- suitable material - from cardboard and plastic to photographic paper, sometimes lavsan is used;
- "copy paper";
- pencils, felt-tip pens, markers (you can in one copy);
- paper knife or scalpel;
- masking tape and regular, transparent;
- draft paper for experiments;
- a wooden board (or other material) that is not a pity for cutting a template on it.
Useful advice: before the crucial moment of applying the drawing “whitewashed”, it is better to practice on a piece of paper, also checking the optimal combination of colors and the degree of fluidity of the paint.

Stencil cutting
The selected drawing must be transferred to the basis of the template using a carbon paper. If the basis is plexiglass or plastic, then a marker is enough to outline the outline of the picture. When copying, the picture shifts along the base, so it is better to fix its position with adhesive tape.
Then cut holes for the paint with a sharp clerical knife or scalpel. Remove layers of paper inside the outlines of the pattern. To make it as good as possible, it is better to do this work on a hard surface that will withstand blade movement - a cutting board or an unnecessary coating, a piece of linoleum.

drawing
After that, they begin to apply the image to the wall or door. It is important to clean and dry the surface from excess moisture or grease stains (otherwise the paint will spread and not lie down). They make outlines in the places where the drawing is placed - use a tape measure, a ruler.
The cut out template is attached to the surface with adhesive tape or glue in the form of a spray. The spray adhesive won't tear off a piece of wall, wallpaper, or paint when removing the template, and it's invisible and doesn't leave marks.
Paint the stencil with a brush or sponge. Take a little bit of paint so that it does not spread under the stencil layer. A convenient way to hold the brush is perpendicular to the wall, applying the paint with light strokes of the swab.
When painting small parts, it is better to use the technique of applying with up and down strokes. If an aerosol can is used, then keep at least 30 centimeters from the wall. Sponge is better to get wet first on a piece of paper, removing excess paint. If you make a large-scale drawing using a roller, then you will have to slightly correct the drawing by painting on small details and strokes after removing the stencil.
Having finished staining, the stencil is carefully removed, trying not to damage the image. Some time the result is dried.

The original design decision will be the creation of dynamic compositions, with a sense of humor or interesting inclusions. Picture a group of animals in motion or a collage of exotic plants or birds.
The choice of paints is individual, but acrylic is more often used due to its cheapness and practicality, ecological composition. Acrylic paints do not fade, they are often used as part of a decorative variety of plaster, which allow you to create very beautiful bas-reliefs.
If we are talking about a diverse stencil, the ideal solution would be to use a self-adhesive film - it is easy to apply and remove, helps to achieve a snug fit to the surface.

10-15 templates are combined into a single ideological picture, gradually, over time, supplementing with new elements. This creates an exquisite look for a home, creative studio or children's room, which will reflect the interests and original flavors inhabitants.
It is not difficult to create stencils for decor with your own hands. It is important to prepare necessary materials, tools, select a pattern and act according to the recommendations. In order for the result to please you, you need to take into account all the nuances, perform the manipulations extremely accurately and accurately.
Stencil preparation
In order to get beautiful stencil templates, you need to think over their design, and then prepare high-quality material. So, the following items should be on the table:
- selected drawing;
- cardboard, film or plastic;
- stationery knife;
- a simple pencil, marker or felt-tip pen;
- scotch;
- Convenient cutting surface.
 First you need to decide on the choice of pattern for the stencil. If you have creative abilities, rich imagination and imagination, you can come up with a composition yourself. You can focus on general style room decor. The selected image must be printed. Large items can be printed on several sheets and then glued together with adhesive tape.
Cardboard or paper is used as a material, thin plastic, film is suitable. When choosing a material, you should focus on the size and shape of the stencil. 
To transfer the picture, use carbon paper. If you work with transparent plastic, it is enough to use a marker to trace the outline. The immobility of the pattern is ensured by adhesive tape or paper clips that connect the elements.
After transferring the selected drawing, it sometimes has to be adjusted. For example, you will need to draw separate lines for cutting. If the template is made on cardboard or plain paper, it is best to fasten it on both sides or laminate it. Thanks to this, the stencil will function as long as possible. 
In the process of cutting stencils for walls, you should act carefully, avoid the appearance of cuts, burrs. If this requirement is not met, the image will turn out to be ugly and will have flaws. If the pattern is complex, for example, flower stencils, consisting of details different size, small elements should be attached to great details, otherwise they cannot be kept intact during the cutting process. 
Cut out only those places that need to be painted. In the process, it is convenient to use a clerical knife, a thin blade will do. Under the stencil there should be glass or a surface that will not be a pity if damaged. If you use a regular knife for cutting, then you will not be able to get the most clear, even lines.
Working with a template
You need to know how to properly use the made stencils for decor with your own hands. In the process of work you will need:
- stencil;
- special glue;
- tool for applying paint (brush, sponge);
- spray or acrylic paint.
Before using wall stencils, the surface must first be prepared. Dust and dirt particles are removed from the wall. If possible, wash or wipe with a dry cloth, it is permissible to use a vacuum cleaner. 
After doing preparatory work markup. It's better to use a level. Thanks to him, it will be possible to apply the ornament absolutely evenly without defects. If the image is simple, for example, letters, they can be immediately applied to the wall. However, it is better to practice beforehand. To do this, you need whatman paper or old wallpaper. By means of a pre-made sample, you can not only train your hand, but also choose the optimal color.
Ready-made stencils can also be purchased at stores. For the manufacture of the product, the manufacturer uses a polymer film, which is distinguished by functionality and reliability. The material is perfectly washed out, not damaged, allows you to experiment. 
As a fixer for stencils on the walls, it is better to use a special aerosol adhesive. It does not leave traces, it does not damage the wallpaper, does not contribute to their delamination from the surface along with the template. In the process, you need to carefully and evenly spray the glue on the stencil. Then it is well pressed against the wall. Particular attention should be paid to places with thin transitions.
Types of stencils
How long will it take to get DIY decor stencils from a template? They are different types, each of which takes less or more time. Ornaments are universal. They decorate not only the walls various rooms but also the floor, doors, fireplace, windows. It is important that everything fits organically into the interior, the overall style. 
Beginners prefer to use a solid pattern type. To do this, you need paint of one tone, which is carefully applied to the wall.
The multi-color type of templates means getting a real work of art. During the manipulation, different colors. A variety of colors is often chosen when creating children's drawings.
There are volumetric stencils. When applied, putty is used. Its thickness should be approximately 2 mm. The application technology is very simple, it looks spectacular, as it creates a semblance of a velvet surface. 
Another type is called the reverse stencil. Staining is carried out not from the inside, but outside the stencil. So, it is possible to get the illusion of illumination. This option is great for bedrooms where calm tones, muted colors are used.
When making templates, you need to focus on the style of the room, its purpose, take into account your own taste preferences. With a large number of elements, you need to be careful. You can not be overly zealous, so as not to get graffiti. Everything should be concise. 
One type of ornament can be used in one room. In the kitchen and in the living room, it is good to use stencils of flowers and greenery, which will emphasize the welcoming atmosphere. At the same time, Damascus ornament cannot be combined with flowers, since it will lose its perfection, luxury. Do not combine geometric images with butterflies, animals, etc.
Do not include very small elements in the drawing. They complicate the task, as it becomes difficult to paint over them. It is highly likely that at a distance such details will look like separate spots. 
If you want to decorate a hall, a hall, an office and other rooms in a restrained style, geometric motifs are best suited. It can be classical Greek or Byzantine themes. Thanks to simple lines that intertwine with each other, it is possible to obtain strict, unusual patterns. Such decorative ornaments suitable for hotels, offices, halls of various public places, etc. 
Thanks to stencils that are made by hand, it will be possible to get beautiful, unique patterns on the surfaces of any premises. Everyone can make a template on their own, you just need to practice a little.
Photo gallery
We invite you to view 33 more photos original ideas stencils for decor with your own hands.


Chocolate biscuit: the secrets of cooking in a slow cooker and oven
Chemical composition and nutritional value
Apple chips at home
Braised cabbage with white beans, recipe
How to reduce the ass, hips and stomach at home?