In addition to decoupage - another not very clear word. The story of what it is - in this article.
Craquelure (from French craquelure) - a crack in the paint layer in paintings. Under natural conditions, such cracks appear over time and are a sign of antiquity. Modern means for the decoration of various surfaces allow artificially "aging" and new items. In modern painting and arts and crafts, there are often examples of when the effect of cracking the paint layer is artificially achieved. This gives the work the spirit of "old times" and a certain charm.
Craquelures are through, i.e. passing through all layers of the pictorial layer, or may occur only in one of the layers; can cover the entire plane of the picture or be located only in certain places. Their sizes can vary from almost imperceptible, the thinnest, the so-called "hair", to very impressive.
Cracks, i.e. violations of the integrity of the paint layer, varnish or primer, have a different nature and pattern, and directly depend on the causes that caused them. Most often, such reasons are violations of the technology of the preparatory and, in fact, pictorial processes: the choice and preparation of the base, the preparation of soil and paints, and the incorrect application of paint layers.
In addition, the cause of the appearance of craquelure can also be insufficiently professionally performed restoration of the work.
The appearance of cracks in paintings is not inevitable and mandatory.
Craquelure varnish is an ordinary dextrin diluted in water, or (colloquially) printing glue. It is processed in a special way corn starch. An approximate recipe is as follows: dry starch 125-150 g, water 875-850 ml.
Dry starch is mixed with a small amount of water, the rest of the water is added, then boiled for an hour with stirring in a boiling water bath until a transparent mass is obtained. The finished thickener is filtered through a fine sieve. Keeps for a short time. It turns out a one-component crackle varnish - the only question is whether you have access to printing glue, but they say dextrin is sold in building materials and chemicals stores.
Craquelure technique with white wheat dextrin. Formula: 40 grams of dextrin plus 18cc of boiling water. (A tablespoon equals 17cc). Add boiling water to the dextrin powder and dissolve to the consistency of liquid yogurt. Keep in a water bath, and not on fire while you do the work. For well-dried, completed work, i.e. painted surface plus decoupage, apply a fairly thick layer of glossy water-based varnish. Let dry. Apply the prepared dextrin with a brush, in a thick layer, without worrying that one smear will overlap another. Let dry for an hour natural way, i.e. never use a hair dryer. Then apply the patina and then remove the excess.
Technique "Crackle" is divided into two main types:
1. C Creation of cracks by superimposing two craquelure varnishes with different properties on top of each other. These are the so-called two-component varnishes from one manufacturer.
These can be, for example: varnish for aging(first and third layers) and craquelure varnish(second layer). In this case, the final varnish coating will give the surface a golden brown tint.
This is a special craquelure paper for decoupage.
Varnish for the first layer in the "Crackle" technique can be easily found in art stores, its name may be one of the following: "lacquer for giving paintings an old look", "patinating varnish", "decoupage patina", etc. The varnish should apply evenly with a flat, wide brush, such as a synthetic or bristle brush. Ideally, if it is a soft, thick synthetic brush.
As soon as the first layer of varnish dries and reaches the state of "stickiness, but not dirty" (not earlier than 30-40 minutes), it is necessary to apply a second layer of varnish with another brush with the same characteristics, which is called craquelure. The thicker the second layer, the stronger the cracks will be. Here you also need to monitor the uniformity of coverage.
After applying the second layer of varnish, the surface can be dried with a hairdryer. At this point, characteristic cracks will begin to appear. After complete drying, the surfaces of the craquelure are rubbed with various grouts: a special composition, the so-called bitumen from a series of patination products; dark oil paint; gold powder or dry pastel powder of any color to create a contrast with the base of the work. The grout is applied with a rag swab or a regular dishwashing sponge.
Excess grout can be removed with another swab or sponge soaked in linen or sunflower oil and then wipe dry with a cloth. The cracks obtained by this method are quite fragile, so the resulting beauty must be fixed with varnish (third layer). To do this, you can use a patinated varnish, with which the first layer was applied, then the work will take on an even more golden-brown look of an aged object. And you can limit yourself to the usual transparent acrylic top coat.
But what to do if you absolutely do not need to endow your piece of furniture dark patina patina, but still want to get the coveted cracks? If you expect to get cracks, for example, on a white decorated surface while maintaining this same white color, you can use a transparent colorless varnish to create a crackle effect. In the modern market, in the departments of goods for hobbies, special two-component colorless varnishes for creating decoupage craquelures.
2. And the use of one special varnish or wax for a crackle effect, during which the pre-painted surface is covered with colored textured cracks.
The same effect can also occur if a new layer of acrylic paint is applied to the layer of craquelure varnish after drying. Cracks will begin to form in about 10 minutes. The annotations for these types of products contain explanations regarding the technique for creating craquelures.
To obtain the strongest color effect, colors contrasting with each other are chosen for preliminary coloring.
In this article, you will learn how to artificially age an object with the help of special varnishes, what types of cracks are and how to get them. Simple techniques will help both beginners and experienced craftswomen to realize a lot of creative ideas and inspire new ideas for decoupage work.
So what is craquelure?
Craquelure is a network of the finest cracks on a product, obtained for the sake of decorative effect. The technique is used to give paintings, furniture and household utensils an antique look, giving the impression of antiquity.
You can artificially age any thing with your own hands using special formulations and paints, which can be found in any specialized stores.
Craquelure goes well with decoupage and makes it possible to transform any thing and add zest to the interior: an ordinary box turns into an elegant box, and a simple glass plate becomes an exquisite dish.
Thin craquelure.
In order to obtain a thin, elegant mesh, it is necessary to use a two-step craquelure varnish, which is applied to the glued application before finishing. Finally, after drying, the surface is treated with a pigment (purpurine, pastel, shadows) or oil paint to highlight cracks.
Alcohol base (shellac and gum arabic)
- First apply 3-4 coats of shellac. Each layer must be dried for approximately 15-20 minutes. The brush after work can be cleaned with alcohol.
- After last layer dry to touch, i.e. it remains sticky, but does not stain your fingers, apply a layer of gum arabic. It is applied with a soft flat brush and then rubbed over the entire surface with circular movements of the fingers. You need to rub until your fingers stop slipping.
- After 30-40 minutes, a thin network of cracks will appear. Oil paint is best for grouting. Rub the paint into the cracks with a dry cloth in a circular motion. After all the cracks are shown, wipe the excess with a dry cloth. For the second step, i.e. do not touch the gum arabic with a damp cloth or wet hands. The water will wash away the gum arabic and can ruin cracks that haven't been developed yet.
- When all the cracks are covered, rinse the gum arabic under running water. warm water. The product will become lighter and cleaner. Cover the dried work with any varnish.
Every time you learn a new technique, try it out and be sure to follow the instructions and follow the recommendations. Work only with a dry and clean brush - especially when applying craquelure varnishes - otherwise you risk irreversibly spoiling the work. Remember also that you can not save on the second step, because the value and appearance craquelure is directly proportional to its quantity.
Water base (Maimery 753-754)

The most convenient for working in the decoupage technique are water-based craquelures. They also create a thin network of cracks on the subject, resembling a cobweb. All components are applied very easily, cracks appear quickly enough, the compositions are washed off hands and tools warm water with soap.
- Apply the first step with a flat synthetic brush. Leave for at least half an hour. It doesn't dry out completely and always stays sticky.
- When the first step is completely transparent and tacky, apply the second. Work with a dry and flat clean brush. You can pour a small puddle and smooth it over the entire surface. Rub it in until it starts to dry out and your fingers stop slipping. Leave the work to dry. After an hour, you will notice that thin and transparent cracks will appear on the surface.
- To highlight the cracks, rub the pigment (pastel, shadows) of the desired shade with a dry napkin or brush.
- Rinse the second step under running warm water and after drying from the water, fix the work with acrylic varnish.
Depending on how you will dry the varnish for craquelure, the type of cracks obtained directly depends. Using a hair dryer will speed up drying, but the mesh will be very thin and fine. It is better to leave the work to dry naturally.
Medium craquelure
To create cracks of medium width, a two-component craquelure is also used. After it dries, the craquelure is isolated with pigment. The result is a glossy finish that does not require finishing. Cracks are more pronounced. After work, the tools must be washed with a solvent.

Oil base (pair Maymery 678-688).

- Apply a coat of Maymery 678 craquelure lacquer
- When it dries to a tack, coat the surface with Maymeri No. 688. Then work with your fingers, rub (massage) it into the surface. You can stop when #688 starts to dry out and your fingers stop slipping. Let dry until cracks appear.
- After 30-40 minutes, this step will begin to dry out and cracks will form on the surface to be decorated. The time for the appearance of the mesh depends on the humidity in the room and temperature.
- We highlight cracks with dry pigment or oil paint of the desired shade.
- For better fixation of the grout, leave the work for several hours and then rinse #688 under a stream of warm water.
- It is not necessary to apply a finishing varnish; the product, decorated with medium craquelures, does not need additional processing. If there is still a need for coverage, then it is better to use as finishing the same oil-based varnish (alkyd).
Rustic craquelure
How to make cracks in country style? To create rustic crackle, one-step crackle is often used, designed to crack the paint layer applied on top of it. As a result, interesting colored cracks are formed.


Mediums for craquelure (Plaid 695, Maymery Idea Medium)

- If the color of the object being decorated is significantly different from the future background, then the surface can not be processed. If the color of the object and the color of the background differ slightly, cover the product acrylic paint contrasting color.
- Then, with a dry flat synthetic brush, apply the medium.
- The medium can be considered ready for applying the next layer of paint when it is sticky and does not remain on the fingers or has dried completely. After drying, cover it with a thin layer of acrylic paint. How to apply paint? Paint in one stroke, otherwise you will cover the resulting cracks with paint. They appear quickly, but this does not mean that you need to rush. Their direction will correspond to the direction of movement of the brush. Wash brushes with soap and water when finished.
Country-style crackle differs from other types of crackle in that you can control the direction of the cracks. If the brush strokes are parallel, then, accordingly, the craquelures will be parallel to each other. If the medium is applied with a sponge, the cracks will be chaotic and multidirectional. To determine the type of craquelure and application technique, make several drafts.
Classic craquelure
This type allows you to decorate objects with pronounced cracks. They are formed as a result of the step-by-step application of two layers of acrylic paints and two types of craquelure varnish. Classic crackle is universal - it is used to create a background and for finishing decoupage works. In this case, the mesh texture will be dense and deep, so this look is best combined with large applications.


Two-component craquelure varnish RAYHER Antik

To create a background
- Apply to prepared surface first step
- Paint the surface with acrylic paint (for example, golden color)
- When the paint dries, apply a thick layer of the first step with a brush.
- After it is completely dry (after about half an hour), paint with acrylic paint of a different color (for example, red)
- Wait for the paint to dry and then apply a thick, even layer of the second step. After an hour, cracks will begin to appear on the surface (red), through which golden paint will show through. The width of these cracks depends on the thickness of the layer of the second step: the thicker, the deeper and wider the cracks.
- The finished work can be covered with acrylic varnish. To give the product a complete look, you can apply a patinating agent (bitumen) for aging
For the development of craquelure on a pasted application
- Apply with a flat brush on the prepared surface to be decorated the first step. If it thickens, add a couple of drops of water.
- After the layer dries and becomes transparent, apply a second one.
- After 15 minutes, large cracks will begin to appear. Rub them with bitumen, oil paint or acrylic paint. The second step is indelible, so if you rubbed the cracks with acrylic paint, the excess can be removed with a slightly damp cloth.
- Cover the finished work with any finishing varnish.
Compositions for classic crackle, compared with varnishes for other types of crackle, have a low threshold of sensitivity. The final result may turn out to be unsatisfactory due to the use of acrylic paint that is incompatible with the type of varnish, for example, acrylic background paint does not interact with craquelure compositions. Subject to the rule of compatibility of acrylic and crackle varnish, the result will be excellent.
At the end of the article, I want to wish you, friends, unlimited imagination, new ideas and inexhaustible energy to bring them to life! Bye.
An unusually popular trend in decoupage is the creation of “antique” things using the decoupage technique. In the course is the use of printouts and napkins with old pictures, and, of course, the use of various aging techniques.
The most popular among decoupage makers, of course, was the aging technique by creating cracks, or crackle.
The technology for creating craquelure can be used in one of two types: one-step craquelure and two-step craquelure.
One-step craquelure is quite simple, the composition for creating crackle cracks the top layer of paint and is applied to the painted surface of the workpiece, showing the base itself in the cracks or another layer of paint of a different color superimposed on top of the craquelure varnish.
But the two-step craquelure in decoupage is more difficult to use, but the result allows you to get a fundamentally different one. Crackle in the two-step system is the cracking of the lacquer layer applied over the finished work (that is, the primed, decoupage and painted surface). Cracks in this technique are just a full-fledged imitation of an antique, the varnish on which cracked from time to time, and dirt clogged into the cracks. Cracks with a two-step craquelure turn out to be transparent (which is logical, because these are cracks in a transparent layer), and these cracks need to be “showed”, imitating the same “dirt from time”. They show cracks with various grouts (coloring compounds) - oil paint, grated pastel, acrylic, or even eye shadow.
The two-step craquelure system is capricious, and the result does not always please the skilled craftswoman. To avoid disappointment, you need to know as much as possible about the two-step craquelure and the technique for applying it correctly.
So, two-step craquelure in decoupage: general principles
The first layer of varnish is applied to the prepared surface (first step), the layer dries to “tack”, that is, when touched with a finger, it should stick a little, but not “stick” and leave no marks. After the first layer is ready, a layer of the second varnish from a pair is applied to the work surface (second step). After the second varnish has dried, the cracks must be rubbed with powder, pigments, bitumen, oil paints (depending on the purpose, the desired color and the selected type of craquelure varnish). Then the workpiece must be gently rinsed under running water to wash off the second varnish, and after drying, cover with a finishing varnish. When washing off, the surface can be gently and gently “rubbed” when the feeling of slipperiness disappears - the craquelure varnish is washed off.
In some cases, the second varnish may not be washed off, however, the durability of the coating cannot be guaranteed, and in such a situation the top varnish must not be water-based!
Secrets of craquelure
- It is advisable to varnish the finished work before creating crackle. Firstly, it will protect the decor made from a napkin, secondly, it will make the surface smooth, and thirdly, it will reduce the “absorption” of the surface and the craquelure will turn out better.
- It is desirable to apply the first step not too thinly, and sometimes it is better to make a double layer of it.
- The second step must be applied as evenly as possible (then the cracks will be more uniform), leaving no empty spaces. This is important, because if there are "bald spots", then when grouting, dirty spots form in these places.
- It is best to dry craquelure in a natural way indoors without high humidity. If you use a hair dryer, then most likely, the cracks will be smaller. However, there is a risk that bubbles and irregularities may form on the surface of the product.
- The size of the cracks is quite dependent on the thickness of the second coat of varnish. The thicker the varnish layer, the larger the cracks.
- Do not overdry the first layer of varnish (first step). Otherwise, you risk facing the fact that when washing off the second layer with water, your grout will also be washed off.
- For long-drying compositions for the first layer, the following relationship can be formulated: the longer this layer dries before applying the second step, the smaller the cracks in the finished work.
And, finally, a few more tips on craquelure:
- Craquelure compositions give the work a yellowish tint (“yellow”), and some craquelure pairs yellow quite strongly, some give yellowness to a much lesser extent. In most cases, this is not bad for work - after all, this yellowness adds an additional effect of antiquity to the product. However, some works are done in cold colors, and for such works, yellowness is completely out of place!
- Write down how you applied each of the layers of varnish (thickness and number of layers of the first step, thickness of the second layer, application method - direction of strokes and tool, drying time for each layer and approximate climatic conditions), a pair of varnishes used and the result obtained. Thus, you can predict the result in other works and achieve the intended result with great success.
- When grouting, do not overdo it, cracks should not cover the beauty of the pasted motif, otherwise the whole meaning of decoupage is lost, and only craquelure comes to the fore.
- Do not forget to cover the work with a finishing varnish in several layers with intermediate polishing.
The best way to “reinforce theoretical material is always practice.
Therefore, we offer you a simple decoupage master class for beginners: we will decoupage the box step by step with applying craquelure.
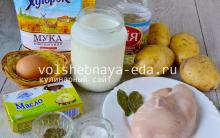
Before work, you need to acquire:
- Preparing a box made of wood or MDF.
- Napkin with a motif.
- Flat brushes.
- Primer on wood.
- office file.
- Scissors.
- Spray gun.
- A jar of water.
- Craquelure pair (two varnishes for two-phase craquelure).
- Golden powder.
- Acrylic paint.
- Sandpaper, bars, etc.
If you do not have a suitable napkin, then you can print one of the similar pictures that are perfect for this work and use it in decoupage of the box. Remember that it is better to print a picture on a laser printer. It is convenient to thin the picture with adhesive tape. Just glue the wrong side of the sheet with the picture with strips of tape, applying the strips with a slight overlap. Smooth it out well so that the tape sticks tightly over the entire surface of the sheet of paper, and then carefully, starting from one corner, remove the tape. Scotch tape will "peel off" along with top layer paper, leaving the picture thin.
Pictures for decoupage a bouquet of flowers on a dark background
Before finishing, it is necessary to unscrew the hinges from the box and apply primer (building primer on wood). If there are defects on the workpiece (notches, “burrs”), then it is advisable to slightly grind the workpiece in these places before priming.
 We paint the ends and bottom on the outside of the box in dark green (or another color you choose). We cover the inner surface and legs with golden paint. We grind each layer of paint. On outer surface We apply white paint to the covers and also carefully process them with emery.
Next, separate the colored layer of the napkin and cut out the pattern. We lay it on the file with the colored side down and moisten with a spray bottle. Flatten the paper towel with your fingers and remove any bubbles that form. Lubricate the lid with glue (for example, PVA with water) and put a file with a wet motif on it, press it down, carefully remove the film. I'm waiting for it to dry.

The term "craquelure", which comes from the French word "craquelure", denotes cracks on the surface, the presence of which gives it a touch of antiquity. The very technique of creating such an effect is called "crackle". Crackle is often used in cases where the surface of an object needs to be artificially aged. A similar method is often used in decoupage technique, as well as for the restoration of furniture and various household items. 
You can achieve the effect of antiquity on the surface using special craquelure varnishes. One-component craquelure varnish is one of the varieties of varnish that is used for one-step craquelure. In order to age the surface with this tool, you will need the following materials: acrylic paint, a foam sponge or brush, as well as the varnish itself, which is available from different manufacturers. Before you start working with craquelure varnishes, be sure to read the instructions. For illustrations, I use the Hobby-Line craquelure tool, manufacturer Kroyle, Germany.
The process of working in the craquelure technique using a one-component varnish begins with the fact that a layer of acrylic paint is applied to the cleaned surface. It should be borne in mind that it is its color after the completion of all stages of work that will be visible through the cracks formed. If the purpose of the work is to show an unpainted view of the surface to be treated, then you can immediately proceed to varnishing it. One-component carquelure varnish is applied in a fairly thick layer, but only after the paint has dried well. For a beginner in this business, it is best to use a foam sponge for this process, since a brush is usually more convenient for professionals.
After the varnish dries (the varnish does not take on the finger, but remains a little sticky), another layer of paint is applied to it, on which cracks appear after a few minutes. The shape and size of cracks depends on the thickness of the applied varnish. The direction of paint application also matters. In the photo below, the paint is applied with a brush in one direction.

If you apply the paint with a narrow brush in different directions, you get the following surface:

Paint is applied to the surface with a foam sponge. On the left in the photo - the craquelure varnish is not very dry and sticky to the fingers, and on the right - it dried out more and the picture on the surface changed after applying the paint.

The final stage of work is an additional coating of the surface with ordinary acrylic varnish, which will protect it and give the object being processed a finished look. But not every craquelure can be coated with acrylic varnish.
So, let's sum up.
1. The procedure for obtaining craquelure on the surface is as follows: applying paint to the surface - completely drying the paint - applying craquelure varnish - drying the varnish to a tack - applying paint.
2. The first and second layers of paint must be of a contrasting color so that cracks are clearly visible.
3. Paint, which is applied to the craquelure varnish, we take only matte. Glossy paint and metallic will not give the desired effect of cracks.
4. When applying a second coat of paint, do not brush twice in the same place.
5. The size of the cracks on the surface will depend on the thickness of the applied craquelure varnish. The wetter the varnish, the larger the cracks.
If you plan to use one-component craquelure in decoupage, then dark paint is applied first, then one-component craquelure, then light paint and a napkin.
When reverse decoupage on a glass surface with reverse side glue the napkin front side down.

When the glue dries well, we apply a one-component craquelure varnish, which we also dry to a tack (it should be sticky, but not remain on the fingers).

We apply light acrylic on the craquelure varnish. A light color will show the pattern on the napkin. Dry well.

Now we apply acrylic of the color that we want to see through the cracks on the front side of the product.

In this example, brown acrylic shows through the cracks.

Craquelure (from the French word "craquelure") is called cracks in a layer of paint or varnish on paintings. IN modern design artificial aging of the surface of interior items, which is also called "craquelure", has become very popular. Master classes on creating various products with a unique charm of antiquity are quite expensive. Knowing the basics of the technique of such decor, anyone can independently create unique interior items.
How can I get craquelure?
Master classes of novice interior designers most often use special varnishes to create “aged” things. They are called - craquelure. To emphasize and highlight the cracks formed on the surface of the object, ink or pastel is specially rubbed into the varnishes. A remarkable effect is given by compositions intended for patination.
The craquelure technique, despite all the new compositions, still cannot compete with natural cracks in works of art. That is why experts can easily distinguish the original of an antique item from a fake.
Tools and materials for applying craquelure
Almost any surface can be applied craquelure. Workshops on varnishing glass, wood, ceramics, metal or paper, despite some similarities, still have certain differences. That is why for each of these types of materials, the most appropriate technique for performing this design should be used.

To apply this decorative coating, you will need the following tools and special formulations:
Synthetic brush;
Hairdryer for drying the product;
Primer;
Acrylic paints (preferably in contrasting tones);
One-component craquelure and finishing varnish.
In the absence of expensive formulations, available improvised materials can be used: egg whites, table vinegar, washing gel, gelatin. There are several ways to apply various surfaces. Below are the most popular ones.
Single phase craquelure

The most popular is one-step craquelure. Master classes on creating this simple coating, also called single-phase, are the most in demand. It is used to create a surface with spectacular contrasting cracks. To do this, you will need a one-component craquelure and acrylic finishing varnishes, a hair dryer.
A primer is applied to the thoroughly cleaned surface of the item (selected depending on the material from which the item is made). A hair dryer is used to speed up the drying process. Acrylic paint is applied to the dried primer. It is she who will be translucent in the resulting cracks. After it dries, craquelure varnish is evenly applied on top. At the same time, it must be remembered that the thicker its layer, the larger the cracks will eventually turn out. When the varnish dries a little and does not stick to the fingers (without losing its stickiness), the main (second) acrylic paint is applied to it. After about 10 minutes, cracks will begin to appear on the surface of the item.
The dried paint is carefully covered with a finishing varnish. This coating is called "one-step craquelure". Even a person who is far from design and art can repeat a decoration master class in this technique. This method finishes are great for decorating porcelain and wooden interior items, jewelry boxes, photo frames. By honing your skills in this technique, you can create unique products.
Decoupage. Craquelure (master class)

No less popular is another technique for applying such coatings, called decoupage. Its essence lies in the fact that various pictures cut from napkins are pasted onto a craquelure mesh of cracks. Some experts perform decoupage in reverse order. In this case, the craquelure is already applied to the pictures pasted on the surface of the object.
For work, the product itself is required, in two tones, PVA glue, cut and selected drawings, acrylic varnish, art brushes, hair dryer.
Stages of making craquelure using decoupage technique
Cleaning and degreasing the surface of an object with alcohol.
Application of a uniform layer on the surface water-based paint with an art brush. Drying until completely dry.
Applying a layer of PVA glue to the surface with brush movements from top to bottom or from left to right.
After the object dries, a contrasting (second) paint is applied. Brush movements should be the same as when applying glue.
Without waiting for the paint to dry, a jet of hot air from a hair dryer is directed onto the surface of the object. Under its influence, the coating will begin to crack. The longer the product dries, the coarser and deeper the cracks will be.
The item is decorated with napkins using glue. The dried product is covered with several layers of acrylic colorless varnish.
Such craquelure looks good on dishes, flower pots, vases, trays.
Two step craquelure

Master classes on this technique are a little more complicated than the previous ones. To work, you will need acrylic varnish, art brushes, gum arabic (a viscous liquid that hardens in air), bitumen shellac, gold or silver powder. The application of craquelure consists of the following steps:
The cleaned surface of the object is covered with 2 layers of acrylic varnish. After it dries, shellac is applied to it in a plentiful layer. The thicker it is, the larger and rougher the cracks will be. To get a barely noticeable openwork mesh, a thin layer of shellac will be enough. When applying this substance, possible smudges should be avoided, since this error is almost impossible to correct.
When the surface of the shellac dries slightly, but is still sticky, gum arabic (liquid sour cream consistency) is applied on top of it with a thick layer. With light movements of the fingertips, this substance is rubbed over the entire surface. After about 3 minutes, the gum arabic will begin to stick to your hands. At this time, "massage" movements must be stopped.
When gum arabic dries, cracks will form on the surface. To emphasize them, bitumen is rubbed into them. Then, golden or silver powder is applied along the cracks.
The finished product is covered with a finishing varnish.
Craquelure on glass objects

Various look very impressive glass products decorated in this technique. The whole process of working with this material is practically no different from the above methods. At the same time, most needlewomen prefer to use single-phase craquelure on glass.
To work, you will need the object itself, acrylic paint in 2 contrasting tones, varnish, synthetic art brush, craquelure varnish. The glass surface on which the decor will be applied is degreased with alcohol. Then it is primed with acrylic varnish. After it dries, paint of one tone is applied (it will show through in the cracks). After that, craquelure varnish is applied to the surface. When it dries a little, but still does not lose its stickiness, the product is covered with the main (second) acrylic paint. After the appearance of cracks and the drying of the composition, varnish is applied to the surface.
Craquelure on a wooden surface
This decor technique is most often used for decoration old furniture, which can become a highlight of the interior. In this case, you can use both one- and two-step craquelure. A master class on wood is practically no different from the above surface treatment techniques. The main conditions for successful and other objects in the craquelure technique are their thorough cleaning of old paintwork and puttying damage.
Features of applying craquelure

Like any kind of design, this one also has a few secrets that can make the job easier. The craquelure technique, which everyone can master, allows you to do the job quickly and without flaws. To do this, remember the following tricks:
Artistic brush should be only synthetic.
After the craquelure varnish has dried, the cracks are often rubbed with “silver”, “golden powder”, and dark-colored oil paint. After that, the remnants of these funds are removed from the surface. vegetable oil and wipe it dry. The finished product is coated with acrylic varnish. This technique allows you to turn even a simple object into a work of art.
Before applying the varnish can not be shaken, so that bubbles do not form. The work area must be free of dust and well ventilated.
The cracks on the surface have the same direction as the movement of the brush. To obtain the so-called craquelure mesh, a sponge is used or very small strokes are made.


Dua for sadness anxiety and depression
Buddhism: the foundations of religion, how many Buddhists are there in the world
Obligatory prayers: features and order of performance by men
Druid horoscope by date of birth: interpretation and features
What is oregano: all about the amazingly useful seasoning!