There are often times in life when you need minor repairs windows or doors, which you can do on your own. In most cases, in order to produce it, it is necessary to remove the door leaf or window opening from the hinges on which they are held. How to remove the door from the hinges so as not to spoil them? How to attach everything in its place? Let's deal with these questions together.
Preparing to remove the door leaf
Before proceeding with the removal of the door or window from the mounting loops, they are visually inspected. Inspection is necessary to determine the type of hinges used and the selection of tools.
Door or window hinges come in two main types:
- detachable, which are two blocks that are inserted one into the other;
- one-piece or universal. They consist of one element equipped with hinges.

The next step is to prepare the necessary tools:
- screwdriver, suitable in size to the diameter of the fasteners. You can use a screwdriver;
- stubborn tool: axe, crowbar, long stick and so on. Anything that can help make a lever that makes the removal process easier.
If it is necessary to remove a product made of plastic, for example, balcony door, then the thrust tool should not be sharp, as this may damage the blade.
The process of removing doors and windows from hinges
After inspection and preparation of tools, you can proceed to remove the door leaf or casement from loops.
Removal and re-installation of the door using detachable type hinges
If detachable-type hinges are used to fasten the door, then the removal process is reduced to the following steps:
- all decorative caps and overlays are removed from the hinge, giving the mechanism an aesthetic appearance;
- all adjusting bolts are loosened to a minimum (if any are provided for by the hinge design);

- the pin connecting the two parts of the loop is removed. With a tight entry of the pin, you can use a hammer, but you should not hit the device hard, as you can ruin the entire loop;

- with the help of a thrust device, the door leaf rises up a few centimeters. However, one part door hinge comes out of another part;

- the door is retracted to the side and completely removed.
When carrying out the fourth and fifth points of work, the utmost attention and help of another person is required. The door leaf is quite heavy. So that it does not fall, it must be constantly held.
The door, removed from the hinges, is subject to the necessary repairs, after which it is installed in its original place.
For installation, you need to do all the work in reverse order according to the list:
- the door is pre-hung on the hinges, they are joined together. Here you will need the help of another person or a persistent mechanism that maintains the canvas in a state of balance;
- a mounting pin is inserted;
- the necessary adjustment is made;
- decorative elements are installed in their places.
How to withdraw plastic door with split-type hinges? According to the same scheme. The main thing is to pay attention to the use of a thrust device.
Plastic is a very soft material. For emphasis, it is advisable to use a non-sharp device. A rubber gasket can be placed between the stop and the door leaf.
What to do if the hinges are rusted and do not separate
With prolonged use of the hinges, a plaque in the form of rust may form on the latter, which interferes with the analysis of the mechanism. If plaque occurs, do not apply great force to the loop and knock on it with a hammer. This can harm and completely disable the mechanism. To remove plaque you need:
- buy in the store special remedy eg aerosol WD-40;
- strictly following the instructions attached to the substance, apply a layer of spray on the rusted place;
- wait for a while (on average, it takes from 6 to 12 hours).
- remove the agent with a dry and clean cloth.
After such a procedure, the rust dissolves, and the loop can be freely disassembled.
If necessary, the whole procedure can be repeated several more times until the harmful plaque is completely removed.
So that the hinges do not rust, they require constant care, which consists in.
Removal and installation of the door leaf from one-piece type hinges
One-piece loops differ from others in that they are not disassembled into their constituent elements. To remove the door from one-piece hinges, you must:
- first remove all decorating elements;
- using a screwdriver, unscrew the fixing screws on one side (either from the door or from the jamb).

How to put a door on universal type hinges? You just need to put the door back and fasten the fasteners.
When using one-piece hinges, the procedure for removing and reinstalling wooden and plastic doors is no different.
How to remove and install a window sash from the hinges
The plastic window has a slightly different hinge design than the doors. As a rule, in the manufacture of windows, only detachable hinges are used, installed at the top and bottom of the sash.
So, let's see how to remove plastic window from the hinges and what is required for this. First of all, you need to prepare the following tools:
- screwdriver of the appropriate size;
- a small hammer, preferably with a rubber gasket;
- pliers.
The PVC window is made of soft material Therefore, all work must be carried out with the utmost care. Removing a window occurs in several stages:
- the window sash opens slightly in the rotary direction for direct access to the installed hinges;
- all decorative caps installed during window installation are removed;

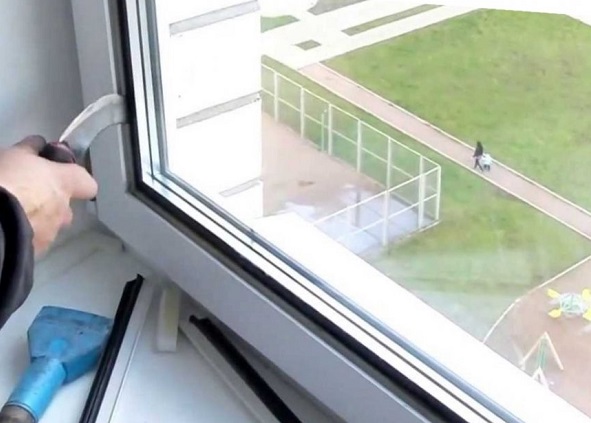
- removal work begins with the upper loop, from which it is necessary to pull out the fastener - the spindle. To do this, several not strong taps are made on the upper part of the loop. The spindle goes down the loop, where it can be grabbed with pliers and finally removed. Top hinge disassembled;

- the window sash is lifted up, thereby disassembling the lower hinge into two component parts;

- the window is completely removed.
As can be seen from the diagram, the answer to the question of how to remove the sash of a plastic window from its hinges is quite simple. All work can be done without the help of specialists and other people.
The sashes of a wooden window are removed using a similar technology.
After carrying out the necessary repairs, the window sash must be put in its original place. To do this, all steps are carried out in reverse order:
- the window is put on the bottom hinge. To do this, the sash is slightly raised and docked with the rest of the loop;
- the upper loop is joined;
- a mounting pin is inserted into its place (in the upper loop);
- loops are adjusted. This process is necessary, because during parsing, the initial setting of the loops gets lost;
- decorative caps are installed.
Thus, to remove the door from the hinges, you will need a minimum set of tools that almost every man has. Following the instructions given, all work on the removal and installation of hinges can be carried out independently, that is, without the help of specialists. Work with plastic windows and doors is recommended to be carried out very carefully so as not to damage the coating and the structure of the material.
All sorts of things happen in life. And it so happened that for some purpose you needed to remove one of the sashes of a plastic window in one of the rooms. It does not matter for what purpose this is done, since this in no way affects the process itself. So how to remove the sash of a plastic window with your own hands?
Instrument preparation
In order to remove the sash, no special tools are required. There are, of course, special pullers designed for this procedure, but we will focus on improvised means, namely, those tools that are at hand in every house or apartment, that is:
- screwdriver
- knife;
- pliers.
Instructions on how to remove the sash of a conventional plastic window
Regardless of the design, everyone can remove the sash of a plastic window with their own hands. But first, you should delve a little into the essence of the design. If earlier sash window with conventional wooden frames could be removed from the awnings by simply lifting it up, then with plastic windows everything looks a little different. Now only the lower one resembles the design of the former canopy. The upper one rests on a pin (rod), which has to be pulled out. On it, the sash rotates. So, how to remove the sash of a plastic window of a conventional design:

Everything, the removal process is completed. The back sash is installed according to the same principle. We insert the lower rod into the sleeve, put it in its place, lock it, adjust the middle of the upper part of the canopy so that the removed rod freely enters through it. We quietly drive it into place, put on decorative panels, and everything is back in place.
Video instruction is provided below.

How to remove the hinged sash of a plastic window. Instruction
Now that we have figured out how to remove the sash of a plastic window of a conventional design from the hinges, let's figure out how to do this with a hinged modification (transom).

Here, before taking on the canopies, which in this case are located in a horizontal position, you should first deal with the limiters. With this, too, there will be no difficulties if you follow the instructions.
Detach process
Since the limiters that prevent the sash from falling down, opening wide open, interfere with removing the flap of the plastic window, they should be disconnected. Depending on the type of fittings that the plastic window is equipped with, there should be a small lever at the edge of the limiter on the side of the window right on the sash, by turning which we force the limiter bar to come off the slot holding it. We turn the lever, remove the bar (in some cases it may be necessary to pry off the edge of the bar with a screwdriver), we coped with one limiter. Now we proceed to the second, acting in the same way.

When the sash is freed from the limiters, you can proceed to remove it from the horizontal canopies according to the same principle as described in the first case. We remove the decorative covers, determine in which direction the canopy with the pin is located, take it out and, having opened the lock, remove the sash from the pin of the second canopy.
The sash is mounted in its place in the same way. First, we deal with the canopies, then we put the holes of the limiter bars on the slots on which they were previously held. We turn the locks and sashes.
A video tutorial on the process is shown below.

We hope that the question of how to remove the sash of a plastic window is completely settled. Have a good mood and success in everything!
Hello! A friend unexpectedly calls me and asks how to pull out a double-glazed window from a plastic window.
I ask him what happened, why he didn't call me.
He says that the matter is urgent: the wife decided to wash the windows, but there are no sashes in them, the developer did not provide, so they need to be removed.
I had to explain over the phone how to do it. Then, however, he suggested simply replacing the window with a casement window.
But if you find yourself in a similar situation, I recommend that you familiarize yourself with useful information indicated below.
A large window area is occupied by a double-glazed window - about 80% window construction and is the most vulnerable part of it. Sometimes situations arise when you need to remove a double-glazed window from a plastic window.
Quite often, such a need arises when you decide to replace your double-glazed window with a more improved one, for example, with a large number of cameras or using energy-saving glasses, etc.
Also, the need to replace a double-glazed window arises when a double-glazed window cracks, breaks, or loses its tightness due to illiterate installation.
Perhaps you need to finish the outer slopes already after the time has elapsed after installing the window, and there is no access from the street and there are blank windows, then you will also need to remove the double-glazed window from the plastic window. It is worth saying that this process is not quite complicated, but it requires certain knowledge.
If you are confident in your abilities and want to avoid additional material costs to the call of the master, our article will help you figure out how the double-glazed window is held in the frame and how it can be removed from it.
How is the double glazing held in the frame?
The double-glazed window is held in the window frame with the help of glazing beads; this method of fastening was also used in old wooden structures.
The glazing beads, as well as the window profile, are made of PVC and are inserted into the frame in the plane of the glass. You must take into account the position of the glazing beads so as not to damage the window during the process of removing the double-glazed window.
Required Tools
In order to independently remove the double-glazed window from the plastic window, you will need:
- protective gloves to avoid possible cuts;
- screwdriver;
- putty knife;
- sharp knife;
- rubber suction cups.
Instruction
If you need to remove a double-glazed window from the sash of a plastic window, then first you need to remove the sash itself. To do this, pull the retaining rod out of the top hinge and now detach the sash from the window frame.
Lower the sash and gently lean against the wall. Now let's move on to the glazing.
Attention! Be careful and careful not to accidentally leave scratches on the window profile.
- Take a knife or spatula and stick it to the vertical seam between the window frame and the glazing bead.
- Now gently pry the bead and slide it.
- Repeat this action along the entire length of the glazing bead.
- Carefully remove the glazing bead from the frame, moving parallel to the glass.
- Remove the lower horizontal bead in the same way, then the second vertical one, and finally proceed to the upper horizontal one.
- When you remove the top bead, be sure to hold the double-glazed window with your hands.
- After all the glazing beads have been removed, it is necessary to remove the double-glazed window from the frame.
- You can use rubber suction cups.
- If there are none, then you can do it with your hands, be sure to wear gloves for protection.
- Gently pick up the upper edge of the double-glazed window with your finger, and then tip the double-glazed window towards you, move your hands and sides take the glass pane.
Note!
Double-glazed windows big size it is worth extracting only with an assistant. While you are removing the glazing beads, the assistant must secure the double-glazed window from falling.
How to remove glass from a double-glazed window?
A double-glazed window usually consists of two or three glasses. In order to remove the glass from the double-glazed window, it is necessary to carefully cut it with a knife upper layer sealant. Now carefully remove all layers of sealant and get to the aluminum frame of the double-glazed window and remove the glass.
Installation of a double-glazed window
Now let's talk about installing a double-glazed window back into the window frame. Before installing a double-glazed window, you must make sure that there is no dirt and dust in the opening on the frame folds.
Unlike dismantling a double-glazed window, when installing it, short horizontal glazing beads are first hammered, and then proceed to the side vertical ones.
To do this, manually insert the bead shank into the bead groove of the frame. Using a rubber mallet, fully insert the glazing bead into the groove, apply medium-strength blows.
Having installed all the glazing beads, you can begin to restore order. Wipe down new glass. If there are small scratches on the frame and glazing bead, clean them with a fine emery cloth.
Removing a double-glazed window from a plastic window, as you can see, is quite simple, without resorting to the help of a specialist.
Note!
It is important to understand that a double-glazed window is the most fragile and vulnerable part of a window, and such actions should be performed only when absolutely necessary and with full confidence in knowing the features of the process.
source: http://okna-prof-donetsk.ru
Modern plastic windows are a rather complex technical design.
A double-glazed window is the most vulnerable part of a plastic window, which often fails.
At first glance, it seems strong and reliable, but it is quite fragile and should be treated with the most careful way.
Glass is protected by all sorts of protective films and coatings, but it can easily break or crack.
To replace a worn or broken double-glazed window, many resort to the help of window repair specialists.
But if you strictly follow all the rules, then it is quite possible to perform this procedure yourself. Basically, the need to replace old double-glazed windows arises if you want to replace them with more advanced ones, with an increased number of sealed chambers or with improved sound and heat insulation properties.
However, it also happens that, through negligence, a double-glazed window breaks, cracks or becomes unusable (tightness is lost). It is not at all necessary to change the entire window structure, it is enough to replace a single double-glazed window.
Of course, it is better not to take risks and order the replacement of a double-glazed window of a plastic window to specialists with sufficient experience. They will be able to quickly and efficiently install new double-glazed windows in your windows in a short time.
However, the cost of such work, which depends on the complexity of the process, the delivery distance of new double-glazed windows, the urgency of the order, the size, configuration of the double-glazed window itself, and other factors, leaves much to be desired.
Specialists from the company who are engaged in the production and repair of plastic windows, first of all, must make all the necessary measurements of the double-glazed window using a special measuring tool.
Double-glazed windows are made in special workshops, after which they are delivered in finished form by specialized transport to the desired facility.
Then the old one is dismantled and the new double-glazed window is installed in the metal-plastic window. In rare cases, you can replace the glass of a plastic window yourself.
Of course, you cannot make a double-glazed window with your own hands, so you should carefully measure all the parameters and dimensions of the window, and then order a double-glazed window from a company that manufactures them.
Useful advice!
As soon as your order is completed and delivered, you need to start the process of replacing the double-glazed window.
Metal-plastic windows can be installed using special mounting plates with a through, through the frame, fastening of the window unit to the walls, but many people who decide to install them on their own are scared by the question of how to remove a double-glazed window without having a special tool.
source: http://estroyka.com
What tools might be needed?
It is possible to install metal-plastic windows with the help of mounting plates, and with a through, through the frame, fastening of the window unit to the walls.
The practice of our masters shows that of all available tools, the ax is the most convenient, due to the length of the handle, because. this greatly simplifies the work. If you come across a window made of soft plastic, feel free to use a spatula with a hard handle.
Professional installers of metal-plastic windows, in addition to a puncher and other tools, in order to remove the glazing bead from a plastic window, must have a special hammer and spatula, as well as suction cups.
But buying these devices for installing just a few windows is quite expensive, unless you want to install large windows. In order to remove the bead, we will use an improvised tool - a knife and a hammer.
The blade of the knife should be thick enough and, if possible, without a sharp tip. You can laugh, but the shape of a table knife is very similar to the shape of a spatula for dismantling plastic glazing beads. You can also use a chisel. The main requirement is not to damage the surface of the metal-plastic window, since you can’t paint over it later.
At work you will need:
- screwdriver
- putty knife
- sharp knife
- rubber suction cups
- protective gloves
a source:
http://prorabsovet.com
If it is necessary not only to remove the double-glazed window from the frame, but also to disassemble it, then proceed with dismantling. Usually a double-glazed window consists of two or three glasses. During manufacture, a moisture absorber is poured into a special frame.
Using a sharp knife, it is necessary to cut the top layer of sealant. All actions must be careful not to damage the glass, because it can crack if the knife is pushed deep.
Carefully remove the sealant layer by layer so you can get to the aluminum frame. At this stage, the disassembly is almost complete. If necessary, repeat all the steps with other window sashes.
But, remember, in order to assemble a double-glazed window, you may need special equipment, so all actions must be deliberate, unhurried, accurate so as not to damage any part of the disassembled window.
Note!
Note that the network is full of proposals for replacing the ax with a wide spatula with a rigid handle. They say it is safer and it is impossible to damage the double-glazed window. Trust us it's a lie clean water. We want to say that a spatula cannot, by definition, always be suitable for these purposes.
It can be suitable in an exceptional case - if we have a soft window profile in front of us, i.e. from soft plastic. However, as we can see, most windows are made of hard plastic.
source: http://www.all-4-home.ru

Part of the design of any plastic window is a double-glazed window.
There are times when it is necessary to disassemble the window for the purpose of repair, adjustment or preventive maintenance.
If this is the first time you have encountered such a problem, then you will have a question “how to remove a double-glazed window?”.
At first glance, this seems difficult, but if you follow a small instruction and adhere to some rules, it will turn out that this task is so difficult.
To remove the double-glazed window, it is necessary to disassemble the plastic window, dismantle it. To do this, pull out the retaining rod from the upper hinge, then you need to disconnect the window sash from the window opening.
Useful advice!
When doing this, be careful, as the window can be quite heavy. Lower the removed sash to the floor, carefully and securely leaning against the wall.
Engage in the dismantling of window sash fittings. To do this, unscrew the handle, unscrew all the screws. To remove the parts of the locking device, a screwdriver is useful. Fold all removed elements, fasteners and accessories in a separate place so as not to lose a single detail.
Insert the tool into the gap between the glazing bead and the window and carefully remove it. Do the same with the rest of the glazing beads.
a source:
http://otdelkavnutri.ru

Blind plastic window
If you have a blind plastic window, then sooner or later there may be a reason to remove the double-glazed window, for example, to paint the ebb or slope from the outside, or to repair these very slopes.
To remove the double-glazed window, we need a hammer (wooden or plastic) and a sharp chisel.
In principle, you can use an iron hammer, but you need to be extra careful. window glass and an iron hammer are poorly compatible - there is a risk of ruining the entire window.
Instruction:
- After we have armed ourselves, we need to start removing the glazing bead. A glazing bead is such a long bar along the perimeter of a double-glazed window, this bar holds the double-glazed window.
- We insert the chisel between the frame and the glazing bead and with light blows we knock out the glazing bead to the center of the double-glazed window. It is better to start with one of the vertical glazing beads, the chisel must be inserted so that the glazing bead is bent and it can be pulled out.
- The main thing is to pull out one glazing bead, the rest will be easier. they can be picked up at the corners.
- Attention! The top glazing bead should be removed last! After all, the double-glazed window on top, except for it, does not hold on to anything, it can simply fall out on your head.
- After the glazing beads have been removed, we take out the double-glazed window and carefully place it against the wall, after which you can deal with slopes with ebbs or whatever you wanted there.
- Under the double-glazed windows you will see plastic plates on black or gray inserts, when you insert the double-glazed window back, do not forget to place them as they were at the beginning.
- When you put a double-glazed window into the frame, start hammering in the glazing beads, first the top, then the bottom and then the side ones, it is clear that you should hammer in carefully, this is not a nail and you don’t need much effort here.
We take out the double-glazed window with an ax
How to remove a double-glazed window from a frame - this question torments not a single dozen buyers of plastic windows. Now we will show you how to remove a double-glazed window from a plastic window frame.
Since we will extract it with our own hands, we do not have special tools available, so we will do it with an ax. We begin to dismantle the double-glazed window.
- The first step is to start gently inserting our ax into the opening between the plastic frame and the glazing bead.
- Then, with a slight movement of the hands, we should gradually press on the handle so that the tip of the ax enters the gap between the frame by about 1-1.5 mm, this will be enough.
- Next, we need to slightly turn the handle of the ax and snap off the glazing bead. When you hear a click, don't panic. You did everything right.
- Now we need to hook the glazing bead in three or four places in order to completely release it from the grooves of engagement with the frame and remove it.
- Let's imagine that we are just standing in front of the window, that is, our eyes are directed to the window opening from the front, then the glazing bead should be inserted into the window frame from the side, moving towards the window.
- It is not difficult to assume that we will extract our glazing bead in the same plane. Thus, we absolutely do not need to pull the glazing bead towards us, standing in front of the plastic window, because. it won't do us any good.
- You need to get it by shifting in the lateral direction, otherwise it will definitely not come out of the window frame.
- Therefore, after our blade is now where it should be, you need to press the ax hard enough and turn its handle to the side.
- Do not forget that the ax should go a little deeper and push the bead 1-1.5 mm away from the frame.
- It is with this method that the bead is most easily separated from the window frame, especially when it comes to the first bead. It is not difficult to guess that it is the first glazing bead that is most difficult to pull out, because. the latches in the frame are quite tight.
- Well, now it's up to the small. After we have removed the first glazing bead, our work will boil more actively.
Note that the topmost glazing bead must be removed strictly last, otherwise you risk that the double-glazed window can easily fall out of the window and break. When removing a double-glazed window, be sure to hold it with one hand, or even better, ask a friend for help.
Note!
We draw your precious attention to the fact that the blade must be used as flat as possible (NOT as sharp as possible), and not rounded, as you see in our picture on the left.
In no case should the blade be sharpened like a knife, otherwise it will scratch the edges of the window frame very strongly, leaving behind ugly notches. Therefore, it is necessary to optimally choose from axes something in between. You can not take something too sharp, and something too blunt.
We take out a double-glazed window with a chisel and a hammer
There are many reasons why people need to remove double glazing. Maybe you want to paint the tide, but your window is deaf, and you don’t live on the ground floor at all. Removing a double-glazed window on your own, despite the apparent complexity, is quite realistic.
To do this, stock up on a sharp chisel and a hammer. It is best to take not an iron hammer, but a wooden or plastic one, because it is dangerous to work with iron tools on glass. However, this is not such a big problem if you are careful not to accidentally damage the glass.
So, you took a chisel and a hammer:
- Now you need to remove the glazing bead that holds the double-glazed window. It can be seen along the perimeter of the double-glazed window.
- A chisel must be inserted between the frame and the glazing bead.
- Now start lightly hitting the chisel to knock the glazing bead into the center of the pane. You should start with a vertical bead.
- Insert a chisel into its center so that the glazing bead bends so you can pull it out. Then you need to remove all other glazing beads around the perimeter of the window.
- Important! You can insert the chisel already from the edge of the glazing bead, however, the top glazing bead must be removed last, because this way you will control the double-glazed window so that it does not fall on your head.
- When the glazing bead is removed, you need to carefully take the double-glazed window and put it against the wall, and move on to repairing or painting the outer slope, low tide, or whatever you want to do.
- Under the double-glazed window, you will notice colored plastic plates that lie on black or gray inserts, when you insert the double-glazed window, you need to remember to put them in place.
When inserting the double-glazed window back, you should start hammering the glazing bead, but in the reverse order. You put the top bead first, and then the bottom. - After that, put the side glazing beads (due to the greater length, they are easier to bend), only you need to score carefully, which is why I was talking about hammers, since when hammering the glazing bead, the hammer is very close to the glass.
- When removing double-glazed windows, do not forget to number all the glazing beads, they will each have to stand in their place, so do not confuse.
- All glazing beads during the manufacture of the window are measured with a ruler according to the location, so if you install the glazing bead in some other place, then it simply will not hold the double-glazed window.
- Even if the glazing beads look the same, for example, from above and below, it can still differ in length by at least a few millimeters. Remember that even a difference of 2 mm will be noticeable at the junction of the glazing beads.
- When the window frame is installed in the opening, it rests with its entire mass on the bearing pads installed under it. In no case should the dowels take over the entire mass of the window, the window itself is very heavy 120-150 kg, and no bolts in the wall can hold it, in short, support in the form of load-bearing blocks is required during installation.
- Blocks should be placed at the corners of the frame and at the location of vertical partitions (mullions).
- When setting the window vertically, use a plumb bob with a sharp tip and axial symmetry. Using a level bar in this case would be a mistake. with its help, accuracy can be measured only conditionally.
- When setting the frame horizontally, for the same reason, a water level from a durable and transparent hose is best suited, the principle of its operation is not difficult to find on the Internet. This level is well suited when you need to install several windows at the same height.
- It is very important to ensure that water does not enter the central chamber through the mounting holes during installation. In fact, in any profile there is the possibility of water drainage, because. it will still seep through the seal.
- But when it comes to the initial installation, water can accumulate in the groove above the center chamber of the frame, and in this chamber is the metal frame.
- Because this water got during installation, and not in a natural way, then it can flow into the attachment points of the impost with the frame, or into the holes of the self-tapping screws. All this is very bad. such water can remain in a sealed double-glazed window for a long time.
- For prevention, you can drill several holes from the bottom end through which moisture can be removed, but there is nothing good in this. additional holes in the frame are not needed, although this is of course better than freezing.
- It is not necessary to tighten the fixing screws too much, if at least one of the screws is pinched, the window may take on a barrel-shaped appearance. Therefore, after fixing the frame, it is necessary to check the window levels again.
- After completion of the installation work, it is necessary to remove the protective film, which is located on PVC profile. This must be done immediately after installing the window.
- Do not think that if the window is protective film then the window will last you longer, in fact, it is only intended for installation so as not to scratch or stain the profile, and it is not intended for long-term use - the film quickly loses its properties and literally grows together with the profile, after which it will be impossible to peel off.
- To completely get rid of the sealant in wooden windows when replacing a double-glazed window, you need a chisel on the glazing beads, a sharp construction knife with a wide and not long blade, a larger skin and a zero skin.
- At first, with a chisel, you roughly remove the old sealant, then cut off what remains with a knife, then what remains with a large skin, well, there is almost nothing left, zero. To make it easier to work rough skin, wrap it in a wooden block and then the surface will be flat and wide.
- Do not hold the glazing bead on weight, as it is fragile and can crack, put it on a comfortable surface so that it does not slip.
- When applying a new sealant and inserting a double-glazed window, be sure to degrease the surface of the glazing bead and double-glazed window at the place of application.
The emphasis is on indicators of protection against low temperatures, dust and external noise, ease of use and durability. And these are the dependent components of the workflow. window fittings. Its quality will affect 97% of the direct operation of the window structure.
The hinge affects the reliability of fastening the sash to the frame. Production material - aluminum, steel or brass alloys finished with high strength plastic. They are produced by pressed and forged methods.
Basic and advanced options:
- The type of raw material used.
- Estimated dynamic and mechanical load.
- Raw material and diameter of the axial element.
- Range and ease of adjustment, defense mechanism from hacking.
These mechanisms are the main components for swing, tilt, tilt-and-turn or sash opening, designed to move the sash leaf smoothly along the horizon of the window without distortion when opening and closing it.
They are required to withstand up to 16,000 working cycles for the standard class, and for premium - up to 50,000.
window hinges
Location Classification:
- upper;
- Lower.
Classification by purpose:
- Swivel - provide external and internal opening;
- Folding - provide top opening;
- Overhead - mechanisms reinforced for sufficiently weighty structures.
Classification by dimension:
- ordinary, going according to the standard;
- small-sized;
- more than usual.
Adjustability classification:
- Adjustable. It is preferable because of the possibility of the sash sagging over time under its own weight, and this will contribute to their difficult closing and will have a bad effect on the pressure density.
- Unregulated.
Classification according to the raw material used, which must withstand the load of the sash and avoid sagging:
- Brass;
- Aluminium alloy;
- Steel coated with a galvanizing compound to protect it from corrosion.
- Decorating plastic as a hinge bar.
Before acquiring hinges, the weight of each sash, which reaches up to 180 kg, is taken into account. The calculation of the severity of the sash includes the weights of the following components: double-glazed window, profile and fittings.
By type, loops are classified into:
- Hidden - their installation is carried out in the thickness of the profile - more heat and noise insulated;
- Open - they are installed on the internal profile and are closed for beauty with a plastic overlay;
- Partially hidden for unusual designs small size tilt-and-turn windows.
Advantages of the hidden option:

- Tightness is ensured due to the additional clamping of the sash structure.
- Reliability from breaking on the loop located from below.
- They help to avoid drafts due to the closedness of the rubber window seal, which does not allow air currents from the street to pass through.
- Concise and stylish design thanks to their integration into the sash rebate.
- The possibility of light or roller shutters, due to the presence of free space due to the displacement of the sash to the center from the window plane when it is opened.
- No need for hinged plugs.
- Accessibility of all types of opening with an increase in the light opening due to the increased angle of rotation up to 100 degrees.
- The presence of special grooves with the possibility of additional lubrication of parts, reducing the wear of the mechanism.
Disadvantages of the hidden option:
- Withstand load only up to 100 kg.
- High cost.
Outside, steel mechanisms are closed with decorative overlays, whose function is to:
- Protect hinges from construction debris and dust.
- Protect the hinges from moisture penetration and, accordingly, from rust;
- Hiding unattractive details;
- Color combination with the window due to their rich coloring.
Classification of overlays according to the material of manufacture:
- PVC products;
- Steel, laminated in a certain color or acquiring color due to powder dyes.
A question of adjustment
Cases where regulation is needed:

- With an old and worn out design.
- With incorrectly installed windows.
- In case of insufficiently tight closing of the sash.
- When the window sash sags.
- When changing the shape of the sash or frame due to an assembly error.
- When the sash leaks or freezes.
Tools needed for adjustment:
- different size screwdrivers;
- hexagons;
- keys with the shape of stars;
- pliers.
Horizontal adjustment is made on the sash hinges with a recess for a hexagon. When the window structure is open, the hexagon is inserted into the recess and rotated clockwise.
As a result, the sash structure moves away and its opposite side lowers. The regulation of the lower canopy is carried out from the outside with the window structure in the closed state. Its shift is carried out no more than 2 mm.
It is possible to adjust vertically with the help of a hinged loop located below. Beginning - flipping the cap. When the hexagon is rotated clockwise, the leaf element is raised, and against it, it is lowered. It is permissible to adjust the window by only 2 mm.
The clamp affects the tightness of the plowing of the window structure. Checking for gaps is carried out in the closed state and bringing a lit candle.
When the flame fluctuates, adjustment is required, which is made by eccentrics around the perimeter of the sash.
To press it against the frame, the eccentric is shifted clockwise, to loosen it - against. To change the state of the eccentrics, which is the same for each of them, a turn of 2 mm is enough.
Determining the pressing density is a risk. When it is directed to the seal - a tight clamp. With its direction from the seal - a weakened clamp.
Depending on the profile type, the eccentrics can be rotated using wrench or pliers. Plate clamping is also possible.
In this case, the clamping mechanism with the tongue is located on the side of the hinges. When the tongue is extended, the sash is pressed against the frame. When the loops are located on the left for pressing, the key is rotated counterclockwise, with the right location, it is rotated clockwise.
It is more correct to carry out the adjustment along 3 planes in order to distribute the mass along the perimeter of the sash and ensure the fit of the seal.
How to remove a plastic window from its hinges

The top loop is the beginning of the whole process. The sash is slightly opened to access the hinges. Removal instructions:
- Removing the decorative plastic trim.
- Sash opening.
- Pulling out the rotating shaft by pressing a screwdriver on the upper hinge end. From below, the edge of the shaft will be visible, which is captured with pliers and pulled out. At the same time, the sash structure is held.
- To remove from the lower loop, the structure is lifted up and pulled out of the socket.
When replacing a window structure, before installation, the spindle or rotation shaft is removed from the upper hinge with a hammer and a thin screwdriver, which is attached to the spindle knocked out with a hammer.
Reverse installation:
- Installing the sash with a hinge located from below on the spindle.
- 2 parts of the loop located on top are connected and fixed with a rotation shaft, which is inserted from the bottom up.
Repair and replacement
Cases of necessary replacement of the mechanism:
- Exit the service life of fittings (10 years).
- Installation of a smaller number of necessary parts, which led to the deformation of the sash.
- To add the number of openings of the sash mechanism.
Instruction:
- Removing decorative overlays from the hinges at the top and bottom.
- The axis is knocked out of the loop from above with an upper blow on it in order to be removed from below with pliers. The sash must be supported.
- Removing the sash from the hinge located below and placing it on the table.
- Removing the handle and unscrewing the fixing screws around the perimeter of the sash structure.
- Removing the hinge mechanism from a special groove.
- Decomposition of accessories on the table and its thorough washing with a brush.
- Drying the mechanism with a bicycle pump.
- Lubrication of transmission elements and parts involved in friction with special fitting grease.
- Reinstalling hardware. Screw fastening. Installing the handle.
- Lubrication of the hinges and hanging the sash structure.
Rules for use and care
- For increase operational period and conservation For aesthetic appeal, at least once a year, the moving hinge parts should be lubricated with an oil that does not contain acids or resins that contribute to the destruction of the corrosion protection.
- With a broken handle the decorative strip under it rises and, tightening the screws, the handle is fixed.
- To clean the fittings, use a hard brush. With an open structure, all hidden parts are wiped with a damp cloth - especially the places where moving mechanisms are attached to static frames.
- Lubrication is carried out by spraying 2 drops of silicone grease on each element of the roller mechanism. In this case, the control handle must be constantly turned, as when opening and closing the window, to evenly distribute the lubricant over the surface of the parts that experience friction.
- Cannot be used for lubrication of vegetable and butter, petroleum jelly, shoe gel, which will lead to rapid wear of parts.
- When ordering the installation of window plastic structures, the choice of a hinged structure is carried out by the manufacturer, and depends on the type of opening, profile, glass package and fitting weight.
- The duration of the operating period of windows largely depends on the quality of the hinges.
- If necessary, adjustment of the sash structure is mandatory to avoid gross damage.
- Lubrication and adjustment of the hinges is possible on their own.
- If there is a guarantee and a defect in the design is found, the problem is solved by contacting the installers.
Double-glazed windows have become a trend today, people are massively changing old wooden windows for new packages. And during the operation, some inconveniences were revealed. The ventilation mode is somewhat inconvenient in winter time. There is a strong cooling of the room, and the air does not have time to refresh the room.
Ideal ventilation is a window with a small sash. A healthy microclimate is created, the heat in the room remains, and the flow fresh air smoothly enters the apartment. You can safely leave a small sash in the ventilation mode for the whole night and not worry about hypothermia housing.
If speak about constituent parts window with a small door, then they are the same as in PVC double-glazed windows. The structure in the opening consists of fittings, double-glazed windows and a plastic profile. Different kinds decorations somewhat transform the PVC window.
Application area
The first double-glazed windows that appeared on the markets adorned only window openings. Over time, their scope expanded, but for a long time they remained inaccessible to many, as a result of their high cost.
The window industry developed, competition appeared, the introduction new technology, ultimately, affected the pricing. The scope of their application has expanded. Packages began to be used in the glazing of loggias and balconies. A big plus of their production is the installation and installation of packages to order. That is, you can glaze the opening of any size.
Based on this, the market has small companies, which gave impetus to the wider use of PVC windows. Now they can be seen not only in window openings, but in mobile and stationary partitions, glazing of large areas, etc.
Advantages and disadvantages
 Advantages of windows with a window leaf:
- Cool air entering the room in the upper part of the window, meeting with a stream of warm air, it has time to heat up.
- There is no need to free the window sill.
- The presence of an additional impost reinforces the design.
- You can install anywhere. For example, for cats, a hole is made at the bottom.
- Reduces ventilated area, so you can leave it overnight, which is convenient for cold regions.
- The opening mechanism is very simple and convenient.
- Hole location at the top, does not allow children or a cat to get to it.
- While cooking in the kitchen, free to enjoy.
- Eliminates the possibility of drafts.
Minuses:
- The presence of an additional structure leads to its rise in price.
- Additional mullions reduce light transmission into the room.
Kinds

- Mortise. The presence of a small door was included in the design of the double-glazed window from the very beginning. It is a separate sash with hinges and a double-glazed window. This is a very successful and reliable option, hence the overestimated cost of products in general by 30%. Just like the sash, the mortise hole has three modes: summer and winter ventilation, full opening.
- Split. Here the door crashes when the double-glazed window is mounted in the opening. The sash is removed and a trim is made in the glass under the door on required size. The difficulty in such work is considered in its fitting and fastening so that it is perfect. The service life is significantly shortened compared to the first type of plunge.
- Sliding. The essence of this method is that during the ventilation, the internal sliding of the glass is used. They are in special skids, due to them the glass moves a certain distance and returns to its original position. This option is considered the most modern, but there is a drawback in the vulnerability of the mechanism. It is undesirable to make such a design yourself; you should trust experienced specialists.
Criterias of choice
 Double glazing is key point when choosing a window.
 The main characteristic of a plastic window is its double-glazed window. It is he who is responsible for the sound and heat insulation system and light transmission ability.
To choose it, it is worth considering some nuances:
- type of dwelling;
- leaf sizes;
- place for the door (top, bottom);
- number of storeys;
- noise level;
It is worth paying attention to the choice of the hole in the window.
As it happens:
- folding when the sash opens down, the handle rotates 180 degrees.
- Swivel, turning the handle here by 90 degrees and opening the sash is from left to right.
- With micro-ventilation, the handle is rotated 135 degrees and a small air flow is accessed.
- tilt and turn, combines all modes of opening.
Price
 Regardless of the functionality of a plastic window with a door, the price mainly depends on the manufacturer.
 Today, the products are successful by ROTO, Siegenia Aubi, Blitz (Germany). Their product is characterized by high wear resistance and reliability.
What does it depend on:
- The company that manufactures the product.
- Product design without installation or with it.
- The presence of additional decorative elements.
- profile designs.
- Material of fittings, double-glazed window, profile.
- Selling firms.
- number of cameras.
- Opening size.
- Installation difficulties.
When ordering windows, you should pay attention to the final turnkey cost, which differs from the price of the package itself.
Rate examples:
Consider the approximate cost of a double-leaf window with a size of 1300 × 1500 with a folding window.
We choose the profile system of the German manufacturer Rehau Blitz 60 mm.
Fittings GU-BKS (Germany), with a double-glazed window 32 mm.
If the price does not include installation, slope finishing, window sill, then the design will cost 8900 rubles.
Removing / adjusting the window
 To remove the small sash, you need to close it with the handle down. Then remove the upper decorative overlay on the loop, perform the same procedure with the lower overlay.
We alternately remove the pin from the upper, then the lower loop by pressing on its upper part. Holding the door, open the handle. We take the frame and lift it up. The sash will be removed.
Suppose the door leaf is slightly warped, you can adjust it with a key (4 mm), which has six edges.
To raise or lower the sash, remove the decorative trim from the bottom of the door. At the top of it there is an adjustment groove. If you need to raise the sash, turn the hex wrench to the right, lower it to the left.
If it is necessary to adjust the upper part of the hole of the horizontal plane, then a hex wrench is also used here. To do this, you should open the small sash wide open and find the element that needs to be adjusted. When you turn the key, the sash will move in both directions.


Living and dead water: myth or reality, what is the power of living and dead water?
Craniosynostosis, or premature fusion of the bones of the skull Frontal crest in a child
Beautiful hair How to achieve hair density at home: useful tips
Why mosquitoes bite some people, but not others
How to achieve beautiful hair