In this article, we will introduce you to the basic rules for the manufacture of products that you can carve on your own hands. lathe. Woodturning is an artistic processing of wood, ranging from candlesticks to balusters for flights of stairs. The turning process is quite complex and consists of several components: the choice of workpiece and tool, determining the speed of rotation of the workpiece, turning directly and subsequent finishing. Sometimes the finished product requires varnishing, intermediate polishing and drying. But first, let's choose a template. The rules are simple, the first step is to determine the dimensions of the finished product.
Suppose we need to carve a candlestick. There is a drawing where all dimensions are indicated, the length is 45 mm, the diameter is 48 mm at the base, and 35 mm is the diameter of the top where the candle will be inserted. The workpiece is selected with the calculation - length plus 8 cm, if your wood lathe is equipped with jaw chuck, and length plus 4 cm if the machine spindle is equipped with a faceplate. The thickness of the workpiece should be with a margin of 20 mm, that is, with a given diameter of 48 mm, the workpiece will need a diameter of 68-70 mm.
 Of great importance is from which you will grind the candlestick. The fact is that turning wood is possible only when using hard varieties. Conifers are categorically not suitable, you can immediately forget about them. They lend themselves well to turning: beech, ash, pear, apple, cherry, oak, hornbeam, walnut and others of about the same hardness. In addition to hardness, the texture of the material matters. Wood turning works give good results if the wood is beautiful. Solid varieties in the finished product will not look. For example, beech, hornbeam and pear have a texture with a slightly pronounced pattern, while ash, apple and walnut, on the contrary, have a very interesting, bright pattern, especially on a transverse and diagonal cut.
 But the texture of an adult white acacia tree is especially beautiful, the pattern in divorces resembles the famous malachite stone, besides, acacia wood is also green. Some Arfrican varieties have good textural appeal. For example, the padduk is a true brick red color, the Kewazingo variety has a dark chocolate hue, and the makore wood is the color of coffee with milk. The most noble colors of rosewood wood, it is difficult to convey this texture in words. Wood turning is possible on any hard material, and the choice of wood is entirely up to you.
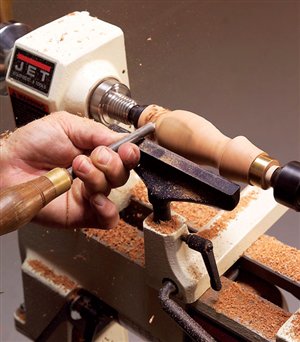
 We install our workpiece in the machine, clamp one end into the cams, and support the other end with the center of the tailstock. The center can be rotating or stationary, in any case, its spout will reliably support the future candlestick. But still, it is necessary to tighten the back gauge from time to time, not forgetting that turning woodwork at home requires heightened attention and accuracy, so that the workpiece does not accidentally fly out of the machine. Next, select the rotation speed. For turning a product with a diameter of 38 mm, the spindle speed of 350 - 450 rpm will be optimal. For grinding and polishing the product, the speed will need to be increased approximately twice.
 First, it is necessary to machine the workpiece along its entire length so as to level its surface and obtain the correct smooth cylinder. flawless Smooth surface needed for marking. All dimensions from the drawing are transferred to the surface of the workpiece. To do this, we measure all the indicated lengths and apply marks with a pencil. Then we start the machine and put a pencil on the rotating part at the marked points, we get smooth circular borders. After this operation, you can start turning the product. But at the same time, it is necessary to constantly monitor the process, it is better to measure it again so as not to make mistakes in the calculations. Turning woodwork is a fascinating and creative business, with the right approach it can bring a lot of pleasure.
Working on a wood lathe is, in principle, simple, but it requires skill and the ability to "feel" the workpiece. It is then that it becomes a real art, in which imagination and creativity find their expression.
A wood lathe has one limited function: it only rotates a piece of wood. The carpenter, on the other hand, gradually carves out a finished object from a simple piece of wood: furniture legs, lamp body, railing posts, toys, boxes, cups, salad bowls, vases, etc.
Unlike other woodworking machines, which are used only at certain intermediate stages, the lathe is suitable for all operations - from roughing to polishing. The required tools are grooved (cylindrical or V-shaped) and flat chisels, cutters, scrapers of various sizes and shapes. The machine rotates the workpiece, and the hand controls the movement of the cutter. Depending on what item needs to be made, there are two ways to fasten the workpiece. In the first case wood detail clamped horizontally between the centers of the headstock and tailstock. The second method involves the installation of the workpiece exclusively in the headstock using a chuck or faceplate. If you are new to working on this machine, it will be logical to start with the first method.
Lathe with electronic control
1. Start-Stop switch
2. Bed
3. Headstock
4. Speed switch (with variator)
5. Spindle
6. Lead center
7. Handpiece (tool holder)
8. Tailstock center
9. Tailstock
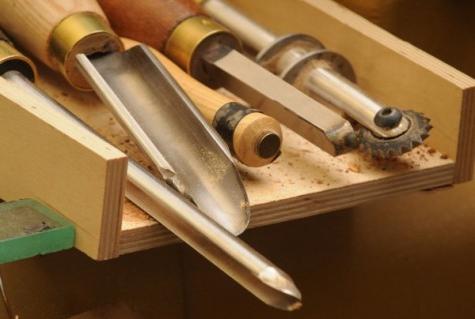
Cutter set
1. Grooved chisel
2. Meisel cutter (2 mm)
3. Semicircular cutter
4. Cutting tool
5. Beveled chisel (jamb)
6. Semicircular chisel for processing shaped surfaces
7. Grooved chisel for roughing (reyer)
Operating principle
The entire mechanism of the machine is mounted on a frame made of two steel bars or profile cast iron or aluminum beams. On one side of the bed there is a headstock, inside of which there is an electric motor (0.5-1.5 hp) that rotates the spindle. The latter has a Morse taper, it can be inserted leash center(with two, three or four knives and one point), cartridge or faceplate. On the other side of the machine is the tailstock, the center of which presses the workpiece, holding it in a horizontal position.
An all-round pivoting hand rest, positioned as close to the workpiece as possible, supports and guides the cutter.
On machines with manual adjustment, the speed (frequency) of rotation can be switched (from 450 to 2000 rpm) by a gear lever in which pulleys with bearings are located. In more complex models of machine tools, the gearbox has been replaced by an electronic variator, which allows you to smoothly adjust the speed on the go.
Machining a workpiece clamped between centers
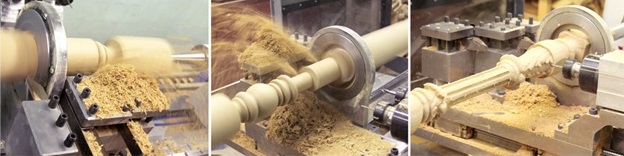
This method is used for processing cylindrical parts of various lengths, reinforced between the centers of the headstock and tailstock. In this way, you can make all sorts of details: from miniature chess pieces to table legs or railing posts. Especially experienced craftsmen even manage to grind billiard cues.
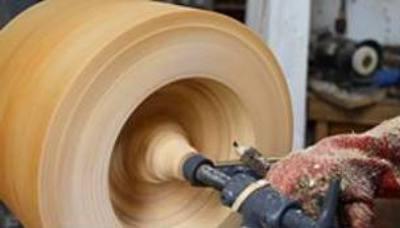
The first step of the work is to find the position of the axis of the wooden workpiece in order to clamp it between the driving center and the center of the tailstock. The next operation is to make the workpiece (from a block of wood of a square section or simply from a piece of log) cylindrical. This is done at a speed of 1000-1500 rpm. In this case, the chips are removed from right to left with the help of a wide concave grooved chisel for roughing - a reyer. If the workpiece is long, roughing is carried out in several stages; the handpiece moves closer to the part as it is turned, without changing its position in height.
For turning parts, there are tools of various shapes: a grooved chisel for processing a shaped surface, a flat chisel, a hook, a semicircular cutter, a beveled chisel (jamb), etc. Depending on the type of tool used and the stage of work, you should periodically bring the handpiece closer to the workpiece. After the completion of the process, when the part has already been turned, the final finishing (grinding, polishing, waxing, toning, etc.) is carried out with the handpiece removed.
With the help of an angular center finder, draw two or three lines with a pencil from both ends of the workpiece, the intersection of which will be the center of the end.
By hitting the marking core hard with a hammer, make grooves and an axial recess at the ends of the workpiece.
Put the workpiece on the driving center, bring tailstock to the opposite end and press the workpiece with it so that the leashes cut well into the grooves at the end, and then take the center of the tailstock - the workpiece should hold itself.
Bring the center of the tailstock close to the workpiece again to fix it on the axis of the centers. Turn the tailstock handwheel a quarter turn if the wood is soft and half a turn if it is hard. The workpiece must be fixed so that it can be turned by hand without resistance.
Bring the handpiece as close as possible to the workpiece. By turning it by hand, make sure that it rotates freely and does not hit anything. The reference plane of the handrest should be approximately 5 mm below the axis of rotation.
Roughing
For rough turning of the cylinder, set the rotation speed to 1000 or 1500 rpm using a reer. The more precise the shape of the cylinder should be, the higher the speed should be set. Workpieces with a small machining allowance can be machined in one pass along the entire length, with a large allowance - in small portions, moving from the tailstock to the spindle.
Begin work slowly, resting the chisel shaft on the tool rest and holding the blade so that the heel of the chisel is in contact with the wood. Then raise the handle of the chisel until the edge of the blade begins to cut into the wood, removing even and well-curled chips.
Guide the cutter in the direction of chip removal in this way: one hand holding the handle sets the movement, and the other only supports the blade (without pressing it).
When roughing a square workpiece, carefully cut off the corners with a chisel, without leaning too hard on it. Bring the workpiece to a cylindrical shape of the largest diameter, moving the handpiece towards the axis of rotation as you grind the allowance.
Depending on what shape you need to give the part, draw the main lines for marking the convex and concave parts with a pencil, turning the workpiece by hand. Mark the workpiece so that the widest parts of the part are always located on the side of the headstock.
Start by turning two edges of the workpiece with a chisel. Leaning on a handrail, it should smoothly enter the tree (without sudden movements), remaining perpendicular to the axis of rotation.
Size check
check the size regularly with a caliper. Experienced carpenters usually press the chisel against their thigh with their elbow to free their hand for the measuring tool. As soon as the caliper begins to vibrate, reduce the chip thickness. Thus grind first largest diameters, and then move on to turning necks, tori, balls, shoulders, etc.
In order to carve one and a half, use a grooved chisel to process the shaped surface. Holding it perpendicular to the axis, "lower" the cutting edge from the outside into the workpiece by raising and slightly turning the handle. To get a whole torus, perform the same operation on both sides.
The neck (arch) is machined with the same cutter as the torus. After roughing the bottom in the middle of the neck, turn the right side of the neck, this time leading the tool from the bottom up and to the right. Never transfer the cutter from one side of the neck to the other at once - they need to be turned in turn.
Listels (small rims, often left on both sides of the neck) are turned with a Meisel cutter. It does not have back corners on the side faces of the rod, like a chisel, but it does have a thin groove for chips to exit.
A fillet is a smooth transition from one surface to another - in fact, a combination of a torus and a neck. Therefore, first sharpen the neck, and then the torus adjacent to it.
A part clamped on both sides is never completely cut off. Turn grooves from two edges, leaving jumpers of small diameter, and saw off the ends with a hacksaw, after stopping the machine.
To finish the part, remove the tool post and machine the part from the bottom fine sandpaper(grain size from 16 to M63). Turn the skin crosswise as you work to avoid ring scratches.
To finish the part while rotating, rub it with a piece of wax and polish it with a dense cloth or cork material.
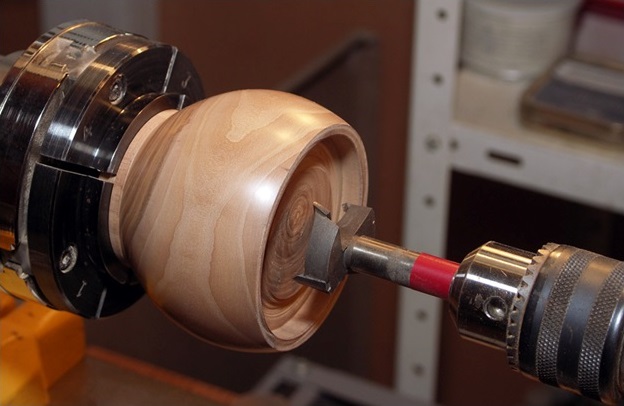
Drilling out the base of the lamp
Insert a chuck into the headstock and clamp a wood drill bit in it. Set the RPM to low and, holding the workpiece with one hand, feed it onto the drill, advancing the tailstock quill. Remove shavings from time to time.
Make centering grooves the same diameter as the drill (a large hole drill that goes through the tailstock quill) on both sides of the piece. To do this, replace the stop center in the tailstock with an annular centering and drill grooves while feeding the tool onto the part. Repeat the same on the other end. Then remove the ring centering and pass the drill into the vacated hole in the tailstock. Moving it forward, gradually drill a through hole.
Machining a workpiece clamped at one end
When making a box wooden blank fixed at one end only. Depending on the shape and size of the part, they are used different means fasteners: 3- or 4-jaw chuck (some clamp at eight points), pigtail chuck (with set screws screwed into the workpiece), collet chuck or faceplate.
This job requires a lot of skill. Here it is necessary to show great care when turning the ledge so that the diameter is not made smaller than necessary.
Clamp the square piece securely in the chuck so that you can manually achieve a small amount of runout. By giving the workpiece a cylindrical shape, you can use a tool rest for greater safety. When the workpiece acquires the desired shape, process the free end with a chisel.
First, the flange of the lid is trimmed, and then its inside is selected with a semicircular cutter. The handpiece is located on the side of the free end of the workpiece, while the center of the tailstock is removed.
Turning this part of the workpiece is necessary for the subsequent manufacture of a hat on a leg - an ornament on top of the lid. After grinding, the part is trimmed with a Meisel cutter, and then sawn off with a hacksaw with the engine turned off.
From the workpiece remaining in the cartridge, a box is to be made. As in the previous case, the end face is ground off, and the diameter of the entry of the cover shoulder is accurately drawn on it.
Having cut out a slightly conical recess according to the marking, drive the lid into it with a mallet. Its shoulder must be at least 5 mm high.
The connection of the lid to the box is quite strong, so that they can be processed together with a grooved chisel. It is necessary to work with smooth, uniform movements, removing chips in the direction from more convex parts to thinner ones.
When you have shaped the box as desired, cut out thin grooves and burn them (make them dark) with a stretched iron wire. last operation should be stopped with the appearance of smoke.
Apply nitro-lacquer to the finished rotating box by spraying from a spray can, and then process it with shavings.
After that, cover the product with wax and polish with a cork.
Insert a wedge between the box and the lid and, after lightly hitting with a mallet, remove it. Using a drill fixed in the tailstock, drill a hole in the product that will set the depth. Keep the cutting tool (scraper) along the axis of rotation, lifting the handle until the optimal cutting angle is found. The cutter can be worked by moving it from the center to the periphery of the workpiece or vice versa. The depth should be checked from time to time. When the inside is turned, trim the hole for the lid with fine-grained sandpaper, and then cut the box with a Meisel cutter.
They make balusters for railings, furniture legs, coasters, racks, vases, various dishes, caskets, toys and much more. Many people have found their calling in this and successfully earn money on it. But the degree of success depends on several factors. Here is the preparation of the material, and the choice of suitable equipment, and, of course, the rules of operation. Having the necessary information, you will always get only what you planned at the output. Your work will be of high quality and fast, and the products will be beautiful, functional and durable, without marriage. Let's take a closer look and start with the first.
Material selection and preparation
The lathe allows the processing of almost all types of wood, including artificial materials based on it (lignoston, lignofoil). As practice has shown, the wood of linden, pear, birch, beech, hornbeam and walnut is the easiest to turn. The most difficult to process include pine, spruce, oak and ash. When choosing a suitable piece of material, it is important that there are no defects on it, such as cracks, voids, knots falling out, weeds, pitching, etc.
 Interesting fact:
tortuosity and cross-layering, which are considered defects, are in this case a great advantage. Such wood splits very poorly, so it makes good mallets, handles for hand tool etc.
Interesting fact:
tortuosity and cross-layering, which are considered defects, are in this case a great advantage. Such wood splits very poorly, so it makes good mallets, handles for hand tool etc.
To determine the moisture content of the workpiece is applied, immediately showing the required percentage. But often the condition of the wood is determined by eye, by the weight of the bar and by the chips. In the latter case, a small piece is cut off from the workpiece. In a sufficiently dried, the shavings break when compressed in a fist and do not tie into a knot, disintegrating, while in an under-dried one, it is crushed and keeps its shape. Before work, all large protrusions should be cut from the bar with an ax and given a cylindrical shape. This is important, as parts with irregularities are very difficult to grind, and there is a chance of breaking.
Mounting the part on the machine
 This operation can be performed in several ways. One of the most common - clamping a bar between the center of the tailstock and the driving chuck. The latter has several teeth that capture the workpiece. This method fastening is the simplest, it is used when turning small long thin bars when machining the end of the part on the machine is not required.
Before fixing the blank, mark its center from the ends using an angular center finder. High accuracy is needed here, so it is not worth determining the center "by eye" so that the part does not beat during rotation. Drill holes at both ends at the marked locations to a depth of 3-5mm. Take driver chuck, insert the center tooth into the drilled hole and tap the center shank lightly with a mallet, driving the rest of the teeth into the workpiece. After that, insert the cartridge into the headstock, put the workpiece on it, from the other end there should be a rotating center in the tailstock quills. It is inserted into the other central hole of the bar and thereby fixes it on the machine.
The next mounting method is using a faceplate. It is used when it is necessary to carry out work with the ends of parts. The faceplate has several holes into which bolts are inserted. Take the blank, also mark the center on it and drill a recess in it. Align the central mounting hole with it and screw a screw into it, then tighten the remaining bolts, fixing the faceplate. After that, put it together with the workpiece on the spindle. This type of fastening is the most reliable, but it takes more time both when fixing the workpiece and when it is removed from the machine.
Tool
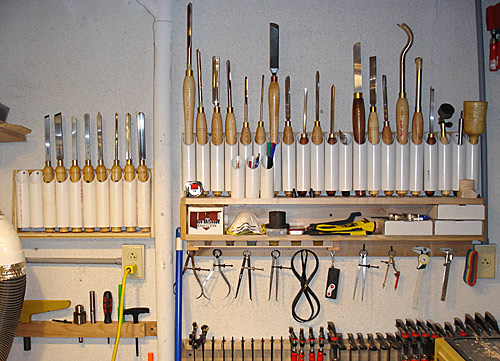 Wood turning is done manually, that is, the cutting tool is not fixed on the holder. It is held by the master in his hands, partially leaning on a special emphasis. So automatic control occurs only by the spindle speed, the feed rate and the depth of cut are manually adjusted by the turner. First, the workpiece is roughed to obtain an even cylindrical shape. After that, finishing turning begins and the part is formed. For all this, various equipment is used, mainly chisels. Turning chisels differ from ordinary carpentry only in size (length from 350 to 800 mm, width from 6 to 50 mm), since they need to be held tighter during operation. This tool is of several types:
| View | Purpose |
| semicircular | Rough turning of cylindrical surfaces. |
| cant | Finishing the workpiece (middle of the cutting edge), trimming the ends, cutting off the part, making grooves (point), turning semicircular and cylindrical surfaces, forming depressions (heel). |
| double head cutter | Turning depressions, protrusions, corner transitions. |
| Stichel | Making narrow rectangular grooves and grooves. |
| flat rectangular | Turning large and wide recesses. |
| Acute cutter | For sharp grooves and recesses. |
| Hooks | Surface grinding in holes, making recesses and grooves in them. |
| Shaped | Turning profiles of complex shape. |
Advice: Before turning any specific items, we advise you to practice working with all types of cutters you have on small blanks.
All chisels are made from tool steel (carbon or high speed) and can be different sizes. After some time of use, the chisels need to be sharpened. It is important that the equipment is always sharp and does not have burrs and notches, therefore, before each use of the chisel, check the degree of its sharpening by removing small chips from the workpiece. If it is hard or grooves and burrs remain on the surface, sharpen your tool using a special tool. grinder with an abrasive wheel (grain size 25-40) or with the help of sharpeners, emery bars and whetstones.
The main quality of a good rig is its “name”, a tool that does not have it has no guarantees. We offer chisels from manufacturers such as, etc., which have already earned the recognition of users. It is best to purchase a set of several types of equipment at once. But if this is a basic set, it must necessarily include a semicircular chisel and a jamb chisel, which perform the most a large number of operations. In our online store you can find sets that immediately contain semicircular, flat rectangular chisels, chisels, jambs, chisels and sharp-angled cutters.
Principle of operation
The cutter must be firmly held with one hand by the handle, while the other blade of the equipment is tightly pressed against the stop. The feed angle of the chisel relative to the axis of the workpiece depends on the operation being performed. If this is a rough turning, it is equal to 15-30 °, if the finishing one is 45 °, and the grooves, protrusions, recesses and trimming of the end face of the part are performed radially, that is, the cutting edge is fed strictly in the center. During any operation, a small chip of 0.5-1 mm is removed, especially if it is a rough turning, when all irregularities are removed. You can read more about performing specific operations in the article.
Safety
Despite the smaller dimensions and simpler structure, compared to, woodworkers, if handled improperly, can also cause injury, so it is important to follow the rules of work:
- Do not grind workpieces with cracks and defects to avoid splitting the bar.
- Work in special clothing, headgear, closed shoes and goggles or a mask to protect the skin from splinters and the eyes from chips. If the operations being performed create a lot of dust, also use a respirator.
- Keep an eye on the electrical cable of the equipment, do not allow it to be damaged, kinked or broken.
- Do not work when tired or intoxicated.
- Do not wear gloves while turning parts, they will interfere and may catch on the workpiece.
- Use only well-sharpened cutting tools, otherwise cutting will be difficult and the tooling may slip out of your hands.
The lathe opens up great opportunities for the master and scope for creativity. It does not matter whether you have been doing woodworking for a long time or just planning to do it, buying this equipment will be very useful. We have both compact models for private use with a weight of only 30 kg, and professional ones - more than 100 kg each. Moreover, in our online store you will find not only the equipment itself, but also the necessary equipment for it. Call our managers to place an order.
If you have never worked on a lathe, then ask an adult who is practically familiar with turning to show you how to stand behind the machine, how to hold a cutter and work on a blank.
In addition, firmly grasp a few simple but very important rules:
1. Always be careful when working.
2. While working on the machine, do not wear loose clothing, that is, one that can be caught by the spindle or blank. Sleeves (if they are without cuffs with buttons) tie at the hands. Girls must keep their hair under a headscarf.
3. Do not touch the rotating handwheel, pulley, spindle and workpiece, or the moving drive belt with your hands.
Do not try to brake a rotating part with your hands. Stop pedal movement and wait for the machine to stop by itself.
4. Keep the workplace clean and tidy. Do not place tools or other objects on the sled, tool rest, and tailstocks.
5. Do not lean too low on the machine, otherwise you may clog your eyes.
6. Do not let the machine into the code if there are comrades near you, and even more so - small children. Ask them to move away and not interfere with work; This is also for their safety.
Now we will talk about the selection and preparation of materials for turning.
The best material for turning is wood of a homogeneous structure, completely dry, not knotty and not layered. Beginners should take soft wood - linden or aspen. Pine and spruce, although not very hard, are less suitable for turning because of their layering. They are usually used for simple products that do not require a clean finish. Alder is sharpened very well, but it is poorly polished. When you learn to sharpen, you will be able to use birch, maple, pear, beech; this is probably the most suitable materials for turning.
In many cases, you will need to prepare the wood (that is, dry it) by selecting logs of the appropriate tree species. To prevent the tree from cracking, divide the log into separate segments, and glue the ends with paper or paint over. Dry the round tree without removing the bark.
Your first work on the machine is educational. First, learn how to sharpen cylinders.
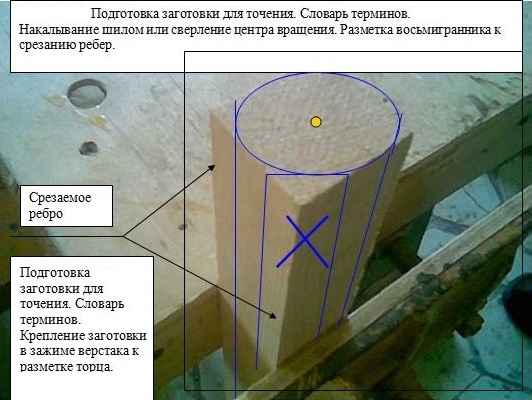
Choose a suitable piece of wood and process ("fool") it with an ax in the form of a cylinder or a hexagonal prism. Mark the centers on the ends and, using these marks, install the blank so that one of its centers falls on the middle tooth of the spindle fork, and the other on the center of the tailstock. Fix the headstock with a wedge and clamp the blank with the center of the clamping screw (Fig. 1). Remove the blank from the machine, drill holes 6-8 mm deep in its centers, lubricate the center of the tailstock with oil and put the blank back on the machine. Clamp it with the center of the clamping screw and secure this screw with a stopper. Remember that the fastening of the blank must be strong so that it cannot budge or pop out. Make sure that the blank is installed correctly: the center of the spindle fork, the axis of the blank and the center of the tailstock should be in one straight line.
Fig.1
Install the tool rest so that the cutter is pressed tightly against it during operation and as close as possible to the blank being turned, so that the fulcrum of the cutter lies further than its center.
Hold the cutter with both hands. Right hand clasps the handle of the cutter, and the left one - the tool itself. Leaning on the handpiece, this hand gives the cutter a solid point of support. The right hand controls the tool, as required by turning things.
First, the blade of the cutter should, as it were, slide over the surface to be treated; it is directed at some angle to the blank. Then carefully lift the handle until the blade begins to remove chips of sufficient, but not very thick thickness. Do not try to remove too thick chips: the cutter will twitch, and the blank may pop out, which is very dangerous.
Remove chips from the middle to the ends of the blank, placing the reaer a little on the right edge - when moving to the right and on the left - when moving to the left. Turn the handle of the cutter in the same direction.
When the blank is turned almost to right size, put the reyer aside and proceed to surface treatment with a mazel.
Usually, the mazel is kept on a handguard in the same way as the reyer. But for small jobs, it is more convenient to grab the Mazel blade with the fingers of your left hand, and grab the handpiece with your index finger and firmly press the tool against its edge.
Fig.2
Hold the mazel somewhat obliquely (Fig. 2) so that the direction of the blade makes an angle of about 45 with the direction of the cylinder being turned. The obtuse corner of the mazel turns in the direction of movement. Hold the mazel firmly and make sure that it does not slip on the surface being turned and does not repel from the handpiece.
We talked about turning cylinders. Let's move on to more complex operations.
Fig.3
If the end of the cylinder needs to be rounded, do it with a mazel, as shown in the figure. 3 , work slowly and carefully, gradually cutting and rounding the corner.
If the end should be flat, then cut it off with a mazel placed on the edge with an obtuse angle upwards. Deepen the cutter a little into the tree, then move it to the right and make an oblique cut directed to the first straight cut (Fig. 4).
Fig.4
Alternate these techniques until a cylinder with a diameter of 10-12 mm remains. It is impossible to cut the deep, otherwise the cylinder may break and the product will jump off the centers. Finally level the end, removing the last, thin chips. Stop the machine and attach the edge of the square to the plane of the end. If the end face is turned evenly, then there should be no clearance. Remove the product from the machine and cut off the remaining cylinder with a sharp chisel.
Get on with the workouts now.
Pick up a thin workpiece about 250 mm long, put it on the machine and grind it to a diameter of 50-60 mm. You don't need to grind.
Without removing the cylinder from the machine, mark it with a compass for several equal parts(Fig. 5a) and make cuts along the marked lines with a mazel, giving them the shape of grooves (Fig. 5b). With the same tool, make notches so that the product takes on the shape shown in the figure. 5v. Mark the middle of each part with a pencil and sharpen the blades of the mazel downward with an obtuse angle so that you get the profile shown in the figure. 5g. Then, alternately using the mazel in high places and a reyer in the recesses, give the product a wave different shape(Fig. 5d), On another similar cylinder, do a series of new jobs. Also divide it into equal parts, and "make straight grooves (Fig. 5f), end face and choose the middle with a narrow mazel or burr. Now try to round off the protruding parts (Fig. 5g).
The following figures (5h-5n) show samples of various chiseled figures for training work.
Products are much more complex. In this case, the spindle fork must be removed, and instead of it, put a cartridge or faceplate, depending on the size of the product and the nature of its processing.
Fig.6
The workpiece is clamped in the chuck (Fig. 6), and screwed to the faceplate with screws (Fig. 7). Often they do it differently: a wooden disk is screwed to the faceplate, and the workpiece is already attached (screwed or glued) to it. When doing this, make sure that the screws do not fall under the cutter.
The workpiece, fixed in the chuck, is pressed by the center of the tailstock during external turning. Then the headstock is moved aside so that it does not interfere, and the desired recess is selected with a reyer. The tool feed must be very small. Pick up the chips with the end of the blade, guiding it from the edge of the butt to the center. To do this, gradually lift the handle of the tool up and also gradually move it to the right. At the same time, make sure that the reyer's piece of iron does not rub against the edges of the recess.
Fig.7
Approximately the same way they sharpen the inside of the product fixed on the faceplate.
For internal turning, place the handpiece obliquely to the axis of the machine centers or even perpendicularly: it is easier to work this way.
Smooth out the inner surface, roughened with a reyer, with a burr with a rounded end (if the recess is oval or round) or straight (if the recess walls are straight).
The finished product, clamped into the cartridge, is trimmed, but from the side of the headstock. Therefore, the workpiece must have some margin in length, sufficient to be able to freely make oblique undercuts.
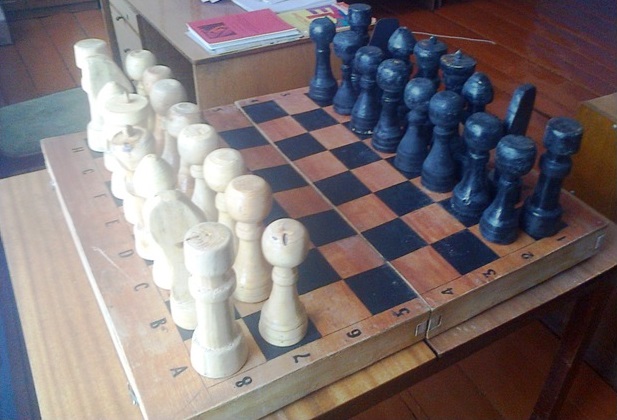
- Chess
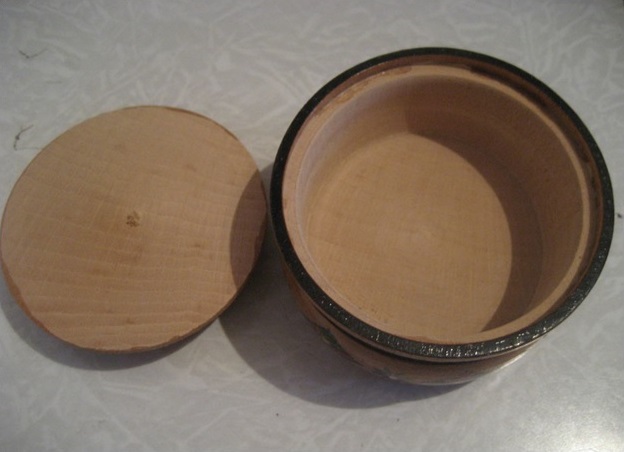
- Making a box
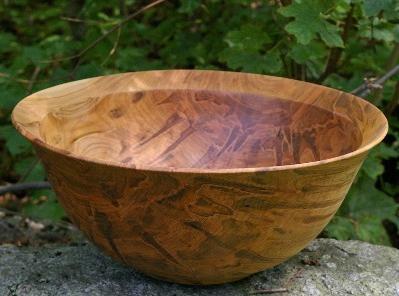
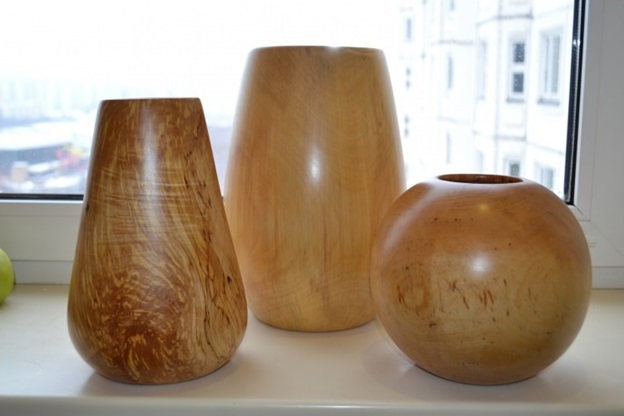
If you have a professional tool at hand, you can explore its capabilities endlessly. So, for example, an ordinary construction lathe is often used as a basis for making souvenirs and various decorative items. A beautifully crafted wooden candlestick on a lathe looks great in classic interior Houses. A large vase made of wood is able to amaze the imagination. Sometimes, in the hands of an experienced craftsman, a seemingly ordinary chock turns into a real artistic masterpiece. How do they do it? What else can you make yourself?
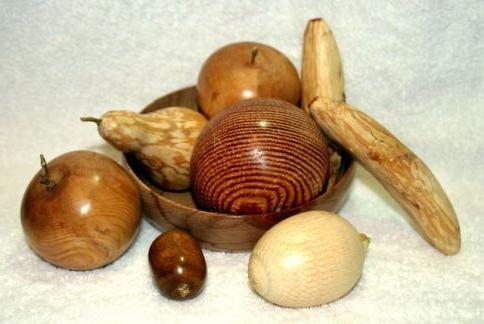
A wood lathe allows you to make not only construction blanks, but also various decorative products that are designed to please the eye and demonstrate the capabilities of the equipment. Any wood crafts are very practical, they always have a place in the house, so you can safely experiment and try to do something with your own hands. The easiest way is to turn a vase made of wood; you can easily get a jug, a salt shaker and a box for storing any little things. You can offer to make chess.
Vase
How can you make a vase on a lathe? For its manufacture, you may need a certain tool. In addition to the lathe, you need to take cutters, a planer, a hacksaw, a ruler, compasses, an ax and a saw, sanding skins and a chisel.
The process of turning a vase is extremely simple. True, it should be noted that vases are complex in configuration and simple. Consider how you can carve out a simple option.
- First, a block of wood is cut with a saw, 10-20 cm long.
- It must be worked out with a planer, both from the ends and along the length.
- The workpiece is installed in the chuck of the machine.
- The machine is turned on and checked for runout of the part.
- If it is present, it is necessary to carry out alignment.
- The top layer of wood is removed to a depth of 1 cm.
- The chamfer is removed at an angle of 45 ° from the outer end.
- A drill is inserted into the tailstock.
- A hole is drilled with a depth less than the length of the workpiece by 3-5 cm. That is, the bottom of the vase is determined.
- Now, with the help of a cutting, which is called a joint, the cavity of the product is cut out.
Since the vase can have a different shape: straight, oval, and so on, then, accordingly, the boring of the upper surface is maintained in the exact shape. After that, the product is polished from the outside and from the inside. What is used for sandpaper. The wooden product is removed from the machine, the bottom is finished manually using a planer and sandpaper. After that, the souvenir is varnished.
Chess
Chess is a small figurine, so their manufacture requires a certain experience and hardness of the hand of the turner, as well as his eye. To make a figure, you will need a small log with a section of 50x50 or 60x60 mm. On the one hand, it is formed under a smaller section, for example, 40x40 or 30x30 mm, as shown in the video.
With this smaller end, the workpiece is inserted and clamped into the chuck. Now you need to cut the free end of the blank with a cutter and press it with the center of the tailstock. A layer of wood is removed with a cutter so that the workpiece becomes round. After that, you can proceed to the manufacture of the chess piece itself. Can be used traditional forms, you can imagine.
As soon as the figure is completely ready, it must be sanded, and at the end cut off from the pressed part of the workpiece. It remains only to manually varnish it or paint it black or White color. By the way, a wooden candlestick is made on a lathe in the same way. Its length is longer, which means that a longer workpiece will be needed.
Making a box
The box is not the most difficult element that can be turned on a lathe. But if it is a product with a lid, then the drawings will be required here. After all, the lid should enter the box and sit on the groove, that is, the lid should be flush with the edge of the product itself.
To make the box, you will need a cylindrical blank, which is installed in a lathe. The main thing is that the workpiece does not reach the bed.
- First, a layer of wood is removed with a semicircular cutter to give the workpiece rounded shapes.
- Then, with a joint, you need to earn money on the surface, that is, make it smooth.
- After that, it is necessary to form an internal cavity wooden product. For this, a narrow straight cutter is used. This operation cannot be completed in one pass, so you will have to carry it out in steps.
- Using a triangular cutter, it is possible to expand the internal cavity to the thickness of the walls.
- The bottom of the box is leveled with a straight but wide cutter. They also make a groove for the lid.
- Grinding of internal and external planes is carried out.
- Lacquer is applied on top, wax on the inside.
The lid is made from the same material as the box itself. It just requires a thin workpiece, which is fixed in the chuck of a woodworking lathe. First, processing is carried out with a wide straight cutter, that is, it is formed inner part, it can be flat or concave inward. Grinding required.
Then the outer part is formed, for which the workpiece will have to be turned over. That is, the half-finished part of the lid is cut off and almost finished inside installed in the cartridge. Then the outer side of the lid is formed with the same cutter. It can also be flat or convex. At the end, grinding is carried out. After that, the finished product is varnished.
Therefore, when turning home-made wood crafts on a lathe, attention and accuracy are required (after all, the work is not rough). Of course, it is necessary to take measurements with a caliper during the work process.


Mixed Personality Disorder: Causes, Symptoms, Types and Treatments
GTA 4 control settings
FAQ on Smuggling in GTA Online
LSPDFR - welcome to the police
The huge map of Grand Theft Auto San Andreas and its secrets