Building a swing with your own hands will allow you to create a universal relaxing tool and provide a good rest in the country or in country house.
The presence of free space in the country or personal plot gives a lot of advantages. Some prefer to set up a vegetable garden in its place and enjoy useful properties hand-grown vegetables. Others prefer to equip it as a recreation area by building a garden shed and ennobling it. All of these options have their advantages and are safely used to fill the site. In turn, the creation of a comfortable and practical place to relax on outdoors allows not only to optimize the territory, but also allows a person to isolate himself from the everyday bustle.
Varieties of swing
Garden or country swings create additional comfort on the site. At the same time, such a device will appeal to absolutely everyone, from small children to adults. For children, it is entertainment that can brighten up their leisure time. In turn, they bring relaxation and comfort to adults, which is extremely important in today's fast and ever-rushing world. 
Similar products can be purchased ready-made in almost any building supermarket or ordered online. Having made a purchase in this way, all that remains is to install the structure, and even then some organizations offer to do it on their own. Such a solution makes it possible to get a full-fledged street swing in the shortest possible time, but it also requires large material costs which is not always relevant in today's realities.
An alternative to a similar solution is the construction of a swing with your own hands, which allows not only to save a significant part of the material resources, but also makes it possible to independently choose the shape and design of the future building. As a rule, such systems are made of two types of materials, which are inevitably available on the backyard or suburban area. These means are wood, metal or their combination. In most cases, it is with the help of these materials that garden swings are erected. 
It should be taken into account that modern swings for your own garden can have very different shapes and sizes, since the main criterion for their creation is own fantasy. This gives room for experimentation and sometimes leads to the formation of completely unprecedented forms. What are the sofa swings that are rapidly gaining popularity these days. In general, the highest demand in modern world use the following options for country swings:
- traditional;
- nest swing;
- cocoon swing.
At the same time, the most popular is still the traditional version, the creation of which with our own hands we will consider further. 
Do-it-yourself swing: stages of work
As mentioned above, most often do-it-yourself swings are made using wood or metal, since these materials are the most affordable and inexpensive. In addition, they guarantee an optimal product, which will be characterized by increased durability and comfort. To impart these qualities to the future design, one should take the development of the project and its subsequent implementation with great responsibility. In general, do-it-yourself hanging swings should be performed on the basis of the following scheme, which most fully and in detail describes the entire procedure for carrying out the work. It consists of the following steps:
- preparatory work;
- drawing up a principal plan;
- collection of tools;
- installation of racks and crossbars;
- creating a seat;
- final assembly of the structure.
Building a swing in your own garden on the basis of the above plan makes it possible to significantly save work time and at the same time get an excellent result. At the same time, the creation of similar structures with your own hands will be impossible without the skills to work with tools and a clear understanding of the purpose of each process. It follows that before starting the construction of a swing, it is necessary to decide on their final design and application. This is the only way to be sure of the reliability of the future product and its practicality. 
Preparatory work
How to make a swing in the garden? Initially, before carrying out the work itself, it is necessary to prepare. You should choose a place where the structure will be installed and create optimal conditions for its construction. At the same time, determining the place of construction of the building plays a huge role, allowing you to obtain additional characteristics of comfort on the site. So, building away from the recreation area is unlikely to create the best ratio of comfort and practicality on the site. Therefore, the swing area should be located in close proximity to the canopy or even installed directly under it. After determining the location, it is necessary to prepare the site for work, which requires the following actions - cleaning the territory, leveling the surface and eliminating its defects.
As soon as this stage is completed, you can proceed to the next stage, which is to display the basic plan of construction. It can be based both on the compilation of a detailed visual model of the system, and represent an ordinary planogram. In general, do-it-yourself drawings are quite simple to create. Their main criterion is the choice of the correct aspect ratio and dimensions of the main parts. Also, this stage includes the choice of material for the construction of the structure, which can be timber or metal pipes. In our case, the optimal solution would be to use a tree, so we will focus on it. 
Wooden swings and their creation require the use of a fairly wide list of tools.
This aspect is due different types work and a large number of processes to be done. So, to build a swing with our own hands, we need the following set of tools:
- shovel;
- Master OK;
- bucket;
- hacksaw;
- roulette;
- pencil;
- hammer;
- screwdriver;
- drill;
- keys set;
- plumb;
- level.
As you can see, the above list is quite large, which causes the complexity of the upcoming work. At the same time, the collection of all the necessary equipment makes it possible to significantly reduce the total time for the construction of the object, so that the construction will be faster and more productive. 
Installation of support legs and creation of a seat
Having finished the preparatory part, you can build a swing from a bar. To do this, it is necessary to dig four holes, in which support posts will subsequently be installed to ensure the stability of the system. There should be at least four of them - two on each side. In this case, the distance between them is determined by the height of the support and the size of the log swing as a whole. The same applies to the number of supporting elements. So, large and massive structures, which involve the creation of several places for skiing, require additional reinforcement, which is carried out by installing auxiliary support elements. As a rule, they are installed between the seats to provide optimal conditions for its movement. 
In the process of creating a swing from a bar, wooden racks are poured with concrete in the shape of the letter "L", which provides them with additional reliability and stability. In addition, several transverse strips are fixed between them, providing an astringent function. As a rule, they are fixed in two or three places on the surface of the racks. At the same time, the poured supports must stand for several days so that the solution is completely dry and becomes monolithic. It should also be noted that in hot weather it must be periodically watered to prevent cracks and chips from appearing on it. 
While the supports are hardening, you can proceed to the creation of the seat itself. Do-it-yourself wooden swings for summer cottages may involve the use of a variety of seat models. Recently, varieties such as a cocoon or a nest have gained particular popularity, allowing you to get mass from the rocking process. positive emotions. However, their application is not as versatile as using a traditional seat, which is suitable for absolutely everyone, from the smallest to the elderly. 
Therefore, our swings made of wood will be equipped with a similar kind seat. To create it, you can use a variety of available tools available: old pallets or boxes. If there are no such materials at hand, then the seat itself must be made independently. In its structure, it resembles an ordinary box, in which one side is missing, and such a model is assembled quite simply - with the help of self-tapping screws and wooden planks.
Assembly and processing of the structure
When the supporting parts are completely settled, and the seat is ready, you can proceed to the last stage of building a swing in the country. It consists in the final assembly of all elements and the formation of a monolithic structure. start collecting wooden swing follows from the installation of a longitudinal beam, which lies with its ends on the racks, as a result of which a crossbar is formed. It is on it that the seat itself will be fixed. For greater reliability, the beam itself is fixed with fasteners, ensuring its immobility and strength. 
- rope;
- chains;
- pipes.
Most often, do-it-yourself wooden garden swings are created on ropes, cables or chains. At the same time, chains are distinguished by good performance, since they are the most durable and reliable products. Based on this, fastening for a swing in the garden is best done using metal chains. To do this, they must be fixed on the one hand on the surface of the crossbar, and on the other directly on the seat. As a rule, for maximum safety and practicality, the seat is fixed in four places with separate parts chains. Each one is attached to wooden base seats with metal bolts, and its ends are assembled in twos and are also fixed, but already on the surface of the crossbar. 
In this embodiment, the swing is completely ready and can be used for its intended purpose. but appearance in this design leaves much to be desired, so they need to be decorated. To solve this problem, you can use a variety of varnishes and paints, which will not only make the swing more colorful, but also significantly increase the service life. Thanks to such rather simple manipulations, for many years to come she will be able to bring joy to all people who have a rest in the country or garden plot.
Photo gallery
We bring to your attention original photo ideas decorating garden swings.


In various ways, you can achieve comfortable conditions for relaxing in the country. Along with beautiful gazebos and comfortable benches, do-it-yourself garden swings for a summer cottage are of no small importance.
A swing is a place where you can ride, relax, and sit when there are no other places in the garden. A photo of a swing in the country with your own hands can be easily seen on the Internet, and a number of rules or instructions will help you without special efforts create such a useful product.

And note that such a swing is intended not only for children, but also for adults. The most important thing is to correctly calculate the weight for which the future swing is intended, as well as to correctly build a safe and reliable design swing.
Classification and properties
Usually, swings for summer cottages are made from traditional materials such as wood and metal. To decorate external characteristics object or to give reliability and safety to the structure - decorative forging elements are often used in work. Also used at work:
- bars;
- elastic and durable rope;
- metal pipes;
- plastic;
- old armchairs or chairs without legs, which serve as the basis for future swings;

For a successful result, of course, you should first make drawings of the swing, as well as an approximate model.

Garden swings can be created absolutely in different forms and types. An original and comfortable swing will also be an excellent option for decorating a garden or landscape of any country house.
mobile swing
They are a lightweight structure, so moving such a swing from one place to another is very convenient and fast. For example, during rain or in winter, you can move such a swing to the veranda. The size of such a swing is not so big.

family swing
The design of such a swing is already more durable and massive. They are endowed with a high and wide back, and in appearance they look like large benches for relaxing, only without legs. Therefore, they are called so, since all family members can fit on such a swing.

In order to ensure a high level of reliability during the operation of the swing, the swing is fixed on a frame, most often U-shaped. The swing is fixed due to tight chains or cables.

You can also build a roof over such a swing so that they don’t get wet during the rain, and enjoy nature while riding on a swing.
Do-it-yourself children's swing
A separate group of products, which in most cases is a boat or an armchair hanging in the air. Children's swings must comply with all standards of reliability and safety.

Suitable for adult children, and small ones can only be used with the help of parents.

The size of the garden swing in most cases depends only on you. You can also make a children's swing in large sizes.

By type of construction, the swing is also variable:
Swing in the shape of a hammock. Such swings are located on the crossbars made of wood or metal. A person who sits on such a swing feels that he is floating above the ground. On such a swing, it is especially great to read books and listen to music.

Single swing. Designs can be variable, and the installation of crossbars is not even required. The installation of such a swing is not a very complicated process. You can install them absolutely anywhere. Most often it is a swing made of pipes. We are talking about metal pipes.

Hanging swing. Question: "How to make such a swing?" does not have a complicated answer, because everything is very simple.

Note!

A swing is an ordinary seat that is suspended on several ropes or chains. As a rule, fastenings are located on the sides.
You see how many options for creating a garden swing you have in your arsenal.

The key point, of course, is to take care of safety while relaxing on a swing. All possible circumstances should be taken into account, and the swing should be provided with maximum reliability and comfort.

Do not forget also about the aesthetic properties of creating a swing. Beautiful and original swing, made in a special style, will attract the eyes of neighbors and guests, and children and relatives will enjoy the pleasure of relaxing on such a swing.

Photo of a swing for a summer house with your own hands


Note!


One of the favorite children's games is to swing on a swing. There are swings in almost every yard in the city. However, in summer, children often go to their grandparents in the village or take them with them to the country. To diversify the rest of your child, you can make a children's swing for a summer residence with your own hands. You will find instructions, photos and diagrams in this article.
The swing may have different design: from the simplest "bungee" to a large swing, on which you can even lie. Next will be described the designs of the swing, which you can do yourself, in order of increasing complexity.
Garden swings are very popular in the country
The simplest swing, familiar to most, is a bungee. It is a strong stick tied on a rope (rope, chain) to a tree. The bungee is made extremely simply: a strong stick about half a meter long is selected (you can saw off part of the handle for a shovel, rake, etc.), a rope is tied to its middle, the other end of which is attached to a thick tree branch. It is best to use the so-called scaffold nodes - they tighten themselves and hold the load well. A child can make such a swing on their own. The bungee can be upgraded by taking a sturdy plank instead of a stick, drilling through the center and threading the rope through the hole, then knot it.

The simplest bungee can be made from a rope and a stick.
Slightly different from the bungee is another projectile - a trapezoid. The trapezoid is the same stick, but the rope is tied to it not in the middle, but from both edges. The rope can be solid, but you can use two - the same length. If one solid rope is used, it can be fixed on a branch with an ordinary loop (photo 1).

Useful advice. It is better to choose a stick with a significant margin of safety. Firstly, increased strength guarantees the safety of the swing, and secondly, then small grooves can be machined on a stick at the attachment points of the ropes so that they do not slip off - this also increases safety.

The cable tarznaki can be fixed between two supports
The simplest swing
The simplest swing can also be hung on a thick branch, but it is better to make a crossbar with supports for this. The design of the supports will be described at the end of this article.

A simple rocker with a soft seat
The seat is a square or rectangular board suspended at four corners. You can use plywood. Not far from the corners, four holes are drilled in the seat, into which a rope or eye is passed (the eye has a ring instead of a head); if the eye is not used, then the rope can be passed through the hole and tied in a knot (its thickness should be equal to the diameter of the hole), thus securing the board on it. If an eye is used, instead of a rope, a chain can be taken, which is attached to the eye with a carabiner.

A backrest made of the same plywood can be attached to the seat on metal corners. Another version of the backrest (suitable for small children) is shown in photo 2. Tubes made of wood up to 30-40 cm long (the same length!) are put on the ropes, after which a crossbar stick with drilled holes along the edges. This design, despite the ease of manufacture, is quite convenient, safe and will serve for a long time.
Note. Instead of putting on wooden tubes (not everyone can make them!) You can tie knots on ropes at an equal distance from the seat. Then the crossbars will be held with knots, not tubes. It does not look as aesthetically pleasing, but it is easier to manufacture.

Useful advice. When making any wooden parts the swing must be cleaned with sandpaper or a file - this will protect your children from splinters and give a more aesthetic appearance to the product. In order for the swing to serve for a long time, they need to be varnished or painted to protect against dampness.
Swing from wooden pallets (pallets)
To wooden pallets, a chain or rope is also fixed at four corners. The advantage of pallets lies in their big size and strength: on wide pallets it is convenient to swing while standing, or you can put a mattress and swing lying down. Pallets can be connected to form large structures.

Swing seat made of wooden pallets (pallets)
Tire swing
Car tires are strong enough, but cut well. The most primitive use of a tire is similar to a bungee: the tire in a vertical position is tied to a branch with a rope, you can sit in such a swing. But such a seat is not very comfortable, and its appearance is not aesthetic. This is not yet a reason to refuse the use of tires.

A swing from a tire tied horizontally on three or four chains looks much better. Four or three holes are drilled in the tire at an equal distance from each other, into each of which an eye is inserted and fastened with a nut. It is useful to lay wide washers between the eye and the seat (and between the nut and the seat). Ropes (or chains) are brought together to support at one point on a steel ring.


The strip cut off from the tire is used instead of the board, as described above. In this case, “ears” are attached to the edges of the tire strip, for which the rope is held or a carabiner is hooked with a chain.

From tires you can make a variety of shapes for a swing
Fabric swing on a metal frame
The swing seat can be made from a metal frame with a strong fabric stretched over it (for example, a tarpaulin). Rope weaving can be used instead of fabric. An example is a hoop swing.
A swing from a hoop resembles a hammock: a wide and strong hoop is tied to three or four ropes, from which thin ropes go to the center, woven with macrame technique into some kind of cobweb. The weaving scheme can be different, the main idea is that the weaving can withstand the weight of your child. The hoop is usually wrapped in foam rubber and fabric, or braided with twine so as not to injure the child with a possible impact and for greater comfort. Instead of macrame, you can pull a tarpaulin over the hoop, as noted above.

Swing supports. Fastening the swing to the supports
Supports (goats) are made of three bars, logs, boards or metal and look like the letter A: their lower ends are placed in specially dug holes and buried or concreted. The crossbar, even for a children's swing, is best made from metal pipe. In the absence of a pipe, a beam is placed on the goats - a thick beam or a rounded log. The structure must be strong and not wobble. Steel supports are assembled using welding, and wooden ones are connected with screws, anchors, self-tapping screws and metal corners.
If the seat is suspended from a metal bar, it is good to use rings - plastic, metal or wooden. The latter can be carved from wood yourself. If you tie a rope to a tube without rings, the rope may fray. Then it is necessary to check its strength regularly. If there are rings, then it is better to lubricate the contact points of the rings and the crossbar.

If the swing is suspended from a log or beam, then rings are not needed: the rope will not slide on the tree due to strong friction. Both ropes and chains can also be attached to eyelets (or hooks) firmly screwed into a beam or log. Wooden structural elements must be varnished or painted to protect them from moisture.

Instead of a wooden beam with eyelets, steel beams with rings welded to them can be used. On the wooden beam frames can be replaced with clamps on which to hang carabiners. Chains can also be attached to vertical posts on anchors with wide washers. In this case, the beam is needed only to give the structure stability and rigidity.

Baby cribs can be attached with chains
Chains can be fastened not individually, but connected in rings: the left chains are attached to one, the right ones to the other. Rings are also hung on carabiners to eyelets, on hooks, clamps, or welded to a metal crossbar.

Children's rope swings are not so reliable
Let's dwell on two more types of swings.
rocking chairs
A rocking chair can replace a swing for a child. The advantages of a rocking chair include safety for the swinger (there is no risk of a rope breaking) and mobility (can be brought into the house, can be taken out into the street); the disadvantages are the relative complexity of manufacturing and the fact that such a chair can crush the leg of the person standing next to it. A kind of rocking chair can be considered wooden rocking horses. The main difficulty in the manufacture of rocking chairs is the manufacture of rounded skids; for a children's rocking chair, they can be cut out of thick plywood.

Rocking chairs are safe and suitable even for the smallest

Horse - rocking chair made of solid wood
For the manufacture of skids, you need to draw their contours on a sheet of plywood and carefully cut it out with a jigsaw, then clean it with a file and sandpaper. A seat made of plywood or chipboard (plywood is stronger and lighter) is attached between the runners to metal corners. It is necessary to work very carefully so that the rocking chair does not turn out to be a curve.

A floor rocking chair for kids can also be made from thick cardboard.
Swing-balancer (English seesaw).
The swing-balancer is a long crossbar-board, at the ends of which seats are made. At least two people can swing on such a swing. The simplest option swing-balancer is done like this:
- A long (2.5 - 3 m) strong board or timber is selected, cleaned and sanded.
- Handles are screwed on each side about half a meter from the edge. To do this, on both sides of the beam, it is attached along the plank, to which the crossbar is then attached (photo 5).
- Plywood or board seats are screwed or nailed on both sides, it is advisable to attach pads so that the seats are soft.
- A thick, strong pillar about a meter long is dug into the ground to a depth of half a meter (or concreted).
- A hinge is screwed or nailed to the middle of the beam, which is then attached to the buried pole.


Another option is also possible, when skids are cut out of thick plywood, as for a rocking chair, and attached to the middle of the timber. Then the swing becomes portable and can be used indoors.

Scheme for making a swing - a balance beam for children
Security
When making a swing, remember: negligence in work can result in injury. Be sure to choose strong chains and ropes, check the stability of structures. It is better to spend more time and money and make the swing stronger than necessary than to become the culprit of a spoiled vacation due to an error in calculations, and worse, a serious injury to your own child.

There is another interesting view a swing is a grasshopper swing. Grasshopper Swing Diagram
Do-it-yourself swing for a summer residence
42 photos:
A favorite detail is a garden swing made of wood. They are equally liked by adults and children. It's nice to stretch out on soft pillows in the shade of trees, relax, dream under the measured swaying. And for children, this is the main entertainment.
 The classic design of a wooden garden swing using a chain
 Manufacturers present a large selection of ready-made models from different materials. They differ:

Conditionally share a swing for adults and children. Large sofa-type models designed for several people are the most popular type. They additionally complete with an awning, soft pillows.
Suspended structures with a spring attract attention. The seat is made in the form of a basket-cocoon from a vine, rattan. They are hung from the thick branches of trees.
 Design and construction of a wicker garden swing in the form of a cocoon
 Cabinet sofas, attached on ropes to tree supports, beams, will add romantic appeal to a corner of the garden.
For entertainment, outdoor activities, Russian swings for several people are suitable. Practical and convenient for relaxation, rest designs with mosquito nets, a tent.
Children are smaller in size, according to the growth of the child. Additionally, they install safety elements, side supports.
 Classic Russian swing assembled from logs using a chain
 Main types:
- balancers;
- suspended;
- pendulum;
- carousel.
You can choose a model according to your wishes, idea of relaxation, landscape style.
How to make a wooden swing with your own hands
Swings are most often made from wood. It has many advantages:

Such a swing is easy to make, even with minimal carpentry skills. Remember that a tree needs protection from moisture, temperature changes, snow, sun, pests. Therefore, all structural elements are opened with moisture-resistant varnish.
Material selection and tools
They begin work by auditing the existing material, selecting wooden blanks. Choose a model, draw its sketch.
The second option is easier. It is necessary to select a product, study the drawing and calculations. Based on them, purchase necessary material for blanks.
Prepare the instrument. For work you will need:
 Drawing with optimal dimensions swing for installation at their summer cottage
 - for measurements, marking - tape measure, construction pencil;
- jigsaw, they cut out individual parts;
- hacksaw, Circular Saw(cut the main elements);
- building corner, level;
- planer for woodworking;
- clamps tighten individual elements;
- screwdriver, hammer;
- tighten the mount with wrenches;
- electric drill, screwdriver.
 Ready-made drawing of a country penitent sofa under an awning
 Fasteners are also needed: self-tapping screws, screws, fasteners for rafters (connect complex nodes), eyebolts with washers. Cleaning, grinding wooden surfaces sandpaper, or a nozzle on a drill. The swing is painted, opened with a protective varnish.
Scheme of a garden swing
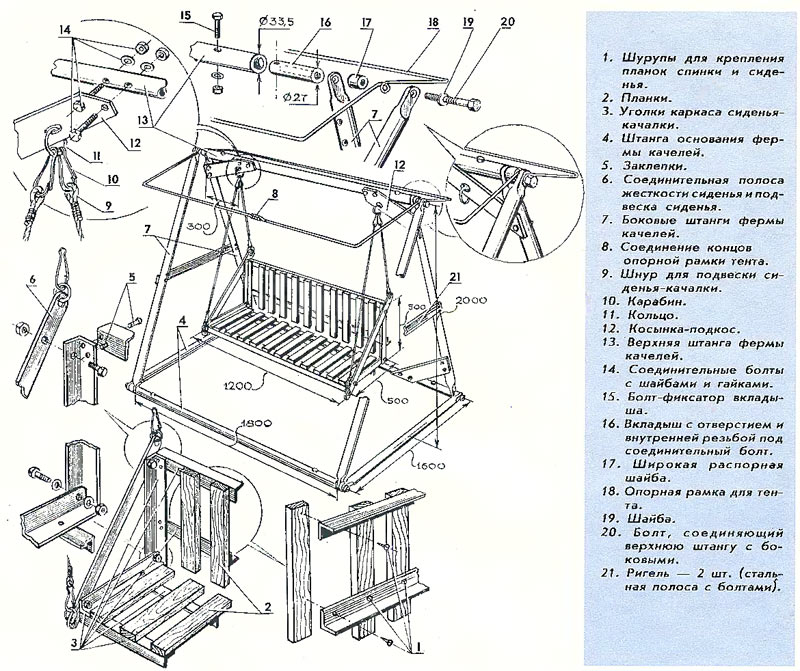 Scheme of the arrangement of structural elements of the swing prepared for assembly
 A popular model among summer residents, gardeners is a swing sofa. They are mounted on two types of racks, "A" and "P" shaped. The material for them is timber, logs.
With a sofa seat length of 2 m (per 200 kg), the recommended section of the racks is at least 100 x 100 mm, for portable ones - better than 100 x 150; 200 mm.
You must first select a location. A straight platform will ensure the stability of the structure. The optimal location is in the shade behind the house. Then a design diagram is drawn.
 The location of the garden rocking chair in the shade of a tree will allow you to relax on a hot afternoon.
 It includes:
 The design option for a resting place in the form of a sofa is a great place to relax
 Fasteners: self-tapping screws, screws, eye nuts with bolts (to secure the chain), metal corners, a carabiner for attaching the swing. The sofa is hung on a chain.
Step-by-step instruction
 A do-it-yourself swing made of timber is a simple and reliable country furniture
 To make a garden swing with your own hands from wood, you need to follow the sequence and carpentry rules. One of them is the ratio of the width of the seat of the bench and the step of the uprights, it should be 50 cm wider. This proportion will provide stability.
Step-by-step instruction:
- Rack manufacturing. Sawing blanks the right sizes. In the shape of the letter "A" connect the main standing supports. They must be rigidly connected, so it is better to use furniture bolts with washers.
 The process of sawing a log into bars for the manufacture of pillars
 - Mark, fasten the side rails. If it is a stationary swing, then they must be buried in the ground to a depth of 50 to 70 cm. This must be taken into account when marking the main racks.
 The process of deepening and installing frame pillars in dug holes
 The underground part of the support must be treated with bitumen, oil so that they do not rot. The design will be more reliable if the racks are cemented. ground part divided into three proportional parts and mount jumpers (on 2 sides of the main rack, on long self-tapping screws).
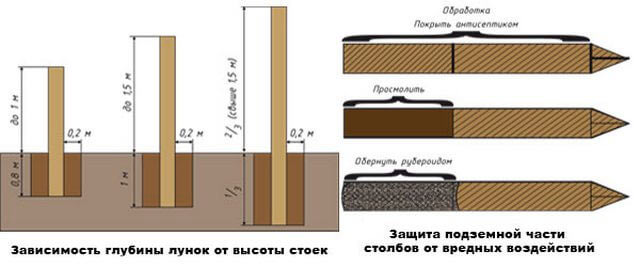 The principle of processing wooden poles with bitumen or other materials
 - The next step is the installation of the main jumper. It is fastened with racks with metal corners.
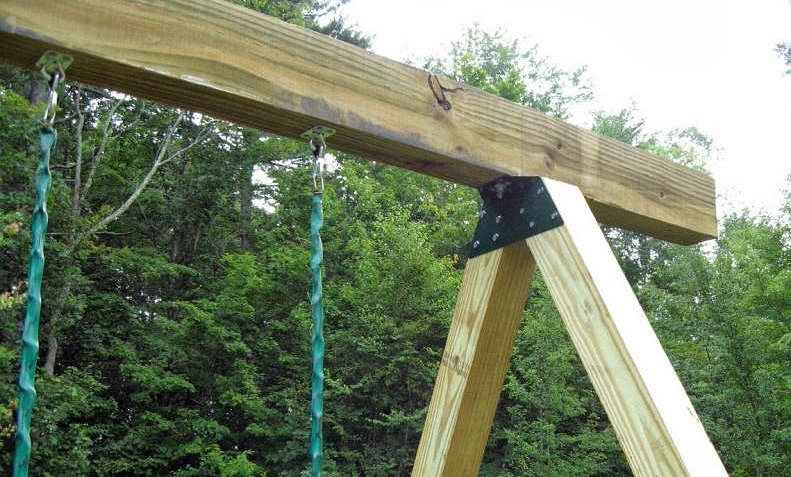 The device for attaching the main beam to wooden supports
 - From the upper side jumper to the main one, jibs are mounted (on metal corners) for stability and structural strength.
 The scheme of fastening the side struts to the main jumper
 - We make a seat. To do this, you need to make two frame structures with additional vertical jumpers. Sitting - 2 m long, 0.5 m wide; the back of the bench is 2 x 0.65 m. Planks are screwed to the frame at regular intervals, it is better to fix them with self-tapping screws. Connect both parts with metal corners. Then install the armrests of the bench.
 Scheme with the dimensions of various components of the design of the swing seat
 - Suspension installation. 2 pairs of eyebolts are attached to the edges of the backrest frame, the other to the seats. Drilled in the main crossbar through hole, two bolts are passed into it. They put on a carabiner for attaching the swing. Then the chain links are inserted.
 Mounting example wooden chair for special bolts
 - The final stage is the installation, the deepening of the entire structure into the ground. The pit is dug 20–30 cm deeper than the underground part of the side post. Each installation step is checked using a level.
An example of a rocking sofa installed in the garden with a canopy
The wooden structure will be preserved better if it is varnished and painted.
Making a children's swing
Suspended collapsible structures are the most popular type. They can be moved around the site by hanging on one of the branches of a tree. The child will always be in the field of view of the parents. Stationary hanging swings are installed on.
 Placing a swing with a slide and a ladder on the playground
 The sequence of installation of the structure does not differ from the usual scheme. The standard version is a "P" shaped support with a hanging seat. You need to take into account the age of the child. For small ones, safety jumpers are additionally installed. Children grow, so it is better to provide a mount that would allow you to adjust the height of the seat.
 Safe rocking seat with jumper for small children
 For this, swing carbines are suitable. The site should be flat, preferably with soft grass, sprinkled with sand. When falling, the child is less injured. Watch in the video the process of making a wooden garden swing.
Children can ride for hours on the outdoor swing. The child is attracted by the feeling of flying. IN apartment buildings swings are installed on playgrounds, and caring parents put them on private plots.
A simple design makes it possible to make a hanging swing with your own hands. Moreover, children can be involved in the process of designing, building or decorating.
Outdoor wooden swing - children's joy in flight
Making a swing out of wood is the most common practice. This is not surprising, because they differ in such advantages:
- environmental friendliness;
- availability of lumber;
- relatively low cost;
- ease of working with wood;
- security. The wood material is soft, which reduces the risk of serious injury when falling.
Thanks to the properties of wood, children's wooden swings can be found in almost any private yard or country house. In terms of mobility, they are divided into stationary and portable. Swings made of wood, unlike metal ones, are more often made stationary, because. the tree does not have sufficient weight for stable standing (the frame of a wooden swing requires secure fastening).
Based on this feature, it is necessary to consider the installation site of the swing.
Where to put the swing?
When choosing a place you need to consider:
- visibility. The child should be visible whenever possible;
- remoteness. The economic zone and the pond located nearby are not a place for games. In the absence of other options for installation, it is necessary to enclose the areas with a fence. Also make sure that the swing is placed at a safe distance from fences, walls with windows, trees, etc. flight obstacles. It is also not worth installing a swing next to communications;
- illumination and shading. The installation site should be bright, but create a shadow, especially in summer at noon;
- humidity. A wooden outdoor swing will become unusable from excessive moisture, not to mention its harm to the child;
- lack of drafts;
- absence of poisonous plants, allergens, honey plants, thorny bushes;
- surface relief at the installation site. The installation site of the swing must be leveled. Then you won’t have to vary the length of the supporting pillars, and nothing will prevent the child from enjoying his favorite fun;
- the quality of fastening of each swing assembly.
How to make a wooden swing with your own hands - step by step instructions
To be sure of reliability, you need to build a swing yourself. Step by step guide for beginners will allow you to indicate the correct direction and construction plan.
Stage 1 - choosing the design of a children's swing made of wood
Children's wooden swings must be safe - this is an axiom! In many ways, their ability to stand stably is determined by the configuration of the support (frame). Before you start work, you need to decide which wooden swing frame will be optimal for installation. After all, its shape affects the safety of the structure and determines the place and method of its installation.
Types and types of frames for swings
U-shaped frame
It is considered the most economical model. Less lumber is used to make it. In addition, the supports do not interfere with the movement of the child, and cannot cause injury through negligence. However, for stability, the structure needs concreting of supports, therefore it is stationary. The frame is ideal for installation on soft ground and for making suspended sectional swings.


L-frame
It is sometimes referred to as an inverted "V" support. More stable than the previous version. This option allows not only to hang a swing, but also to create a children's corner.


X-frame
It is a kind of L-shaped, only the support beams are fastened not at their junction, but slightly lower, at a distance of 150-200 mm. At the intersection vertical bars jumper is installed. This is an easier way to make a support. It should be noted that such a frame needs additional reinforcement in the form of a side stop.


A-frame
The most reliable of all designs, due to the jumper, which strengthens it. It is this frame that should be preferred if it is planned to expand the swing by arranging stairs, installing a climbing rope and other elements of the playground.


Stage 2 - drawing a wooden swing for children
The presence of a drawing or sketch of a swing helps to determine the optimal dimensions of the structure, calculate the load, choose the right section of wood for manufacturing, determine the amount of material and the parameters of the workpieces.


Wooden swing drawings must contain:
- frame configuration (shape);
- wooden swing dimensions It should be noted that the dimensions of the swing are the height, as well as the perimeter of the base;
- the presence and place of installation of additional reinforcing elements (kerchiefs, spacers);
- the number and type of seating (taking into account the age of the child);
- type and length of suspension (ropes, chains, cables, etc.);
You can make an additional drawing with a detailed breakdown and dimensions of the blanks.
The dimensions of a wooden swing are determined based on:
- the age of the child - the length of the suspension, the size and configuration of the seat depend on it;
- growth - determines the length of the suspension.
You can make a swing "for growth", then:
- the optimal seat width is 600 mm.
- seat height above the ground - 500 - 550 mm. This will allow, on the one hand, to swing and stop the swing on its own, and on the other hand, it will not interfere with skating;
- height from seat to crossbar - 1600 mm. To make it convenient for the child to swing while standing;
- the total height of the swing from the ground to the crossbar is determined taking into account the thickness of the seat.


Advice. The seat and suspension must support the weight of the child. For reasons of practicality, it is better to make a margin of safety up to 100-120 kg (several children or a child and an adult).
Stage 3 - material for a wooden swing
To make a wooden swing with your own hands, you need to choose the right wood. It is better to give preference to durable wood species - oak, larch, or cheaper ones from spruce, pine, birch. The main thing is that the lumber is dry, of good quality, without falling knots, holes and other defects.
Depending on the type of frame, you need to prepare:
- for a U-shaped frame - timber 80x80 or 100x50 - 2 pcs. For all other types of frame - 4 pcs.;
- for the crossbar - a beam (log) of the same section - 1 pc.;
- for sitting - boards 600x300x25 - 1 pc. For the manufacture of seats for children under 2 years old, additional elements are thought out - backrest, handles, fences;
- for suspension - a welded chain with an anti-corrosion coating or a strong rope (the one used by climbers is suitable). The length of the suspension is equal to two swing heights. On average - 4,500 mm - 1 piece;
- for fastening the frame - wood screws 80x4.5 - 40-50 pcs., as well as self-tapping screws 50x3.5 - 250 pcs.
- for attaching the suspension - carabiner, hanging hooks, steel corners. Quantity - depending on the method of attachment;
- for wood processing (protection) - primer;
- for decoration - paint or wood varnish.
- for concreting racks - cement, gravel and sand (for mounting a U-shaped frame).
From the tool you will need: a screwdriver, a saw, a planer, a grinder, a level, a drill, a plumb line.
Stage 4 - making a homemade wooden swing for a summer residence
Moving from theory to practical implementation project. Consider how to make a wooden hanging swing with your own hands.
Preparing a place for installing a swing
After choosing a place, you need to remove the remnants of construction debris, remove thorny bushes and level the site.
Note. Some users advise to concrete the platform for the swing, citing the fact that in the place where the children push off the ground, a hole appears in which water accumulates. Others believe that this is the lesser of the troubles. After all, falling on concrete base this is a serious risk.
Timber preparation
Outdoor hanging swings made of wood should be safe for children. Therefore, it is necessary to grind each workpiece in order to exclude the appearance of splinters. And cover everything wooden elements primer. Ready-made swings can be primed, but then there is a possibility of destruction of the wood at the junctions.
Installation of a frame for a children's swing made of wood
As discussed above, there are several ways to arrange a frame. Therefore, we consider the main nuances of mounting each of them:
U-shaped frame. The arrangement begins with the fact that the vertical racks and the upper jumper are fastened. Then you need to dig two recesses (the depth is 1/3 of the height of the support). Pour a gravel-sand cushion on the bottom, install a stand, concrete, wait until the concrete hardens, and install a suspension with a seat.
Note. The lower part of the supports must be treated with any means that will prevent wood decay. The most budgetary and reliable option would be to use used engine oil.
L and A-shaped swing frames are usually also assembled on the ground. Order of execution: cut four supports at an angle, for a more reliable connection. Then attach the top crossbar to the knot. In the case of the A-frame, a crossbar is added, which makes the structure more stable. Then the assembled frame is installed in the prepared place. For reliability, you can drop into the soil (previously treated with a primer against decay) or fix the lower part of the supports to the ground with a long rod and bracket.

X-shaped frame for a swing. It is done similarly to the previous one. Only the ends of the supports are not sawn, but fixed with each other. A jumper is placed in the formed upper corners.


Note. So that the installed X, L and A-shaped frames do not fall into the soil, users recommend concrete patches under the base. Thus, the probability of skew of the structure is eliminated and its mobility is preserved.
The weak point of X, L and A - shaped frames at the junction of vertical supports and lintels. To make this knot, long self-tapping screws are used, but, as the masters note, it is advisable to use a nozzle nozzle of suitable sizes. The photo shows this element and its installation location.


Advice. You need to fasten the screws in the manufacture of the frame in this way: first, drill a hole with a diameter slightly smaller than the diameter of the screw, and then assemble the workpieces onto the self-tapping screw. Some craftsmen advise gluing the joints of the workpieces for reliability, while others recommend strengthening the knot by using metal plates or wooden spacers.
Swing seating device
The method of manufacture and the material of the swing seat is determined by the age of the child. Children are not demanding on design, they are quite satisfied with a tire seat or a simple board. At the same time, you can count a dozen ways to make it.
Fastening the swing to the crossbar
Suspension (cable, rope or chain) is attached to the crossbar. Suspension is a swing knot for attaching the swing to the crossbar. The suspension has the maximum load, which means that special safety requirements are put forward for it.
Note. The seat is installed only on chains or cables, and not on wooden or metal hangers. Garden swings are designed for adults and do not need to be adjusted, while wooden country swings for children need to be adjusted as the child grows.
Mounting the swing and seat suspension can be done in several ways using different fasteners:
 throw the rope over the crossbar and tie or fasten with a staple;
 using metal plates that are attached to the crossbar in the upper part;
  with a carabiner.
 The material was prepared for the site www.site
By screwing the anchor into the crossbar and attaching the suspension to it.


By covering the beam.


Stage 5 - decorative design of the swing
Decorating a wooden swing performs a dual function. On the one hand, it protects wood from external factors. On the other hand, the original design of the swing forms a beautiful and bright element of the playground. The main rule is that paints and primers must be of high quality and safe so as not to harm the health of the child.
As an additional decor, you can install additional jumpers on the frame, which will strengthen it, and the children will have a ladder that will be of interest to those who are waiting in line to ride.

Caring for a wooden swing
Care is to check:
- attachment points;
- suspension;
- seats;
- paint quality.
- to report a swing load greater than the one for which it is designed;
- avoid shock loads (sharp sitting on the seat);
- try to distribute the weight on the plane of the seat (do not roll);
- ride perpendicular to the base. Suspended swings are designed to ride along supports;
- maintain a moderate swing amplitude to avoid overturning a loose swing.
Conclusion
We check the reliability of the installation of the suspension and seat, and at the same time the strength of the entire structure. If nothing is deformed under the weight of an adult, then the child will survive. However, a wooden swing for a summer residence needs a periodic inspection of the main knots and attachment points.


The legacy of the Atlantean civilization
What is the dream of the red stone
Dream interpretation of the royal family. The king dreamed. Old Russian dream book
What to do to increase hemoglobin during pregnancy: products, pills, general recommendations Products to increase hemoglobin in pregnant women
The concept of negativism: symptoms and features of manifestation in children and adults