- First stage table assembly
- Drive installation and recommendations for safe operation
The milling table allows you to significantly increase the efficiency and productivity of work. Many models are available for sale for a wide variety of hand routers. However, the price of finished products is very high. It is much more profitable and more interesting to assemble a table with your own hands. No expensive materials and difficult-to-handle tools are needed for this.
Jim describes all the functions of his workshop. Milk paint is more than just a traditional finish - it is distinguishing feature shaker design. Create beautiful furniture reproductions that are not associated with old world anachronisms. Today's tables are safer than ever. Learn how to use modern systems safety and get the most out of this workhorse.
Sanding is the single most common surface preparation method available to furniture manufacturers. But there is more than just going from sand to sand. Don't miss our top tips for getting the most out of your sandpaper.
General information about the design of the milling table
The milling table can be installed on a workbench or a specially assembled separate table. The product must have a rigid structure and good stability, because. during operation, a very noticeable vibration will be created. Be sure to consider the fact that the installation of the router will be done from the bottom of the countertop and absolutely nothing should interfere with it. No additional elements are installed there.
Read the original articles that inspired our authors. They are available for a limited time. Look at dozens of these furniture boxes and how they were created on band saw. Get tips on how to use this essential workplace assistant to your advantage.
Purpose of the milling table
Learn how to build and use an all purpose dead ammo routing fixture in boxes or cabinets. Furniture maker Timothy Russo demonstrates how to build dinner table from the pedestal from start to finish. With this handy aircraft, you can trim any sliding dovetail, straight or tapered, for the perfect fit.

Design homemade table provides for the presence of a mounting plate, due to which the router will be attached directly to the table. To create a plate, use a durable high quality material: plywood, textolite, metal sheet, etc.
Learn the basics of using wood veneer in this three part series. Journey to the workshop of a master builder in Baltimore. Learn the secrets of a pro for plywood furniture pieces so you can unleash the endless design potential of this time-honored technique.
Learn how to use boiling water and simple shapes bending to create traditional shaker shakers. Download a simple chart to convert fractional measurements. Learn how to turn firewood into stunning works of art with famed turner Mike Mahoney.
On top of the tabletop, a sample is created for the plate. The plate is fixed directly with self-tapping screws with a hidden head. The milling cutter is fixed with screws with the same hidden head. Additional fixation of the plate can be performed using clamps.
For convenient inclusion of a milling cutter the button is fixed on a table. Additionally, it is recommended to install an emergency shutdown button of the fungus type. If you have to work with large workpieces, equip the table with upper clamping devices. For even greater convenience and precision, the table is equipped with a ruler.
See and hear about the dynamic furniture made by Aaron Levin. The aluminum flashing beacon turns into simple models for easy connection of several dovetails. Learn an efficient approach to cutting joinery. Steve Latta introduces you to the period elements of this Federal table. From the rooster beaded and strung on the box, to the bandage on the legs and aprons, this small table serves as great lessons on a variety of period furniture.
Details on the table in this issue and more about Hernandez's furniture. A router and three fixtures are all it takes to set the locks accurately. Low Cost Fixture produces basic cabinet joinery that is lightweight and strong.
For self assembly milling table you will need the following tools:
- Electric jigsaw. If not, you can get by with a hacksaw.
- Plane. Preferably electric.
- Chisel.
- Grinder. In the absence, you can get by with a bar with sandpaper, but processing with their help will require more time and effort.
- Screwdriver or drill with screwdriver function.
- Electric drill with a set of drills.
Back to index
Build a magazine honing screw for superingle alcohol. The smart mechanism makes it easy to put on any table with an expanding top. Learn about the design and techniques used to create a modern side table that serves as an amalgamation of the Shaker technique and 18th century furniture.
Mounting plate: nuances
Pulver describes his career path and some of the influences on his work. Bring detailed work closer to eye level and make shop life much easier. Learn how to properly install the right type of blade and say goodbye to blades forever. Travel to one manufacturer's dream shop and watch them pull great tool handles straight out of a magazine.
The initial stage of the assembly of the table

Explore your workshop and choose a place to install your future milling table. Determine the most suitable product design. Tables are:
- Aggregate. At their core, they are a side extension of a standard saw table.
- Portable. Very convenient and ergonomic desktop option.
- Stationary. Installed separately and assembled specifically for the router.
If your milling table will be used infrequently, or if you have to work outside the workshop, opt for a portable option. If there is enough space, make a separate table. For greater convenience, it can be equipped with wheels that will allow you to “move” to another place if necessary.
Learn how to fix upload table sagging on your connection. Hot leg alignment bar for easier adjustment. Diversity retail space in converted buildings. Lowe demonstrates how to build a traditional Queen Anne Lowboy from start to finish.
Unlock the secrets of Darrell Peart's easy trait for Green and Green's furniture. Learn how Michael Pekovic reimagined the classic convertible foot into a modern masterpiece with simple lines. Antique furniture maker demonstrates The right way use of your bit.
You can assemble a small-sized structure and install it on an ordinary table. You can take chipboard right size and install a guide on it. The guide in this case is a board of relatively small thickness, fixed with bolts.
Take 2 clamps. Make a hole for the cutter. This will complete the main work. However, if the machine is your main working tool, you need to approach the process more thoroughly and create a comfortable and reliable table, at which it will be comfortable to spend time.
Build a solid foundation
Follow furniture factory Adrian Ferraziutti as he creates dazzling patterns in veneer, creating a custom box that's sure to work. A detailed look at the corners on the Windsor chair. Look at the row of Buchanan chairs and hear him discuss them.
Join hand tool specialist Andrew Hunter as he walks you through the process of creating a beautiful display without using power tools. Build a simple table fence accessory that handles a wide range of joinery.
Back to index
Preparing the bed and worktop

The bed is a stationary part of any milling table. At its core, it is a frame on supports with a tabletop on top. The material of the frame does not really matter. Suitable for wood, metal, chipboard, MDF. The main thing is to ensure the required rigidity and maximum stability. The dimensions of the frame are also not critical. Choose them according to the size of materials you most often have to process.
This smart base might just be the ultimate reef stand accessory. Learn how to properly set the router bit for safer tree handling. Explore various ways protect your details for safer manual routing.
DIY milling table video
Demystify this seemingly complex woodworking mix with a simple tuner. Look at unusual furniture Lee. Set up your chisel bits for silky smooth work with our step by step video tutorial. Learn how to turn a mediocre instrument into a stellar performer with our tuning tips.
The lower part of the bed should be deepened by 10-20 cm in relation to the front overhang of the table top. Dimensions, as already noted, select according to your needs. For example, for processing the ends of blanks of facades and door linings, you can make a frame 150 cm wide, 90 cm high, 50 cm deep.
A very important characteristic in this case is the height. The optimal value is considered to be 85-90 cm. It is good if you can equip the frame with adjustable supports. They will allow you to compensate for uneven floor surfaces and change the height of the milling table if the need arises.
Take the fear out of the routing pattern with our circular routing video ride that delivers great results while keeping your fingers out of the danger zone. See more of Brown's furniture and hear how he describes it. Craftsman Steve Latta demystifies a variety of techniques by demonstrating how to build a federal desk for a table filled with period details.
Features of a homemade design
Create custom door and drawer handles using your drill press. Learn a simple trick for a stronger grip on joints and pins with the help of a humble artist's tape. A row of Klazenen furniture and hear him discuss it. Learn how to cut lumber by hand and you'll never be limited by your milling equipment.
To make a homemade table, you can take an ordinary kitchen worktop from chipboard. A plate with a thickness of 26 or 36 mm with a wear-resistant plastic coating is used. Thanks to the plastic, the workpiece will slide well on the countertop, and the chipboard will take on the task of dampening vibration. In extreme cases, you can use chipboard or MDF with a thickness of at least 16 mm.
If you want to drive the lumber yourself, setting up the connection is critical. Even if your articulation clamp is out of square, this simple tip will ensure perfect edge seams. This audio slideshow features the work of some of the less familiar but rather unusual designers and creators of the Arts and Crafts movement.
How to choose a practical option
Learn how to assemble a box for easier layout. Learn how to embed and mount tricky knife loops into a curved case. Woodworker demonstrating the flexibility of wood with some vaporization bends. Explore slicing techniques for more complex structures. From consistency to double line inlay filling, these tips can apply to many different designs.
Back to index
What you need to know about the mounting plate?
A mounting plate is necessarily fixed near the place of attachment of the sole of the router. The best is durable and at the same time thin material. The most commonly used sheet metal. A more convenient and no less durable option is textolite (glass fiber). Usually it is a rectangular plate with a thickness of 4-8 mm. In the center of such a plate, it is necessary to prepare a hole. Its diameter should be the same as the diameter of the hole in the sole of the router.
Steve Latta's tutorial on advanced string techniques continues in Part 2 as he shows you how to make a full circle and how to encrust corks. More utopian benches from Cape Francis. Learn tips and techniques for using Universal Smoothing Plane #4 from a furniture maker.
Keep wood dust and chips private with our step by step lesson for increasing dust removal based on a rotary table. In the smallest places, choose your compromises. Build an arts and crafts cabinet with an eternal appeal and expand your skills by entering the classic door panel fiberglass.
The sole of the router, as a rule, is equipped with regular threaded holes needed to secure the plastic trim. Thanks to these holes, the router is fixed to the mounting plate. If there are no holes, make them yourself. You can use another method of fastening the router, for example, with metal clamps. Holes for fixing the plate are created closer to its corners.
Garrett Hack demonstrates his methods of turning a flea market into a top performer. Learn how easy it is to forge period-perfect loops, such as those used in Andrew Hunter's chest quilt. Learn how to use your dining room to safely cut moldings.
When it comes to using hand tool, practice really makes perfect. More realistic examples of wood workers who made their dream come true. Find out what this heirloom instrumental quality case does.
Back to index
Step by step instructions for assembling the table

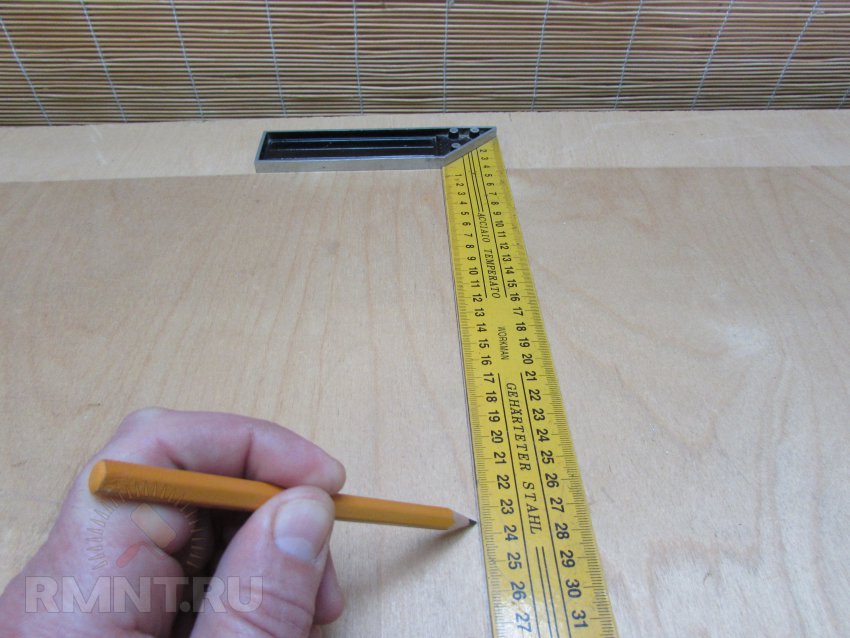
First you need to fix the countertop to the finished bed. A plate is placed on a pre-selected place on the countertop. A pencil is taken and its contours are outlined. Next, you need to take a hand router with a 6-10 mm cutter and select a seat for the mounting plate in the countertop. It should lie flush, i.e. compose perfectly flat surface with a tabletop, as if a single whole.
Get advice on how to get the most out of your vacuum press. Learn how to sharpen your veneer saw for perfect cuts every time. Gregory Paolini offers an overview of his step by step videos on how to build an Arts and Crafts bookcase based on the stick.
Get clip pressure where you need it with convenient magazines. Make your built-ins look like they've been in the family for generations using this simple technique. See how one woodworker turned a potentially mundane project into a work of art.
At seat should have slightly rounded corners. You can round them off with a file. After adding the mounting plate, take a cutter with a thickness slightly greater than the thickness of the countertop, and make in the countertop through holes exactly in the shape of the sole of the milling cutter. You don't have to try too hard, perfect accuracy is not required at this stage. From the bottom of the tabletop, you need to make an additional selection for the dust collector housing and other accessories that you plan to equip your router table with.
Celebrated woodworking teacher Mark Adams offers an overview of the topics he covers in his guide to Stolsav's methods. This is possibly one of the most used fixtures in any workshop, but if your cross sled is out of square, you might as well throw it in the dustbin.
Learn the hassle-free technique for the perfect articulated knife cartridges, every time. Learn how to choose the right finish for all your woodworking and furniture projects. Learn the right way to prepare and stick your woodworking projects - from start to finish.
The work is almost completed, you just need to assemble everything into a single product. Start the router from below and screw it to the plate. Fix the plate to the tabletop with self-tapping screws. Self-tapping screws need to be drowned, otherwise they will interfere with the work process. Finally screw the tabletop to the bed.
Learn how to cut better, faster through a dovetail using your table and a standard rip blade. Find out how two lightweight tools can help you sharpen your bevel blade. Thomas McKenna. Learn how to put on toolboxes for smart, organized tool storage.
Find out how two simple tools can make installing bed bolts a breeze. Matt Kenny. Watch as our editors showcase their favorite fixes. Check out how one furniture maker used rounded dovetails to spruce up a rustic bookcase.
In order to increase convenience and safety, you can equip the structure with an upper pressure roller device. Such an addition will be especially useful when processing large-sized workpieces, such as door linings. The design of the clamp does not have any complex elements, so you can make and install it yourself without any problems.
A ball bearing can be used as a roller right size. The bearing is installed in the holding fixture. The device itself must be rigidly fixed at the required distance from the surface of your countertop. So you will ensure a constant tight pressing of the workpiece to the surface of the countertop at the moment the product passes under the roller. This will improve the accuracy and safety of the work performed.
The milling table will facilitate your work and help to increase the accuracy of processing workpieces. You can buy ready-made, or you can make a milling table for manual router with their own hands, using the skills of working with wood. We have prepared for you a fairly detailed step by step instructions for table making.
The essence of all designs of a horizontal milling table is the same, the idea is clear - you need to think it over for yourself and execute it, taking into account your capabilities. And in the end, get a machine that allows you to process workpieces much more accurately and perform operations that previously seemed difficult for a manual milling cutter.
Decide on the size of the work surface, starting from the dimensions of the workpieces being processed and the free space in the workshop. Start small by building a simple countertop with upgradeability in mind. Work on it and gradually bring to mind.
Make a tabletop
The simplest table for a milling cutter is a separate work plate, placed on carpentry goats or between cabinets. The device costs a penny and is made in a few hours, but will allow you to perform a significant proportion of the same operations as multifunctional machine. You only need MDF or birch plywood 19-25 mm thick. Better fit a plastic-coated panel that provides less friction resistance, and a plate laminated on both sides will not warp during operation.
Set the exact right angle of the cut on the circular saw, cut the parts according to the dimensions and grind the ends.
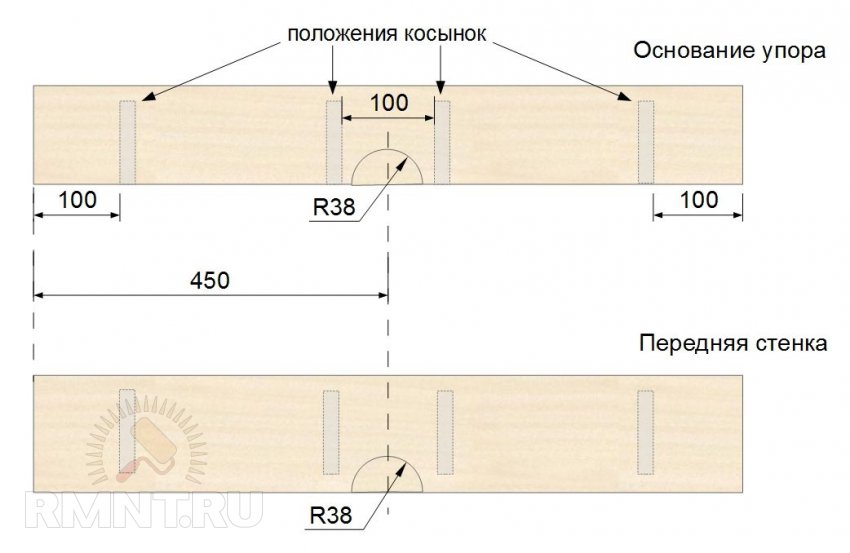
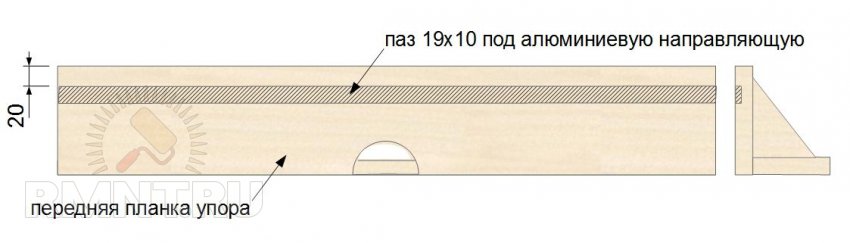
 Cutting pattern: 1 - main plate; 2 - stop base; 3 - front wall of the stop; 4 - scarf (4 pieces, dimensions for 19 mm plywood); 5 - tsarga (2 pcs.); 6 - side bar; 7 - connecting bar (4 pcs.)
Advice. Before cutting, measure the thickness sheet material often deviating from the standard. Make adjustments to the drawings, eliminating problems during assembly of the structure.
Remove the plastic pad from the sole of the router.

Draw a line in the middle of the slab and mark 235 mm from the edge.
Place the overlay so that the router's main controls are next to the edge of the table. Visually align the center of the lining with the marked point and mark the places for drilling the holes for the mounting screws.
Determine the center location for the sole with equidistant screws.

For a base with asymmetrical screws, measure the diameter of the rubber and the distance from the outer circumference to the cut of the sole.

Draw a line with a pencil in the middle of the beveled side, calculate the distance from it to the center:
- S=D/2-(D-H)
Position the cut perpendicular to the midline and mark the center of the sole.
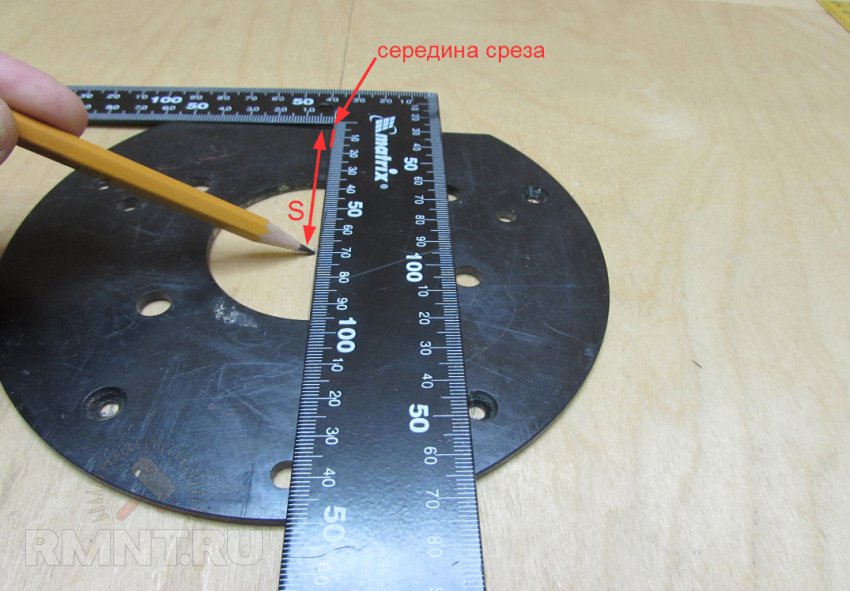
Mark the mounting screw locations.

Drill mounting holes and under the cutter, countersink the recesses. Mark semicircular cutouts in the base and front wall of the stop.
Cut out the bends with an electric saw. Make auxiliary frequent cuts perpendicular to the edge of the part, slightly leading to the marking line. Then lead the file a little closer to the contour line - the pieces will fall out without interfering with the movement of the blade. Sand the cutout with sandpaper wrapped around the pipe.
Fasten the connecting strips from the bottom of the tabletop.

Glue all the blanks and fasten with additional screws. Pick up screws longer than the regular ones by the thickness of the plywood and install the router at the bottom of the slab.
 1 - side bar for fastening with clamps on the goats; 2 - tsarga; 3 - countersunk guide holes; 4 - front wall of the stop; 5 - self-tapping screw with countersunk head 4.5x42; 6 - scarf; 7 - stop base
Fix the table on the goats with clamps, fix the position of the stop with clamps and get to work.
Build a solid foundation
The worktop can be installed on a frame of low height, sufficient to accommodate the router. A portable table is stored on a rack, and is fixed on a workbench for work. If you often mill and have free space in the workshop, add support pedestals to the table top and get a full-fledged machine.
Cut the cabinet pieces to the dimensions given for the 820mm high table or modify them so that the tabletop is level with other equipment .
 Frame details: 1 - outer side panel; 2 - inner panel; 3 - rear panel; 4 - base
Lay the tabletop upside down. Install side panels in sequence and fasten them with screws, pre-drilling pilot holes. Fasten the base, lay the frame face down, align the square corners and install the two back panels.
At the end, attach the wheel supports to the bottom of the hull using roofing screws. Position the wheel mounting pads at least 20 mm from the edges.
 1 - side stand; 2 - wheel support; 3 - bottom; 4 - internal rack; 5 - rear panel
Use free space in cabinets to solve the problem of storing tools and consumables.
Insert mounting plate
Get a longer cutter overhang by placing the tool on a 4-6 mm thick plate made of duralumin, getinaks or solid polycarbonate.
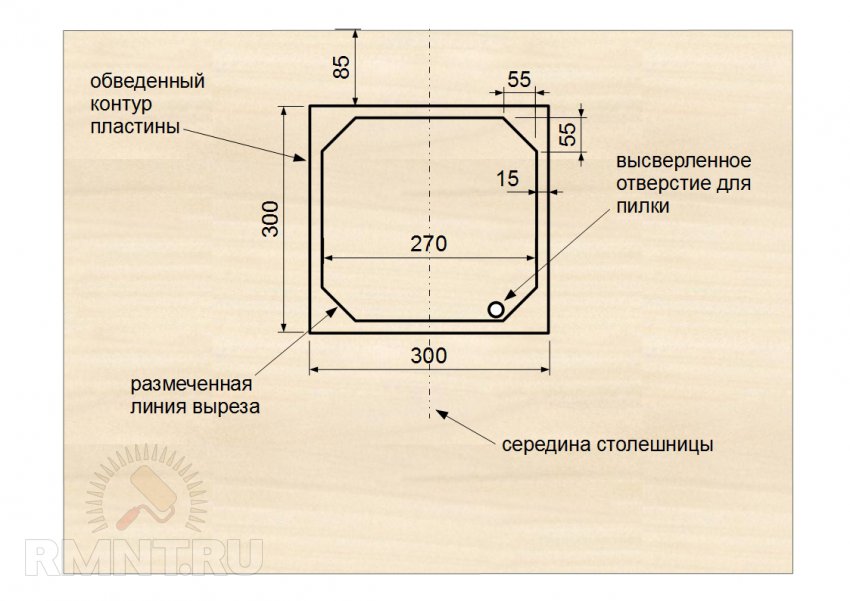
Cut out a 300 mm square from the sheet, put it on a workbench. Glue the plastic sole of the router on top with double-sided tape, placing it in the middle face up. With a drill of the same diameter as the fixing screws, drill holes in the plate using the plastic pad as a template. Remove the sole, make recesses for the caps with a countersink or a large drill.
Screw the plate to the disconnected router, insert an 8 mm drill into the collet. Lower the body of the tool until the drill touches the surface and rotate the chuck, marking the center. Unscrew the plate and make a hole according to the mark with a hole saw.

Place the plate on the tabletop and trace the outline. Draw and cut the cutout by inserting the jigsaw blade through drilled hole. Trim the ends with a file and sand with sandpaper.
Fix the thin boards around the marked contour with clamps.

Clamp the copy cutter with bearing in the collet, set the milling depth according to the thickness of the mounting plate. Carry out the milling in several passes, then add 0.5 mm with the micrometer regulator of the router and make the final pass.
Drill through holes for the screws and expand them with reverse side countertops with a 11 mm drill for self-locking nuts. Clean the surfaces and install the nuts on the epoxy, leveling with the screwed bolts.

Fit the mounting plate to the cutout, lay it in place, drill the fixing holes and countersink with front side. Attach the part to the sole of the router, insert the tool into the tabletop and tighten the screws. Check that the plate is flush with the tabletop plane, if necessary, compensate for errors with washers.
Improve your focus
For faster and more convenient machine setup, modify the parallel side stop and complete the machine with a rotary stop to help finish the ends. narrow details. The latter can be taken from a stationary circular saw. Cut aluminum guides with a T-profile into the surface of the plate. To make cutouts in the countertop, use a router or circular saw with groove disc.

Lightly round the top corners of the grooves with sandpaper. Cut the profile to size, drill holes according to the diameter of the screws, process them with a countersink. Insert the parts into the grooves, make thin holes and tighten the hidden screws.
Drill 7mm holes in the base of the stop, pick up hex bolts and plastic handwheels with nuts.

Install the guide profile in the front plate of the stop to secure the clamps, auxiliary pads and protective devices.

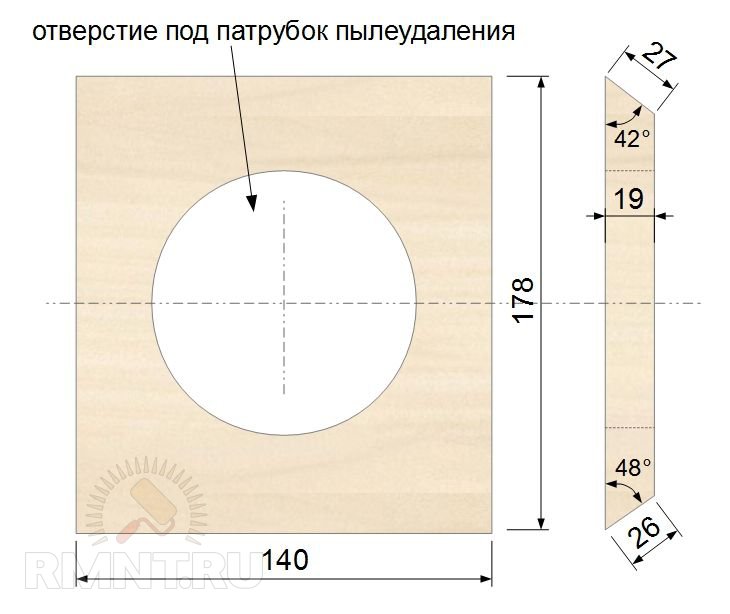
Cut out a plywood cover with a hole in the center, fasten it to the scarves located near the cutout of the longitudinal stop. Connect the adapter and connect the vacuum cleaner when working on the milling table.
Add a safety shield to the stop, made from plywood trim and a strip of plexiglass.

To make oblong cuts, drill 7 mm holes at the indicated points, connect them tangentially and make cuts with a jigsaw.
Make homemade clamps and clamps needed for milling small elements.

A comb press can be made from maple wood, choosing a straight-grained area. Make the gaps between the ridges on a circular machine:
- Set the cutting height to 50 mm.
- Set the cutting width to 2 mm.
- Make a cut.
- Pull the workpiece back with the manual pusher.
- Turn the board 180°, saw through the other side.
- Move the stop by 5 mm, repeat the operations.
- Move the fence back again and make cuts all over the workpiece.
Secure the clamps to the rail with bolts and wing nuts.
 1 - stopper; 2 - clamp-comb; 3 - protective shield; 4 - aluminum guide; 5 - nozzle for a vacuum cleaner
Sand the surfaces of parts, especially in places where workpieces will pass during the milling process. Clean the machine from dust and cover with oil.
 1 - drawer for cutters; 2 - trapezoidal groove for stop
Summing up the project
Materials needed:
- Plywood 19x1525x1525 mm - 2 sheets.
- Plastic 4x30x30 mm.
- Several dozen screws.
- Aluminum guides - 2.3 m.
- Wheel support with brake — 4 pcs.
- Glue joiner's and epoxy.
- Bolts M6 with nuts.
The ability to take your time and think through every step, accurately mark and cut blanks, or the desire to learn this, came in handy. The result is a solid milling table for little money. In the future, it is worth thinking about equipping the machine with a switch and a milling height adjustment mechanism.


How to cook ham in the oven at home
Pain in the lower abdomen during pregnancy, reasons for what to do Can the lower abdomen hurt if pregnant
Protein for muscle gain
The best vitamins for men according to customer reviews
How to lose weight on a vegan diet?