Soviet-era furniture - walls, cabinets, chests of drawers - does not differ in beauty, but is reliable and strong. Well, it's just that the hand does not rise to take it to the landfill. And rightly so. It is very easy to upgrade, giving a completely new sound and modern look. Alteration of cabinet-type furniture may not be very difficult: there are materials that allow you to significantly change with little effort appearance. Most easy way— change the color and fittings. With fittings, everything is clear - choose what is more suitable for the style, and the color changes in two ways - paint and glue the film (or wallpaper).
Alteration of the old wall: changing the design
paste over old furniture self-adhesive film - the easiest way to change the decor. The film is today both monophonic and color, different colors, textures and shades. It does not make sense to glue a film with a wood pattern: otherwise it is in trend today. But plain or with a pattern - this is what can turn an old wall into new furniture. The actions are simple, but the work requires accuracy. But the result is excellent. See two photos. On the first one there is an old Soviet wall from before the renovation, on the second - after.
Updating an old furniture wall - before and after
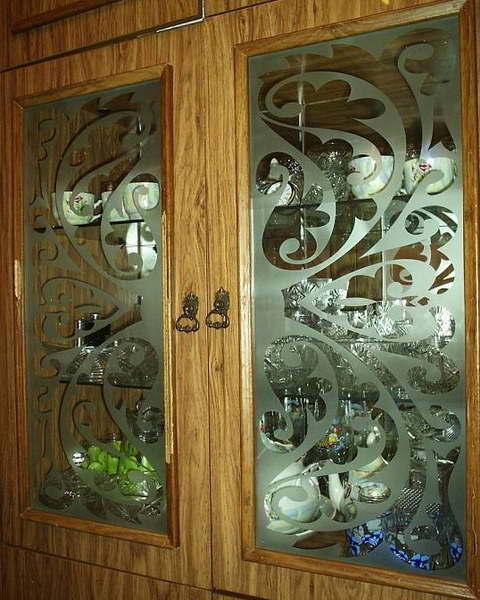
Now about how it was updated. A compacted self-adhesive furniture film was used, cream color, matte surface. open part old wall closed with glass doors, for the glass they took a translucent matte film. Edging - furniture layout (also self-adhesive) color chrome. The order of work is as follows:
- Everything that can be removed, removed, disassembled. Remove old hardware.
- Surfaces must be clean and free of grease. This is easier to achieve with a soft cloth dipped in detergent for dishes. Then everything is washed away warm water with a little vinegar. Wipe clean with a dry cloth.
- Cut out the details. It is better to cut the film 8-10 mm more. The rest is then cut off with a paper cutter.
- Spray the part to be glued with water from a spray bottle. On a wet surface, the film can be moved if something goes wrong. You can even peel it off without damaging it.
- After removing the protective layer from the film, carefully lay it out. Having aligned, begin to smooth with a soft cloth from the middle to the edges. Try not to have bubbles. To do this, you need to move gradually, without jumping from place to place.
- If there is still a bubble, it can be pierced with a thin needle approximately in the middle. Then expel air from the edges of the bubble to the hole and wipe the puncture site.
- After gluing the film, we take a clean thin cotton fabric, spread it on top and iron it with a warm iron (medium heat).
- We glue the trim, install new handles.
Such a sequence of work with every detail. Everything is the same with glass, only you need to glue it on inner surface. After assembly, you have an updated wall. This technique can be used for any item: chest of drawers, bedside tables, wardrobe, etc.

For example, after a successful experiment with the wall, they redid it in the same way old wardrobe and added it to the right. Now the whole wall is occupied. In the same way, you can update the kitchen set: stick a self-adhesive film and replace the handles.
There is a second way. It is a modification of the proposed method, but simpler and less laborious. Only the doors are pasted over and not with a film, but with non-woven wallpaper. Wallpaper is glued to PVA glue. To prevent the edges from bulging, the parts are cut 5 mm less on all sides. It turns out a kind of edging. Everything looks good (example in the photo below).

What is good about this method: it is easy to change the decor. Tired of the old appearance, cut off the wallpaper, pasted new ones. Despite the fact that the method seems frivolous, the appearance persists for several years. Its author even tried it on kitchen set. Only the wallpaper on top is covered twice with PVA glue. In this case, the lockers can be washed. It is important to apply a layer of varnish evenly, without sagging, there are no other difficulties.
Sometimes the wallpaper is varnished. But before you do it, try it on an unnecessary piece: see how they react to it.
When choosing a varnish, you need to remember that acrylic and cellulose varnishes remain transparent after drying, polyurethane turns yellow after a while. Also, polyurethane is almost not softened by solvents: it can only be removed mechanically (from wood it is cleaned with sandpaper).
Dresser update
The old chest of drawers stood for who knows how many years in the attic, but it is very strong and reliable, not a single gram of cracked, only the polishing cracked. In terms of strength, it far exceeds modern products. This is the feature that is inherent in the old, still Soviet times, furniture. It is not very detailed (to put it mildly), but after standing for several decades in poor conditions, it remains strong. The makeover of the chest of drawers is more complicated: two techniques were used: painting, and then decorating with polyurethane moldings and wallpaper.

Step 1. We remove the accessories, remove the old coating. In some places the polishing was scraped off, in some places it was polished with sandpaper. Chips were covered with putty on wood, waited until it dries. At the final stage, everything was cleaned with a sandpaper with a fine grain. At the same time, the chest of drawers became the same as in the photo below.

This is after it has been sanded and leveled. sandpaper
Step 2. Installation of polyurethane moldings. When choosing moldings, make sure that they are not voluminous: too thick on a small chest of drawers will look very rough. They should be no wider than 5 cm and as narrow as possible when viewed from a profile.
Purchased polyurethane moldings are neatly cut, the corners are sawn down at 45 °. (). The pattern match must be perfect. We glue them on PVA. For reliability, you can additionally fix it on self-tapping screws with wide caps. A small recess is made under them, after the screw is screwed in, the hole is covered with putty. Try to ensure that the putty immediately lays down perfectly (you can touch it up with a wet finger), since it is problematic to clean off the dried one.

Moldings are glued and put on self-tapping screws
Step 3 Everything is treated with a primer. You can use PVA glue diluted with water in a ratio of 1: 2. After the primer dries, paint (two layers). For this case, water-based acrylic paint was chosen. The color is coffee with milk, although it looks very different in the photo. Color rendering is inaccurate.

This is after the second application of paint. pretty
Step 4 For decoration, wallpaper was chosen, in which the coating is made using the silk-screen printing technique. Pieces are cut according to the size of the inside of the frames from the moldings, glued to the PVA. After the glue dries, the entire chest of drawers is coated twice with a water-based varnish.

Step 5 And the last to install new legs (furniture wheels) and handles.

We install handles and legs)) The updated chest of drawers is not at all like the one you saw in the first photo.
As you can see complex work no. Everything is really elementary. But all processes require accuracy - the appearance depends on it. In the same way, you can update the old wardrobe. Get a set for the room. Stylish and original.
When updating furniture, the worst thing is if the surface is varnished. The polish takes a long time to peel off. If the surface is smooth and polishing is not damaged, you can apply a primer for difficult surfaces on it, and paint after drying. This greatly speeds up the process of painting lacquered furniture.
If you have kids and a dacha or yard, you might be interested in reading with lots of photos. And about
How to update an old nightstand
In the photo gallery below you can see the restoration process of an old polished nightstand. First, the old polishing was removed from it, puttied, sanded, and after processing it was painted twice with acrylic paint. Then paper with an interesting pattern was glued to the doors (it was a gift paper bag). After drying, everything together was covered with two layers of semi-gloss acrylic varnish.
The sequence of work is simple if you know how to do it. All processes will repeat the sequence of actions that you saw in the example of updating the chest of drawers. The result is also impressive.
Remaking furniture with your own hands is a painstaking task, but the result is worth it. Below is a photo of a bedside table restored using a simple technique: it is pasted over with embossed wallpaper, and varnish is applied twice on top.

Table makeover
By the same technology banal Coffee table can be turned into a modern piece of furniture. In this case, it was pasted over with wrapping paper. It is dense, sticks well and does not sag when applying varnish.
Before starting work on decorating the tabletop, the legs of the old table and the edges of the tabletop were painted in a light color: this way it suits the new design style more. Then began the process of its transformation.
When pasting, the panel is cut out much larger than the dimensions of the tabletop. So it is necessary. Paper is glued on PVA, rolled with a roller so that there are no lumps and swellings. The surface must be absolutely smooth.

After pasting, take sandpaper with fine grain (it is more convenient to work if it is attached to a bar). Passing it along the edge, they bend and at the same time separate the excess paper.

Even cutting on a guillotine you will not get a fairly even edge. And with this method, it turns out to be designed professionally. Do-it-yourself and does not smell.

After the glue has dried, the surface is covered twice with a thin layer of varnish. It should be applied with a soft brush in a small amount. Layers are applied in different directions: first along the long side, then across.
Alteration of furniture: photo ideas
Remaking furniture with your own hands is a creative business. Even a boring one can be made into a great thing. And it is not necessary to repeat exactly what you saw. Lot useful ideas comes during the execution of the "project". The only pity is that some of the plans are not as attractive as it seemed. Try, experiment. Good modern technologies allow you to do this at minimal cost.
There is no need to buy a new cabinet when the previous one is still quite functional. If the doors no longer look presentable, or you have changed the interior, and the old cabinet does not fit in, change it beyond recognition! All the methods that we list below are suitable for both wardrobes and chests of drawers and even shelving with alternating open and closed sections.
Paste with a film
A self-adhesive film will help hide all the imperfections of cabinet doors or chest of drawers in a couple of elementary steps. The range of films is huge, you can choose one-color or with an interesting pattern, golden or imitating wood. Do not forget to degrease the surface before applying, or even better to sand and cover with a primer layer.


wallpaper
Wallpaper gives more options than film, because they are matte, with a relief and in general for every taste. If desired, you can choose wallpaper, which will visually expand the space. Wallpaper is applied using PVA, the surface must be prepared in advance for better adhesion. You can decorate with wallpaper not only the front doors, but also the internal shelves or the back wall of the cabinet or rack.


Sheathe with fabric
This method looks more even and textured than wallpaper. Cloth is better to fit large elements such as wardrobe doors, fasten furniture stapler or glue. It is interesting to choose leatherette as a fabric for a luxurious look.


Fabrics made from pieces in the patchwork technique will make your closet cozier and help you fit it into a child's room or into such styles as Provence and country. The style can also be embodied with wallpaper or film, if you paste over the drawer panels with materials with different patterns.

paint
Paint will be a real savior in the restoration of furniture. Before applying paint, sand the surface and coat with a primer.
You can just paint the cabinet in 1-2 colors, or you can draw a real picture on it. If you do not have enough artistic abilities for painting, you can make a drawing using a stencil. Geometric lines and shapes are easy to create with masking tape - it will serve as a smooth border for the paint. And for more complex patterns and pictures, the stencil will have to be made specially.


We talked about ways to transfer images to surfaces here:. And by this link detailed instructions for using stencils:
Make a slate surface


stick rivets
To create a brutal effect for a loft or cabinet doors can be decorated with metal rivets or staples. Nails with decorative caps are also suitable. Let the chest of drawers look like an old chest, and the wardrobe look like a door to a submarine. You can use other metal fittings for decoration, and support the style by coloring or covering with fabric.


Make doors mirrored
Mirrors not only expand the space and add light to the room, but also hide surface imperfections underneath. Any cabinet can be turned into a mirror if you fix one full-height or several small mirrors on its doors. This technique will help in creating an art deco wardrobe.


An alternative option is a mirror mosaic, which will create wonderful highlights.
Add Volume
If you want to achieve a classic look for your wardrobe, all you have to do is stick wooden slats or stucco, and then paint - and the effect will add up. You can stick an inscription carved from wood with words that are meaningful to you or the name of the contents of the box.


A three-dimensional texture can be created with colored sawdust or other similar material: the door is covered with glue, and the sawdust is inflated from above, then everything is fixed with spray varnish. Please note that this surface is very difficult to clean.
Do not forget that the appearance of the furniture big influence provides accessories. In any case, it is worth replacing the handles, or maybe this will be enough. Lighting can also spice up the familiar look of a cabinet or shelving unit.
Photos: bohemianjunktion.com, anangelatmytable.com, decorpoint.com, fondodejuventud.org, theroomedit.com, hfapconference.com
It's no secret that good furniture is very expensive, and And antiques and does have an exorbitant value. It's like with clothes: it seems that there is a lot of everything on sale, and there are no problems with the choice, but you just have to take a closer look, as you find out: there is nothing suitable. It is very difficult to find the item of your dreams.
And, finally, it is a pity to part with old, but high-quality furniture, especially from. Quality is also a commodity. Therefore, do not rush to throw away, say, an old cabinet. It can be completely upgraded and given to him new life.
But in order to choose the right decorating method, you need to consider what your cabinet is made of and what degree of wear it has. And there may be several cases.
natural wood
This is a noble, worthy material. Before wooden crafts were very high quality.
First of all, you need to fix the broken fasteners and be sure to wipe the cabinet from dust. Inner part closet would be nice to treat with a special antibacterial spray or wipe with vinegar to get rid of bad smell. Well, then - choose one of the ways of external decor.

Toning. If there are defects on the surface of the cabinet - scratches, chips, cracks, they must be puttied with a special wood putty, the color of which must be matched to the color of the wood of the cabinet. When the putty dries, you need to sand these places with sandpaper, and then cover the entire cabinet with a special structuring stain for wood. The color of the stain should be chosen darker than the original color of the cabinet. As a result, you will get a completely new look.

Aging.
This method is suitable for natural wood products. It involves painting the cabinet and some special effects. You can make a "worn" surface.
To do this, a light tree is first painted in dark brown or maroon, dark lilac, etc. (based on the prevailing colors interior), then, when the paint dries, some places are rubbed with a candle, and then the cabinet is painted in a light color - beige, white, cream. After that, the surface is wiped with sandpaper, and in some places dark “scuffs” appear from under the light paint.
In case the cabinet is dark, you can make craquelures.

Painting. It also provides for staining in any color, but not too dark. Paints are used for furniture. When the paint dries, painting is carried out on the facades of the cabinet using acrylic paints. The most win-win option is stencil painting.

Decoupage.
Perhaps no other type of decor will give such a stunning effect as decoupage. If you decorate furniture using this technique, the effect is guaranteed to be the same as if a professional worked on this thing.
This is due to the specifics of the “pictures” for decoupage, and special image design techniques greatly enhance the effect. The effect is as if it were a painting. Furniture becomes author's, one of a kind.
To decorate the cabinet using the decoupage technique, napkins with a suitable pattern are selected, the pattern is cut out, stratified and then glued with a special glue. The finished work is covered on top with furniture varnish, preferably in two layers. Decoupage looks great on light wood. But the dark cabinet must first be painted.

New fittings . New pens are not a trifle at all - they give up to 40% success.

Inlay. It sounds loud, but in fact this is just a decoration of the surface with overhead elements, not at all precious stones. You can use lace, embroidery and vinyl lace napkins. Embroideries are simply attached to the doors directly in the frame using small screws. If the embroideries are without frames, then they can simply be glued on with shoe glue, and then “arrange” them with a frame of painted foam “stucco”.
And yet, you can make an excellent jewelry box or chest for jewelry made of wood or thick cardboard. Watch the exclusive master class in a special video.
Cabinet made of chipboard or composite materials
This material, of course, is less valuable than natural wood. If the cabinet is in good condition, then all the methods already listed are suitable for decorating it. wooden cabinet except, of course, toning. If the condition wants the best, then it is better to replace the doors .
Dark polished cabinet
A fairly common model, the decor of which is aerobatics for any decorator. The fact is that the synthetic dark varnish that was used for such furniture cannot be removed and almost no decorative materials. This is the tactic in this case. If the cabinet is in poor condition, it is better to replace the doors. If everything is in order with the quality, then you can use two decor methods:
Blunt and stucco . Blunting is the tinting of a surface with a sponge. You need to use gold or copper metallic paint, it falls on a similar polish. The technique is that in some places you fill the paint with up and down movements of the sponge. After that, the cabinet looks much nobler! After that, PVC stucco borders are glued along the perimeter of the doors, and a rosette of such stucco molding is placed in the center of each of the doors.
stencil ornament . You also need to use gold or copper paint, only aerosol. Before that, you need to stick a large stencil with an ornament on the doors (for example, in the Baroque style). Then, on top, on a stencil, treat the entire surface with an aerosol matte varnish, this is done in order to create a base for paint. Lacquer in this case is a primer. After 5 minutes, you can apply a colored aerosol. After another 5 minutes, remove the stencil - and here you have a new cabinet, completely different from the previous one!
As a rule, every self-respecting owner eventually faces the question of restoring an old cabinet. But it will be even more relevant if you are the owner of Soviet interior items that are made of solid wood of rare species, and not from sawdust, like most modern furniture.
It is about the procedure for restoring an old cabinet, as well as how to decorate it, that we will talk about in this article.
All work on the restoration of the old Soviet wardrobe can be conditionally divided into two stages - repair and decoration. The first one is common for wardrobes of any kind, while the process of giving furniture a unique design directly depends on the tastes and skills of its owner.
Tool
In order to carry out repair work you will need the following types of tools and materials:
- emery skin;
- hammer and furniture nails;
- primer and putty for wooden surfaces;
- brush and spatula;
- screwdriver and a set of fasteners;
- various types of accessories;
- glue and pencil.
After preparing all necessary materials and tools, you can proceed directly to the restoration of the old cabinet.
The procedure for carrying out repair work
- First you need to free the interior of the cabinet from foreign objects and place it in the central part of the room, which will allow you to have access to the piece of furniture from all sides.
- The next step in the restoration work of a lacquered cabinet is to check the strength of the connection of its elements. To do this, carefully inspect the furniture and, if necessary, replace the old screws with new ones.
In this case, the fixing elements should be installed in other places, and the old holes should be covered with putty and allowed to dry before the next type of restoration work.
- After all structural elements are firmly interconnected, you can begin to eliminate surface defects. The first step in this phase of cabinet refurbishment is to remove the old paintwork with sandpaper various graininess.

Having carried out this procedure, you should carefully wipe the surface of the cabinet with a damp cloth. Then it is necessary to treat it with a primer, and after drying, you can begin to eliminate cracks and scratches.

Large dents can be covered up with putty, while small scratches can be easily repaired with clear furniture wax.
Having carried out such procedures, you can apply paintwork on the surface of the furniture (with its further polishing) or decorate the cabinet using other improvised means, which we will discuss below.
Also in our photo catalog you can see some other options for decorating an old cabinet that do not require much effort on the part of the owner of such a piece of furniture.

Decoupage cabinet
The decoupling procedure will allow you to turn an old wardrobe into an original piece of furniture that will look great in a bedroom or children's room.
In order to decoupage such furniture, you will need:
- a pair of paint brushes;
- varnish (colorless);
- napkins with a pre-selected pattern;
- warm water;
- glue;
- paints (acrylic).
After everything you need is prepared, you can proceed directly to the decoupage procedure itself.
First, with the help of masking tape, you should close those elements that will not be subject to restoration.

Then it is necessary to shake up the previously prepared paint and apply it to the primed surface of the piece of furniture.

After the paintwork has dried, cut out a pattern from napkins, attach it to the painted surface and circle it with a simple pencil.
This will allow you to accurately mark the location of the elements on the cabinet.
When you have finished marking the surface, lower the pattern cut out of napkins into warm water and leave it there for thirty seconds, then take it out and put it on the cellophane.
While the napkins dry out a little, apply PVA glue to the place of gluing and alternately apply the drawings to the prepared surface.

The final stage of the restoration and decoration of the old cabinet will be the application of a colorless varnish, which will protect the decoupage places from possible mechanical damage.

Craquelure
Another common way to decorate a renovated cabinet is single-phase craquelure, the essence of which is to give the furniture an artificially aged look by applying a special varnish.
First, the surface to be decorated is covered with a layer of acrylic, which will show through the craquelure cracks, giving the furniture the desired effect.
After the base layer has dried, a craquelure varnish is applied, on top of which a transparent varnish is applied.

As you can see, restoring an old cabinet is not such a complicated procedure that will give your furniture a unique design and significantly extend its life.
A comfortable, functional closet loses its external elegance over time. If you feel sorry for throwing it away, you can do restoration work. This exciting activity will bring a lot positive emotions. Restoring a closet with a skillful approach turns old furniture into a striking element in vintage style.
To update the cabinet, you need to perform a whole range of works. The condition of the cabinet, the material for the manufacture of the walls and the facade matters. Sometimes required minor repairs, and someone wants to completely change the appearance of the product.
There are several common types of work:
- restoration of the cabinet walls, if the laminate pattern has faded;
- sealing cracks, chips;
- replacement of glasses, mirrors, matting;
- facade coloring;
- use of photo printing;
- use of decorative plaster.
An old wardrobe will last for many years if you give it a new life. Restoration of a closet is a creative process, it does not like haste.
Tools for the job
Let's figure out what tools you need for the job. This list is not final, it may change depending on the wishes of the furniture owner.
Restoration stages
Before starting work, you need to visually evaluate it. Having examined the old cabinet, it will immediately become clear which parts require restoration, and which can be left in their original form.
The next stage of work is disassembly. Furniture is disassembled carefully with screwdrivers. First, the cabinet doors are removed, then the lid, after removing all the shelves, drawers. If the fasteners and accessories are outdated or have become unusable, they should be replaced.
Now start cleaning the parts. This stage includes:
- cleaning from dust and dirt;
- degreasing;
- removal of varnish and paint;
- sanding.
If necessary, the parts are ground. After cleaning, the parts are left for several hours to dry completely.
The next stage of work is pre-treatment of surfaces. It is necessary to cover the tree with insecticide. Facade details are examined for scratches. If they are, use putty. Chips on the laminate are covered with special furniture wax, selected by color.
Now paint the old cabinet in any color you want. After the parts dry, assembly begins. Old fasteners are replaced with new ones, this also applies to door handles.

Cabinet painting
Let's take a closer look at how to paint a closet. This is the question that generates the most discussion. Coloring is done:
- stain;
- acrylic paint;
- oil enamel.

To paint evenly, without flaws, masking tape is used. If the cabinet has decorative elements, they are painted separately, and then placed back. The decoration technique allows you to use a bright film, paper napkins with decor. You need to apply the drawing on the dried paint.
Decor options
Consider several decor options. They will allow you to find the available and most suitable update technique.

Before you update your closet, read the advice of experts. They will help you get the job done right.
- If the cracks on the furniture are large, the restoration is carried out using furniture wax. It is sold in specialized stores. The work is done by hand.
- Some types of primers are suitable for certain types of paint. Before buying, you must read the instructions.
- Furniture parts are painted with a velor roller, it paints over even an uneven surface. The corners are painted with a brush. If you have a sprayer, it is better to use it.
- Acrylic or vapor permeable paint is the ideal material for working with furniture.
Restoration of an old wardrobe will give it a new life, the interior of the room will sparkle with new colors. Do not throw away old furniture, look at it through the eyes of a designer.


Chicken in kefir - recipes for marinated, stewed and baked poultry for every taste!
Simple Chicken Recipe in English (Fried) Recipes in English with translation
Chicken hearts with potatoes: cooking recipes How to cook delicious chicken hearts with potatoes
Recipes for dough and fillings for jellied pies with mushrooms
Stuffed eggplant with chicken and mushrooms baked in the oven with cheese crust Cooking eggplant stuffed with chicken