The apartment has a Soviet-era wall, made of high quality natural wood. But over time, the facades warped, the fittings failed, appearance became unrepresentative. It is a pity to throw away this piece of furniture, so many people have a question about how to update old furniture wall with their own hands and they study the photos before and after the restoration.
Before starting any work, you need to prepare everything you need - buy material, tools. The list consists of the following:
- Furniture fittings;
- Putty material for wood;
- Facades, if necessary;
- Paint or stain (preferably spray);
- Construction knife;
- Building hair dryer;
- Screwdriver;
- Sharp scissors;
- Iron;
- Film furniture self-adhesive;
- Wax for furniture of different consistency;
- Candle;
- spatulas;
- Rags, clamp;
- PVA glue;
- Varnish for wood;
- felt-tip pen;
- Edge for processing end faces.
This is not the whole list of materials and tools, since there are several ways to update old furniture, each option has its own, specific set of necessary tools.


Update types
If you don’t know how to update an old furniture wall with your own hands, before and after photos can be found on the net. In addition, we present several ways, by applying which, you can give a second life to any furniture.
Restoration of an old wall
If old furniture is dear to you as a memory, but its appearance has suffered greatly over time - chips, creases, deep cracks have formed on the plane - it can be restored. After spending a minimum of time, you will receive an updated piece of furniture. For repair work use a standard set of materials and tools. For quality repair just do the following:
- The working surface must be cleaned and washed with a solution of soap and water, dried well - this will help increase the adhesion of the material to the wall facade;
- To save the plane from deep scratches, they are poured with melted wax. After the fill has hardened, you need to take a felt-tip pen to match the wood, put strokes on the wax that will imitate the structure of the wall material. This is not difficult to do, it is enough to continue an existing drawing. After that, a clean rag is taken, which is carefully carried over the hardened wax, smearing the dashes a little. As soon as the desired result is achieved, the plane is covered with furniture varnish;
- If strong scuffs are visible on the facade, they are painted over with varnish of the desired shade from a can;
- If there are cracks and delaminated sections on the facade, you can update the old wall with the help of elementary means - PVA glue, a medical syringe and a fixative. It is necessary to draw glue into the syringe, inject the required amount of the composition into the crack. Then press the split and remove excess glue. Using a clamp, press the area, leave to dry for 24 hours;
- Are there many chips on the facade? The same melted wax will help to cope with them. First you need to trim the edges of the chip with a spatula, and fill it with wax. Once the wax has dried, sand the area well with a clean, dry rag. Then perform the same steps as when repairing scratches and varnishing.
After such processing, the wall will not change its design, but its appearance will become much more attractive.

Removing dirt and dust from coatings

We process cracks with wax

Repairing chips with glue

We paint over scuffs
Transformation of the wall with furniture varnish
If the interior in your apartment has changed, and a simple restoration does not suit you, then you can radically change the old furniture with your own hands. There are several ways to update furniture, the choice of which will depend on artistic skills, preferences and the amount of free time.
by the most in a simple way is lacquer. The process is not complicated, subject to the procedure and restoration technology.
The set of tools is standard, but for a good result, you need to follow the following algorithm:
- Take a picture of the wall before work begins. This will help in the future to collect it after the update without confusion;
- Disassemble the structure. It is necessary to remove the fittings and doors;
- Wash the wall and all components with soapy water;
- Remove dust, soot deposits in the corners with a toothbrush or toothpicks. This stage should not be ignored, since the quality of the final result depends on the preparation;
- Check the condition of the facades. If the surface is not badly damaged, then it will be enough just to cover it with varnish;
- If the facades are in a deplorable state, they have a lot of chips and deep scratches - the old coating is removed without residue. To make things go faster, you can use special formulations that help remove varnish, or use a regular spatula;
- As soon as all the exfoliated areas are removed, the old varnish is removed, you can proceed with the restoration with wax - how to do it is described above;
- Sand the surface with fine-grained sandpaper and remove dust;
- Cover the facade of the wall and all components with 3-4 thin layers of furniture varnish. It is worth remembering that when applying a thick layer, streaks may form that will spoil the appearance of the wall;
- As soon as the varnish coating dries, the wall should be assembled, the fittings should be replaced with new elements.
By updating old furniture in this way, you can add a few more years of life to the wall in your interior.

Removing dust and dirt

We remove cracks

Removing old varnish

Lacquering in several layers

Installing new handles
Application of self-adhesive wallpaper
Today, there are a lot of materials that can be used for restoration. Renovating old furniture with self-adhesive wallpaper is one of the most simple options. It is easy to work with this material, and it is inexpensive. In addition, the range is so large that you can choose the material for every taste. The film is waterproof, so it can protect the wall from impacts environment. The algorithm for performing work is as follows:
- Prepare as in the previous method - remove the fittings and disassemble the structure;
- Clean the facades, wash, after drying, treat the surface with white spirit, for degreasing;
- While the facades are drying, we cut the material. Film sheets should be 10 mm larger than the original size on each side. This is necessary in order to eliminate gaps in the finish;
- The surface on which the material is planned to be glued must be moistened. Attach the film to the upper edge, carefully separate a small strip of the protective layer. The film is glued gradually, slowly moving down;
- After gluing, you need to level the material with a soft rag, moving from the center to the edges;
- As soon as the entire wall is pasted over, you need to heat the iron and iron the plane through the fabric - this will help the film to adhere tightly to the surface;
- Return the doors and fittings to their place, stick the edge tape.
It is not necessary to use a film under the tree, you can choose any color. A competent design combination of different shades will help to make a real masterpiece out of an old wall.

Dismantling furniture

We clean the surface

We moisten the coatings

We glue the film

Collecting back
Restoration with staining
Repainting the old wall will change its appearance beyond recognition, while the main outlines will remain unchanged. You do not need artistic skills, as well as a special tool. The work is not difficult to do, just follow the basic rules:
- The wall is completely disassembled and the fittings are removed - this makes the restoration process much easier;
- The old coating must be completely removed, obvious flaws must be repaired with wax;
- Sand the surface after it dries, sandpaper or soft rags;
- Staining is done in several layers, while you need to make sure that there are no sagging and smudges. As soon as the staining is completed, we leave the structure to dry, after which the wall should be assembled.
If during the work an influx formed, which was detected after drying, it should be cleaned with sandpaper and additionally covered with paint. For a complete understanding of the staining system, see the master class for beginners on updating furniture with your own hands.
Work technology
Carrying out work for any type of restoration has one common technological sequence - preparation and updating itself.
Preparatory work
Before you decide to remake old Soviet-era furniture, you need to understand that such a process is justified only if it is made of wood. It is not advisable to update old furniture made of chipboard, since the service life of these structures is not long, and perhaps the wall is no longer suitable for restoration. So there is preparations that must be carried out before any restoration:
- Clean the surface of dust and dirt, while dismantling all the decor and accessories;
- Be sure to remove the old layer of paintwork. This can be done with a sandpaper with a large grain, or with a grinder. A solvent solution can also be applied;
- Grout deep cracks with a special material;
- Fill chips and dents with wax and sand;
- Prime the surface with wood compound. It is desirable to use acrylic compounds that fill all microscopic cracks.
The preparation stage is very important, since the final result depends on the quality of surface cleaning.

Removing dust and dirt

We clear from old paint or varnish

We overwrite deformations

We prime the surface
Update instructions
Before restoring old furniture, you need to decide on the design that you want to get. Consider the most popular update method at the moment - decoupage. Preparatory work carried out successfully, you can start the restoration. The algorithm for performing the work is simple and will not cause difficulty even for a beginner:
- Cut out the desired pattern, or take special wipes for decoupage. If you are working for the first time, take pictures of medium size relative to the surface on which they will be superimposed;
- Apply PVA glue to the plane, you can apply the composition for the blend. Do not smear the entire wall at once, as the glue may dry out while you are pasting over one area, so you need to work in stages;
- When gluing a picture, you must strictly monitor the fit of the edges to the surface. Drawings can be glued overlapping each other, so the decor will turn out to be voluminous and original;
- If you have to paste over the corner, then the material just gently bends around the corner, you do not need to cut anything. Smooth the picture with your fingers or with a rubber spatula to remove air bubbles and leave to dry;
- The next step is varnishing. Apply a thin coat of clear furniture polish with a brush or lint-free roller and allow to dry. The process is repeated 3-5 times;
- After last layer the varnish dries, you need to rub the surface to a shine, this can be done with a soft cloth. Polishing should be done without pressure in a circular motion.
In the photo before and after you can see how to update the old furniture wall with your own hands. If you follow the instructions and apply design methods for decorating furniture, you can get an excellent result that will become the pride of the owners of the apartment.
Despite the fact that Soviet-era furniture is quite reliable and strong, it is not considered beautiful, let alone competing with modern furniture. In addition, by this time it was pretty worn out and in need of repair. Even in such conditions, the owners are sorry to part with it. To buy a new, modern one, you need a lot of money, because furniture has always been not cheap, and it is not cheap even now. In this case, there is one, alternative option to leave the old furniture and not buy a new one - this is to try to update the furniture with your own hands, giving it an attractive and modern look. Cabinet furniture is quite easy to remake, especially since there are all the materials necessary for this. In any case, it will be much cheaper to purchase materials for reworking furniture than to buy new furniture. One of the easy and affordable tricks is to change the color and replace the hardware. There will be no special problems with fittings, but with a change in appearance, everything is much more complicated. There are several options, but two are considered the most common - painting and gluing a special film or wallpaper.

The most affordable and easiest option is to paste old furniture with self-adhesive film. On sale you can find a film for every taste, both color and monotonous, of various colors, shades and textures. Many prefer wood effect film, but there are other options that meet the spirit of modernity. This approach can really turn an old wall into furniture that will have an attractive and modern look. It is not at all difficult, it is enough to do your work slowly and carefully, which will allow you to get an interesting result that deserves attention. To see this, just look at 2 photos. In the first photo, an outdated Soviet wall made of chipboard, and in the second - the same wall, but after renovation.
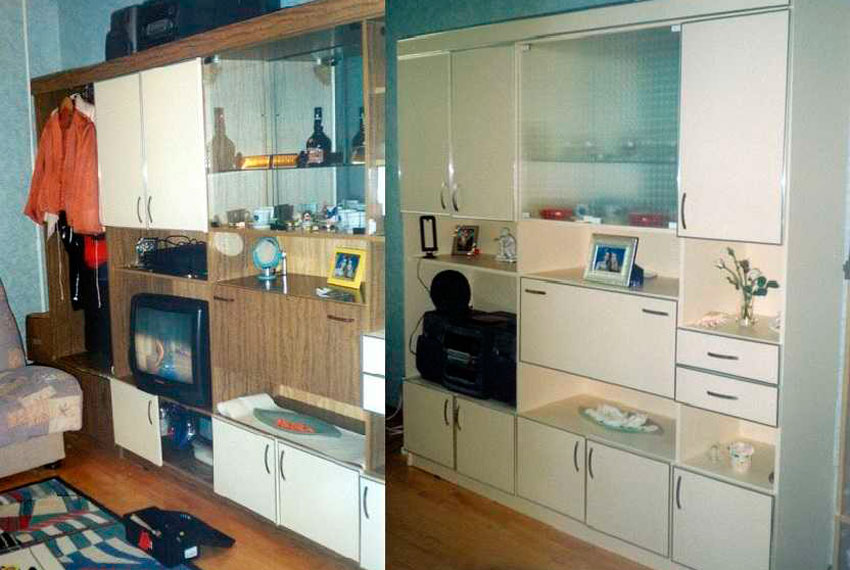
The wall has received a new appearance thanks to the use of compacted self-adhesive furniture film, cream color with a matte surface. Where there was an open part of the wall, there are glass doors pasted over with a translucent matte film. For edging used furniture layout, chrome colors, and also self-adhesive.
The work consists of the following stages:
- The old wall is dismantled, everything that is not needed is removed, including accessories.
- All surfaces are cleaned of dirt and degreased. To do this, use a soft cloth and detergent. After that, the agent is washed off warm water with vinegar and finally the surfaces are wiped with a dry, clean cloth.
- Fragments are cut out of the film required size, with a margin of up to 1 cm. After pasting, the excess film is cut off with a clerical knife.
- The surface before pasting is irrigated with water from a spray bottle. A wet surface will allow you to accurately position the film, as it can be moved, or even peel off if the first time it was not possible to glue it well.
- Before pasting, removed from the film protective film, after which it is laid on the surface. Having correctly positioned the film fragment, they begin to smooth it with a soft cloth in the direction from the middle and to the edges. The main thing is that there are no air bubbles under the film. In this regard, all work is done slowly and very carefully.
- When bubbles form, they are pierced with a thin needle and the air is expelled from them. This operation is also carried out with a rag, moving from the edges to the puncture point. After that, this place is carefully rubbed with a rag.
- After the film is glued, a thin cotton fabric is taken and superimposed on top of the film, after which an iron with an average heating temperature is used. The fabric is ironed along with the film.
- In conclusion, the finish (edging) is glued and fittings (handles) are installed.
- This technology is applied to each glued part. Glass is glued in the same way, only from the inside. After complete assembly, you will get a completely new furniture wall. In this way, you can breathe a second life into items such as bedside tables, chests of drawers, cabinets and kitchen furniture.
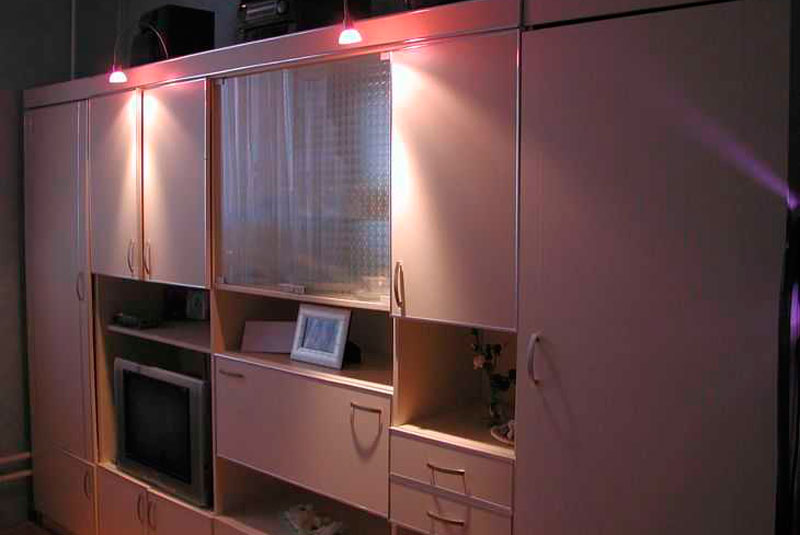
After the wall was successfully pasted over, the old wardrobe and installed on the right. As a result, it turns out that the entire wall is filled with updated furniture. Using the same technology, you can update the old kitchen furniture– glue the self-adhesive film and replace the handles.
There is a second option for updating furniture, which is less expensive and, most interestingly, you don’t need to disassemble anything. In this embodiment, only furniture doors are pasted over and not with a film, but with non-woven wallpaper. PVA glue is used for pasting. So that the edges of the wallpaper do not bulge, they are cut into blanks, the size of which is 5 mm smaller than the size of the doors. Judging by the photo below, the result is not bad at all.

The advantage of such a finish is that the finish can be replaced with new wallpaper at any time.
As a rule, the surface pasted over with wallpaper lasts for five years. Similar technology was used in finishing kitchen set. To make the surface washable, the wallpaper is covered with two layers of PVA glue. The most important thing here is to do everything carefully so that smudges do not form, since you will have to work with a brush.
Alternatively, the wallpaper can be varnished, but before that it is better to experiment on unnecessary wallpaper. It is important to determine what will be the reaction of the wallpaper to the varnish. When choosing a varnish, you need to know that acrylic and cellulose give a transparent surface, and polyurethane, after a certain time, will turn yellow. Polyurethane varnish is practically not amenable to the action of solvents and, if it is necessary to remove it, then mechanical action will have to be resorted to. Usually, coarse sandpaper is used for this or an electric drill with a nozzle is used.
How to update a chest of drawers
An old chest of drawers can stand in the attic for several years and lose only its appearance. As a rule, the old varnish coating cracks, but otherwise, it can be envied modern furniture. It does not dry out and remains as reliable and strong as it was before. In this case, the chest of drawers undergoes a more complex update, using painting and decoration, using polyurethane molding and wallpaper.

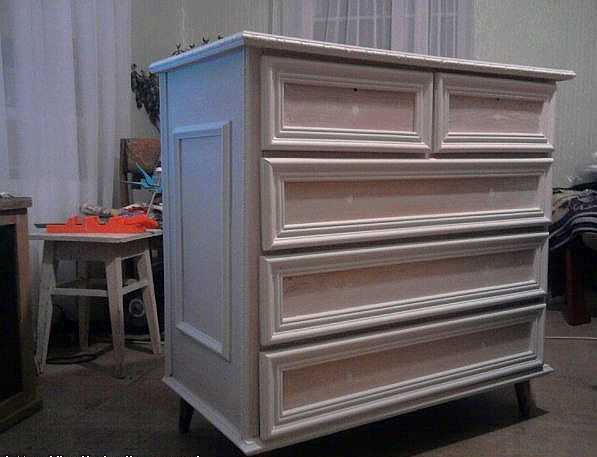
Stage number 1. All fittings are removed from the chest of drawers, after which the old coating is removed. As a rule, the old varnish coating is removed mechanically using sandpaper (large) for this. All shells, cracks and chips are sealed with putty and wait for it to dry. After complete drying, the surface is sanded with a fine sandpaper. The result is what is in the photo below.

Stage #2. Installation of polyurethane moldings. The main task is to choose the right moldings so that they are neither small nor large. Basically, products up to 5 cm wide are selected and very narrow if you look at them in profile.
Acquired moldings are very carefully and accurately cut into segments of the required length, and the corners are cut at an angle of 45 degrees. At the same time, care must be taken to match the pattern. The molding is attached with PVA glue. Alternatively, you can use self-tapping screws for reliability. At the same time, before screwing them, recesses are made for them. All recesses are sealed with putty very carefully, otherwise there may be problems when the putty dries.

Stage 3. All surfaces for gluing are treated with a primer. As a primer, it is possible to use PVA glue diluted with water in a ratio of 1:2. After the primer has completely dried, proceed to painting. As a rule, 2 coats of water-based acrylic paint are applied. Color - coffee with milk, although the photo does not match the color indicated due to poor color rendering.

Stage number 4. Decoration is carried out on the basis of wallpaper made using silk-screen printing technology. Segments of wallpaper are cut clearly according to the size of the inner part, bordered by molding. The wallpaper is glued with PVA glue. After complete drying, the entire chest of drawers is covered with a water-based varnish in 2 layers.
Stage number 5. In conclusion, modern legs in the form of wheels for furniture are screwed to the chest of drawers and handles are installed.

If you carefully study the technology, then everything is much simpler than it might seem. Although, all stages require a certain accuracy, otherwise there will be problems with the appearance. In the same style, you can update the wardrobe. The result is not a bad set for a room or bedroom. Maybe not quite modern, but original and stylish, and most importantly - very cheap.
If old furniture has a varnish coating, then getting rid of it is very difficult. In the absence of obvious flaws, it is better to resort to the help of a primer for complex surfaces and only after that proceed with painting. This approach will minimize the effort to update old furniture.
Updating an old nightstand
The photo below shows the process of updating an old polished bedside table. First of all, polishing was removed, after which the surfaces were puttied and sanded. After that, it was painted acrylic paint in two layers. In conclusion, paper from the gift bag was glued onto the door, thanks to which it was possible to obtain an original drawing. After that, the entire bedside table is covered with two layers of semi-gloss acrylic varnish.

All stages are not particularly difficult if you have the slightest skills. All processes correspond to the sequence of actions described during the restoration of the chest of drawers. The result exceeds all expectations.
 This old nightstand needs to be updated.
 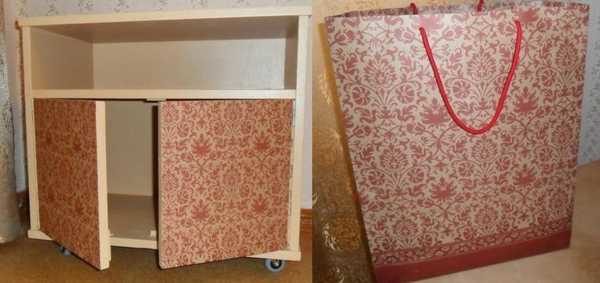 This package will serve as an excellent decor for the doors.
 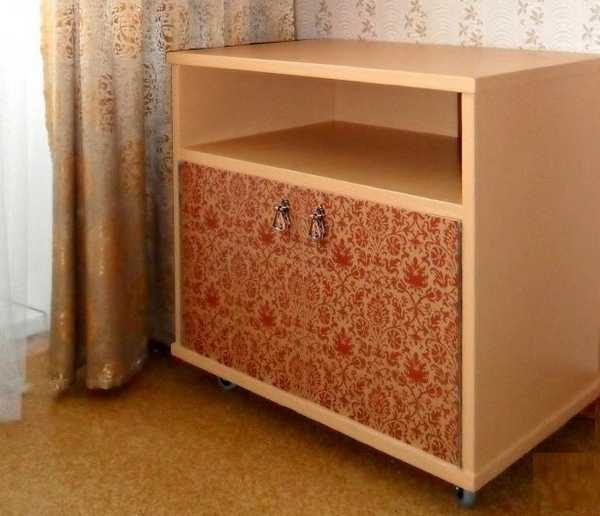 The result of updating the old nightstand.
 Remodeling furniture with your own hands is simple and accessible to everyone, if there is a desire. Unfortunately, without desire, nothing will work. Above in the photo, you can see a bedside table, remade according to a very simple technique: the bedside table was simply pasted over with embossed wallpaper and varnished twice.
How to remake a table
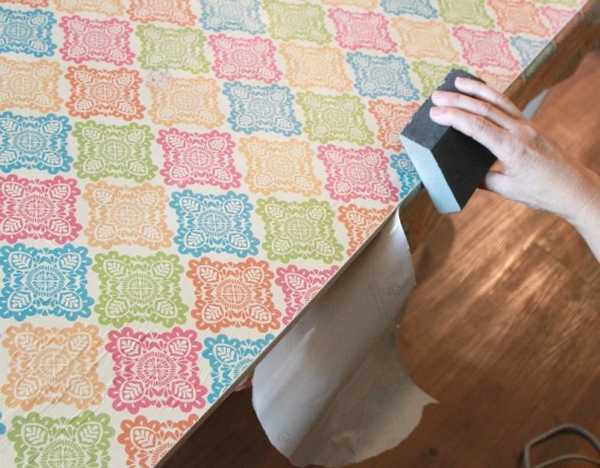
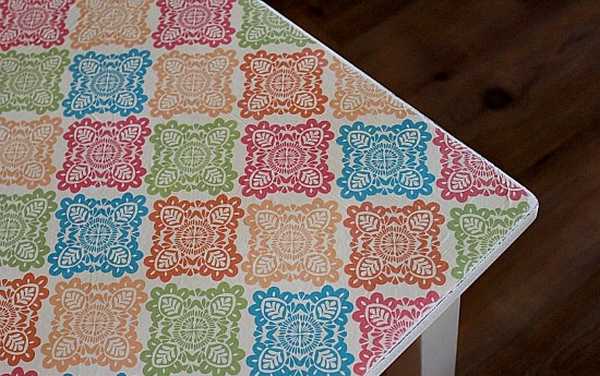
Having adopted such technology, it is enough just to turn an ordinary coffee table into the subject modern interior. It is simply taken and pasted over with wrapping paper. This thick paper, which is glued without problems and does not sag under the action of varnish.
First you need to do the legs and edges of the tabletop. They need to be painted in a light color so that they fit more with the new style. After that, you can proceed to further work.
Before gluing, a paper blank should be cut out a little larger than the size of the countertop. PVA glue is used for gluing. The surface is well rolled with a roller so that there are no air bubbles. The result should be a perfectly smooth surface.

After that, remove excess material by running a fine-grained emery bar along the edge of the tabletop, pressing the paper against the tabletop. This method allows you to very evenly remove excess material, which is more like a professional action.
Finally, the surface is covered with two layers of varnish. In this case, the layers should be thin. Each layer is applied perpendicular to the previous one.
Alteration of furniture: photo ideas
What can be done from an old closet? No need to rush to throw away or give away. Let's take a closer look at some of the options with ideas for using the closet.
Desktop
From the walls of the cabinet, you can design a desktop for children. And from the shelves to make closed drawers for the table. Then carefully connect everything and clean it with sandpaper. Next, apply several coats of wood varnish.
Important! Let the first coat of varnish dry well before applying the second.
Cabinet
Make a versatile nightstand out of an old closet. Such a new piece of furniture will always come in handy. After all, you can put any accessories that will always be at hand in it. The originality of the cabinet will give drawings with patterns. And to make the cabinet look more comfortable, put a flower plant in a pot on top of it.

Wrapping or painting a cabinet
Updating an old wardrobe and giving it a second life is very simple. The main thing is to choose the right material for gluing. Self-adhesive wallpaper will do.

Reference! Before pasting, you need to unscrew the handles of the cabinet for a while, then you will get a striking effect.
If you have chosen to paint the part, then choose a varnish or special paint to match the color of your apartment interior. The assortment in hardware stores has a wide selection for every color and taste.

Important! The style is given by two types of painting. Recommended for example in black and white, etc.
Shelf in the garage
Depending on the size of the old cabinet, you can make a shelf of any size in the garage with your own hands. Since there are almost always a lot of different tools scattered in the corners in the garage, a shelf is required for them. Assembly of the shelf takes less than an hour.

Sideboard
The sideboard is done in several stages:
- Make an ordinary rectangular nightstand and fasten a light back half from the cabinet to the back on both sides. And for more beauty, add a mirror with holders along the edges of the contour.
- In cabinet with inside attach two slats for shelves.

Floor stand for flowers
The stand can be made in any shape. The ideological version in the form of a square pyramid. Much more can fit on this stand. flower pots. Geometric shapes are the fashion trend of the 21st century. Originality without repetition. In the store, such a stand is unlikely to be found and purchased.

Important! The bottom square needs to be stronger and more stable because the main weight of the flower pots and pyramidal subsequent structures will push down.
Potato box
Most fast way to make such a box from an old cabinet is suitable for large volumes of potato storage. Just put the cabinet on the back wall, open the door and pour in the potatoes. If you need a much smaller size, then disassemble the old cabinet and assemble a regular box from the walls. To add beauty, you can design a cover for a lock or a latch.

Soft ottomans for the hallway
Remove the shelves and connect them together to make a square. Put foam rubber in size on the top and sheathe it with a cloth. The walls of the ottoman can be painted in any suitable color.

There comes a time when the furniture ceases to harmonize with the design of the room. The cupboard becomes a tasteless box, disturbs you. Tired furniture can be replaced or given a new style.
There are several simple techniques that allow you to update an old wardrobe with your own hands. We will tell you how to repair vintage furniture or create an original piece of furniture from it.
Wrapping or stickers
To make an outdated chiffonier fit into the updated design of the room, add ornate flower patterns. Unusual geometric ornament created with self-adhesive film will breathe into old-fashioned furniture new life.
They are:
- standard: matte or glossy surface with a variety of patterns and colors;
- furniture for the facade, with a touch of wood or metal.
Step-by-step instruction work with self-adhesive film:
- Prepare the façade: remove dust and stains with water and chemicals.
- Level the surface with plaster and primer.
- Mark the self-adhesive film from the inside in advance, not forgetting to take into account the allowances.
- Remove the protective layer from the inside by 2-4 centimeters.
- Stick sticky surface to cabinet
- Using a rag and spatula, smooth out the sticker.
- Carefully peel off the protective paper.

Beautiful pictures will create a positive atmosphere in the room.
Watch for bubbles. To avoid their occurrence, attach the sticker carefully, straightening the film.
On a note. If the bubbles that appear do not smooth out, pierce them with a needle.
Photo printing and photo wallpapers
The technique is suitable for the restoration of a kitchen cabinet or sideboard. Wall mural can be bought in the construction department or contact the printing house.
Print Centers will help:
- enlarge the image without losing the quality of the picture;
- make a collage of several photos or pictures;
- to apply the image on a film for gluing on a specific type of surface.
Toning
Decorate boring furniture can change the color of the facades. Instructions for tinting a wardrobe:
- Clean the surface of dust with a dry cloth.
- Also treat the inner walls with an antiseptic (vinegar will do). It will get rid of the musty smell.
- Use wood putty to eliminate defects. The color must match the details.
- After the composition dries, sand the treated areas with sandpaper.
- Coat the closet with a structuring wood stain. It should be darker than the color of the furniture.
The tinting technique is suitable for decorating a closet in the bathroom, in the kitchen or in the hallway.
Remember that this method is only suitable for natural wood surfaces.
Slate surface of doors
This decoration is becoming very popular. Slate doors are in vogue, on which you can write or draw.

Before and After - the transformation of an ancient chest of drawers
There are 3 ways:
- Sticking of a slate film to a door or a facade.
- Buying a finished board.
- Covering the door or inner wall with special paint.
Painting technique:
- Sand out bumps and scratches.
- Apply primer in two coats.
- Using a roller, treat the surface with slate or chalk paint.
- After drying, apply a second layer.
A cupboard or sideboard will shine in a new way.
Mosaic decoration
Decorating with various small details will help create an art deco atmosphere. Finishing base:
- pieces of colored glass;
- ceramics;
- shells;
- beads;
- sea pebbles;
- artificial flowers.
You can attach the elements to the cabinet with colorless rubber-based glue.

Expert opinion
Victoria Chernikova
Decorator
Before starting work, draw a sketch of the future composition. Arrange the elements on a flat surface to present a visual image. So the drawing will turn out neat.
Mosaic decor will add brightness and elegance to the interior. This design is suitable for any closet, if the style of the furniture matches the design of the room.
Aging
Cabinets painted with a dry brush will look elegant, which leaves behind only a part of the paint, creating the effect of the effect of time (only for wooden furniture).
Artificial aging method:
- Paint the surface a color that is a few shades darker than the original. Choose a shade according to color scheme rooms.
- Wax some areas. You can use a regular candle.
- Paint the closet a light shade such as cream or beige.
- Wipe the surface with sandpaper, so scuffs will appear.
An easy way to give an antique look to a cabinet is craquelure. The varnish of the same name is applied to the surface. After drying, small cracks appear on the facade paint.

Kitchen drawers are aged with craquelure
Decoupage
The peculiarity of this design is a smooth transition from the picture to the color of the cabinet.
Use patterned napkins as materials for decoupage, so you create the feeling of painting on furniture. The composition can turn out to be clear, with watercolor gaps.
For cabinetry:
- cut out the image or use the whole napkin;
- divide it into layers;
- paste the picture;
- cover the dried surface with varnish.
Decorative rivets
To add brutality to old furniture, you can attach to the closet metal parts. For lovers of loft design or steep punk, it is recommended to decorate the doors and the facade of the cabinet with rivets or nails with decorative hats. With such accents, even standard IKEA furniture will look like pirate chest with treasures or a cabin on a ship.

Glue the metal parts to the facades. If the surface is upholstered in leather or thick fabric, nails will be required to securely attach everything. Combine metal fittings with other decorating methods (paint or fabric) for a personal touch.
Inlay
This is not a finish. precious stones, and the design of furniture with overhead elements:
- vinyl napkins;
- embroidery;
- lace.

Have you decided to make repairs, change the interior, purchase furniture that will match the updated design? But it happens that it is a pity to throw away old furniture, because it is still quite strong, it can last a long time. Yes, and each piece of furniture keeps its memories, family traditions. It’s just that a hand will not rise to take such things to a landfill. But both in the landfill and in the sales markets, you can see furniture that could still serve and serve. Designers are looking for this “treasure”, they make real masterpieces.
But it happens that it is a pity to throw away old furniture, because it is still quite strong, it can last a long time.
You wanted to change the situation, to make original ideas into the interior, so that old furniture sparkles with new colors? You will bring your ideas to life, create magnificent things.

Yes, and each piece of furniture keeps its memories, family traditions.
The furniture of the old times had the main advantage - it was very strong, durable, it was made from natural wood. Using all your imagination, you yourself will decide how best to use certain parts from the headsets, what new purpose the table, chair, chest of drawers, etc. will have.

It’s just that a hand will not rise to take such things to a landfill.
You think it's hard to do. In fact, everything is not so difficult. Read the relevant literature, look on the Internet, talk with friends, acquaintances who are fond of this business. You will give things a unique look. There are many materials and ways in which you can remake furniture with your own hands. You can save a significant amount of money by restoring interior items than by purchasing new furniture.

Use a huge number of ideas, methods, how to reconstruct outdated furniture.
Before you begin, decide which restoration method to choose. Get the right ingredients. Remember, in this case diligence, endurance, a serious approach are needed. Maybe this will motivate you to start your own business. You will delight not only relatives, friends and acquaintances with amazing things, but also fulfill orders.

The furniture of the old times had the main advantage - it was very strong, durable, it was made from natural wood.
Living room, office
The most important room in the house is considered to be the living room. Actually, here we mostly spend time, relax, meet friends, gather with the whole family. If you decide to make repairs or change the interior, take the matter seriously. The environment should be comfortable, multifunctional. If desired, set aside a place for a study. At first glance, this seems to be impossible, because the rooms are small and it is difficult to allocate space for an office. If you work from home, you need nothing to distract from work, the conditions correspond to a fruitful, even atmosphere. Designers advise to fence off the work area.

You will give things a unique look.
To do this, use partitions. They can serve as shelving. In order not to spend significant amounts to purchase furniture for the workplace, use old interior items. You can reconstruct them:
- repaint;
- paste over with wallpaper or self-adhesive film;
- change accessories;
- decorate with various objects, attributes;
- arrange books, indoor flowers.

You can save a significant amount of money by restoring interior items than by purchasing new furniture.
So that the furniture does not take up much space, it can be converted into a transformer, made on wheels. It is compact, easy to move, fold and unfold. The converted furniture will perfectly match the overall atmosphere in the room.

You will delight not only relatives, friends and acquaintances with amazing things, but also fulfill orders.
In a small living room, it is important to save more space. Therefore, it is better to use a table-shelf for a study. It will be more suitable for the general environment. Revamp old furniture wall shelves, racks, bedside tables, where you will store everything you need for work.

Many houses have old chairs.
colorful chair
Many houses have old chairs. They are worn out, the upholstery has fallen into disrepair, do not rush to get rid of them. They can be restored, and they will last for a long time. By changing their texture, you will return the former beauty. Now there are many varieties for restoration, be smart.

Now there are many varieties for restoration, be smart.
The first step is to remove the old coating. If the seat is soft, then it is also removed. Then sandpaper, the grain size can be any, the surface is treated. How you sand will determine how far the other coating will go. The work will be a little easier if the surface is wetted. Usually, from such a procedure, the old coating turns out to be viscous. Let the chair dry and go over it again with fine grit sandpaper.
Thinking about varnishing a chair? It is better to use a colorless primer. You can’t do without it, even if you want to paint the chair. This allows the coating to last longer and apply better. The varnish must be applied in two layers. The first coat must dry before the second coat.

If the seat is soft, then it is also removed.
It has become popular to paint furniture in White color and the seat is draped in contrasting colors. Many options are provided.
- The chair will look unique if you use a stencil for decoration. Drawing can be the most diverse.
- Upholstery and foam are completely replaceable. Any fabric will do, fixed with a stapler.
- Another option is to make a cover. The coating will hide the flaws and disadvantages without major alteration.
- You can decorate the cover in different ways - to your taste and color.
- Needlewomen can knit or crochet the original upholstery.

Use obsolete things in a new way. Show your imagination full power.
Use obsolete things in a new way. Show your imagination to the fullest. Here are a few options where you can use old chairs.

Many craftsmen can make a bench, a bedside table, a photo frame, a planter, a hanging shelf, even a dog feeder.
Here, for example, is such a necessary item as a wall hanger. Making it is easy enough. It is necessary to separate the back from the chair, paint or decorate, attach hooks and hang it on the wall. Favorite rocking chair that everyone wants to have, but not many have. It is easy to make, just make semicircular crossbars and attach to a chair.
An unusual option is a crib for a pet. First you need to build a box with a mattress. The filler can be foam rubber. The back of the chair will serve as the headboard, and the legs will serve as the base. From them it will turn out to assemble a wonderful box for magazines and newspapers.

Have you decided to make repairs, change the interior, purchase furniture that will match the updated design?
Do you like rustic furnishings? Towel holders fit perfectly here. They are made from the backs of chairs, they are made quite simply, they will look stylish in the kitchen or in the bathroom.

Designers are looking for this “treasure”, they make real masterpieces.
If the frame is strong, and the legs have become unusable, then the chair can become, to the delight of the kids, a swing. First, the furniture must be carefully processed - sanded, coated with an antifungal solution, painted.

Use a huge number of ideas, methods, how to reconstruct outdated furniture.
Many craftsmen can make a bench, bedside table, photo frame, planter, hanging shelf, even a dog feeder. From the chair you can get an unusual table for storing various accessories.

The furniture of the old times had the main advantage - it was very strong, durable, it was made from natural wood.
light buffet
Before, almost everyone had a buffet. Many have kept it, not wanting to throw out the outdated thing. It adds a certain charm to the atmosphere. The restored sideboard is placed in any room. The main thing is that it matches the interior. Before starting work on the alteration of old furniture, it is necessary to assess its condition and eliminate flaws. Then we clean it - remove the old coating with sandpaper or a tool designed for this, grind and paint. It is important not to forget that before any painting the surface must be primed.
Now light colors are in fashion, but you can give the furniture a bright shade or paint it in a neutral color, apply a pattern, paste over with wallpaper, gift paper, film. Use new hardware. If you like to draw, put some image on the doors. Not enough patience, stick stickers, and cover the surface with a transparent varnish. If the sideboard is wooden, it is better to use varnish for painting. You will get a unique thing, it will last a long time.

Before starting work on the alteration of old furniture, it is necessary to assess its condition and eliminate flaws.
How to update an old nightstand
A Soviet-era bedside table is a valuable thing. It is so strong, it can last more than one year. But her appearance leaves much to be desired. From such a thing you can create a newfangled object.

If you like to draw, put some image on the doors.
You will need the following materials:
- self-adhesive film;
- putty;
- acetone;
- dye.

You will get a unique thing, it will last a long time.
We look for defects, cracks, and other flaws on the nightstand. We wipe dust, remove pollution. We dismantle parts, process with sandpaper. Putty the damaged areas, let dry, sand the surface again. Be sure to degrease with acetone. The next step is film wrapping. We prepare a piece of the required size, plus 3-4 cm. We apply it to the plane, detach the substrate from above and carefully glue it. So we glue the entire surface of the bedside table. Next, we repair the decoration elements, attach them to the furniture, change the fittings, and assemble the parts.

Instead of a film, you can use wallpaper, gift paper, or just paint.
Features of reworking the wall
We all remember the old Soviet walls that stood in the houses of our grandmothers and mothers. Furniture, unfortunately, dilapidated, there were chips, scratches, cracks. Nowadays, these walls can still be seen in apartments. If they are strong, but outwardly worn out, it is better to remake them in a modern way.

There are many options for reworking furniture with your own hands.
Here are a few options.
- Pantry. Remove everything that is superfluous, the most necessary will remain. Move the shelves to another place or add a few new ones. Arrange boxes for shoes, containers for linen, change the facade.
- Wardrobe. We remove the doors, install additional shelves and crossbars for clothes. It's great if the wall is elongated. Then we change all the doors on the compartment door from floor to ceiling, this will help to hide the gaps.
- Or we divide the wall into parts and install it in other rooms. For example, mezzanines - in the corridor or hallway, a wardrobe - in the bedroom or in the nursery, and a sideboard will make a wonderful library.
- You don’t want any changes, but the wall needs to be updated, you need to completely disassemble it, removing fasteners and accessories. We clean, remove the old coating. Using the necessary pastes and a primer, we close up cracks, chips, scratches. All dry and sanded. Not satisfied with the color of the wall, repaint, then cover with a matte varnish. After drying, we collect the wall, change the handles, hinges. If you want, put modern doors.

Keep it up and everything will work out!
Turn on your imagination, and your wall will turn into trendy furniture, update the interior of the room.
How can you recycle other items
You can update any old furniture. She's made from quality wood will always be in demand. After carrying out the necessary alteration procedures, you will have real works of art in your house. After cleaning, processing, painting, decorating, an old chest of drawers will turn out to be an elegant thing. You can make a sofa out of it, convert it into a table for a mirror. Convert the lower part of the chest of drawers into a place for pets.

It is made of high quality wood and will always be in demand.
From coffee table you get a wonderful ottoman, a children's changing table will serve as a unique stand in the country. An old armchair can be repainted, upholstered, an original table will come out of a dilapidated door, a cozy bench with shelves will come out of a table for dishes.

You can update any old furniture.
There are many options for reworking furniture with your own hands. All you need is desire, patience, imagination, ingenuity, and with your own hands you will create special things not only for yourself, but also for relatives, friends, and acquaintances. Keep it up and everything will work out!
VIDEO: Second life for old furniture


The legacy of the Atlantean civilization
What is the dream of the red stone
Dream interpretation of the royal family. The king dreamed. Old Russian dream book
What to do to increase hemoglobin during pregnancy: products, pills, general recommendations Products to increase hemoglobin in pregnant women
The concept of negativism: symptoms and features of manifestation in children and adults