Rice. #4
Mounting wedges are installed under all vertical elements of the window box - these are vertical trims and vertical imposts. Distance (side) pads are installed at a distance of about 200 - 250 mm from the corners of the window frame, the dimensions of the side pads are selected similarly to the dimensions of the lower support pads. The installation of spacer blocks in the very corners of the window frame is unacceptable, since the blocks will prevent thermal deformation of the window during seasonal and daily changes in air temperature and the window itself.
10. Positioning the window block box vertically and horizontally, temporarily fixing it in the required position
Box window construction, together with the tapes glued to it, is placed in the opening and, using plastic wedges, is aligned vertically and horizontally and pre-fixed.
11. Final fixation of the window frame in the opening
Holes for fasteners are drilled in the wall. The frame of the window structure is finally fixed with fasteners to the wall. When installing the fasteners, make sure that the box is not stretched by the fasteners!
12. Bonding tapes at the bottom of the window structure
Carefully remove the dust generated when drilling holes in the wall. Prime those areas of the opening surfaces to which the tapes will be glued. Wait for the primer to dry. A vapor barrier tape "ROBIBAND VM V 100" is glued to the bottom surface of the opening. When gluing, the tape should be directed towards the room. The length of the tape segment should be sufficient to cover the lower horizontal assembly seam along the entire length, taking into account the formation of laps or edges at the corners for reliable sealing of the corners. Tape "ROBIBAND NL 120" is glued with a narrow adhesive strip on the outer plane of the stand profile or the outer plane of the fold intended for installing the ebb. When gluing, the tape should be directed towards the street. The length of the tape segment should be sufficient to cover the lower horizontal gap along the entire length, taking into account the formation of laps or edges at the corners for reliable sealing of the corners.
13. Filling the mounting joints with polyurethane foam insulation
A cylinder of polyurethane insulation (PPU) is prepared for work in accordance with the instructions for the use of a specific foam. It is recommended to use PPU with high initial and low secondary expansion. Before filling the assembly gap with PPU, it is necessary to moisten the surfaces of the assembly gap with water by spraying. Do not dampen the parts of the surfaces to which the tape will be applied, as nothing will stick to a wet surface! After moistening, mounting gaps are filled with PPU. The degree of gap filling depends on the degree of expansion of a particular PPU. Test releases are recommended. The amount of mounting foam in the seam should be sufficient so that the PPU stretches the tape when it expands, but does not tear it off.
Before sticking tapes on wet foam, re-moisten the surface of the foam, otherwise large voids may form in the foam!
14. Bonding "ROBIBAND VM" tapes to the opening
The protective paper is gradually removed from the adhesive strip of the ROBIBAND VM 120 vapor barrier tape, glued to the vertical and upper horizontal sections of the window frame, and the tape is glued to the surface of the window opening. Make sure that the mounting foam does not get between the tape and the surface of the opening when gluing. The protective paper is removed from the ROBIBAND VM 100 vapor barrier tape located in the lower part of the opening, and the tape is glued to the front plane of the support profile or to the front plane of the fold intended for installing the window sill. In the corners of the opening, rims (sides) are formed to reliably protect the joint. The protective paper is removed from the ROBIBAND NL 120 tape, and the tape is glued to the bottom of the window opening. In the corners of the opening, rims (sides) are formed to reliably protect the joint.
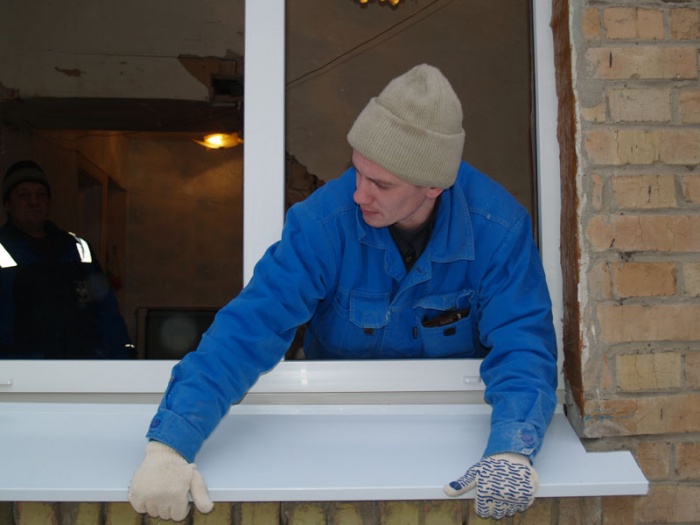
15. Installation of low tide and window sill
An ebb and a window sill are installed on the window block. All operations must be carried out carefully, in order to avoid displacement of the box of the window structure.
16. Hanging the sashes and installing fixed glazing
The sashes are hung, and blind glazing is installed. The shutters are closed. All operations must be carried out very carefully, in order to avoid displacement of the box of the window structure.
17. Quality control
Quality control is carried out after 24 hours. Quality control consists in checking the density of gluing the tapes around the entire perimeter of the assembly joint, both from the side of the room and from the side of the street. If the tape is glued tightly, without delaminations and gaps, then we can assume that the installation was done with high quality.
The PSUL tape should expand and completely cover the gap.
18. Finishing slopes
Finishing of slopes is carried out in accordance with the accepted constructive and design decision.
Need more information?
You can watch on our website a training film on the installation of window structures, which shows the entire process of high-quality installation of a window unit.
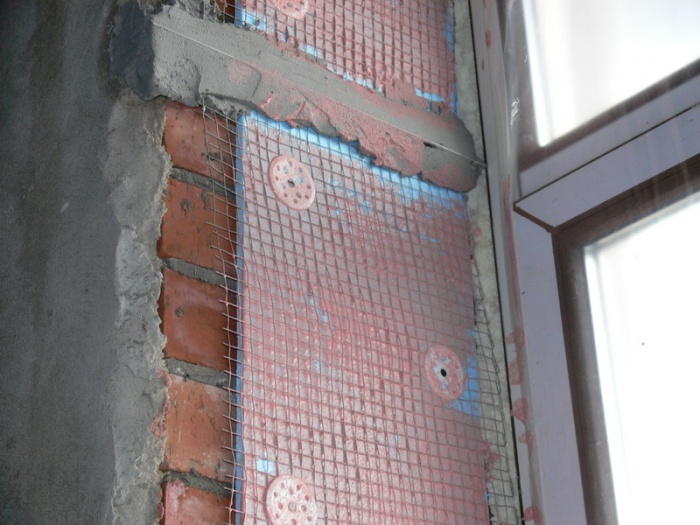
Thus, the insulation must be somehow protected from the penetration of direct moisture or water vapor into it, and for moisture that has nevertheless got into the insulation, it must be possible to evaporate outwards so that the installation seam does not threaten any of the described problems. For this, special vapor barrier and waterproof vapor-permeable materials have been created, which we produce. The first ones are installed from inside the room and prevent the penetration of moisture contained in the room air into the installation seam, that is, to the insulation. The second is installed outside. These materials protect the insulation from the penetration of direct moisture (water) from the street. And also, which is very important, being vapor-permeable, they ventilate inner part mounting seam, allowing it to breathe. Thus, condensed water is removed from the seam, or water vapor that got there from inside the wall - (from its condensate plane). Stagnant processes inside the insulation are eliminated, figuratively speaking, it "breathes out". This mechanism of action special materials to protect the main element of the assembly seam - insulation from the harmful effects of moisture.
However, moisture is not all that the insulation and the entire assembly seam can suffer from. Let us dwell on two factors that have the most critical effect after humidity.
In second place is ultraviolet solar radiation. This radiation destroys the insulation (polyurethane foam, used in almost 100% of window installations) in a very short period of time. So, in the southern regions of Russia, the process of almost complete destruction of mounting foam can occur in a couple of months. V middle lane it will take a year - one and a half, depending on the direction of the world, where the window structure is facing.
Conclusion - the insulation must be protected from the harmful effects of ultraviolet radiation. The task is successfully solved by the same vapor-permeable waterproofing tape, which protects the insulation from direct exposure to water from the street.
In third place is the linear expansion (movement) of the window structure due to temperature fluctuations (thermal expansion). And such shifts are significant and can reach from 5 to 10, and in some cases even 15 percent of the width of the assembly seam itself! At the same time, the insulation does not suffer, since it is well resistant to deformation loads and, in addition, is glued to the wall and window frame. It is clear that the means of its protection must also be resistant to such colossal deformations.
Imagine if you apply plaster mortar or hard sealant - at what point will it collapse, or come off from the smooth plane of the plastic window frame? (GOST allows the use of certain types of acrylic sealants to protect the outer contour. These must be elastic (not completely drying), vapor-permeable materials with good adhesive abilities). Here again, the same vapor-permeable waterproofing tape successfully solves the problem, since it is not afraid of shifts of 15 or even 30 percent.
Plastic windows increasingly installed by owners country houses because they have many advantages over wooden products. Also, they are reasonably priced. But before you install, you need to carefully prepare for such work. To do everything yourself, you need to know the features of performing all operations.
All plastic products are completed with parts for installation, so with proper preparation, you can install a window without outside help. It is necessary to perform all actions very carefully so as not to damage the structure. In order to fix the windows in the opening more accurately, it is worth working with an assistant. In some cases, before carrying out work, it is necessary to strengthen the opening.

Materials required for work
Before starting the installation, you need to prepare the following materials:
- wedges inserted for correct location windows;
- mounting foam;
- sealant;
- hydrovapor barrier material necessary to protect the joints from moisture;
- anchor bolts.
Wedges are used during the installation process for more precise installation plastic profile. Without these materials, it is much more difficult to follow. Mounting foam is an insulating material that fills the space between the wall and the frame. When choosing a foam, it must be borne in mind that it must correspond to the temperature at which the work will be carried out. If you purchase material intended for use in summer time, its use in winter can lead to the creation of a poor-quality insulating layer.

Also during the work you will need a self-expanding sealing tape. This material is glued around the perimeter of the window from the outside, after which it expands. Sealant is used to fill the space between the slopes and the window sill.
How to determine the correct position of the plastic window
Before carrying out installation work, it is important to correctly determine the position of the frame in relation to the wall thickness. The plastic window should go inside about a third from the street side. This rule is not mandatory, but when shifting the window in any direction relative to the specified distance, it should be borne in mind that the length of the ebbs and window sills must correspond to the project.
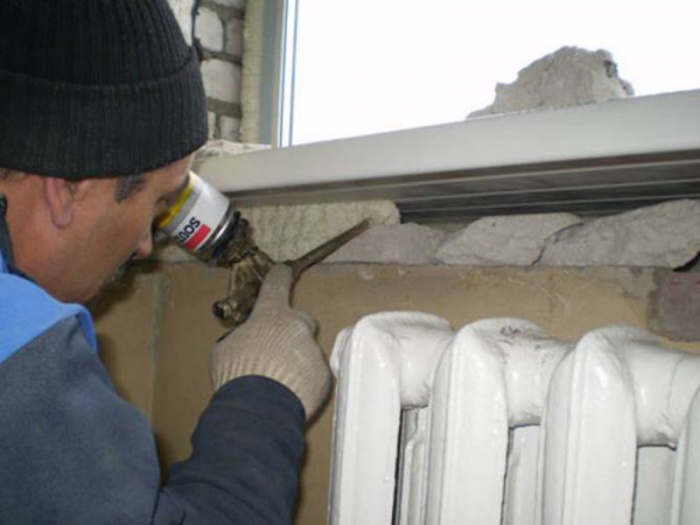
It is important to consider the size of the radiator and its position. The window sill should not overlap it by more than ½ of the width. If the radiator is completely shut off, this may adversely affect the room temperature in winter time, as well as on the window state. If installed incorrectly, plastic windows usually begin to fog up.
The length of the window sill should be approximately 15 cm longer than the window opening. Thanks to this, it is possible to process the edges of the window sill during the finishing of the slopes. Side plugs are included with the window sill, which should also be fixed after installing the window.
Methods for fixing plastic windows
The choice of a particular fixing method depends on parameters such as the size of the window opening and the material of the walls. This should also be taken into account when choosing fasteners for a plastic structure.
Fixing plastic windows can be done in several ways:
- With dowels or anchor bolts. They are fixed in pre-created holes in the wall.
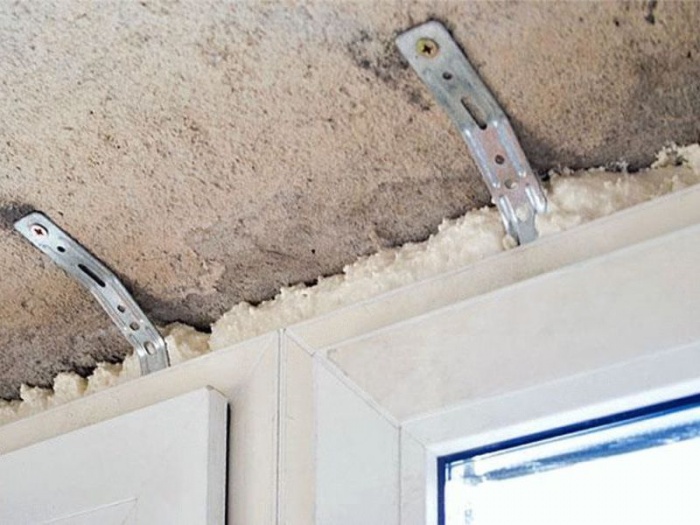
- Serrated plates that are outside the window profile. They are mounted on a spacer and fixed with self-tapping screws.
The first described method is considered more reliable. That is why with the help of dowels, plastic structures that are large in size are fixed. The fastener passing through the window block is more reliable and able to withstand impacts.
If you decide to install a plastic window that has small size, they can be fixed when using anchor plates. These fasteners can be hidden by slopes and finishing materials. But before carrying out the work, small recesses should be prepared for them. This will avoid plane alignment problems.
It is worth noting that when installing plastic windows, professionals combine these methods. In this case, anchor bolts are used to secure the base of the profile and its vertical parts. The upper part is fixed with plates.
Basic rules for installing plastic windows
To properly install windows, you should follow a few basic rules:
- Installation of plastic double-glazed windows should be carried out using polyurethane foam. This material allows you to give the structure additional rigidity. It also acts as a fixative and heat insulator.
- To protect the space between the window and the wall, it is necessary to fix a waterproofing material on the outside, and a vapor barrier on the inside.
- Windows can be installed at any time of the year. Many professionals recommend that work be carried out in the winter, as this will allow you to immediately see if mistakes have been made.
- Before purchasing foam, you must carefully study the features of the composition. These materials differ in several ways. One of them is the solidification temperature. The instructions on the bottle indicate the most favorable conditions for using the foam. If they are ignored, the material may begin to break down during the operation of the building.
- During the foaming of the gaps between the plastic windows and the walls, it is necessary to fill in small portions. This allows you to use less foam.
- If the opening crumbles, it is necessary to clean the surface of old materials and reinforce it.
By following the rules described, you can install windows with your own hands without making the mistakes that people who do not have experience in such work make. The technology for installing plastic windows in a brick house is quite simple, but it is important to carefully follow each step so as not to make a mistake.
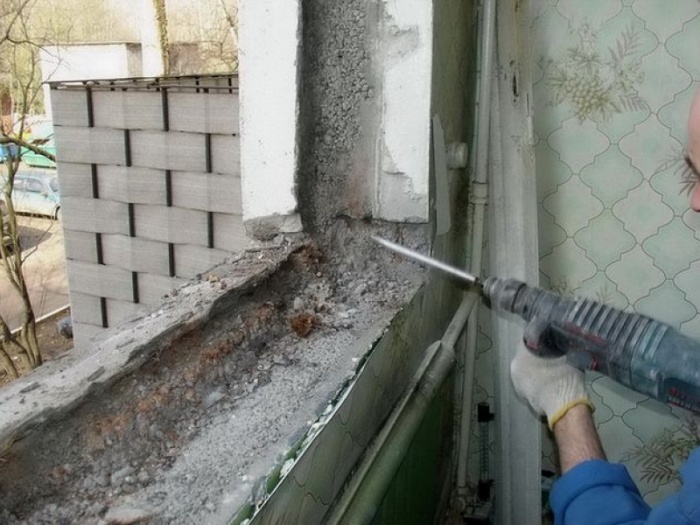
How is the preparation of the opening
Before performing work on the installation of windows, it is necessary to thoroughly clean the opening from dirt and dust. It is important to remove all paint residue and building materials. Before installation, it is also important to compare the dimensions of the opening and plastic frame. If the gap is more than 4 cm, it is necessary to use not only foam. This is due to the fact that when using it, it will not be possible to create an even and high-quality seam. In addition, a lot of foam will go away.
Before installation, it is necessary to remove the sashes from the frame. To do this, just pull the pin out of the loops. If it is necessary to remove the double-glazed window from the frame, the glazing beads holding the glass are removed. These steps must be performed very carefully so as not to scratch the glass.
After removing the sash and double-glazed windows, place them on a soft pad and lean against the wall so that they are in a stable position. Double-glazed windows are not laid flat, as this can lead to scratches on the glass surface.
This is followed by deletion protective film and marking the places where the fasteners will be located. The distance between them should be about 40 cm. It is important to consider that the indents from the corners should be more than 15 cm.
Installation process
After carrying out the described actions, insert into the window opening into brick wall spacers to create the necessary clearance. Frame alignment should be done with building level. It is also important to control the side clearances.
In the openings of brick houses, it is necessary to mark the installation sites of anchors. After that, holes are created in the walls. If fixing is done with anchor plates, it is necessary to bend them in such a way that they lie well on the wall.
The next step is to install the frame. It is important to check the horizontal and vertical structure of the structure before. How will it be finalized? After that, the bolts are finally tightened until the cap protrudes above the surface by no more than 1 mm.
After all the described work, the installation of sashes and double-glazed windows is carried out, as well as the functionality of the entire structure is checked. If you installed the products with your own hands for the first time, you should carefully inspect the opening and make sure that no mistakes were made during the work.
Slope installation
Before installing external slopes, it is necessary to measure the width and length of the opening. Cutting plastic slopes is done using a circular saw.
Important! It is necessary to fix the slopes only on clean and leveled surfaces.
At the first stage, the upper horizontal part is fixed. It needs to be drowned as deep as possible, and the space must be filled mounting foam. Worth remembering. That it should not be released too much, since when hardened, the material can change the shape of plastic products.
After that, the installation of vertical slopes takes place. During these works, it is important to check the verticality of the elements. In the same way, the installation of the lower slope occurs. It is important to ensure that all elements are properly docked, and there are no gaps between them. The corners between the plastic slopes are closed with a special detail.
The installation of internal slopes should be carried out only after careful preparation of the surface. If the opening crumbles, it is better to clean it up to the main wall and only after that carry out further work. After that, the opening is leveled and filled with insulation. If necessary, strengthen the window opening.
Reading 7 min.
More recently, in glazing residential buildings and industrial buildings, exclusively wooden window frames were used. Today, many consider them relics of the past and are in a hurry to replace them with modern metal-plastic structures. After all, in addition to high performance characteristics they are much cheaper wooden frames. To install plastic windows with your own hands, you do not need to have superpowers. Almost anyone who can hold a tool in their hands will cope with such a task.
However, do not forget that each job requires certain skills and craftsmanship. Lack of experience in installing windows can lead to a number of troubles. These are systematic breakdowns, loose fit and high throughput of street air into the apartment.
To avoid the above points, in this article we present step by step instructions, which will help you install your windows correctly and efficiently. If you still decide to trust the professionals, be aware that some of them are not really like that, and for a number of reasons they frankly neglect the individual stages of proper installation (some save time, others save money). Having an idea about the ongoing work, you can easily exercise independent control over the entire process. And later you will enjoy the high-quality operation of your windows, which will bring joy to all family members.
The main steps for installing new windows:
- taking measurements;
- dismantling of old windows;
- preparation of openings;
- assembly of a metal-plastic structure.
Not everyone knows that the manufacturer does not give absolutely no guarantee for their services in case of installing windows on their own. Therefore, if various troubles arise during the installation process, you should not rely on a refund or replacement. All metal-plastic structures are made strictly according to predetermined dimensions. In the event of your mistake, the window may not fit in the opening or it may turn out to be much smaller. And it will only be your fault. The employees of the company are solely responsible for the implementation of each of the stages of installation of the product.
Also, any inaccuracy made when installing a metal-plastic window will deprive you and your loved ones of all the advantages modern design and expected level of comfort.
window measurements
When performing the necessary measurements, you need to pay attention to the fact that window openings exist with and without a quarter. Accordingly, they have different formulas for calculating sizes. 
For the first case, we must measure the width of the opening between the existing quarters, this is done at the narrowest point. And then add 3-4 cm to the figures obtained - this will be the width of our plastic frame. In addition, it is important to check that the largest distance between vertical quarters should not exceed the calculated block width.
Read also: "Karcher" for washing windows: features of use and benefits

The height is determined by measuring between the top quarter and the bottom surface of the window opening.
If the window opening is without a quarter, the desired values \u200b\u200bcan be obtained by subtracting 5 cm from the vertical size (to put the window sill) and 3 cm from the horizontal.

When determining the size of the window sill and low tide, it is worth considering the following details:
- Often the size of the window sill is chosen based on its functionality. It should cover the radiators and indoor flowers should be placed on it;
- The window sill is taken along the length of the window opening exceeding 8-10 cm, its edges should be drowned in the slope cavity by approximately 4-5 cm;
- The dimensions of the ebb are calculated taking into account the planned insulation. It is recommended to leave it protruding 5-10 cm from the wall.
Features of measuring balcony windows
When calculating the width of balcony windows, the length of the parapet is taken as the basis, it is on it that the entire structure will lean. Also, on both sides, it is necessary to subtract 6-7 cm, which will be needed for mounting the corner profile, with the help of which they are connected window blocks front and side parts. The distance from the roof to the railing, with the exception of a difference of 2.5-3 cm, which is important to set aside for fastening gaps, will be the height.
Regarding the side balcony frames, their dimensions are determined in the same way. The only thing is that you need to subtract 6-7 cm from the width for mounting the corner profile, as well as 2.5-3 cm for the gap from the wall to the window.

Features of measuring windows in private houses and buildings of the old fund
When measuring windows in private houses and buildings of the old fund, it is recommended to first beat off part of the slopes on both sides (in the measurement areas). This is done in order to see what the space occupied by the window opening is like. It often happens that there are dilapidated cement mortar and various heaters that can crumble in the process of disassembling an existing window. positive moment here is what's new plastic construction it will be possible to slightly increase due to the expansion of the cleared window opening. 
Ordering a metal-plastic window
Before contacting a company with an order, you should think about what type of double-glazed window is right for you. It can be one-, two- or three-chamber. As for fittings and fasteners, you can also choose them yourself.
WITH technical specifications plastic windows that will be preferable for your home, consultants of the manufacturer's company will help you figure it out already at the time of ordering.
Some important points during installation
When installing windows on your own, you should pay attention to the following:
- metal-plastic construction must be well fixed;
- the mounting foam, which fixed the windows, must be plastered on both sides (this will prevent its subsidence and deformation of the frame in the future);
- it is very important to set the structure vertically and horizontally using a level (this will help to avoid warping).
How to install metal-plastic windows with your own hands
Before starting the installation, prepare everything you need for work:
- Window frame with fasteners;
- Building level;
- Mounting foam;
- mount;
- Bulgarian;
- Windowsill.
The process of preparing the window block
Window preparation is an important step installation work that you do with your own hands. If necessary, the double-glazed windows themselves and swing sashes are dismantled from the window structure. To release the double-glazed window, a chisel is used, it is very carefully necessary to pick up the glazing bead (fastening) and after a light blow on the tool it will come out of the grooves. Then the vertical fasteners are removed, top and bottom. The released glazing beads will need to be marked, sometimes their sizes can differ significantly, which will lead to the formation of gaps of several millimeters. The double-glazed window will come out of the grooves on its own if you tilt the frame a little. Gently lean it against the wall, creating a slight angle.


Chicken in kefir - recipes for marinated, stewed and baked poultry for every taste!
Simple Chicken Recipe in English (Fried) Recipes in English with translation
Chicken hearts with potatoes: cooking recipes How to cook delicious chicken hearts with potatoes
Recipes for dough and fillings for jellied pies with mushrooms
Stuffed eggplant with chicken and mushrooms baked in the oven with cheese crust Cooking eggplant stuffed with chicken