In order for the product to be perfect, it is enough to have high-quality stencils for woodcarving! In this article you can find out all the information on how to use them and how to find them. Woodcarving is an ancient art. Mastery passed from generation to generation, with evolution gained momentum, improved. Now there are enough materials for working with wood, blanks. You just need to have a little patience, craving for learning and mood!
We select a template
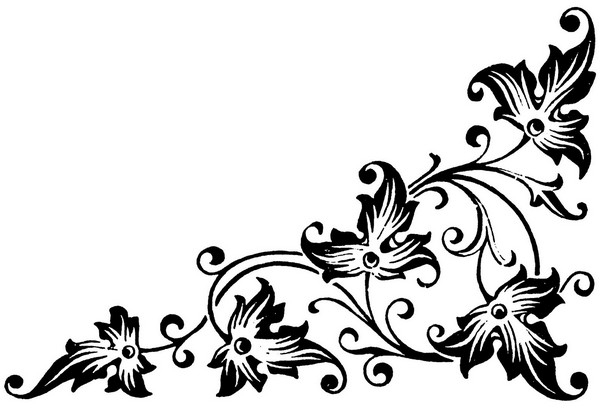
First you need to decide on the choice of pattern. A stencil helps to apply characters or a pattern to a surface. They are suitable for decorating external walls, creating a new interior in the house.
Let's look at what stencils are for:
1) For carved ornament;
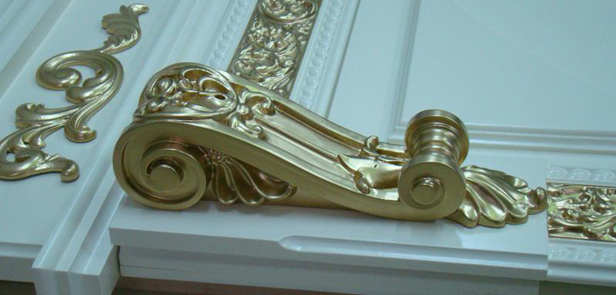
2) For pilasters;
3) For towels;
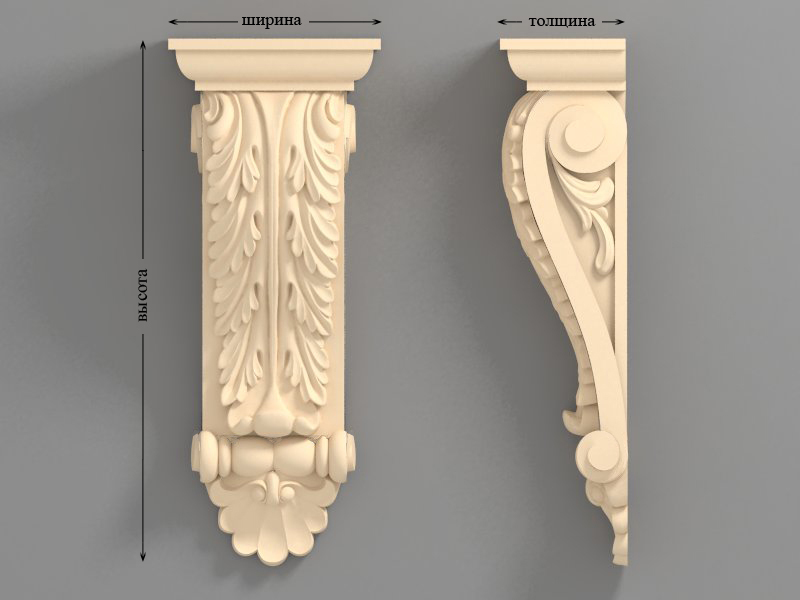
4) For brackets, etc.
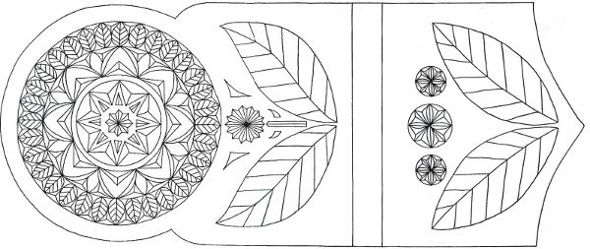
Examples can be seen below:
Thanks to these templates, you can create a three-dimensional ornament. They will help create a beautiful product. A stencil will completely facilitate the task, because you don’t need to invent something new, draw, spend a lot of time making a template. It is enough to find a wonderful option on the Internet and that's it - the masterpiece is ready for execution.
Working process
Before starting work, decide what exactly you will do. Enough ornaments have been created, so it will be easy to find patterns.
1) For beginners, you can find various sketches, but most craftsmen post schemes for an average skill level on websites. To create such products you need to have experience and skills.
2) If you did not find the template of interest, then you can draw it yourself. Use thick cardboard. Sketch, draw lines. Keep the proportions right! To work, use a ruler, compasses and tracing paper so that every detail is traced and drawn.
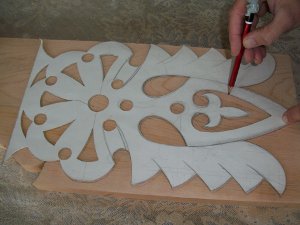
3) When the template is ready, then apply it to the workpiece and carefully draw around the contour.
4) There are 2 more convenient methods of work:
- If you transfer geometric shapes, then use the puncturing technique. This will make the job easier. It is enough just to fix the sketch on the workpiece, and then outline everything with a needle or awl desired points. Connect the marks on the wood with straight lines so that the product has exact proportions.
- Copy paper is ideal for the product. Place it under the sketch, circle the lines in the drawing. Thus, the image is transferred to the workpiece.
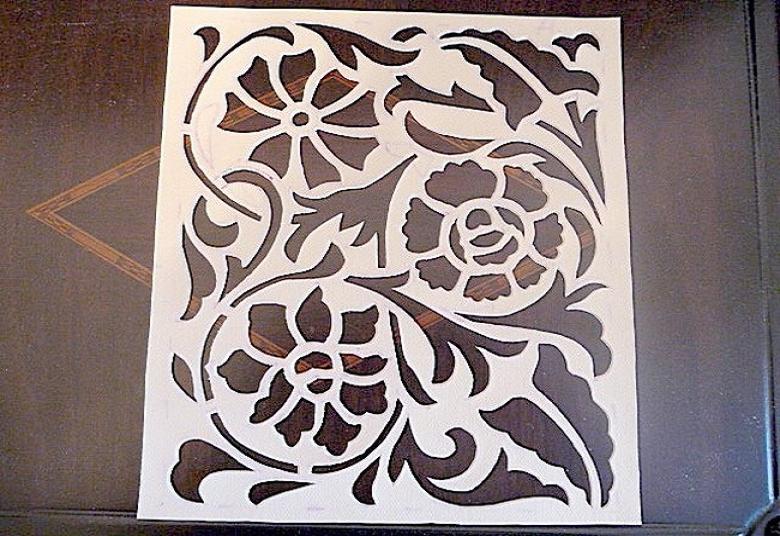
We offer a look at the photo, where there are examples of templates:
Methods and ways
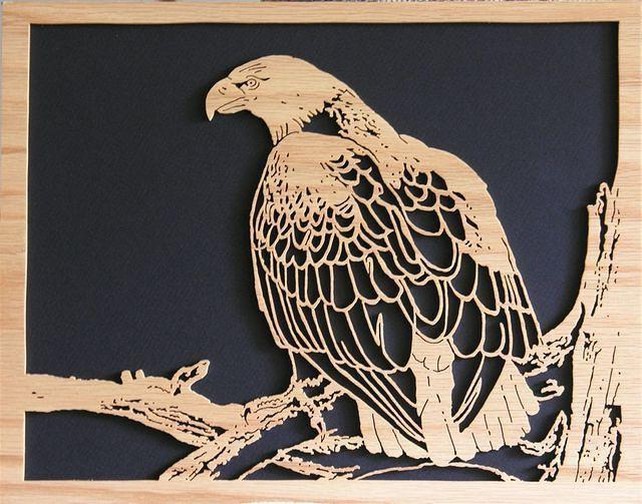
There are several types of woodcarving. Difficult, but exciting, will always be slotted carving. Traditionally, such a thread is also called through or openwork, because it is very similar to lace. The peculiarity of this carving is to remove the background part of the picture. It is carried out by sawing through workpieces of small thickness. slotted thread Suitable for almost all kinds of products. It turns out an original and aesthetic look that masters like to use. The widespread use of carving is reflected in decorations, cornices, picture frames, etc.
Stencils for slotted threads are easy to find. How to work with them is indicated above.
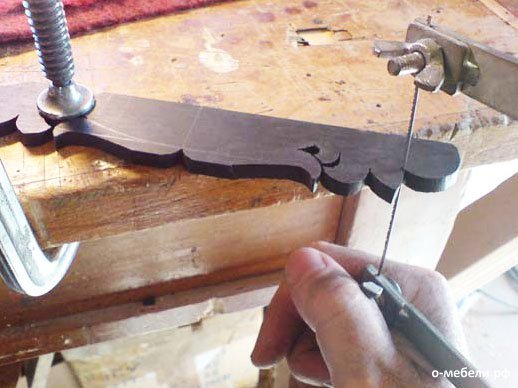
Carving tools may vary. Suitable for slotted thread different types chisel, knife and jigsaws. By the way, the masters believe that the jigsaw is a substitute for many electronic machines and knives that are necessary for the product. In their opinion, it performs patterns no worse than more professional tools. Via a simple tool, jigsaw, you can easily surround yourself with beautiful things. There are millions of pattern options. A jigsaw can work wonders.
Stencils can be made from any material. Whether it's plywood, paper - a plus in repeated use. One has only to number the sheets so as not to lose them! Such templates will often help in creating the interior of a house or room. Recently, wood products have been gaining momentum, but isn’t it great to make something with your own hands?
Housing
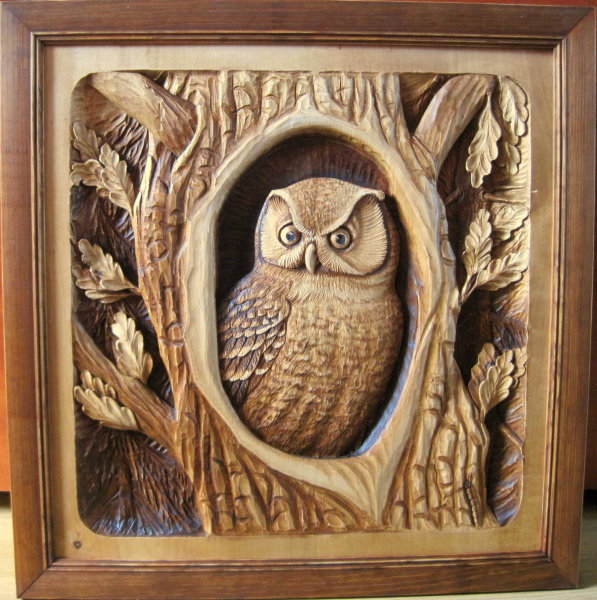
In ancient Russia, decorating the architraves of your house with carvings is a sign of well-being, wealth and grooming. Each house looked like a picture. Ornate patterns attract attention and fascinate. But who said that now it is not beautiful or fashionable? In our time, old traditions are returning, so information about woodcarving for suitable at home for each. What is most common in homes? Animals, sculptures of people and carved household appliances.
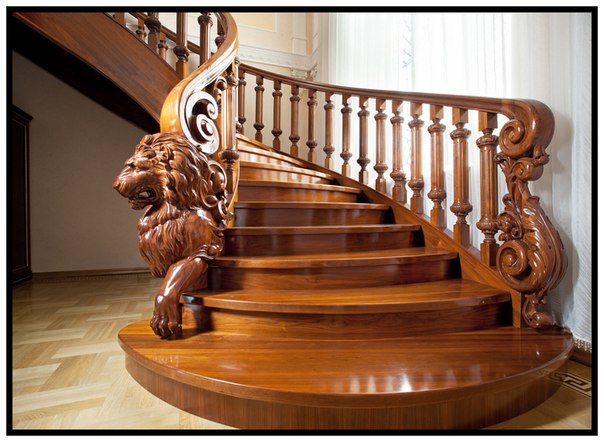
The carving is chosen for the decoration of private houses, cottages and arbors. Such house carving suitable for exterior design - platbands on doors, windows. Animal images are suitable for houses, ideally looking in the form of sculptures, paintings, etc.
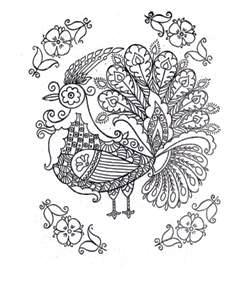
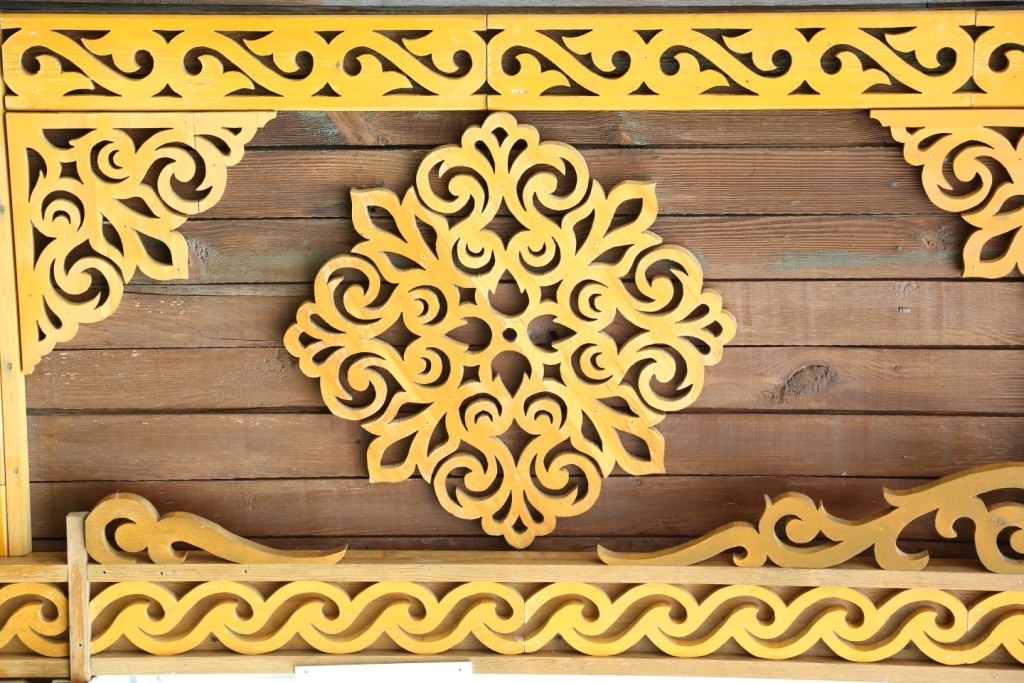
Some drawings for inspiration:

Such complex work is performed by a milling cutter. This is a processing tool. They perform heavy complex and creative work. It is used to drill holes, process edges wooden product. But all work begins with stencils. After all, there are always tools, and finding or making a quality template is a difficult task.
Masters say that mastery comes with practice. If it doesn't work the first time, then you need to keep practicing. Then you can achieve the following results:

Video on the topic of the article
The ancient art of woodcarving has always been considered a fascinating pastime, with the help of carved decorations, towers and huts of unique beauty were erected, most of which are still classified as architectural monuments. Wood carving, or wood carving, is becoming a popular craft, used to make large and small masterpieces. Beginning craftsmen are helped to create masterpieces by ready-made stencils for wood carving - special templates for creating three-dimensional ornaments and patterns.
The ancient art of wood carving has always been considered a fascinating pastime.
Stencils for woodwork are used to transfer ready-made identical patterns to a three-dimensional plane. Most often, such work is done to decorate walls and window casings, which is why sketches for working with wooden surfaces are considered the most common.
Carved patterns made using a stencil are divided by craftsmen into several types:
- ribbon carved ornament;
- carved platbands;
- carved balusters;
- pilaster;
- towels
- brackets.
According to such ready-made templates, even a novice master can compose and independently create a unique drawing and a real masterpiece of carved art. With the help of a ready-made stencil, you can easily decorate any wood product. artistic cutting And openwork drawings, as a rule, will come in handy when decorating:
- pieces of furniture;
- dishes;
- frames for paintings or photographs;
- caskets.
In the event that the master wants to convey certain national motifs or features of the subject in his work, you should first study the subtleties and nuances of ornaments and patterns.
How to learn woodcarving (video)
Sketches for patterns: instructions
For those craftsmen who have recently picked up tools, experienced craftsmen recommend considering the following nuances when preparing for work:
- the engraving template should be as simple and understandable as possible, without complex and ornate elements;
- for each type of thread there are templates for work;
- lines from the existing template to the material for work are transferred as accurately as possible, since this is the only way to achieve accuracy in work.
 Do not start work without first creating a sketch
 When choosing a drawing for its subsequent transfer to the material, it is worth considering a number of subtleties that will help to make the product professionally and skillfully.
- For a large product, you should not choose an openwork ornament or a pattern with small details. Such a pattern will be lost on the finished item and will not make it unique.
- Small things are not decorated with patterns with large elements and ornamental details, so as not to hide the shape and uniqueness of the product.
- The proportions when transferring details to fragments of the product should be observed to the finest so as not to violate the integrity of the finished ornament.
You should not start work without first creating a sketch, which you can make yourself or download ready-made photos from the Internet.
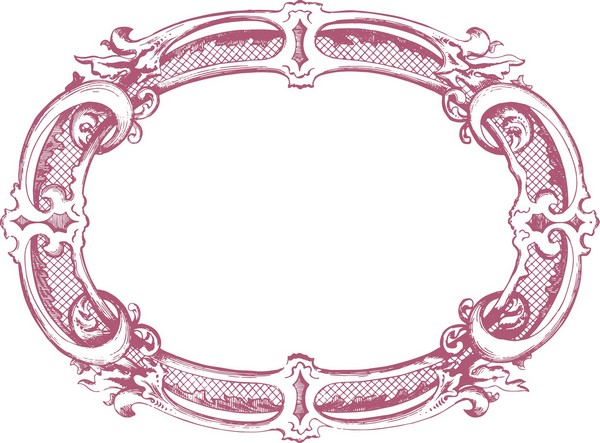
Carved mirror frames: an interesting idea
Art Nouveau interior lovers will love carved frames framing pictures or mirrors.
Such interior items not only look rich and unique, but add a special “zest” to the interior of the room. For cutting frames for a mirror, experts recommend using several basic styles for work.
- The double baroque style contains two contours inside and outside, represented by openwork curls. The craftsmen included a feather profile in this style, it reflects some lightness and elegance of a rectangular piece.
- For mirrors, the feather profile with a back is ideal, providing a dense back, where the mirror is attached.
- The refined profile also has the style of a dumbbell, despite the somewhat massive frame. It is these frames that hold a heavy and massive mirror well.
 Art Nouveau interior lovers will love the carved frames framing paintings or mirrors.
 For the manufacture of mirror frames, special decoration methods are also used:
- gilding with preliminary polishing;
- varnishing with a transparent composition;
- patina, or artificial aging of wood;
- antique decoration with cracks called craquelure.
In order to transfer the pattern from the stencil to the product, soft pencils are used, transferring the ornament as accurately and accurately as possible.
Stencils for woodcarving in pencil: how to make
Those craftsmen who are just starting to try themselves as a woodcarver should understand that high-quality cutting can be done only after the template has been properly prepared.
- Initially, it is worth deciding on a blank for carving. Beginning craftsmen better fit geometric carving on a plane or a simple wooden figurine.
- A sketch is made on paper with a pencil, while the main zones and places where carving is planned are clearly defined on it.
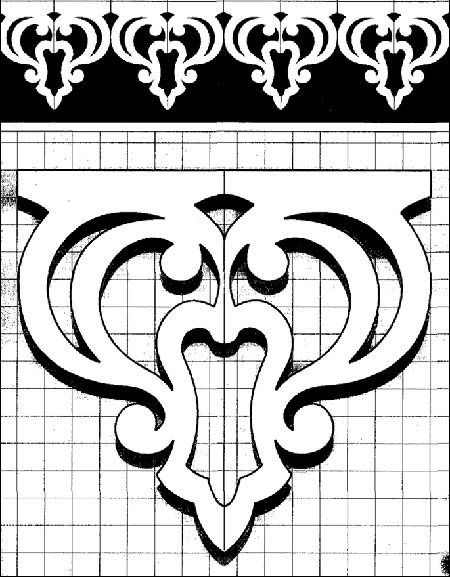
- Via special devices for drawing the image is transferred to graph paper.
- Repeating parts are made of thick paper or thick cardboard.
- The finished paper pattern is fixed on a wooden base and copied.
 While creating stencil sketch it is recommended to follow a certain sequence of actions
 In the manufacture of stencils for carvings made in the slotted technique, craftsmen recommend initially using thick paper for patterns.
Geometric and flat-relief carving: what is it
Name geometric carving on wood comes from the main details and elements at the heart of the pattern: geometric shapes, figures and their elements. Use such ornaments to decorate furniture, household utensils.
To create this engraving, you will need a simple set of tools:
- a piece of board made of soft wood;
- special knife-jamb;
- simple soft pencil;
- ruler.
In the manufacture of the product, an overhead paper blank is not required, since elements of a geometric pattern can be applied directly to a wooden blank.
relief carving is done in a similar way, but the pictorial elements are not geometric shapes, but images of animals, elements of nature, people. This type of carving is also used for making backgammon.
 The finished product can be treated with a colorless varnish
 For such a wood engraving you will need materials:
- a set of cutters for wood;
- soft wood blank;
- sandpaper, pencils.
A product is manufactured in accordance with a certain sequence of actions.
- The wood is pre-cleaned and prepared for work. The drawing is applied to carbon paper and transferred to the workpiece.
- The contour carving is made according to the drawing, the relief and the frame of the product are pre-selected.
- Upon completion, the work is processed with stain, dye or simply watercolors. Cleaned up with sandpaper.
The finished product can be treated with a colorless varnish.
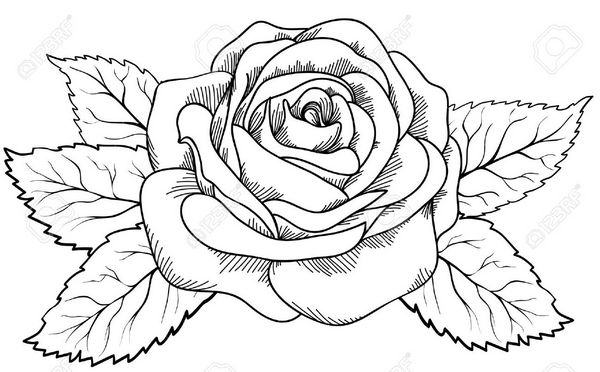
Flowers: Wood Carving for Beginners
Flowers are one of the main elements of many wood carving patterns. Cutting this element is not difficult, it is important to follow the sequence of actions and the principle of operation.
- On the wooden surface a drawing is applied in the form of circles and the details of the future flower are marked.
- The central circles are cut in a circle, after which they are cut from the outer circle to the center.
- After marking the petals, they are cut along the contour, cutting off the triangles between the petals, after which the outer contour of each petal is cut.
- An incision is made inside the flower, rounding the center of the drawing element.
You can decorate the picture with any additional motifs; the geriolac base of the product provides ample opportunities for toning
Wood carving for beginners (video)
You can make templates and stencils for carving yourself, using your own creative abilities, you can download ready-made templates from the Internet. Most of the ready-made stencils can be found on the Tatyanka website, some, no less interesting options offer other online resources.
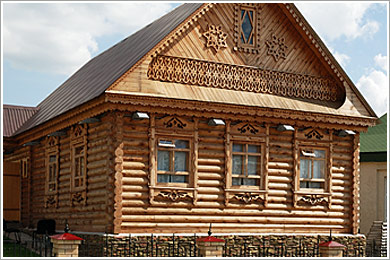
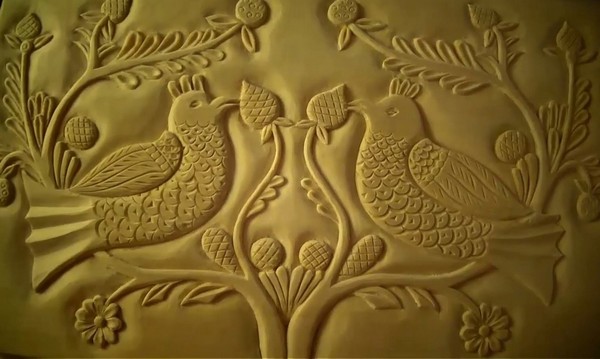
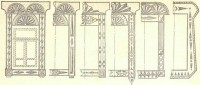
The decoration of houses with wooden carved patterns and elements - traditional for folk arts and crafts - is widespread in our country. Let us recall how much joy the eye gives light and elegant, amazingly beautiful decoration of platbands, shutters, cornices, roof ridges in both rural and still surviving city houses in the central part of Russia, the Urals and Siberia. Here you can find the most difficult kinds carvings - of complex shape, with the use of floral ornaments and fantastic images of all kinds of birds and animals. In the North, simple geometric patterns of shallow recesses and grooves are widespread: they are not afraid of heavy rainfall here, which would quickly lead to the destruction of more complex carvings.
Not only platbands, cornices, gables, doors, gates, arbors, terraces, but also various fences are subjected to ornamentation. Dressing a modest house in wooden lace, the owner not only decorates it, but also shows his skill and artistic taste.
For example, consider the decoration of the house by N. I. Vilkov, a resident of the village of Zalesnoy, near Kazan (see color photo). How much skill and love he invested in decorating his home. The cladding is made in a herringbone pattern, the carvings in the house itself and on the pediment do not repeat each other, they are complemented by a beautiful cornice. The pediment above the porch is made in the form of a complex lancet arch; the roof of the porch is supported by figured square pillars. The corner of the pediment is partially closed by a plank, the boards of which are cut into a cone; a beautiful rosette is fixed on them. The top of the roof is crowned with a carved board.
A terrace is attached to the house, the window frames of which are also patterned, in the form of straight and rhombic figures. Above - a wide board with figured carving.
And the fence of the house is unusual. The heads of the posts are given a beautiful shape, the planks are not stuffed strictly horizontally, but with a small notch in the middle of each link between the posts, with rhombuses made of laths, with a circle in the middle and triangles along the edges. In the center of the circle is a rosette-star.
The pillars for hanging the gates are covered with boards - they are called shoulder blades - with carved details attached to them. The gate lining is made in two tiers; the lower one with the boards arranged vertically, and the upper one - "herringbone", with rosettes.
Such a fence decorates both the house and the estate as a whole.
Thread materials
Coniferous wood is used for home decoration elements (as it is more resistant to atmospheric influences), without defects (oblique, knotty) that make it difficult to work or spoil the product; dry, otherwise it will warp and crack when it dries.
On the workpiece - a bar, a board of the required length - after giving the desired shape, the contours of the pattern are applied. If the surface is not clean enough after planing, it is not recommended to clean it. sandpaper before carving: abrasive grains embedded in the wood will quickly dull the tool. Therefore, it is best to carve first and then grind.
For durability, soft hardwoods are recommended to be preserved - impregnated with anti-rotten compounds, painted with oil paints.
You can fasten individual parts to each other on spikes, nails or screws, waterproof synthetic adhesives.
Wood carving tools
For simple wooden patterns, it is enough to have a joiner's jigsaw, a joint knife, straight and semicircular chisels. More complex threads will require a more complex tool. General rule: it should be very well sharpened and aimed at the touchstone.
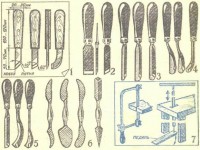
Rice. 1. Carving tools:
1 - kosyachki knives, 2 - flat chisels, 3 - semicircular chisels, 4 - cranberries, 5 - corner chisels, 6 - rasps, 7 - jigsaws (manual and foot).
Joint knife. His working part sharpened on both sides and forms an angle of 20 °, has a bevel or oblique cut at the blade at an angle of 45 ° for one type of knife, and 60 ° for another. The length of the blade is small: it protrudes from under the handle by 50-70 mm.
The handle is wooden or plastic, 100-120 long, 20-30 wide, 12-15 mm thick. It is given a convenient form for work without sharp corners and edges.
The cutting part of the joint has a toe (acute angle of the incisor) and a heel (obtuse angle). These terms will be referred to frequently in the following. During carving, the toe is always buried in the wood, and the heel is slightly raised. The scythe knife is widely used in geometric carving.
Chisels there are straight, semicircular and cranberries. They are sharpened so that the angle is within 18-20 °: it is easier to work with them than with steeper sharpening. The cranberry chisel has a curved blade of different widths.
Chisels-corners practically they are two chisels with canvases welded together at an angle of 50 to 70 °. The width of each is from 5 to 15 mm. They are used for cutting veins or lines in the form of grooves of different widths in one go.
Rasps- these are steel rods of various shapes, widths and lengths, with notches in the form of small teeth - for grinding wood and giving it one form or another, which is not possible to obtain with another tool.
Coins- steel rods with working ends of different patterns. Under hammer blows, they leave small indentations on the wood - to obtain the necessary background of the product. Usually the depth of the pattern does not exceed 5-6 mm.
Jigsaws- manual, foot and mechanical, most often electric. With their help, slotted work is performed: curved lines or holes are sawn into the wood. For the same purpose, hacksaws with a narrow blade are also used.
A jigsaw blade is considered normal with a width of up to 5 mm and a thickness of 1-1.5 mm, with teeth for longitudinal or mixed sawing. One end of it does not have a hole, but a hook: thanks to it, the saw can be quickly removed from the handle and, having passed the workpiece into the hole, fasten it again.
The teeth can be of different sizes: the larger they are, the rougher the cut, and vice versa. They should be directed so as to cut wood away from you, and with a foot jigsaw - from top to bottom.
The last one is set up like this. A hole is drilled or hollowed out in a workbench or board, where the saw blade will be passed. A spring is hung over the hole, and a pedal is attached under it: a saw blade is hooked to it and to the spring on leashes. This makes it possible to work with your foot, and hold the workpiece with both hands, guiding the file exactly according to the pattern. To make the saw blade more stable, guide bosses are mounted on the bracket above the hole on its sides.
When working while standing, the height of the workbench should be at the level of the carvers' elbows, on average 100-110 cm. It is better to sit on a strong, stable stool 65-75 cm high, which has a prong at a height of 20-30 cm from the floor - to rest one leg during work.
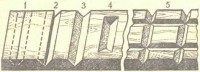
Holders
With their help, you can securely fix the workpieces on the workbench and, if necessary, can be easily removed. They are end, corner, curly, nest, remote and others.
The end pieces are needed for narrow and long workpieces, the corner ones are for large square or rectangular ones, while the curly ones speak for themselves.
The stop holds the workpiece when making a geometric thread. Attach all holders to the workbench with two nails.
For the same purposes, in addition to holders, they use fixing screws - cone-shaped rods with ends in the form of a gimlet on one side and a lamb on the other: it is easy to screw in and out.
Jacks and pressures are pieces of boards or bars with cutouts at the ends, attached to a workbench with screws.
Screws are also used. So that they do not leave holes on the workpiece, they make an allowance of 20-35 mm, and screw them in here. After the thread is completed, the allowances are cut off.
Clamps are also handy for securing workpieces. They are wooden and metal. Experienced craftsmen prefer wooden ones, so as not to accidentally blunt the tool when working.
Rice. 2. Holders: 1 - face, 2 - figured, 3 - angular, 4 - jacks or pressures.
Drawing Translation
The contours of the future pattern are transferred to tracing paper with a soft pencil, ballpoint pen, pen. It is desirable to use black ink or paste.
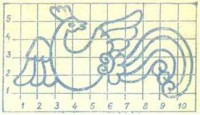
If the drawing is small, it can be enlarged (and a large one can be reduced) using the grid. To do this, its contour is transferred to tracing paper, then its field is divided into squares and numbered. The same number of squares is applied on paper or cardboard, but larger or smaller, and an image is drawn into them, guided by the first grid.
Transferring a pattern to a workpiece
The image from tracing paper is easy to transfer to a wooden surface using carbon paper.
If you have to make a lot of identical parts, then it is better to make a template from cardboard, thick paper, plywood, thin boards. You can also use a well-made first blank, be sure to carefully clean its edges along which the pencil will move.
CARVING EXERCISES
A variety of patterns can be found on the details of the decoration: geometric with different backgrounds and contours, slotted, laid on, bas-relief, high-relief carving. Without knowing the technique of its implementation, many mistakes cannot be avoided. Therefore, it is useful to pre-practice carving on small blanks of soft hardwood, such as linden. It is best to start with a geometric carving, performed with a joint knife or a chisel with a beveled blade. First, you should go through triangular recesses, lines, squares, ornamental elements of leaves, flowers.
For training, they take a workpiece measuring 20 × 70x200 mm, planed on both sides and carved on both surfaces.
Knife-knife technique
The cutter should be taken not only by the handle, but also by the blade, grabbing it with your hand so that the blade protrudes from under the clenched fingers by 30-40 mm. The heel is facing the cutter. The part of the blade that is held by the hand can be wrapped with insulating tape or cloth.
The joint is in relation to the workpiece strictly vertically, they lead it towards themselves. The toe of the cutter is pressed into the thickness of the workpiece to the desired depth, and the heel is raised above the surface by 1-2 mm. When it rises more, the joint cuts through the wood more easily.
If the incision is not through and does not reach the end of the workpiece, but only to the transverse line, then, finishing the incision, the heel is immersed in the wood to the desired depth. Then the joint is again deflected from itself and this and the transverse lines are cut with a toe.
![]()
Rice. 5. Working with a joint knife: 1 - the position of the knife at the beginning of the cut, 2 - the final cut, 3 - cutting the line, 4 - transverse cutting of the end of the straw; A - marked workpiece.
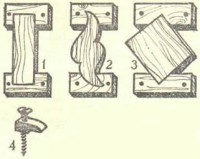
Making triangular recesses
A trihedral groove 4 mm wide and 3 mm deep is cut with a joint at an angle of 30-40°. First, using a square, axial lines are drawn on the workpiece with a solid line. From it, on both sides, at a distance of 2 mm, additional lines are drawn with a dotted line, which determine the width of the groove. First, with a cutter, holding it strictly vertically, cut the center line to a depth of 3 mm or a little deeper. Then the blade is attached to an additional line to the right of the axial one, the cutter is given a lateral slope of 45 °, it is cut into the wood to such a depth that the toe penetrates to the notch along the axial one. Having cut through this additional line, the workpiece is rotated through an angle of 180 ° and the second additional line is cut in the same way. When the cuts are made correctly, the straw, as it is called, itself comes out of the groove. If this is not the case, then some line is not cut, and the work has to be repeated.
When two such recesses pass side by side, there is wood between them, called a platform. The groove may not go right through, but be closed, forming, as it were, a trough; for this, at the ends it is cut with transverse lines that cut the straw.
The movement of the joint along the annual layers is easier than across them, but at the same time the cutter may deviate from a straight line, leaving in the direction of the fibers - this must be borne in mind when doing work.
Rice. 6. Training performance of recesses:
1 - marking, 2 - sampling of half, 3 - sampling of the entire through recess, 4 - "closed" recess, 5 - sampling of the square.
Getting squares
They are formed at the intersection of triangular recesses. First, the grooves are cut along the fibers, then across. It is best to repeat the execution of lines - the figures will turn out cleaner.
Embossing
Patterns from triangular grooves will look sharper if a shadow is revealed in them. To do this, cut the slope of the groove with an inward inclination, for example at an angle of 45°. The resulting sharp edge can be cut off again; a chamfer is formed, which is easy to further round off.
Rice. 7. Reinforcement of the relief: 1 - internal cut at an angle of 45°, 2 - blunting of the cut edge with a chamfer, 3 - rounding of the cut edge.
Cutting Triangles
Such figures are widely used in geometric carving; they come in different shapes, sizes: isosceles, equilateral with straight and curved lines. These include the so-called almond-shaped recesses, which are formed by curved sides of the same size. Ornaments of various beauty and complexity are created from triangles - rosettes, friezes, cuts.
Triangle friezes
Three triangles, cut so that they have one common vertex and two lines of contact with each other, form a large triangle. At the same time, it is necessary to strive for the common top to be deepened: it will turn out, as it were, a depressed pyramid - a spectacular figure for the formation of geometric patterns, widely used, for example, in decorating friezes.
A frieze can be obtained simply from a chain of such recessed triangles. It is easy to complicate the drawing if you place two identical chains side by side. Moreover, two variants of the pattern are possible - depending on whether the chains are joined by the bases of the triangles or their vertices. The main requirement here is the complete identity of the figures themselves and the depth of their selection.
It is interesting that the last pattern can be even more complicated if two more in-depth triangles are cut in diamond-shaped areas between two chains: it turns out, as it were, a third, intermediate chain in which the triangles are connected in pairs either by bases or by vertices. In this pattern, vertical ridges-arrows and slightly stretched four-pointed stars are clearly visible. They will acquire the correct shape and fit into the squares with rays if all the triangles of the pattern are made equilateral.
And finally, another interesting frieze will be obtained if the two initial chains are placed side by side so that the vertices of the triangles do not meet, but lie between the other two: a relief zigzag snake runs along the pattern.
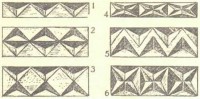
Rice. Fig. 8. Details of the frieze formed by triangles with a deepening of the center: 1 - a chain of triangles, 2 - "mirror" chains adjoining the bases, 3 - adjoining the tops, 4 and 6 - a three-row chain, 5 - a zigzag of two chains.
Triangle transformations
The options for hollow-centered triangle patterns are truly endless when one, two, or all three sides of the triangles are curved. Fancy rosettes and flowers, ornaments and stars - a variety of figures can be obtained from combinations of such elements; at the same time, the inner lines are first cut, and then the outer sides of each triangle. The drawings show figures and rosettes made in this technique with the help of slants and chisels.
THREAD PALETTE
In addition to those discussed above, there are other types of threads that can also be widely used in home decoration.

Rice. 9. Types of thread: A - contour, B - cut, C - consignment note.
contour thread is done like this. The outlines of the pattern are transferred to the workpiece, and along these lines, a shallow, up to 1-1.5 mm, thread in the form of triangular grooves is made along these lines with a joint or an angled chisel.
relief carving it is done in the same way as contour, only the depth of the groove is from 2 to 2.5 mm. At the same time, its slope can be trimmed or rounded, sharply highlighting the relief.
Recessed thread differs by a deeper cutting of the background. The carving technique remains unchanged. Outlining is a must.
relief carving is that on wooden blank convex figures of people, masks, birds, animals, fish are cut out. They rise above the background, which is selected to the desired depth.
Cutout figures are also very common. They can be free-standing, such as a rooster on a roof ridge, or overhead on walls, doors, gates, fences. These figures are executed deaf, when their contour is simply cut out, or openwork, slotted through in different places. They may have sharp edges or oval.
Slotted and overlaid threads
These types of carving are widely used in the decoration of houses: on platbands, cornices, fences.
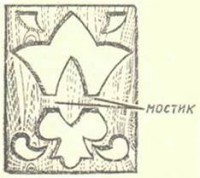
slotted- with a fully selected background, as if lacy. It is often called openwork. It is used where the underlying background is visible - say, plank sheathing or a painted surface.
Rice. 10. Slotted thread and a device for its implementation.
Applied thread is an ornament made by cutting and glued or nailed to the finished background. This is how the trim boards around the window opening, shutters, gates, and gates are decorated.
Details for platbands can be of different shapes and sizes - geometric, floral and others. Some are cut with cutters, others are cut with a saw, rarely they are cut with incisors.
To obtain blanks, for example, trihedral bars, it is recommended to plan a board of the required thickness, mark the shape of triangles at the ends, draw risks along the plates, saw and cut the sawn sides. When pentagonal bars are required, it is best to prepare square or rectangular ones and stuff triangular ones on them. When shaping flutes-grooves, plows-fillets are used.
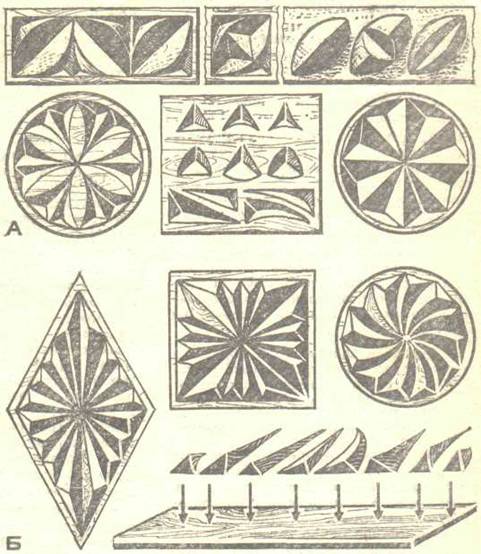
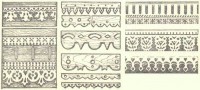
Fig 11. Details of the ornament: A - formed by recesses; B - overhead elements of various configurations.
ASSEMBLED SOCKETS
They are not cut from a whole workpiece, but are made from individual parts (planed, sawn, drilled).
A conceived pattern is assembled from the prepared parts, fastening the workpieces with nails. If the shape of the rosettes is elliptical, then first you need to build an ellipse, divide it into parts (8, 10, 16, 20 parts) and place individual elements on them.
Rice. 12. Prefabricated sockets: round, square, elliptical.
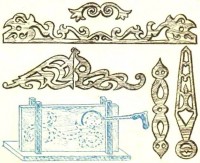
platbands
Various ornaments can be used to decorate them. The pictures show the most affordable options, made up exclusively of geometric ornament. The shape and dimensions of individual elements may vary depending on the size of the window opening and the overall solution. decorative design Houses.

Rice. 13. Details of decoration of platbands and their decoration with cuts.
Rice. 14. Platbands with geometric ornaments.
All sorts of cornices, simple and complex shapes, are widely used for decorating houses. They can consist of a geometric, floral and combined ornament. Most often they are made openwork and performed by drilling, sawing, gouging, cutting.
Rice. 15. Carved cornices.
FENCES
They are different: around the porch, gazebos, terraces, and also in general - around the estate. The height of the fence of the first type is up to 1 m, the second - from a meter and above. Most often, a picket fence, bars, boards go to them (more material is used for solid ones, less for sparse ones). decorative elements they are easier than on the house, but in general, the fence perfectly complements the overall outfit of the dwelling.
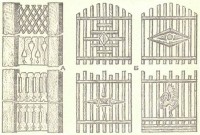
Rice. 16. Decoration of fences: A - for the gazebo, porch, terrace, B - for the estate.


Living and dead water: myth or reality, what is the power of living and dead water?
Craniosynostosis, or premature fusion of the bones of the skull Frontal crest in a child
Beautiful hair How to achieve hair density at home: useful tips
Why mosquitoes bite some people, but not others
How to achieve beautiful hair