With the external design of the house, many owners strive to give their possessions an accentuated individuality. For this, various techniques are used - the original facade decoration, the unusual shape of the roof, with pronounced decorative qualities, and more. Do not forget about other design elements, including those that have long been traditional in some countries, but for some time - undeservedly out of fashion. Currently, many exterior decorative details are making a comeback, and one of them is the weather vane on the roof.

Agree that with such a detail, the appearance of the building acquires a completely different “sound”, so there are more and more people who want to decorate their roof with a weather vane. But just where to get it? - look for a finished product in stores or go through the ads of craftsmen in the hope of finding a quality product at an affordable price? Neither one nor the other - if desired, it is quite possible to make a weather vane with your own hands, choosing for its manufacture suitable material. And this role can be played by metal of different thicknesses, wood or even ordinary plastic bottles.
In this article, we'll look at several options. self-manufacturing such a roof decoration. However, for starters, it’s worth understanding what weathercocks are, what they are used for, and also what types of these devices are most often used.
What is a weathervane
A weather vane is a device that in domestic use is designed to perform several functions that are usually combined in one model. Moreover, the "options" have both decorative and applied value.
- The first, and as many believe, the main one, is the meteorological function - it consists in a visual demonstration and even in a quantitative measurement of the direction and strength of the wind.
- The second, and no less important function, can be considered the use of weather vanes to protect the chimney from wind blowing into it, which prevents smoke in the premises.
- A somewhat unusual function - a propeller mounted on a weather vane and rotating under the influence of the wind creates peculiar vibrations that scare away rodents from the house, and shrews and moles from the garden plot. If the weather vane is intended for this purpose, then it is not installed on the roof, but in the middle of the garden or garden. However, in this case, to install it, you need to select open area on a hill, as there the propeller will capture more wind.
- And, finally, the weather vane is used as a purely decorative element that adorns the roof of the building.
Weather vanes served and serve as traditional elements for decorating roofs in the countries of Eastern and Northern Europe, in particular - they are very characteristic of the Baltic architecture. Therefore, in those parts, almost every private house is equipped with this device, and the owners of buildings always try to choose an original version that you will not find anywhere else.
What are the main parts of an ordinary weather vane

The main elements of the basic design of the weather vane for the roof
The design of the weather vane includes several basic elements:
- Flag (pos. 1), which, due to its windage, rotates under the force of the wind, rising parallel to it and thereby indicating its direction. The flag can take the form of an ordinary simple geometric figure or an artistic design, thanks to which it becomes the main decorative element of the weather vane.
- The flag is placed on one of the ends of the boom (pos. 2), and if the weather vane is working properly, it should be located on the side where the wind blows. The arrow is not a mandatory element of the design, since sometimes the flag figure is fixed directly on a vertically mounted rod - the axis.
- Counterweight (pos.3), located opposite the flag. However, this element is also not always used in the design, as sometimes the flag itself balances the arrow. If it is necessary to install a counterweight, then its weight should be slightly greater than the mass of the figure - then it will help return the weather vane to its original position.
- A vertical axle (pos. 4) fixed in the housing and equipped with bearings in a special block (pos. 5), or simply inserted into a larger diameter pipe (pos. 6). In the second case, the axle is usually supported at the bottom by a metal ball. Bearings or a ball provide ease of rotation of the axis along with the flag.
- A cap, often centering the axis from above in the body of the rotary mechanism and protecting the latter from rain and melt water getting inside.
- Modern weather vanes are often equipped with an electronic device - angle sensors or encoders, which record the readings of the mechanical part of the device.

- On some models of weathercocks, a metal plate is installed, suspended on a horizontal axis and in a free position, swinging under the influence of the wind. The angle of deviation of this structural element from the vertical shows the strength of the wind. This plate can be replaced with a lightweight propeller. Such structures, combining the function of demonstrating the direction of the wind and an anemometer (air flow velocity meter), are called Wild weathercocks, after the name of the developer, a well-known meteorologist of the 19th century, who worked for a long time at the Academy of Sciences of Russia.

Quite often, on the lower, fixed part of the weather vane, points with letter designations of the cardinal points are fixed. This makes it easier to navigate with the direction of the wind. But one nuance should be correctly understood. In meteorology, winds are named after the direction they are blowing from. The weather vane is organized according to the same principle - the flag will be on the leeward side, and the arrow will show the direction from which the wind is blowing. In particular, according to the weather vane shown in the illustration above, it can be judged that the wind direction is west-north-west (WNW).
A few words about the symbolism of weather vane flags
Silhouette figures for flags, chosen for the manufacture of weather vanes, were previously made for a reason - they served as various symbols and a kind of amulets. For example, according to the Chinese teachings of Feng Shui, fixing a weather vane on the roof of a house helps to establish good relationships with neighbors.
Basically, figurines of various animals and birds are chosen for the weather vane of a residential building.
- The rooster is a sign of vigilance. It is especially common in Russia, and folk beliefs- well scares away evil spirits, as it is a symbol of the Apostle Peter.
- The cat symbolizes home comfort.
- The owl has always been a totem of wisdom.
- Leo is power and strength.
- The eagle already protects the dwelling from enemies with its appearance.
- The stork is a sign of family happiness and mutual understanding.
- The Dragon. Weathercocks with this mythological animal are most often found in Asian countries, as in local culture it personifies wisdom and spiritual strength.
In addition to animals, you can also see other real or fairy-tale characters on the flags of the weather vanes:

- The chimney sweep usually brings good luck to the house.
- George the Victorious is a traditional defender of the house from various negativity.
- Baba Yaga, oddly enough, is also the protector of housing from evil spirits.
When choosing this or that figure for making a weather vane, it is advisable to ask what it means, since not all images bring positive emotions to the house.

It is not at all necessary to adhere to some canons, focusing on Russian or Eastern culture. No one forbids simply choosing the picture you like, and using it to make a weather vane flag. The main thing is that the image should be positive or even cheerful.
You can also add that earlier, above the workshops or trading shops, their owners installed weather vanes with images that indicated the type of activity:
- The shoemaker had a boot on the weather vane.
- The baker chose a picture of a pretzel.
- The hairdresser used flag-scissors to designate his workshop.
Passers-by saw from afar where the necessary shop was located, focusing precisely on the figures of the weather vane. So street advertising has very ancient roots.
How to make a weather vane with your own hands
Materials for the manufacture of a weather vane
So, we figured out what a weather vane can be intended for, and what basic elements its design consists of. Now the question arises of what material they can be made of.
The flag is usually made of metal - sheet steel or copper, but sometimes wood is also used for this purpose. However, today craftsmen make the outer part of the weather vane from improvised materials, such as used plastic bottles or old unnecessary CDs.
Previously, flags for this device were often made from steel bars using a forging technique. And today, too, some craftsmen make weathercocks in a similar way, but such products are quite heavy and are very expensive. Therefore, not every budget will pull a forged product, and in addition, in order to place it on the roof, it will be necessary to provide for reinforced fastening, since under its own weight, multiplied by wind pressure, the weather vane can collapse down.
Metal and wooden flags must be covered with moisture-resistant paint, which will protect their surfaces from external destructive influences - moisture, ultraviolet radiation, biological damage, and abrasive action of the wind.
The specifics of the axis and the rotary unit of the device leads to the conclusion that they must be made exclusively of metal, otherwise the weather vane will not work properly - it will start to jam or, conversely, dangle, and the non-metal axis will quickly wear out and become unusable.
Tools for the job
To make a weather vane design with your own hands, you will need to prepare some tools. And for metal product and wooden, they will be different, that is, their set primarily determines the choice of material. However, given that the unit for installing and rotating the axis of the device will in any case be made of metal, even if the flag is planned to be made of wood, some metal tools will still be required. If it is not possible or there is no experience in working with metal, then the mechanism itself, due to which the weather vane rotates, can be ordered from a qualified craftsman, and then you can independently attach a flag to it.
So, for work you will need the following tools:
- Electric jigsaw with saw blades for wood or metal - this device is necessary for cutting a flag and other elements of the outer part of the structure.
- Electric drill and a set of drills.
- Hammer.
- Powerful soldering iron.
- Clamps.
- Vice.
- Nippers and pliers.
- Angle grinder and hand files different sizes- for processing the edges of a metal flag.
- Sandpaper.
- In the manufacture of complex structural parts, an anvil may be required, lathe And
Flag stencil
Even before acquiring the material, it is probably necessary to decide on the choice of the figure that will be located on the wind vane as a flag, and to choose the right stencil for this. If there is no experience in cutting out complex small details of a flag from plywood or metal, then it is better to choose a simple pattern, without intricate bends. But still, decorative weather vanes look much more attractive, so it makes sense to try.

This contour drawing has some difficulties and requires some skill and considerable time when cutting it out. Therefore, choosing a similar option, you need to soberly assess your capabilities.

This stencil of a weather vane flag, despite its volume, is easier to transfer to metal or plywood, as well as to cut it out, since it involves the removal of large parts of the pattern and has a minimum of small pattern elements and complex bends.
You can make a stencil yourself, first on a regular landscape sheet, and then draw it in the natural size of the flag. It is convenient to transfer by squares, breaking into them small drawing. When making a drawing, you need to take into account that it will then have to be cut out with a jigsaw, so all its lines and edges of the bends must be clear.
The finished stencil, made in full size of the future flag, is applied to a sheet of metal or plywood, and with the help of a simple pencil, the drawing is circled, highlighting the cut lines.
The optimal flag parameters for a weather vane can vary from 300 to 500 mm, since if you make it larger, then the body of the structure will have to be strengthened, otherwise it will break under the influence of gusts of wind.
The process of making a weather vane - step by step
Whatever figure is chosen for the weather vane flag, the manufacturing principle of this device is the same.
The main nodes of the rotary structure are its axis and body, on which it directly depends on how the flag will react to the wind. The best option would be to install bearings on the axis and close this part of the device with a housing. Bearings do not require constant lubrication, since in a closed housing they will not come into contact with moisture.
The axle itself must have a diameter of at least 10 mm, which will ensure a stable position above the fixed structure in case of strong wind gusts.
In the hull, it is necessary to provide fasteners for the element of the roof structure where the weather vane is supposed to be installed.
It is very important to observe all proportions when planning and manufacturing a product, therefore, having drawn up a drawing, it is recommended, if possible, to show it to specialists who are able to assess the correctness of the project. It is possible that they will help with advice on how best to do some details for him.
As an example, we will consider the manufacture of a weather vane with a flag in the form of a cute cat figurine, which is quite simple in execution, as it has smooth, curved lines.

For work, you will need to prepare the following materials:
- Steel sheet with a thickness of 2.5÷3 mm.
- Steel tubes with a diameter of 15 and 22.5, as well as a piece of pipe 50 mm long and 60 mm in diameter.
- Steel wire with a diameter of 3 mm.
- Copper pipe with a diameter of 15 mm with a wall thickness of 1.5 mm, a length of 367 mm.
- Steel hollow ball with a diameter of 80 mm and solid metal or glass with a diameter of 15 mm.
- Square bar with a section of 15 × 15 mm.
- Square tube 25×25 mm, wall thickness 2 mm, length 120 mm.
- Steel bar with a diameter of 12 mm.
- Steel plate 3 mm thick and 60 × 60 mm in size.
Having prepared everything you need, you can start work, which is divided into several stages:
- Preparatory work.
- Transferring the outline of the drawing to a metal sheet.
- Cutting out a figure.
- Making an arrow to place a flag.
- Production of the rotation mechanism.

The above drawing shows the parameters of the arrow and the turning mechanism of the weather vane, suitable for the dimensions of the flag, the manufacture of which will be described later.
The stages of manufacturing a weather vane, after drawing a pattern on a metal sheet through a stencil, are shown in the table:
| Illustration | Brief description of the operation to be performed |
|---|---|
 | After the outline of the flag figure is transferred to a sheet of metal 2.5 ÷ 3 mm thick, they start cutting it out. So that when performing this work, the metal plate does not move and the cut does not go to the side, it must be rigidly fixed in one position, for example, using clamps. The work is carried out on a metal table, and the plate is fixed with an overhang. Having cut one edge of the figure, the clamps are loosened, the plate is installed in them with the other side and the next line is cut. This happens until the entire figure is cut along the contour. |
 | In the next step, the edges of the resulting figure must be aligned and slightly rounded, removing the burrs. This stage of work is carried out by a grinder (grinder) with a grinding wheel installed on it. Performing this process, the figure is also rigidly attached to the table with clamps. |
 | In places where it is impossible to reach with a grinding wheel, the work is done manually with a file of the right size. The figurine is rotated and fixed so that the area to be treated hangs off the table. |
 | Small holes, such as animal eyes or blanks for inserting other elements, in this case, the nose and whiskers of a cat, are drilled with an electric drill. If used hand tool, then the figurine should also be fixed to the table, but it is more convenient to carry out this process on a stationary drilling machine. The drill is selected according to the diameter of the hole. In this case, the master used drills with a diameter of 12 ÷ 15 mm. |
 | Further, drilled holes that will not be used for inserting other elements must be well cleaned with files. First, their edges are processed with a tool with a large notch, and then with a small one, since their edges must be perfectly even and smooth. If it is necessary to expand or give an elongated shape to round holes, a file or needle file 5 ÷ 7 mm wide and 2 ÷ 2.5 mm thick is used. |
 | If the figure of the flag according to the project has protruding elements, as in this case it is the mustache and nose of the cat, then they are made of steel wire with a diameter of 3 mm and from a steel bar with a diameter of 12 mm. The wire for the future mustache is cut with wire cutters into segments 110 ÷ 120 mm long, then a distance of 15 ÷ 20 mm is measured from one of their sides and this part is bent with the help of pliers so that the workpiece has an L-shaped shape. |
 | The nose is made of a steel rod, the edge of which is processed with a grinder to a semicircular shape. To make it easier to work, the rod is rigidly clamped in a vise. Having shaped the edge and polished it to smoothness, three strips are cut into it with a chisel, which will make this detail look like a cat's nose. |
 | After that, 4 ÷ 5 mm are measured from the prepared edge, not counting the rounded part, and the workpiece is cut off from the rod along this line. You need to cut the bar as evenly as possible, otherwise, when it is put in place, it may stand up crooked. The cut is made with a cutting wheel for metal mounted on a grinder. In this case, the rod must be clamped in a vice, but this time, setting it horizontally. |
 | The next step in preparing the nose and mustache is to fix it on the muzzle of the cat figurine. Fixation of parts is carried out using a semi-automatic welding machine, spot welding. First, the prepared L-shaped mustache blanks are inserted into the previously drilled holes on the front side of the figurine, hooking with the bent side. Then, they are fanned out, as intended by the project, held with pliers and welded from the inside out. The nose part is inserted from the front side of the figurine into a wide hole drilled between the whiskers, and then it is also welded with reverse spot welding. |
 | After welding work is completed, the parts of the welded parts protruding from the wrong side must be carefully cut off, and then cleaned with a grinder until smooth. |
 | The finished figure is temporarily set aside, and they proceed to the manufacture of an arrow on which this flag will be fixed. First, its tip is made. For this, a plate of 60 × 60 mm is taken and a drawing is applied to it, in accordance with the dimensions indicated in the above drawing. After that, the plate is fixed with a clamp to the table, leaving its part with the drawn detail on the overhang. Then cut out the tip with a jigsaw, installing a metal file in it. The elements of the shank are immediately prepared - its dimensions are also indicated in the drawing. Two elements of this part are cut out - from metal 3 mm thick. |
 | For the manufacture of the base of the arrow, on which the tip and plumage will be fixed, a square bar with a section of 15 × 15 mm is used. The base consists of two elements - a tip will be welded to one of them, and plumage to the second. The piece of bar to which the plumage or shank will be welded has a length of 470 mm, and the one intended for installing the tip is 290 mm. The bar is cut with a grinder, after fixing it in a vice. Further, as can be seen in the drawing, the rod in the region of welding of the tip narrows to 3 mm, that is, to the thickness of the plate from which the tip is made. These sections are called flats, and they are intended for a good fit of the two structural elements to each other. Part of the shank bar is also turned in its back. Cutting off protruding parts is also necessary to create a higher streamlining of the product, that is, so that they do not slow down the weather vane when exposed to wind. |
 | Now the tip and two parts of the shank, after marking their location on the bars prepared for them, are carefully welded to them. Then the welds are cleaned to smoothness. |
 | The elements of the arrow are ready, and you can proceed to the manufacture of the rack on which the arrow and the swivel will be attached. To begin with, a prepared hollow metal ball with a diameter of 80 mm is taken, on which the previously made figure will be attached. A hole with a diameter of 13 mm is drilled in it. In addition, a cover is cut out of a metal plate 12 mm thick, under which a rotary mechanism will be located and a hole of the same diameter as in the ball is also drilled in it. |
 | Further, the cut-out cover with a drilled hole is fixed in a vice, a pipe segment 50 mm high and 60 mm in diameter is installed on it, and from the inside these elements are welded together by a semi-automatic device. |
 | Next, a steel bar 600 mm long and 12 mm in diameter is taken, fixed in a vice, a ball drilled through it is put on its edge and fixed on both sides by welding. |
 | The next step is to take a piece of a square pipe 120 mm long and 25 × 25 mm in section and welded to a cover with a hole fixed on the pipe segment. Then, the rod with a ball welded on its end is inserted into the resulting structure, the square pipe is joined to the ball and carefully scalded. |
 | The next step on the ball is marking the points to which two parts of the arrow will be welded horizontally, at a right angle - one on one side of the ball, the second on the opposite side. For the convenience of performing work, at the marked points, you can drill recesses with a diameter corresponding to the size of a square bar. The parts of the arrow inserted into the holes are carefully fixed by welding. |
 | When the arrow is securely fastened to the ball, a cut-out cat flag can be welded to it. To perform marking, the finished structure is fixed on the table with the help of clamps. Then, the lower part of the figurine, in this case, the front paw of the cat, is applied to the ball. A semicircle is drawn on it with a marker, which is then cut out with a jigsaw. |
 | Then, the flag, with the cut out part, is applied to the ball and welded. So that during welding, the sparks from it do not fall on the flag and do not leave melted spots on it, it is recommended to cover it with a metal sheet. The figurine must be securely fastened to the structure, for this the front paw is welded to the ball, and the rear paws are spot-welded to the back of the arrow. It turns out that the flag is shifted to the rear of the boom, which is necessary for the weather vane to work correctly. The counterweight in this case is not required, the design is normally balanced. |
 | After completing the assembly of the upper part of the weather vane, you can proceed to the installation of the lower one, which includes a swivel - a rotational mechanism. In addition to the supporting rod that unites the two parts of the weather vane, the rod, to assemble the lower part of the structure, you will need to prepare the following parts: a copper tube 367 mm long, 15 mm in diameter, a steel tube with an outer diameter of 22.5 mm (1/2 inch), a piece of steel a rod 50 mm long and 15 mm in diameter, as well as a steel or glass ball with a diameter of 15 mm. |
 | The hole in the steel tube at the bottom is welded, as it must be deaf. Then a piece of a bar 50 mm long is installed in it, a ball is placed on top of it, then a copper tube goes, inside which a support rod is inserted, welded in the upper part of the structure. It is recommended to lubricate the ball installed inside the tube with grease - this measure will facilitate the free rotation of the weather vane under the influence of the wind. When the assembly work is completed, the structure must be coated with a special paint for metal, which prevents the appearance and spread of corrosion. |
 | After the paint has dried, the weather vane is installed in a mount that is installed on the ridge or chimney of the roof. This photo shows a ridge mount, but it, of course, may be different. |
The above instructions can also be used to make a weather vane with a different flag. The difference is not fundamental, and consists only in the choice of stencil and size. steel sheet, to which the drawing will be transferred.

There are other schemes for manufacturing a weather vane, in which elements indicating the cardinal points are involved. They can be used in combination with an arrow or without it. TO distinctive features include the following manufacturing steps:

- Instead of a ball, a bearing corresponding to the diameter of the vertical inner column can be used as a turning mechanism. A bearing with an outer diameter of 20 and an inner diameter of 9 mm is well suited for a weather vane, however, it must be borne in mind that it must fit tightly into the housing tube. Therefore, for this purpose, the so-called reinforced ¾ inch VGP pipe is usually selected, having an outer diameter of 26.8 and an inner diameter of 20.4 mm, with a wall thickness of 3.2 mm. The bearing is installed in its lower part. If it enters too freely, then a layer of tin is welded onto the outer part of the ring, but this procedure will require a powerful soldering iron.
- Instead of fastening separate parts designs using can be used threaded connections, but in this case, you need to purchase a pipe with already threaded threads or have a special tool - an appropriate die for cutting it or a die.
- If it is supposed to include indicators of the cardinal points in the design, then it is more difficult to do without welding, although if desired, a solution can be found here. For the manufacture of this part of the structure, metal bars are required - they can be round or square. You will also need metal letters N, S, W, E (or in the Russian tradition - C, B, Yu, Z), cut from a steel sheet 1.5 ÷ 2 mm thick. The size of the letters depends on the height of the building, as they should be clearly visible from below.
The letters are welded to the bars, and the bars to the lid. They should be perpendicular to each other, forming four right angles.
- If a metal sheet of 1 ÷ 1.5 mm is selected for the manufacture of a weather vane flag, then it can be cut with metal scissors.
Taking into account the peculiarities of the manufacture of a particular design, it is possible that additional tools will be required for work.
Installation of a metal weather vane on the roof
In order for the device to work properly, it is not enough to make it with high quality - it is also necessary to correctly install it on the roof, while orienting the scale with the letters fixed on the crosspiece to the cardinal points. You can set the points correctly using a regular compass (many people now have it even in mobile phone), and also, for example, by the position of the North Star (north, N) or, with some error, simply by sunrise (east, E).

The weather vane can be fixed to the roof in several places and in various ways:

- On the weather vane (cap) of the chimney using several metal strips for fixing, which are screwed or welded to the base. If it is planned to position the weather vane in this way, then the installation is carried out before the hood is raised on the roof to the installation site.

- On the ridge, corner or spire of the roof of the building with the help of special brackets, which are fixed with self-tapping screws.

- On the wind board of the pediment.
It should be noted here that if the end of the steel wire is fixed to one of the fixed parts of the metal weather vane, and the second, stretched to the ground, buried one and a half meters into the ground, then the weather vane will become an excellent lightning rod. However, it still requires a professional approach.
Checking the operation of the weather vane is quite simple - it should rotate even from the influence of a weak wind and take a position parallel to its direction.
In order for the structure to function properly, it must be maintained in working condition by regularly lubricating the bearing or the metal (glass) ball installed inside with one of the traditional lubricant compositions.
Weather vane from plastic bottles
For those who do not have the opportunity to make a metal weather vane on their own or order an experienced craftsman, but there remains a desire to decorate country house With this accessory, you can use for its manufacture the material that is found in every home today - these are empty plastic bottles. Of course, this option is used more as a decorative element than a functional one, but there is no doubt that it will enliven the exterior of the house.
There are many options for decorative weather vanes made from plastic bottles. In the following, some of them will be briefly discussed.
First option
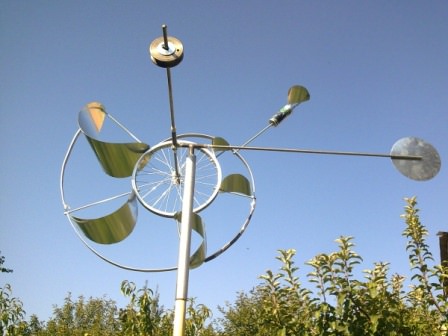
This weather vane model can be called the most difficult to manufacture from this “line”, since, in addition to bottles, this design will require a bicycle wheel and a tube on which it will be installed. In addition, it is necessary to prepare a support for fixing the wheel - it can serve, for example, as a pole. It is not recommended to install such a weather vane on the roof, since when exposed to wind during rotation, it will make a certain noise that the inhabitants of the house are unlikely to like at night.

This version of the weather vane is also called the "Ferris wheel" or "mill", for its external resemblance to these designs. If a suitable place was found for this device in the summer cottage, then for its manufacture you will need:
- A wheel that can be taken from an old children's or adult bicycle.
- An even number of plastic bottles of different sizes and preferably different colors.
To make such a weather vane does not have to make much effort.
First, with the help of a marker, the wheel is divided into equal sectors, and the bottles will be fixed along these markings. To fix them, you need to do the following manipulations:
- Holes with a diameter of 3 mm are drilled along the markings.
- Then, through these holes, using metal screws, bottle caps are screwed to the outside of the wheel.
- Further, the main structural elements are being prepared, which will act as blades - plastic bottles. To work on them, you need a sharp clerical knife. They cut off one edge from large bottles as shown in the photo. Half-liter bottles remain intact.
- The next step is to alternately screw the bottles to the lids fixed on the wheel, and so that the cuts on the larger bottles are turned in one direction.
The wheel is fixed in such a way that it can move - it can be bent with the letter “G” and a flattened tube, with an external thread at the free end. The tube is fixed on the top of the pole with self-tapping screws through holes drilled in its flattened part. After that, a wheel is put on the edge of the threaded pipe and fixed in such a way that it can spin.
Such a weather vane must be installed in an open space so that the wind can, falling into its blades, set the movement.
Second option
A similar weather vane model is called a "turntable", as it rotates around the axis on which it is installed horizontally.

For the manufacture of this product, you will need one liter or one and a half liter bottle and a metal rod that will act as an axis. A spoke from a bicycle wheel is well suited as an axle, since it has a thread at its end, and if necessary, fix the structure in a certain place, it can be easily bent.
Work on the manufacture of this weather vane will take quite a bit of time, and they are carried out in the following order:
- The selected bottle is marked into several sectors (in this case, six) using a marker. There are bottles that already have a relief pattern, which will allow you to do without markings at all.
- Further, in the marked places, peculiar stripes are defined, rounded off from the bottom side of the container. The stripes should be located in the middle of the bottle, as shown in the illustration.
- The next step is to cut out the marked strips around their entire perimeter, except for the upper part, and then bend them from the bottle at a right angle. When the spinner is spinning from the wind, the blades will take the optimal position.
- After that, in the lid and in the middle of the bottom of the bottle, holes for the axis are drilled or pierced with a heated awl. They should be slightly larger than the diameter of the rod - only then the bottle will spin freely on it when exposed to wind.
- The prepared rod is rigidly fixed in the selected place on a wooden base using, for example, metal clamps. The axis must take a horizontal position.
- Then, a bottle with cut-out blades is put on the rod and a nut is screwed onto the thread of the rod in the bottom part, which will hold the resulting weather vane on the axis when it rotates from the wind.
Both the bottle itself and the bent blades, if desired, can be decorated with insulating colored tape or paint to make the weather vane more picturesque, especially when rotated.
Third option
This version of the decorative weather vane resembles a children's spinning top or hanging lantern, so the master himself can give it a name.
To make this model, you will need a two-liter or one and a half liter bottle and a threaded rod at the ends. If the previous turntable was installed horizontally on the axis, then the spinning top is fixed in a vertical position.

The work on the manufacture of this uncomplicated model is simple and is carried out in the following order:
- The plastic bottle must be marked, setting aside 50 ÷ 100 mm from its upper and lower parts, depending on the shape of the bottle, defining the lines between which vertical cuts will be made.
- Then, from the top to the bottom line, the middle part of the bottle is cut into strips about 10 mm wide.
- In the next step, the bottom side of the strips is bent at an angle to one side outward, and the top side to the other side, also at an angle. Additionally, in the middle part of the strips, you can also make one or two bends in different directions.
- Further, in the center of the bottom part, as well as in the bottle cap, you need to make holes with a heated rod or awl.
- Then a rod is inserted into the holes made, which should be less than the height of a whole, uncut bottle, by about ⅓ part. In the bottom part, as well as on top of the cover, nuts are screwed onto the thread of the rod from the outside. At the same time, the design seems to be “flattened”, acquiring the characteristic shape of a New Year's “lantern” or a children's top.
- Now, it remains only to choose a place and fix the finished "windmill". To do this, the protruding part of the rod can be bent into a loop, for which the weather vane will be fixed. However, there may be other options - any owner will surely be able to figure out how it is more convenient for him to install or hang this "toy".
When making holes and choosing a rod, it must be borne in mind that the bottle must rotate freely, without any interference and braking, on the axis.
Fourth option
This model, unlike the previous weather vane, consists of two horizontally arranged tiers, along which semicircular blades are cut. The weather vane is also made from plastic bottle, which is fixed on the axis according to exactly the same principle as the previously considered model.

However, marking and cutting the bottle walls for this model will still be more difficult. First, on the walls along the vertical, you need to define two wide strips separated by one narrow one. The next step is to draw semicircular blades on each of the strips with the help of a marker, somewhat reminiscent of large fish scales. Then, with a sharp knife, cuts are made according to the drawing, while maintaining integrity in the upper and lower parts of the future blades - their width should be equal to 10 mm. After the blades are cut, they are bent at an angle of 90 degrees to the main surface of the bottle.
Further, if there is such a desire, the weather vane can be painted in different colors, choosing their optimal combination with each other. After the paint dries, the weather vane is assembled and fixed in the same way as the top. In addition, this model can be simply suspended only by a cord that is threaded through a hole in the lid. And so that the suspended weather vane does not dangle much in the wind, it can be loaded by putting a pebble inside the bottle.
* * * * * * * *
In conclusion, we can add that if you plan to decorate the roof of the house with a full-fledged metal weather vane, but there are no necessary tools, and there is little experience in this type of work, then it is best to order such a product to a master who is professionally engaged in welding and plumbing work and has a whole arsenal of tools. Such a specialist can be found in any auto repair shop. Well, a sketch of a weather vane can already become the owner's personal contribution to its manufacture.
And finally, to complete the picture - an informative video that shows the manufacturing process of another interesting model of a metal weather vane:
Video: The work of the master in the manufacture of a metal weather vane for the roof
A weather vane is a metal flag with a counterweight that rotates under the influence of the wind and allows you to determine its direction. In the economic part, knowing the direction of the wind can be very useful!
And when you also make a weather vane on the roof of the house with your own hands, you put your soul and understanding into its protection, and every day you have the opportunity to admire your skill. Moreover, the variety of samples is huge, if only there was imagination and hands!
In fact, the very word "weather vane" comes from the Dutch vleugel and literally translates as "wing". It has long been fashionable to install family coats of arms on a weather vane, and if there were none, then silhouettes of animals, birds, people, and most often a rooster.
Even according to modern concepts the weather vane not only crowns the house, as many people believe, but also energizes the air element. You will be interested to know that the most ancient weather vane that was found at all was made in 48 BC and depicted the formidable menacing god Triton.
Apparently, even then weathercocks had a certain symbolic meaning. Certain meanings were attached to the shape of the weather vane, because people at all times believed that it was a charm that protected the house from all troubles.
The meaning of the weather vane figures: we decide on the design
Modern specialty stores and designers in particular offer a huge selection of weather vane sketches - you just need to choose something from a plump catalog. But it is much more fashionable today to come up with your own design, with its own important meaning.
Previously, once weathercocks met en masse in coastal zones, on the homes of sailors, for whom determining the correct direction of the wind was very important. It is precisely such ancient forms as a fish and a mermaid, which certainly bring good luck in maritime affairs, and came from there.
If the weather vane is made in the form of an animal, then the meaning is given to it depending on the type of such: a lion brings courage and courage, a cat brings comfort in the house, an eagle brings protection, and a dog brings true friendship. But the horse is depicted when they want to be successful in business. You can also apply to best traditions Middle Ages by installing a weather vane on the roof with the symbol of your occupation.
As you already understood, a weather vane is an international detail of the exterior design of a house, and each of its types has its own symbolic meaning. So, a rooster on a weather vane protects all household members from the evil eye, unclean people and trouble. It is he who is put on the roof when they want to protect themselves from natural disasters, fires or robbery. In pagan times, the weather vane-rooster personified vitality, and his singing drove away evil spirits and marked the coming of a new day.
Even in ancient Persia, the rooster was considered a magical creature, and in Christianity, the rooster is the emblem of St. Peter, who denied his teacher three times while the rooster crowed. And all in the middle of the ninth century, the Pope of Rome issued a Decree, according to which the spire of every existing church had to be crowned with a figurine of a rooster, so that Christians would not repeat the mistakes of the apostle. This meant that the church cares and carefully watches over the souls of believers.

The figurine of a ship is a symbol of purposefulness, a cloudless journey along life's roads, clover is a symbol of good luck, an angel is a house guard. Interestingly, many still believe that the witch on the weather vane keeps the evil eye and damage from the eye.
If you want to depict something special and mystical on your weather vane, then put a griffin there - this is an animal with an eagle's head, a snake's tail and a lion's body. Only rich people used to install this for themselves, because the griffin is a symbol of absolute power. But the dragon is a symbol of wisdom, strength and prosperity.

It is customary to decorate the top of the weather vane with a wind rose - these are thin metal tubes that indicate the cardinal points. From above, the weather vane is usually covered with a protective cap, but not always.
There are no strict rules in choosing the image of a weather vane: you have the right to use the symbols of the zodiac signs, come up with a variety of scenes, especially funny ones, stories with subtext. Or forge a family coat of arms of your family. You still don't have it? It's time to create!
Installation of the finished weather vane on the roof
A standard weather vane is a base that is fixed on the roof of the house, pointer arrows that show the direction of the wind and the figure itself, plus the movable part of the weather vane.
In order for the whole structure to fulfill its functions, it is necessary to fix all parts of the weather vane on the roof and correctly distribute the cardinal directions. In other words, position the wind rose in the right direction:

Since the weather vane is constantly exposed to strong winds, its fastening must be especially strong. Quite rarely, its parts are made of wood, but, as practice shows, such products do not differ in durability.
If you decide to purchase a ready-made weather vane, its kit should include the weather vane itself, parts that will orient it relative to the cardinal points, a stem, hardware and some additional elements. Let's look at an example of installing a finished weather vane on the roof:
- Step 1. You can figure out how to assemble the weather vane parts even without instructions - usually everything is quite simple. Just fasten the parts together and put them on the stem.
- Step 2. Next, orient this entire structure according to the compass and fix it with a screwdriver in the right place.
- Step 3. Before you stick the weather vane in the stem hole, put the ball in the hole. It will act as a bearing and reduce friction to a minimum. So the weather vane itself will be more susceptible to the wind.
- Step 4. Now insert the weather vane into the shock.
If you did everything right, the weather vane will be sensitive to the wind and turn.
Various DIY options
The simplest and fastest weather vane can be made from plywood, you only need one sheet of 10 millimeters thick, a jigsaw and a hacksaw.
Then all this will need to be fixed on a metal rod about half a meter long. But the aesthetic qualities of such a product leave much to be desired, and therefore we will offer you other options.
Weather vane with propeller: colored and reflective
The weather vane, which was given dynamism, looks most impressive. We are talking about moving elements, which are affected by the wind. Therefore, we will now figure out how to make a weather vane with a propeller with our own hands step by step:
Reflective wind vane with propeller
And here is the one that will let out sunbeams. Fashion item! Surely, you have seen home-made weathervanes-windmills from ordinary disks that look amazing on the roof more than once.
So, we need the most common wheel from a scooter or roller skates. If you don’t have them, you can easily get them at a sports store or simply remove them from old unnecessary things. Then follow these steps:
- Step 1. We mark the wheel for making slots for future blades. It is better to make a stencil for this purpose. Normal ballpoint pen we make risks on the wheel for about 4 blades, for starters.
- Step 2. We clamp the wheel in a vise so that later the rubber sawdust does not fall on the bearing. We put the hacksaw blade at an angle of inclination of 30-45 degrees and start sawing from the top of the wheel. To do this, take a saw for metal and do not rush, otherwise you will damage the hacksaw blades. You need to cut to a depth of 2/3 the thickness of the rubber, but not to the steel lining.
- Step 3. As soon as the first cut is made, we transplant the wheel and make the second cut.
- Step 4 Now think of a mirrored surface to reflect the sunbeams. The simplest is to take old CDs and DVDs for this purpose. In order not to accidentally scratch your hands, it is better to wear gloves.
- Step 5 Slightly shaking the disk, insert it into the cut carefully so that it does not bend or break. By the way, if it breaks, just throw it away and take the next one. It’s better to practice this way several times, so that later you can quickly and successfully put everything on the glue.
- Step 6 Prepare the epoxy. Do not use Moment glue and similar analogues, as they create a brittle zone at the border of the disk and wheel, and the glue itself does not tolerate destructive ultraviolet rays. Therefore, the most suitable option would be resin.
- Step 7. Assemble the propeller on the resin better on fresh air. Line your work surface with newspaper and dilute the components right before use. Watch the density of the resin: it is important that there is not too much binder and it does not drip off the weather vane.
- Step 8. Now carefully insert the smeared edges of the discs into the cuts. We do the same with the other blades. And carefully coat with resin all the voids in the wheel. The main thing is that the mirror and non-mirror parts alternate when the sun reflects from such a weather vane.
- Step 9. Now we take the turbine, put it on a chair and carefully adjust the blades. The wheel should be parallel to the working surface, and the blades should touch it. Even if you get some kind of curvature, do not be discouraged - it will still spin.
- Step 10. Let the glue dry for two or three days in summer weather, and at this time take care of the windmill rocker of the very part on which we will mount the wind wheel and tail blades. The tail blade itself is needed in order to direct the wheel into the wind. The most ordinary hacksaw and discs will help you cut the desired part.
- Step 11. Now you need to install the handle or pole. The main thing is that the upper end of this should be with an even cut, and in the center of it we will drill holes to secure all this.
- Step 12. At the finishing stage, check that the wheel is balanced, because if the discs are of different weights or the installation is inaccurate, the imbalance will lead to strong vibrations and mechanical noise from such a weather vane. To fix this, simply turn the wheel to the desired angle.
- Step 13. When lifting such a weather vane to the roof, the main thing is not to accidentally destroy it by hitting foreign objects.
The reflected rays of the sun from such a weather vane will let sunbeams into the whole dark place of your garden, and it will seem magical!


Bright weather vane from a plastic bottle
You will be surprised to learn what wonderful weather vanes are obtained from ordinary plastic bottles, which are thrown into landfills in huge quantities every day. Moreover, the weather vane itself can be made multi-colored!
But we were talking now about a simple windmill, although you can even make a full-fledged weather vane from a bottle. Why not? Moreover, we have prepared for you detailed photo instructions how to make a weather vane from a bottle with your own hands - you just need a strong wooden block, at one end of which we will fix the fan, and at the other we will make vertical plumage.
It is necessary to fix everything on the axis right in the center. To make a vertical plumage, we perform all the same manipulations as with a simple windmill, from the same walls of a bottle without a neck. The only thing is that it is desirable to straighten the plumage and only then insert it into the slot at the end.
Step by step:
- Step 1. Cut off the neck of the bottle and cut the sides into strips 25-40 millimeters wide. Make sure they are the same width so that you don't have a leftover. Therefore, to begin with, simply measure the circumference of the bottle with a simple string or centimeter, and divide it into equal parts.
- Step 2. We bend these strips down and to the sides at an angle of 40-45 degrees, and cut off the ends of the strips on both sides.
- Step 3. Now we rotate each strip a little so that we get the profile of the propeller.
- Step 4. Next, we make a hole in the bottle for installing a weather vane. We will mount it on a shaft, which you can make from any rod.
- Step 5. Now think over the limiters that will not allow the propeller to fly off its axis.
In practice, everything is simpler, see for yourself:

Here is another fairly simple option:

And here is such a wonderful weather vane with painting:


Keep in mind that a weather vane made from a plastic bottle will last you a maximum of five years. Because plastic does not tolerate ultraviolet rays. There is, of course, an option to paint it in light-resistant paint and try to prolong its life. But it is much more expedient to use such a weather vane as a temporary one, making a real one out of metal in the future.
After all, judge for yourself, in what conditions is the weather vane on top of the roof? These are constant strong winds, raindrops, temperature changes, corrosion from residential smoke and heating from sunlight. Not to mention the destructive power ultraviolet exposure, because of which the presence of a weather vane on the roof can be safely called the most stringent conditions of all possible.
Such a roofing element must be the strongest! And therefore the only durable materials that are able to withstand all this - roofing metal, galvanized metal and stainless steel.
“Real” weather vane made of metal
Traditions still exist today artistic processing sheet metal. Today, you can often find weather vanes on the roofs of houses, made with special love and invention.
Even improvised weathercocks from an old cast-iron bucket or flask, which do not decorate the pipe, of course, but they remarkably protect against wind blowing and improve traction. Therefore, if you were able to build a good stove yourself or put up a fireplace, then the basics of tinsmithing will be within your power.
All you need is a few tools and a quality sheet material. Even in the absence of the necessary skills, you can still make at least the simplest, but cute weather vane:

What material to choose for manufacturing?
Most often, the weather vane is cut from roofing iron. The main requirement for him is that the depicted figure clearly looms against the sky and is clearly distinguishable. Therefore, it is not customary for him to make too many details, especially small ones. Usually it is a silhouette of a person or an animal or a fabulous creature, understandable and recognizable.
Why from this material? The fact is that sheet metal was the most common material in cities and towns at the end of the 19th century. At that time, houses were often decorated with carved decor, and especially expressive decoration was obtained from lace tin. An openwork crest was fixed on the ridge, and miniature turrets with tin weathercocks were installed along the edges.
But the most beautiful and spectacular weather vanes are made of copper. It's all about the quality and properties of this material, and therefore it is easy to give it volume and a more expressive look. Warm golden color always looks spectacular:

How to draw a picture on a tin sheet?
You can take sketches for making a weather vane from us, in this article. Yes they small size. The easiest way is to simply redraw them or pass them through special programs that convert them into a vector drawing. The third option is to print any image you like on a sheet in a large cell, and then enlarge it all manually on the finished cardboard. It's not difficult, believe me. Still, you will not find the exact dimensions of the weather vane, since they need to be calculated individually.
And now about how to transfer the drawing to a tin sheet. Many people do this: they spray water from a spray bottle onto a protected sheet of metal and glue the pattern. Then a core is drawn along the contours, and all wet paper is removed. Draw a picture again and cut out large pieces of metal with a jigsaw, and smaller ones with a metal file, or a large chisel. The most complex parts are easiest to process with a file.
If you just want to redraw the drawing from the sample directly onto the tin, a grease pencil will help you, which you can make yourself: from four parts of wax, two parts of black powder or oven black and one part of lard.
Just add all the ingredients to the melted wax, mix thoroughly and pour the liquid mass into the hollow trunks of any weeds. In extreme cases, use a paper tube folded in several layers. When the wax mass hardens, you will get a solid rod, which will be especially convenient for drawing clear lines on roofing metal. Here good example:

When you finish drawing and remove the paper from the metal, use a steel scriber and ruler to connect the corner points, draw circles and arcs with a compass, which has steel needles at both ends. For example, if you transfer straight or slightly curved long lines onto metal, you can make the interval between them quite large. But where you transfer the contours of small parts from paper, the distance should be reduced:
More to draw openwork patterns in sheet metal is easy with special tools that are made from special tool steel No. 8 and 10. And after each cut working part weather vane needs to be hardened. If patterns repeat on your weather vane, it is better to make a template. It is easy to make it from thin plywood or thick cardboard. The main thing is that it should be in full size.

How to cut an image from tin?
But if you don’t have special cuts, then use chisels and a regular chisel. This is how sheet metal should be cut:
- Step 1. Set the tip of the blade and slightly tilt the cut so that it is convenient to observe the movement of the blade.
- Step 2. Without taking away from the metal surface, place the cut already vertically and hit the end of the handle with a mallet. You need to hit so hard that the roofing steel immediately spreads, the first time.
- Step 3. As soon as the metal is cut through, move the cut and repeat everything again.
Note that the cuts themselves come in different shapes of blades:
- Slicers with semicircular blades are good because they have greater maneuverability. They are especially convenient for contours with a complex configuration, and all the edges of the future weather vane are smooth, without burrs or steps.
- And semicircular cuts with wide blades are good for making straight or slightly curved lines.
- Candles with straight blades - only straight lines and corners of openwork openings are convenient.
If you don't have special materials, it is also convenient to cut sheet metal with scissors for metal or a jigsaw. You can then smooth out all sharp edges with a regular file. But do-it-yourself weathercocks are especially beautiful, they are obtained if some details are additionally highlighted with the help of chasing.
You can also apply in a move special machine:

The most difficult thing in this matter, which you will have to face, is the execution of patterns on sheet steel:
- Step 1. On the sheet thick paper full-size future weather vane draw a picture.
- Step 2. Now proceed to transfer this drawing to the roofing iron. To do this, attach the paper along the edges of the iron sheet with small pieces of plasticine or with glue.
- Step 3. Using a chisel or a sharp compass, transfer the drawing to the sheet.
- Step 4. Now place the tool on the line of the drawing and apply a quick sharp blow, but not a strong one.
- Step 5. Apply the same blows step by step until the whole drawing is done. As a result, you will have small dents on the drawing line, which are also called black. There is a difference what will be the distance between them - it depends on the nature of the lines themselves.
And to bend the edge, you need to make two precise and strong blows with a mallet on opposite edges of the sheet, and then in the middle.
How to install a finished weather vane on the roof?
Make a weather vane stand from a small piece of pipe, up to 1.5 centimeters in diameter and about 12 centimeters long. Cut the thread in its upper part, and fix the bearing in the lower part.
On the roof itself, you can fix the weather vane with steel strips and fix those on the side of the rack. The main thing is that the stripes do not interfere with the free rotation of the weather vane itself.
A great option is to install a weather vane immediately with the base:

Or make a special stand for it:

Another option:

The selection of fasteners for the manufacture of a weather vane depends on how you will mount the cardinal pointer. The easiest way is to simply weld this pointer to the main body from the pipe. This can be done by a welder or a car service worker.
Do not forget to build a protective cap for the rod as well, which will protect the bearings from rainwater.
Every owner of suburban real estate wants to make his home beautiful and unique. If you know how to make a weather vane with a propeller with your own hands, then you can equip any building with it. Despite the availability of modern instruments with software, the weather vane remains a fairly accurate device for determining the direction and strength of the wind, which operates around the clock, without the need for energy sources, adjustment and frequent maintenance. In addition, these products perform a practical function, driving away birds that can destroy the crop. Having a little free time, you can make a weather vane yourself from scrap materials that you can always find in the pantry.
Scheme of the weather vane device. Despite the availability of modern instruments with software, the weather vane remains a fairly accurate device for determining the direction and strength of the wind.
Required Tools
This may require the following tools:
- welding machine;
- oil level;
- roulette;
- Bulgarian;
- electric drill;
- riveter;
- jigsaw (manual or electric);
- sandpaper;
- whatman;
- pencil;
- varnish and paint;
- paint brush.
Before work, the tools must be checked and completed.
Back to index
Applicable materials
Weathercocks made from a wide variety of materials are used to decorate houses.

Handling them requires a variety of skills, tools and equipment.
- Wood. This is a lightweight and easy-to-work material, proven for centuries. For wood processing there is no need for complex tools and professional skills. For the manufacture of a windmill, it is necessary to take waterproof wood with good hydrophobic qualities. The tree must be impregnated with a special compound that will keep it from moisture and insects. But a significant disadvantage of wood products is its low strength and fragility.
- Steel. This is a fairly durable material, resistant to strong mechanical stress. You can make a weather vane from black or stainless steel. Stainless steel is resistant to corrosion and has an almost unlimited service life. Ordinary steel can last quite a long time, subject to periodic maintenance and repair. But, given the location of the outbuilding, this task is quite difficult.
- Copper. This metal is strong enough to withstand strong gusts of wind. Sheet copper is quite easy to cut and saw. An important factor is that soldering can be used to connect copper parts to each other. The softness of the material makes it possible to process it by chasing. Silver can also be applied to copper using photo developing chemicals. The metal is resistant to corrosion and does not need additional finishing.
- Plastic. Modern polymeric materials have sufficient strength and resistance to ultraviolet radiation. Plastic is easily amenable to all types of processing. It can be sawn, glued or soldered. Polymer plastics do not lose their qualities when strongly heated or cooled.
- Plywood. Only multi-layer waterproof plywood can be used in the work. But, a plywood product will not last long. Even a coating of several layers of paint will not save it from destruction. If the plywood outbuilding works for one year, it will be considered a great success.
When choosing a material for work, the ultimate goal of making an outbuilding should be taken into account. In any case, it is better to choose a durable material that will last for many years.
Back to index
Weather vane device

As a rule, outbuildings are installed on the roof of the house. At this point, they can be seen from anywhere in the area. Based on this to appearance such a product is subject to increased aesthetic requirements. According to it, an opinion will be formed about the tastes, worldview and prosperity of the owners of the land allotment. Therefore, when making a weather vane, you should show maximum imagination and creativity in the design and creation of every detail.
The weather vane device is quite simple:
- Frame. It is made from steel pipe inch section. It is allowed to use a brass pipe, which is quite durable and resistant to corrosion.
- Bearing rod. It is inserted into the body. Represents steel reinforcement without notches. The wind turbine is attached to it. Based on this, it is recommended to use reinforcement with a cross section of 9 mm. This is enough to withstand the wind load acting on the wind vane.
- Flygarka. It is a rotary part of the device that indicates the direction of the wind. In addition, the wind vane carries an artistic component that determines the theme of the product.
- Bearings. These parts are necessary for the free torsion of the carrier rod inside the housing. For assembly, products with inside diameter 9 mm.
- Fasteners. Depending on the method of fastening the outbuilding, corners, linings, self-tapping screws, bolts or rivets are used.
- Propeller. This is a detail, by the frequency of rotation of which you can determine the speed of the wind. The propeller is made of tin, plastic, plywood or wood. A good option is to use an old computer fan.
Despite the abundance of finished products on sale, a homemade weather vane will allow you to put your soul into work and bring together all family members to implement a joint project. In the manufacture of this device with your own hands, there is work for everyone.
Since the main part of the windmill is a wind vane, special attention should be paid to its design.
It may look like this:
- cockerel;
- sailboat;
- propeller ship;
- aircraft with one or more propellers;
- galloping horse;
- a cat chasing a bird;
- hunter with a gun;
- moon with stars;
- lion on the hunt;
- angel;
- swans or stork in the nest.
You can make a flygark in any design. For a fishing lover, it can be catfish or pike. A motorist will like the contour of a sports car. In this case, there are no limits to the imagination.
Today, a rooftop weather vane is more a tribute to tradition than a practical device. In order to make it, you need to have minimal locksmith skills.
You can decorate the house, always be aware of the direction of the wind and surprise your neighbors if you make a weather vane with your own hands. For this, it is desirable to use sheet copper. The main elements that make up the product: body and axle. The wind vane is driven by the force of the wind.
Why do you need a weather vane
The main purpose of a weather vane is to report the direction of the wind. However, it is believed that the device in the form of a rooster can serve as a talisman for the home. According to Feng Shui, weather vanes help establish good relations with neighbors.
If you decide to attach the product to your roof, then first of all you should make drawings of the propeller. Its presence on the weather vane will allow you to assess the strength of the wind. However, it is worth considering the fact that vibration can go from it through the structures. Most often, the product is used to decorate the roofs of various buildings located in a summer cottage. Such an element will become a harmonious addition.

Work order
- First you need to build a support. The pipe is taken. A piece equal to 12.5 cm is cut off from it. The diameter should be about 1.3 cm. A thread must be made in the upper part of the pipe so that a cover can be put on it.
- A bearing is placed inside the pipe. It is important that it fits in size.

- The weather vane on the roof must be installed firmly. For this, it is recommended to use steel strips. They are mounted to the side of the device, but so that the rotation of the product occurs without interference.
- Particular attention is paid to the case cover. It is not difficult to make it from steel, the main thing is that it fits perfectly into the pipe thread.
- This product has a wind rose. Often it looks like thin steel sticks with letters attached to them indicating the cardinal points.
- To prevent moisture from entering the housing, a cap is mounted on top.

Photo gallery


Roof mount features
It is not enough to make a weather vane with your own hands, you need to correctly install it on the roof. First, the body is stuffed with lithol or grease. Then, according to the compass, the direction of the wind rose is adjusted to the cardinal points.
There are several mounting methods:
- on the chimney cap with metal strips;
- welding to the end of the body of a round flange;
- mounting with clamps or flat plates.
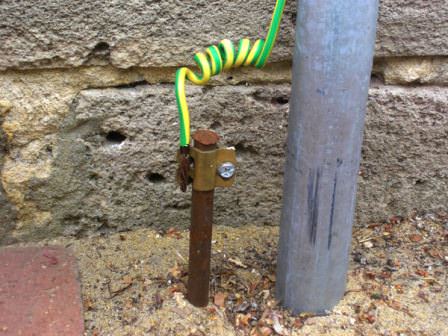
To understand that everything is done correctly is quite simple - the product must rotate freely around its axis even in light wind. In this case, you can install a vertical plate on the weather vane, its deviation will show you the strength of the wind. After you have installed the weather vane with your own hands, you can also put a lightning rod. Fix one end of the steel wire to the product, and ground the other one and a half meters.
Now you know how to make a weather vane. To ensure that the device does not fail for a long time, the bearings must be lubricated at least once a year.
Weather vane as a decorative element
The most popular decorative form of the product is a rooster. But this does not mean that you should stop at this option. At the moment, you can find drawings for products completely different forms. For example, nothing prevents you from making a product in the form of characters from fairy tales, insects, signs of the zodiac, an airplane, a ship or animals.

You can make any dynamic elements in the design of the weather vane. It can be a figure of a horse that moves from a pecking bird or from a propeller. Such a refinement will be appreciated by all the neighbors in the district.
Moving parts will be visible on low buildings. They are great at repelling birds. You can put weathercocks of this type in garages and greenhouses. The product will decorate.
materials
Now it’s clear to you how to make a weather vane with your own hands, but the question remains of what the product can be made of. As a rule, preference is given to copper or steel. At the same time, the outside of the finished device is covered with paint. It is rare to find forged products. But in fact, you can make a weather vane from improvised materials.
So, CDs, plastic bottles, tin and moisture-resistant plywood can act as a material. If you prefer wood, it is worth remembering that when connecting the parts you do not need to tightly fasten them. Otherwise, the dynamics will be broken.


The simplest weather vane model (video)
A weather vane is used to determine the direction and speed of the wind. It is installed on the roof or any other high point, and can be equipped with a rotating tube with an arrow to determine the strength of moving air masses. You can make a weather vane yourself, and if you show imagination, you can make it not only a determinant of the strength and direction of the wind, but also an original decorative element that adorns the roof of a house in a personal plot.
Before you make a weather vane with your own hands, you need to prepare a sketch on graph paper or cut out a ready-made template of the figure you like. The most popular figurines for making a weather vane are animals and birds, in particular, a cat or a rooster. It is better to make stencils from lined paper or cardboard, so that later you can easily transfer the pattern to a metal sheet.
In addition, you need to prepare a drawing of the arrow of the weather vane and its rotary assembly, with the help of which it will be possible to determine the direction of the air masses. The drawing should show all the right dimensions: structure height, arrow length, swivel diameter, etc.
Necessary materials and tools
Before you make a weather vane, you need to purchase the necessary material:
- Metal sheet 1.5-2 mm thick.
- Wire 3 mm thick
- Three metal tubes with a diameter of 15, 22.5 and 25 mm
- Copper tube with a diameter of 18 mm
- Profile pipe 15x15 mm
- Metal ball with a diameter of 80 mm
- Ball from a bearing with a diameter of 15 mm
- Round rolled metal 12 mm
- Iron plate 60x60 mm 12 mm thick
From the tools you will need equipment for cutting metal - a grinder, an angle grinder, an electric jigsaw, as well as a welding machine, an electric drill with a set of drills for metal, a hammer, a chisel, a set of files. Of course, in addition to this, you will need special protective gloves, a shield, glasses, clothing for working with welding and cutting metal.
Cut out the shape from the template
A weather vane figurine template is applied to the metal sheet, then it must be cut along the contour. To do this, the sheet is fixed with clamps to prevent displacement during cutting, attach to the workbench. A template is cut along the contour with an electric jigsaw, after which all burrs are removed using a grinder with a grinding wheel set for this function. If there are hard-to-reach places, you need to use a thin file. If an animal figure is cut out, for example, a cat, you will need to make holes for the eyes, nose and mustache. This can be done using a drill with a drill with a diameter of 12-15 mm and a needle file. Mustaches are made of wire, 10-12 cm pieces of which are inserted into the holes made for this. The nose of the animal is made of a round bar with a diameter of 20 mm, the end of which can be rounded off using an angle grinder.
Making an arrow
The arrow indicating the direction of the wind is also cut out along the contour previously applied to the metal sheet with an electric jigsaw. In this case, not the entire arrow is made, but only its plumage and pointing part. These parts must be welded to profile tubes with a cross section of 15x15 mm: the index part to one bar, and the plumage to another. Places of welding are carefully cleaned.
Swivel Assembly Manufacturing

To make a swivel assembly, a hole is drilled in the surface of the steel ball with a 13 mm drill. A cover is welded to a piece of pipe with a size of 50 mm and a diameter of 60 mm. In order for both ends of the arrow to fit snugly against the surface of the ball, small indentations must be made on its two opposite sides. Both ends of the boom are welded to these places. Then a rod from a profile pipe is welded to the ball, and a piece of a round tube 50 mm in size is welded to it.
Wind vane mount
After the element of the arrow with the turning mechanism is assembled, you can proceed to fixing the weather vane figure to the steel ball. To tightly dock its base with the sphere, you need to cut out a small part of it in the shape of a semicircle and connect it to the ball by welding. In this case, it is very important to ensure that an angle of 90 degrees is formed between the arrow and the rotary mechanism. The weather vane figure must be mounted on the axis so that a counterweight is formed on both sides.
To ensure free rotation of the weather vane, it is necessary to prepare a support rod: a round bar is inserted into the copper tube, the parts are welded together. A ball from a bearing is inserted into a wide tube, which is lubricated with some kind of grease. After that, a copper tube with a bar is inserted there. The design for determining the strength and direction of the wind is ready, it remains to paint and install it on the roof.
In more detail, the entire process of manufacturing a weather vane and its individual elements is shown in the video.
Making a weather vane with a propeller with your own hands

A windmill with a propeller is able to visually show the strength of the wind. This design is installed at a low height, because at too high roof it will be hard to see with what force the propeller is spinning. The more intensively it spins, the greater the speed per second the moving air masses have. To learn how to make a weather vane with a propeller with your own hands, you can take the knowledge of making a conventional design as a basis. It is necessary to draw up a detailed drawing of the weather vane, including the propeller, which must be made of metal.
For the manufacture of a vertical support is used metal pipe or fittings with a diameter of 13 mm and a length of 12.5 cm. A wooden plate must be attached to the thread on top of the vertical support to fix the horizontal part of the weather vane.
A bearing is installed on the lower part of the structure so that it can rotate around its axis. The weather vane is directly attached to the roof with plates welded to the bottom of the base on self-tapping screws.
The propeller is cut from galvanized sheet metal using metal shears. A hole for fasteners is made in the center of the piece of sheet metal, and its edges are bent to the sides at a certain angle. If the design of the weather vane is made of plywood or plastic, the propeller is attached to its end part with self-tapping screws, but without twisting them to the end, in order to rotate freely on the axis. If the weather vane is metal, a small pin is welded to the end part, at the end of which there is a thread. A nut with a washer is screwed onto it, serving as a fastener for the propeller and a limiter, at the same time.
Making a weather vane from a plastic bottle

The simplest and most budgetary option for determining the strength and direction of movement of air masses is a weather vane from a plastic bottle. You can show your imagination and hold a master class for your children by making a windmill from plastic containers in the form of an airplane. To do this, you will need: two large plastic containers with lids, one wooden block, a nail 10 cm long, wire, a piece of cardboard, a felt-tip pen, stationery scissors.
Bottles are thoroughly washed, cleaned of labels. A sketch of the propeller and wings of the aircraft is made from cardboard. The propeller is cut out from the bottom of the bottle, and the wings pattern is applied to the side surface of the bottle and outlined with a marker.
In the cover with a nail or a drill with a thin drill, you need to make a hole in its center, make the same hole in the propeller, and then connect them by planting them on a nail. The screw must rotate freely around the axis. A blank of wings is cut out of the second bottle, and in the first bottle, using a clerical knife, cuts are made along the width of the wings for their insertion. The fuselage of the windmill aircraft is attached to a wooden block and mounted on the roof.
Often used are wind vanes made from bottles in the form of a rotor. In this case, such a weather vane is not mounted horizontally, but vertically. Square holes are made on the sides of the bottle, resembling small doors arranged in a checkerboard pattern. It is mounted on a vertical axis, which can be used as a wooden or metal bar. Small bearing balls are inserted under the cork to create rotation. Such windmills-rotors are very useful when used on summer cottages: they help keep a weather diary, determining good periods for sowing, determine the strength and direction of air currents, and the sound made during rotation and the very sight of the rotating wings of the bottle scare away birds, protecting the crop.


What to do with a girl on a first date?
Grams or grams - which is correct?
How to solve motion problems IV
Winter landscapes of outstanding artists How to draw a light landscape in winter with a pencil for beginners
Solving logarithmic and exponential inequalities by the rationalization method