Idea #1: Repost it.
The tile can be laid again, and, believe me, it will look good. Refresh the look of a summer house or garage. The laying process should be easier and faster than the first time, since the material has already been prepared.
Idea #2: Break into pieces.
If the tile after removal is not in its original form or you have several types of tiles, then it is better to turn them into small fragments. Such eclecticism will look very original.
Idea number 3: use as a decorative element.
Tile patterns can be very pretty and self-sufficient. Use it to your advantage and turn boring pottery into a work of art.
And now more about how you can use old tiles and turn those ideas into reality.
How to use broken tiles?
Do not rush to get rid of tile fragments, as they can be used in interior design. Here are a few examples of what pieces of tile can turn into:
- abstract painting;
- stand for hot;
- a frame for photographs, mirrors, paintings;
- tabletop;
- cutting board;
- framing for paintings or mirrors;
- Mosaic on the garden paths.
Get rid of the sharp edges of the tiles. You can also chamfer - so the tile will look neater.
On the surface of a solid color, a picture of a tile looks appropriate. If only small pieces remain from the tile, then draw them into an abstraction and place them in a frame. If the tile is well preserved and has an interesting pattern, you can use it as an independent element of the interior. Thus, a color accent will appear on a calm, even wall.
To make a frame, use plywood as a base on which pieces of ceramics will be glued. You can crush and combine them in various variations, regardless of shape and color. Glue all the elements well, give them time to fix on the frame - and you can use it in the interior!
Tiles and other materials
The tile looks good with gypsum - these materials make beautiful crafts. Place pieces of tile on the bottom of a detachable form for gypsum, fill them with mortar. Depending on the shape, you can get an original plate, animal figurines and much more. The main thing is that it does not take a lot of time and money.
In the Old World, painting on tiles is now common. So if you have artistic talent and a few tiles, you can try. You can create both on one element and on several, subsequently arranging them in one panel.
Tile pieces can revive an old flower pot or vase. Just stick a pattern on them, and boring objects will sparkle with new colors.
How to use leftover floor tiles? Use when decorating garden paths or countertops. The latter is decorated like this: the surface is covered with cement, on which broken ceramic elements are laid out. Will it be an ornament or a chaotic pattern - the choice is yours. After the mortar has set, the irregularities are filled with grout. A similar algorithm of actions is also used when making a path: pieces of tiles are heated in cement, and they are given time to dry.
Now you are armed with great ideas. How to use the remains of ceramic tiles - your choice!
After the house has been renovated, many materials purchased with a margin remain unnecessary. Tiles are no exception. Of course, if there is very little left, it is better to keep it just in case: already laid tile can be beaten, then it will be nice to have an ideal replacement on hand.
If there are a lot of tiles left, but they don’t accept them back to the store, or more than one generation has accumulated, you will want to put them into action. Here are some ideas on how to use leftover tiles:
Furniture decor
For furniture decoration, it is most convenient to use broken tiles and make a mosaic out of it. If the tile in the remains is whole, it can be carefully broken by putting it in a cloth bag and hitting it with a hammer from above. Picking up pieces of tiles in size, laying out a pattern or alternating colors, you can achieve interesting things. decorative effect. Attach the mosaic to the tile adhesive, and fill the gaps between the pieces with grout. Even large pieces of furniture can be decorated in this way. Mosaic can be laid out on the countertop in the kitchen, coffee or coffee table.
For small items like flower pots, vases or for mirror frames, photographs and paintings, the mosaic will serve great way design. For the same purpose, you can use long tiled borders without breaking them.

A whole tile is also suitable for facing the countertop. To make the edges look neat, they can be closed with a wooden profile or laid out in smaller pieces.

A large tile or porcelain stoneware can become a small table in itself: you just need to stick it on a plywood sheet for strength, come up with legs and process the corners.

Practical application in the kitchen
From beautiful tiles of a small format, a convenient and heat-resistant stand for hot dishes is obtained, and from very small tiles - for mugs.


Larger tiles or porcelain stoneware can be used to make a durable cutting board. And other useful crafts, not only for the kitchen: 
Now it is fashionable to lay out a kitchen apron with multi-colored tiles. If you have remnants of a close size from different collections (for example, you managed to collect them from relatives or friends or buy them for next to nothing) - this will be an interesting design technique. 
Practical application in the country
At the dacha in the house, the remnants of the tiles can be laid out around the fireplace or stove.
The method of turning a tile into a mosaic, which was described above, is also suitable for decorating outdoor planters, a club or a porch: ceramics are not afraid of moisture. 
From the remains of porcelain stoneware, you can lay out a path in the country. It is better to use a matte or textured material for this, the gloss will be too slippery.
Most likely, you are not indifferent to the mosaic. Such is the nature of this art form. Surely you have admired a certain street panel by an unknown artist more than once. Perhaps your abode is not even deprived of factory mosaics. Thousands of miniature elements, assembled by a caring hand, invariably delight the eye, but sometimes bite the pocket. And they hurt pride - you have so many wandering, but bright, ideas. Why not try it yourself? Take a chance, do-it-yourself mosaic is an indispensable thing not only for the interior, but also for the soul.
At home, compositions are made from anything, the most incredible objects are used: a mosaic of tiles, broken dishes, pebbles, broken bottles, mirrors, and even.
Making a mosaic is divided into stages:
- tile preparation;
- surface preparation;
- planning and sketching;
- mosaic laying;
- grouting;
Quick article navigation
Tile blank
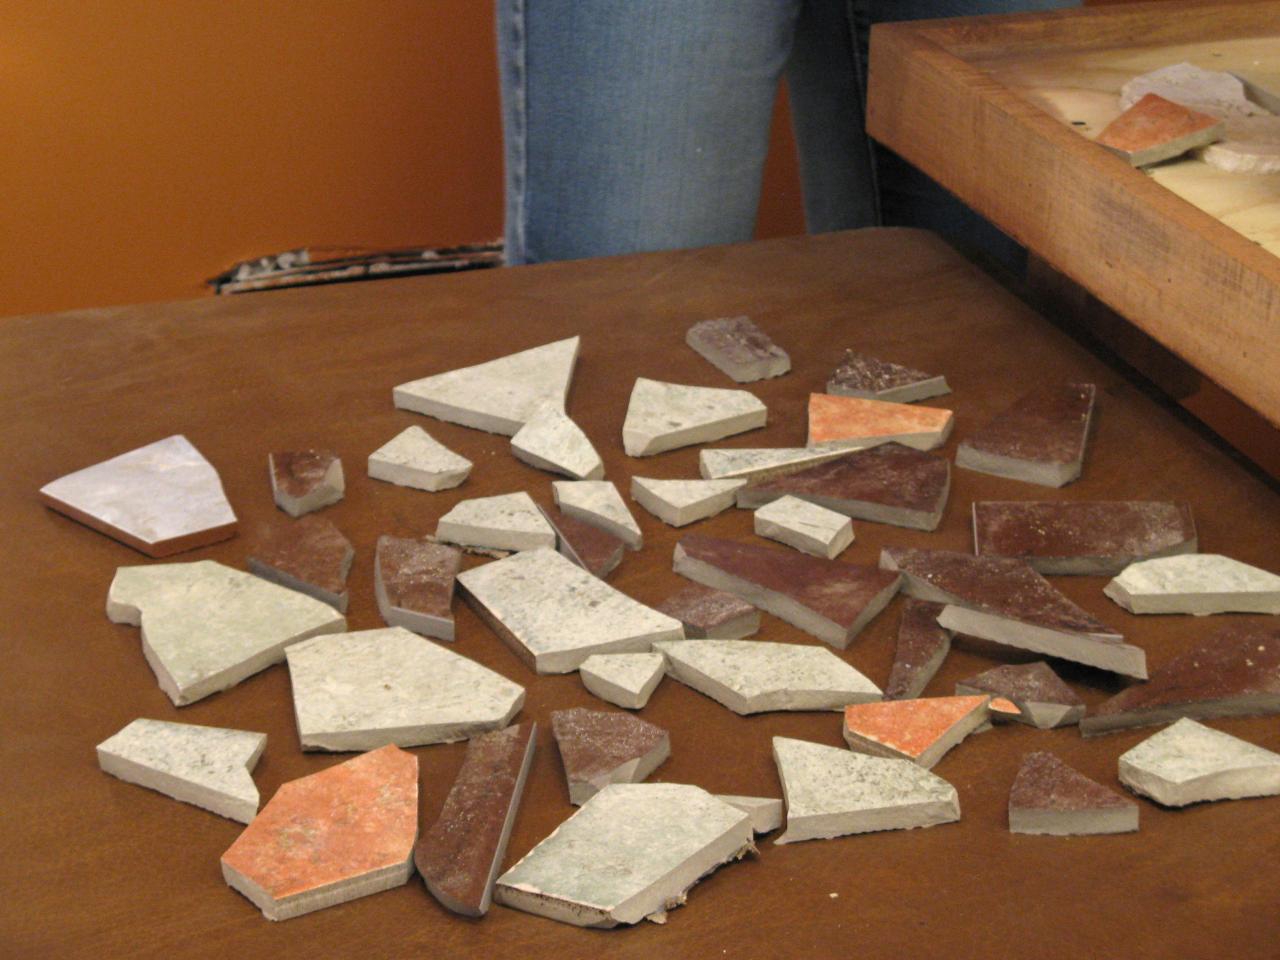
You may already have raw materials, but if you don’t, don’t worry. Any store will gladly sell battle and the remains of ceramics for a pittance. It is good if there is a familiar master tiler who is constantly faced with the need to throw away waste. Take on his "garbage" and find yourself with an inexhaustible supply of tiles. Stock up on multi-colored raw materials, a little bit of different shades is better than a lot of plain tiles. It’s even better to keep the future drawing in mind, it’s easier to navigate.

Mosaic from broken tiles requires small fragments of different formats. We suggest cutting a part of the tile - compositions often need rectangular pieces. Cut ceramics with a glass cutter or a professional tile cutter. If you plan to create regularly, get an inexpensive tool. High cutting accuracy is useless here. Simply break the main part of the tile into fragments. It is more convenient to do this with a rag in which you will wrap the fight, and a hammer wrapped in a dense layer of cloth. The latter is necessary so as not to unnecessarily crumble the material.

Fill in the puzzle pieces different sizes, it is easy to follow a certain format. For the future: do not throw away the remains of tiles, broken dishes, etc. Postpone for later, the failed garbage will one day become part of the masterpiece.

Surface preparation
Suitable base for mosaic - cement-sand screed or plaster, putty and drywall. They provide good adhesion to adhesives and ceramics. It is important that the surface is clean and even. Remove irregularities, repair cracks, if any. After that, treat the coating with a primer, it helps to strengthen the base and increases adhesion.
Sketch preparation

Even a trained eye is easier with a guide. An inexperienced artist, when working with a complex drawing, is nowhere without him. In order not to get away from the dimensions, contours and proportions, apply a pencil sketch on the base. If you have artistic skills, enough hands and eyes. Without such useful baggage (we are talking about skills), use the scale grid method, or even better, transfer the sketch using a projector.
Plan out color scheme and break the sketch into zones based on tonal representations. Consider how to make a mosaic according to your scheme optimally.
Stick to certain rules:
- Start from the center, so the composition will be better in terms of proportions and compliance with the sketch;
- Do the background last;
- Leave abstraction in the end too, first people, animals, plants - something that has complex geometry.
Mosaic adhesive
The mixture for laying out the pieces should have high adhesion to the materials that you use. It is best to work with white glue, regular gray is not suitable for aesthetic reasons. For typical concrete foundations white cement glue (, Kreps Reinforced White) is suitable. For laying on a non-standard base (for example, wood), it is better to use epoxy-based reactive tile adhesive (Litokol Litoelastic), liquid nails or epoxy grout.

Mosaic laying
If you plan to use tiles of different thicknesses, start with the thickest one. It will serve as a guide for others. It is desirable to spread the glue both on the base and on the ceramics, but one of the surfaces requires only light smearing. One that will not increase the thickness of the layer, but will positively affect the strength of the installation.
Apply glue to small areas that have previously been selected on the sketch. Lubricate light areas with a larger area, complex ones will require slowing down. Having smeared glue on the base with an ordinary spatula, remove the excess mixture with a spatula with teeth. If the pieces of the mosaic are uniform in thickness, the work will go easier. Otherwise, the difference must be compensated by adding glue. But even homogeneity does not always save. Pieces that are too different in size require different bonding forces, smaller tiles with the same layer of mixture will always sink a little deeper, so they need more glue. The comb is just a guideline, each element still has to be brought to the desired plane individually. 
Mosaic of broken tiles on the wall does not have to be in the same plane. Start from your own ideas of beauty. In addition to tiles, use other materials that diversify the composition and allow it to match the idea. The floor mosaic should be flat, irregularities and roughness will create problems when walking on the tiles.

It is difficult to achieve an even coating with only the help of hands and eyes. Use a flat sheet of wood, plastic, or metal to periodically press down on the laid out areas and thus level them. It is better to have sheets of different formats. The principle is simple: more complex drawing - less area covered at a time - less sheet.
Mosaic from broken tiles involves laying pieces with gaps. Do not lay tiles close to each other. A very precise fit of the parts will not only complicate the work many times over, but can also cause damage to the canvas later. Seams compensate for thermal expansion of materials resulting from temperature changes. But it’s also not worth making huge gaps, be guided by common sense. The final drawing should not suffer. Do not put pieces of the same size side by side. Too multi-format is also not a “class”, there should be differences, but within reasonable limits.
Worktop cladding

If the countertop is made of wood, clean it of paint with acetone or special washes. Then go through twice sandpaper, first with a coarse abrasive, then with a fine one. These manipulations are needed to increase adhesion, do not start mosaic without preparation.
How ? This requires a different laying scheme:
- Start from the edges, gradually getting to the center;
- Compact the canvas as much as possible;
- Remove glue immediately, high density implies a large number of seams; cleaning at the end will lead to unnecessary waste of time.
Video master class on decorating countertops with mosaics:

Grouting
Applies to floors with walls, and countertops. You can overwrite not earlier than one day after the end of the lining. The mosaic must dry evenly. If the room temperature is too high, cover the canvas with a damp cloth. Before jointing, remove any adhesive residue and wipe the mosaic with a damp cloth. To work, you need a rubber spatula.
Best for mosaic panels is a transparent grout based on epoxy resin with chameleon effect (). It will adjust to the color of each piece. cement mixture much inferior to epoxy in strength and can literally fall apart.

Apply the puffer with a rubber grater, pressing it firmly into the gaps between the pieces. Remove residue with a damp foam sponge. Epoxy mixtures must be washed off with plenty of water, and plaque is removed with special detergents(Litonet gel, Sopro ESE 548). 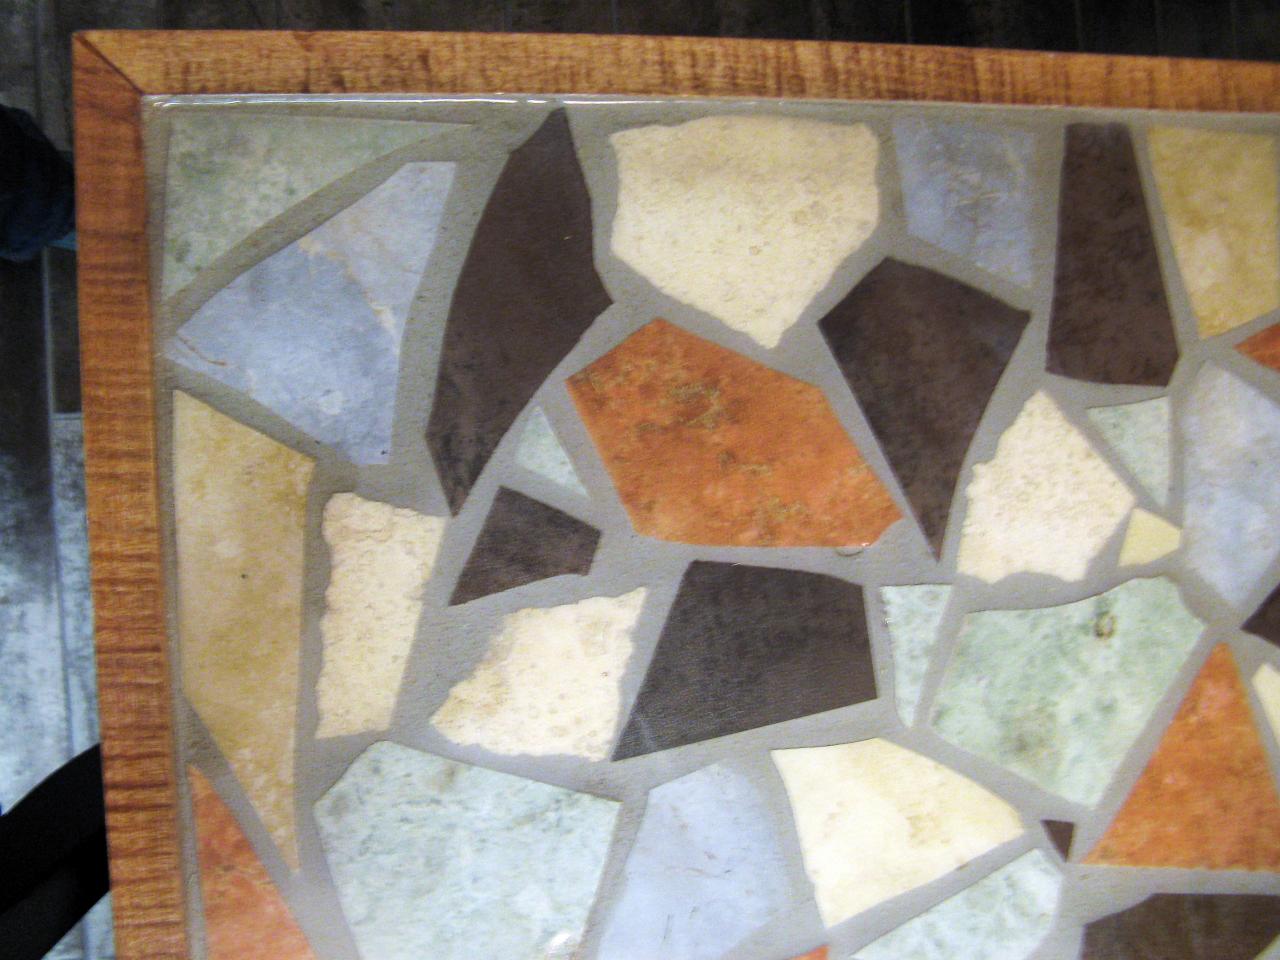

Well, now you know how to make a mosaic at home. We hope that the master class served Starting point. Remember that mosaic requires regular maintenance. Do not wipe it with substances containing phosphoric acid. Use products with a low percentage of acidity, but even after them, wipe the mosaic with a rag and water.
Do not get hung up on tiles, train your imagination and use unusual and interesting objects.
comments powered by HyperCommentsHow to use broken tiles or old whole ceramic tiles.
Old tiles can be used in various finishing work while saving a significant amount of money. And it doesn’t matter - a whole tile, broken tile or together with the base - you can successfully install old tiles.
When replacing an old tile with a new one, a lot of garbage is generated, among which a large proportion are fragments of ceramic tiles and tiles with an old mortar, which, apparently, was applied to an unprepared surface. Broken tiles of any size and any shape can be used in a mosaic, or you can decorate a part of a curved surface with a mosaic, or finish the floor in a bathroom, bathroom, closet, garage - anywhere.
In my case, fragments of old ceramic tiles were used to finish the threshold at the entrance to the house. In one place, the mosaic decoration changed the perception of asymmetry.
How to choose old ceramic tiles for laying.
They picked it up in size, color, and even got a tile with a pattern that was aligned in the center. Finished the edges of the threshold and its parapet.
The front side of the steps was finished with old tiles from the walls from the bathroom. It turned out to be small and glazed.
How to choose an old tile for reuse.

Among the piles of so-called construction debris, it is necessary to select the entire old tile and its fragments.
For example: a whole, in the amount of five pieces, beige colour- will go to four corners and one to the center of the site.
Twenty pieces of blue and the same size - around the edges of the site. There are seven whole tiles left, but different color and size. Lay it on the site with a pattern in different places. The rest of the surface will be filled with a pattern of a mosaic of fragments of broken tiles. Fantasy and imagination are an assistant in this case.
How to prepare a surface for ceramic tiles.
A dense surface is being prepared for the base under the tile. In my case I used cement mortar with not screened coal slag of medium and coarse fraction in the ratio: part of cement (M400) + six parts of slag and two parts of fine-grained quarry sand. The laid mortar was compacted with a wooden rammer, starting from the place where the mortar was laid out and, especially carefully, at the corners and edges of the prepared surface. There is a vibrator - even better.
When the solution shrinks, the large fraction goes down, and a cement suspension with sand and water remains on the surface, which is convenient for smoothing and leveling the laid concrete.
How to lay old tiles.

When finishing the threshold of his house, the tiles were laid in an unconventional way, that is, not from corner to corner, but from the middle to the corner. Why? main reason- the front door, at the threshold of which I wanted to maintain symmetry and match the pattern on the tile with the dimensions of the door.
Then the tiles were laid along the perimeter of the site, with the completion of laying in place of the future imitation of the rug on the threshold.
On the hardened concrete base, a cement mortar was laid out in small sections with the composition: one part of cement (M400) + three parts of fine quarry sand. Slightly leveled and from the middle of the threshold front door laid our old ceramic tiles. How?
On a fresh solution, according to the sides, they put a clean , tiles soaked in water. They leveled it and lightly tapping it with a hand, keeping the level on the horizon, drowned it in the solution until a small amount of water appeared from under the tile. On both sides of the first laying, the rest of the tiles were laid in a row. Further, laying was carried out along one of the sides of the site from the corner of the first laid row, filling the entire surface with tiles.
The horizontality of the laid tile was controlled by a level attached to a flat wooden block with a length equal to the length of the diagonal of the site. A device with a level was applied in different directions over the area in order to reveal uneven places and tiles not recessed in level. It is necessary to correct the unevenness of the tile immediately after laying it, while the solution still retains its viscosity and the tile has mobility. Excess solution squeezed out between the tiles was removed with a rubber spatula.
What to do with broken ceramic tiles.
On a large sheet of paper (you can use a poster or a calendar), glue it with stationery glue front side according to the image on paper (you can use your own drawing), fragments of tiles in accordance with the selected color and size. As the glue dries and everything is glued, lay the glued fragments on the cement mortar with paper up. Lightly compact with an even board, as a rule, with a grater. After a few tens of minutes, or when the glue that binds the fragments of the tile is soaked, the paper can be removed, and if everything lies smoothly, then remove paper base can be used before wet cleaning of the finished laying of the entire surface.
 You can arbitrarily lay out a mosaic without a template drawn on paper, choosing fragments of tiles that are suitable for ornament and type. Level control must be done constantly, not missing this moment.
After filling the main area of the threshold with tiles, we started finishing the parapet wall. Here, the decoration went in the standard way - from the corner in a row along the bottom and up.
Then trimmed the edges of the steps.
The corners were left cement and rounded, since the edges of the tiles are sharp and the tiles themselves can be damaged by metal heels of women's shoes or other objects.
In the process of work, the cement mortar falls on the front side of the laid tile. You need to clean the tile with a dry rag when it sits tightly and does not move during cleaning.
The seams between the tiles and the surface between the fragments laid out with mosaics are well rubbed with ordinary putty to internal walls. It turns out a beautiful contrast pattern.
If the surrounding air is dry and hot, the finished surface is slightly moistened with water and hidden from direct sunlight, covered from above with a damp blanket or other material.
The next day, the entire styling is cleaned of traces of the solution, washed and enjoy their work.
The cement surface left without laying should be painted with thinned paint two to three weeks after all or almost all moisture has evaporated from the surface.
Here is one way you can lay out broken tiles I used five years ago.
Each person has his own approach to decorating a house: someone uses stained-glass windows for this, someone murals, and someone gravitates towards different kind stencils and sculptures ... But the mosaic deserves more attention from all this.
Even in my student years, studying at the Faculty of Design and Architecture, I enthusiastically studied the work of the great Antonio Gaudi. To go to Barcelona and see his unsurpassed creations live is my dream. But to create at least a small piece of furniture in his style is available to absolutely anyone.
Mosaic cladding One of Gaudí's favorite tricks. For his collages, he used fragments of dishes, ceramics, bottles. Rubbish made masterpieces!
It was these photos that ignited in me the desire to create a "piece of Barcelona" at home.

beaten ceramic tile is an excellent material for creativity. It is great for creating decorative elements both in the country house or in the house, and in the apartment.
Mosaic from broken tiles
Such work does not require special skills, but perseverance will come in handy. And if you, like me, want to try yourself in this field for the first time, then for a start it is better to choose something not very grandiose. As experience is gained, it will be possible to move on to more complex fantasy decor elements.- What a great frog! It is somewhat reminiscent of the famous Gaudi lizard from the Park Güell.

- The original solution for the restoration of the old table. An interesting effect can be achieved by adding a layer of glass on top.

- A wonderful idea for decorating a working corner in a country kitchen.

- Your breakfasts and dinners at such a table will be even tastier!

- I just fell in love with this table!

- This is truly a unique piece of work...

- You will obviously have to work hard on the decor of such small architectural forms, but the result is worth it!

- Broken tile walkway- a great solution if you recently had a repair and left a lot of damaged or unused material!

- Amazing magnificence!

- On such a bench you want not only to sit, but also to take a picture!

- There's something about it!

- What a wonderful fragment of the image of a snail from the remains of a broken tile.

- Here is such a garden sofa you can create if you wish. Beautiful and practical!

- Bright and unusual solution for the facade country house or cottages.

- Thanks to the combination of colors, they look very stylish.

- There are simply no words ... I did not expect such a decision!

- Very interesting and unusual approach. Inspiring!

- What a great dragonfly. Just a sight!

- With the help of the remnants of broken tiles, you can decorate almost any furniture.

- Exclusive coasters for flowerpots: no one has these for sure!

- And it is not at all necessary to invest a lot of money in buying expensive tiles for the kitchen. Here is just a wonderful solution for a kitchen apron that does not require special expenses.

- Creating such a decor is not at all difficult, but the effect is impressive!

- Very gentle and pleasing to the eye combination of colors.

- An interesting idea, plus your perseverance, and a real designer thing is ready!

- Painstaking, but very interesting option balcony wall cladding solutions.

Comfort in the house is created with the help of fancy details, selected with taste. And better - made with your own hands with soul and boundless love for creativity. I hope these ideas have inspired you to create your own decorative solutions for your home.
After all, it is not at all difficult to find materials to create such masterpieces. In many hardware stores there are always leftover tiles or ceramic battens, which are sold as raw materials for small price. You can also use the tiles that you have left from the repair.
So it remains only to catch fire with a certain idea, find time for this and start doing it. Fantasize and create!


Mixed Personality Disorder: Causes, Symptoms, Types and Treatments
GTA 4 control settings
FAQ on Smuggling in GTA Online
LSPDFR - welcome to the police
The huge map of Grand Theft Auto San Andreas and its secrets