Or do you just not want to spend time and effort on it? The exit is simple. Provided that the old pottery is held firmly, the new one can be placed directly on top of it. Read carefully the basics of how to lay tiles on tiles and you will be able to complete them as quickly as possible. Finishing work.
In what cases is this installation possible?
This pottery is not always possible. Let's see when it is permissible, and when it is strictly prohibited.


materials
Experts who have considerable experience and know everything about how to lay tiles on tiles recommend the use of the following consumable mixtures:
- Primer Ceresit ST-19 betokontakt or a similar mixture from another company.
- Adhesive composition for tiles Ceresit CM-17 or CM-117. You can also purchase SM-16 or SM-115.
Why betokontakt? Because this acrylic primer has particles of sand, cement and other additives that can create roughness on the glossy surface of ceramics. Only when using it can a good result be guaranteed.

Get a little more new tiles than you need according to your calculations. Ten percent over is enough to eliminate the lack of a whole tile that occurs when cutting or splitting, as well as in case of calculation errors.
Work progress
Before gluing tiles on tiles, be sure to prepare the base. This stage is the main one in determining the quality of the final result.
Foundation preparation
Make sure the old finish layer is strong. If any tile is chipped or cracked, remove it. Where the sounds of emptiness are heard, the floor should also be cleaned of old tiles. Close up the formed empty places and depressions cement mortar below floor level.
Then remove all dirt and dust. If cracked in old seams, it should also be removed. By opening the base with the above primer, you will create a grain on the surface, which will give additional adhesion to the new mortar. The soil is quite expensive, but it allows you to do everything quickly.

There is another way out in the question of how to lay tiles on old tiles under conditions of poor adhesion. To improve it, you need to remove the glazed layer from the old tile. This can be done using an ordinary grinder and an emery wheel. It is enough to carefully scratch and the adhesion of the glue will increase significantly.
Another option is to create scratches manually. You can also use for this sandpaper coarse grit or a sanding grater with an appropriate attachment.
For better adhesion, you can make notches on the tile, removing with a grinder not the entire glossy layer, but only 60%. Notches can be made with any suitable tool. The distance between them should not exceed 20 mm. This is the slowest and most time-consuming method, therefore specialists rarely resort to it.
We put ceramics

- Only the base (wall or floor) needs to be lubricated with adhesive solution.
- Please note that for normal adhesive mixture for ceramics, it is necessary to prepare the base more carefully.
- When treating the base with soil, you can protect the surrounding objects with an oilcloth. Please note that pipes and taps must also be covered.
That's all the basic rules for laying new ceramics on the old. If the decision is made, then, following the above instructions, you can do very high quality.
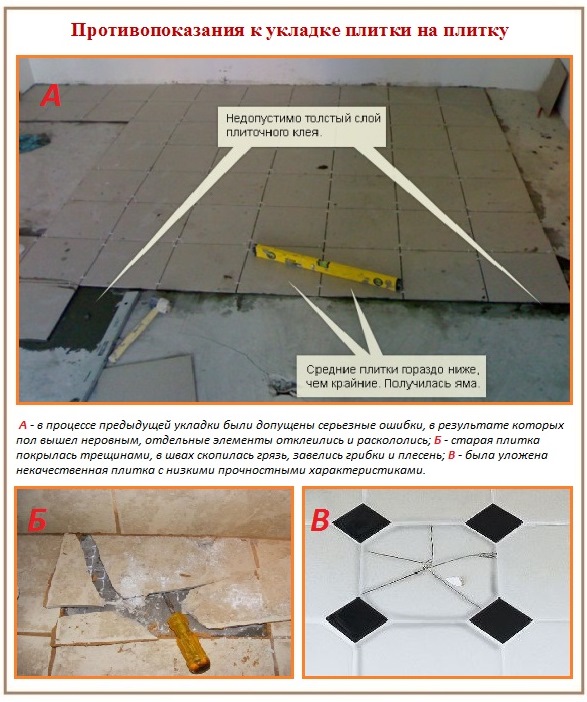
One of the most economical ways - laying tiles on tiles - may not be applicable under certain circumstances. These include the following:- If worn-out communications are under the old coating, and there is no way to access them;
- When cracks of various sizes are found on old ceramics;
- If voids are found when tapping the floor;
- Small dimensions of the room: the new layer will make the room visually even smaller;
- If the tile is old, and a “web” of cracks has formed on it, which indicates not only a large accumulation of dirt, but also the possible presence of a fungus;
- Strong surface slope.
Surface inspection
If a decision is made to lay new ceramics on top of the old one, then it is imperative to carefully prepare the foundation for further work. Inspection of the condition of the old tile is carried out as follows:- Check how the floor in the bathroom is located in space using building level. Leveling the surface with glue is not enough if there are strong slopes to the side or irregularities are found.
- Pay attention to fallen pieces of tiles on the floor, chips, cracks and any other imperfections.
- Knock out the old coating using a hammer. The tile has peeled off the base if ringing sounds are clearly audible. In this case, laying a new ceramic layer on top of the old one is not possible.
- Check all seams. They must be intact: not crumble and not fall out.
- Check the floor for loose finishes.
Attention! If during the inspection more than 10% of floor defects were found over the entire area of the bathroom, then the old coating should be dismantled, the surface cleaned and glued. new finish. Laying tiles on tiles on the floor in this case is impractical.
Preparatory Steps
So that after laying ceramics on the old tile layer decorative coating did not slip off due to the lack of a solid base, it is necessary to achieve excellent adhesion of the layers to each other. In this case, the old tile should be sufficiently rough. At the stage of preparation for laying, it is imperative to clean the old surface from contamination. Even if at first glance it seems that the tile is clean, the thinnest greasy coating has formed on it during the entire period of operation, which can prevent two tile layers from sticking. To achieve optimum ceramic roughness, one of the following options can be used:- Treat the top glossy ceramic layer with a primer;
- Remove no more than 60% of the layer with a grinder and make notches every 3 cm.
The order of the process
The process of laying a new decorative ceramic layer on the old one is practically no different from the usual one, however, there are certain differences between them. So that the seams of the new ceramics do not coincide with the old ones, when laying out the first row, this nuance must be immediately foreseen. The recommended height of the comb on the spatula is from 10 to 15 mm. The cleaned surface must be treated with an adhesive intended for ceramics and left to dry completely. New ceramics should be dusted first with a damp cloth, then dry. Use a roller to apply a special primer, if the appropriate method of surface preparation is selected. The drying time of the concrete contact is at least two hours.When working with a grinder to clean the surface of the glaze, be sure to use special glasses. This will protect your eyes from the smallest grains of ceramics and dust particles. The surface prepared by any of the above methods is covered with a special adhesive composition designed for your coating with a smooth spatula. Using the relief tool, the coating becomes rough. The laying of new ceramics can take place in any convenient way. Experienced craftsmen advise grouting all joints after at least three days from the moment of laying, since special glue for ceramics dries rather slowly. Adhesives such as Eunice are in demand, guaranteeing a stable and reliable coating, which you can buy in the network of our company stores.
Attention! Laying new decorative ceramics on top of the old one raises the level of the floor by 3-4 cm. Therefore, the floor level must be less than the specified height. For practicality, it is recommended to install a small threshold at the entrance to the room, which, when water leaks, will protect the corridor from moisture.
Subject to the basic rules for surface preparation, put a new ceramic coating on old tiles is not difficult. It is important to conduct a thorough inspection of the floor before starting work, to identify all defects and only then proceed to cleaning the surface and laying. In terms of time and finances, this method is considered the most optimal, and with a competent approach, the coating will turn out to be reliable and durable.
Economy is a philosophy, principle and engine of progress. Under the economic slogans, new technologies appear, ingenious methods are being developed to reduce the cost of labor, money and an important factor - time. For the sake of savings, sometimes the strictest requirements of building codes are forgotten, which prohibit gluing floor ceramics on a previous coating of a similar material. However, it was she who made the craftsmen think about the problem of "is it possible to lay tiles on tiles." And since they had to “break” their heads, the way out was found - reliable way build a new coating on top of the laid tiled floor.
Economic prerequisites for maintaining coverage
The idea that a hard, even, impermeable ceramic floor can not be dismantled before changing the coating could not but arise from prudent craftsmen, since:
- dismantling will take a lot of time and effort;
- fragments will probably break off along with the tile cement-sand screed. It will need to be filled in whole or locally again. with plywood or plasterboard flooring, it will also become completely unusable with the consequences of a complete alteration. And the polymer preparation also needs to be updated;
- dusting will be significant. Before repair, it will be necessary to free not only the room itself, but also adjacent rooms. Even if you cover furniture and equipment in neighboring rooms with polyethylene, it is not a fact that the contaminated finish will not suffer;
- rubbish removal, cleaning;
- the construction of a new screed is coming with the acquisition of materials, with the expenditure of labor and again time waiting for the hardening of solutions or binders.
No wonder that the amount of complications persistently whispered the idea of refusing to repair. But if the old coating calls for rework, means to minimize costs had to be found. Those. get the opportunity to lay ceramic squares, hexagons and rectangles on probably not very presentable predecessors. The task was to remove purely technical obstacles to the implementation of the plan.

Sometimes it becomes necessary to put tile on the wooden floor. Due to the fact that wood tends to change dimensions with the instability of temperature and humidity, this may seem impossible. Let's tell you how to do it right and avoid trouble in the article:.
What are the difficulties?
There are good reasons for the slightly outdated technological decree, according to which ceramics had to be unconditionally destroyed before laying a new coating, for good reasons:
- the draft base should be monolithic, and not composed of separate, insufficiently large elements;
- the rough surface must be distinguished by the porosity and roughness required for reliable adhesion of the adhesive to it, which is not characteristic of ceramic products.
Solidity will not cause concern among the owners of the floor with a well-placed previous tile, usually quite new. If the ceramic coating with the underlying base really creates a single whole, it will adequately fulfill the load-bearing function. Otherwise, an unnecessarily large load will fall on the bonding layer located between the old coating and its base. As a result, the elements of both coatings will break off.
With porosity, everything is more difficult. This is the main snag for those who thought about the question "is it possible to lay tiles on tiles." The main advantage of building ceramics is high density with a minimum number of pores that can absorb moisture.
Moisture absorption or scientifically its absorbency coefficient is directly related to the number of pores. At the tiles for interior decoration it varies from 0.5 to 3.0%. Moreover, in the 3% case, it is supplemented with top glaze, leaving the back side porous to optimize adhesion. But the glue needs to penetrate through the miniature tubules into the body of the substrate, gain a foothold in it and attract the finish coat to itself. This means that you just need to open or create pores, and at the same time increase the roughness. How?
In order to increase the porosity and provide the necessary roughness for bonding, three options were invented:
- Cleaning the top layer of the supporting ceramic floor with a grinder grinder.
- The formation of notches, preferably combined with the previous tool.
- Use of Concrete contact marked CERESIT ST-19, enriched with acicular quartz, or its counterpart with ordinary sand. There are analogues with the brand Knauf, Bolars, etc. After applying these primers, the surface acquires the required roughness, so that it will be possible to use ordinary tile adhesive, such as CERESIT CM-11.
Best if all three effective methods will be used together. Then the grip will definitely be excellent.
Even a flawless tile installation will not look perfect if you do not pay enough attention to the tile seams at the final stage of finishing. Learn how to choose a grout for tiles and how cement and epoxy options differ in the following material:.

Contraindications for such work
The means have been invented, but their use is not always feasible, which must be taken into account even at the stage of the idea's inception. The following contraindications determine whether tiles can be laid on tiles in a particular case:
- The tile was laid on low-quality adhesive, as a result of which the predominant part of the elements completely or partially peeled off from the base. The same could happen due to non-compliance with the instructions of the adhesive manufacturer or if the proportions are violated. To identify the indicated cause, a kind of diagnostics is carried out using the wooden handle of any of the tools. By simply tapping, we find out whether each tile responds equally to it. We hear a ringing, which means that there is emptiness inside, a rattling is heard - it has completely peeled off. Only a dull sound will convince you of strength and reliability.
- The floor is uneven. In general, for laying tiles, differences of 4 mm per 2 m of the lath applied to the surface are acceptable, because. primer and binder will play the role of a leveling layer at the same time. But if there are more violations, we pick up a puncher.
- The tile is very old and covered with a network of cracks, in which, no doubt, many years of dirt, indelible fat have accumulated, fungi have divorced.
- Communications pass under the old ceramic coating, and they forgot to build revision hatches for them last time. We dismantle such a floor, “without waiting for peritonitis”, and arrange everything according to the rules.
- After the floor in the equipped room will be higher than the general level of the floors. Such an excess is highly undesirable, because ceramics are placed mainly in bathrooms, showers, and kitchens. In a word, where it is supposed to make the floors lower by 3-5 cm, so that accidentally spilled water does not have the opportunity to freely drain outside the room.
If the listed obstacles are not identified, you can proceed to the preparation of the floor and to the laying following it. Work should be started if the floor temperature is not lower than +5ºС, and in the general room it is not less than +10ºС.
The process of building tiles on top of tiles
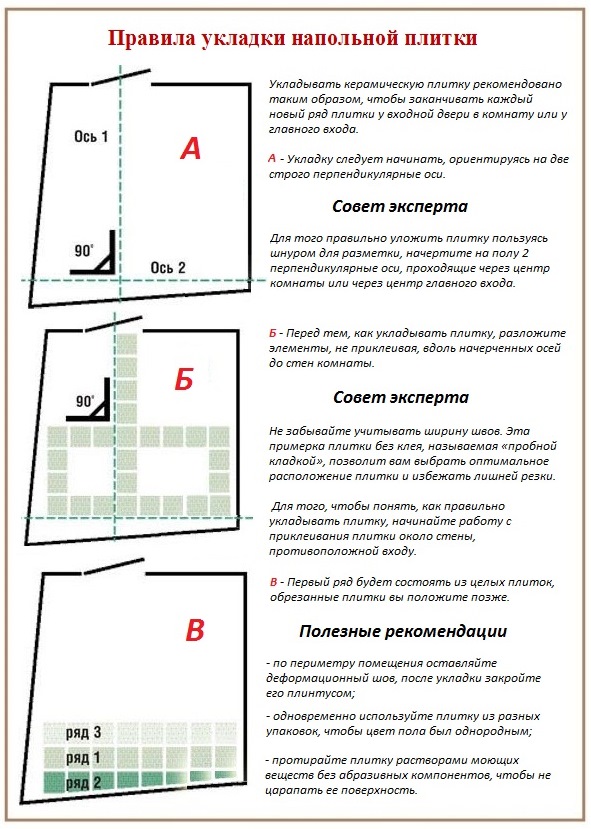
Fundamentally, the described scheme differs from the standards only in preparation. First, according to tradition, a small plan is drawn with all design features premises. Then a fitting is carried out with the layout of the material “dry” to see how the ceramic floor will look like, in order to place the cut pieces of the tile in places remote from the view. The layout of the tiles must be done so that the seams of the upper elements rest on solid tiles. Those. you need to shift the upper seams relative to the lower ones or try to ensure that there is a minimum number of matches.
- We carry out a thorough audit with detailed tapping of the elements in the center and in the corners. We carefully dismantle the identified unreliable tile with a chisel and a hammer, fill the bare area with cement mortar. Waiting for freezing. The curing time of the mortar is proportional to the thickness of the cement-sand filling. 10.0mm will cure in 1 week.
- We clean the crumbled seams with a chisel, fill it with tile glue or the same solution that was used to fill the sections.
- We clean the glossy surface of the tile with a grinder, choose a grinding wheel with a medium grain size. It is also desirable to make notches.
- We carefully wash the old ceramics first with just water from dust, then with soapy water. If there is old dirt and greasy spots add soda to water. Finally, rinse several times with clean water.
- We process the old ceramic floor with Betonokontakt Ceresit ST-19. Apply it evenly, spread it with a brush or roller. The material is sold in finished form, packaged in buckets of 15 liters. Approximately 300 gr. per m². Before applying to the floor, adjacent structures, pipes, parts are recommended to be covered with polyethylene. Otherwise, random blots and smears color pink will be difficult to remove. We are waiting for drying for 3-4 hours. If we plant the tile on tile adhesive, it is not necessary to moisten it before laying.
- We apply glue to the thickness specified by the manufacturer on a small area of \u200b\u200bthe floor. The glue quickly loses its elasticity, therefore we treat it with an area of less than 1 m².
- We glue the first tile with effort. Until the glue begins to set, its position can be adjusted. Similarly, we stack the elements surrounding it. Along the perimeter of each of the tiles, a expansion joint must be left for linear expansion. Its value depends on the size of the elements, usually it is 1-4 mm. For the formation of seams we use plastic crosses.
- After a day, the grooves around the tile will need to be filled with a suitable polymer cement composition or a solution of equal parts sand and cement.
Tile adhesive should harden naturally without artificial heating and ventilation. It is also not necessary to moisten the coating planted on the glue after laying.


It is extremely important to strictly follow the instructions of the material manufacturers, not deviating one iota from the instructions. With scrupulous observance of the rules, after 3 or 5 days it will already be possible to safely walk on the finished surface. And to the questions of neighbors-colleagues-acquaintances "is it possible to lay tiles on tiles" to give an honest affirmative answer.
Video examples of installation

 Imagine a repair procedure that requires complete dismantling of existing finishing structures. Even an experienced master will shudder from such a volume of work, not to mention a simple layman - only a week or two of continuous work can be spent on eliminating old materials.
Therefore, when renovating a kitchen or bathroom, the question always becomes - is it possible to lay tiles on tiles, or will you have to be content with traditional method resolving the issue.
The advantages of this method are obvious - to put the material on an already finished flat surface much easier, and you don't have to pollute the house with a lot of dust and broken ceramics.
However, it is necessary to remember about the disadvantages - you can only lay tiles on a very durable surface, not subject to cracking and capable of withstanding increased loads, otherwise after a while it will begin to collapse.
When working with tiles that you are going to lay on the floor, there is much less problems than with a finishing agent that is designed to organize the surface of the walls.
 The reason for this is quite simple - the wall tile is also affected by gravity, as a result of which it pulls itself down on its own. It is possible to put an additional layer of material, covering the old plane with it, however, it is necessary to approach this issue with the utmost care and conduct thorough preparation.
A similar solution is most often used for the bathroom and kitchen - that is, those rooms where ceramic cladding resistant to moisture and high temperatures.
Checking the old coating
 First of all, you need to understand whether the builders followed the technology when they laid the old tiles - for this it is better to take the smallest steel hammer and tap the entire surface with it, without missing a single square. If there are cavities inside, then the strength of the coating will be broken - this will be displayed in a ringing echo that will come from under the ceramic layer.
As a working tool, you can also take a special hammer equipped with a copper tip - it has the best acoustic properties, which are important in this case. If there are small chips or open seams and ends, try to understand on what basis the tile was laid.
The best option is a building mixture consisting of synthetic and  mineral components - laying tiles using such a tool is recommended by most professionals.
Synthetic mixtures hold tiles made of materials such as:
- ceramics;
- tile;
- porcelain stoneware;
- composite ceramics.
Preparing for the second layer of tiles
Now it is necessary to provide the necessary adhesion properties, because the finishing tiles in the bathroom often have a smooth glossy surface that is not able to properly hold the surface layer of a large mass.
 For this you need to remove upper layer using a grinder or grinder with a special brush consisting of steel wire. In addition, the old surface can also be treated with an abrasive disc, creating cross-cuts on it, which increase the adhesion efficiency of the adhesive composition.
As a basis to be laid under new material, it is better to use a concrete contact composition containing various synthetic components that increase the strength of the connection. Acicular quartz should be added to it, which replaces sand if it is necessary to create especially strong concrete structures.
Applying tiles to the wall
At the beginning of work, the seams should be additionally cleaned with a chisel in order to improve their filling with building mixture. Using a trowel or spatula, we put the concrete contact on the old tile, not forgetting to level it to achieve the maximum quality of the created surface.
The material consumption should be about 300 grams per square meter- this means that it should not be applied in a very thick layer.
If such a recommendation is not followed, the strength of the finish will be called into question. If you work in the bathroom or kitchen, and not the utility room, then the floor and furniture should be covered plastic wrap- otherwise, ugly pink and gray spots will appear on all interior items and structures, which are almost impossible to wash.
 After 5-7 hours, glue is applied over the concrete contact - it is best to select the most durable synthetic modification. It is worth remembering that, unlike the base, the glue hardens almost instantly, therefore further work are carried out in small parts of 1-2 square meters.
The tile must be pressed with force to the surface and then released, checking the strength of its connection - in this way the entire treated area is laid out. While the glue has not yet hardened, you can correct the bumps and adjust the depth - for this you should use a rubber mallet.
We must not forget that between the squares there should be a gap of 1-5 mm for expansion with temperature changes.
floor laying
Features of the flooring
 Unlike walls, tiles placed on the floor are not affected by gravity. However, another difficulty arises here - passing people, installed furniture and various devices, as well as transported equipment, press on it daily. So floor tiles must be checked no less carefully than the finishing wall - for this, a similar method with a hammer is used.
In addition, you can find a heavy box or object with a flat base - you need to drag it all over the floor and make sure that the tiles located on it do not fall in even a few millimeters. However, the latter method is unlikely to be applicable for a bathroom with its limited space.
 After you have checked the old tiles, you can start work, generally following all the recommendations described for the walls. However, the floor will require the use of a mineral mixture with a small amount of synthetic additives - it will provide greater elasticity and the ability to withstand significant temperature fluctuations.
In addition, the old surface can not be processed so intensively - it will be enough to walk on it with a metal brush. Before laying the adhesive on the floor, it is worth moistening the base so that it is better connected to it - this is not required only when using ready-made solutions sold in large buckets.
street work
Enough interesting question is whether you can do this if you are stacking paving slabs to create outdoor structures - paths, platforms, terraces. The answer to it is much easier to find - you just need to check the quality of the fit of the blocks and try to get one of them using a solid, durable knife or mount.
If paving slabs can be reached with considerable effort, then it is laid very firmly and tightly - otherwise it will move under the mass new surface, violating its integrity.
The process begins with a new cushion of loose soil, gravel and sand falling asleep on top of the material - each of these layers must be compacted individually. On top you need to lay paving slabs, to increase the strength of which you should use a small vibrating machine or a mallet with a large striker.
11-03-2015Very often, when making repairs in an apartment, especially in the kitchen or in the bathroom, the owners wonder about the old tiled flooring. Can you tile on tile? What to do: dismantle or lay tiles on a layer of old tiles? If you remove the old coating, then the time period for the repair can be significantly delayed, and more finance will be required. This is due to the need to level the surfaces after dismantling.

Laying tiles on tiles is done after determining the condition of the old tile.
And separate time will need to be spent on the process of removing tiles from the walls or floor of the bathroom (kitchen) and on the subsequent removal of construction debris. It is in connection with these factors that the logical question arises about the possibility of laying new tiles on top of the old one. This is quite an acceptable situation, of course, subject to certain requirements.
Criteria for assessing the condition of the old tile layer
To ensure that your decision to lay new tiles on top of old ones is balanced and correct, carefully examine and evaluate the quality of the old bathroom or kitchen wall tiles.
The most important thing is to find out how firmly it holds on the wall (floor).

If the old tile is cracked or has chips, then it is better to remove it.
- At the very beginning, the old tile is inspected for various damages, such as cracks, chips, or parts of the tile lagging behind the wall. Don't trust only your eyes. Even if visually it seems that the tile is located on the bathroom wall quite securely, this is not always the case.
- It is necessary to arm yourself with a wooden hammer and tap all suspicious areas. If you hear a characteristic rattling sound, or after this procedure, cracks appear on the surface of the tile, then the tile fastening does not meet the reliability requirements.
- Remove such old tiles from the surface of the wall (floor) of the bathroom (kitchen). If these areas a large number of and they make up a significant percentage of the entire surface area, you still have to be patient, time, financial and proceed with the procedures for the complete dismantling of the tile. Next, you will have an operation to level the surface, and only after completing it, you can lay the tiles.
When it comes to ceramic flooring in the bathroom, one more thing is important: the level of the floor. It is necessary to check whether it will exceed the height of the threshold in the room, and only then lay the tiles on the existing tile layer.
Back to index
Preparing the surface of the old tile for laying the new coating

Scheme of laying tiles on the old tiles.
So, you have carefully examined all areas of the tiled surface and have come to the conclusion that the old ceramic coating of the bathroom can be left. So, we will lay tiles on top of it. And this requires the use of a special technology, slightly different from conventional styling.
In order for the adhesion between two tile layers to be strong, you need to make the old tile layer rough. This is necessary for good adhesion. How to do it? There are several easy ways.
- You can simply remove the top tile layer, as it is usually glossy. In this case, it will no longer interfere with the good adhesion of the two coatings.
- Another option involves applying notches to the tiled surface.
- The third method proposes to treat the old tiled surface with a special kind of primer.
All three of these options are quite feasible with your own hands. But keep in mind that the first two methods will be more time consuming. In the process of their implementation, a lot of dirt and dust is generated. If that doesn't stop you, you can use one of them. The third method is simpler, but requires certain financial costs aimed at acquiring a special primer composition.
To implement the first option, you will need a tool such as a grinder. With its help, it is much easier to remove the glossy layer of tiles, and make notches faster and easier.

In order for the laying of tiles to be possible, it is necessary to prepare the old layer, for example, to apply notches.
By carrying out this procedure, you will improve the quality of contact of the adhesive with the layer of old tiles. Please note that you can not remove the entire top layer of the old tile, it is enough if the percentage of the area processed in this way is 60%. If you settled on a method that involves notching, then usually the distance between them is from 1 to 2 cm.
Now - as for the treatment with a primer. This is the most modern way to make smooth surface suitable for its finishing with any material. This method gives any surface roughness properties. Such a primer composition is called concrete-contact. Coating with this type of primer will provide you with high-quality adhesion to the glossy surface of the old tile; adhesive designed for ceramic tiles is very well applied to such a layer.
Back to index
How to properly lay tiles on old tiles: the technological order of work
If you have never done finishing with tiles, it is best to familiarize yourself with the basic rules and requirements for this process in advance. So you can avoid many mistakes that beginners make.

When laying floor tiles on top of old tiles, keep in mind that this will significantly increase the level of the floor.
- First you need to carry out surface treatment in places of chips and other damage. For these purposes, a solution of cement and sand is used. You can also replace the solution with a special tile adhesive. Irregularities are sealed flush with the main surface, after which you should wait for it to dry completely.
- At the next stage, it is necessary to carry out the final cleaning of the treated surface from the remaining contaminants. These may be the remains of a solution, glue, etc. All of them are peeled off, and the surface is wiped dry with a piece of cloth or sponge.
- Now, as noted above, it is the turn of applying the concrete-contact primer. This is done with a roller (brush). For its setting, 2 to 4 hours is enough. Exact time indicated in the instructions that come with the primer.
If you have chosen another way to prepare the old tile for the subsequent laying of a new coating, then the glossy surface must be removed using a grinder. This method is described in more detail above. Just do not forget to ensure yourself when performing this procedure. reliable protection. Hands must be in gloves, the use of goggles is also a prerequisite. Working with a grinder implies the possibility of getting parts of the tile into the eyes, to prevent this, never neglect personal protective equipment.
After these procedures, you can lay the tiles.

1. Application of glue.
2. Laying tiles.
The tile adhesive is applied using a spatula (smooth). But the alignment and giving it a relief shape is already done with the help of a jagged tool. Tiling is done in the usual way.
Another important point: If you put the tile on the old tile, the adhesive will dry a little longer than usual. This is due to the low absorbent properties of the base. All this does not allow for subsequent grouting work immediately after installation. It is better to wait about 3 or 4 days and only then practice finishing seams. A rubber spatula is best for applying the grout.


Chocolate biscuit: the secrets of cooking in a slow cooker and oven
Chemical composition and nutritional value
Apple chips at home
Braised cabbage with white beans, recipe
How to reduce the ass, hips and stomach at home?