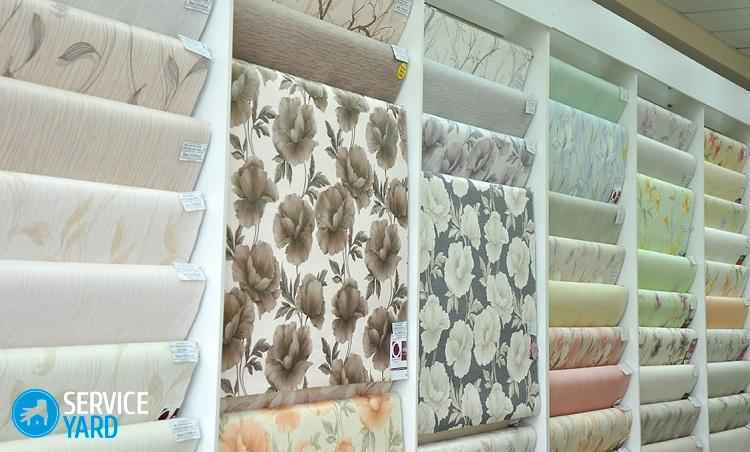
Many people decide to do repairs themselves, because it is much cheaper, albeit longer. Problems with wallpapering usually do not arise if you already have such experience. If it is not there and the wallpaper is pasted on the walls with violations of technology, then all the flaws become visible. The joints look especially ugly. So, if the wallpaper broke up at the junction, how to fix the situation? Strictly speaking, the fact that ugly joints, or “seams”, as they are commonly called, may appear, you need to think about even at the stage of buying a finishing material. We will talk about all these nuances in this article.
Important! The first thing to decide is the type of wallpaper. After all, it's not a secret for anyone that the rules for their gluing have their own characteristics, non-compliance with which leads to strong disappointment with the work done. Read more about the rules of wallpapering in our flocks:
Why do seams appear?
This problem, in most cases, is typical for low-quality inexpensive materials. But sometimes they appear even when using expensive non-woven finishes.
Important! If you have no experience with sticking, you can use this trick. If you buy material in a longitudinal stripe or in a cage, the joints are easy to hide, even if they are.
It is much more difficult with vinyl, glossy, textured, thin or plain panels. The seam is usually noticeable.
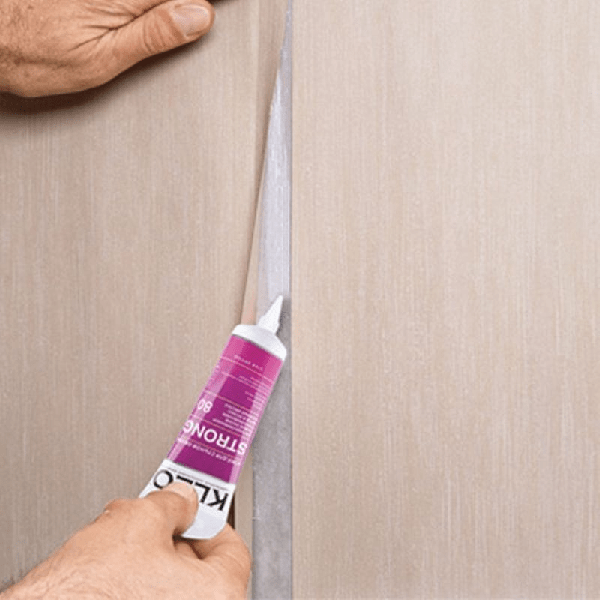
In order to make the joints of the panels invisible, a special sealant is used. But this measure is relevant if the wallpaper needs to be painted. Alternatively, you can paint the sealant itself to match the color of the main canvas.
Important! The reason that the joints become noticeable is improper storage and transportation of rolls. When purchasing material, carefully inspect the ends. If the ends are damaged or crumpled, then the seams immediately appear. If you have removed the packaging from the rolls, store them in a standing position.
It happens that the end part of the trellis of a dark shade is not painted. To avoid ugly stripes, paint these places with a pencil that matches the color.
However, the appearance of joints is a typical problem for inexpensive paper products. This is due to the fact that the paper panel impregnated with glue is stretched, and when moisture evaporates, it shrinks in size. That is why, when gluing paper tapestries, it is important to mount them immediately after smearing with glue, without waiting for the panels to swell. If this is neglected, the risk of deformations and ruptures is very high.
Wall preparation
To avoid deformation of the wallpaper and achieve their perfect joining, you need to seriously approach the preliminary preparation of the walls. Applying putty, sanding, priming - the necessary points. If you do not apply a primer, under the wallpaper will be a large number of dust, which simply absorbs some of the glue. Naturally, the material will stick to the wall much worse.
Important! It is advisable to prime the walls about a day before gluing, so that the primer has time to dry completely. The main thing here is to choose the right material, the material of our site will help you with this:
Proper application of glue
Mistakes made when applying wallpaper paste is another joint problem. Moreover, there is a risk both with insufficient and with excessive application of glue to the canvas. It takes a long time for the thick adhesive base to dry. The paper on top is already dry, but the glue under the panel is still wet. All this will sooner or later lead to deformation.
Important! If you decide to wallpaper your house, then the question is search quality glue- paramount, just like the rules for its use, learn more about these subtleties from our blogs:
After the adhesive is applied to the canvas, fold it and roll it with a rubber roller. This contributes to a uniform distribution of the composition over the surface. After the wallpaper is mounted, roll the area of \u200b\u200bthe seams with a rubber roller. This action contributes to a better fixation of the canvas.
Important! If the material is glossy or silk-screened, it is almost impossible to hide the joints. The same applies to vinyl wallpaper. Therefore, when buying, focus on wide canvases, and try to hide the joints with interior items.
Visible joints on the wallpaper - what to do?
There are several options for the divergence of the panels in the area of \u200b\u200bthe seams:
- The joints diverge so that a wall is visible between them.
- The glue protrudes and stains the wallpaper at the joints.
- The edges of the panels are raised and wrapped.
- Unevenly painted joints.
Each of these problems is corrected in its own way. All methods differ in terms of cost and complexity. Before correcting flaws and thinking about what to do if seams are visible on the wallpaper, analyze what is their cause.
Important! Fix the edges of the canvas with special glue, which allows you to securely hold the edges of the canvases on the wall. When pasting wallpaper, do not forget to pass the roller in the area of \u200b\u200bthe joints.
How to remove the seams on the wallpaper after gluing? What to do if ugly joints have already formed?
- An effective but costly method -.
- There is another - relatively economical, but laborious, using grout for ceramic tiles. Add color to the grout to match the color of the walls, and apply to the joints.
- You can paint over them with pencils, markers or felt-tip pens.
What to do if the wallpaper is separated at the joints?
- You can putty the joints with wallpaper crumbs from the top of the trellises mixed with glue.
- A good option is to use special panels or moldings. You not only forget about the problem of joints, but also improve appearance interior. The design looks original with borders or edgings.
- The most radical way is an attempt to re-paste the wallpaper at the junction of the panels. Gently wet the joints with warm water. Then carefully coat them with glue, stretch and reconnect. If the error is small, then it can be eliminated quite easily.
Important! It is impossible not to mention another problem: dried glue on the surface of the wallpaper. It is transparent, but sunlight noticeable enough. To prevent this from happening, you need to apply the composition to the canvas strictly in accordance with the instructions. Dried glue cannot be removed, but during the gluing process, you can remove it with a clean soft cloth.
If the tapestries peel off and twist at the joints, it looks very ugly. The most common reason is poor quality. finishing material. To avoid this, roll the joints with a roller when gluing.
Features of installing vinyl wallpaper
Vinyl wallpapers look very beautiful on the wall, they are easy to maintain and durable. However, the installation of thick panels in the corners often causes problems. Proper preparation walls, especially the perfect alignment of the corners, is already half the solution to the problem. When decorating corners with vinyl wallpaper, use the following mounting technology:
- Glue the canvases on both sides with an overlap of 3 cm.
- Next, cut this place. It turns out 2 canvases connected end-to-end.
Important! The only drawback of this method is that if the wallpaper is with a pattern, it is far from always possible to perfectly reduce the pattern.
Before starting the repair, we mentally imagine in our imagination how everything will look beautiful in our apartment. And it is clear that perfectly glued ones will bring special beauty and harmony to the new environment. But unfortunately, in our life there are often blunders. The next day after sticking expensive wallpaper, for example, we go into the room and see with horror that they have parted, and naked gapes at the joints. We are simply shocked by what we see. The first question we ask ourselves is what to do now? How to fix it now? Let's sort everything out in order, and maybe we won't have to get into the same situation.
What causes the seams on the wallpaper to become visible?
There are several reasons. Let's try to consider the most common.
1. One of them, when the joints parted from each other. Without exception, all paper wallpapers (or on a textile substrate) have a completely natural property to swell from moisture. Moreover, this process is so visible to the naked eye that it is simply unreasonable not to pay attention to this fact. For example, if you wet a half-meter-wide canvas with water or glue, it will increase by three to five millimeters. Therefore, it is clear that no flaws are visible during the wallpapering process, but when the paper dries, it tries to take on the original width. This leads to the divergence of the joints between the sheets.
To somehow avoid this, try not to allow strong soaking. When you feel that the sheets are already wet enough, then start sticking them. Moreover, the wood pulp that makes up the wallpaper swells unevenly. Therefore, after gluing, we can observe a not very beautiful picture, when the seam between the canvases either converges or diverges.
2. Another point to consider is to try not to apply an excess amount of glue to the surface of the sheet. It is advisable to apply so much glue that at the moment of drying the glue seizes first, and only then the canvas shrinks. But not vice versa.
We will simply try to list other reasons due to which the joints on the wallpaper become visible. One edge may be darker than the other. Or the sheets have uneven, obliquely cut edges.
Advice. When buying in a store, be careful and check the series of each roll (the series must be identical).
Also in the store you need to remember that on the wallpaper on low price visible joint occurs more frequently. And on a checkered or vertical strip, the joints are practically not striking.

Also remember that during transportation, the end of the web may be wrinkled or torn. In this case, the joint on will be visible for sure. Also try not to store the wallpaper "standing up" or unwrapped.
Is it possible to re-glue the joints on the wallpaper so that they are not visible?
Indeed, a completely correct question arises, how to close up the joints on the wallpaper, and even so that they are invisible to our eyes? You can, of course, but different types manipulation will be different. For example, for wallpapers that are to be painted, this is much easier to do. The seams can be sealed with a special sealant, and then carefully tinted to match the color of the walls. Of course, this must be done before painting.
Advice. Do not use putty in this case, because it cracks and crumbles over time..
Let us now consider another, more complex option, when the joints of the wallpaper have to be re-pasted. To do this, we need a spray bottle with warm water, a brush, a sponge, a brush, a rubber roller and PVA glue. First we will try to moisten the edges of the sheets warm water and pull the sheets to each other. For five minutes they will absorb moisture, then apply PVA glue. Try to align the joints of the sheets, run a rubber roller over this place. Smooth out wrinkles and air bubbles.
Advice. All paper wallpapers are highly susceptible to deformation. Therefore, do not let the paper swell too much to avoid possible tearing and uneven shrinkage.
As for working with puff wallpaper (non-woven, vinyl, duplex), you will need to moisten the wrong side of the edges that we are going to re-glue. It is important to remember that these types (if they are strongly stretched) shrink very strongly after drying, acquiring their original shape (unlike paper ones). In this work, a rubber roller helps perfectly, which does not stretch, but only presses the material against the wall.

To connect more complex and serious joints, there are additional ways. Let's try to consider one of them. For these purposes, we use a clerical knife, trimming, tinting paste, sandpaper and decorative piping. First, rub the crumb with sandpaper front side remaining scraps of wallpaper. Dilute this powder with PVA glue. To veil an ugly gap, we spread the resulting paste on it. This should be done very carefully, without grabbing too much. If the color does not quite suit you, then you can choose the appropriate tinting paste, which is sold in any store of finishing materials.
Advice. The unpainted edges of the wallpaper (dark colors) can be tinted in advance with an appropriate colored pencil.
Sometimes it happens that one edge turned out darker than the other, not because a poor-quality sticker was produced, but because the rolls came from a different batch, or it could be a factory defect.
How to decorate the joints on the wallpaper?
There is another way to seal the joints on the wallpaper. Of course, it is not suitable for every wallpaper structure. You can make the so-called "artificial joints" or, more simply, "patches" from the remnants of the material yourself. After the patches are cut, we connect them with two edges (factory and cut wallpaper strip). The main thing is to combine the decorative pattern and the “patches” as accurately as possible.

There is another interesting, frankly, creative option. You can apply all your imagination and decorate the place where the joints diverge with a paper border. The most important thing is to choose a suitable border, which will be combined with the wallpaper in terms of color, quality, structure. You can also creatively beat the place where the joints diverge and decorate them with various ribbons, braid, curtains, etc. At the same time, frame a picture or photograph on the wall from the same material. Guests may get the impression that this was intended from the very beginning of the renovation.
Thanks to modern technologies After that, you can correct almost any flaws, and wallpaper joints are no exception. However, in order to avoid unnecessary work, it is better to follow the instructions, as the process of each type of sticker has its own characteristics.
When carrying out repair work, everyone imagines that the result will be a beautiful, renovated apartment. And a lot of it depends on the quality of wallpapering. But often it turns out quite the opposite. The next morning after pasting the walls with wallpaper, it turns out that they have parted or peeled off at the joints. The first question that is currently of interest is how to fix everything and how to glue peeled wallpapers and joints? This article will describe the causes of such troubles and how to fix them.
Why do seams appear on wallpaper?
Absolutely all wallpapers, regardless of whether they are paper or textile-based, have the property of swelling when exposed to moisture, in this case glue. And it can be seen even with the naked eye. So, for example, if the wallpaper is half a meter wide and wet with glue, they increase by several millimeters. Consequently, nothing is noticeable during pasting, and after drying, the paper acquires its original appearance. As a result, gaps appear between the sheets and a bare wall is visible. To prevent this, it is not recommended to strongly soak the used piece of wallpaper. When the sheet is sufficiently wet, it must be immediately pasted.
It is important to follow the instructions and give them the time for impregnation that is indicated. When sticking sheets, you must strictly observe the impregnation time of each sheet and prepare only the amount that you can stick on in the same period of time.
paper borders
And you can do it differently. If you have imagination, you can use paper borders. The main task in this case is the selection of the border itself, which will be suitable both in color and in the structure and material used in its production. You can also mask the areas of discrepancies with all kinds of ribbons, curtains. And then make from the same material, for example, a frame for a photograph or a picture. It will turn out very beautiful and original. No one will even understand that this was done later, everyone will assume that everything was originally supposed to be so.
Be wary of pencils and markers, with a strong application, the pigment may show through on the wallpaper.
Currently, there are many technologies that can be used to correct various wall defects, including the resulting gaps between sheets of wallpaper. But it is better to immediately follow all the rules when carrying out work and take into account all the features of the acquired type of wallpaper, than then look for ways to hide the joints or make them invisible. Write your wallpaper repair options in the comments.
Many lovers of wallpaper decor are well aware of the situation - the masters seem to be very good, and the wallpaper is expensive, and after wallpapering, the seams between the panels clearly appeared on the walls. Unofficially, every third case of repair with wall decoration with trellises is faced with the problem of how to hide the joints between the wallpaper. It is almost impossible to mask the stripes by changing the lighting, and it turns out to be expensive to re-glue the entire room, so you can try to fix the problem more before drastic measures. simple means.
Defect Options
Most often, the owners blame both the craftsmen and the quality of the wallpaper. But if the craftsmen are professionals, and before this room they managed to stick kilometers of canvases without any remarks, why did they not take into account the peculiarities of the brand of tapestries when sticking. An indirect confirmation is the fact that the same problem occurs with both cheap paper and expensive non-woven wallpaper.

The answer to the question of how to make wallpaper joints invisible does not have a definite answer, since the defect itself at the joints can manifest itself in different ways:
- Neighboring canvases parted, and a thin gap formed through which the wall is visible;
- A lighter or darker uneven strip of glue residue appeared along the joint;
- The joints on the border of the wallpaper rose like a "house";
- At the junctions, the difference in shades of the two canvases is clearly visible.
The last point is the most annoying. It often happens that when buying wallpaper in a branded salon, you can buy rolls of the same manufacturer, of the same brand, but belonging to different batches. In order to sell the sorting and make the product attractive, the salons collect the remnants of rolls from different batches into one and sell them at a slightly reduced price.
For your information! Even within the same batch, the wallpaper may differ in shades.

Many manufacturers, due to the peculiarities of the technology for applying paints to the panel, are not able to provide an ideal distribution of toner, as a result, one edge turns out to be slightly darker and more saturated than the other. It is impossible to hide such a defect, therefore, an icon with two vertical arrows directed in different directions is placed on the roll. This means "reverse sticker sequence". To hide uneven coloring, each subsequent roll must be turned over 180 degrees before cutting and labeling. If you do not pay attention to the icon hidden in the text of the marking in time, you can only redo the mismatch of shades at the joints by painting the tapestries.
Five ways to hide seams
Correctly hiding the formed defect at the junction is often even more difficult than sticking the wallpaper correctly. You can learn how to work with tapestries from the instructions, while you have to invent and look for ways to hide defects on your own.
You can hide seams in one of the following ways:
- Clean the edges of the wallpaper from the remnants of glue;
- Shade or paint the walls to hide the background that reveals the gap between the joints;
- Try to reduce the wallpaper panels after a preliminary slight wetting of the trellis material;
- Paint the wallpaper or hide the joint with a special tinting paste.
Advice! Before trying to hide the joints with paint or tinting mass, you will need to practice on closed area, for example, behind the closet, where the furniture covers the wallpaper.
The easiest way to hide revealing light spots is to try to paint over them with a special paint or pencil. To do this, you need to buy a special coloring composition.

To hide the white stripe between the panels, it is enough to apply a tinted color on the seam with a brush or an ear stick. Wipe off excess paint with a clean cloth.

Unfortunately, you can hide the joints in such a simple way only on plain wallpaper, if you can choose the composition of the right color.

The most risky way to hide seam problems is the use of tinting paste. For its preparation, you will need to trim the wallpaper, with which a sharp knife or sandpaper remove paint surfaces. Colored paper dust is mixed with glue and the joint is overwritten. In this way, restorers restore old books and paper products, the method is complicated, so it is not always possible to hide the problem.
In particular difficult cases the owners decide to use polyurethane decorative strips that are glued to the joints. In this way, you can hide any defects, even if the shade of the panels is different.

How to hide a joint contaminated with glue
Excess glue at the joint is the simplest case, but only under one condition, if you pay attention to the problem in time. If the wallpaper is glued by hired craftsmen, it will be necessary to check the quality of the work in the first hours, while the glue is not yet dry.
On vinyl or non-woven wallpaper, it is enough to simply wipe the glue with a dry and clean cloth; on paper, excess adhesive material is blotted, as if ink blot, without rubbing on the canvas. After the wallpaper dries, the joints must be checked again, since over time the adhesive spots tend to turn yellow and appear in the picture, after which it will be impossible to hide them.
On dark wallpapers, glue residue at the joints can be hidden with a retouching pencil. Before decorating the seams on the photo wallpaper, the traces are wiped with a clerical eraser.
The most difficult case
The most difficult thing is to hide the joints with a gap, when the edges of the panels have diverged so much that the wall is visible. To hide the unmasking seam, you need to try to move the edges and fix the canvas with a proven glue. Many double-layer wallpapers react differently to moisture. Most trellises when applied liquid glue swell and become plastic. After sticking to the wall and smoothing, the width of the canvas can increase by several millimeters, and after drying, the reverse process occurs.

To hide the resulting gap, you first need to moisten the edges of the canvas with a spray or spray gun. After 10-15 minutes, the wallpaper will become soft, and you can, by slightly pressing your hands on the canvas, try to connect the edges of the panels. The seams are glued with PVA glue and rolled with a rubber roller.

If you cannot hide the joint in this way, for example, joints on paper wallpaper it is very difficult to hide in this way, you can try to decorate the seams, as in the photo.

To decorate the joints, colored stripes and individual fragments are suitable, you just need to stick it on the panel so as to hide the defect, and at the same time divert attention from the problem area. Wallpapers of different patterns will help to perfectly hide the parted seam, as brighter colors always attract the eye. Before you make a joint from different wallpapers, you need to plan a transition with an overlap. The pasted new trellis can not even be cut off.

Fighting the edges raised by the lodge
Not the most difficult, but quite common case when the joints rise and twist, photo. Usually, masters in such a situation, in order to hide their imperfections, sin on the quality of the wallpaper and bad glue. In fact, the problem lies precisely in the unprofessionalism of workers. In the process of greasing the cloth, experienced craftsmen apply glue to the edges twice, because the glue mass dries much faster along the edge of the cloth. To hide the raised joints, it is enough to smear under the seam line with an additional adhesive layer and roll the trellis with a rubber roller.

It is much more difficult to hide the defect at the joints in a situation where the seams have risen along with pieces of soil and whitewash. This means that the surface preparation of the walls was carried out extremely carelessly, and during shrinkage, the wallpaper fabric tore off the adhesive seam at the junction. In this case, you have to spend a lot of time to soak and remove old glue from under the joint, and only then glue and roll the canvas. If you try to re-glue the seams as they are, then the remnants of the old glue and whitewash will make the seam embossed, and under certain lighting the defect will appear in a new way.
Conclusion
A good way to hide seams is to use thin strips of paper or wallpaper in the same color as the main canvas. This will ensure normal bonding strength, the absence of embossed seams and unmasking light spots between the panels. To do this, you need to moisten the edges of the panel, and after soaking the glue, carefully lift the seam and glue an additional strip. The method works with any wallpaper.
Before you spend repair work, all people in their thoughts represent the end result, in which everything is perfect and beautiful, but in practice various problems often arise.
One of the common problems is the appearance of seams and joints on the wallpaper, which lag behind the walls and become visible. At this time, the question immediately arises, how to remove the seams on the wallpaper?
This article will present all possible options elimination of seams after gluing, as well as the causes of such defects.
Reasons for the appearance of joints
In practice, there may be several reasons for the appearance of visible seams. The most common of them are shown in the table:
| Reason for the appearance | Description | Elimination Methods |
|---|---|---|
| The divergence of the joints from the swelling of the wallpaper. | All paper materials swell from moisture. During the pasting of the room, the material from the glue swells and when the wallpaper is placed on the wall, the surface is obtained without joints. After the paper dries, it takes its original shape, a small section of the bare wall appears. | To prevent this, it is necessary in the process of pasting the room not to allow the wallpaper to get very wet. |
| Applying a large layer of adhesive. | The glue is applied in such an amount that it sets first, and only then the wallpaper begins to shrink. | It is necessary not to allow the reverse sequence of setting the glue. |
When buying materials, you need to look and check the batch and number of each roll of wallpaper. They must be identical and made on the same day.
Correction of seam discrepancies
 Most often, this problem occurs with paper wallpaper.
 Paper materials after contact with glue can increase in width by 6 mm, and after drying, a gap appears on the walls. To prevent such flaws, you must:
- Control the layer of adhesive composition, which should not soak the material much.
- After applying the glue, you should wait a bit until the material becomes moist and immediately glue the canvas to the wall even before it begins to swell.
As a rule, the divergence of the seams occurs if a lot of glue has been applied. In this case, the canvas cannot properly adhere to the wall and will have to be re-attached.
The use of special glue for joints, which fixes the edges of the wallpaper, will help prevent the seams from coming apart. To do this, the edge of the canvas is hooked and glue is applied, after which the canvas is pressed against the wall with a rubber roller.
 Tiled grout, applied to the joints in small quantities, will help to cope with the problem
 You can remove the distance between canvases like this:
- Paint the entire surface.
- Seams can be hidden with tile grout. A dye of the required shade is added to the composition and applied to the joints in a small amount.
- You can remove the decorative layer from the remnants of the wallpaper using sandpaper. Next, add PVA glue to the resulting material, and after stirring, apply the product along the seams.
- If the seams have diverged quite strongly, and there is no desire to re-glue, then you can decorate the wall or glue the moldings.
- At the seams, you can glue the wallpaper on a new one. This method the most optimal, all you need is to soak the wallpaper with water and, after swelling, apply glue, and then press the canvas against the wall. After holding for a few minutes, the canvas is leveled with a spatula or roller. - read in another article on our website.
Removing adhesive from the front
 Often the seams are visible due to the protruding glue
 Often the problem is the appearance of glue at the seams. Such residues may not be removed, but they begin to shine in the light and may change color at the development sites.
So that the glue does not stand out at the seams, the composition should be applied during gluing in the optimal amount without excess.
If there is such a manifestation, then you need to try with a clean, damp cloth or in another way.
When removing defects, it is better not to apply efforts so as not to spoil the canvas.
A detailed acquaintance with the instructions for the adhesive composition will help to eliminate troubles.
Removing edge curl at seams and color matching
 Curled edges must be glued again
 If the preparation of the surface of the walls was carried out poorly, then after gluing the wallpaper, the seams may lag behind the walls and twist. At the same time, part of the plaster remains on the edges. This trouble appears if low-quality materials were used, which means that it is not worth saving on surface preparation.
To eliminate the flaw will allow gluing the seams with glue for joints. After applying the composition, you need to fix the canvas with a spatula or rubber roller.
Often, the wallpaper may not match in shade from different edges. If you unwind the roll, the differences will be invisible, but when pasting the walls, defects appear, the seams are obtained with sharp color transitions that can be seen without any problems.
Reverse pasting will help prevent this effect. In other words, one canvas is glued, as usual, and the second is turned over and only in this state is applied to the wall. For more information on how to glue the joints, see this video:
If the work has already been done and such a defect has appeared or uneven cuts are visible at the joints, then staining the seams will help to hide the flaw. For this you can buy special agent in the store or use a regular pencil. The main thing is to choose the right shade. Uneven joints due to incorrect cuts can be covered with decorations: piping, ribbons, etc.
Studying the instructions for the wallpaper will help to exclude corrective work. Manufacturers can write a gluing procedure for different types materials.
 very problematic. As a rule, problems appear with seams in the corners. If the surface is properly prepared, more precisely, all the corners of the room are even, then there will be no problems.
The basic rule for quality corner connection canvases - complete cutting through the seam. Both canvases are applied to the wall with an overlap of 3 cm. Then the seam is cut and butt-joined. This place is smeared with glue, and then smoothed out.
To prevent joints from appearing in the process, all wallpaper strips will need to be applied with a slight overlap. If the material has a non-woven base, then the overlap can be 20 mm, for paper material it will be 40 mm. After carrying out the work, it is necessary to cut the joint strictly according to the level and remove the remaining glue.
Upon completion of the work, the surface is checked for the presence of air bubbles and the divergence of the seams. If necessary, you can simple ways. For the intricacies of pasting vinyl wallpaper, see this video:
For vinyl wallpapers, different adhesives can be used depending on their base. In addition, the application of glue is different, the composition is applied to the wall and canvas, depending on the basis of the material.
 Non-woven coatings are best glued according to the level
 Non-woven fabric is very convenient to use because it does not stretch or swell. To make the coating look beautiful, the strips need to be glued according to the level, after drawing lines on the wall.
Special attention is paid to the corners, each strip should fit into the corner by 10-15 mm, the next strip is glued with an overlap.
When wrinkles appear, they will need to be cut and air removed, after which you can inject a little glue with a syringe and smooth the wallpaper with a roller. For external corners, the sheets are overlapped by approximately 25 mm.
 On paper wallpaper, most often there are problems with seams. For proper gluing, you need to follow certain rules:
- The wallpaper roll is unfolded and strips are cut out to be applied to the wall. It is necessary to leave a gap of 3-4 cm.
- Next, a cut-out strip is rolled out onto a clean floor with the front side down and an adhesive composition is applied with a wide brush. After that, the strip is left for the time specified in the instructions for impregnation. During this period, you can prepare the second strip.
- The first strip is glued to the wall, starting from the door or window opening.
- With a clean and dry rag, the strip is pressed against the wall, and then the remnants are cut off.
- The second strip is applied with an overlap of about 30-40 mm so that no seams appear after drying. The whole room is glued in the same way.
Having become familiar with the methods of pasting wallpaper and how to remove the seams on the wallpaper after pasting, you can do the work yourself, it is only important to follow the rules and recommendations of the masters. Helpful Hints For gluing joints, see this video:
Finally, you need to remember that each material has its own characteristics for use, therefore, before buying and using it is necessary to study the composition and characteristics of raw materials without fail.


Mixed Personality Disorder: Causes, Symptoms, Types and Treatments
GTA 4 control settings
FAQ on Smuggling in GTA Online
LSPDFR - welcome to the police
The huge map of Grand Theft Auto San Andreas and its secrets