What choice of home-useable compressors does the industry currently have to offer? Frankly speaking, the assortment is small, and besides, the proposed samples have a lot of drawbacks, ranging from dimensions and weight to the noise level.
Ready homemade compressor
It turns out that a homemade compressor will best solution problems with home workshop equipment.
Engine selection
In my opinion, the best choice for a home compressor engine, you can call the unit from household refrigerator Soviet era. Personally, I made myself two home-made compressors with such units, one block was vertical (I don’t know the brand), and the second was from the Yuryuzan refrigerator (horizontally located).
One compressor was designed to power the airbrush, while the other worked with a staple gun. There were no problems with either unit. Many may object that they have little productivity, in my opinion, more is not needed for the house. But during operation, such a device is almost inaudible.
Compressor equipment
In addition to the engine and the pumping unit itself, the compressor also needs other components for normal operation. To make a compressor with our own hands, we need:
- Foundation for the whole structure;
- Air receiver;
- Filters and moisture separator;
- Connecting hoses or tubes;
- Reducer and pressure gauge;
- Starting equipment of the engine;
The design of a homemade compressor
The base, it is also a frame, can have any design and be made of any material at hand.
For example, you can use a sheet of thick plywood or chipboard of the required dimensions as a base, and mark all the components of the compressor so that free access to all its parts is provided.
In principle, the design of the base and its materials are limited only by the imagination of the developer, for example, I had one of the compressors without a frame at all (I will describe below how to do it).
As a receiver, most often resourceful people use old receivers from the KamAZ brake system, a very convenient thing, there are all the necessary threads for fittings and a condensate drain valve. Alternatively, you can use an old foam or carbon dioxide fire extinguisher (preferably several in series).
With such a receiver, you will have to work a little - weld pipes and bushings to connect the rest of the system.
It is best to use industrial-made air filters and a moisture separator, of course, the price is a little expensive (a good kit now costs from 3000), but the quality is worth the money.
Craft air compressor with your own hands without connecting hoses or tubes will not work. By personal experience I can say that oxygen hoses (from welding) show very good results, the only drawback is a decent mass, and, therefore, it is inconvenient to work with an airbrush, it is better to use a standard spiral hose for it.
Everything is clear with the starting equipment, a standard engine starting relay is used, only a switch is added. It is more convenient to use the foot key, then the hands remain free during operation.
Work on the compressor
I'll tell you how to make a compressor using my example. It began with the fact that I tried to use a small compressor for inflating wheels from those that are commercially available for an airbrush. He was dissatisfied with his performance and set to work.
Took from mother-in-law old refrigerator, took out the unit with wiring from it, threw the rest away. The motor was sanded and repainted with spray paint, then went to the construction market. There I picked up a piece of oxygen hose, purchased suitable clamps and a switch.
After that, he went to his friends in the unit and became the owner of a new KAMAZ receiver. He brought all this good home and began to create a simple design.
In order not to make a frame, I decided to use the receiver as the basis of the entire compressor. To do this, I first cut it out of whatman paper and adjusted it to the place of attachment under the engine and supports for the receiver. After everything was ready, I cut out the parts from 1.5 mm thick steel, bent them and welded them to the receiver. Thus, an analogue of the factory compressor was obtained.
Then everything is simple - I installed a pumping unit on the pillows and connected all the electrics. Then he took up pneumatics, attached a fuel filter from a Zhiguli to the compressor inlet pipe through a piece of hose (subsequently replaced it with a frame soldered from wire, covered with thin foam rubber).
I screwed an adapter for the supply hose into the threaded bushing of the receiver and connected it to the outlet pipe of the pump, a dehumidifier unit with a reducer and a pressure gauge, to which a gas valve with a connector for connecting the airbrush hose, was screwed into the opposite bushing. I tried it - everything works great, no complaints.
A little advice for those who are going to make a compressor from the refrigerator with their own hands - turn on a check valve between the compressor and the receiver, the load on the motor will be significantly reduced.
Represents a device for the mechanical compression of gases, which generates an air pressure at the outlet that is greater than atmospheric in value. By forcing air into the combustion chambers of the internal combustion engine, the compressor increases engine power due to increase efficiency fuel combustion. The fuel mixture when the supercharger is running contains more air, and therefore it is easier to ignite and release during combustion more energy. In the course of research, it was found that the engine adds 46% of power and 30% of torque to the latter - this device is so important!
This device is used as a power supply for pneumatic tools
The air compressor is installed not only in cars with internal combustion engines - this equipment is used as a power supply for pneumatic tools, in industry and other industries. Main performance characteristics air compressor - operating pressure and capacity in liters of air per minute.
The following types of air compressors are distinguished:
- Piston. Device with direct force transmission. During engine operation, the piston moves through the cylinder and compresses the air that enters the system. There are oil and oil-free piston blowers, the latter being widely used to power spray guns in the painting industry. Air two-piston compressors are used in industrial applications due to their high performance.
- Rotary. The transmission of power from the engine occurs with the help of a belt. Propellers with rotating blades compress the air inside the device and create. Rotary equipment is characterized by high performance, good efficiency, low noise and vibration during operation. Air type oil is used sparingly and does not enter the compressed air. 380 V received special distribution in production.
The blower can operate independently or with the use of a receiver, which provides a smooth supply of compressed air to the system. An air compressor without a receiver is less expensive and smaller, but more prone to breakage.
Is it possible to do it yourself?
Not everyone can make an air compressor on an engine on their own, moreover, making modifications not provided for by the automobile manufacturer can unpredictably affect operation. However, you can assemble for a garage or auto repair shop - with the help of quickly fill tires with air, create excess pressure for a spray gun and other pneumatic tools, and also find other uses for the equipment.
A do-it-yourself compressor with a receiver will last a much longer period than purchased equipment, provided that it is properly assembled from high-quality parts. This is due to the fact that the master, who set out to make an air compressor with a receiver, makes it for himself, and for this reason he cares about quality. What parts are needed and how to assemble?
We collect the compressor with our own hands
The main element of a homemade air blower is the propulsion system. It is recommended to use for the refrigerator. It is notable for the presence of a starting relay, which makes it possible to set and maintain a certain level of air pressure in the receiver. If you don’t have an old and unnecessary refrigerator at hand, you can find the unit at an industrial waste dump or with friends. Preference should be given to a refrigerator made in the USSR, since powerful and reliable compressors were used for the production of Soviet refrigeration equipment.
The refrigeration supercharger has three tubes in the design, one of which is sealed at one end. The rest are air ducts - one lets air in, the other lets out. With further assembly of the unit, it is important to understand in which direction the air flows circulate. To determine it is necessary to a short time turn on the compressor in the network and observe in which direction the circulation occurs. It is recommended to mark "input" and "output" different colors so as not to confuse during assembly. An air check valve for the compressor will help prevent arbitrary change in air direction.
In addition to the heart of the old refrigerator, to assemble car compressor will need:
- Air receiver (a good option is a fire extinguisher).
- Pressure gauge.
- Coarse fuel filter.
- Moisture filter.
- Air pressure control relay.
- A set of adapters, clamps, hoses.
- Toggle switch for voltage 220 Volts.
At various stages of assembly, you will need: a base for installing the finished unit, wheels (you can take it from old furniture), paint, engine oil and anti-corrosion agent.
Receiver Assembly
The compressor receiver is a solid container that contains pressurized air. The role that the car air receiver performs is to eliminate pulsations during the air supply by the compressor, which is carried out by equalizing the pressure in the system. The secondary role of the receiver is the storage of inert gases or condensate.
The receiver capacity is absolutely hermetic, and the required volume depends on the cycling of air consumption by the consumer and the performance of the air compressor. The use of a receiver extends the life is often used in various fields including painting work industrial production and other industries.
An automobile air receiver can be manufactured in three ways:
- Carbon dioxide fire extinguisher. Well suited for long-term storage of gases under pressure up to 10 atmospheres, it has strong steel walls and is safe to use. A fire extinguisher with a volume of 5-10 liters is sufficient for the receiver. To turn the fire extinguisher into a compressor receiver, it is necessary to remove the shut-off and starting device and put the prepared hose adapter on the hole. The bottle must be emptied and washed thoroughly. Next, a water cross is installed and sealed. After that, you can use the manufactured receiver for work.
- Hydraulic accumulator. A more specialized device with a sufficient range of capacities. The disadvantage is the low nominal pressure. Plus - a suitable thread at the exit. To use as a receiver, remove the internal carbon dioxide storage membrane, then connect the hose as in the fire extinguisher example.
- Oxygen balloon. Exceptional strength and air pressure of tens of atmospheres, but small capacity, inconvenience of transportation and heaviness. To use, just connect the hose - the homemade receiver is ready to go!
A do-it-yourself air receiver can be made from any cylinder for storing compressed gases, but before using it, you need to make sure that the selected container can withstand the operating pressure of the future compressor.
Final assembly of the compressor unit
The compressor with the receiver should be installed on the same common base for ease of storage and transportation of home-made equipment. The compressor from the refrigerator, found earlier, must be cleaned of rust (if any). Next, the oil in the air compressor is replaced, since the old one has probably become unusable. It is not possible to pour oil into an air compressor - in the absence of a special compressor lubricant, you can use motor, synthetic or semi-synthetic.
Mount the compressor and receiver on the same base for easy storage and transport
The assembly of the compressor is carried out in five consecutive steps, as follows:
- Install the supercharger from the refrigerator on the prepared base and secure with threaded studs. The receiver is installed in a vertical position and secured by means of folded plywood sheets in the amount of three pieces with a hole for the cylinder. Wheels are attached to the bottom of the base for easy transportation.
- Install the compressor and check valve for the air compressor in the air intake port. For convenience, you can use a rubber hose.
- Install a water separator through a hose on the outlet pipe of the supercharger - it can be taken from a diesel engine. To prevent the hose from breaking under pressure, it is necessary to strengthen the connection with automobile clamps. A moisture separator must also be installed at the inlet of the gearbox - devices for decoupling pressure in the receiver and compressor. The outlet pressure pipe is connected to one end of the water cross.
- Install a relay on the top of the cross for pressure adjustment, and a pressure gauge on the free end for control. All joints must be firmly reinforced with fum-tape and tightened with clamps to prevent breakdown.
- Using a 220 volt toggle switch, connect the mains phase to the compressor output. Insulate the contacts with electrical tape or a dielectric casing.
After connecting the equipment to the network, it can be considered that the oil air compressor is assembled. You can connect the device to the network and check its operation.
What problems can await during assembly?
Auto air compressors are simple in terms of design and operation of the device, however, during self-assembly, you may encounter the following problems:
- Oil supply to the wrong hole. Due to the presence of several tubes in the supercharger, you can get confused and fill in oil at the wrong hole. To prevent a problem, oil must be poured into any of the two inlet tubes - the outlet is excluded.
- Small diameter receiver inlet. If the use of a standard cylinder thread is not possible, solder the two elements with flux and attach. The final design is able to withstand a pressure of 5-6 atmospheres.
- Incorrect connection of the blower tubes. In order for the circulation in the system to occur without failures and in one direction, it is necessary to install a check valve on the compressor with your own hands. He will prevent possible problems and ensure stable operation of the supercharger.
Try to assemble the oil blower with your own hands in full accordance with the instructions, recommendations and safety rules. In this case, there will be no problems with the operation of the equipment.
Setting the required pressure
An air motor compressor or a car supercharger must be properly prepared for the first use. To get started, you need to set the pressure mode using the relay. Adjustment is carried out by means of two springs - a large one sets the minimum pressure, a small one sets the maximum. The first contact of the relay is connected to zero, the second is attached to the supercharger.
WATCH THE VIDEO INSTRUCTIONS
When using the equipment for the first time, follow the readings of the pressure gauge - the relay should turn on and turn off the supercharger when the lower and upper limits of the set pressure are reached, respectively. After the final adjustment, you can paint the homemade supercharger and continue to operate.
Good day! In this article, using the example of my compressor assembly, I want to show the method of building compressors from available parts for model airbrushing.
Main elements
The first step is to issue technical requirements to our fruit of goblin engineering.
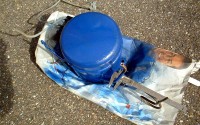
Since I purchased a new double action airbrush, a compressor with a receiver was needed. The fact is that, unlike a single action airbrush, the new airbrush is able to control the air flow, lock it, and open the air duct. In European countries, many people use such an airbrush along with a separate compressed air cylinder, disposable or reusable, we leave the economic side of this matter aside. Air tank - receiver- allows you to collect air like such a balloon. If air is continuously injected into the air duct hose, then at some point the fitting may not withstand and the hose will fly out. To get a blown out hose on any part of the body is very painful and unpleasant. And so - the airbrush uses air from a cylinder. So, a double action airbrush involves the use of a receiver. We will return to it later.
The main thing is actually compressor. We will use a refrigerator compressor. Like a "pot" - because, compressors of the "cylinder" type can no longer be found during the day with fire, and they are all old. We decide on the choice of compressor using various sites for the sale of refrigeration equipment. Probably, their price will be the main criterion, since their air injection parameters are approximately equal. Some are stronger, some are weaker. On purchase - you can go to the store yourself, you can order delivery if they do not have a retail store and they work only on the Internet. Before ordering, we look at the compressor model, and write out the name of the company that produces it, you can use ctrl + c, you can use a piece of paper. And go to the manufacturer's website. The manufacturer of the compressor that I ended up with is Danfoss, on their website you can download a pdf file from technical description compressor. Download MOT necessarily, we need it!
Let's go back to the receiver. The receiver should be a container designed to contain gases or liquids under high pressure. It is desirable that it meets the requirements of GOST. I’ll make a reservation right away - a plastic bottle, plastic tanks, tanks and canisters do NOT belong to such things. Their use is a flagrant violation of safety regulations! Consider containers:
Option one- carbon dioxide fire extinguisher. A good option, tested, holds up to 10 atm. Very wide choice of capacity - 3,5,10 l. - just enough to get (you can buy, you can get "exhausted"). However, it has one significant disadvantage - metric thread at the entrance. I used exactly that. 
Option two- hydraulic accumulator. A decent choice of capacity, however has a small working pressure. At the entrance - comfortable 1 inch thread. Requires fine-tuning before use, because inside it is divided into a membrane containing carbon dioxide, which holds water under pressure. It needs to be pulled out. Get it - just buy it in a construction hypermarket or at a construction market. 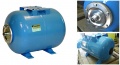
Option three- oxygen balloon. Some samples can hold a huge amount of atmospheres, however, either cylinders with an extremely small capacity, or heavy, massive ones, are available for welding work, and it is extremely difficult to get other options. But if you get some of the medical equipment (I'm afraid it's very expensive), you can arrange before assembly oxygen bar!!! =))) 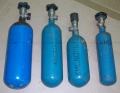
Option four- cylinders from various gases (propane, etc.) - easy to get, otherwise similar to a fire extinguisher. However, they say that the use of compressed air is not recommended. 
Connecting links between reducer and receiver, air preparation unit
Now that the compressor and what will be the receiver are defined, it is necessary to think about how they will be connected, and how compressed air will flow to the airbrush.
The first is the node that is attached directly to the receiver and provides air distribution between the lines (it should be mentioned that one of its main characteristics is compatibility with the connector on the receiver, I will mention screwing methods later).
The second is a pressure switch. The pressure switch must ensure that the compressor is turned off when a certain pressure in the receiver is reached, and turn it on when the pressure drops to a minimum value. As a pressure switch - the best option is the RDM-5 relay for plumbing systems. It is very easy to find, it is sold in most plumbing stores. It is necessary to pay attention - the RDM-5 connecting element is designed for an external thread of 1 inch. 
Thirdly, it is necessary to indicate the pressure in the receiver. We buy a pressure gauge with a measurement limit of 10 atm. These have a connection size of 1. Important - you need a static device. 
The fourth is an air preparation unit. A certain pressure must be applied to the hose leading to the airbrush. Therefore, a reducer is needed. The reducer must have a pressure regulation limit from zero to 8-10 atmospheres. Also, it is necessary that a pressure gauge be attached to it in order to see the value adjustable pressure and an oil separator filter. Since, even particles of compressor oil can fly from the receiver. Attention - in no case do not buy a filter lubricator - it performs a diametrically opposite function.
Fifth - Consumables, fittings, turns, tees. The main size of the fittings is 1 inch, in order to calculate their number, it is necessary to build a diagram of the air distribution and preparation unit. In addition to them, we will need several adapters from 1 to 1 inches, external and internal.
After looking at all the details and assemblies, we will make a drawing of how it will all look assembled, for example, like this: 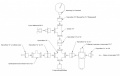
Now let's think about the placement of the whole structure. As an option - ordinary chipboard plates. In order not to drag the entire structure around the apartment of the garage workshop with matyugs, we will provide roller legs that are easy to find in any furniture store. So that the installation does not take up much space, I decided to place everything on two floors. To make it easier to work in the future, we will draw the following scheme: 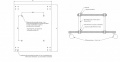
You will need either very long M8 bolts or short studs. Also nuts and washers.
Now, to summarize the planning stage, let's write a list of required materials.
- Compressor - 1 pc.
- Receiver (fire extinguisher) 1 pc.
- Pressure switch - 1 pc.
- Manometer - 1 pc.
- Filter reducer - 1 pc.
- Emergency valve-1 PC.
- Fittings, adapters - based on the selected scheme
- Various plumbing gaskets, fum tape, sealant.
- Cables, switch, plug + various small things for their installation and connection.
- Flexible hose (preferably oil-resistant), with a diameter matching the outside diameter compressor air outlet.
- Chipboard-plate for the stand, 4 roller legs, 4 M8x25 bolts or M8 studs, nuts, washers and other small hardware, as well as various tools.
Let's start assembling!
Compressor assembly
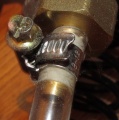
So, running around the shops is over, we have drawn a diagram, we are starting a vertex =). The first difficulty - which I encountered - was the node at the outlet of the fire extinguisher. There are several options here - dismantle the assembly, and find a welder to weld the desired fitting adapter. Due to haste, I did not want to look for someone, so I acted simply - I unscrewed part of the valve (leaving the internal mechanics, removed the control element). An adapter came up to one of the outputs with internal thread 1 inch, screwed the adapter from 1 to 38 into another with a creak. Hand on heart - this (and, in fact, like the entire receiver) was done in violation of the rules for the operation of pressure vessels. Still, it’s better to weld a new adapter with high quality (which, of course, is also not quite according to the rules ...).
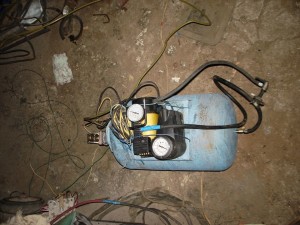
The first stage of assembling the compressor is simple - we arm ourselves with a water pipe wrench, fum-tape, sealant (attention, it subsequently freezes - if you want to do it for centuries - do not regret it!), And twist the adapters according to the plan planned in advance. An important note - in order to ensure a tight connection, it is not necessary to wrap everything “to a creak” - according to the law of meanness - tees and turns will never reach the desired angle. We mount a reducer, a pressure gauge, a pressure switch, an adapter for a flexible hose. Each stage of the process must necessarily be accompanied by fitting to the receiver-fire extinguisher.
Carpenter versus carpenter
"Viper with wheels here ku!"
kf "Kin-dza-dza"
The second stage of assembly is carpentry work. I took ready-made chipboard plates “from stocks” and screwed furniture wheels to them on self-tapping screws, having previously drilled with a thin drill seats for them (so they are screwed exactly in place and much easier). Be sure to ride the newly made product around the apartment (you need to check it! =)) - you are guaranteed attention and an interested reaction from your family (from the category of bad advice, it would be worth leaving a postscript “never repeat this on your own”). Since I was making a two-level stand, the next step was to mark and drill holes for the studs. Approximately in the middle of each stud, I screwed the nuts, measured the perforated tape with a margin (so that it turned out to be a “bed” for the fire extinguisher) and lifted the latter to the place intended for it.
Attention!!! All bitten off places of punched tape must be pasted over with electrical tape or other soft material to avoid the possibility of injury, or process so that there are no sharp edges or burrs. 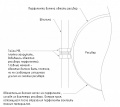
After positioning the fire extinguisher, I put two more perforated tapes on top and fixed it with nuts.
If you use a prepared accumulator as a receiver, then most of the small (5, 6, 8 l.) models of the “horizontal” type have wonderful brackets-paws at the bottom and top. The lower ones can be screwed to the base, and the compressor can be placed on the upper ones. 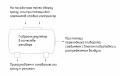
In my case, which I use as an example, the structure consists of two levels. The “second floor” of the structure must be prepared before installation. We find suitable holes on the compressor feet (there are a lot of them), and, maintaining the geometry, we mark and drill them on the “second floor”. It's okay if the holes are slightly larger than the diameter of the bolts (I used M8), wherever necessary I used wide washers. We mount the “second floor” plate, looking at the diagram that we talked about in the first part.
We put the compressor. In order to reduce vibration, it is necessary to provide some damping elements. I adapted ordinary plumbing silicone gaskets as them, building a kind of shock absorber out of them. We fix the compressor, do not forget to put washers. 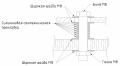
We try on the air distribution module to the receiver. If something rests, or is simply poorly located, the design can be changed. After fitting - fasten. Using a flexible hose, fum-tape and clamps, we connect the outlet of the compressor and the inlet of the air preparation unit. The clamps must be tightened well, ensuring a snug fit of the hose - otherwise it can poison and splash oil on the compressor side, and poison air on the side of the air distribution module. 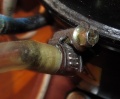
I sing the electric body. Final touches and...
"Mahmud, set fire!"
kf "White Sun of the Desert"
First, a little theory about the motor used by the compressor. The compressor, which we consider as an example, uses a single-phase asynchronous machine as a drive. Therefore, to run it, you need different auxiliary devices. In our case, this is a starting winding with a capacitor. Carefully read the instructions for the compressor! The types of devices that provide starting the drive can vary greatly between models.
Now the most important thing - you need to work with the connection diagram of the installation. There are several pitfalls here:
- The compressor is torn out of the usual wiring diagram. To make it work, you need to install a jumper.
- It is advisable to provide protective elements (circuit breaker) - a moot point, in principle, in case of any excesses, the machine should work on the group of sockets to which the compressor is connected - it is not necessary to install another machine, in my opinion.
- The connection line must necessarily go through the relay and the switch.
- Sometimes, a capacitor must be connected to the compressor. It depends on its type. Be sure to check the specifications and manual for the compressor you are using.
The connection must be made according to the following scheme:
From the plug-plug we lead the phase wire (L) to the switch. Next, connect the phase wire to the desired relay terminal. The neutral wire (N) remains intact, if there is a ground wire, if the latter is not present, we start the neutral wire to the ground terminal of the relay (it turns out protective zeroing), from the relay we lead the phase and neutral wires to the starting device of the compressor drive (there is such a box on its case), and according to the diagram we connect it to the corresponding terminals. It turns out something like this:
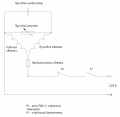
General form connection diagrams. RDM-5 relay connection diagram. Please note - we use the L1 terminal to connect the phase, as well as the corresponding terminal on the top block - from it the wire will go to the compressor. L2 is not used! Also, in no case do not connect the pads to each other - then the relay will not work.
From an ordinary plug (cable 2.5 mm2), through a switch, to a pressure switch (it says where to connect what) and to the compressor. The cable at the plug can be of two types - with earth, phase and zero if your house is new, or simply with phase and zero if the house is old. In principle, you can not take a steam bath, and bring the earth to the neutral conductor, as is done in old houses.
So, now, in order for the system to work, we will install a jumper. It is installed directly on the starter terminal block. soldering is best, but you can use crimp contacts of a suitable type (they are indicated in the description of the compressor). The jumper is shown in blue:
Jumper wiring diagram in the starting device.
This jumper is very important, as it provides the connection of the windings to the phase.
At the end, carefully lay the cables using plastic ties and self-adhesive pads for them. Carefully inspect the cables for insulation integrity, and check each connection for mechanical strength. Check carefully for potential short circuits - each wire must be carefully stripped and have contact only with the terminal intended for it.
Now - we check everything, run it, and start painting the models! =)
Every car enthusiast wants to have a compressor in his garage, which is not surprising, because its application is very wide: they can blow off dust or use it to paint a car, etc. In order to make a compressor with your own hands, you need to understand how the mechanism works and what requirements are put forward for a quality device.
The device must create a certain air flow, completely devoid of any kind of impurities (water, dust, oil, etc.). For example, if you use a compressor for painting and foreign particles get into it, then shagreen, graininess will form on the surface and, in general, the work will not be done very well. Moreover, if the air supply setting is uneven, spots or streaks may occur.
Of course, you can purchase a ready-made compressor, the options of which are presented on the market. a large number of. However, their cost is usually quite high. Therefore, you can do the work yourself. The main thing is to know the basic principle of its operation: high pressure is formed in the receiver (air storage tank), after which air is supplied to one of the actuators. In general, nothing complicated, especially since the manufacture of such a mechanism does not require any unusual materials. In general, you can make a simple and more professional compressor.
simple compressor
This option can be built using the simplest parts. You will need:
- Car camera;
- Pump with pressure gauge;
- Nipple;
- Awl;
- Tire repair kit.
A car camera will be used as a receiver, which first of all needs to be checked for holes and punctures. You can do this by pumping it up with a pump, and if the air does not come out, then everything is in order. Otherwise, damaged areas must be sealed.
 The next step is to create another hole for the nipple, which will serve as an outlet for air and where you will need to glue the fitting by unscrewing the nipple in advance. The first fitting will serve as a valve to contain the air. Next, by trial and error, we adjust the desired pressure level so that the flow is uniform and calm. Using a pressure gauge, you need to select an indicator that will allow you to avoid sudden jumps when you turn on the device.
This version of the compressor will allow you to perform simple tasks and can serve as an excellent replacement for spray cans, etc. However, frequent and more complex use will require a more professional mechanism.
The main advantage of a do-it-yourself device is its durability and reliability, which significantly exceeds commercially available models. This is not surprising, because when you assembled the structure yourself, in the event of a breakdown, you can easily replace the desired part. This is another advantage - the possibility of repair at home. For the manufacture of a semi-professional compressor, the following elements will be required:
- Motor;
- Reducer;
- Fuel filter;
- pressure gauge;
- Controlling pressure relay;
- Cross for holding water;
- Receiver;
- Tumbler;
- Hoses, tubes;
- Thread adapters, clamps, washers, nuts, studs, etc.
 In addition, you will need a board that you will use as a base, as well as sealant, semi-synthetic oil, paint and rust converter. To facilitate its movement, you can take a pair of furniture wheels and attach them to the board. You can buy all the parts at any building supermarket or order on the Internet.
Engine and its features
In order to save money, you can buy a motor from a refrigerator and use it for a compressor. By the way, it is great because it is equipped with a special starting relay for the desired pressure in the air tank. It is better to choose an engine from refrigerators that are made in the USSR, as they are more durable and can create very high pressure.
After you remove the motor from the refrigerator, it must be thoroughly cleaned and treated with a rust converter, which will prevent its further destruction and prepare it for painting. The next step is to replace the oil with a semi-synthetic one, which has a number of necessary additives.
The compressor has 3 tubes (2 open and 1 closed). One of the open tubes is used to draw air in and the other to let it out. In order to determine this, you need to turn on the system and look at its operation. As for the closed tube, it is used for regular oil changes. To ensure maximum comfort, you need to file the tube, and then come up with some kind of removable plug (for example, a screw). You need to fill in the oil using a regular syringe. By the way, motors of this type tend to throw a little oil into the air stream. To detain it, you need to install a special oil and moisture separator. The motor ultimately needs to be fixed on a wooden base, having previously installed a starting relay.
Air tank
For these purposes, you can take a cylinder that is used in a fire extinguisher. This is due to several reasons:
- Has high strength;
- Able to withstand significant pressure;
- Easy to install as an attachment.
For example, you can choose the OU-10 model, which is designed for 10 liters and can withstand a pressure of 150 bar. First, it must be treated with a rust converter, after which the ZPU must be replaced with a special adapter.
If everything is clear with the outer part, then the inner part will need to be further processed. To do this, you need to place the cleanser inside and shake well. Next, wash the bottle with water and screw in the water cross, securing the tape and sealant. This completes the work with the main two elements of the compressor.
Parts installation
As mentioned earlier, to increase the mobility of the device, it is best to place all the elements on one wooden board. The motor will need to be secured with studs, nuts and washers. The receiver should be in a vertical position and put a few plywood sheets under it. After that, you need to perform the following actions:
In general, the compressor is ready. Now it remains only to paint and test for proper functioning.
Pressure regulation
To check the operation of the compressor, you need to connect some device to it (a gun for pumping wheels or a pulse for painting). Next, at a minimum pressure, turn on the supercharger and carefully control the pressure gauge. At this stage, you need to make sure that the motor turns off when the desired pressure level is reached, and all connections are tight.
When you are convinced that air is not being let through, you need to let it out of the receiver until the engine starts. If everything works correctly, then you can check the device in practice by painting some surface. There is no need to prepare anything in advance, because the main goal is to check the performance of the device.
Maintenance
 As a rule, caring for a compressor that you have made by yourself is quite simple. Maintenance consists of periodic oil and filter changes.
If you perform car repairs and maintenance on your own, then you know that the compressor is simply indispensable in different types works. For example, you are repairing the chassis - you need to remove all the dirt and metal chips, it is also necessary for painting the car. Since the equipment is expensive, it does not hurt to know how to make a compressor with your own hands.
The principle of operation of the compressor
The compressor works very simply. The motor drives air into a certain container, and there the air is under pressure. For example, for painting a car, the compressor works in such a way that excess air that can harm work is removed through special exhaust valves. Due to this control, the paint from the spray gun lies evenly on the body area. Essentially, a car paint compressor pressurizes the paint in a spray gun. Without constant pressure, such a “smooth operation” cannot be achieved, so setting up an air compressor for painting a car is also quite an important job.
So, how to make a compressor without having a large selection of elements? We'll figure it out different variants- from an elementary compressor to a semi-professional one.
The simplest air compressor
The simplest homemade air compressor for painting a car body is a high-pressure supercharger made on the basis of an old car chamber. It will be used as a receiver (a vessel designed to accumulate any gas). In our case, the receiver will accumulate air. A homemade receiver from a car camera is a great option for a small amount of work.
For work you will need:
- car camera;
- car pump with pressure gauge;
- nipple from an unnecessary camera (not from the one we already call the receiver);
- a set of elements with the help of which car rubber is repaired;
- tool kit.
So, we have a car camera that replaces a full-fledged receiver. It is important that the chamber is intact and without punctures, because the receiver is always under pressure. Now you need to take care that it will work as a supercharger. The simplest homemade compressor for painting can be equipped with a simple car pump with a pressure gauge - this will be the supercharger. You can start making a compressor.
- We take our receiver (camera) and carefully check whether everything is tight and reliable there. You can check the receiver with a pump. If the receiver holds air, then everything is fine - move on. If the receiver has leaks, we repair the rubber.
- When the receiver is ready, you need to make a hole in it with your own hands, where an additional nipple will be placed. In the finished state, compressed air will flow from it. We need to carefully glue the additional fitting with special glue, and then connect it to the spray gun. We unscrew the nipple with our own hands - if the air flow calmly exits, then the repair was carried out correctly. We leave the nipple in the native nipple of the chamber, which will now work as a valve that removes excess pressure.
- Next, we must determine the compressed air pressure. Excess pressure can be calculated on the pressure gauge, it should not be spasmodic.
Assembling such a unit is quite simple. Yes, this is not a professional unit, but a home-made compressor for painting a car will work just as well. The model will work well, but if you automate the air injection, the work will go faster.
Homemade air compressor from a car engine
So, we decided to try to assemble a more serious air compressor with our own hands, which will be based on an automated supercharger. It is worth saying that such a home-made semi-professional compressor for blowing and painting a car will cost more in terms of materials, so you should think about how often you will use it. If not, then it is better to leave the first option.
Materials for an automated supercharger
- receiver - suitable capacity;
- engine;
- manometer;
- shield for fastening parts;
- a filter that separates oil and moisture from the air;
- gasoline filter;
- coarse filter;
- pressure control relay;
- rust converter;
- additional materials and tools: a file, a pharmacy syringe for filling oil, sealant, nuts, a mains voltage switch, paint for metal, a set of tools.
Preliminary work
Any electric motor can be taken as a power unit, it is desirable that it be fully ready, that each filter works properly, the pressure control switch gives the desired results, etc. Before starting work, it is best to thoroughly clean the supercharger with an anti-corrosion solution. If any filter is clogged, it must be changed. useful procedure there will be an oil change. The supercharger (engine) must have an outlet to three tubes:
- for oil change;
- for air inlet;
- for air outlet.
Engine ready for installation
You can determine where the air supply is and where the exit is by briefly turning on the engine. One of the tubes is sealed (for oil change). When you open it, make sure that the sawdust does not get inside. We need an oil separator, because some of the oil can enter the air flow into the air streams that the supercharger produces. The filter must be screwed onto the air supply pipe; car clamps are best suited for fastening (not one car repair is complete without these elements).
As for the receiver for the car compressor, it can be a cylinder, for example, gas or from a fire extinguisher. The main thing is that it is suitable even for the highest pressure. Attention! When handling the cylinder, make sure that it does not contain flammable substances.
Shield for fixing parts with installed receiver
The container must be thoroughly rinsed and cleaned of rust and other contaminants. The pressure switch also needs to be thoroughly cleaned of rust.
Everything is clear with the board - we use it for a shield on which the motor, supercharger and pressure switch will be placed. All parts of the structure must be firmly fixed on the stand. It is best that the relay with the motor be in the same position as before. If you removed it from some device, repeat the circuit, not forgetting the relay and oil separator. Using auto seals and adapters, you can easily connect the cross with the receiver (cylinder). It is desirable to paint the entire structure to protect against rust.
How assembly is carried out
Compressor assembly
So, the receiver must be securely fixed to the shield (you can also use any case). The main plane of the stand or shield can be planted on mini rollers from old furniture. Check that the filter is securely installed on each necessary element of the autocompressor. In addition to the fact that the auto compressor must have an oil separator and a coarse filter, take care of the air intake. It is quite simple to make it with your own hands. A tube is taken through which the compressor for painting a car takes water, and then a coarse filter is installed on it. Next, the filter with your own hands must be connected to the gearbox. Without this element, normalization of pressure will not be performed. Its outputs are also connected to the cross of the receiver with your own hands. Two more crosses will remain - they can be used for a pressure gauge, as well as for connecting to an airbrush. In words, this all seems too complicated, but knowing the principle of operation, you can assemble a compressor for painting a car if you have a blower motor and receiver on hand.
For safety reasons, so that the connections are not broken, you need to periodically run the compressor for the car. This action is performed using a relay. Top Models the pressure switch at the moment is RM5 and RDM5. These are elementary switches that are regulated by means of springs. The supercharger is connected to the zero phase. It is best to put a toggle switch on the main phase wire. After all, you may always need to abruptly turn off the device.
It is on this basis that home-made semi-professional compressors for painting and blowing cars work. Of course, experience is needed to make such a unit with your own hands. But the main factor is the knowledge of the scheme of all tubes. If you figured out this, then doing mechanical work is not difficult. Servicing it is quite simple - we change the oil, just like in a car. This is easy to do if you have a homemade mini compressor for personal use.
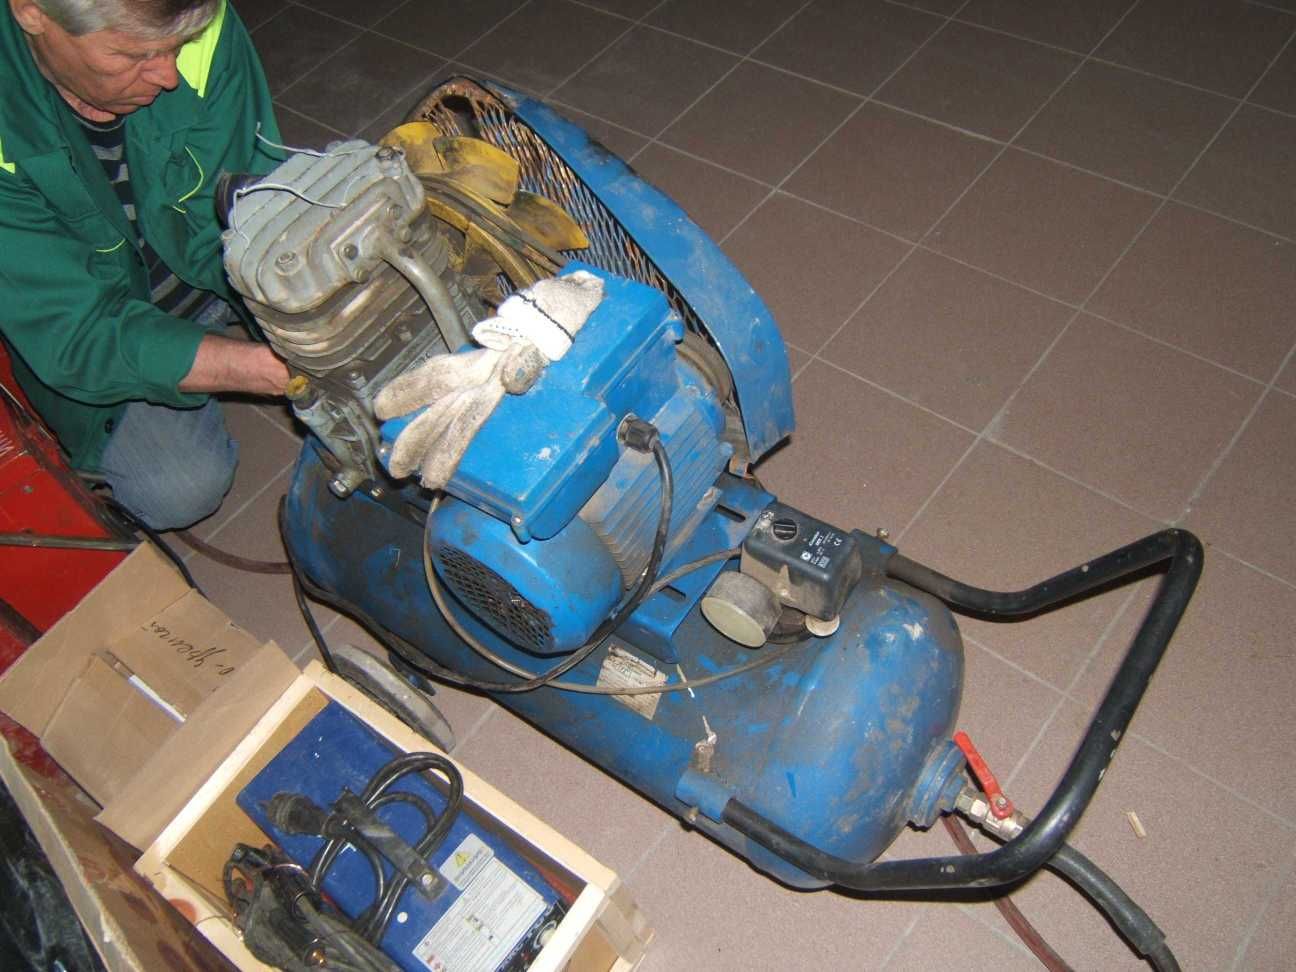
You can use a mini compressor, or you can take a powerful ready-made unit from KAMAZ. But if you take powerful compressor with KAMAZ, then it will need additional repairs, or rather, adaptation for your purposes at home. Therefore, this option is not very popular.


How to understand: will the kitten be fluffy?
What kind of light alcohol can be drunk for pregnant women: the consequences of drinking
Why do the legs swell in the ankles and ankles of the feet in pregnant women: causes and methods of treatment
The wedding of Prince Harry and Meghan Markle: scandalous and secret details of the marriage (photo) The future marriage of Prince Harry year NTV
How to close white plums for the winter