The key to successful breeding of bees are comfortable and properly equipped hives. How well the frames are made and located inside the bee house largely depends on how successful the honey collection will be.
The correct frame design, despite its apparent simplicity, should take into account whole line factors, each of which has a significant impact on their quality. This should include:
- choice of material for manufacturing;
- geometric dimensions;
- plank shape;
- wire tension method;
- installation method;
- the number of frames in the hive.
Therefore, the correct manufacture of frames for hives is a very important and responsible task, which must be approached very responsibly.
Options for the location of the frames inside the hive
The spatial position of the honeycomb frames is determined depending on the direction of their axes. It can be longitudinal or transverse with respect to the notch. As experienced beekeepers note, the chosen way of arranging frames for hives does not affect the productivity of bees, but the speed and convenience of control by the beekeeper depends on it.
With a longitudinal arrangement, it is possible to tilt the hive and inspect all the frames at once. This is not possible in a transverse position, as the hive frames will sway and may crush the bees.
The longitudinal arrangement is used for quick work only by experienced beekeepers in large apiaries, and for beginners and small bee farms, a transverse arrangement and inspection of each frame separately is recommended.
In the case of hives with a square cross section (for example, magazine type), you can change the spatial arrangement of the frames at any time and switch to an accelerated control method.
Size selection and basic standards
Before you determine the required geometric dimensions of the frames, you need to know the basic requirements for their correct placement. Both the overall performance and the development of your apiary can depend on their correct spatial arrangement inside the hive. Therefore, when manufacturing and installing frames, it should be borne in mind that the distances:
- between the axes of adjacent frames should be 37-38 mm, which will ensure the width of the "streets" (passages for bees) within 10-12 mm;
- from the upper and lower strips of the hive frame to the body should not be more than 10 mm and not less than 8 mm;
- from the bottom row of frames to the bottom of the hive body - 20-30 mm;
- from the walls of the hive to the side rails - within 5-7 mm;
- the recommended width of the upper bar is 25 mm.
The technology for manufacturing frames for hives should ensure their reliable fixation in the internal volume and the possibility of unhindered excavation if necessary.
Among the most common standards that show good results, experts indicate the following dimensions, which have frames for comb honey in terms of outer height and width:
- Zander, 220 x 420 mm;
- frame for 12 frame hive Dadan-Blatt, 300 x 435 mm;
- Dadana (modified), 285 x 448 mm;
- Kuncha or "Hive of Goltz", 330 x 250 mm;
- Langstroth, 232 x 448 mm;
- German standard, 223 x 370 mm.
When determining required sizes it should also be borne in mind that they must correspond to the size of the hive in order to fully comply with the conditions indicated above. Therefore, we can say that the design of the house for bees and the dimensions of the honeycomb frames are inextricably linked and your honey flow and the proper development of the bee colony depend on their correct combination.
 Drawing and dimensions of the Dadan-Blatt frame.
 Distance between frames
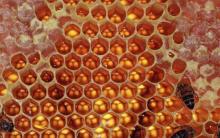
The construction of the honeycomb takes place inside the frames that the beekeeper sets in the hive. This technology makes it easier to control the filling of combs and facilitate the process of collecting honey. The stability of the honeycomb can be increased by installing a special wax plate and fixing it on the wire stretched inside.
Intermediate honeycomb walls can be purchased at specialized beekeeping stores or you can make them yourself. Bees fill honeycombs much faster in ready-made beeswax plates.
 Drawing and dimensions of the Ruta frame.
 The distance between the planes of the frames for the hives is called "bee streets". Their width should be within 10-12 mm. Reducing the passage will not allow the bees to work normally on the combs due to tightness, and due to the increased distance, the construction of combs between the frames may begin or a significant increase in the thickness of the comb set may occur.
In order to accurately maintain the required distance, the side planks are given a figured shape, in which the upper part of the plank is wider and the middle is thin. Another solution would be to use special spacers on the side rails, which keep the frames from moving together and allow for quick and accurate installation.
Construction principle
Traditional frames for comb honey are assembled from 4 wooden planks: two side, top and bottom. At the same time, the length of the upper bar is slightly larger than the overall dimensions of the frame and its edges protrude from both sides. This allows you to quickly and easily install the structure inside the hive, laying it on the existing longitudinal supports along the side walls.
 The dimensions of the Ruta blank.
 Trading networks offer beekeepers sets of elements for assembly, bee frames already assembled, with or without wire holes. The price of prefabricated frames depends on the type of wood, the quality of the processing of parts, the presence of holes, the level of assembly and trademark manufacturer. The most expensive products are made of beech and are delivered in a completely ready-to-use form.
The type of material chosen for the manufacture of frames has a significant impact on the effectiveness of their use and the amount of comb honey obtained. Just as important are the dimensions of the structure, its strength and weight. Today, wood and plastics are used as materials.
 Sectional frame collection.
 Moreover, plastic, as an innovative material, has not yet received wide distribution. Most beekeepers, in the manufacture of bee frames, prefer wood, as a more natural and environmentally friendly material.
Wooden planks used for assembly must be well processed sandpaper or at grinding machine until a completely smooth surface is obtained.
When using resinous softwoods, it is recommended to treat the surface of the planks with hot wax or natural drying oil. The connection of the planks to each other should be carried out with steel self-tapping screws, having previously smeared the joints with PVA glue. The use of nails may not provide sufficient structural strength.
The fastening of the intermediate walls made of honeycomb, in the inner space of the frames, is provided by the tension of steel wire strings. At the same time, the strength of the wooden planks should be such as to ensure the possibility of a strong tension of the strings, while excluding the deflection of the wooden parts.
To ensure better stability of the assembled structure, it is recommended to do 4 stretches in the longitudinal arrangement of the string and 6 times to tension the wire in the transverse direction. In mini frames, you can do only 2 broaches. The use of hardwoods allows you to reduce the number of strings and simplify the work process, but this option will increase the weight of the product.
To ensure that the installed wire does not protrude above the surface of the planks and does not touch the walls of the hive, making it difficult to install them, longitudinal grooves are cut in the boards. The diameter of the holes drilled to pass the wire must not exceed 1.5 of the wire diameter.
The holes themselves are best done with a low-speed drill or screwdriver. Good results can be obtained by burning holes with hot metal. The use of a cold awl or other similar tool for this purpose can lead to splitting of the finished planks.
Which wire arrangement is best?
The increased number of tensioned strings in the transverse arrangement allows for a more even distribution of the force applied to the bars and reduces possible bending. Four, and sometimes only two stretched strings increase the force effect and contribute to greater bending, and, therefore, the subsequent weakening of the wire tension.
 Longitudinal and transverse winding.
 On the other hand, an increase in the number of strings leads to a complication of the structure, increases the time for its manufacture, and complicates the process of soldering the intermediate wall from the honeycomb onto the wire. Therefore, when choosing the option for the location of steel strings and their number, one should take into account the strength of the frame material and its dimensions, since the larger the frame, the more tension will be required.
To create the possibility of tightening the strings when they are loosened during operation, some beekeepers recommend not tying the ends of the wire with a stretched string, but hammering fixing nails into the upper bar.
They should protrude 4-5 mm above the surface of the bar, which is quite enough to fix the wire. The length of the nails is 15-20 mm, the diameter is 1.5-2.0 mm, and the surface itself must have an anti-corrosion coating.
If it is necessary to perform a tightening, the nails are simply hammered into the bar to the very top. In this case, the wire changes its length and provides better tension. This tensioning technique eliminates the need for a tensioning machine or other specialized devices.
Choice of frame wire
The wire used for bee frames as tension strings must be steel. The use of non-ferrous metal wire or thick fishing line is not recommended due to the soft structure of the material and the ability to stretch over time, as well as the complex technology of fastening to the frame of the intermediate wall. In addition, the use of fishing line or soft metal does not ensure the safety of the strings when removing the comb with a knife.
Excellent results can be obtained with the use of nichrome or tungsten. These materials do not corrode, are easy to process and heat up quickly. However, the high cost does not contribute to their wide distribution.
Therefore, in specialized stores for beekeepers, they offer two types of steel wire: ordinary black and high-alloy stainless steel. Stainless steel is durable, but it is also more expensive.
Its increased rigidity somewhat complicates the process of pulling on the frame. At the same time, it should be borne in mind that black strings are much cheaper and softer, but can rust over time due to the treatment of frames with pest control compounds. The final choice is yours, as each type of wire has its own advantages and disadvantages.
1 of 3


Wire pulling instructions
After the manufacture of wooden frames with installed spacers or curly side strips, it is necessary to start tensioning the wire for subsequent fixing of the intermediate wall of honeycomb on it. To do this, you will need the following inventory and materials:
- steel wire with a diameter of 1.5-2.0 mm, wound on a coil;
- drill or screwdriver with a drill corresponding to the diameter of the wire;
- a marking drilling jig or a template that you can make yourself;
- hammer, pliers, pliers;
- nails for fastening and tightening the wire.
To improve the convenience of unwinding the wire, it is recommended to install the coil on a vertically located axis.
Installing and stretching strings
During the stretching of the strings on the frame, the order of work will be as follows:
- using a conductor or marking using a template, drill the necessary holes in the opposite strips, depending on the selected arrangement of the strings;
- drive a tension nail into the frame;
- pull the wire through drilled holes, passing through them in a sequential snake;
- wind one end of the wire around the corresponding nail;
- tighten the wire using the pliers and secure it to the second nail in the same way.
The tension level of the string should be such that a musical tone appears when it is twitched with a finger. Otherwise, it is necessary to carry out a constriction.
Installing the inner wall
After the frame with the stretched strings is ready, you can begin the process of fixing the inner wall of honeycomb to the wire. This is done by heating the wire and fusing it into the material of the plate to be fixed.
The ends of the wire are connected to a current transformer operating at a supplied voltage of 12-36V. The use of 220V equipment is prohibited due to safety reasons.
Can be used as a power source Charger for car batteries or buy a device in a specialized beekeeping store in the inventory department. The use of a car battery is not recommended, because you can simply ruin it, including in short circuit mode.
To solder an intermediate wall:
- install the frame with the stretched steel wire on the desktop horizontally;
- put the cut wall plate inside the frame on the wire;
- connect the ends of the electrical wires from the current source to the nails or ends of the wire;
- turn on the source of electric current;
- when the wire is heated, the wall material will begin to melt and it will go inside the material;
- after cooling, the intermediate wall will be securely fixed to the frame.
Highly important point when performing this operation is to prevent overheating of the wire. If this happens, then the hot strings will simply cut through the material, and the result will be negative. It is also impossible to achieve a good result with insufficient heating.
For bees, the principle location of the intermediate wall is not of great importance. It may not reach the edge of the frame a little, have a slight skew during installation, or be assembled from several strips. The main thing is that it does not fall off after installing the frame in the hive.
Plastic hive frames
Today, most beekeepers use wood to make bee frames as a natural material proven over the centuries. However, development modern technologies led to the introduction of plastic products on the market.

This is due to the desire of manufacturers to surpass the performance of traditional materials and create lighter, stronger and more comfortable hive frames. Wood in cold weather quite actively absorbs moisture from the air, and shrinks in the heat. This leads to a deterioration in the quality of the frames and may lead to a decrease in the quality of honey.
So far, plastic frames are made only industrially and are sold as ready-to-use products. From plastic, designs of a full-fledged standard size and mini frames are made for connecting them into a cassette unit.
At the same time, the internal space of the product is filled with a thin plastic plate and the tension of the wire with the subsequent installation of the inner wall is not required. It is enough just to cover the surface of the plastic with melted wax using a roller and install the frame in the hive.
Summarizing
Self-made frames for bee hives is not hard work, and even a novice beekeeper can perform it. Traditional structures are made of wood and steel wire. dimensions frames depend on the design of the hive and its volume.
In addition, plastic frames are presented for sale and are successfully implemented, which are easier to use, but more expensive for the beekeeper. The choice of a suitable design depends on the size of your hives, the level of development of the bee colony and the wishes of the beekeeper.
Select
baguette
Choose a baguette and passe-partout from our catalog that best suit your painting and interior.
Home - Services - Picture frames - Production of frames to orderFrame making
The picture, designed in an appropriate way, looks noble. Not only aesthetics, but also perception depends on the baguette. That is why special attention is paid to the manufacture of custom-made picture frames. An individual order of the product allows you to choose the most suitable option, take into account the features of the canvas, achieve an elegant, complete appearance any painting or embroidery.
Frame and image should not compete. A well-chosen baguette emphasizes the style, places the necessary accents, perfectly harmonizes with the image. Making frames to order is an opportunity to create the desired composition, properly arrange a canvas of non-standard sizes. The products are made from high quality materials and the work is done by hand. Photo frame making services are no less popular: both amateur and professional photography wins in combination with a beautiful, exquisite baguette.
Making picture frames from wood is a special skill, subject only to professional craftsmen. By ordering work here, you will get a decent result with excellent processing and a coating that protects wood from the harmful effects of moisture.
Frames to order
Baguette decoration is relevant not only for home decoration. We create custom-made frames of non-standard sizes for exhibitions and expositions, for decorating municipal institutions, offices. Any letters, diplomas, certificates will look presentable if you choose an original baguette that is in harmony with its contents. Such solutions will distinguish your company from others, and the information reflected in the certificates will become more catchy and concise, and will attract the attention of office visitors.
Many prefer not to overpay and choose options from plastic or combined materials. But custom-made frames made of wood are perceived differently. They can have different colors and exclusive decor, each product looks unique. A wide range of materials makes it possible to choose the type of baguette that seems to you the most worthy and harmonious. Professional craftsmen will talk about the features of the materials presented in the workshop, show all possible options and will be happy to start working on your order! Within the specified time you will receive a finished product that meets your ideas about the ideal design of the picture!
The internal arrangement of the hive necessarily includes the installation of special wooden frames on which the bees will build honeycombs. Making frames for hives with your own hands is a good basis for a novice beekeeper, since it will take a lot of these products to successfully breed insects, and it is not economically profitable to buy them ready-made.
From this article you will learn not about how to make frames with your own hands, but also how to build houses for bees on your own. The article provides instructions, drawings, photos and videos for the construction of a sunbed hive and a multi-hull house for bees.
How to make hive frames
In order for the manufacture of frames for hives to be successful with your own hands, you first need to decide on the size of the bee dwelling itself. Each type of house has its own models, so their height depends on the depth of the boxes.
In addition, they are divided into several types, a description of which you will find below. They differ in design and complexity of manufacture. Also, these products are usually divided into types depending on the material from which they are made.
Frame types
If you are not going to make frames yourself, but want to buy them in a store, it will be useful for you to know what types they are divided into depending on the material.
Modern manufacturers produce models from such materials.(picture 1):
- plastic made from high quality material that does not release toxins into the air and has no bad smell. If you come across a copy with a sharp characteristic smell of plastic, it is better not to buy it.
- Polymer products, including those made of plastic, are considered one of the most durable. Such material does not absorb moisture, does not deteriorate under the influence of direct sunlight and does not deform under the influence of high temperatures.
- Wooden are considered the most environmentally friendly, since in nature bees live inside tree trunks or on branches. You can make them out of wood with your own hands, using ready-made drawings and improvised materials.
 Figure 1. Models from different materials: 1 - plastic, 2 - polymer, 3 - wooden
 The only drawback of wooden products can be considered their relative fragility. Wax moth often starts in them, which gnaws through passages and makes the structure unsuitable for further use. In addition, no processing special formulations such products quickly deteriorate under the influence of moisture and direct sunlight.
Kinds
Conventionally, all models are usually divided into nested and shop models (Figure 2). Nesting bees act as an incubator, as in them young bees reach adulthood. They can store a very limited amount of honey and bee bread.
Storehouses are distinguished by their simple design, since their main function is to store supplies of honey produced by bees.
 Figure 2. Nest and magazine model drawings
 To make a frame yourself, you need to decide which hives will stand in your apiary. Each type has its own models, but most beekeepers prefer to save materials and effort, and make hives and frames of a standard size so that they can be changed at will.
DIY frame making: video
Making a frame yourself according to the drawings can be problematic, especially if you are doing this for the first time. To facilitate the task, we recommend watching the video, which shows step by step all the stages of their production.
The multi-body hive is one of the most popular among beekeepers. It allows you to place large families, as well as many frames inside at the same time and, accordingly, get more finished products.
In addition, such models are easy to manufacture and maintain, so it is quite possible to make such a house for bees with your own hands, if you take into account some practical nuances and features.
Rules
To make a multi-hull house for 10 frames with your own hands, you need to follow certain rules. Firstly, the size of one frame should be 230 * 435 mm. Secondly, it is necessary to strictly observe the dimensions of the case (length 450 mm, height 250 mm, and width 375 mm). Thirdly, it is advisable to select boards with a thickness of 35 mm: this is how an optimal microclimate will be maintained inside the house.
In order for the manufacturing process to be successful, you need to follow these rules(picture 3):
- Strict adherence to dimensions will allow you to make several multi-hull houses and frames for them at once. An apiary with such identical dwellings will be very convenient to maintain.
- The material must be durable and of high quality. It is better to use wood for construction, as it is a natural material that is comfortable for bees.
- When installing the roof, you should try to install it tightly, without gaps, and cover it with any available roofing material.
 Figure 3. Design features of a multi-hull hive
 Small ventilation holes with metal mesh grates are necessarily made in the walls so that a sufficient amount of fresh air, but other insects and debris did not penetrate.
Peculiarities
The main feature of a multi-hull hive is the presence of several extensions, the number of which can reach 6 pieces. The top three extensions are higher and larger, the lower ones are smaller, which is associated with physiological characteristics bees (Figure 4).
The bottom of this design is removable, and in shape it resembles a frame. As a rule, boards with a width of 3 centimeters are used for its production.
Note: It is better to install the bottom on a slope so that it is easier to clean the interior space.
 Figure 4. Drawing of a multi-hull hive
 Letok is a small board that is attached to the house with the help of two supports. If necessary, it is easy to fold the notch so that the bees can fly out of the house, or vice versa - to cover it if it is planned to transport the house. To prevent the bottom from rotting, two bars are stuffed onto it, which act as legs.
Making a beehive lounger for 20 frames
Beehives differ from multi-hull hives in that the new frames are delivered in width rather than in height. In fact, the size of the sunbed can be arbitrary, but in practice the most popular model is considered to be a sunbed hive for 20 frames, so we will take a closer look at this design in more detail (Figure 5).
Note: Sun loungers are considered quite bulky, so they are used mainly in stationary apiaries.
 Figure 5. Beehive lounger: design features
 The internal dimensions of the lounger are: 810 * 450 * 400 mm, and different walls require material of different thicknesses. The front and rear walls are made of boards 40 mm thick, and the side walls - 30 mm.
Rules
Making a beehive lounger is more difficult than independent production multi-hull (Figure 6). Firstly, the finished design is quite bulky, and secondly, during production, it is necessary to strictly observe the dimensions on the drawing and tightly fasten the parts to each other.
To make it easier for you to make hive frames, we recommend watching a video that shows in detail all the stages of the process.
Peculiarities
Among the main features of the hive-lounger, it is worth highlighting the bulkiness of the design. Such a house for bees is quite heavy, and is not suitable for manual carrying or transportation.
 Figure 6. Drawing for the manufacture of a lounger hive
 In addition, in comparison with vertical hives, not all comb molds are filled with honey in sunbeds. Also, such houses are more difficult to maintain, since the bottom cannot be removed from it, but at the same time the structure is very strong and durable.
A feature of the sunbeds is that they can leave not one, but two bee colonies for the winter. This saves food and vitality worker bees.
Beekeepers are people who can do a lot with their own hands, because we are talking about the convenience of the bee colony. High-quality and correct manufacture of frames for hives with your own hands is very important for bees and honey production. We invite you to find out from our article what types exist and how exactly to do them.
This design is considered the most popular among beekeepers, but this is not surprising, since it is one of the most convenient for the bee family. In addition, it is elementary to do it yourself, picking up right size wooden slats. Beehive frames, both earlier and in our time, were mainly made of wood, as the safest and most environmentally friendly material.
Dimensions and features
The dimensions of the Dadan-Blatt design are fixed by many years of beekeeping experience and are divided into shop and nesting ones. Shop (or semi-frames) are used in the lower tiers of the hive, so their size is smaller. The size of the nesting form is 435x300. The size of the store form is 435x145.
The constituent parts of each frame form are an upper and lower bar (1 pc each), as well as two side bars. The length of the upper bar must necessarily provide 1 cm on each side for installing the frame in the hive (it will be held on these “ears”).
Scheme and layout of the future design
The width of the side bars and the top bar is standardly 25 mm, the height of the top bar is 20 mm, the width of the side bars is 10 mm. The lower bar should be 10 mm in height and 10 to 25 mm in width. Next, we will tell you what materials will be required in order to make this design yourself.
Tools and materials
Materials for the frame frame: dry wooden slats, sanded and prepared for hammering together, as well as a coil of thin wire (can be bought at a beekeeper's store or at the construction market). Tools for making: an awl, a hammer, pliers or strong wire cutters, shoe nails (thin and small). The workpiece is made on a convenient surface - a table or a machine, so that all the elements are visible and at hand. You can also use clips for fishing line to fix it on both sides when pulling.
Step-by-step instruction
The correct manufacture of the frame for the hives is not only hammering together the rails, but also pulling the wire on its frame.
You can see the exact dimensions in the figure at the beginning of the article, and for greater clarity, the exact markings of each frame part are also shown there. So, what sequence of actions will need to be followed in order to correctly manufacture the frame frame for the hive?
- With the help of shoe nails, everything is neatly knocked together wooden details. So you can make a frame. The next step is holes.
- Holes for pulling the wire are made in the side faces at an equal distance from each other. There should be four holes in total, the topmost and bottommost punctures should be double so that the wire can be fixed.
- A wire is threaded through the uppermost or lowermost hole on the side bar and pulled to the opposite bar.
- The stretched wire should be symmetrical, “snake”, so that an even, symmetrical tension is formed.
- After it is threaded into the last hole, it is necessary to make a loop and twist it in a spiral, as in the figure below.
- The frame must be well stretched, but do it so that the tree does not sag. You should have four wire lines in total, evenly stretched, which means your worker frame is ready for waxing.
In the same way, the preparation of store bee frames is carried out, only there the number of wire rows is two. Next, we invite you to watch a video in which an amateur beekeeper will talk about his own process of making frames. As you can see, it is quite possible to make them quickly and easily, without any special financial expenses.
Langstroth Ruta
The wooden structure of this hive is similar to that of Dadan-Blatt, it is also taken out through the top of the hive, but the dimensions are slightly different. The standard norms for such a framework are: the height of the side rails is 232 mm, the width is 35, the top bar is 9 in height, and 470 in length (taking into account the width of the hive 450 plus 10 mm on each side).
The lower bar is 8 high, 19 wide, 450 long. In fact, the design is very similar to the Dadan frame form, it can be easily made by yourself according to the above scheme (also using wire).
Drawing frame for Langstroth-Root bees
Video "Correctly stretch the wire on the frame"
- 1. Frame material
- 2. Dimensions
- 3. DIY frame
- 3.1. Sequence of work
The bee house consists of many components. These include the body, liner, roof, bottom, but the frames for bees are considered the most important component. They are designed to accumulate honey and extract it without harm to the bee colony. Such forms are installed in the middle of the body in special grooves. The number of these structural elements will depend on the type of hive, as well as the degree of development of the family.
frame material
Wood is considered the main material for the manufacture of the structures in question, although plastic products have recently appeared on sale. According to experts, they are no worse than their counterparts. If frames for hives are made with their own hands, then the beekeeper must pay attention to the quality of the joining of the connected elements, and also observe the dimensions indicated on the drawings.
Goods purchased in the store also need to be checked for compliance with these requirements. The new honeycomb is a rectangular structure with a stretched wire and installed honeycomb. In the future, the bees will make honeycombs here and begin to pack honey.
The main advantage of wooden frames is the possibility of making such structures with your own hands, as well as naturalness and good ventilation material. But the disadvantages include: the destruction of wood at a temperature of 40 degrees and the difficulty in transporting the apiary, since wooden crafts quite massive.
Advantages of plastic frames:
- enviable strength, which eliminates the possibility of product rupture during transportation and pumping of honey;
- durability;
- ease of cleaning the surface of the frame;
- light weight (plastic is two times lighter than wood).
Flaws:
- in case of damage, plastic is difficult to repair, while wood can be fastened with a nail, spending minimal time;
- bees are reluctant to build honeycombs on structures made of artificial material.

Dimensions
Despite the relative simplicity of the frame (the frame consists of four wooden planks), the productivity of the entire bee family and ease of maintenance will depend on its dimensions. From the history of beekeeping, it is known that the well-known beekeeper P.I. Prokopovich was the initiator of the unification of the dimensions of the frame structure, this happened in 1918, and since then the dimensions have the following values:
- the middle nest frame or for Dadan hives - width 43.5 cm, height 30 cm. The upper bar protrudes 1.5 cm from two sides;
- standard frame or Langstroth design - width 43.5 cm, height 23 cm. The top bar protrudes 1 cm from both sides;
- store, the so-called half-frame, is designed for the accumulation of honey and has dimensions: 43.5 cm wide, 14.5 cm high;
- narrow-high or Ukrainian frame is different from all, its dimensions are: height - 30 cm, width - 43.5 cm.
DIY frame
Before proceeding with the manufacture of a frame structure, it is necessary to determine its size. In this article we will describe how to make do-it-yourself hive frames that fit the Dadan hive, because this form is considered the most common in our country. Plastic frames are usually sold in the store, it is difficult to make them yourself, so let's take an environmentally friendly material - wood.
Making a side bar for beehive frames
By design features Dadan frames can be divided into two main types: nesting frames (for laying eggs by the queen and rearing brood) and store frames, which are used to accumulate honey. You got acquainted with the required dimensions in the last chapter.
when installing the top bar, leave a gap of 1-1.5 centimeters on each side. This extension is used to secure the frame to the hive body.
The width of the side, as well as the upper bar, has a standard value of 2.5 cm, the lower one is from 1 to 2.5 cm. The height of the upper bar is 2 cm, and the side and lower parts are 1 cm.
Necessary tools and materials:
- wood blanks made according to the specified dimensions;
- thin wire;
- hole punch for bee frames (awl);
- small nails;
- pliers;
- small hammer.
Sequence of work
To start, blanks, as well as essential tool Lay it out on a flat, flat surface, such as a table. Now, with the help of a hammer and nails, we knock together the frame. Further, on the side walls of the structure with an awl, we make holes of 4 pieces on each side. Here it is necessary to observe the same distances between the holes, and two punctures are made in the upper and lower parts, this is necessary to fix the wire.
How to quickly stretch the wire on the frame
At the final stage of work, a wire is pulled onto the frame, it is arranged in the form of a snake, which allows you to make the necessary tension. The edge of the wire is twisted with pliers. After that, a piece of foundation is cut off and pulled between the threads. The places of contact between wax and wire are rolled in with a special roller. That's all, our product is ready to be installed in the hive.


How to atone for your sins. How to atone for sin
The Crime of the Soviet Power and the Treasure of the Russian Orthodox Church - New Martyrs and Confessors of Russia Who are the New Martyrs of the 20th century
Prayer Easter Week
Can a husband and wife be godparents of the same child, for different children from the same family?
What prayers should be read in the morning and evening